
-1-
esk Organizer
Too much work and not enough desk space? Make better use of your work surface with
this handy organizer. There’s room for scores of desk necessities, and the top surface is large
enough to accommodate books and even a clock.
D
-2-
Materials List
§ 12 linear feet of 1 x 12 pine
§ 9 linear feet of 1 x 4 pine
§ 6 linear feet of ¾”-wide cove molding
§ 6 linear feet of 3-1/4”-wide crown molding
Hardware
§ 40 1” (2d) finish nails
§ 20 1-1/4” wood screws
§ 50 1-5/8” wood screws
Special Tools and Techniques
§ Miter
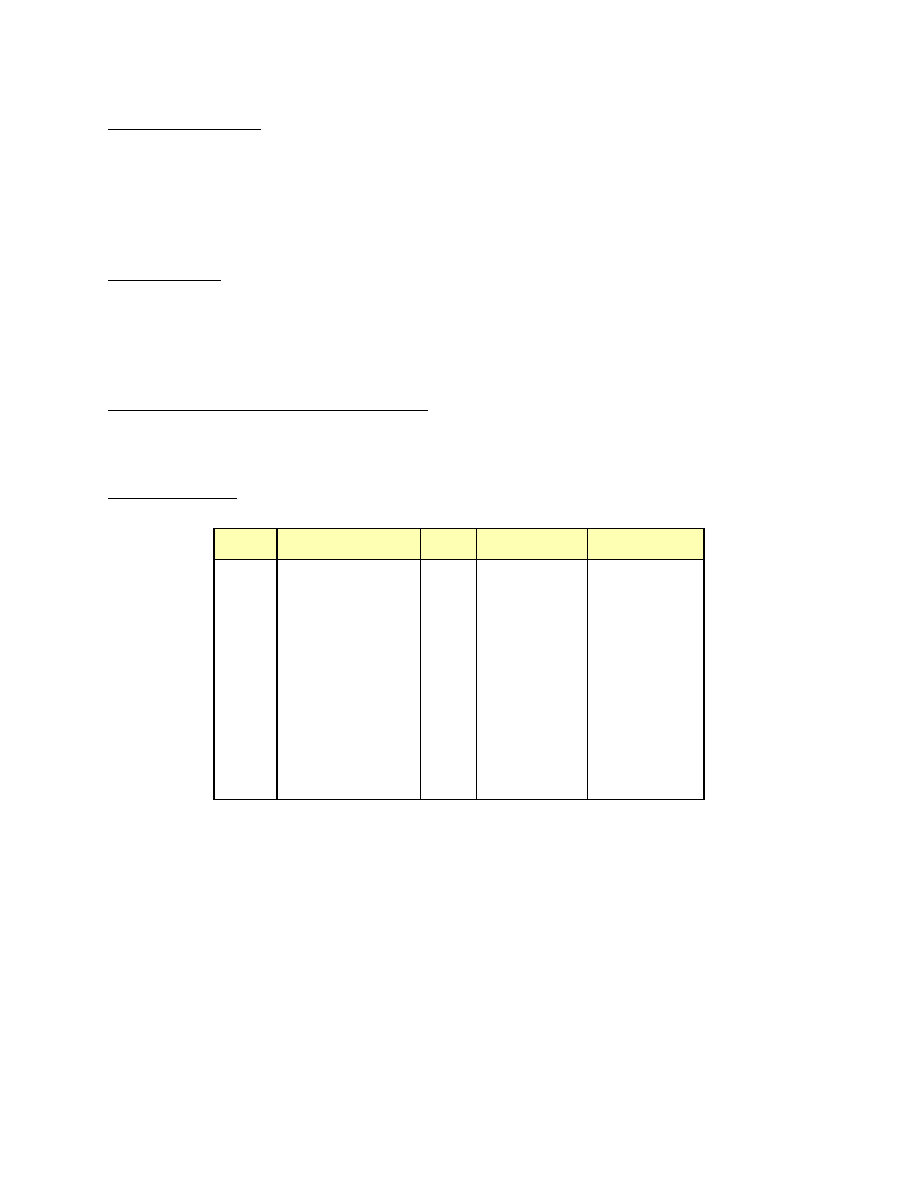
Cutting List
Code
Description
Qty.
Materials
Dimensions
A
Vertical Divides
4
1 x 12 pine
9” long
B
Shelves
2
1 x 12 pine
11-5/8” long
C
Top/Bottom
2
1 x 12 pine
38” long
D
Front Trim
1
1 x 4 pine
40” long
E.
Side Trim
2
1 x 4 pine
12-1/4” long
F
Back Trim
1
1 x 4 pine
35” long
G
Cove Molding
¾” x ¾”
Cut to fit
H
Crown Molding
3-1/4” wide
Cut to fit
Building the Center Compartments
1. Cut four Vertical Dividers (A) from 1 x 12 pine, each measuring 9 inches.
2. Cut two Shelves (B) from 1 x 12 pine, each measuring 11-5/8 inches.
3. Place two Vertical Dividers (A) on edge on a flat surface, parallel to each other, and 11-5/8
inches apart. Center one Shelf (B) horizontally between the two Vertical Dividers (A), as
shown in Figure 1. Apply glue to the meeting surfaces, and screw through the Vertical
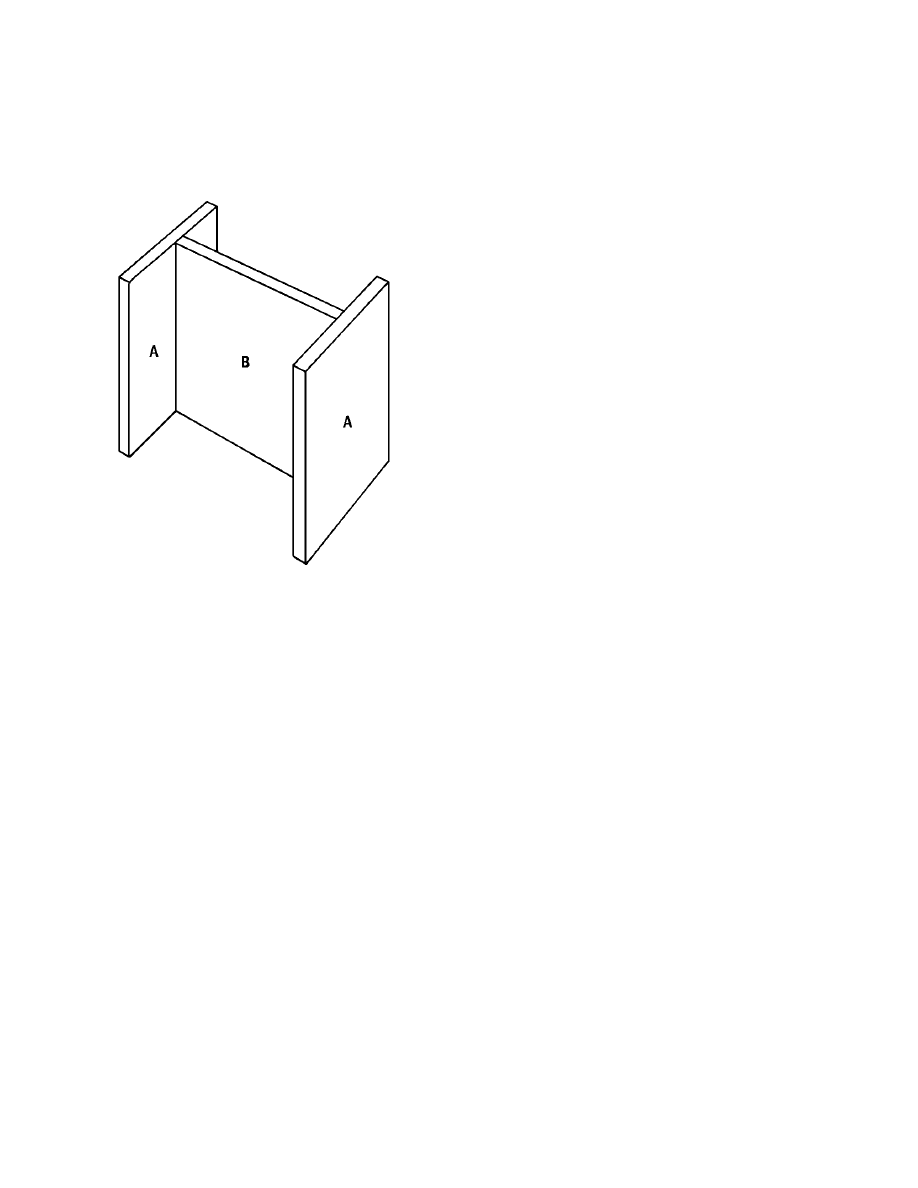
-3-
Dividers (A) into the edges of the Shelf (B), using three 1-5/8” wood screws.
4. Repeat Step 3 to attach the remaining Shelf (B) to the remaining two Vertical Dividers (A).
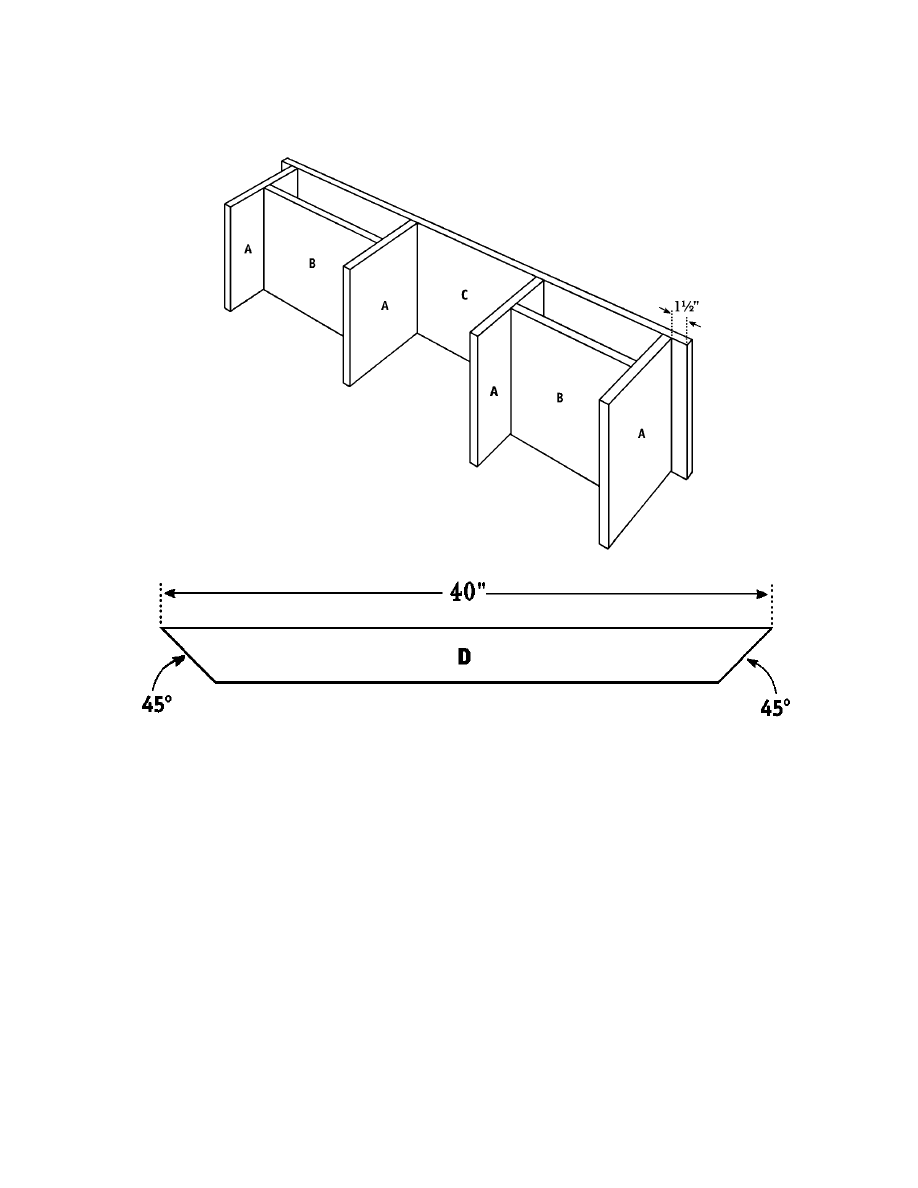
Adding the Top and Bottom
1. Cut two Top/Bottoms (C) from 1 x 12 pine, each
measuring 38 inches.
2. Place one Top/Bottom (C) on edge, on a flat
surface. Place one shelf assembly (A and B) 1-
1/2 inches from one end of the Top/Bottom (C),
as shown in Figure 2. Apply glue to the meeting
surfaces, and screw through the Top/Bottom (C)
into the ends of the Vertical Dividers (A). Use
three 1-5/8” wood screws on each joint.
3. Repeat Step 2 to attach the remaining shelf
assembly (A) and B) 1-1/2 inches from the
opposite end of the same Top/Bottom (C).
4. Center the remaining Top/Bottom (C) over the assembly. It should overhang the outermost
Vertical Dividers (A) by 1-1/2 inches on both ends. Apply glue to the meeting surfaces, and
screw through the Top/Bottom (C) into each of the Vertical Dividers (A). Use three 1-5/8”
wood screws on each joint.
Adding the Trim
1. Cut one Front Trim (D) from 1 x 4 pine measuring 40 inches.
2. Miter each end of the Front Trim (D) at opposing 45-degree angles, as shown in Figure 3.
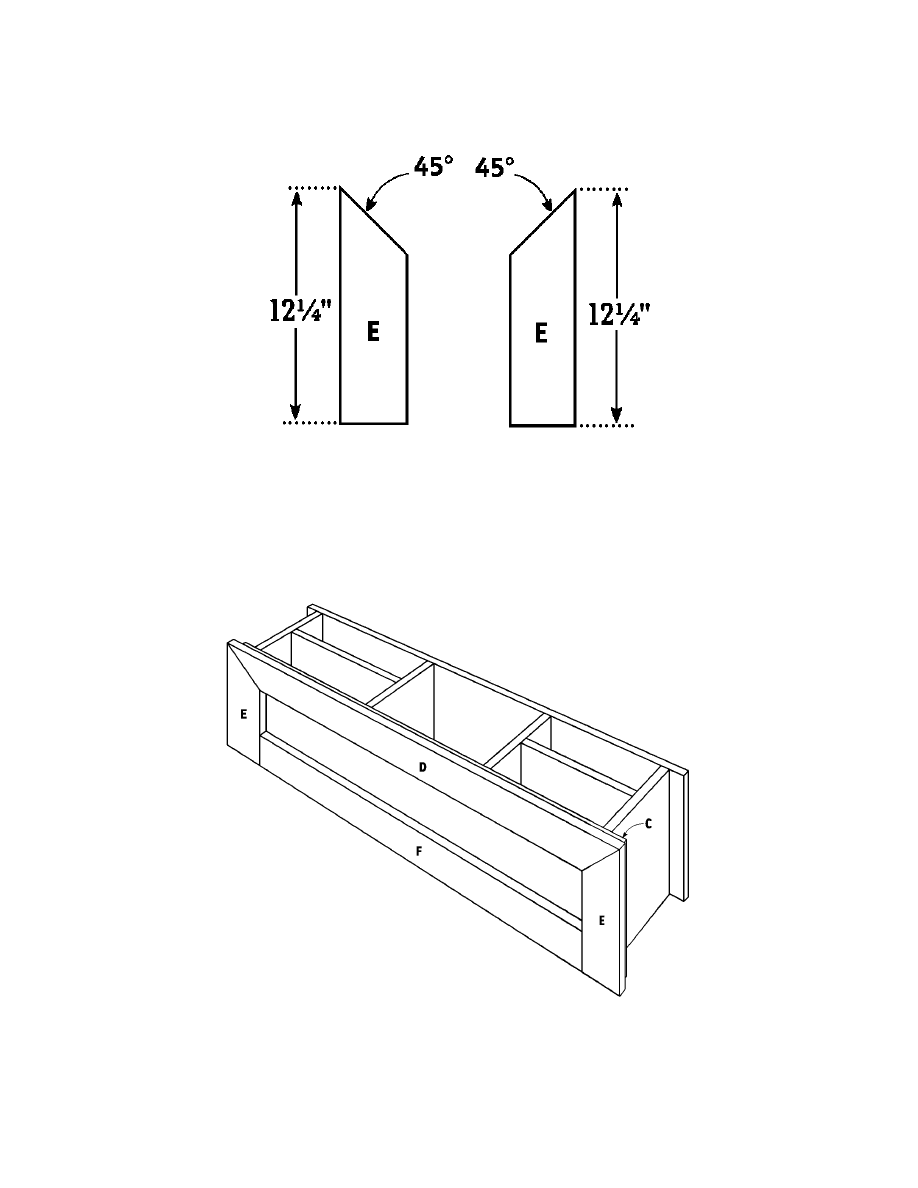
3. Cut two Side Trims (E) from 1 x 4 pine, each measuring 12-1/4 inches.
4. Miter one end of each of the Side Trims (E) at a 45-degree angle, as shown in Figure 4.
5. Place the Front Trim (D) over the edge of the Top/Bottom (C), as shown in Figure 5. The
Front Trim (D) should overhang the Top/Bottom (C) by 1 inch on the front and both sides.
Apply glue to the meeting surfaces, and screw through the Front Trim (D) into the
Top/Bottom (C) using 1-5/8” wood screws spaced every 5 inches.
Figure 1
Figure 1
-4-
6. Place one Side Trim (E) over the ends of the Top/Bottom (C), with the miter toward the
Front Trim (D), as shown in Figure 5. The trims should overhang the sides by 1 inch.
Apply glue to the meeting surfaces, and screw through the Side Trim (E) into the
Top/Bottom (C) using three 1-1/4” wood screws.
7. Repeat Step 6 to attach the remaining Side Trim (E) to the opposite end of the Top/Bottom
(C).
8. Cut one Back Trim (F) from 1 x 4 pine measuring 35 inches.
Figure 2
Figure 3
-5-
9. Fit the Back Trim (F) between the two Side Trims (E), flush with the back edge of the
Top/Bottom (C), as shown in Figure 5. This piece does not overhang. Apply glue to the
meeting surfaces, and screw through the Back Trim (F) into the Top/Bottom (C), using 1-
5/8” wood screws spaced every 5 inches.
Figure 4
Figure 5
-6-
Adding the Molding
1. Turn the assembly so that the Front, Back and Side Trims (D, E, and F) are against the work
surface. Cut and fit ¾”-wide Cove Molding (G) to cover the joints between the Top/Bottom
(C) and the Front, Back and Side Trims (D, E, and F). The molding should be cut at a 45-
degree angle to fit the front corner, except for the molding for the back of the organizer,
which should be cut straight. Apply glue to the meeting surfaces, and nail through the Cove
Molding (G) into the Top/Bottom (C) using 1” finishing nails.
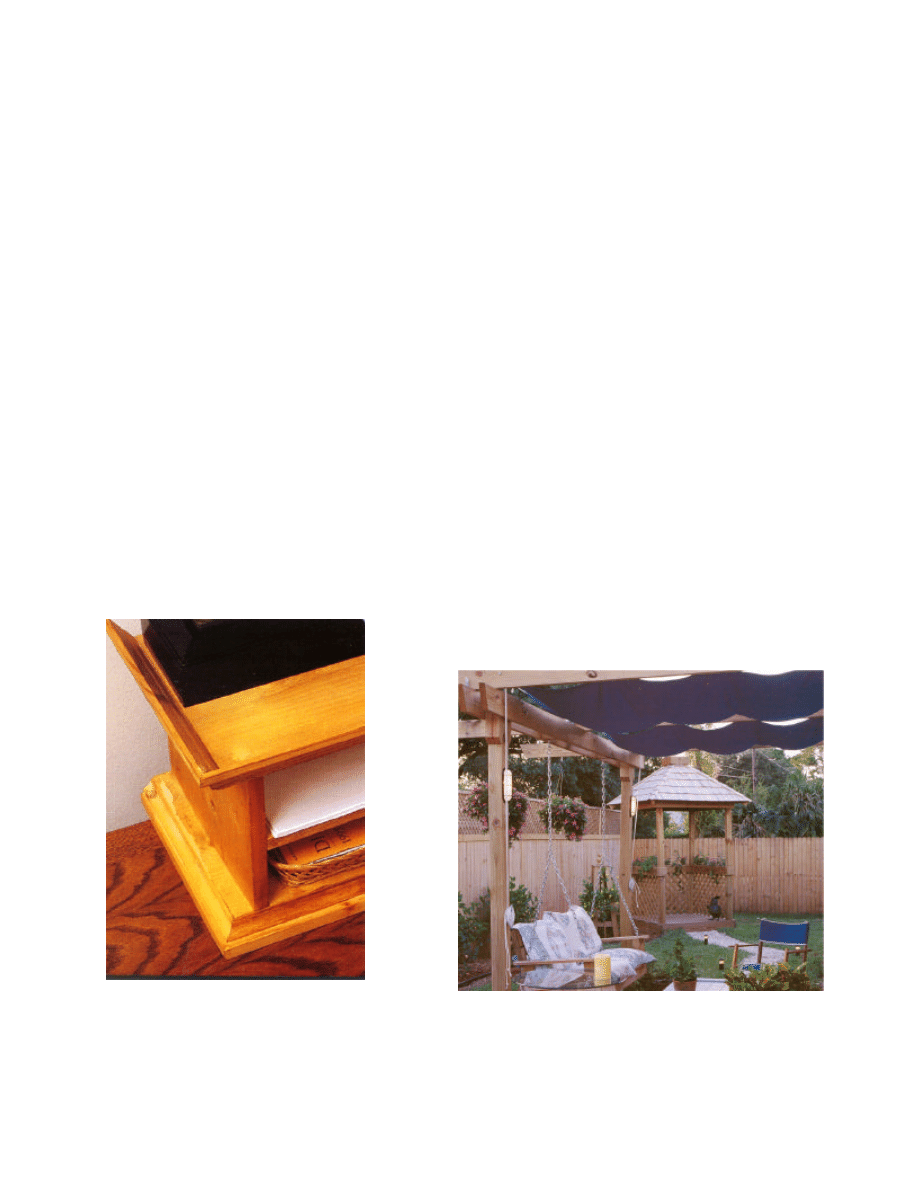
2. Cut and fit 3-1/4-inch-wide Crown Molding (H) to fit around the remaining Top/Bottom
(C), as shown in the photograph. Remember that the front corners are a compound 45-
degree angle cut. Apply glue to the meeting surfaces, and nail through the Crown Molding
(H) into the Top/Bottom (C) using 1” finishing nails.
Finishing
1. Fill any holes, cracks or crevices with wood filler.
2. Thoroughly sand all areas of the completed organizer.
3. Paint or stain the organizer with the color of your choice. We chose a honey maple stain,
and then sealed it with satin polyurethane.
Enjoy many more indoor and
outdoor projects from
www.wowimadeit.com
Wyszukiwarka
Podobne podstrony:
desk organizer2 biurko
System plików to sposób organizacji danych na dyskach, Notatki z systemów
ORGANIZACJE TURYSTYCZNE NA , Inne
Fiasko integracji WNP i inne organizacje miedzynarodowe na obszarze poradzieckim 1991 2006
Organizacje pozarzadowe na rzecz?zpieczenstwa kraju
Chemia organiczna pytania na egzamin
Wsparcie osób niepełnosprawnych poprzez działalność organizacji pozarządowych na przykładzie?ntrum
socjologia organizacj do egzaminu SOCJOLOGIA ORGANIZACJI zagadnienia na egzamin WSAP 11
Zarządzanie projektami ekonomicznymi i organizacyjnym Materiały na egzamin
Międzynarodowe organizacje gospodarcze na świecie
Cheery polka Na puzon i orkiestrę1
Zasady i organizacja handlu na giełdach, Ekonomia, ekonomia
STRUKTURA ORGANIZACYJNA NATO, Na zajęcia - różne
Chemia organiczna - pytania na koła, towaroznawstwo
organizacja przyjec na stojaca itd
Cheery polka Na puzon i orkiestrę
Konspiracyjne organizacje młodzieżowe na terenie województwa mazowieckiego w latach 1945 1956
więcej podobnych podstron