From Workbench Magazine
All rights reserved
page 1 of 10
©2004 August Home Publishing
One copy for personal use. Other copies prohibited.
Plans
N O W
w w w . p l a n s n o w . c o m
®
TO O L S & T E C H N I QU E S S E R I E S
S
OLID
W
OOD
F
LOOR
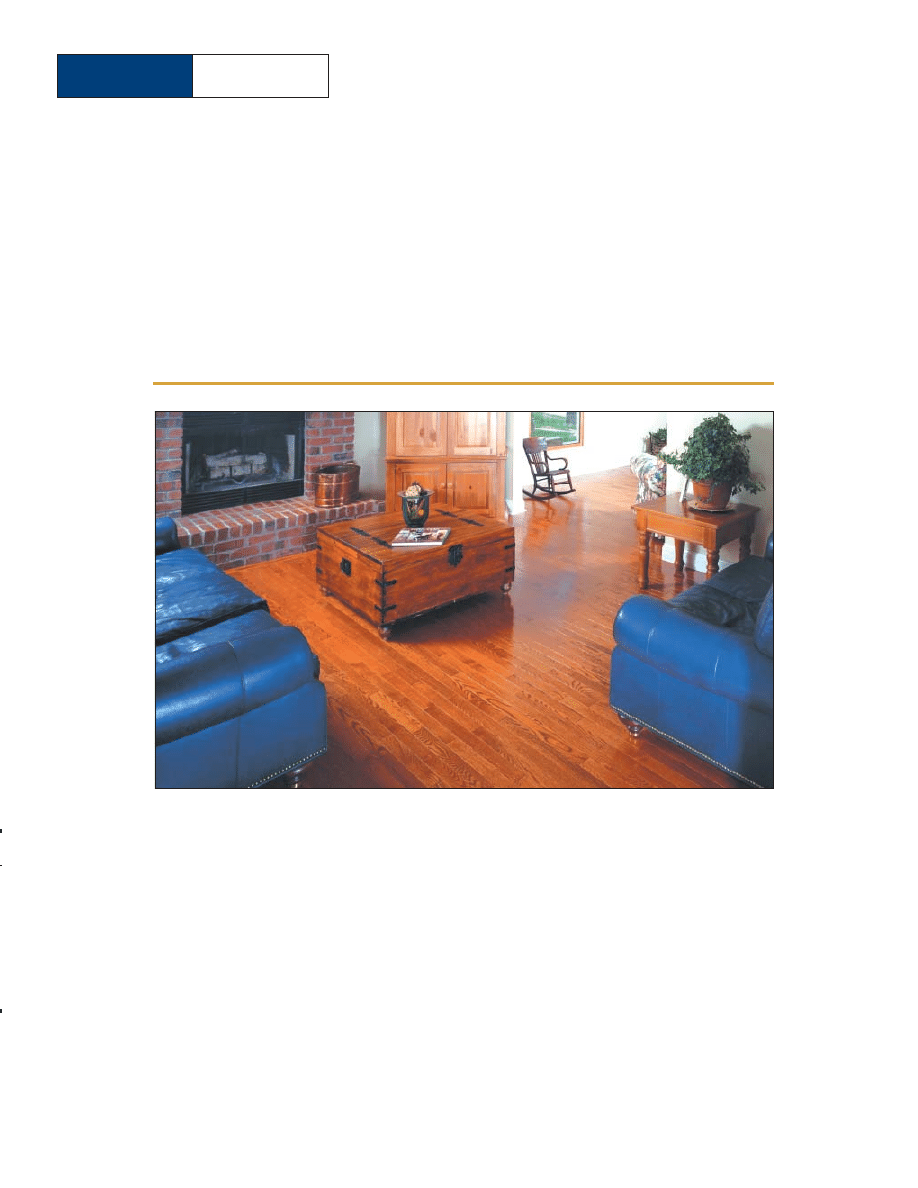
Install your own
Pre-finished wood flooring make this project something any homeowner can do.
From Workbench Magazine
All rights reserved
page 2 of 10
©2004 August Home Publishing
One copy for personal use. Other copies prohibited.
I
t’s hard to beat the warmth and
beauty of a solid wood floor that's
durable enough to last a lifetime.
Plus, it adds a tremendous amount of
value to a house.
But let’s face it, the prospect of
laying a solid wood floor can be a bit
intimidating. In fact, it’s not a job that’s
usually tackled by most homeowners.
Not that the actual installation is all
that difficult. It’s just that sanding and
finishing a wood floor is a real chore.
Not to mention having to deal with
all the sanding dust and fumes from
the finish.
Fortunately, there’s an ideal solution
that won’t drive you out of the house.
That’s to install pre-finished wood
flooring. This type of flooring has a
durable finish applied at the factory. So
the difficult job of sanding and fin-
ishing is already done.
You’ll find pre-finished wood
flooring in a variety of widths, thick-
nesses, and wood species.We used 2
1
/
4
"-
wide strips of
3
/
4
''-thick oak for this
project. See page 9 for details.
Notice that these strips of flooring
have a tongue on one edge that fits
into a corresponding groove in the
adjoining piece. Likewise, interlocking
tongue-and-groove joints provide a
way to fit the ends of the strips together.
This makes it easy to install a flat, solid
floor. (For more information about pre-
finished flooring see page 9.)
No matter which flooring you
choose, a good understanding of how
it’s installed will help prevent problems
from cropping up later.
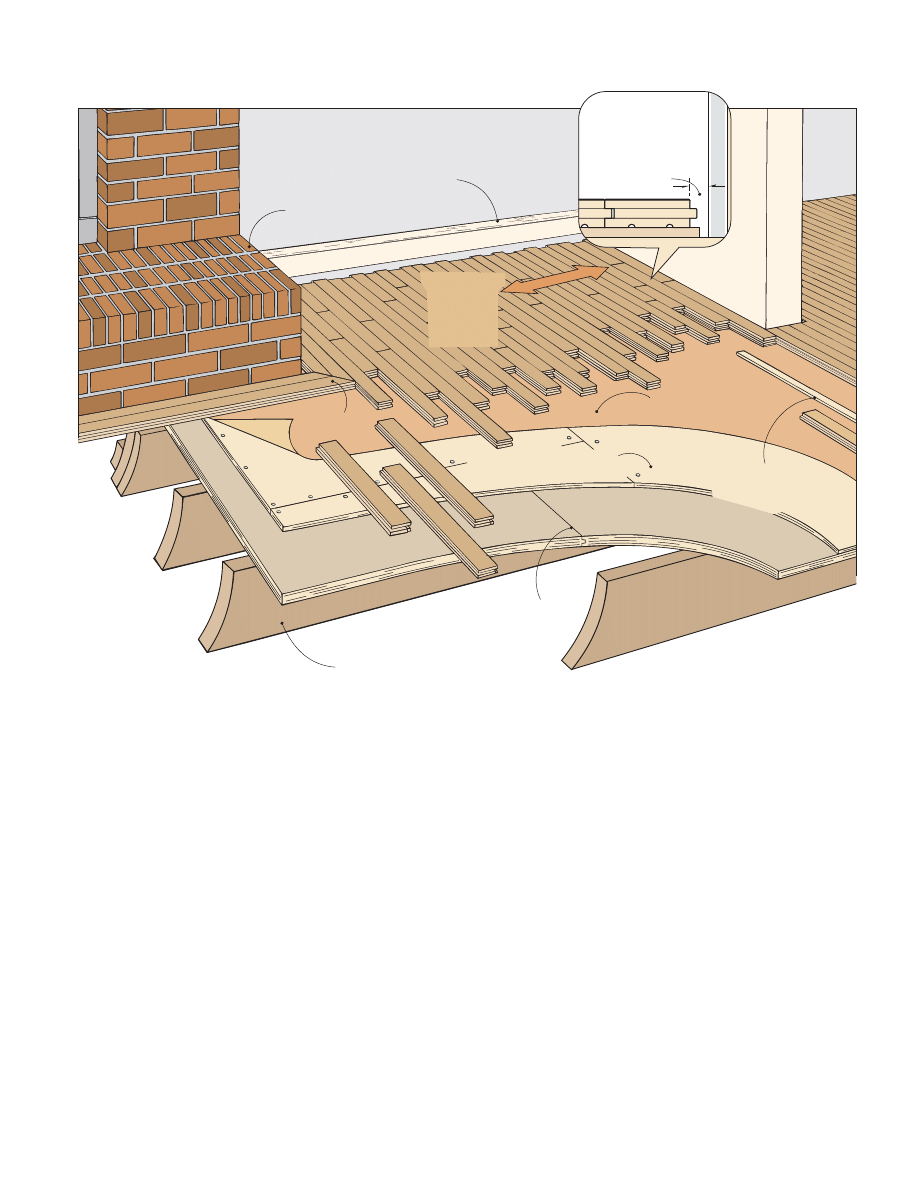
The drawing above shows an
overview of all the elements in our
floor installation. But you should be
able to apply these same basic concepts
to your own situation, as well.
To help guide you through the
entire process, we’ve included some
practical tips and techniques in the next
few pages for installing a pre-finished,
solid wood floor. From the initial plan-
ning and preparation to figuring out
the basic layout of the floor, here’s
everything you need to get profes-
sional-looking results.
Baseboard
covers expansion gaps.
15 lb.
Construction Paper
forms moisture barrier.
Spline (or Slip Tongue)
is used to reverse
direction of flooring.
Fireplace
& Hearth
2x12 Joists provide
a study support for floor.
Trim Strips
accent fireplace
Plywood creates
a solid subfloor.
#/4" Tongue-and-Groove
NOTE: Install flooring
perpendicular to joists
to create a flat, level surface.
#/4" Tongue and
#/4" Tongue and
Groove strips
form an
interlocking
floor system.
Groove strips
form an
interlocking
floor system.
#/4" Tongue-and-
Groove Strips
form an
interlocking
floor system.
Optional
" Underlayment
!/4
evens out variations in subfloor.
ANATOMY OF A SOLID WOOD FLOOR
!/2" Expansion
Gap
Expansion Gap allows
floor to expand
without buckling.

From Workbench Magazine
All rights reserved
page 3 of 10
©2004 August Home Publishing
One copy for personal use. Other copies prohibited.
FLOOR PLAN
PLANNING & PREPARATION
Installing your own wood floor is def-
initely a “do-able” job. But it shouldn’t
be rushed.To get good results, it takes
planning and preparation.
ESTIMATE MATERIAL
.
The first
step is to estimate the amount of
flooring material that’s needed.This
depends on the total square footage
of the room.
This is easy to calculate if it’s a
square or rectangular room. Just mul-
tiply the length of the room by its
width. If it’s an irregular-shaped area,
it helps to make a scaled floor plan, as
shown at right. Then calculate the
square footage of the smaller rectan-
gles and add them together.
One thing to keep in mind is
there will be some waste when cut-
ting the strips of flooring to fit the
room. Also, you may end up dis-
carding a few pieces because of
defects or a mismatched color. To
take those things into account, it’s a
good idea to buy about 5 percent
more flooring than needed.
LET IT BREATHE
. Once you
bring the flooring home, it’s
tempting to start laying it down right
away. But to avoid potential prob-
lems caused by moisture and wood
movement, it’s best to set it aside for
awhile to let it “breathe” or accli-
mate to the moisture level of the
house. Most manufacturers recom-
mend waiting at least 24 hours. For
information on how to measure
moisture content, see page 4.
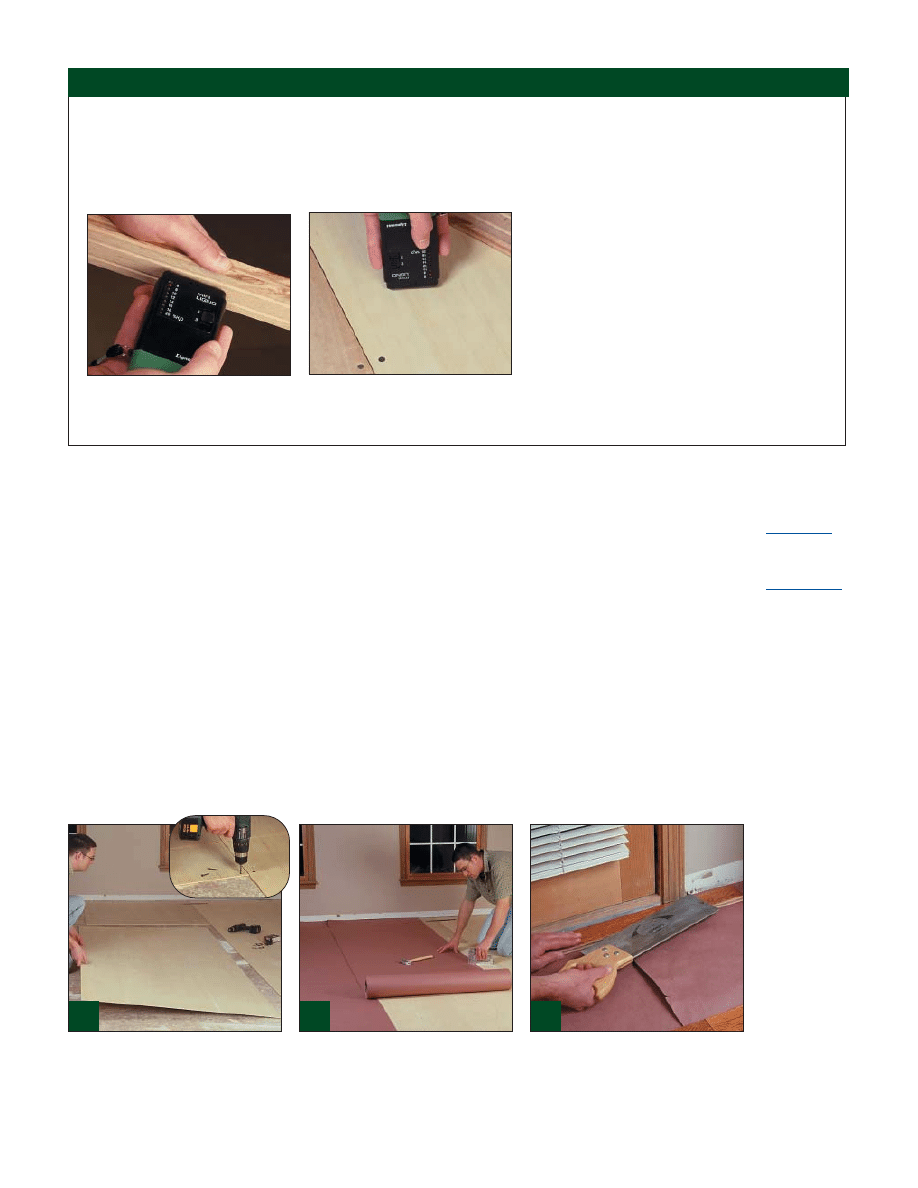
PREPARING THE SUBFLOOR
While you wait for the flooring mate-
rial to acclimate, it’s a good time to get
started on the subfloor. Keep in mind
that the floor will only be as good as
the condition of the subfloor. So it’s
important that the subfloor is solid,
flat, and level.
Depending on where the floor is
installed (or the age of the house), the
subfloor may be made of solid wood
slats, plywood, or concrete. In my case,
3
/
4
" tongue-and-groove plywood had
been used as a subfloor.
To provide access to the subfloor,
you’ll first need to remove the old
floor covering. For me, this meant
taking off the baseboard shoe and
molding, rolling back the carpet, and
then prying off the tack strips as in
Figure 1. Removing the carpet was
easy compared to the next step.
I wanted to lay wood flooring in
the small area next to the kitchen that
was covered with tile. (Refer to the
Floor Plan above.) Breaking up these
tiles was a real workout — and some-
what messy (Fig 2). But in the end,
incorporating this area as part of the
wood floor installation was worth the
extra effort.
CLEAN SWEEP.
After scooping
up the rubble and sweeping the sub-
floor, it’s time to give it a good once-
over. Scrape off any dried adhesive or
joint compound, and fill knots and
holes. Also, look for loose spots and
secure them with nails or screws.
While you’re at it, set any protruding
nails or screwheads flush with the sur-
face of the subfloor.
Sometimes there are more severe
problems that can result in a wavy,
uneven floor. To check for these
potentially troublesome areas, place
a long, straight board at several dif-
ferent locations and slide it across the
floor. If there are large dips or high
spots, you may want to consult a pro-
fessional to look at the underlying
13'
6' 6"
6'
6"
2' 6"
16' 2"
3' 0"
3' 8"
3' 6"
6' 4"
24"
13' 6"
6' 6"
16' 6"
PRE-EXISTING
TILE FLOOR
TO BE
DEMOLISHED
FAMILY ROOM
ENTRY
TILE FLOOR
TILE FLOOR
PASS THROUGH
FIREPLACE
LIVING ROOM
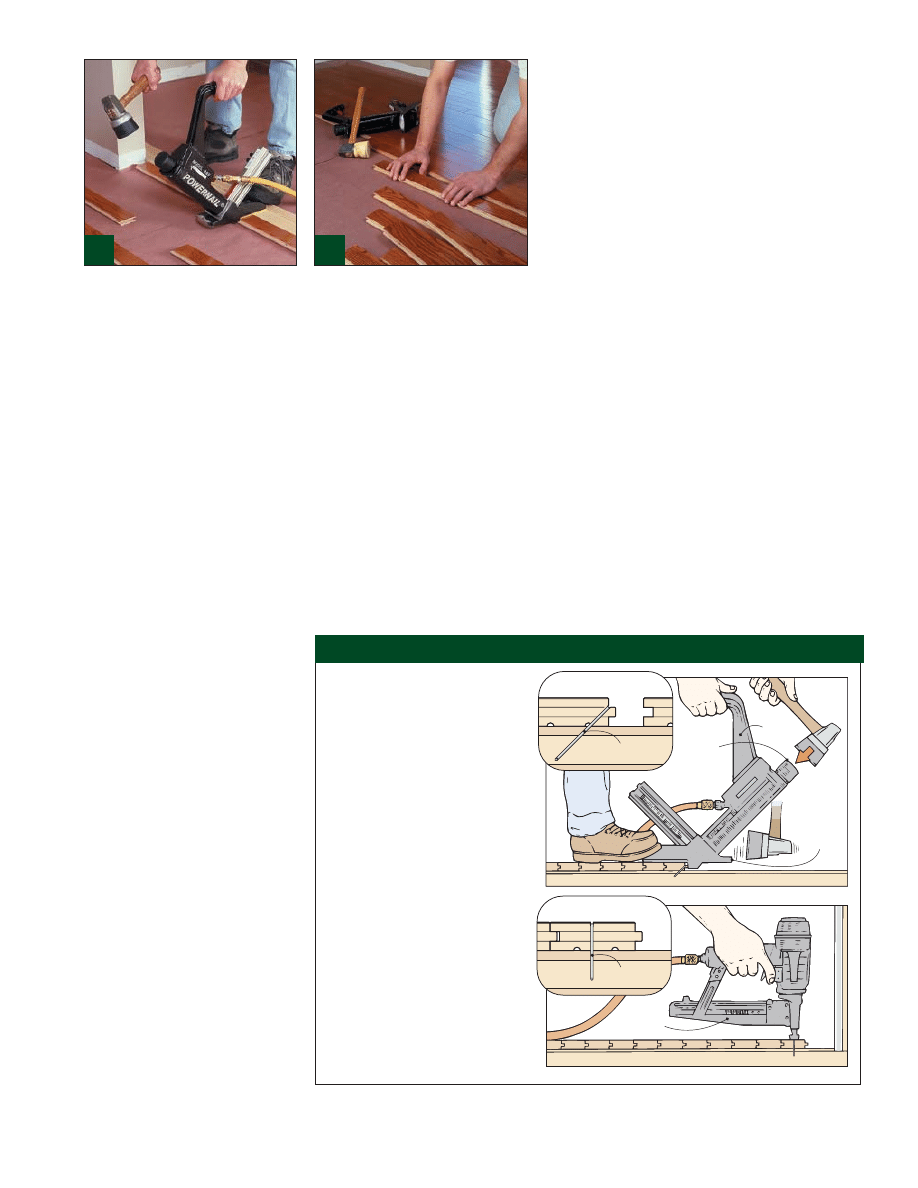
To prepare the subfloor, I started by
using a wrecking bar to pry off the tack
strips that held the carpet.
Demolishing the tile floor next to the
kitchen exposed the subfloor so I could
lay wood flooring there, as well.
1
2
From Workbench Magazine
All rights reserved
page 4 of 10
©2004 August Home Publishing
One copy for personal use. Other copies prohibited.
structure of the floor or house.
UNDERLAYMENT.
Once you’re
satisfied with the condition of the sub-
floor, the next step is to decide whether
or not to add underlayment. It’s made
up of plywood sheets that are laid per-
pendicular to the subfloor.
Not all flooring projects require
underlayment. I used it on this project
for one reason.Without it, the tile floor
in the kitchen and hall would sit about
1
/
4
" higher than the wood floor. This
would mean having to step down onto
the floor. So to even out these two
surfaces, I installed sheets of
1
/
4
" lauan
mahogany, as shown in Figure 3.
Note: If the subfloor is uneven
(and the underlying structure is
sound), try installing
1
/
2
" or
3
/
4
" ply-
wood to create a flat surface.
LAY DOWN PAPER.
Regardless
of whether you use underlayment,
it’s a good idea to cover the entire
area with construction paper (Fig.
4).The paper acts as a vapor barrier
that prevents moisture from
migrating into the floor, which can
cause the strips to cup.
One of the side benefits of the
construction paper is it provides a
clean worksurface. And later, when
you’re laying out the floor, it will
make it easy to see the pencil lines.
TRIM JAMBS
. Before laying out
the floor, trim the door jambs and
casing so you’ll be able to slip the
flooring underneath. A hand saw
makes quick work of this. I use a
scrap piece of the flooring as a gauge
to establish the proper height of the
cut (Fig. 5).
If there are quite a few doors, you
might want to consider using a power
jamb saw.These tools are available at
many rental stores.
To “raise” the height of the wood floor,
I screwed sheets of
1
/
4
" plywood per-
pendicular to the subfloor.
Next, to create a moisture barrier, roll
out construction paper in overlapping
strips and staple it in place.
When cutting door casings, use a scrap
of flooring as a gauge. Just rest a hand
saw on the scrap and trim the casing.
To check the moisture content, jab the
prongs of the meter into the bottom of
a strip of wood flooring.
Make sure the moisture content of the
underlayment is within 4 percent of the
flooring before installation.
One of the secrets to installing a wood floor is patience. To
avoid damage to the floor, it’s important to give it time to
adjust to the moisture level of the house.
How long do you have to wait before installing the floor?
That depends on the moisture content of the flooring material
and the subfloor (or underlayment). Moisture content is the
amount of water trapped inside a board compared to the
weight of the wood when it’s dry.
To measure moisture content, I use a special meter that
has two sharp prongs (sensors). When you jab these prongs
into a board, the moisture that’s present com-
pletes a circuit between the sensors. A small com-
puter reads the moisture content, which is dis-
played as a percentage on the meter. (Sources of
moisture meters are listed in the margin below.)
Ideally, the difference in moisture content
between the wood flooring and the underlayment
should be no more than 4 percent. This will allow
the flooring and underlayment to expand and con-
tract at similar rates with changes in humidity.
Checking the moisture content as shown at left —
and waiting to install the floor until they’re in the
correct range — will ensure a long-lasting floor.
CHECKING MOISTURE CONTENT
3
4
5
Find moisture
meters at:
-
Amazon.com
- Woodcraft
800-225-1153
-
Tools-Plus.com
800-222-6133
From Workbench Magazine
All rights reserved
page 5 of 10
©2004 August Home Publishing
One copy for personal use. Other copies prohibited.
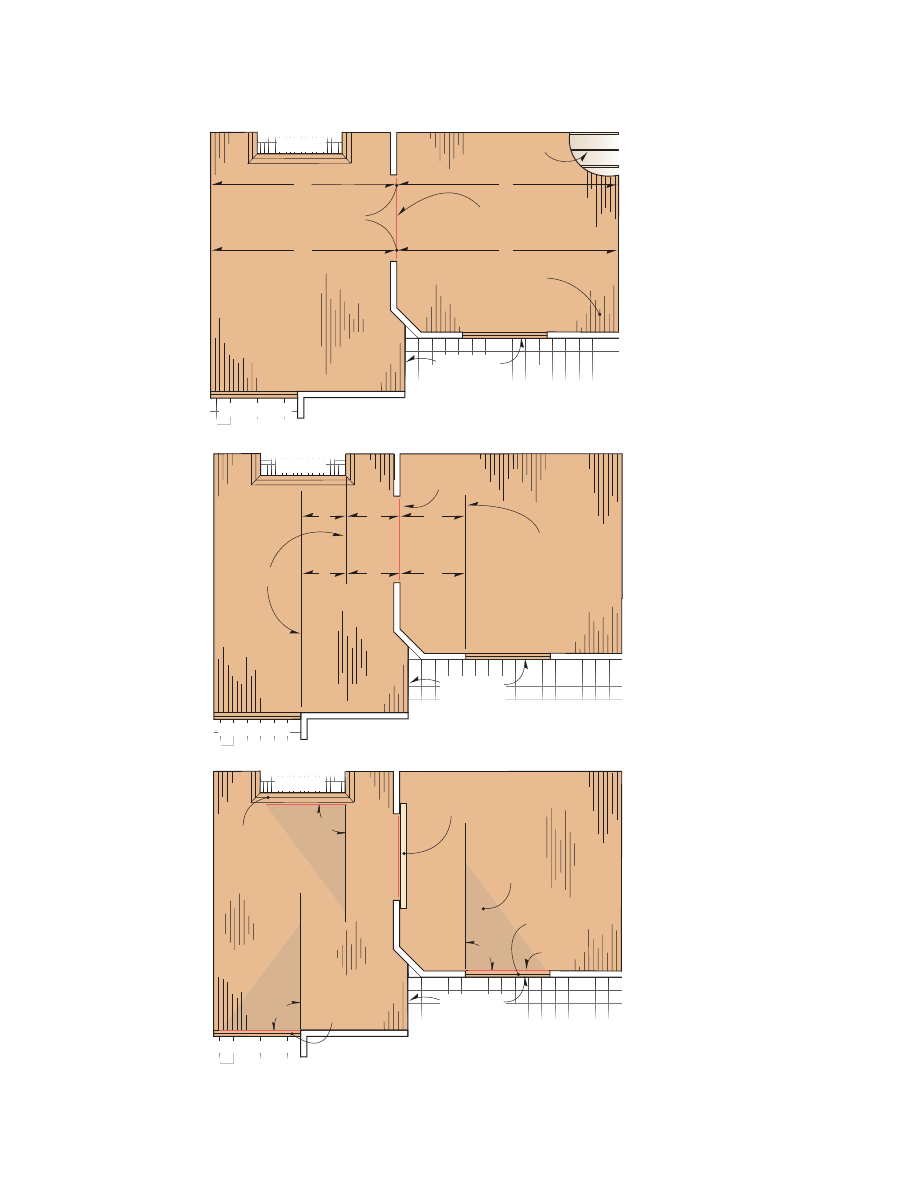
LAYING OUT THE FLOOR
STEP 1:
To determine the
location of the
baseline, consider
the focus areas,
transitions from
room to room, and
the direction of the
floor joists.
CAREFUL LAYOUT IS THE KEY
The best piece of advice I can give
you for laying out a floor is to take your
time. It took an entire morning for
me to plan, measure and lay out my
floor, but all this puzzling was defi-
nitely time well spent.
BASELINE.
To lay out the floor,
the first step is to establish a baseline.
This is the starting point for the first
row of flooring. As you can see in
Step 1 at left, I decided to lay out the
baseline in the pass-through between
the two rooms. I did this for a couple
of reasons: the direction of the floor
joists and the size of the rooms.
A good rule of thumb is to lay the
flooring perpendicular to the floor joists.
This way, you’ll end up with a solid,
stable floor. So what does this have
to do with the location of the base-
line? It needs to run in the same direc-
tion as the flooring.
The second consideration in estab-
lishing the baseline was the size of
the rooms. In my case, they were quite
large (about 425 square feet). So
locating the baseline between the
rooms divided the project into more
manageable areas.
Another look at Step 1 will explain
how to lay out the baseline.The idea
is to mark two points that are identical
distances from the wall and then snap
a chalk line. Since I wanted to start
near the middle of the floor, I made
two measurements from each wall.
GUIDELINES.
Once the baseline
is established, the next step is to lay out
some guidelines (Step 2).These lines
will provide an important reference
that will help keep you on track as
you lay the flooring. I’ll explain more
about that later.
The process for laying out the
guidelines is similar to that for the
baseline. Only this time, the goal is to
make the guidelines parallel to the
baseline, as shown in Step 2. So here,
just lay out a couple of marks the
same distance from the baseline and
snap a line.
Notice that I laid out three guide-
lines, and each one is aligned with a
highly visible area of the room (the
fireplace and two entryways).There’s
a good reason for that. I planned to
Entryways
Lay flooring
perpendicular
to floor joists.
SECOND: Lay out Baseline.
FIRST: Mark two points at
distances “A” and “B”
from walls.
Fireplace
Kitchen Entry
Floor Joists
A
A
B
B
Guidelines
Baseline
Guideline
Fireplace
Kitchen Entry
Entryways
E
C
D
E
C
D
NOTE: Lay out parallel
Guidelines that align
with leading
edge of focal points.
10'
8'
6'
Screw Starter Cleat
flush with Baseline.
10'
90°
90°
8'
6'
8'
10'
6'
90°
Fireplace
Kitchen Entry
Entryways
Squaring
Triangle
Trim
Strips
Trim
Strips
Trim
Strips
Reference
Line
STEP 2:
From the baseline,
measure to the
leading edge of any
focal areas and
establish parallel
guidelines.
STEP 3:
Laying out
squaring triangles
makes it easy to
create reference
lines that will be
used to locate the
trim strips.
From Workbench Magazine
All rights reserved
page 6 of 10
©2004 August Home Publishing
One copy for personal use. Other copies prohibited.
FIRST: Tap
Nailer
against
floor.
Blind
Nailer
SECOND:
Strike
Plunger
with Mallet.
Finish
Nailer
After screwing a wood cleat to the sub-
floor, set the first flooring strip against
it and nail it in place.
Racking the boards helps you select the
colors, grain patterns, and lengths that
blend together in the completed floor.
Nail is set at 45°.
BLIND-NAILED
Nail is set at 90°.
FACE-NAILED
PNEUMATIC FASTENERS
highlight these areas with trim strips
that run perpendicular to the
flooring. So to establish the location
of these trim strips, I needed one
more set of reference lines that were
square to the guidelines. (These are
the red lines shown in Step 3 on
page 5.)
SQUARING TRIANGLE
. To lay
out these reference lines, I used an
old trick. It’s called a squaring tri-
angle, and it’s based on the fact that
any triangle with sides that yield a
3:4:5 ratio will guarantee a right angle
corner.With that in mind, I laid out
three large (6:8:10) triangles to create
a square corner between the guide-
lines and the reference lines.
GETTING STARTED
After completing the layout, it’s time
to get started. I recommend rounding
up a couple of air nailers like those
shown at right. It will definitely make
the job go quicker and provide better
results in the end.
Since I planned to start in the
pass-through opening between the
rooms, I was able to use the blind-
nailer to install the first strip of
flooring. If you’re starting near a wall,
you’ll have to face-nail the first few
strips until there’s clearance for the
blind nailer.
STARTER CLEAT
.To install the
first strip, I had to use a starter cleat.
This is a straight board that’s posi-
tioned along the baseline and screwed
in place. The starter cleat acts as a
stop. With the cleat in place, set the
first strip of flooring tightly against it
(Fig. 6).This way, the impact from the
nailer won’t push it off the baseline.
To provide a nailing surface, the
tongue on this strip should face away
from the cleat.The nails are driven in
about 8" apart to fasten the strip to
the subfloor.
Before going on, it’s a good idea
to “rack,” or arrange, a number of
flooring strips in front of you. That
way you can sort through them and
place boards with similar color and
grain in a loose sequence of how
you’ll want to install them (Fig. 7).
This way, you’ll be able to grab a
board, nail it in place, and move on to
the next piece without having to search
for the right strip.
One thing I’d suggest is mixing
the lengths of the strips. If there are
too many similar length strips in one
area, it can cause a noticeable — and
not very pleasing — pattern where
the ends of the strips come together.
If possible, avoid H-shaped patterns or
“stairsteps.”
Also, make it a point to repeatedly
measure the distance from the last strip
of flooring that’s installed to the guide-
lines. These lines that you painstak-
ingly laid out are there for a reason
— to keep you on track.
I measured after every five or six
rows. If there’s any discrepancy, try to
compensate for it by making a very
small correction between one strip
and the next. At most, this means
leaving a
1
/
32
" gap at the end that
needs to be adjusted.
6
7
Always use the right tool for the
job. That old saying definitely
holds true for installing wood
flooring. I used two types of air
nailers for this floor project.
The first one is called a Blind-
Nailer. It drives nails at a 45°
angle through the tongue of each
strip. It works by setting the nailer
directly on the flooring, tapping it
back into position against the
flooring, and then striking the
plunger with the rubber mallet.
I also used a Finish Nailer. This
works a little different than the
Blind-Nailer. It drives the nail at a
90° angle through the face of the
flooring strip. I used the finish
nailer to fasten down all the trim
strips and the flooring strips close
to the wall.
From Workbench Magazine
All rights reserved
page 7 of 10
©2004 August Home Publishing
One copy for personal use. Other copies prohibited.
One of the things I like to do when
laying a wood floor is to highlight
the most visible areas. For this project,
those areas turned out to be the fire-
place and the entryways.The transi-
tions from one room to the next also
deserve special attention.
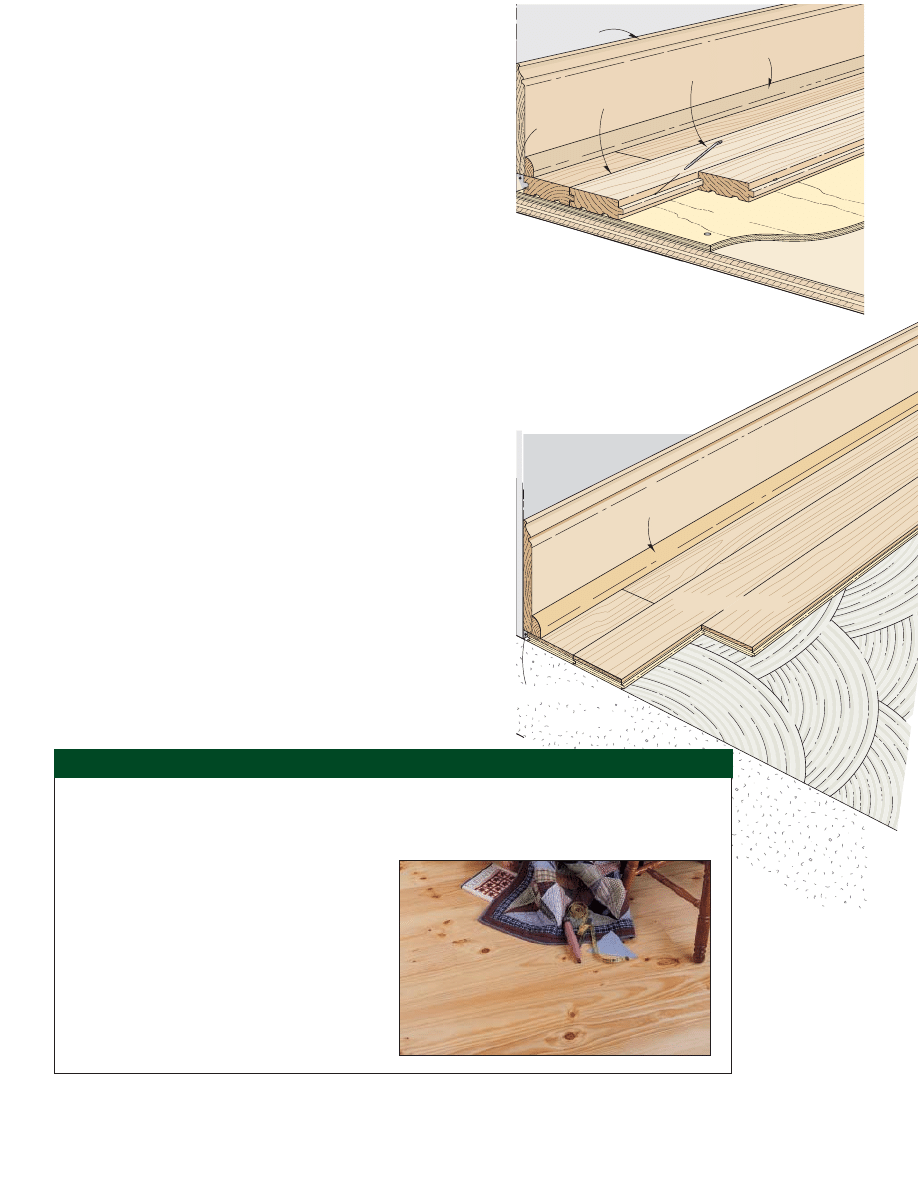
TRIM STRIPS
To accent each of these areas, I
installed two trim strips.These were
long pieces of the same flooring strips
I’d been using for the rest of the
project. But what really set them apart
is they’re perpendicular to all the rest of
the flooring strips.
A look at Figures 8 and 9 shows a
double row of these trim strips next
to one of the entryways and the fire-
place. Notice that they’re butted edge-
to-edge with the tongue facing into
the room.This way, the groove in the
end of each flooring strip will slip
over the tongue and create a nice,
tight-fitting joint.At least that’s the goal.
To make this work, the trim strips
must be perfectly square to the ends
of the flooring strips. That’s where
the layout line made earlier with the
squaring triangle comes in. By placing
the trim strips precisely along this
layout line, it ensures that they’ll be
perpendicular to the flooring strips.
With the trim strips in position, it’s
just a matter of face-nailing them, as
shown in Figure 8.After installing the
rest of the trim strips, you can fit the
main flooring strips against them, as
shown in Figure 9.
When laying these rows of
flooring, a general rule of thumb is
to work away from the trim strips, not
toward them.There’s a good reason for
this. The last wood strip installed in
each row usually has to be cut to
length. This requires removing the
“factory” end of the strip.You really
don’t want this end of the board to be
in a highly visible area (like up against
a trim strip). It’s better to hide the cut
end under the base molding at the
opposite end of a row.
BACK-LAYING
Installing the trim strips was just one
of the interesting challenges presented
by this flooring project. It also gave me
a chance to try my hand at a tech-
nique called back-laying. Like the name
suggests, back-laying is installing
flooring in the opposite direction from
which you started.
If you recall, I laid out the baseline
and installed a starter cleat in the pass-
through between the two rooms. So
the first row of flooring that was set
against the cleat (and all the subse-
quent rows up to this point) had one
thing in common — the tongues faced
away from the cleat. That way, they
could be fastened with the blind nailer.
But in order to lay flooring on the
opposite side of the cleat, I had to reverse
direction. In other words, the tongues
on the flooring strips had to face the
other way.That much was easy. I just
turned the strips around. But this also
meant that two of the flooring strips
would be placed groove-to-groove.
To connect these two strips, the
idea is to insert a slip tongue or spline
into the grooves. (Refer to the Back-
laying illustration below.) The spline is
just a piece of hardwood that’s ripped
to the thickness of the grooves and
glued in place.
A careful layout results in a tight-fitting
joint where the flooring strips meet the
trim strips around the fireplace.
To create an attractive transition
between rooms, I face-nailed a double
row of trim strips in the entryway.
SECOND:
Fit Groove in
this strip over spline.
Spline
FIRST:
Glue Spline
into groove
in this strip.
FIRST:
Glue Spline
into groove
in this strip.
FIRST:
Glue Spline
into groove
in this strip.
NOTE: Leave Expansion Gap
between the wall and the ends
of the Flooring Strips.
See
at left.
Detail a
Wood Flooring
expands and contracts
across its width.
Wood Flooring
expands and contracts
across its width.
Wood Flooring
expands and contracts
across its width.
Trim
Strips
Flooring
Strip
HIGHLIGHTS & TRANSITIONS
!/2" Expansion
Gap
g
8
9
BACK-LAYING
EXPANSION GAP
a.
From Workbench Magazine
All rights reserved
page 8 of 10
©2004 August Home Publishing
One copy for personal use. Other copies prohibited.
“Stepped”
Strips
Wall
Use
Pry Bar
to make final
strips fit tight.
Once the glue dried, I fit the
groove in the next strip of flooring
over the spline. Then I nailed that
strip in place and continued working
my way across the floor. The pace
of the project picked up considerably
at this point. And before I knew it,
I was ready to install the last few rows
of flooring. (See Laying the Last Strip.)
EXPANSION GAPS
There’s no need to cut the last
flooring strips to fit tightly against
the wall. In fact, it’s just the opposite.
You want to leave a gap between the
wall and the floor. This gap allows
the wood floor to expand and con-
tract with changes in humidity.
If you look at the Expansion Gap
illustration on page 7, you can see
that most of this wood movement
occurs across the width of the floor.
This means you’ll want to leave the
largest gap next to the long edge of
the floor. A
1
/
2
" gap should be
plenty to allow the floor to move
freely without binding against the
wall (Expansion Gap Detail a).
As for the gap next to the ends of
the flooring strips, about
1
/
4
" is all
that’s needed. There’s not as much
movement with the grain (along the
length) of the flooring.
FINAL DETAILS
To complete the project, there were
just a few final details to take care of.
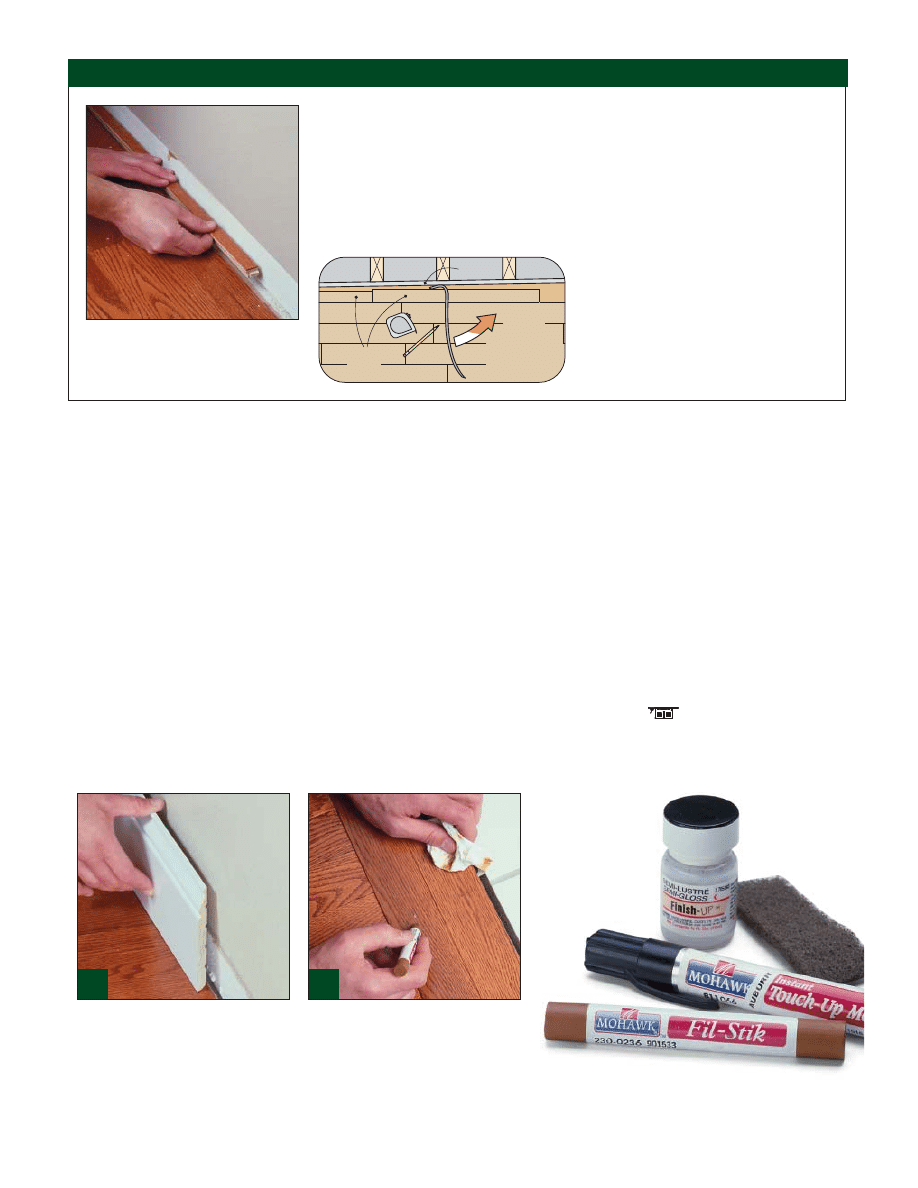
BASEBOARD.
First, I reinstalled
the baseboard (Fig. 10). In my case,
it was thick enough to cover the
expansion gap. But if necessary, you
can add a shoe molding to cover
wider gaps.
TOUCH UP
. Finally, I touched
up a few boards that I accidentally
scratched during installation. The
touch-up kit supplied by the manu-
facturer (shown below) came in
handy here. It contained a wax stick
for filling nail holes (Fig. 11).And for
fixing deep scratches, there’s a stain
marker and a small bottle of
polyurethane topcoat.
After completing the installation, the
gaps around the floor are covered with
baseboard and a shoe molding if needed.
Finally, a wax “crayon” that matches the
floor color creates an almost invisible
repair when filling the nail holes.
LAYING THE LAST STRIP
If there’s an uneven gap between the
floor and the wall, you can compensate
by installing strips of different widths.
This touch-up kit
has everything
that’s needed to fill
nail holes and
repair scratches in
the pre-finished
wood floor.
10
11
When it comes to laying the last strips of flooring, you’ll probably notice there’s an
uneven gap between the wall and the floor. That’s because very few rooms are perfectly
square, and very few walls will be absolutely parallel to the edge of the floor.
Fortunately, there’s an easy solution. That’s to create a “stair-stepped” row of flooring
next to the wall that compensates for the gap. (See drawing below.) This requires ripping
strips of different widths and fitting them in place, as shown at left. Be sure to leave a
1
/
2
"
gap between the strips and the wall so the floor can move with seasonal changes.
There’s not much room to work when installing the last row. Using a pry bar as a lever
will help coax the last strip into place. If
the space is just too tight to get the
tongue-and-groove joint together, cut the
bottom edge off the groove and simply set
the board in place. Then tap one end of
the strip with a hammer to seat the oppo-
site end and face-nail the strip.
From Workbench Magazine
All rights reserved
page 9 of 10
©2004 August Home Publishing
One copy for personal use. Other copies prohibited.
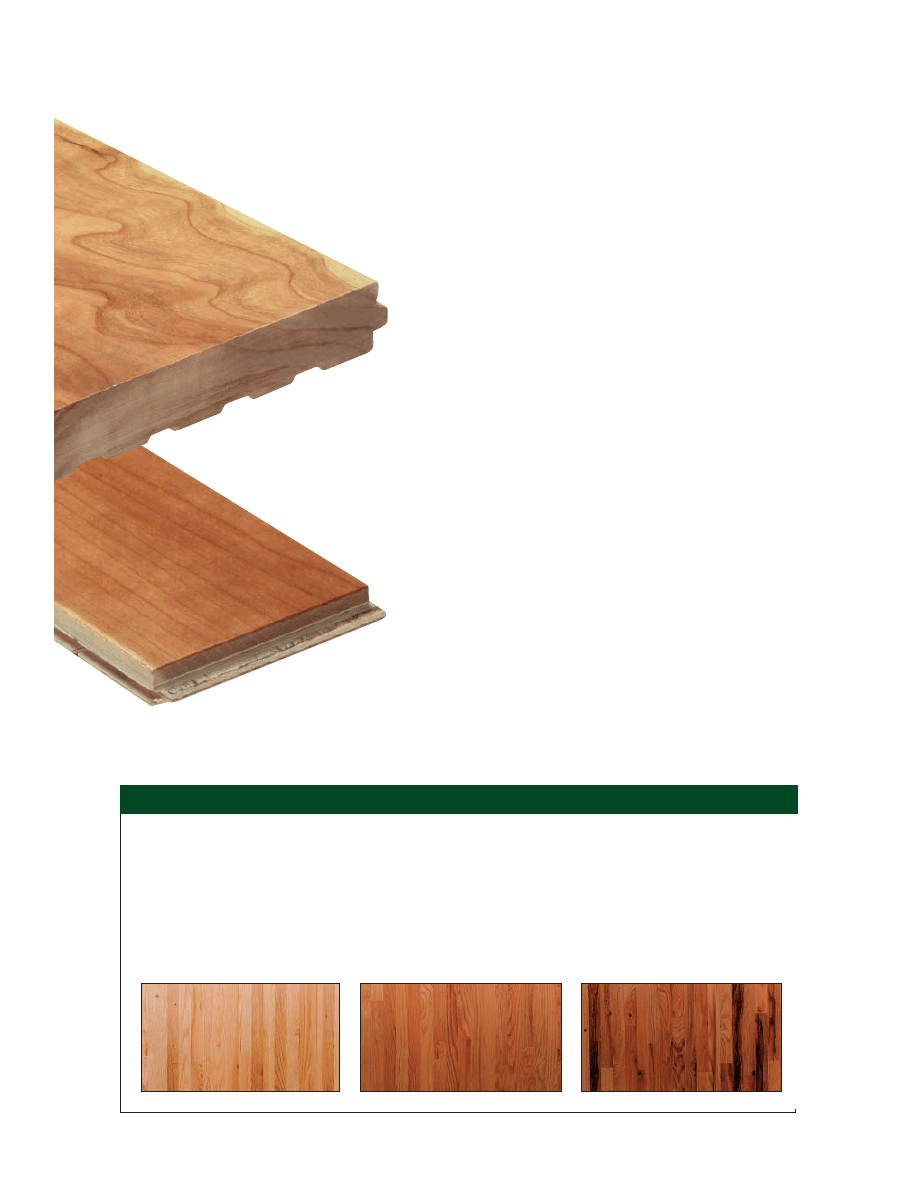
Find out which type — solid hardwood or
engineered — will work best for you.
T
here are several good reasons
to choose a pre-finished
product for your next flooring
project. One of the biggest benefits is
the hassle-free installation.
NO SANDING.
A pre-finished
floor doesn’t require sanding. This
means your home won’t need a top-to-
bottom cleaning once the job is com-
pleted. Plus, you don’t have to worry
about gouging a brand new, expensive
floor with a heavy sander.
NO FINISHING.
As the name
implies, with a pre-finished floor, all
the finishing is done at the factory
— not in your home. So there’s no
waiting for the finish to dry or the
fumes to disappear before you can
move the furniture back and breathe
the air in the house.
CONSISTENT LOOK.
Finally, it’s
almost impossible to duplicate the con-
sistent quality and appearance of a pre-
finished floor.A builder often finishes
a floor on-site in three steps — stain,
seal, finish coat — but a manufacturer
can go through four, seven, even up to
13 steps. The additional sanding and
extra finish coats result in an extremely
high-quality product.
But when buying pre-finished
flooring, there’s more to consider than
the finish.As you can see in the photos
at left, there are two types of pre-fin-
ished wood flooring: solid wood and
engineered.
On the surface, both solid wood
and engineered products look the same
once they’re installed. Both types are
manufactured in strips (typically 2
1
/
4
"
3
/
4
" SOLID
HARDWOOD FLOORING
3
/
8
" ENGINEERED
FLOORING STRIP
Wood Flooring
CHOOSING THE RIGHT GRADE OF PRE-FINISHED FLOORING
Pre-finished wood flooring — solid and engineered — is
graded based upon the number and prominence of the
“character marks” of the individual wood species. Some
of these marks include pin knots, mineral streaks, and nat-
ural color variations.
As you might expect, Prime- or Select-grade flooring
that has very few noticeable character marks (almost
entirely clear) will cost more than flooring of the same
species that shows a lot of heavy character marks.
However, sometimes you can use grading to your advan-
tage. For example, you might want to install an oak
floor that has a lot of natural character to it. Choosing
a Tavern- or Cabinet-grade of flooring will not only give
you the look you’re after but will also save you money.
It’s important to note that some manufacturers’ war-
ranties vary depending on the grade of flooring.
Tavern or Cabinet
Standard or Better
Pre-Finished
Prime or Select
Nat’l.
Oak Floor
ing Man
u
f.
Assoc.
From Workbench Magazine
All rights reserved
page 10 of 10
©2004 August Home Publishing
One copy for personal use. Other copies prohibited.
Base Shoe
!/4" Expansion Gap
#/8" Engineered Floor
Baseboard
Mastic
Adhesive
Concrete Floor
Baseboard
Flooring
Nail
!/4" Lauan Plywood Underlayment
#/4"-thick Subfloor
Base Shoe
!/2" Gap
#/4" Solid Hardwood Floor
wide) or planks (3" or wider). One
difference is that engineered planks
often come in wider widths than solid
hardwood — up to 7" or more.
All pre-finished flooring — solid
wood and engineered — is milled to
very exact thicknesses. Interlocking
tongues and grooves hold each indi-
vidual strip or plank in place to create
a solid, level floor. But there are a few
significant differences between the two
types you’ll want to consider.
SOLID WOOD FLOORING
A solid wood floor is exactly what its
name implies — solid wood
throughout (see top photo, page 9).
It’s not a wise choice for damp areas
(especially below grade) because the
wood absorbs moisture, which can
cause the floor to buckle.This means
it’s also unsuitable for use over a con-
crete slab unless a subfloor is installed.
The most common way to install
a solid wood floor is to nail it to a ply-
wood subfloor, as shown above. Some
flooring projects may require a lauan
underlayment between the subfloor
and flooring (see page 4).
Solid hardwood flooring is usually
sold in
3
/
4
"-thick strips.As you might
expect, material prices vary depending
on the species of wood, finish, manu-
facturer, and grading (see page 9).
ENGINEERED WOOD FLOORING
Unlike solid hardwood, engineered
flooring consists of several layers of
wood —
3
/
8
" to
1
/
2
" thick — glued
together (see bottom photo, page 9).
The top “wear” layer is usually
1
/
16
" to
5
/
32
" thick. Depending on its thick-
ness, it can be sanded and refinished
several times.
This multi-layered design makes
engineered flooring more dimen-
sionally stable than solid wood and a
good choice for below-grade installa-
tions. It can be nailed to a plywood
base. But more often, it’s glued-down
using a mastic adhesive, as shown at
right. When applying engineered
flooring over concrete, it’s important
to follow the manufacturer’s recom-
mendation on which type and brand
of adhesive to use.
You might expect to pay less for
engineered flooring.But the extra time
it takes to manufacture the product
offsets any potential price savings. So
expect to pay about the same amount
for engineered flooring as you would
for solid wood.
Nailing (or stapling) is the most common
way to install solid hardwood flooring.
{
{
HARDWOOD
INSTALLATION
}
}
ENGINEERED INSTALLATION
FLOATING FLOOR
PRE-FINISHED PINE: AN ALTERNATIVE TO HARDWOODS
Everywhere you look, homeowners are using wide
wood planks to create historic, elegant, and bold
flooring styles. With its distinctive grain pattern and
rustic look, pine flooring is an option worth consid-
ering when you’re looking for a floor with lots of char-
acter. And now it’s also available as a pre-finished
product. Seen here is Rustic Pine flooring from the
Coastal Woodlands collection from Bruce Flooring.
The engineered construction of this pre-finished
pine flooring makes it a realistic and practical alter-
native to common hardwood floors. Although pine
flooring will show more wear and indentations than a
harder flooring such as oak, the factory-applied finish
again makes it tough and durable. Plus, the natural
pitch in pine flooring will harden over time.
Pre-finished pine flooring has the same tongue-and-
groove construction as other engineered products. And
it’s available in different widths and thicknesses.
Engineered flooring is often installed
on concrete using a mastic
adhesive much like tile.
Cour
tesy of Br
uce Floor
ing
Wyszukiwarka
Podobne podstrony:
Flooring Bamboo Flooring Installation Basics
Fences Installing Wood Panel Fencing
Flooring Hardwood Flooring Installation Basics (22290)
Flooring Installing Bamboo Flooring
Install Plank Flooring
Flooring Locking Hardwood Installation (24785)
Flooring Wooden Solid Strip Installation (18838)
Flooring Solid Hardwood Plank and Strip Installation (18898)
Install Plank Flooring
instalacja debiana
INSTALACJE TRYSKACZOWE I ZRASZACZOWE
Urządzenia i instalacje elektryczne w przestrzeniach zagrożonych wybuchem
Instalacje elektroenergetObl1
Projekt Instalacji deponowanie 2
Instalacje odgromowe
Wybrane elementy automatyki instalacyjnej
instalacje grzewczaet
więcej podobnych podstron