Philips Domestic Appliances and Personal Care
Published by Philips Domestic Appliances and Personal Care
Printed in the Netherlands
© Copyright reserved
Subject to modification
Coffee Maker Senseo
HD7810/10
04/02
PRODUCT INFORMATION
- This product meets the requirements regarding
interference suppression on radio and TV.
- After the product has been repaired, it should function
properly and has to meet the safety requirements as
officially laid down at this moment.
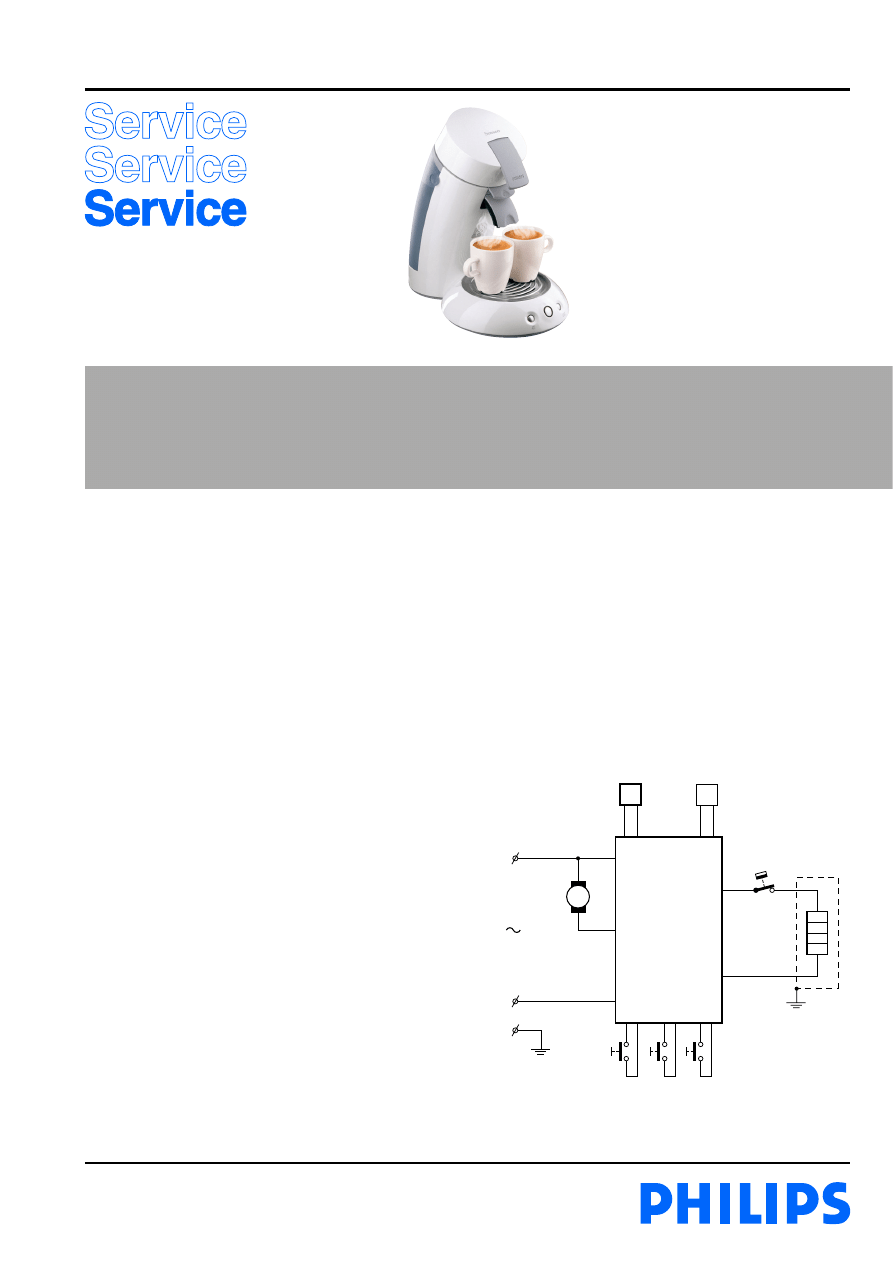
TECHNICAL INFORMATION
- Voltage
: 220 - 230 V
- Frequency
: 50 Hz
- Power consumption
: 1450 W
- Standby power consumption : 0.002 kWh
- Contents reservoir
: 755 cc
- Colour setting
: White / Vapour dusk
CONTROL
PCB
L
N
Boiler
Pump M
Automatic
thermostat
Temp.
Sensor
Waterlevel
Sensor
Push buttons
HD7810/10
Removing Brew chamber head (item 1 exploded view) handle
as follows:
- Back cover and 3-way valve must be disassembled!
- Place the appliance such a way that you are looking at the
boiler.
- First remove the boiler from the snap lock position of the
brew chamber.
(there were the boiler is fixed to the brew chamber)
- To do so use a screwdriver and bend slightly the both ribs to
the outer side and pull the boiler out of the fixation point.
- To remove the brew chamber,
use your both thumbs (see
picture 3) and push strongly
with a little distortion
(rotation) until the brew
chamber comes loose.
- Reassemble follow above steps backwards.
To reach the components placed on the base handle as
follows:
- First remove back cover, brew chamber and 3-way valve.
- Remove both Torx T15 screws see exploded view in the near
of position
A
.
- Bend the 2 click snap locks with a screwdriver (see base),
and the housing can now be removed.
- To remove the rest of the housing unlock the last 4 snap
locks at the base and gently pull of the front cover.
- To reassemble follow above steps backwards.
REPAIR INSTRUCTION
Descaling
Regular descaling will prolong the life of your appliance and
will guarantee optimal brewing results for a long time.
- Follow the steps in the section headed “Preparing the
appliance for use” see DFU (Direction For Use manual).
- In stead of only water use a mix of water and Lemon sour.
- For the best result leave the mix of water and Lemon sour
for about 30 minutes in the appliance, before you start with
flushing the appliance.
- To get the best results repeat above mentioned step once or
twice.
- When finished, flush the appliance twice by repeating the
above mentioned steps only use water instead.
OPTIONAL (accessories)
- XL watertank (10 Cups)
Commercial type number HD7982
Service code : 4222 259 20100
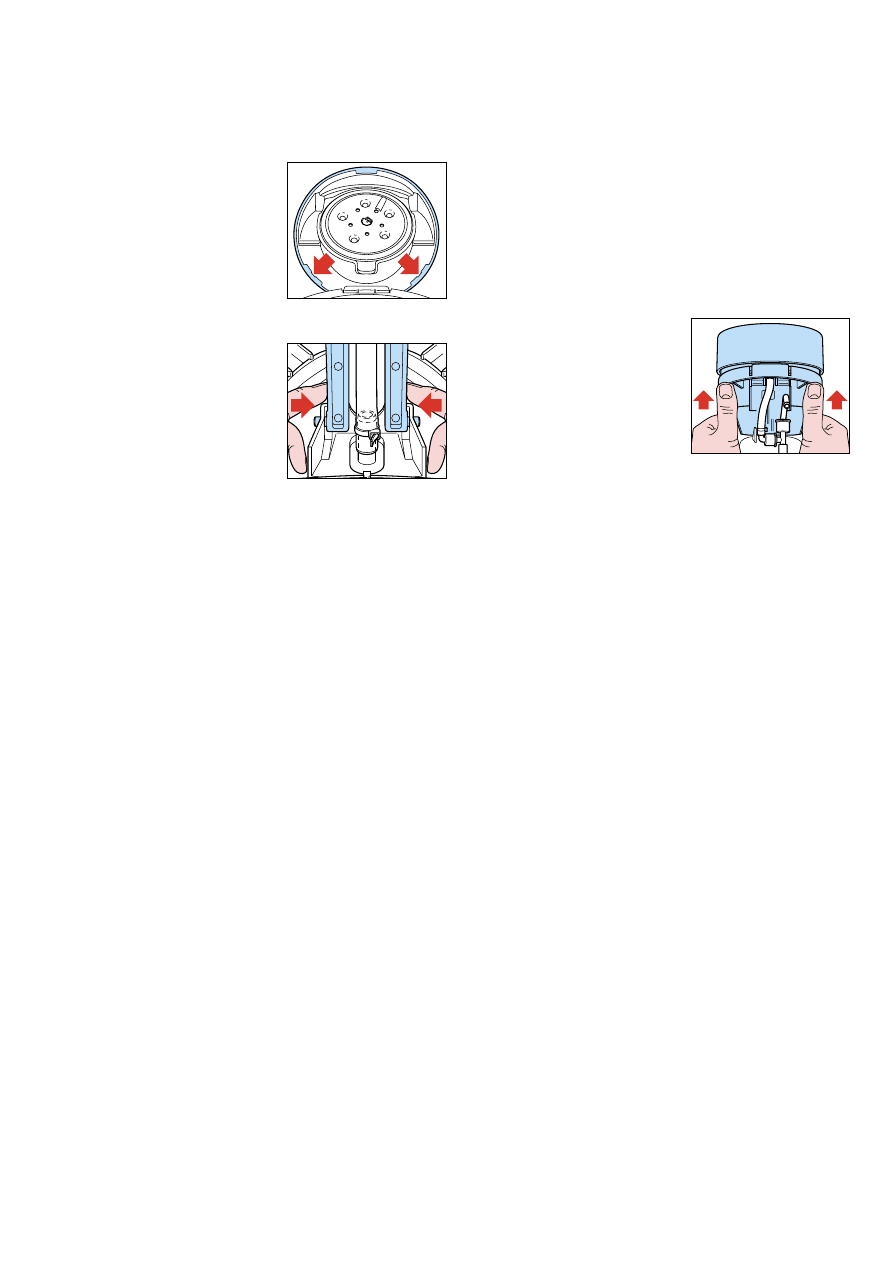
Disassembly information
To remove the brew chamber lid cover (item 8 exploded view)
handle as follows:
- Place the screwdriver on the
positions (see picture 1) and
lift the cover over the snap
locks on both positions.
- The cover lid can now be lifted
up a little and to remove the
complete cover including lever
and push rod (items 9 and 10)
squeeze strongly with two
fingers both legs of the push
rod (see picture 2) to each
other, so that the two pins will
get out of the hinge position
on the brew chamber.
- To remove lever from lid cover, take a screwdriver and bend
carefully the two lips/ribs in the lid cover outwards and
push the lever with force out of the hinge.
- Reassemble follow steps backwards, without using a
screwdriver.
To remove the back cover (item 23 exploded view) handle as
follows:
- Remove valve outlet.
- Start at the upper side of the back cover and stick a
screwdriver into the 2 snap locks positions and gently pull
the back cover from the appliance so that a little chink
between back cover and brew chamber becomes visible.
- Put the screwdriver in to the 4 rectangular holes (snap
locks) at the back and gently pull the screwdriver such away
that the lips of the snap locks are bent outwards.
- If all clicks positions are loose, it is possible to remove the
back cover.
- Reassemble follow steps backwards.
Removing 3-way valve (item 13 exploded view) handle as
follows:
- Unsnap boiler out of brew chamber.
- Rotate the 3-way valve a quarter (90°) counter clockwise.
- Gently pull the 3-way valve out of the boiler.
- Reassemble follow the above steps backwards.
DISASSEMBLY- AND RE-ASSEMBLY ADVISE
picture 1
picture 2
picture 3
2-4
HD7810/10
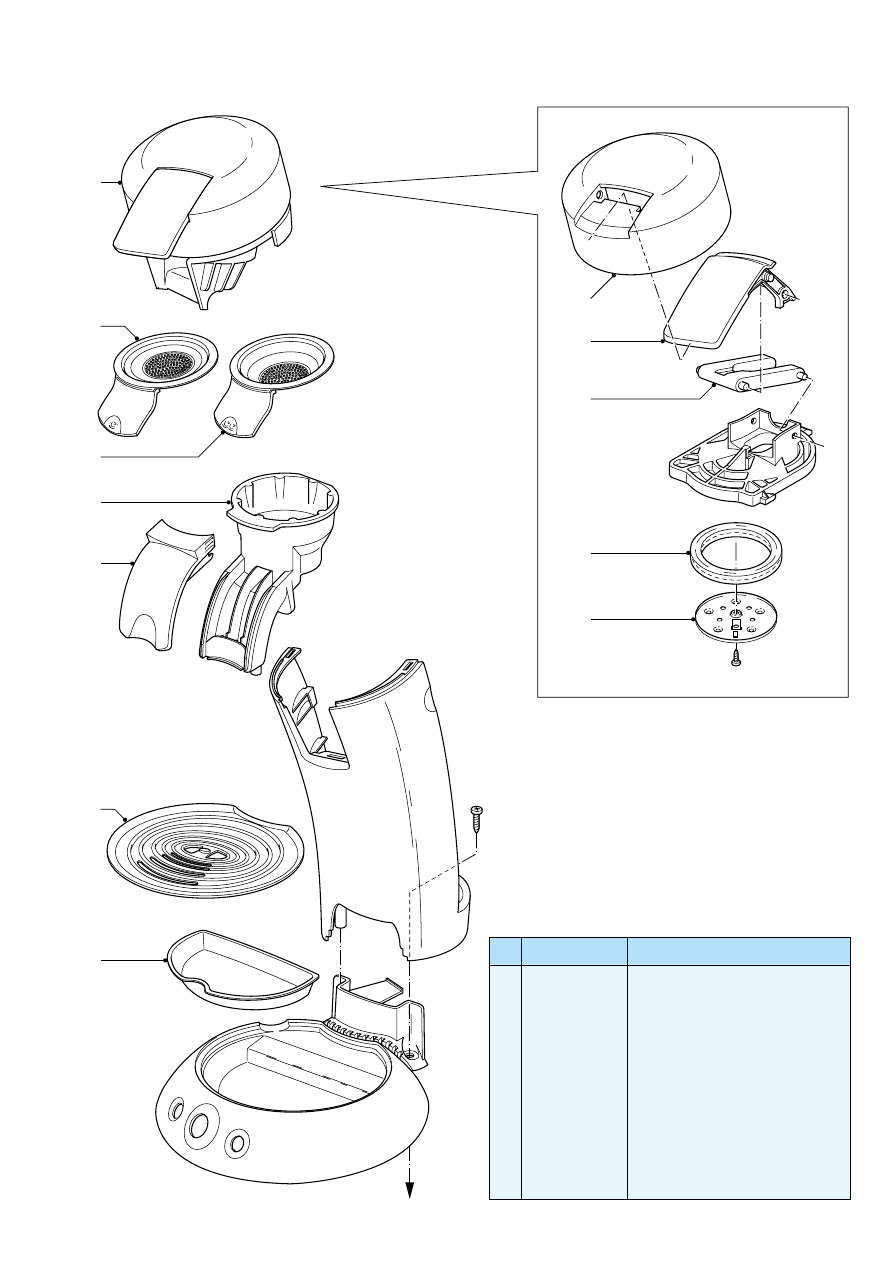
PARTS LIST & EXPLODED VIEW
1
11
8
10
9
12
2
4
5
6
7
3
A
3-4
Pos
Service code
Description
1
2
3
4
5
6
7
8
9
10
11
12
4222 259 08570
4222 259 08800
4222 259 08950
4222 247 35750
4222 247 37560
4222 240 06360
4222 247 35790
4222 259 08680
4222 247 37520
4222 247 35820
4222 247 06810
4222 259 06890
Brewchamber assy compl.
White
Pad holder single
Vapour dusk
Pad holder double
Vapour dusk
Foam chamber
Foam chamber cover Vapour dusk
Drip tray cover
Drip tray
Brewchamber Lid
Lever Vapour
Dusk
Push Rod
Brew chamber radial seal
Distrubutor assy
HD7810/10
PARTS LIST & EXPLODED VIEW
14
15
13
23
21
17
18
19
16
20
22
25
26
A
24
4-4
Pos
Service code
Description
13
14
15
16
17
18
19
20
4222 259 01290
4222 259 03610
4222 247 35590
4222 259 11160
4222 247 06840
4222 246 16300
4222 247 35880
4222 247 06860
Valve (3way)
Boiler assy compl. 230 V / 1450 W
Boiler frame
Temp. sensor
Hose 0.25 metre
Water level sensor
Pump Elbo
O-ring (elbo)
Pos
Service code
Description
21
22
23
24
25
26
4222 259 04390
4222 259 20100
4222 247 37550
4222 247 37540
4222 247 35870
4222 247 06820
4213 247 05250
Water tank assy
Aqua blue
XL (10 Cups)
Water tank assy
Silent blue
Valve outlet
White
Back cover
White
Filter
Water socket
Foot
= changed
Wyszukiwarka
Podobne podstrony:
Ekspres Philips Senseo HD7810 10 B instrukcja serwisowa
Ekspres Philips Senseo HD7810 55 C instrukcja serwisowa
Ekspres Philips Senseo HD7830 80 instrukcja serwisowa
Ekspres Philips Senseo HD7800 1 instrukcja serwisowa
instrukcja serwisowa termet gco 23 07 17 29 08
instrukcja serwisowa minimax plus
Instrukcja serwisowa skrzyń biegów PG1 i PG2
instrukcja serwis a3000d (2)
Junak M 10 Instrukcja Naprawy
cw 10 instrukcja do moska Whe Nieznany
Cwiczenie 10 instrukcja
automat schodowy asp 10 instrukcja pl
kosiarka Brigs and Straton instrukcja serwisowa PL
CA 10 instrukcja instalatora
INSTRUKCJA SERWISOWA
36 Instrukcja serwisowa FM448
cwiczenia 9 i 10 instrukcja 2010, BIOLOGIA UJ LATA I-III, ROK III, semestr I, Mikrobiologia, Cwiczen
Instrukcja serwisowa pralek Candy (IT)
10 instrukcja switchid 11289 Nieznany (2)
więcej podobnych podstron