Woodware Designs -- Armoire Student Computer Desk -- Freebie
Armoire Student Computer Desk -- Freebie
1.
Origin of the Armoire
An armoire (sounds like: arm-war) is simply a French word for arms cabinet and now usually
refers to large closet-like piece with two tall doors that is used like a closet. Historic furniture
books show many examples of armoires that are very formal and ornate, but many American
versions have simple, clean lines and are simply called wardrobes.
Recently the armoire has been adapted to hold televisions and other electronic equipment either
in the living room or bedroom. These feature doors to hide the equipment when not in use. An
armoire can be as big and solid as needed to hold large equipment, yet still be consistent with the
historic examples.
2.
Woodware Versions
The Woodware Armoires go a little beyond the home entertainment center to provide everything
needed for a roomy, low-stress computer desk. And they do hide everything away when not in
use, even the printer. This versions makes a good project for a team of a few students and makes
http://www.charm.net/~jriley/armstu.html (1 of 18)12/03/2005 19:12:13
Woodware Designs -- Armoire Student Computer Desk -- Freebie
a very nice gift.
3.
Student Version
This student version is our fourth variation on this popular design. It is designed to be built by
students using only a few hand tools and at a reasonable cost. It features the use of factory build
cabinet doors thus eliminating the most difficult woodworking. It comes apart into two sections
for ease in transporting.
p> Almost all the materials can be bought at your local home store. The one special hardware
item can be mail ordered. It is 37.5 inches wide, 21.5 inches deep, and 72 inches tall on the
outside. It requires 38 additional inches of wall space to open the doors and has an inside depth of
21 inches.
p> If you like our fun Freebies, remember we can only keep this Web site open if we sell our
Low-Stress Computer Furniture Plans
or you follow our ad links and make purchases from
our sponsors. Thank you.
http://www.charm.net/~jriley/armstu.html (2 of 18)12/03/2005 19:12:13
Woodware Designs -- Armoire Student Computer Desk -- Freebie
4.
Download the Detailed Drawings
This free design includes 11 detailed sketches. You can get by justing click on the link below to
download the drawings drawings in .PDF format. These construction notes can be printed out
with your Web browser.
1.
Student Armoire Drawings in .PDF
2. A free Acrobat Reader (.87 meg) is available from:
3. Or, if these don't work simply send in this
If you like our fun Freebies, remember we can only keep this Web site open if we sell our
Stress Computer Furniture Plans
or you follow our ad links and make purchases from our
sponsors. Thank you.
5.
Desk Construction
You can make this desk by:
1. Downloading the drawing and this text.
2. Studying information and locating materials.
3. Mail ordering speciality hardware.
4. Selecting Doors.
5. Purchasing local materials.
6. Having the plywood cut.
7. Hand cutting and drilling the small pieces.
8. Gluing up parts.
9. Assembling the desk.
10. Hand fitting critical parts.
11. Disassembling
12. Finishing all pieces
http://www.charm.net/~jriley/armstu.html (3 of 18)12/03/2005 19:12:13

Woodware Designs -- Armoire Student Computer Desk -- Freebie
13. Reassembling
14. Installing the computer.
6.
Discussion of Sketches
After you download the sketches, these notes will help you understand them more completely.
1.
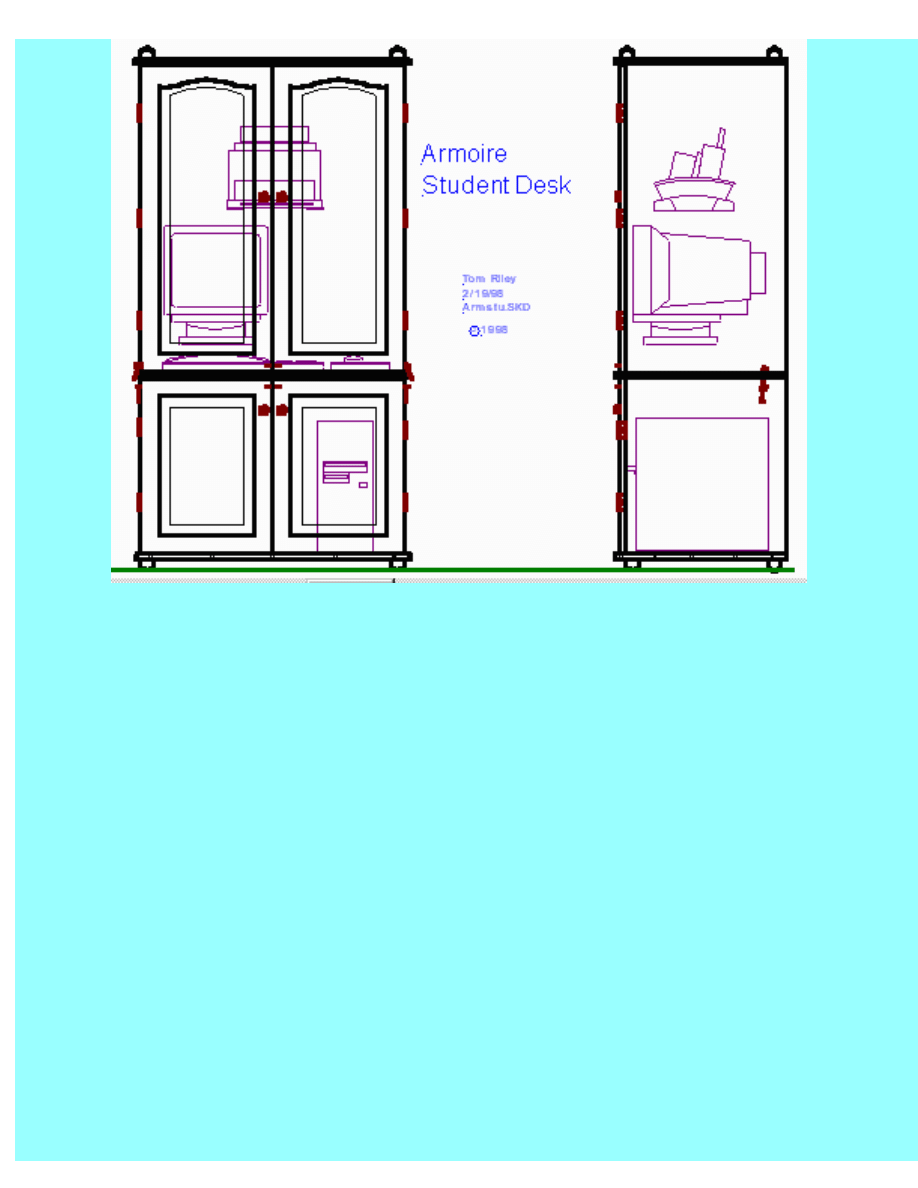
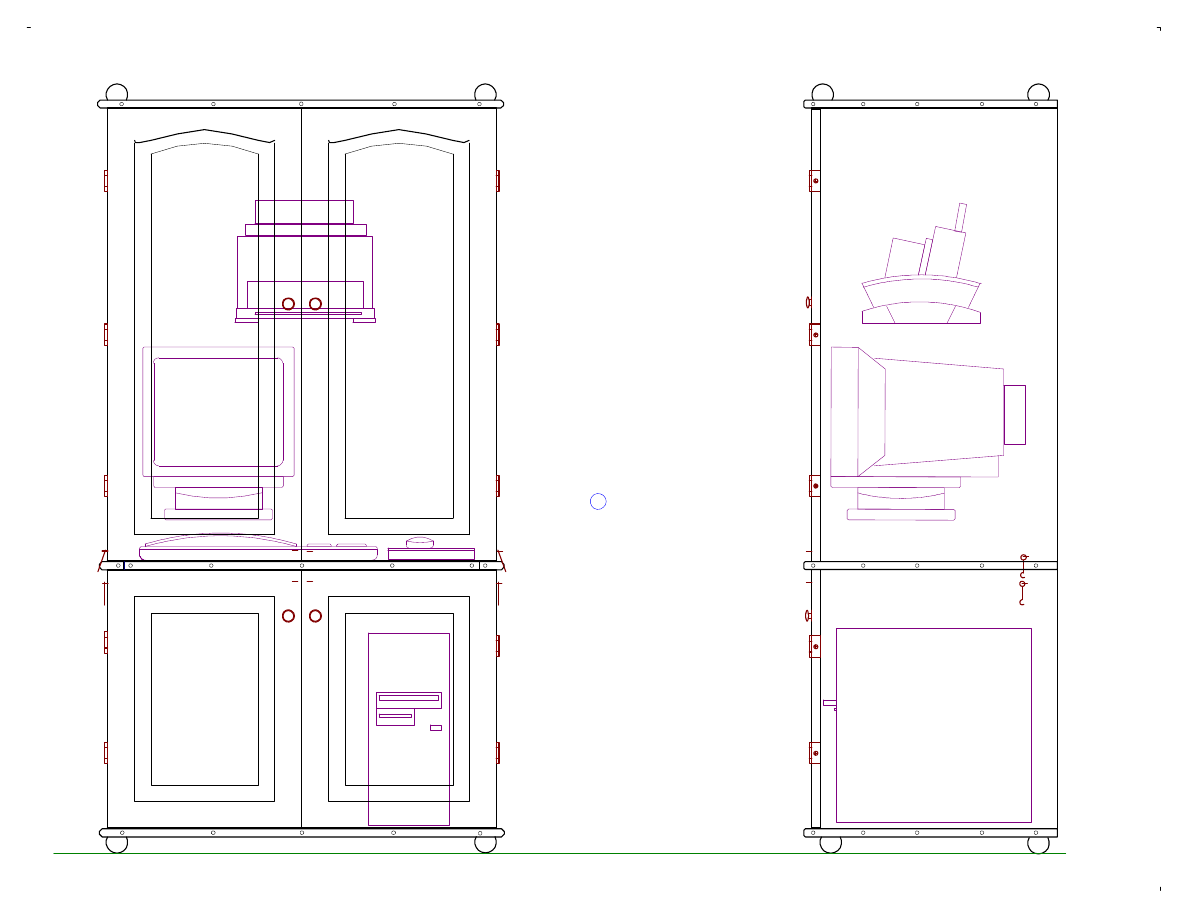
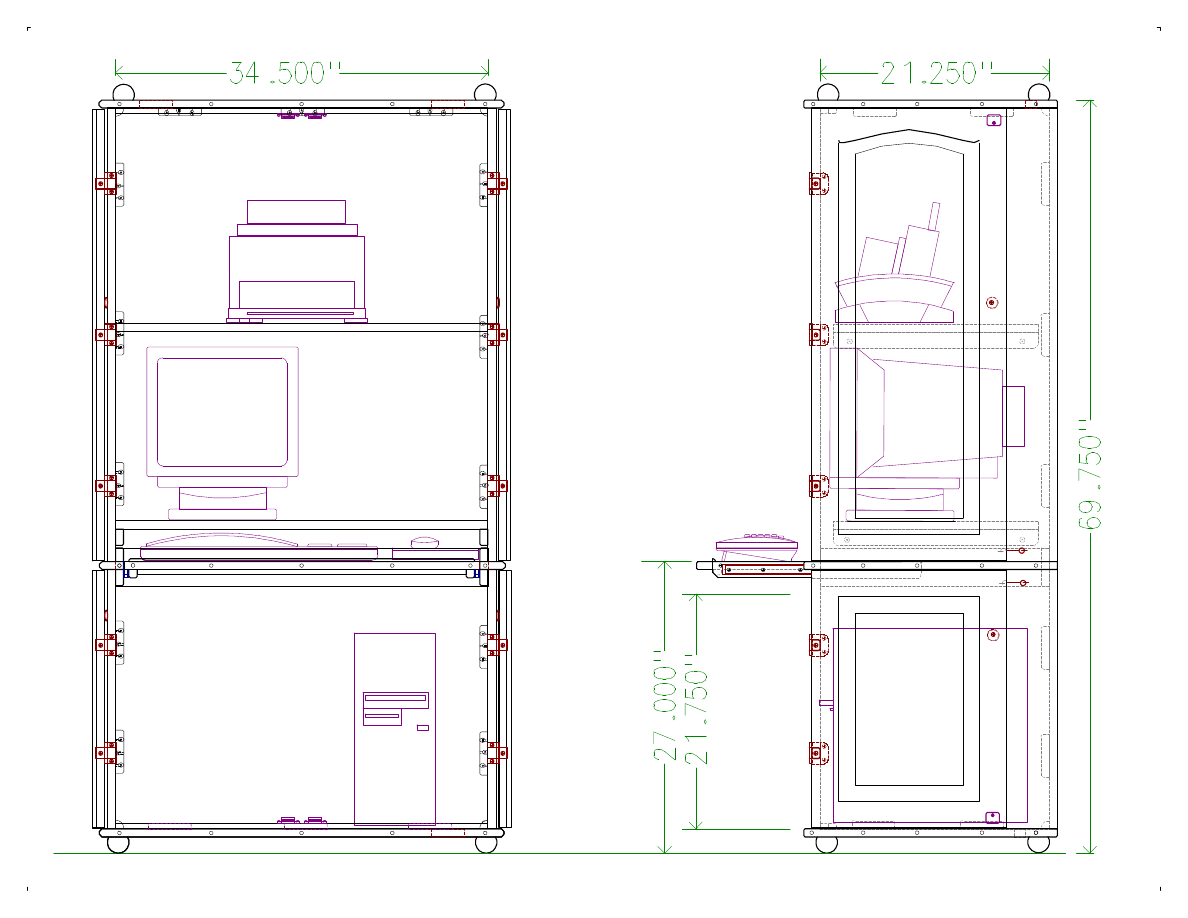
Armoire Student Desk
The front view shows the desk with the doors closed. Note that the cabinet is deep enough
for even a large monitor and there is room for a printer. Also the computer sits in the base
in the tower configuration. These are shown as ghost images inside the Armoire.
The feet are two inch spherical knobs and a matching set are placed on the top for a
balanced look.
The hinges are special ones that let the doors swing all the way around though 270
degrees. This gets them out of the way when the computer is in use. The doors are held
open by simple hooks.
2.
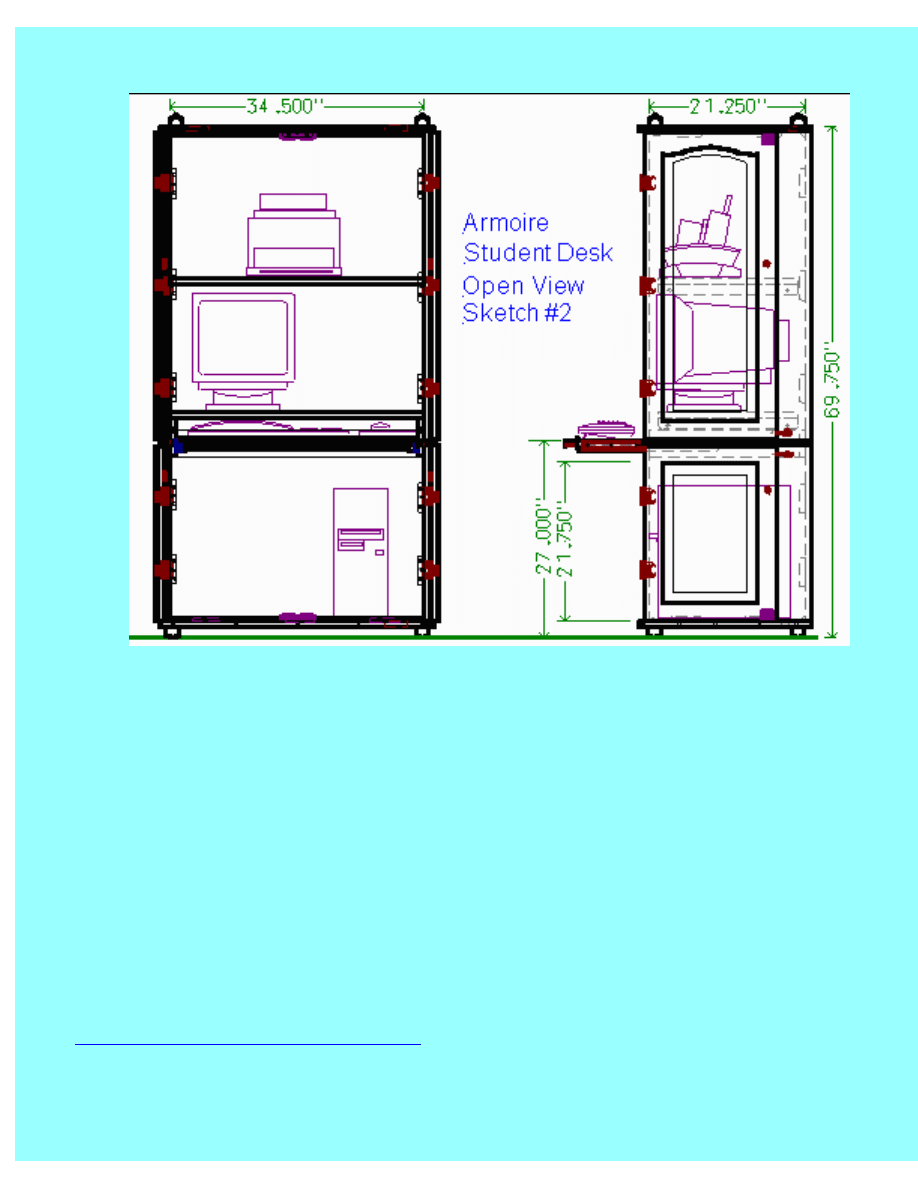
Armoire Student Desk, Open View, Sketch #2
This sketch is very like Sketch #1 except that the doors are open and the keyboard tray is
extended.
The shelves in the top section may be installed higher or lower to suit your equipment.
The monitor shelf must be high enough to allow your keyboard to store under it. There is
space behind the shelves to pass cables down.
The armoire comes apart just above the keyboard shelf. Removing a few screws allows
you to take the unit apart for moving.
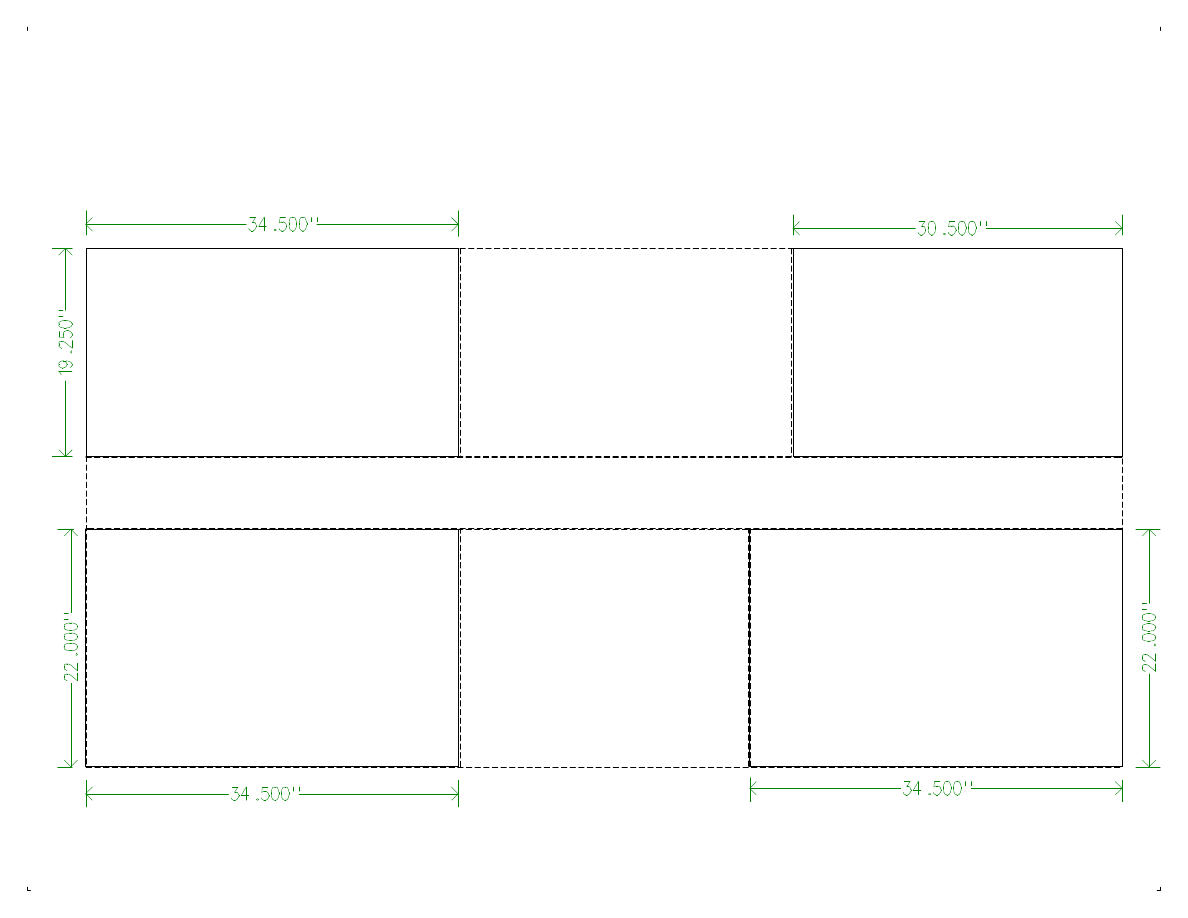
3.
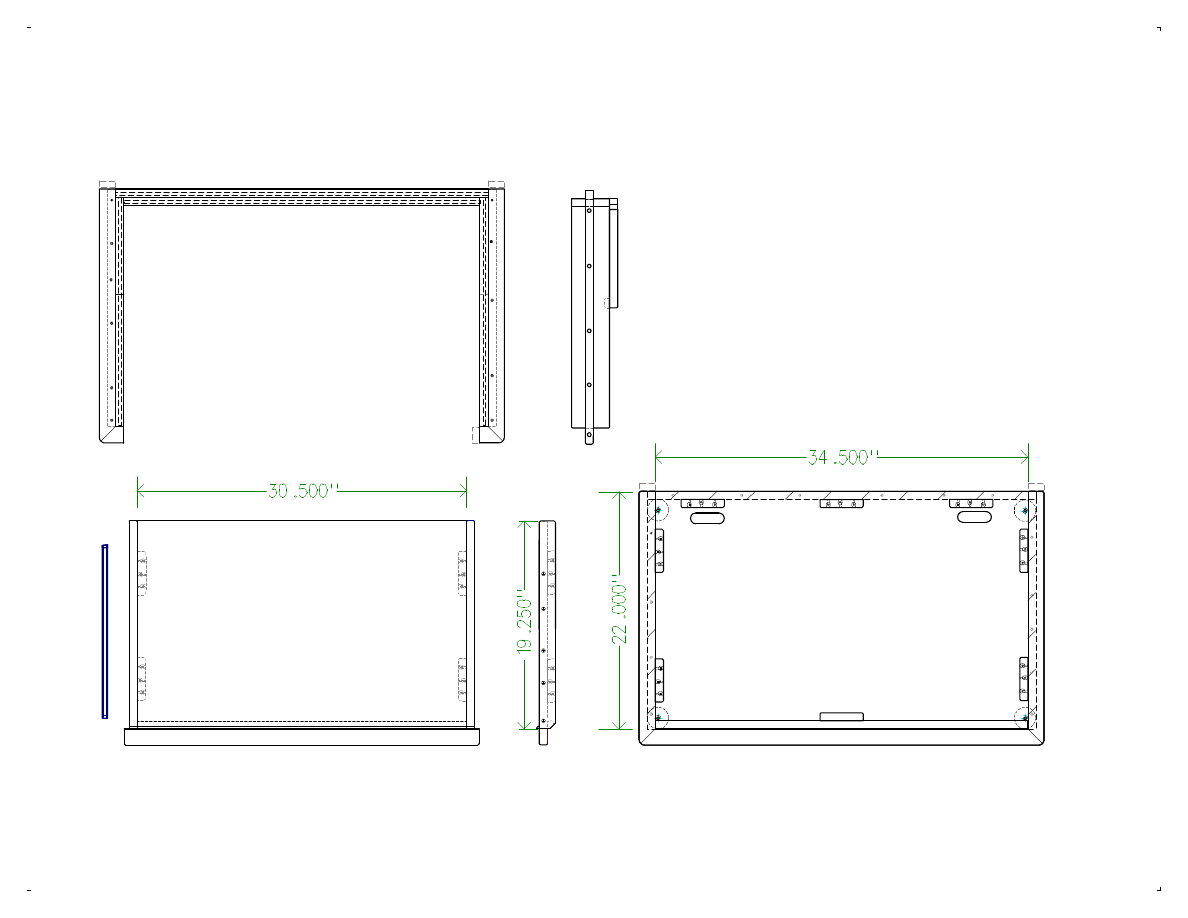
Armoire Student Desk, Sketch #3, Top Views
This sketch shows the top view of the base and the top view of the mid section with the
top section removed. The keyboard tray is also shown completely removed from the
Armoire.
The fine dashed lines represent the edges of pieces that are hidden behind solid parts. The
hatched areas are where other parts will be glued. The edge of plywood is show as layers.
http://www.charm.net/~jriley/armstu.html (4 of 18)12/03/2005 19:12:13

Woodware Designs -- Armoire Student Computer Desk -- Freebie
The two cable holes in the base allow cables to pass out the bottom and speaker cables to
pass down from on top.
The ball feet are shown as hidden circles. The back ones are a little forward to miss
baseboard molding.
Seven screw blocks are included to attach the base to firmly attach the back and sides. A
strip of .5 by .75 inch molding crosses the front for the doors to strike against.
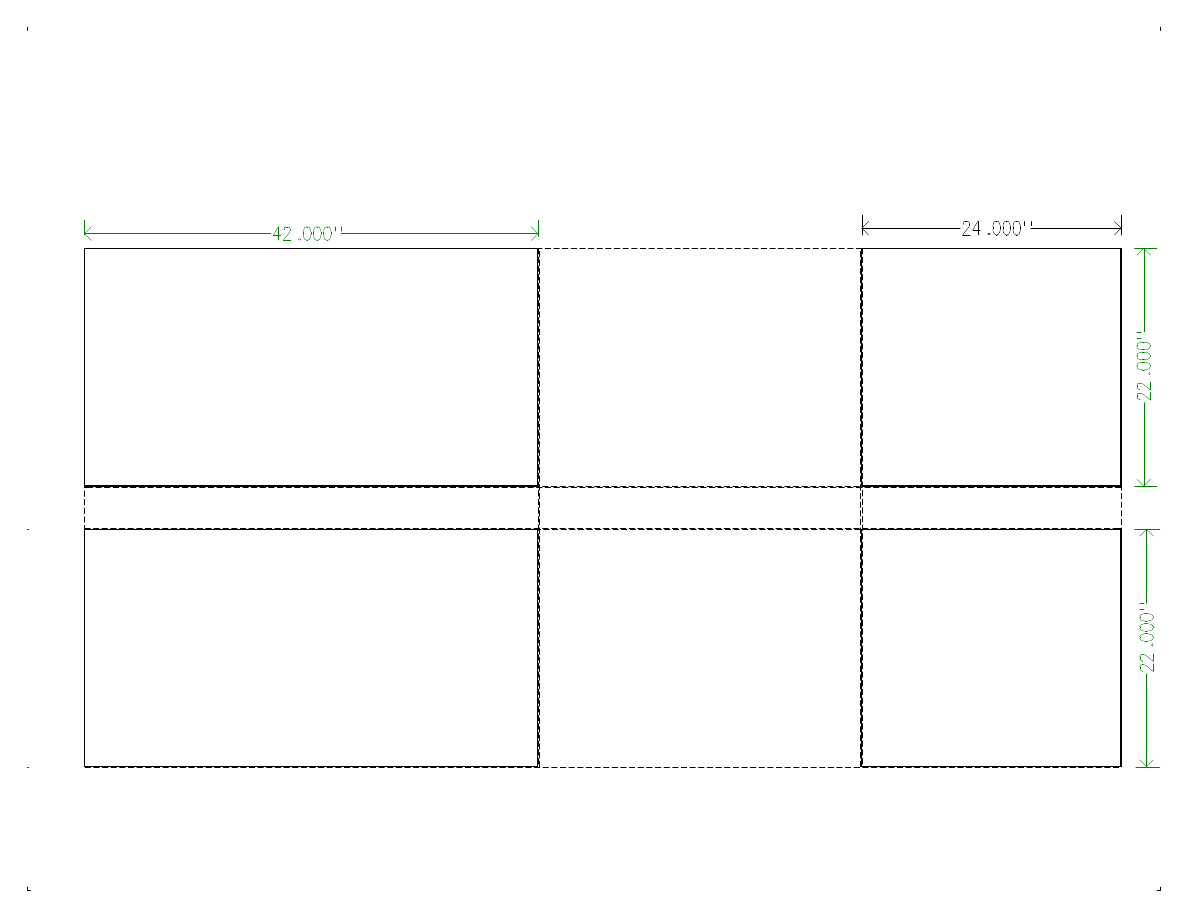
4.
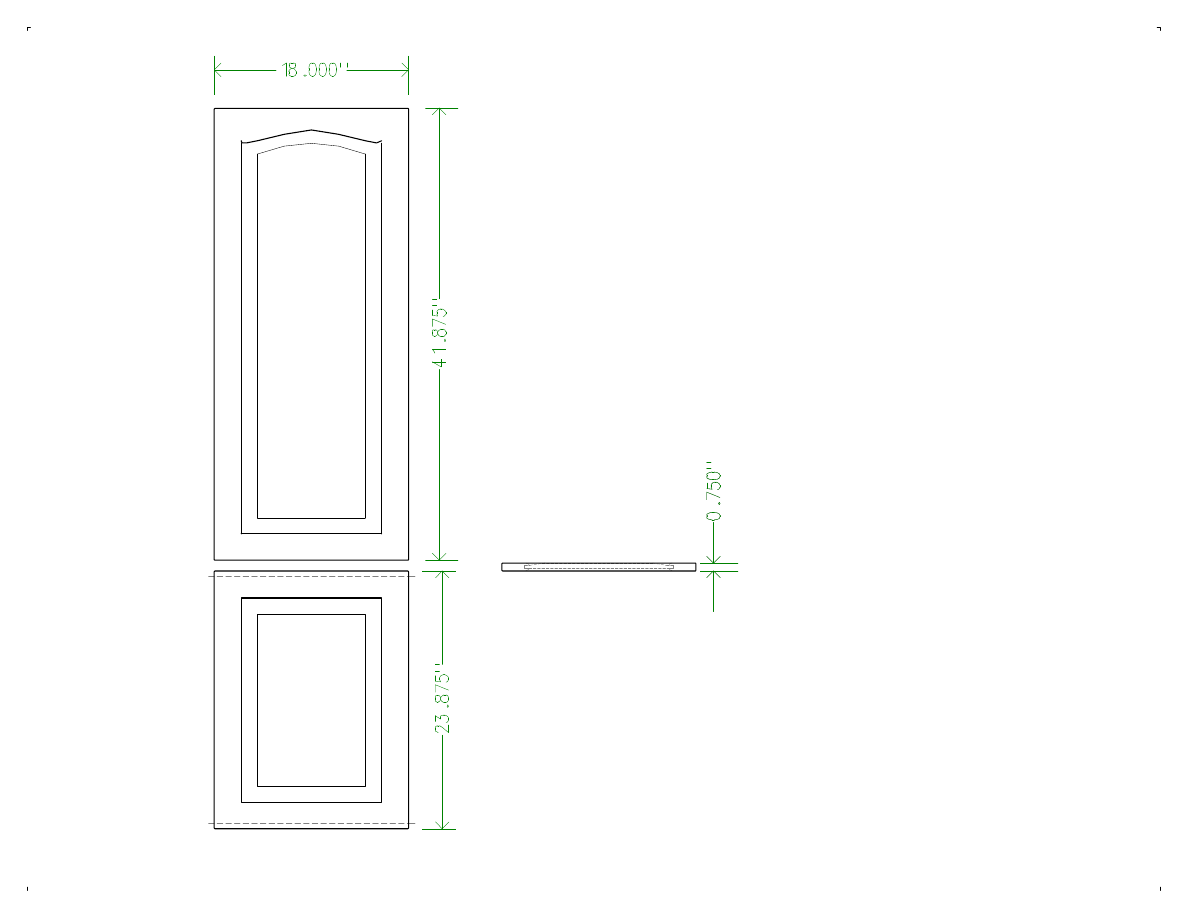
Armoire Student Desk, Cabinet Doors, Sketch #4
These are the cabinet doors that were available off the shelf at our local Home Depot.
Note that the edges are square and that they are .75 inches thick.
You may be able to find good doors for much less money at a building materials salvage
yard. You may need to trim off bevels edges. You will probably have to make simple
adjustments to the top and side dimensions to suit your doors. This is not difficult but
must be done carefully.
If you are not a tall person you may wish to trim .5 inches of the top and bottom of the
lower doors. This will reduce the height of the keyboard to a less stressful level.
5.
Armoire Student Desk, Pieces, Sketch #5
These are all the hardwood pieces pieces you need. They are cut from 1-by-2 stock with a
miter box and hand saw. The outside edges are rounded with a block plane or sand paper.
The square ends are at first left a little long and then trimmed after installation.
6.
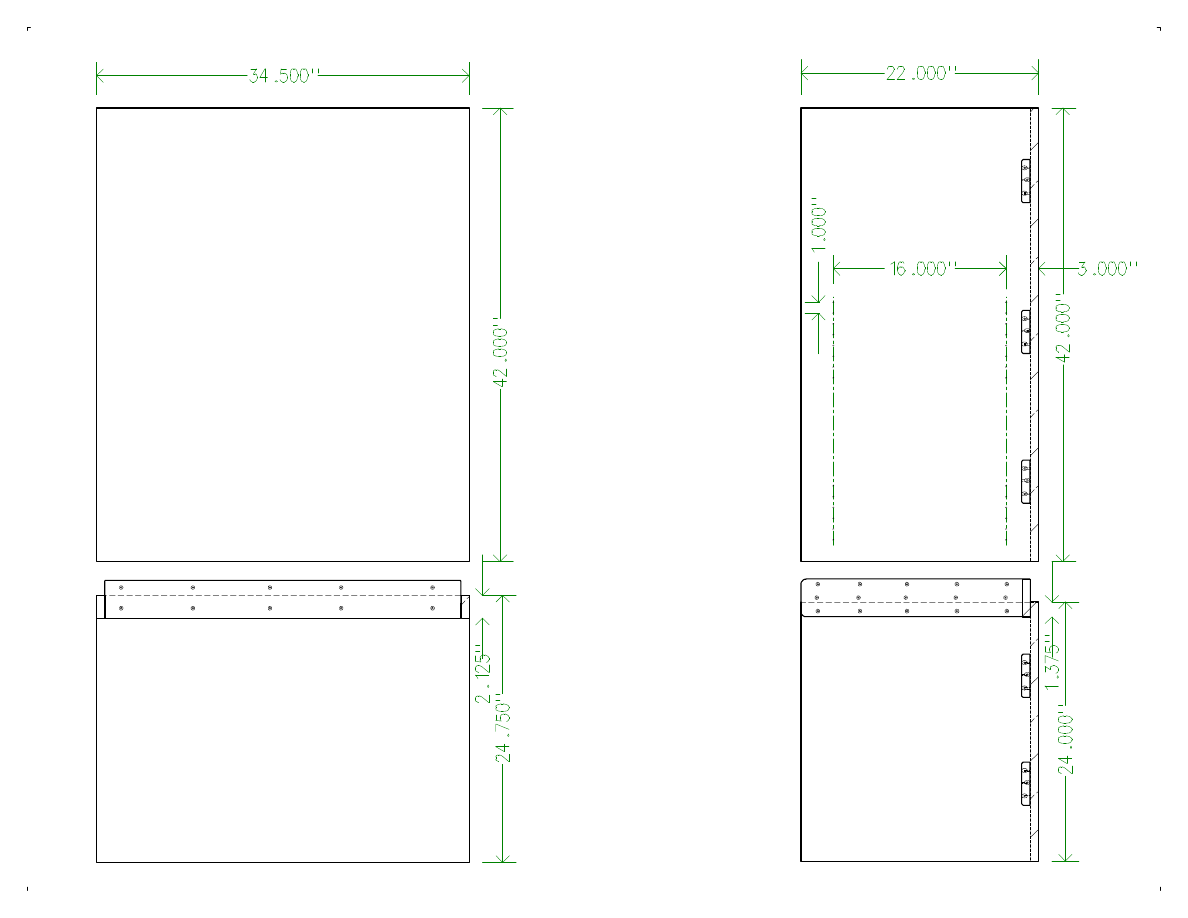
Armoire Student Desk, Back & Side, Sketch #6
The back and side are cut from .75 inch fir plywood. The back has screw blocks to it to
attach the sides. The sides have a glue area marked for the back and two lines of predrilled
holes for the shelves. These holes do not go all the way through.
The dimensions that would have to be adjusted for custom door sizes are marked.
7.
Armoire Student Desk, Shelves, Sketch #7
This sketch shows the parts for the shelves. The wood pieces do not need to be made from
expensive hardwood as they will be painted.
http://www.charm.net/~jriley/armstu.html (5 of 18)12/03/2005 19:12:13

Woodware Designs -- Armoire Student Computer Desk -- Freebie
8.
Armoire Student Desk, Miscellaneous, Sketch #8
These are the pieces that tie the top and bottom together. They can be made from plywood
or plain wood. They are screwed and glued to the bottom section but only screwed to the
top.
9.
Armoire Student Desk, Plywood Layout #1, Sketch #9
You will probably need to have the store make the major cuts on the plywood pieces. The
required store cuts are labeled. This greatly reduces your requirement for tools and makes
the plywood easer to get home. You may have to pay a little extra for the cuts (first cut is
free and then $.50 to $1.00 each) but it is worth it.
The cut dimensions that may have to be adjusted for custom door sizes are shown.
An .125 inch allowance has been made on the drawing for the saw blade width.
10.
Armoire Student Desk, Plywood Layout #2, Sketch #10
This drawing is the same as Sketch #9 except it is for the second sheet of plywood.
11.
Armoire Student Desk, Plywood Layout #3, Sketch #11
This drawing is the same as Sketch #9 except it is for the third sheet of plywood.
7.
Materials
This Armoire is made of hardwood kitchen cabinet doors set on a plywood frame with hardwood
trim. The parts are assembled with glue, wood screws, and finishing nails.
The cost estimate below is for oak doors and trim with pain hardware. The optional features
listed below are not included.
1.
Wood
Plywood:
■
3 -- Fir, .75 inch, A/C, 4x8 feet, $28.00 each -- $84.00
Doors:
■
2 -- Kitchen Wall Cabinet Door, hardwood, 18 by 42 inches -- $76.00
http://www.charm.net/~jriley/armstu.html (6 of 18)12/03/2005 19:12:13

Woodware Designs -- Armoire Student Computer Desk -- Freebie
■
2 -- Kitchen Base Cabinet Door, hardwood, 18 by 24 inches -- $70.00
(The ones shown are Cambridge Kitchen Cabinet Doors made by Mill's Pride and sold at
Home Depot.)
Boards:
■
24 ft -- Oak, .75 by 1.50 inches, $.79/ft -- $ 20.00
■
10 ft -- Popular, .75 by 1.50 inches, $.45/ft -- $ 4.50
Molding:
■
10 ft -- .75 by .50 inches rectangular, $.37/ft -- $ 3.70
■
12 ft -- 1/4 Round, .75 inches, $.35/ft -- $ 4.20
■
3 ft -- 1/4 Round, .25 inches, $.23/ft -- $ 1.10
■
3 -- 5/16 Dowel, 36 inch length -- $ .90
■
1 package -- Wooden wedges -- $1.50
Wood Subtotal: $265.90
2.
Hardware
Fittings
■
5 pair -- Hinges, 270 degree, @$6.29 -- $32.00 (Mail ordered from The
Woodworkers' Store { 1-800-279-4441} item #15455 in 1997 Fall Catalog)
■
1 pair -- Drawer Glides, heavy duty -- $18.00 (Must have steal ball bearings)
■
2 pair -- Door Knobs -- $ 8.00
■
2 pair -- Door Latch, magnetic -- $ 4.60
■
4 -- Hooks and Eyes, 3 inch -- $ 6.00
■
8 -- Wooden Knobs, 2 inch spheres @ $1.25 -- $10.00
Fasteners
■
100 -- Screw, flat head, #8 1.25 inch -- $ 3.40
■
100 -- Screw, flat head, #8 1 inch -- $ 3.20
■
16 -- Screw, pan head, #6 .75 inch -- $ .80
■
4 -- Screw, Round head, #10 1.5 inch -- $ .80
■
4 -- Flat Washers, #10 -- $ .20
■
1 box -- Brads, .75 inch -- $ 1.00
■
8 oz. -- Woodworker's Glue -- $ 3.80
Hardware Subtotal: $91.80
http://www.charm.net/~jriley/armstu.html (7 of 18)12/03/2005 19:12:13

Woodware Designs -- Armoire Student Computer Desk -- Freebie
3.
Finish:
■
1 qt. -- Stain -- $ 5.00
■
1 qt. -- Shellac -- $ 6.00
■
1 pt. -- Shellac thinner -- $ 4.00
■
1 qt. -- Polyurethane, satin finish -- $ 10.00
■
2 qt. -- Paint, oil based -- $ 14.00
■
2 qt. -- Paint thinner -- $ 3.00
Finish Subtotal: $ 42.00
4.
Omissions and Contingencies (~12%)
( Tax, sand paper, etc.) $50.30
5.
Estimate Total Cost $450.00
This is only an estimate (made in the February 1998). The price may vary in your area. Getting a
good price on the doors and plywood is critical to keeping the price down.
Sometimes you can catch a commercial version of an Armoire desk on sale for about this
amount. Most of these are made from particle board and other materials that are relatively short
lived and are difficult to repair. Such pieces have a life expectancy of about five years. This
design done in hardwood and .75 plywood, in contrast, is easy to repair or modify, can be
refinished, and can be expected to last 75 years.
8.
Tools
This desk was designed to be build using only a few hand tools that a student might have,
purchase at reasonable cost, or borrow. These tools are all useful for general around-the-house
maintenance and can fit in a tool box.
1. Electric Drill, 3/8 chuck
2. Bits, 1/8 inch twist, 1 in. paddle
3. Screw Mate bit for #8 screws -- $6.20 new
4. Miter Box and hand saw -- under $20.00 new
5. Tri-Square
http://www.charm.net/~jriley/armstu.html (8 of 18)12/03/2005 19:12:13

Woodware Designs -- Armoire Student Computer Desk -- Freebie
6. Screw drivers
7. Coping Saw
8. Hammer and small nail set
You will also need sand paper, paint brushes. etc. It would be nice to have a block plane and a
four-in-hand rasp.
9.
Fabrication Notes
This is your desk and you can build it to suit your likes and needs. This is a big piece of valuable
furniture but don't get in a big hurry.
1.
Design Options
Before starting you might want to consider these design options. Some require only small
changes to the dimensions but other require some additional materials.
■
Hinges -- If the hinges you choose do not work exactly like the ones in the
drawing, the width of the front with the doors closed may be effected. This is
easily corrected by adjusting the width of the back. You should obtain your hinges
before building the back, top, and bottom. E-mail us if you need farther discussion
on this.
■
Shorten Doors -- You may want the keyboard shelf lower than 27 inches. You can
trim the doors by equal amounts top and bottom. You need to subtract this distance
from heights of the sides and back.
■
Change Width of Keyboard Shelf -- This shelf is shown at its widest, 20.75 inches.
This allows it to be used as a writing surface. You can narrow it to fit only the
keyboard, but be sure that the side boards are long enough for the drawer guides.
■
Increase Depth -- You can increase the side depth to from 22 to 23.875 inches
without much additional material.
■
Brace Shelves -- You can brace the monitor and printer shelves by simply adding a
block behind the shelf and installing screws through the back and block. The
blocks would be 4 by 1 by .75 inches and can be made from two thickness of .75
by .5 stock. The screws should be 2.5 inch #10 flat heads.
■
Molding on shelf edges -- you can add .75 by .5 inch molding to the front edge of
the two shelves.
■
Hardwood Sides -- You can pay $30.00 extra for one piece of hardwood plywood
for the sides but it is difficult to match the door colors really well.
■
Add a Light -- One or two long bulb lights work well mounted in the top.
http://www.charm.net/~jriley/armstu.html (9 of 18)12/03/2005 19:12:13

Woodware Designs -- Armoire Student Computer Desk -- Freebie
2.
Doors
The doors set the look of the piece and are nearly half the cost. You may be able to find
perfectly good doors at a building materials salvage yard at about 1/2 half the cost of new
ones.
Most salvage doors will not be quite the same size and may have beveled edges that do
not suit the 270 degree hinges. These problems can be dealt with. The edges can be
trimmed with a saw or planed. The dimensions that you will need to adjust to fit your
doors are marked on the drawings.
If you are not a tall person, you may wish to shorten the bottom doors. The factory
dimensions put the keyboard at 27 inches. Low stress heights range from 25 to 28 inches
depending on the user's height.
If your lower doors are very short, you will want to increase the height of the feet to bring
the keyboard height up to 25 inches.
You will hand sand and refinish any doors you buy, even new ones.
3.
Plywood Cuts
You will need to cut the three large plywood sheets. You can accomplish this in a number
of ways:
■
Pay the plywood supplier to make the major cuts shown in Sketches #9, #10, and
#11
■
Get access to a table or radial arm saw
■
Use a skill saw with a plywood blade and a clamped straight edge
If you want the supplier to make the cuts, go at an off time usually mid-morning or mid-
afternoon. Demonstrate that you can pay for the materials before they are cut. Have the
drawings with you and double check any dimension adjustments. You will to buy the
plywood even if you make a mistake.
You may be able to get access to a table or radial arm saw through a family member, a
student crafts workshop, or even a drama shop. You will also need a way to haul the large
sheets around.
If the corners of the plywood sheets are beat up, you can make the first long cuts an inch
into the center scrap and then make another cut for the outside edge.
http://www.charm.net/~jriley/armstu.html (10 of 18)12/03/2005 19:12:13

Woodware Designs -- Armoire Student Computer Desk -- Freebie
Mark all the pieces with the sheet number and description using a pencil by writing on the
C side. Keep all the scrap pieces.
4.
Screw Blocks
The screw blocks are shown in Sketch #8. They are used to strength all the plywood to
plywood joints and to make assembly easy. Screws into the edge of plywood do not hold
well. They are also used in gluing up the other parts so you might as well start
construction by making them.
The ones show are made from 11/16 inch quarter round but you can make them from .75
square molding or even strips of scrap wood cut on a table or radial arm saw. Round over
one edge with a block plane or sand paper. The finished desk will look much better if all
these block are almost identical and are placed in symmetrical patterns.
Cut the blocks to the same length using the miter box and hand saw. They are usually cut
one blade width short of the measurement to make the material come out to the even foot.
Each has three screw holes, two in one direction and one in another. Cut out the paper
pattern (Sketch #12) and glue it to a piece of thin cardboard. Use this to mark the glue
faces with an awl. Drill pilot holes from the flat glue face into the stock sloping up slightly
(about 15 degrees). This slope will allow you room to use a screw driver. Redrill the holes
from the non-glue side with the #8 Screw-Mate drill. Make the lower edge of the screw
head match the surface of the block.
Make the first screw block and practice screwing it down to scrap plywood. When you
have it the way you want it, make the rest.
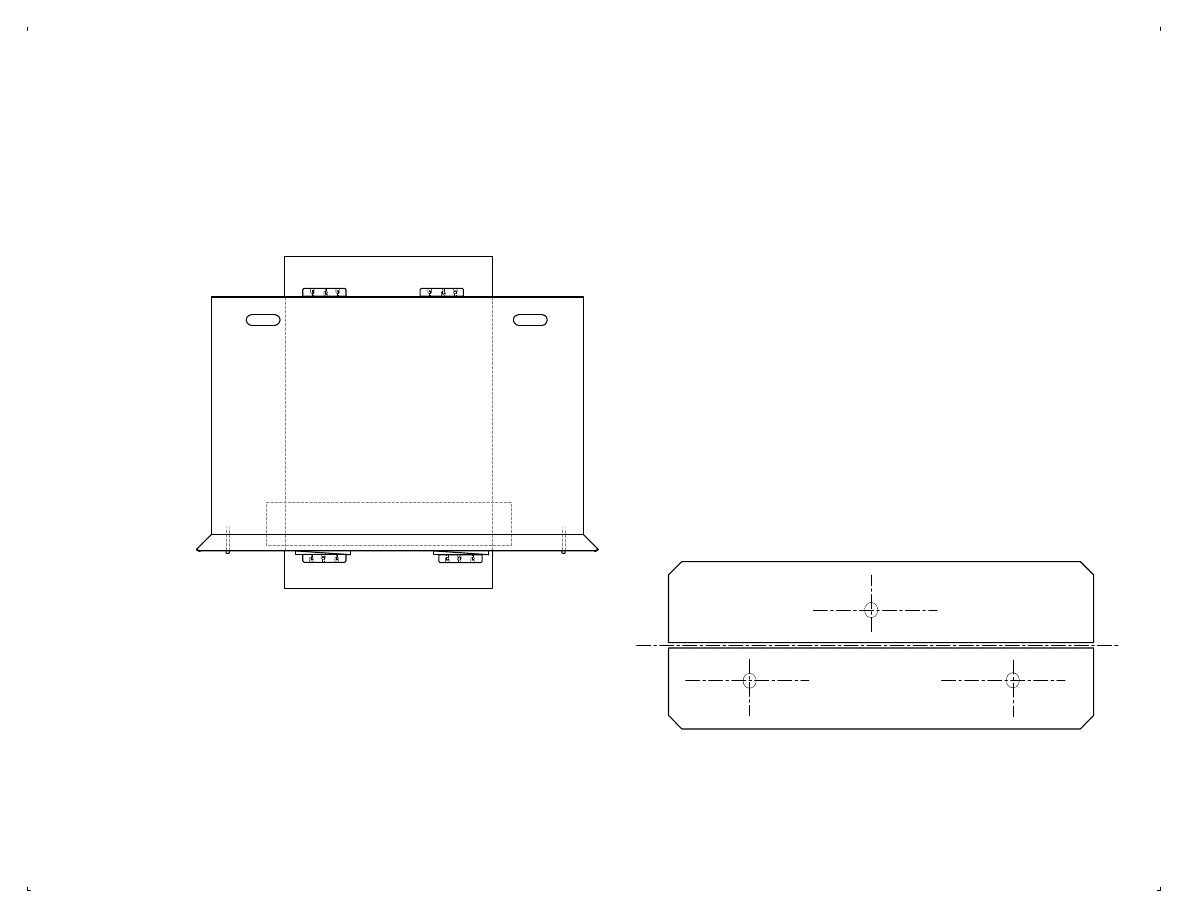
5.
Making Base and Top
The base and top are identical and are shown once drawing in Sketch #3. They consist of a
rectangle of .75 inch plywood with 1.5 inch wide hardwood trim around there edges.
The cable holes are two .75 inch or larger paddle bit holes with the material cut out from
between them with a coping or jig saw. They must be able to pass a connecter at least .75
by 2.5 inches in size. Round all inside edges with a file, rasp, or course sandpaper.
Attaching the trim edges with out special clamps but this takes several steps. You use
plywood scrap, screw blocks, and wooden wedges. Buy a package of wooden wedges
from the home store, they are normally used to install doors.
http://www.charm.net/~jriley/armstu.html (11 of 18)12/03/2005 19:12:13

Woodware Designs -- Armoire Student Computer Desk -- Freebie
Select a large piece of scrap plywood for a work base place it a work table with the long
way away from you (See Sketch #12). Screw (but do not glue) two two blocks in a
straight line along the back edge with the straight faces toward you. Place the bottom
plywood against the blocks.
One end of a piece of hardwood 1-by at a 45 and then carefully match the inside length to
the front edge of the plywood. Mark the length and carefully cut the second 45.
Place the trim piece along the front edge of the bottom plywood and install two screw
blocks .25 inches in front of it. Remove the wood parts and place two layers of newspaper
or thin plastic sheet under the area to be glued. Apply glue to sides of the glue joint and
place the pieces back in the clamping jig. Tap four wedges in between the front screw
blocks and the trim edge. Do not over drive the wedges but a little glue should run from
the joint. Double check the alignment of the from piece. If you have some C clamps or
weights, use them to keep the parts aligned.
Clean up excess glue. Some people like wipe it up with a kitchen sponge and large bucket
of water; others like to let it get gummy (about 20 minutes) and scrape it off.
Set this part aside to dry and take another piece of scrap plywood and repeat the same
operation for the Top.
After the glue has had at least one hour to set, carefully mark the location of the outside
dowels with an awl. Drill pilots hole straight into the trim. Be very careful to drill straight.
Drill out the holes to 5/16 inches and to a depth .75 inches into the plywood edge. Cut
pieces of of dowel 1/4 inch longer than the hole and roughen the outside with a rasp or
saw. Work some glue into the hole and glue the outside of dowel. Tap the dowel into
place.
After the glue has set, remove the piece from the clamps and install the other three
dowels. Turn the piece 90 degrees and set up a long piece of scrap to clamp the edges.
Cut the square edges pieces of the hardwood trim 1/2 inch long so that you can trim the
back ends off exactly flush with the back. Repeat the same glue and doweling process.
After all the glue is dry, remove the pieces from the clamps, clean up glue, trim the sides
at the back, and cut off dowels. Also round the edges and corners of the hardwood with a
block plane, rasp, or course sand paper.
Install the seven screw blocks onto the bottom. The side ones align with the plywood to
hardwood joint. The back ones are set in the exact thickness of the back. Use glue and 1
inch screws.
http://www.charm.net/~jriley/armstu.html (12 of 18)12/03/2005 19:12:13

Woodware Designs -- Armoire Student Computer Desk -- Freebie
Cut and install the front .5 by .75 moulding with brads and glue. Add a short piece in the
middle to mount the latch. Sand the edges off.
Mark and drill the holes for the feet. You may want to counter bore the holes .25 inch.
6.
Back & Sides
Sketch #6 shows the back and side plywood pieces with the screw blocks, glue areas, and
splice pieces. The splices pieces are glued and screwed to the back and sides. The way
these parts overlap is shown is Sketch #3. The screw blocks are set back the exact
thickness of the back plywood and held with one inch #8 screws. This works best if you
assemble all the parts dry (no glue) with only the screws and check the fit. When they are
right, you can then take them apart and glue them back together.
The sides are drilled to take the screws for the monitor and printer shelves. Drill from the
inside and be careful not to drill all the way through the plywood.
You can start the finishing of these parts before final assembly (see 'Finishing' below). If
you do, be careful not to paint the glue areas.
7.
Assemble Bottom Section
Mark out the glue areas and drill pilot holes down through the bottom. Turn the bottom
over and drill out the holes with the #8 Screw Mate.
Dry assemble the bottom, lower back, and two lower sides. Drill out the screw holes with
the Screw Mate and use 1 inch screw in the blocks and 1-1/4 inch screws up from the
bottom. When you are sure it all fits and is square, take it apart and glue it.
Cut the middle hardwood side pieces with a 45 degree bevel. Leave the pieces a little long
on the back. Predrill the piece with the Screw Mate and set the inside 45 exactly at the
front corner. Drill down into the side plywood for two 1-1/4 #8 screws and recheck the
front corner. When it is just right, remove the two screws, apply glue, reinstall those
screws, and drill for three more down and four more from the inside out.
Cut the two short pieces of hardwood trim and leave the square end a little long. Clamp
one in place and drill a hole for the front peg well into the side splice plywood. Apply glue
and insert this peg. Drill and install a second peg from the side. The rest of the side pegs
are just for show and can be only .75 inches long.
After the glue is dry, trim the four pieces of hardwood flush with the back. Take a straight
http://www.charm.net/~jriley/armstu.html (13 of 18)12/03/2005 19:12:13

Woodware Designs -- Armoire Student Computer Desk -- Freebie
edge and press it against the back. Draw a line straight across the hardwood and then bring
it down the outside face with the square. Saw the excess wood off by placing a hand saw
against the plywood. Be careful not to damage the plywood surface too much.
Leave the keyboard shelf construction and installation till later.
8.
Fit Bottom Doors
Drill pilot holes for the hinge screws and install the bottom doors. Place 1/16 inch pieces
of cardboard under them when marking for the screws so they will swing free when
installed.
9.
Monitor and Printer Shelves
Cut the side pieces for the two fixed shelves, round the corners, and drill for mounting
screws. These pieces can be a secondary wood like popular or clear pine as they are to be
painted.
Check the fit of the plywood pieces in the lower section. The top will be the same size.
Attach the support pieces with glue and screws. Sand the back edge to remove any
sharpness as cables pass over it.
You can add pieces of .75 by .5 molding to the front edge if you like.
10.
Assemble Top Section
Dry assemble the top, back, and sides upside down then sit the assembly on the bottom
and secure it with a few screws in the spice pieces. Install the monitor shelf with for #10
round head screws and flat washers. It helps if you file the points off these screws just to
be sure that they do not come anywhere close to breaking thorough to the outside.
You should be sure that the monitor shelf is high enough to clear your keyboard. This
usually requires at least three inches clear. You can set the monitor higher if you like.
11.
Fit Top Doors
Install the top doors. Again use 1/16 inch cardboard spacers to insure that you will have an
even space at the top. You can take the top section off the bottom section to fit the doors if
you like.
12.
Keyboard Shelf
http://www.charm.net/~jriley/armstu.html (14 of 18)12/03/2005 19:12:13

Woodware Designs -- Armoire Student Computer Desk -- Freebie
Install the drawer guides on the side splice pieces. The front of the guides should be 1 inch
inside the Armoire. Put the first screws into the slotted holes to allow adjustments.
Check that the width of the shelf plywood and two side pieces fit the space between the
drawer guides. Attach the side pieces to the plywood with screws, glue, and four screw
blocks.
Install the keyboard tray in the drawer guides with four screws in slotted holes. Custom
cut the hardwood front pieces to have 1/16 inch space on each end and mark where the
shelve comes. Remove the shelve and glue the hardwood on the same way as bottom and
top trim pieces.
Add the two pieces of molding to the keyboard shelf with glue and brads. It helps if you
cut the head off a brad and use it as a drill bit to drill pilot holes for the nails. Be careful
not to touch the molding with the end of the drill chuck. Round off the exposed edges of
this molding with a block plane or sanding block.
13.
Disassemble
Remove the hardware and bag it. Take off the doors, shelves, and legs. Separate the top
and bottom sections.
Sand all parts. Move power sanders very slowly so that they erase their own swirl marks.
Round off all edges. You are ready for finishing.
10.
Finishing
You may finish your desk any way you like. We recommend:
1.
Color Scheme
You can, of course, finish the desk to suit yourself. We recommend a three color
treatment. The all hardwood (trim, legs, and doors) should be stained and varnished so
that it is nearly the golden oak color.
The outside of the sides should be painted a dark color. Classically this is black but dark
blue, green, or even brick red should work well. Use a spit coat and two coats of oil based
enamel. Alternately you could use light color like off white, or cream.
http://www.charm.net/~jriley/armstu.html (15 of 18)12/03/2005 19:12:13

Woodware Designs -- Armoire Student Computer Desk -- Freebie
The inside of the sides, back, bottom, and top, should be painted a light peaceful color like
robin's egg blue. A calm color will reduce stress through hours on the computer.
The tops of the shelves may either match the inside or the outside color. This is your
choice.
2.
Preassembly Finishing Pieces
If you like you can prefinish the back, sides, bottom, top, feet, and shelves before final
assembly. This work is easier to do with everything laid out flat.
Avoid painting over the glue areas although painting just inside the line is good. You will
have to touch up the paint after assembly.
3.
Recommended Finishes
We would like to recommend the following finishing steps:
■
Hardwood and Doors -- sand, stain, prime with 5-to-1 thinned shellac, two coats of
satin finish polyurethane, light sanding between coats.
■
Outside plywood -- Sand, prime with thinned shellac, two coats of oil based paint,
light sanding between coats.
■
Inside plywood -- Fill plywood edges, sand prime with thinned shellac, two coats
of oil based paint, light sanding between coats.
■
Back of Back, Underside of Bottom -- No finish.
You may wish to add a coat of polyurethane over the paint on the exterior of the sides.
4.
Staining
Applying a stain will bring all the hardwood brings all the parts to nearly the same color.
A stain called 'Golden Oak' matched our factory doors. If the doors are prefinished the
they need to fine hand sanded and at least one coat of urethane but they do not need to be
stained. If you trimmed the edges of the doors you will have to stain the fresh wood.
Stain can be applied with a cloth.
5.
Spit Coat
A spit coat made of one part 3-pound shellac to five parts shellac thinner makes a good
wood sealer and primer. Here its use is important in getting the paint to stick and in
http://www.charm.net/~jriley/armstu.html (16 of 18)12/03/2005 19:12:13

Woodware Designs -- Armoire Student Computer Desk -- Freebie
sealing the edge of the plywood.
6.
Plywood Edges
Plywood edges take some effort to seal. The end result should be uniform in texture and
not have holes one place and excess filler another.
First fill all visible holes with glue and wood splinters. Toothpicks work well. Let dry and
sand with course paper over a wooden block. Fill with wood putty (I like the power you
mix with water). Let this dry thoroughly and sand again. Seal with a spit coat. Sand again
and refill. Sand again, seal again, and sand with fine sand paper. In the process you can
round the edges of the plywood a little bit. The edges are now ready to be painted.
For a couple dollars more you can cover the edges of the printer and monitor shelves
with .75 by .5 inch molding. Mount this with glue and finishing nails. There is room for
this molding in the design.
11.
Completion
All that is left is to reassemble the desk, and install the computer cables.
1.
Reassembly
Do not glue the top and bottom sections at the splice. Do not glue on the feet.
When you have the keyboard shelf adjusted just the way you want it, install eight more
screws in round holes in the drawer guides. The guides do not usually come with enough
screws.
Be sure to print your name, the date, and who the desk was for on the back of the piece.
Draw pencil guide lines and print with a indelible marker.
2.
Cabling
for making a remote power switch, and cable tie mounts are given in
. Make up a good number of cable tie mounts and be ready
with mounting screws and tie wraps. The remote power switch is optional but is really
needed with this desk.
http://www.charm.net/~jriley/armstu.html (17 of 18)12/03/2005 19:12:13

Woodware Designs -- Armoire Student Computer Desk -- Freebie
Determine which bottom hole will be closest to the wall outlet. Screw the remote switch
box and surge suppressor to the inside back close to that leg cable hole. Route the switch
cable up to the monitor shelf.
Install a generous number of cable tie mounts to the back where cables will run. You may
also need some at the back of the two upper shelves.
Place each piece of the computer in the Armoire one at a time. Route and connect the
cables. Dress the cables neatly up to the back using tie wraps. Do not pull the tie wraps
too tightly. The cable should be able to slide back-and-forth a little. Trim off all the tie
wrap ends.
You may need a cable tie mount at the back of the keyboard shelf where the cable comes
out of the keyboard. Route the mouse cable over to the same mount and secure them
together. Place a matching mount on the back directly behind this one.
Conclusion
Thanks again for using a Woodware Computer Furniture Plans. We very much want to know how you
are getting along with your project and would be happy to answer any questions by email.
If you send us a picture of your finished desk, we would be happy to put it on our web page. We need
pictures of desk with real people standing beside them.
Woodware Designs, jriley@charm.net
http://www.charm.net/~jriley/armstu.html (18 of 18)12/03/2005 19:12:13
Armoire
Student Desk
2/19/98
Armstu.SKD
Tom Riley
c 1998
Armoire
Student Desk
Open View
Sketch #2
Armoire
Student Desk
Cabinet Doors
Sketch #4
Wall Cabinet Door
Base Cabinet Door
2 Req.
2 Req.
Square Edges
Armoire
Student Desk
Back Lower
Side Upper
Pair Req.
Side Lower
Pair Req.
Back Upper
Back & Side
Sketch #6
Back Glue Area
Back Glue Area
(Adjust for Upper Door Height)
(Adjust for Lower Door Height)
(Adjust for Door Width)
(Adjust for Upper Door Height)
(Adjust for Lower Door Height)
Armoire
Student Desk
Top & Bottom
2 Req.
Keyboard Tray
Top View with Upper Section Off
Top Views
Sketch #3
Cable Holes
Glue Blocks
Side View
Side View
Glue Area
Ball Foot
Drawer Guide
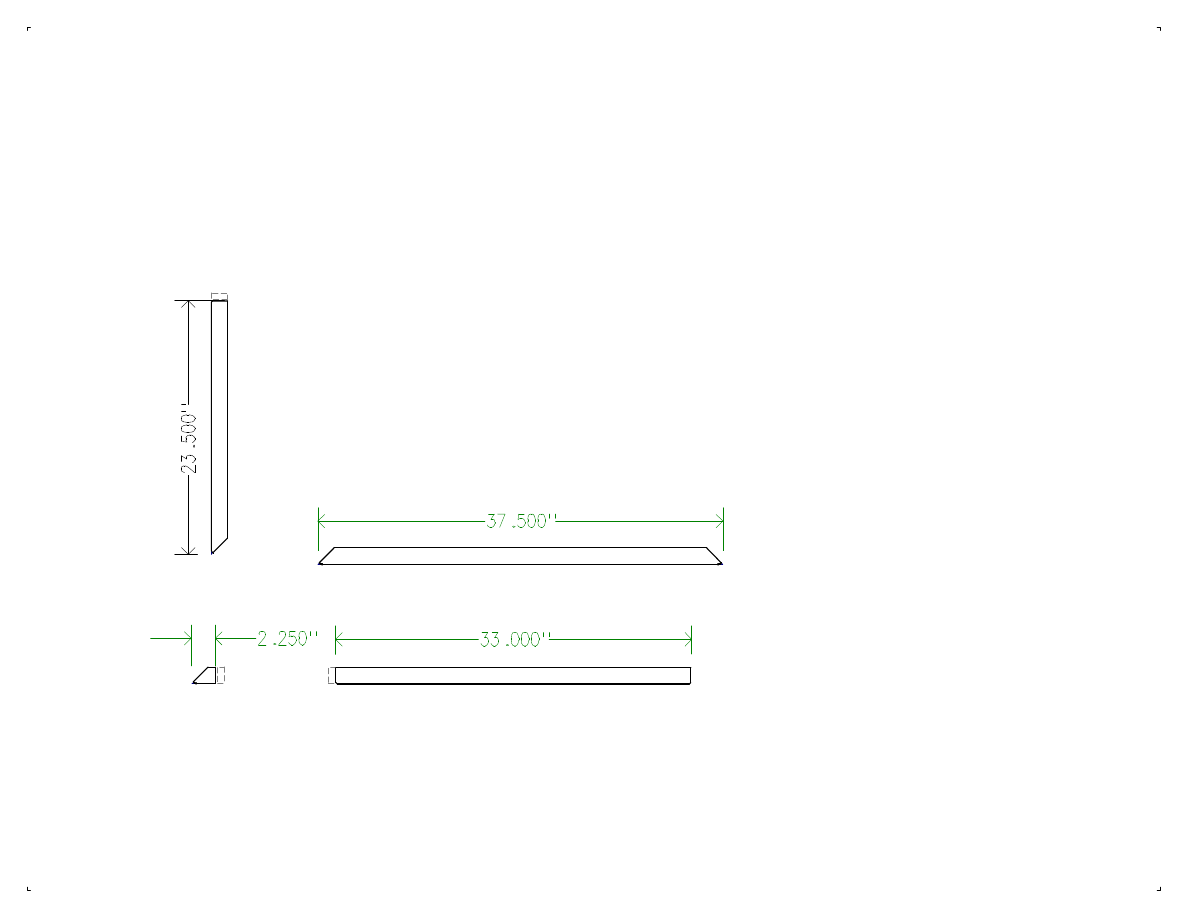
Pieces
Sketch #5
Front Edges
2 Req.
Keyboard Front Edge
Side Edge
6 Req.
Keyboard Corner
2 Req.
All pieces are .75 by 1.5 hardwood
Angles are 45 degrees
Cut Long and Trim
Armoire
Student Desk
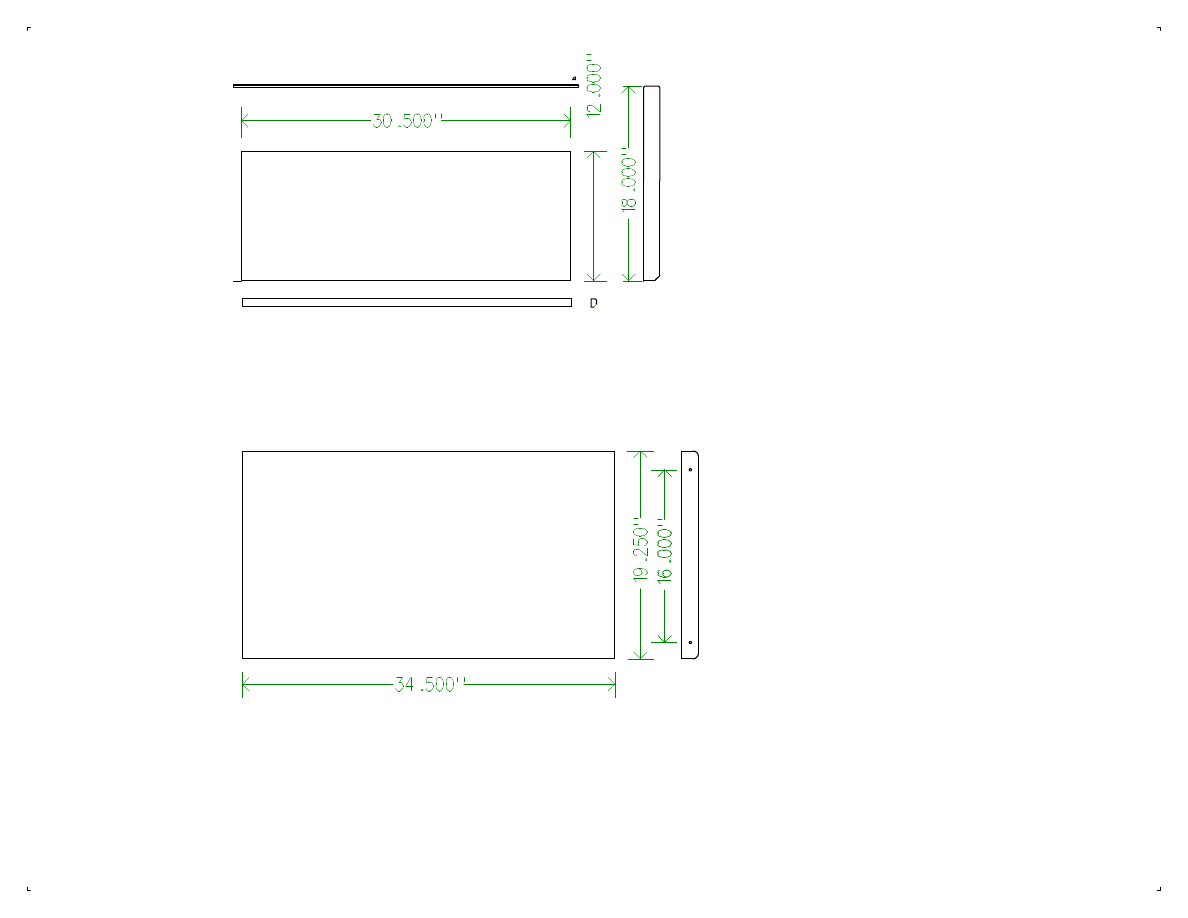
Shelves
Sketch #7
Monitor & Printer Shelves
.75 inch Plywood
2 Req.
Keyboard Tray
.25 Quarter Round
.5 by .75 Molding
Runner
2 Req.
.75 Plywood
Armoire
Student Desk
Support
4 Req.
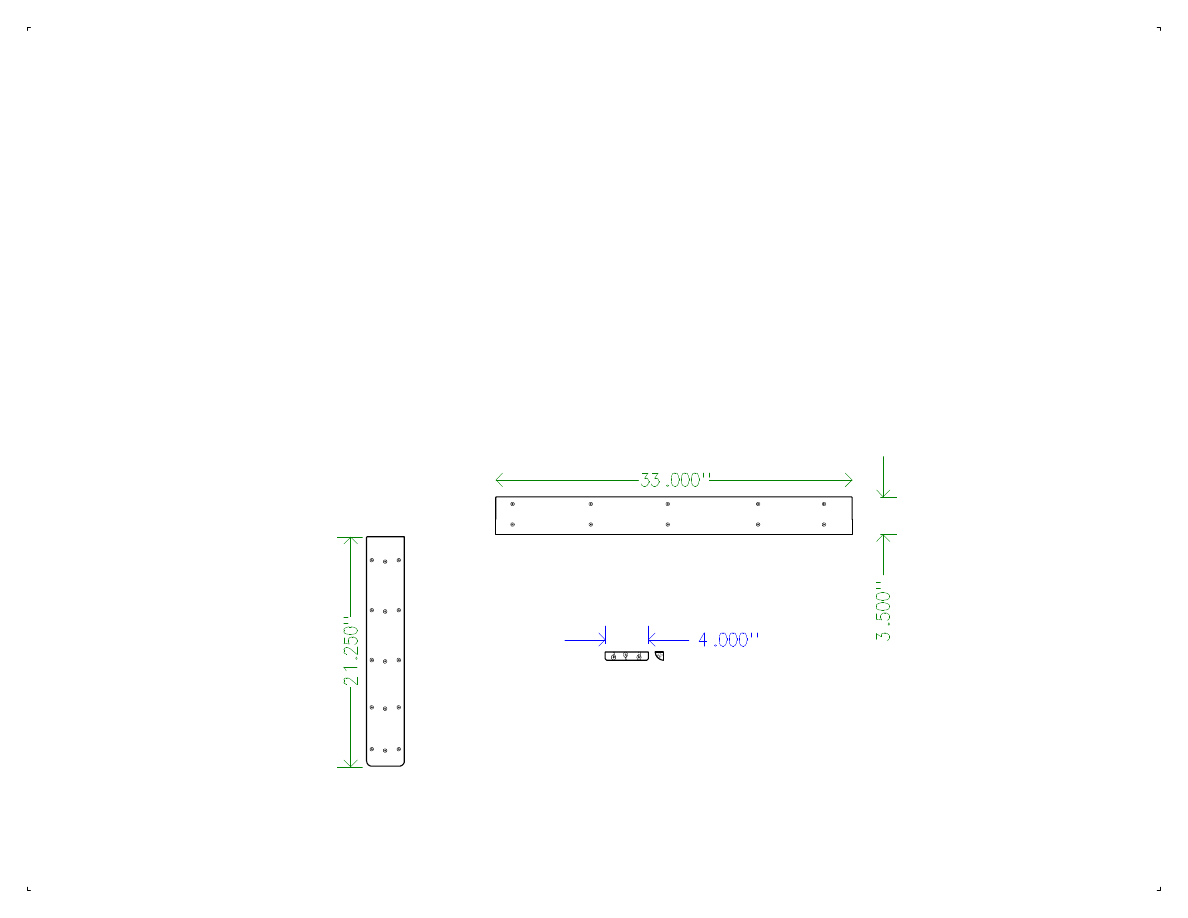
Armoire
Student Desk
Back Splice
Side Splice
2 Req.
Screw Block
30 Req.
Miscellaneous
Sketch # 8
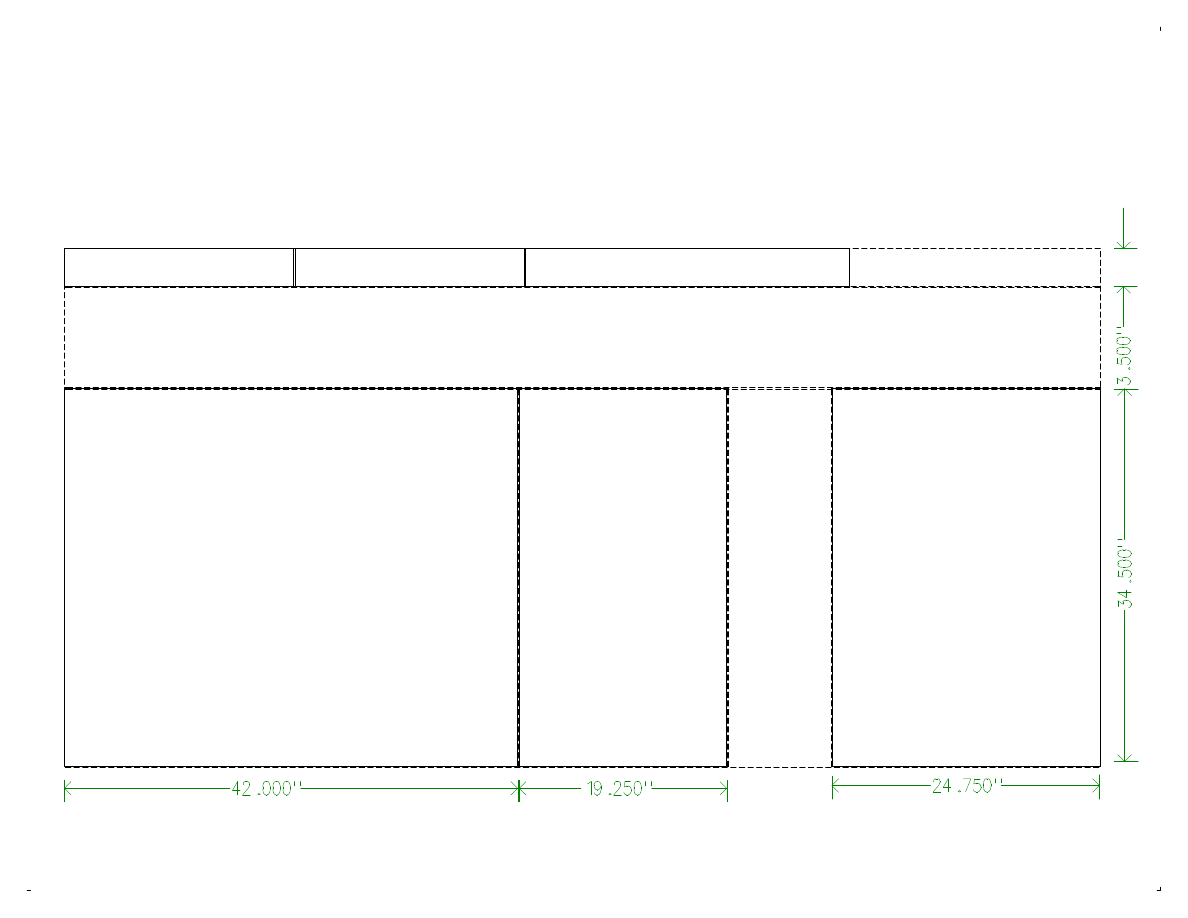
Armoire Student Desk
Plywood Layout #1
Back Upper Section
Lower Section of Back
Monitor Shelf
Sketch #9
Cut #1
Cut #2
Cut #3
Cut #4
Cut #5
Side Splice
Side Splice
Back Splice
(Adjust to Upper Door Height)
(Adjust to Lower Door Height)
(Adjust to door width)
Armoire Student Desk
Bottom
Top
Printer Shelf
Keyboard Tray
Cut #1
Cut #2
Cut #3
Cut #4
Cut #5
Cut #6
Plywood Layout #2
Sketch #10
(Adjust to Door Width)
(Adjust to Door Width)
(Adjust to Door Width)
(Adjust to Door Width)
Armoire Student Desk
Side, Upper Section
Side, Upper Section
Side, Lower Section
Side, Lower Section
Plywood Layout #3
Sketch #11
Cut #1
Cut #2
Cut #3
Cut #4
Cut #5
Cut #6
(Adjust to Upper Door Height)
(Adjust to Lower Door Height)
Armoire
Student Desk
Clamping Jig
Patterns & Jigs
Sketch #12
Screw Block Pattern
Wedges
Newspaper
Fold
Fold
Bottom
Fold
Fold
Document Outline
Wyszukiwarka
Podobne podstrony:
Desk Armoire Student Computer Desk
Desk Student Desk
2010 ZMP studenci
gruźlica dla studentów2
Prezentacja 2 analiza akcji zadania dla studentow
Szkolenie BHP Nowa studenci
Student Geneza
Kosci, kregoslup 28[1][1][1] 10 06 dla studentow
higiena dla studentów 2011 dr I Kosinska
Studenci biegunka przewlekła'
WYKŁAD STUDENCI MIKULICZ
Wyklad FP II dla studenta
Inwolucja połogowa i opieka poporodowa studenci V rok wam 5
Materiały dla studentów ENDOKRYNOLOGIA
więcej podobnych podstron