
125
In This Chapter
9
Working with 2D Hide and
2D Steel Shapes
In this tutorial, you learn about the new features in
AutoCAD
®
Mechanical 6 for defining the 2D hide
situations, and how to work with 2D steel shapes.
■
Defining a 2D hide situation
■
Inserting a 2D steel shape
■
Modifying steel shapes using
power commands
■
Editing a 2D hide situation
■
Copying and moving a 2D hide
situation

126
|
Chapter 9
Working with 2D Hide and 2D Steel Shapes
Key Terms
Term
Definition
background
A contour that is covered by another contour or by objects that are lying behind
another contour, in the 3D sense. A background may be a foreground for an
additional contour.
foreground
Objects which are lying in front of another contour in the 3D sense. A foreground
may also be a background for an additional contour.
hidden line
Line that is not visible in a specified view. For example, in a front view, lines
behind the front plane would not be visible.
steel shapes
Steel shapes are standardized steel geometries and profiles, which are used for
steel- and plant construction.

Working with 2D Hide and 2D Steel Shapes
|
127
Working with 2D Hide and 2D Steel Shapes
Open the initial drawing.
To open a drawing
1
Open the file tut_ex09 in the acadm\tutorial folder.
Menu
File ➤ Open
Command
OPEN
2
Zoom in to the chain drive on the right.
Menu
View ➤ Zoom ➤ Window
Command
ZOOM
128
|
Chapter 9
Working with 2D Hide and 2D Steel Shapes
Defining a 2D Hide Situation
Now you define a 2D hide situation. You can define foreground and back-
ground contours as well as the settings for the representation of the hidden
objects.
To define a 2D hide situation
1
Start the Hide Invisible Edges command.
Menu
Modify ➤ 2D Hide ➤ Hide Invisible Edges
Command
AM2DHIDE
2
Respond to the prompts as follows:
Select objects for foreground:
Select the chain
Select objects for foreground:
Press
ENTER
3
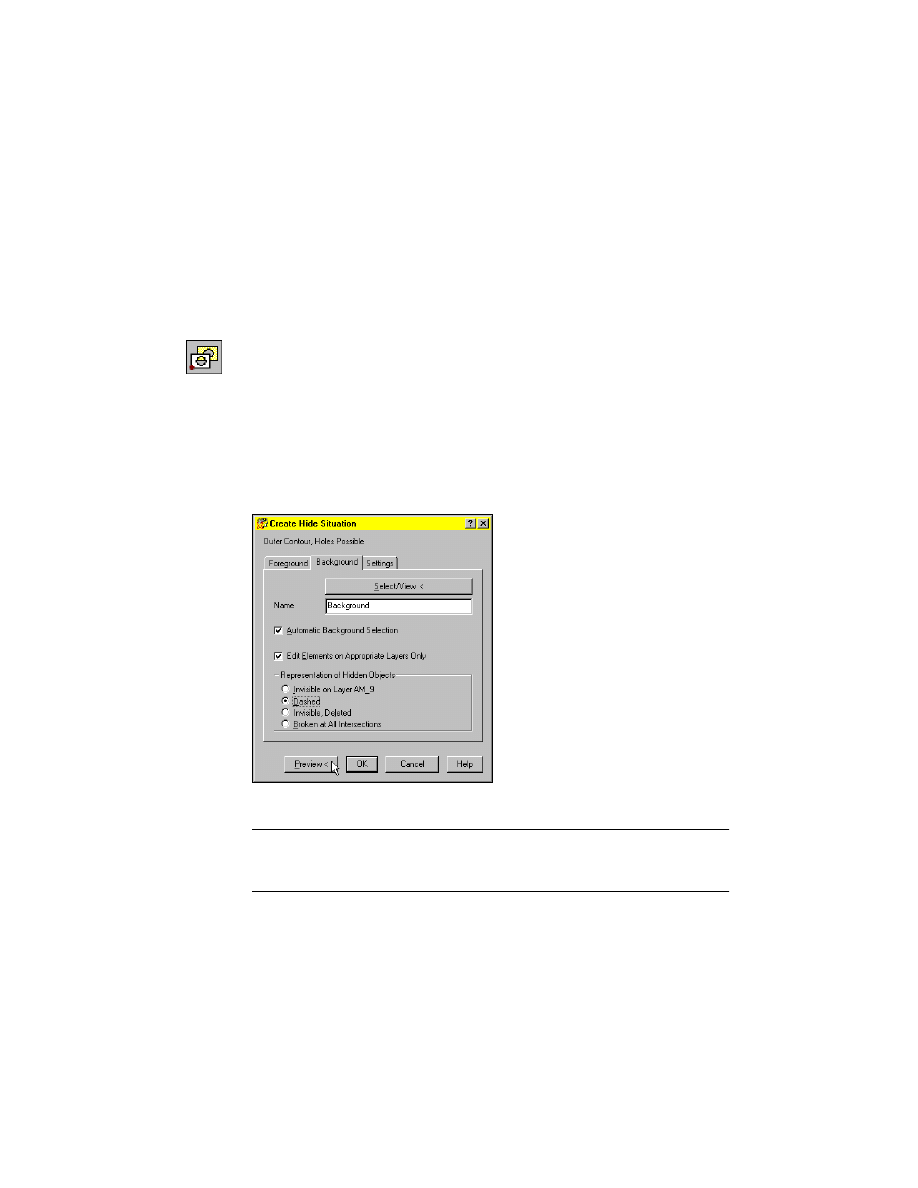
In the Create Hide Situation dialog, specify:
Representation of Hidden Objects:
Dashed
4
In the Select a Steel Shape dialog, choose Preview <.
NOTE
As you can see, the parts of the sprockets, which should be visible, are
dashed, too. This shows that the complete area inside the outer chain contour is
defined as foreground.
Now, define the 2D hide situation in a way that the chain has an inner con-
tour.
Working with 2D Hide and 2D Steel Shapes
|
129
5
Continue to respond to the prompts as follows:
Accept preview and exit command [Yes/No] <Yes>:
Enter N
6
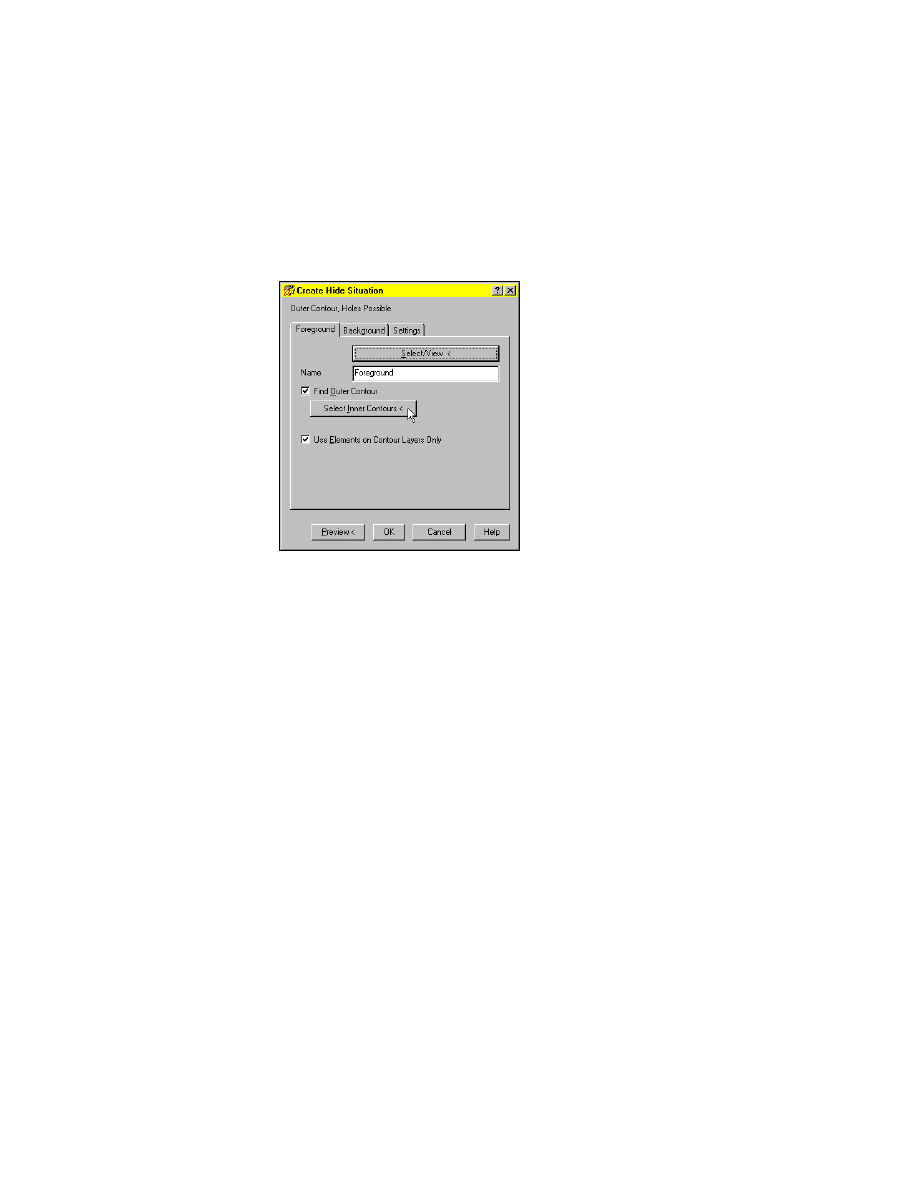
In the Create Hide Situation dialog, activate the Foreground tab and choose
Select Inner Contours <.
7
Respond to the prompts as follows:
Select point inside a hole or select a loop to remove:
Select a point inside the
chain
The inner contour of the chain is displayed green.
8
Continue to respond to the prompts as follows:
Select point inside a hole or select a loop to remove:
Press
ENTER
9
In the Select a Steel Shape dialog, choose Preview <.
Now, the chain drive is displayed correctly.

130
|
Chapter 9
Working with 2D Hide and 2D Steel Shapes
10
Respond to the prompts as follows:
Accept preview and exit command [Yes/No] <Yes>:
Press
ENTER
Your 2D hide situation is defined correctly and you can proceed with your
drawing.
Save the file.
Inserting a 2D Steel Shape
Steel Shapes can easily be inserted through a selection dialog, where you can
define the standard, profile, size and length of the steel shape.
Now, insert a steel shape with a square hollow section on the left edge of the
I-shaped girder.
To insert a 2D steel shape
1
Start the Zoom All command.
Menu
View ➤ Zoom ➤ All
Command
ZOOM
2
Start the Steel Shape command.
Menu
Content ➤ Steel Shapes
Command
AMSTLSHAP2D

Working with 2D Hide and 2D Steel Shapes
|
131
3
In the Select a Steel Shape dialog select Square / Rectangular hollow section.
4
Select IS 7630 and Top View.
5
Respond to the prompts as follows:
Specify insertion point:
Select point P1
Specify rotation angle <0>:
Press
ENTER

132
|
Chapter 9
Working with 2D Hide and 2D Steel Shapes
6
In the ISO 657/14 - 1982 (Rectangular) - Size Selection dialog, specify:
Select a Size:
90x90x4.0
7
Choose Finish.
8
Respond to the prompts as follows:
Drag Size:
Select point P2
The steel shape is inserted. Your drawing looks like this:
Save the file.
Now, modify the steel shapes using the Power Commands.

Working with 2D Hide and 2D Steel Shapes
|
133
Modifying Steel Shapes using Power Commands
With the Power Commands, you can create different views of the steel shapes
as well as you are able to copy, multiply or edit the steel shapes.
Now, insert the steel shapes in the top view of the assembly using Power View
and Power Copy.
To modify a steel shape using Power Commands
1
Start the Power View command.
Menu
Modify ➤ Power Commands ➤ Power View
Command
AMPOWERVIEW
2
Select the previously inserted steel shape.
3
In the Select new view dialog select the Front View.
4
Respond to the prompts as follows:
Specify insertion point:
Select point P3
Specify rotation angle <0>:
180
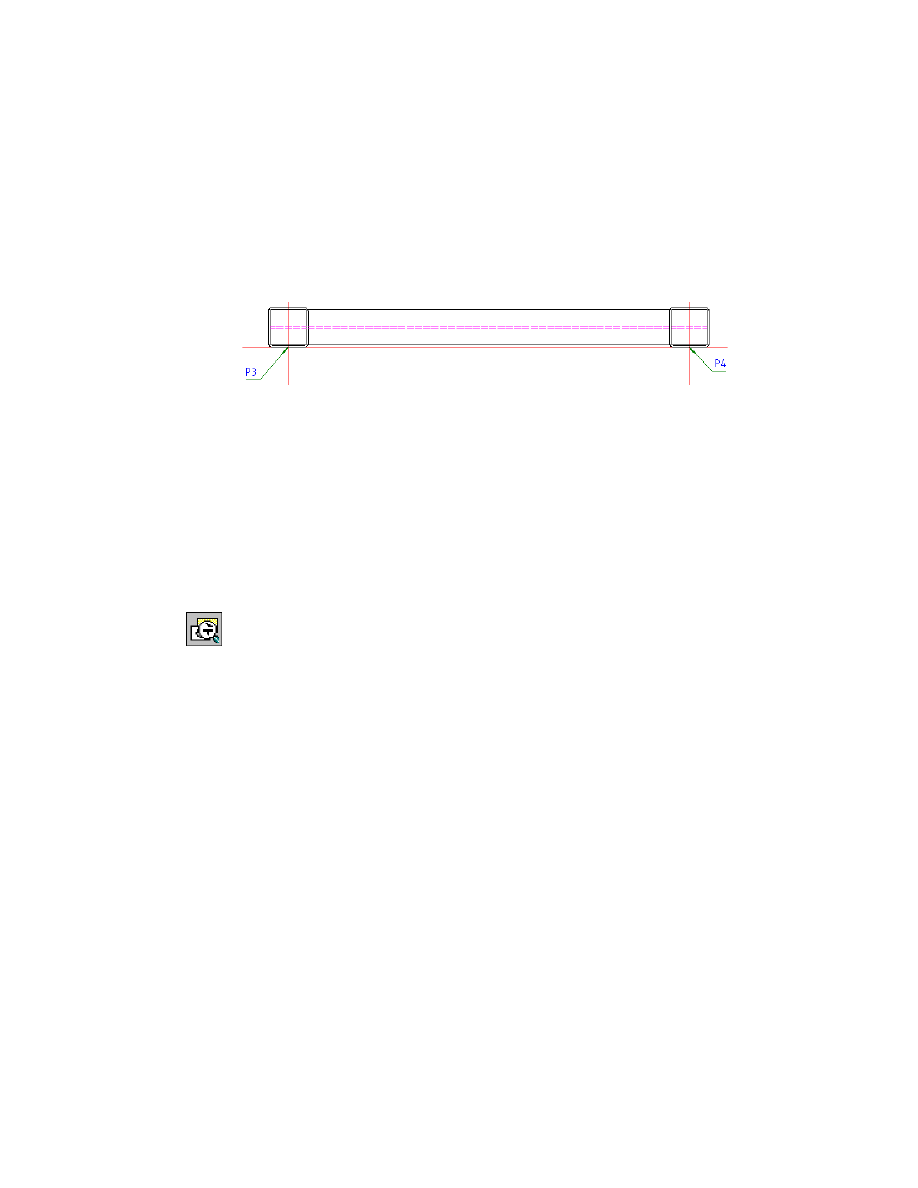
The steel shape is inserted in the top view of the assembly. Your drawing
looks like this:
NOTE
A 2D hide situation will be generated automatically when inserting the
steel shape.
Now, copy the previously inserted view to the other edge of the girder.
5
Start the Power Copy command.
Menu
Modify ➤ Power Commands ➤ Power Copy
Command
AMPOWERCOPY
134
|
Chapter 9
Working with 2D Hide and 2D Steel Shapes
6
Respond to the prompts as follows:
Select object:
Select the previously inserted steel shape at point P3
Specify insertion point:
Select point P4
Specify rotation angle <0>:
180
The steel shape is copied. Your drawing looks like this:
Save your file.
Editing a 2D Hide Situation
The insertion of the steel shapes in the top view of the assembly has created
a 2D hide situation automatically. As you can see, this 2D hide situation is
not correct.
Now, edit the 2D hide situation.
To edit a 2D hide situation
1
Start the Edit Hidden Edges command.
Menu
Modify ➤ 2D Hide ➤ Edit Hidden Edges
Command
AM2DHIDEDIT
2
Respond to the prompts as follows:
Edit the behind situation [modifY/Move/Restore/Genius12] <Update>:
Y
Select objects:
Select the square hollow section on the left
Select objects:
Press
ENTER
Working with 2D Hide and 2D Steel Shapes
|
135
3
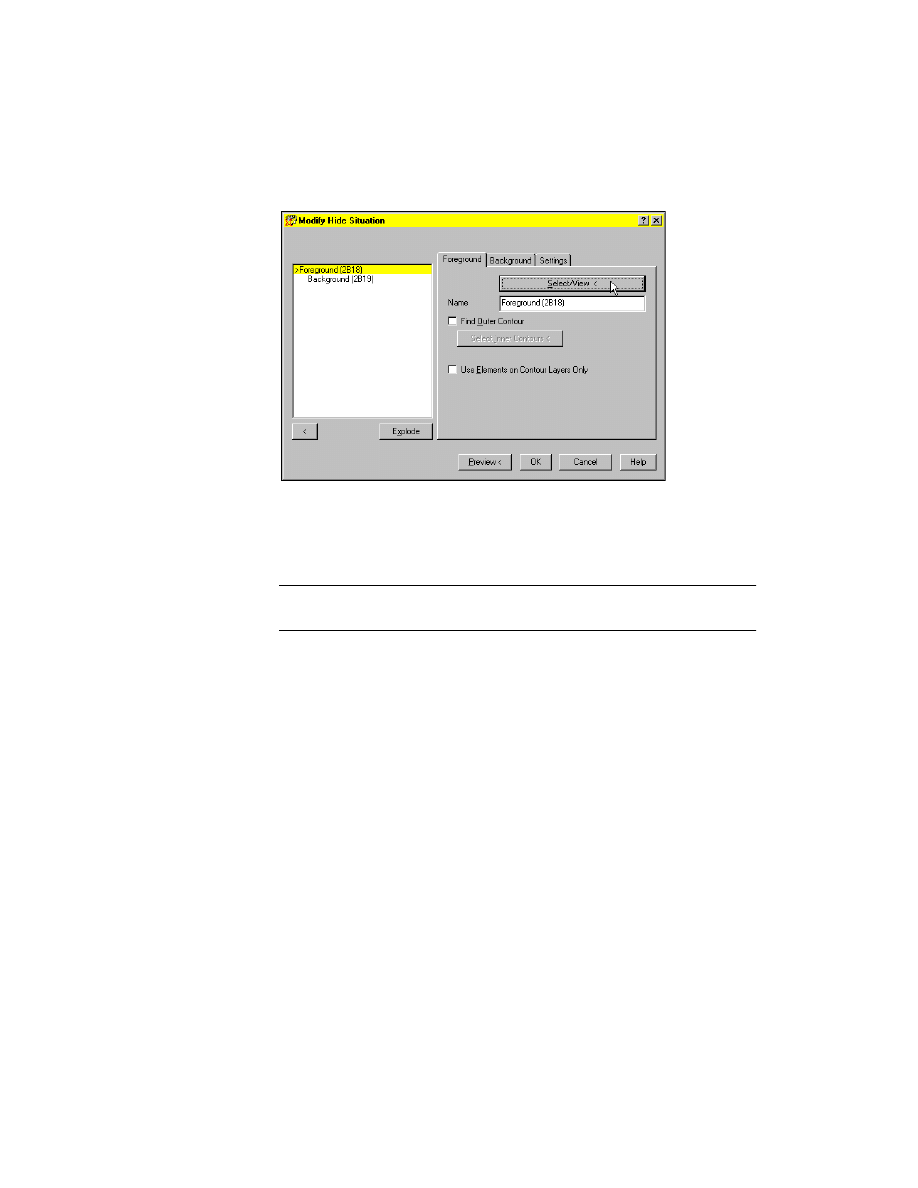
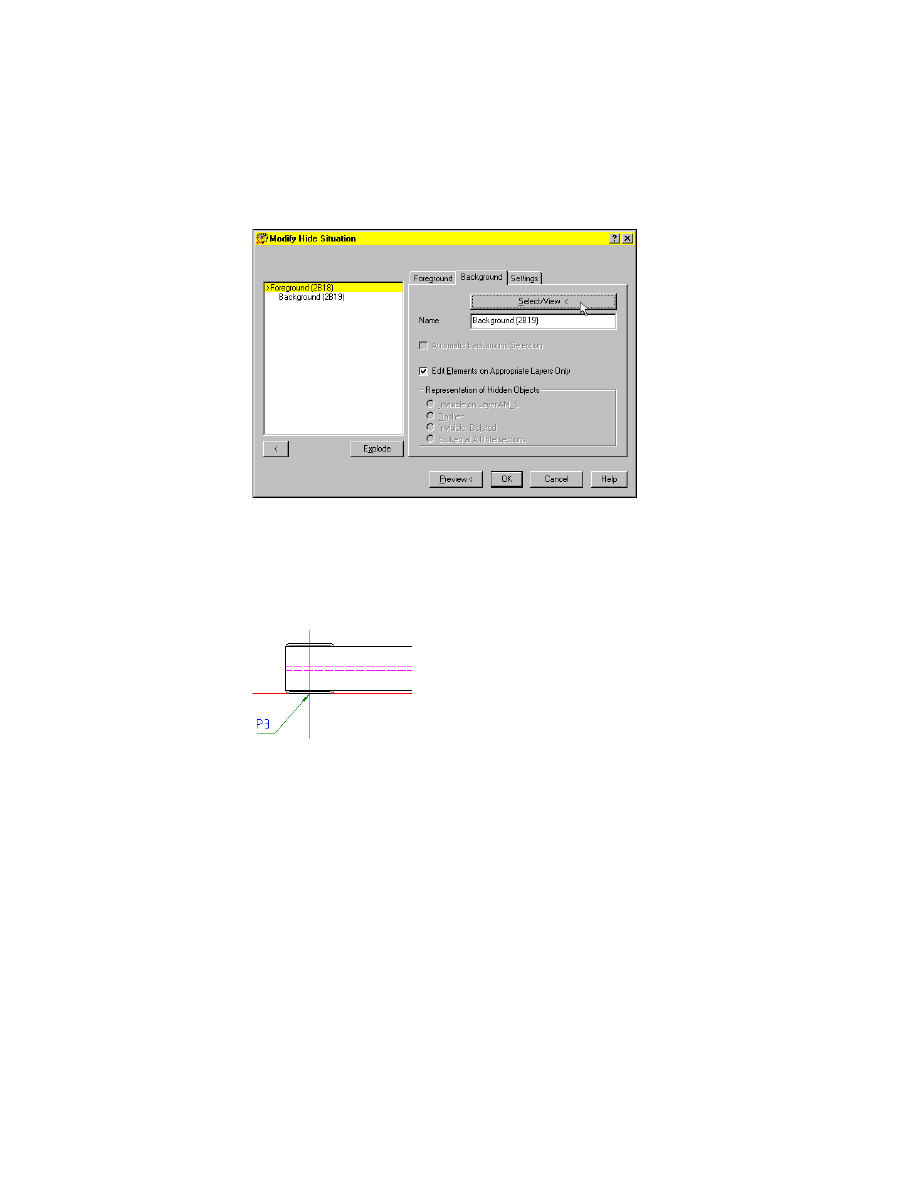
In the Modify Hide Situation dialog, choose Select View.
4
Respond to the prompts as follows:
Select objects for foreground:
Select the I-shaped girder
Select objects for foreground:
Deselect the square hollow section on the left
Select objects for foreground:
Press
ENTER
NOTE
You can deselect a selected part by holding the
SHIFT
key while clicking
the part.
136
|
Chapter 9
Working with 2D Hide and 2D Steel Shapes
5
In the Modify Hide Situation dialog, activate the Background tab, and choose
Select View < .
6
Respond to the prompts as follows:
Select objects for background:
Select the square hollow section on the left
Select objects for background:
Press
ENTER
7
In the Modify Hide Situation dialog, choose Preview < .
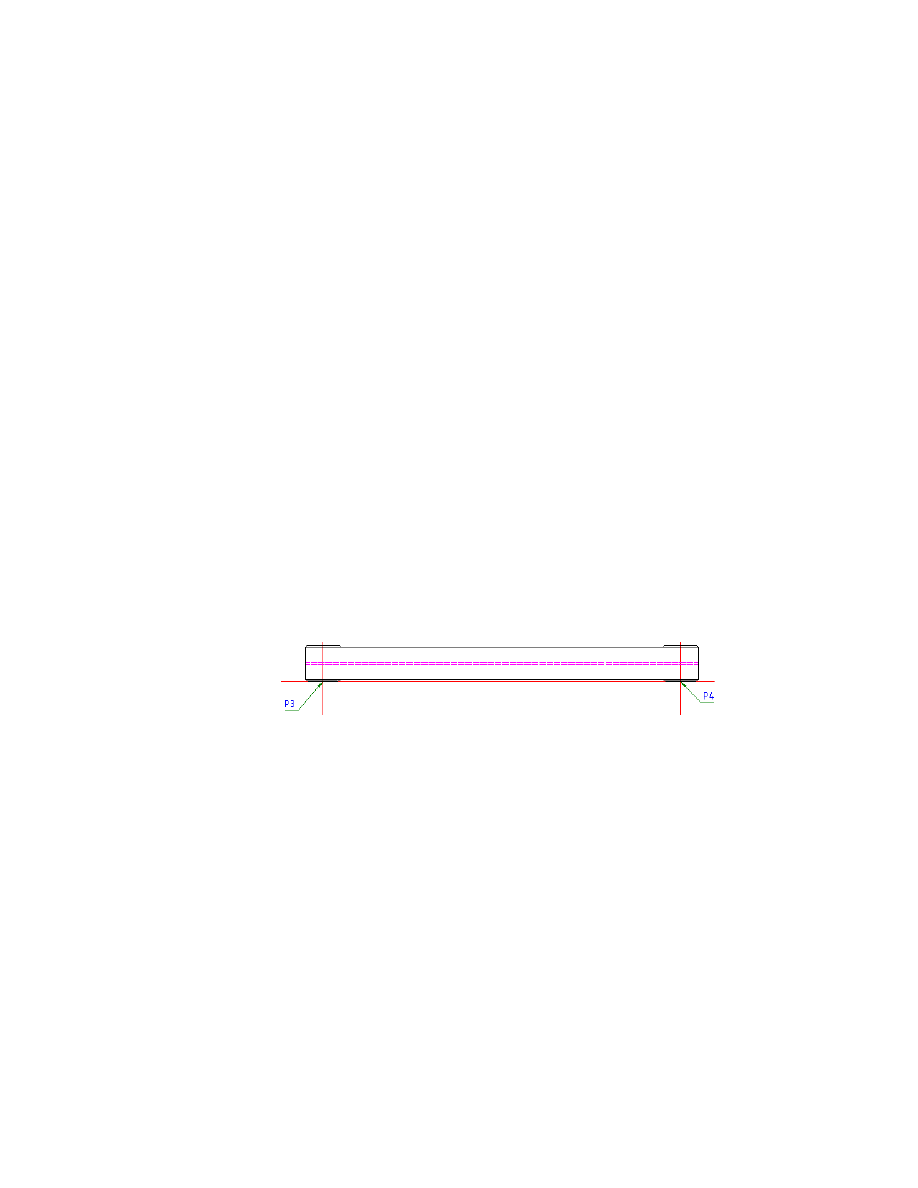
Now, the 2D hide situation is correct. Your drawing looks like this:
Select objects for foreground:
Press
ENTER
8
Respond to the prompts as follows:
Accept preview and exit command [Yes/No] <Yes>:
Press
ENTER
Now, edit the 2D hide situation of the right edge of the girder. The Edit Hidden
Edges command is still active.
Working with 2D Hide and 2D Steel Shapes
|
137
9
Respond to the prompts as follows:
Edit the behind situation [modifY/Move/Restore/Genius12] <Update>:
Y
Select objects:
Select the square hollow section on the right
Select objects:
Press
ENTER
10
In the Modify Hide Situation dialog, choose Select View < .
11
Respond to the prompts as follows:
Select objects for foreground:
Select the I-shaped girder
Select objects for foreground:
Deselect the square hollow section on the right
Select objects for foreground:
Press
ENTER
12
In the Modify Hide Situation dialog, activate the Background tab, and choose
Select View < .
13
Respond to the prompts as follows:
Select objects for background:
Select the square hollow section on the right
Select objects for background:
Press
ENTER
14
In the Modify Hide Situation dialog, choose Preview < .
The 2D hide situation on the right is now correct, too.
15
Respond to the prompts as follows:
Accept preview and exit command [Yes/No] <Yes>:
Press
ENTER
16
Press
ESC
to leave the command.
Your drawing looks like this:
Save your file.
Copying and Moving a 2D Hide Situation
If you copy or move assemblies which contain 2D hide situations, the 2D
hide information will not be lost.
Now, copy the girder assembly.
To copy a 2D hide situation
1
Select the I-shaped girder and the two square hollow sections.
2
Right-click and choose Copy with Base Point from the context menu.
138
|
Chapter 9
Working with 2D Hide and 2D Steel Shapes
3
Respond to the prompts as follows:
Specify base point:
Select point P3
4
Right-click and choose Paste from the context menu.
5
Respond to the prompts as follows:
Specify insertion point:
Select point P5
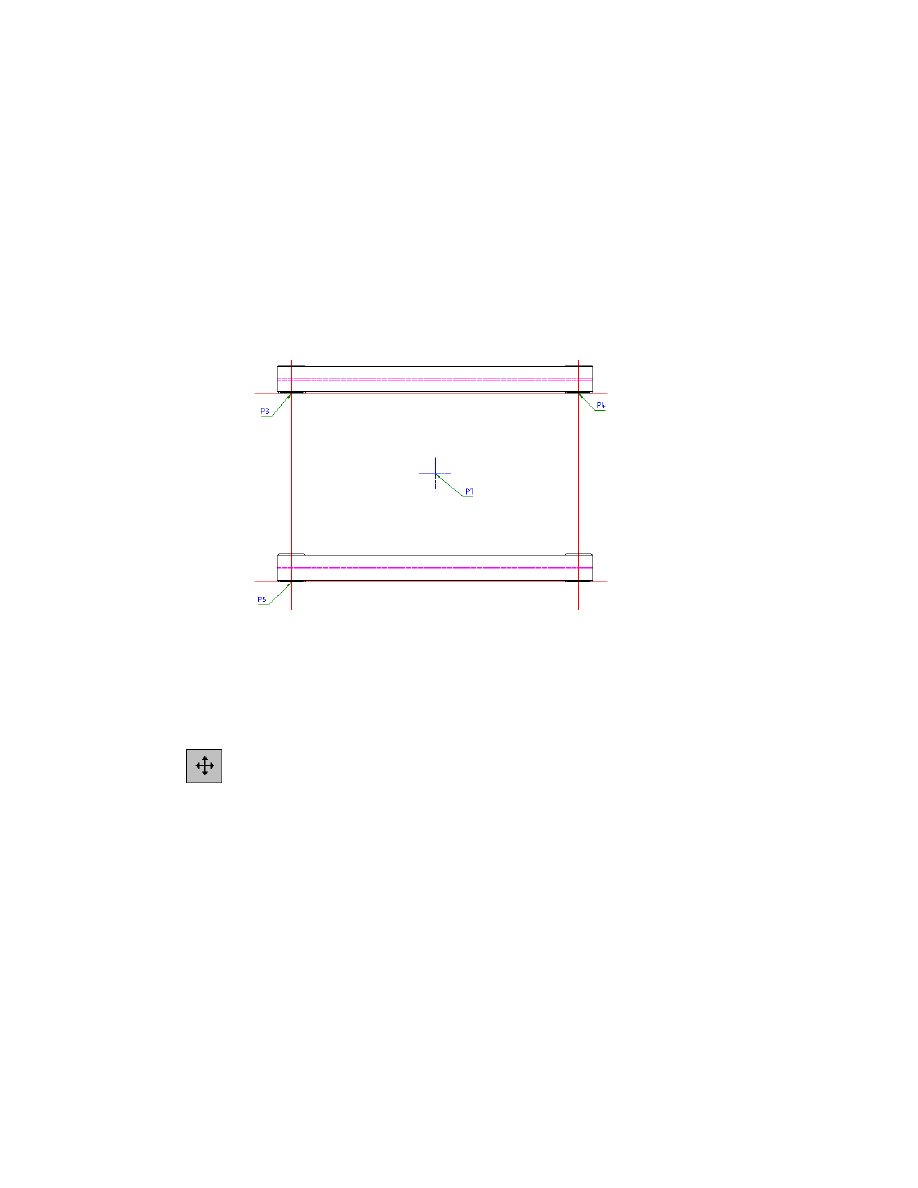
The girder assembly is copied to the new location. Your drawing looks like
this:
Save your file.
Now, move the chain drive from the beginning of the chapter to the top view
of the assembly.
To move a 2D hide situation
1
Start the Move command.
Menu
Modify ➤ Move
Command
MOVE
2
Respond to the prompts as follows:
Select objects:
Select the complete chain drive using a window
Select objects:
Press
ENTER
Specify base point or displacement:
Select point P6
Specify second point of displacement or <use first point as displacement>:
Select point P7

Working with 2D Hide and 2D Steel Shapes
|
139
The complete chain drive is moved to the top view of the assembly. Your
drawing looks like this:
Finally, you have to define the 2D hide situation for the girder assembly and
the chain drive.
To define a 2D hide situation
1
Start the Hide Invisible Edges command.
Menu
Modify ➤ 2D Hide ➤ Hide Invisible Edges
Command
AM2DHIDE
2
Respond to the prompts as follows:
Select objects for foreground:
Select the complete chain drive
Select objects for foreground:
Press
ENTER
140
|
Chapter 9
Working with 2D Hide and 2D Steel Shapes
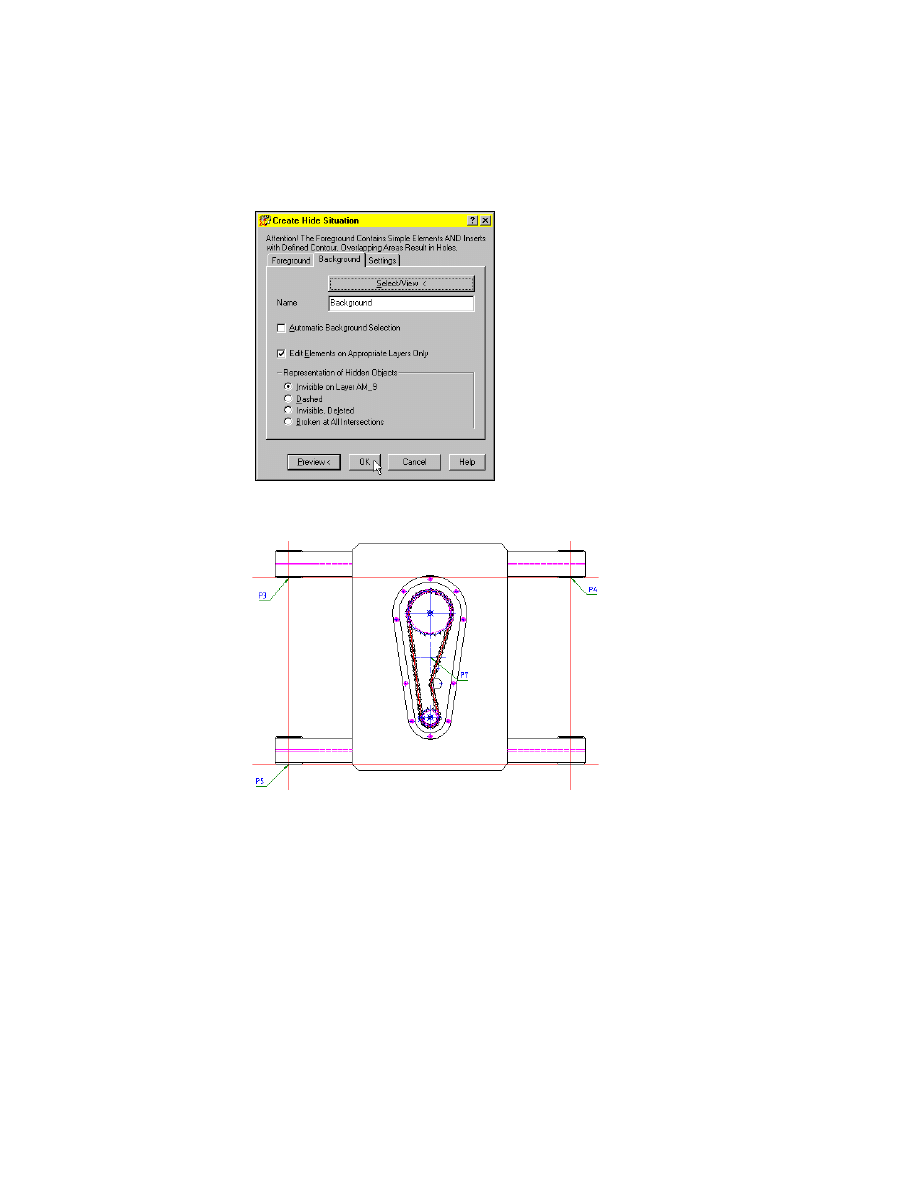
3
In the Create Hide Situation dialog, choose OK.
Now, the girder assembly is hidden by the chain drive. Your drawing looks
like this:
This is the end of this exercise.
Save your file.
Wyszukiwarka
Podobne podstrony:
Ch9 2D Hide & 2D Steel Shapes
Ch09 2D Hide & 2D Steel Shapes
Ch09 2D Hide & 2D Steel Shapes
2d 3 6 Nieznany (2)
2D ZŁOŻENIOWY A3
cw 2d kanalizacja przewody kanalizacyjne PRZEWODY
Kolokwium 1 zestaw 2D
Coupe, 2d , 2006 2010
2d-15.09, AWF, konspekty
Coupe, 2d , 2002 2006
Matematyka Dyskretna Test 2d
Wykład XIII Zadania brzegowe 2D, Wykład XIII
GRAFIKA INZYNIERSKA JAK RYSOWAC 2D
Nowy folder (3), 2d-15.09, Scenariusz lekcji wychowania fizycznego
Cw4 - Belka 2D, Nowy Dokument programu Microsoft Word
2D Analysis of an Aluminum Bracket
2d
2d 7 5
KCZ2wykład 2d
więcej podobnych podstron