2009 ACCESSORIES & EQUIPMENT
Power Seats, Third Row - Service Information - Grand Caravan, Town & Country
DESCRIPTION
DESCRIPTION
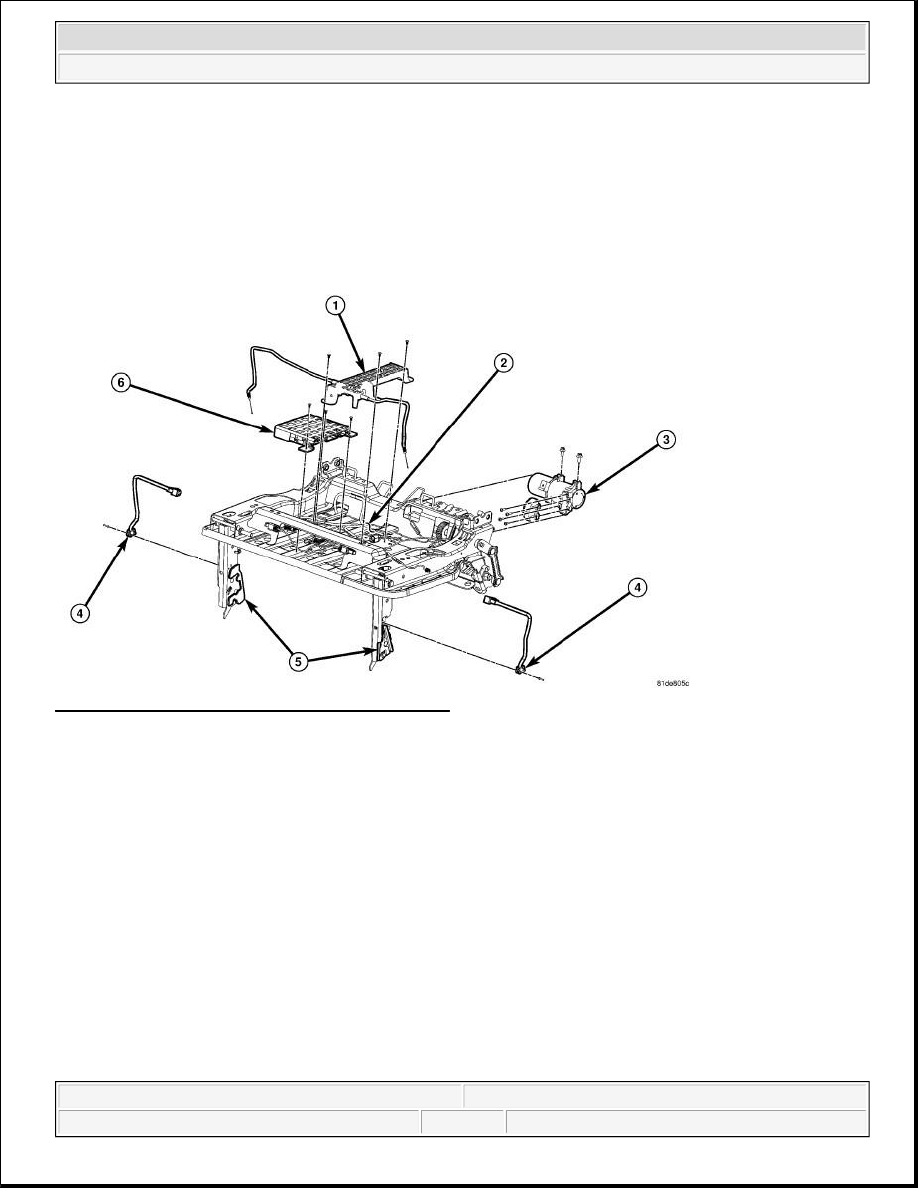
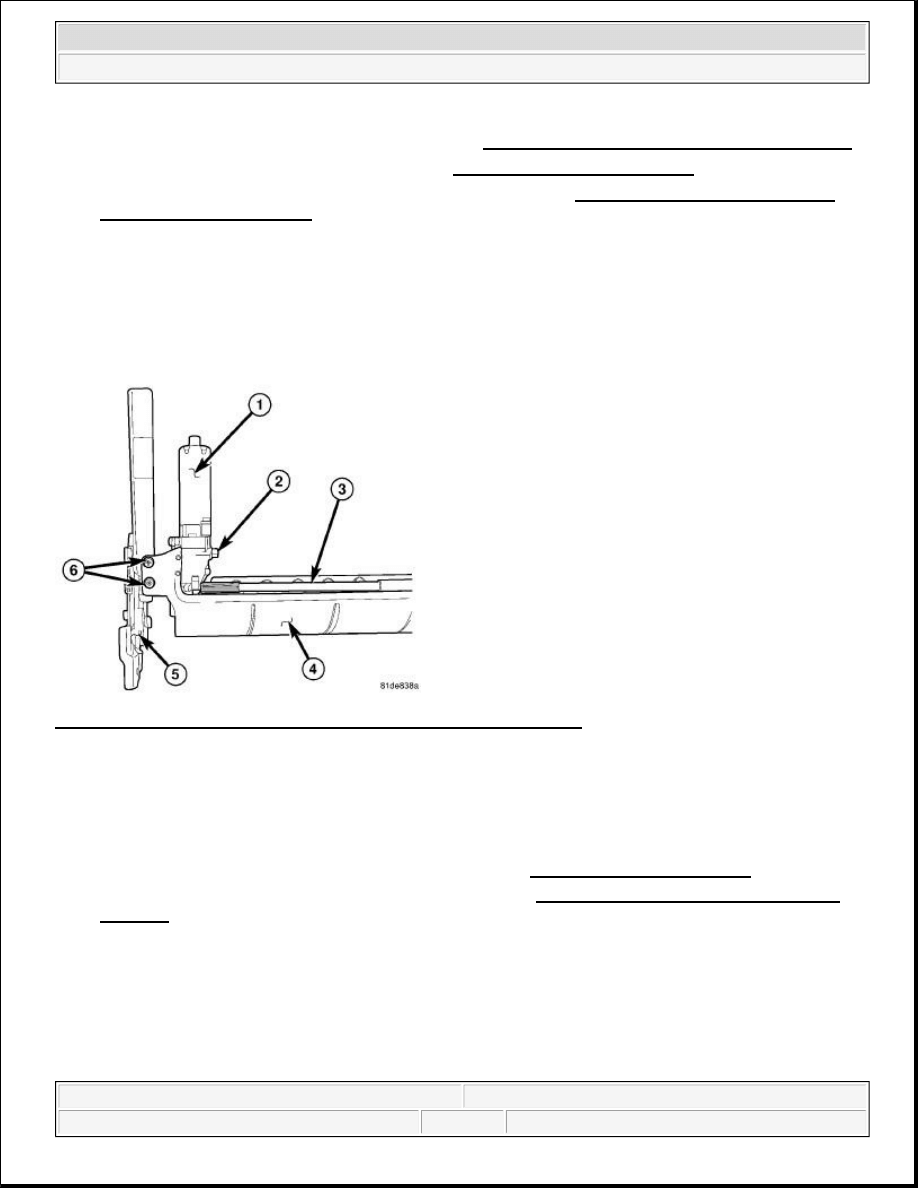
Fig. 1: Power Folding Third Row Seat Components
Courtesy of CHRYSLER LLC
A power folding third row seat is available on some models. The seat configuration is that of a 60/40 split bench
seat.
The power folding seat offers convenient one-touch operation. Pressing a button on the D-pillar switch once
moves the power folding seat into the desired position, allowing the operator the freedom to walk away. The left
and right seats can be folded individually or together as desired.
The power folding third row seat adjusts to the following positions using the switches in left-side D-pillar:
Open seats to normal position
Stow seats in floor
Fold seatbacks flat
Tilt seats for tailgate mode
Both seat backs can be adjusted individually for occupant comfort. This is accomplished with a field effect type
2009 Dodge Grand Caravan SE
2009 ACCESSORIES & EQUIPMENT Power Seats, Third Row - Service Information - Grand Caravan, Town & Country
2009 Dodge Grand Caravan SE
2009 ACCESSORIES & EQUIPMENT Power Seats, Third Row - Service Information - Grand Caravan, Town & Country
steve
Monday, May 23, 2011 2:13:15 PM
Page 1
© 2006 Mitchell Repair Information Company, LLC.
steve
Monday, May 23, 2011 2:13:18 PM
Page 1
© 2006 Mitchell Repair Information Company, LLC.

recliner switch that is located in each outboard seat cushion cover.
The major components of the power folding third row seat are:
The seat leg latch release actuator and cable assembly (1)
The seat frame assembly (2)
The stow motor assembly (3)
The seat leg latch actuator position switches (4)
The seat leg assemblies that include the latches and cable mounting hardware (5)
The power folding third row seat control module (6)
OPERATION
OPERATION
The third row folding seat system receives battery voltage from a 40 amp fuse in the Totally Integrated Power
Module (TIPM). Power is supplied to the system in any key position except START. If the Folding Seat
Module (FSM) detects that the key is in the START position, it will stop seat motor operation. The FSM will
hold the seat in its current position until the engine crank event has completed and then continue the requested
movement to completion.
The FSM uses inputs from the recliner switches, D-pillar seat switch which includes the seat selector and seat
mode switches, the Controller Area Network (CAN) data bus, hall sensors located in each seat motor and seat
leg latch switches to determine the proper control of the third row seat motors.
The FSM receives analog inputs from the seat selector switch. The seat selector switch is an integral part of the
D-pillar seat switch. The FSM uses the seat selector switch analog input to decode which seat(s) it is to control
(i.e. Left, Right or Both simultaneously). The FSM uses the seat selector switch input combined with the seat
mode switch inputs (Normal, Stow, Fold, and Tailgate) to determine which seating mode is being requested for
each seat. The seat mode switch is also an integral part of the D-pillar seat switch.
The FSM is capable of adjusting the seat(s) to the requested position when it receives the proper momentary
signal from the seat mode switch input. The possible seat modes are:
Seated - the third row seat backrest is up and the seat bench is in a position to allow an occupant to sit
facing forward in the vehicle. All seat leg latches are fully latched.
Stow - the third row seat backrest is folded down and the seat assembly (right, left or both seats) is fully
stowed into the floor of the vehicle.
Fold - the third row seat backrest is folded down onto the seat bench. All seat leg latches are fully latched.
Tailgate - the third row seat backrest is fully reclined (i.e. At rear recliner hard stop). The seat bench is
raised perpendicular to the floor and the seat backrest is positioned to allow an occupant to sit on it facing
rearward in the vehicle.
The FSM also receives analog inputs from the right and left seat recliner switches. The FSM uses these switch
inputs to determine the required control of the right seat back and left seat back motor outputs. The FSM is
2009 Dodge Grand Caravan SE
2009 ACCESSORIES & EQUIPMENT Power Seats, Third Row - Service Information - Grand Caravan, Town & Country
steve
Monday, May 23, 2011 2:13:15 PM
Page 2
© 2006 Mitchell Repair Information Company, LLC.

capable of moving the seat back recliner in both the forward or rearward direction when it detects a recliner
switch (right and/or left seat) being activated. The module can operate the recliner motors independently or
simultaneously in both directions. Seat recliner operation via the recliner switches is inactive when the seat is
not in the seated position. Rearward travel of the seat back recliner is limited by a mechanical stop. The FSM
limits the forward recliner travel to the soft stop location learned in the routine. See Electrical - Power
Systems/Power Seats - Standard Procedure.
The power folding system includes six motors total, three motors in each side of the seat. A small motor
disengages the leg latches, another motor stows and unstows the seat, and a third motor reclines and folds the
seat back flat. The stow and recline motors contain a hall sensor that provides inputs to the FSM for seat
position and motor speed.
The system also includes obstacle detection for safe operation. When the system detects an obstacle the motors
will stop and reverse the motion for a brief period. If the FSM detects an obstruction preventing it to back off by
the required distance, the FSM shall abort all seat movement. The obstacle detection feature is not required
during seat recliner adjustments that are activated by the right or left recliner switches. The obstacle detection
feature is deactivated when the seat is (approximately 100 mm) before reaching the fully latched position to
ensure best possible latching. Obstacle detection is also inactive during motor movements that result from
diagnostic scan tool active commands.
DIAGNOSIS AND TESTING
THIRD ROW POWER FOLDING SEAT
In order to obtain conclusive testing of the third row power folding seat system, the Controller Area Network
(CAN) bus, and all of the electronic modules that provide inputs to, or receive outputs from the seat system
components must be checked. Use of a scan tool and the proper diagnostic information is necessary to
accurately diagnose and repair the third row power folding seat system.
If the seats exhibit an interrupted or jerky motion, ensure the wire harness is connected correctly. Repair any
wiring problems and retest the third row power folding seat system. Refer to SYSTEM WIRING DIAGRAMS
for Town & Country and/or SYSTEM WIRING DIAGRAMS for Grand Caravan for complete circuit
schematic or connector pin-out information.
Before any testing of the third row power folding seat system is attempted, the battery should be fully-charged.
STANDARD PROCEDURE
THIRD ROW POWER FOLDING SEAT POSITION CALIBRATION (LEFT SIDE)
NOTE:
Vehicles equipped with the third row power folding seat system utilize a low
voltage cut-off feature. This feature turns off the 12 V power to the power seat
system anytime vehicle voltage is below 10.6 V. Be certain to check the vehicle
electrical system for proper voltage anytime the power seat system appears
inoperative.
2009 Dodge Grand Caravan SE
2009 ACCESSORIES & EQUIPMENT Power Seats, Third Row - Service Information - Grand Caravan, Town & Country
steve
Monday, May 23, 2011 2:13:15 PM
Page 3
© 2006 Mitchell Repair Information Company, LLC.

Any time a third row power folding seat assembly or component is removed, replaced or adjusted, DTC B1E4D
is present, or Left Rear Seat Position state is unknown or does not match the seats position, a rear seat position
calibration must be performed. This calibration enables the third row power folding seat control module to learn
or relearn information (travel limits, resistance to seat travel, etc.) which allows it to perform properly and
safely. To perform a rear seat position calibration do the following:
1. Obtain an appropriate scan tool.
2. Connect the scan tool to the vehicle and check for any third row power folding seat system stored trouble
codes, correct and erase any stored codes.
3. Ensure that all four seat legs are securely latched to the floor strikers.
4. Using the scan tool, check the latch switch states for both seats. If OK, proceed to 5. If not OK, cycle
effected seat to stow and then back to normal. Recheck the latch switch states for both seats. If OK,
proceed to 5. If seat fails to latch, diagnose the problem using a scan tool and the appropriate diagnostic
service information.
5. Using the scan tool, select the third row power folding seat module menu, Miscellaneous Functions and
select the Write Valid Left Rear Seat position Test.
6. Using the scan tool select the correct position of the left side third row seat to match the actual position of
the seat.
7. Using a scan tool check "routine status" for a pass or fail message. If the calibration routine did not pass,
Refer to the appropriate diagnostic service information for system diagnosis and repair. Rerun the
calibration routine following seat repair procedure.
8. Follow the instructions on the scan tool to complete the test.
9. The third row power folding seat position calibration routine is complete.
In order to obtain conclusive testing of the third row power folding seat system, the Controller Area Network
(CAN) data bus, and all of the electronic modules that provide inputs to, or receive outputs from the third row
power folding seat system components must be checked. Any diagnosis of the third row power folding seat
system should begin with, the use of a scan tool and the appropriate diagnostic service information.
THIRD ROW POWER FOLDING SEAT POSITION CALIBRATION (RIGHT SIDE)
Any time a third row power folding seat assembly or component is removed, replaced or adjusted, DTC B1E52
is present, or Right Rear Seat Position state is unknown or does not match the seats position, a rear seat position
calibration must be performed. This calibration enables the third row power folding seat control module to learn
or relearn information (travel limits, resistance to seat travel, etc.) which allows it to perform properly and
safely. To perform a rear seat position calibration do the following:
NOTE:
The power folding seats must both be latched before the seat position
calibration routine can be initiated. Failure to do so will result in calibration
routine failure.
NOTE:
The power folding seats must both be latched before the calibration routine can
be initiated. Failure to do so will result in calibration routine failure.
2009 Dodge Grand Caravan SE
2009 ACCESSORIES & EQUIPMENT Power Seats, Third Row - Service Information - Grand Caravan, Town & Country
steve
Monday, May 23, 2011 2:13:15 PM
Page 4
© 2006 Mitchell Repair Information Company, LLC.

1. Obtain an appropriate scan tool.
2. Connect the scan tool to the vehicle and check for any third row power folding seat system stored trouble
codes, correct and erase any stored codes.
3. Ensure that all four seat legs are securely latched to the floor strikers.
4. Using the scan tool, check the latch switch states for both seats. If OK, proceed to 5. If not OK, cycle
effected seat to stow and then back to normal. Recheck the latch switch states for both seats. If OK,
proceed to 5. If seat fails to latch, diagnose the problem using a scan tool and the appropriate diagnostic
service information.
5. Using the scan tool, select the third row power folding seat module menu, Miscellaneous Functions and
select the Write Valid Right Rear Seat position Test.
6. Using the scan tool, select the correct position of the right side third row seat to match the actual position
of the seat.
7. Using a scan tool check "routine status" for a pass or fail message. If the calibration routine did not pass,
Refer to the appropriate diagnostic service information for system diagnosis and repair. Rerun the
calibration routine following seat repair procedure.
8. Follow the instructions on the scan tool to complete the test.
9. The third row power folding seat position calibration routine is complete.
In order to obtain conclusive testing of the third row power folding seat system, the Controller Area Network
(CAN) data bus, and all of the electronic modules that provide inputs to, or receive outputs from the third row
power folding seat system components must be checked. Any diagnosis of the third row power folding seat
system should begin with, the use of a scan tool and the appropriate diagnostic service information.
THIRD ROW POWER FOLDING SEAT RECLINER CALIBRATION
Any time a third row power folding seat assembly or component is removed, replaced or adjusted, a seat
recliner calibration must be performed. This calibration enables the third row power folding seat control module
to learn or relearn information (travel limits, resistance to seat travel, etc.) which allows it to perform properly
and safely. To perform a seat recliner calibration do the following:
1. Obtain an appropriate scan tool.
2. Connect the scan tool to the vehicle and check for any third row power folding seat system stored trouble
codes, correct and erase any stored codes.
3. Ensure that all four seat legs are securely latched to the floor strikers.
4. Using the scan tool, check the latch switch states for both seats. If OK, proceed to 5. If not OK, cycle
effected seat to stow and then back to normal. Recheck the latch switch states for both seats. If OK,
proceed to 5. If seat fails to latch, diagnose the problem using a scan tool and the appropriate diagnostic
NOTE:
If the third row power folding seat will not complete a full cycle a problem
exists with the third row power folding seat system.
NOTE:
The power folding seats must both be latched before the recliner calibration
routine can be initiated. Failure to do so will result in calibration routine failure.
2009 Dodge Grand Caravan SE
2009 ACCESSORIES & EQUIPMENT Power Seats, Third Row - Service Information - Grand Caravan, Town & Country
steve
Monday, May 23, 2011 2:13:15 PM
Page 5
© 2006 Mitchell Repair Information Company, LLC.
service information.
5. Using the scan tool, select the third row power folding seat module menu, Miscellaneous Functions and
select the Recliner Calibration Test.
6. Using a scan tool check "routine status" for a pass or fail message. If the calibration routine did not pass,
Refer to the appropriate diagnostic service information for system diagnosis and repair. Rerun the
calibration routine following seat repair procedure.
7. Follow the instructions on the scan tool to complete the test.
8. The third row power folding seat recliner calibration routine is complete.
In order to obtain conclusive testing of the third row power folding seat system, the Controller Area Network
(CAN) data bus, and all of the electronic modules that provide inputs to, or receive outputs from the third row
power folding seat system components must be checked. Any diagnosis of the third row power folding seat
system should begin with, the use of a scan tool and the appropriate diagnostic service information.
THIRD ROW POWER FOLDING SEAT LATCH MANUAL RELEASE
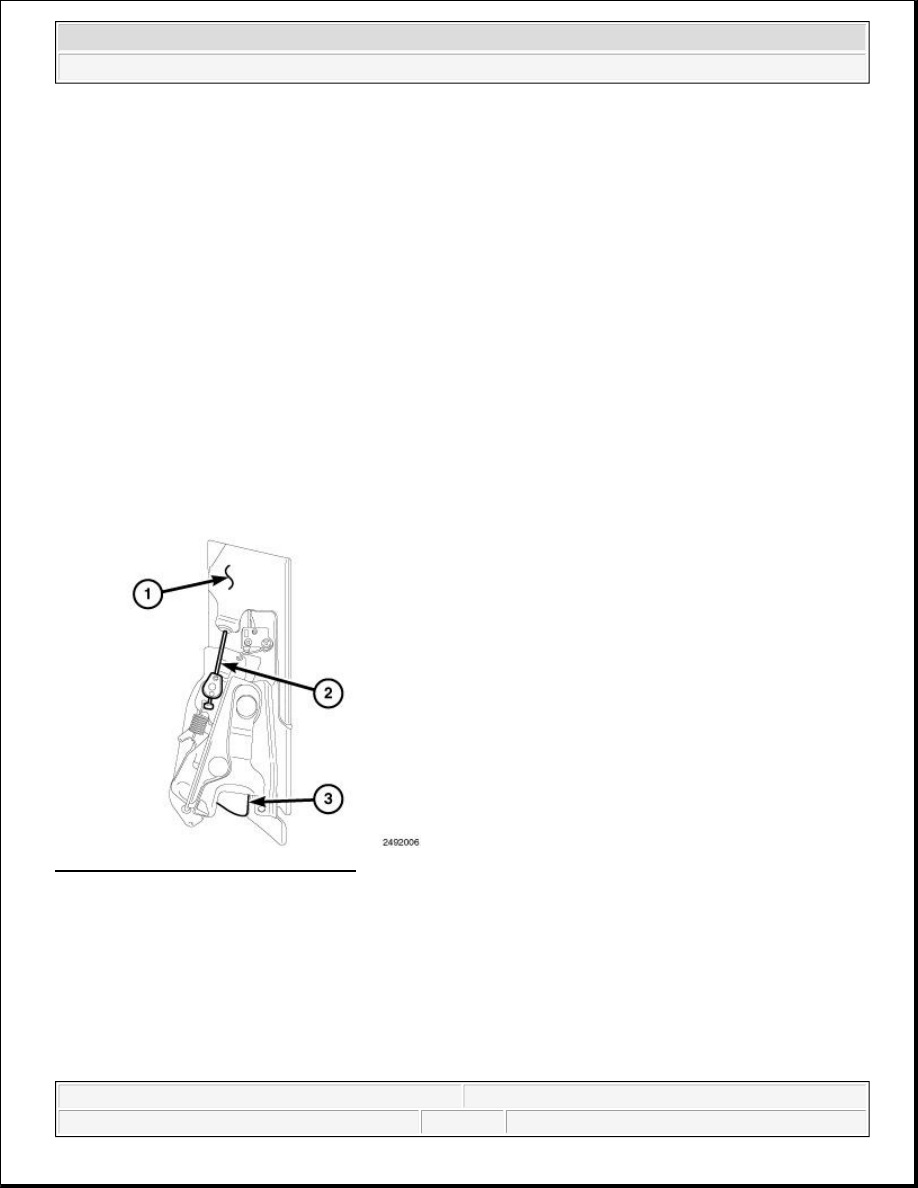
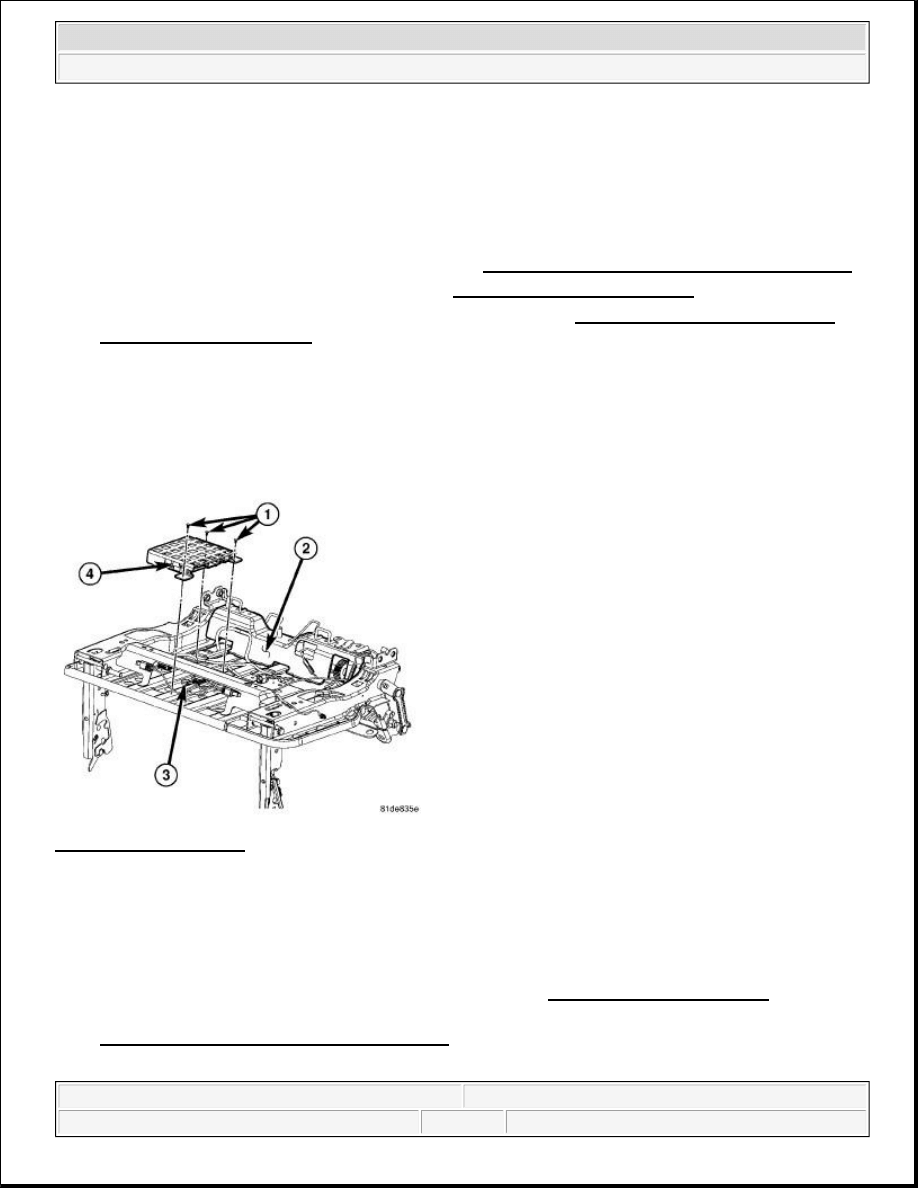
Fig. 2: Leg Latch & Release Cable End
Courtesy of CHRYSLER LLC
NOTE:
If the third row power folding seat will not complete a full cycle a problem
exists with the third row power folding seat system.
NOTE:
If the electric seat leg latch release actuator and cable assembly is inoperative,
or one or more leg latches fail to release, it will be necessary to manually
release the latch or latches. The following procedure should be performed to
eliminate the risk of seat component damage.
NOTE:
The leg latch release cables are located on the outer edges of the seat legs.
Depending on the inoperative latch, it will be necessary to access the area
2009 Dodge Grand Caravan SE
2009 ACCESSORIES & EQUIPMENT Power Seats, Third Row - Service Information - Grand Caravan, Town & Country
steve
Monday, May 23, 2011 2:13:15 PM
Page 6
© 2006 Mitchell Repair Information Company, LLC.
1. Access the effected leg (1). The leg latch release cables are located on the outer edge of the seat legs.
Depending on the inoperative latch, it will be necessary to access the area between the two inboard legs
of the 60/40 seats or the area between the outboard seat legs and quarter trim panel.
2. Find the leg latch release cable end (2) where it attaches to the latch stud.
3. Lift up on the cable end until the leg latch (3) releases from the floor striker.
ACTUATOR
REMOVAL
REMOVAL
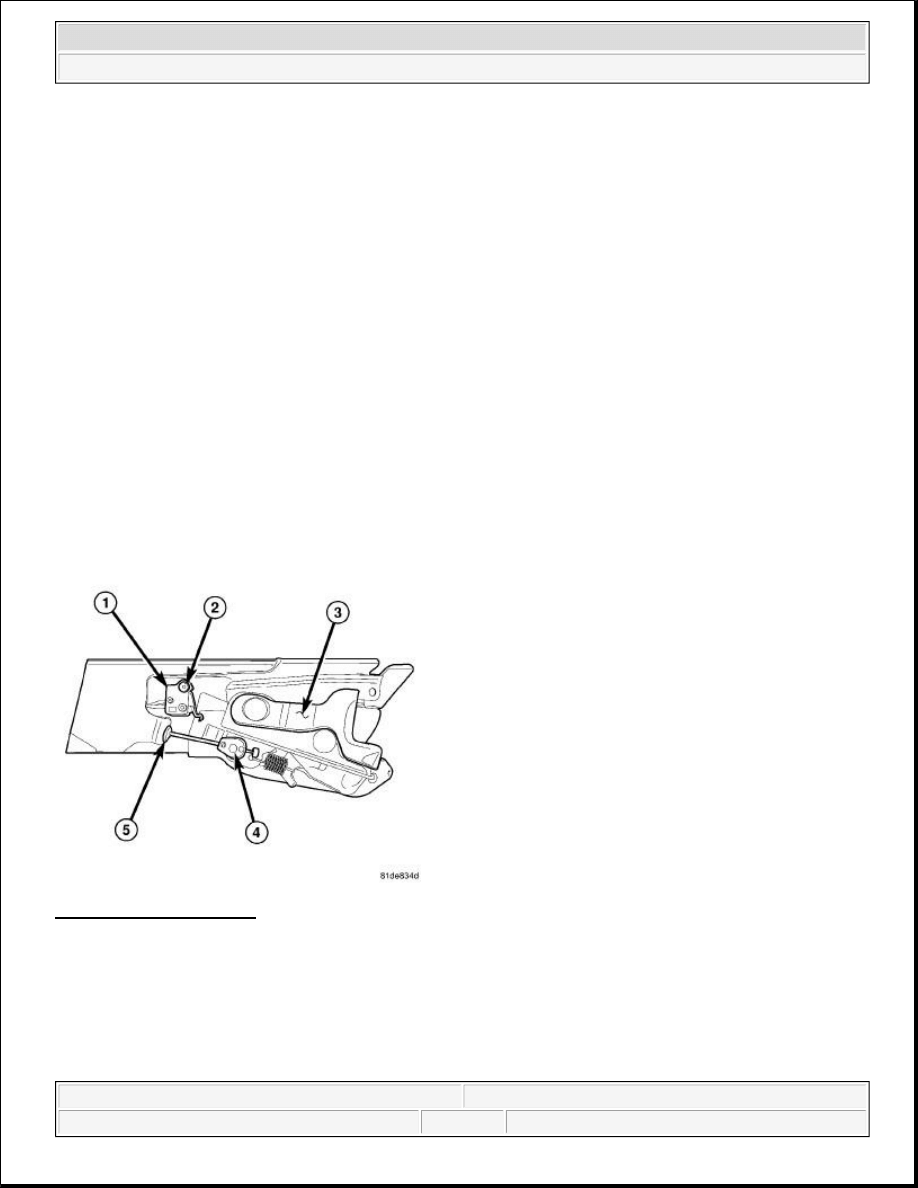
Fig. 3: Latch Components
Courtesy of CHRYSLER LLC
between the two inboard legs of the 60/40 seats or the area between the
outboard seat legs and quarter trim panel.
NOTE:
If the seat is inoperative due to a foreign object prohibiting one of the seat legs
to latch, the following procedure will need to be performed and the seat lifted
off the floor striker. Once the object is removed the seat should function
properly with the use of the D-pillar switch.
NOTE:
The procedure for replacing the seat leg latch release actuator and cable
assembly is the same for both the 60 and 40 third row power folding seats. The
following steps should be performed only on the seat with the inoperative seat
leg latch release actuator and cable assembly.
2009 Dodge Grand Caravan SE
2009 ACCESSORIES & EQUIPMENT Power Seats, Third Row - Service Information - Grand Caravan, Town & Country
steve
Monday, May 23, 2011 2:13:15 PM
Page 7
© 2006 Mitchell Repair Information Company, LLC.
1. Remove the effected third row power folding seat. Refer to Body/Seats/SEAT - Removal .
2. Remove the seat cushion and cover assembly. Refer to Body/Seats/COVER, Seat Cushion - Removal .
3. Remove the cable assembly from the seat leg.
a. Remove the tie strap holding the switch wire harness and leg latch release cable to the seat leg
assembly (3).
b. Push the cable connector (4) down to disengage it from the latch stud.
c. Remove the cable sleeve from the seat leg retaining bracket (5).
d. Pull the cable assembly up out of the seat leg.
e. Repeat this procedure for the other seat leg.
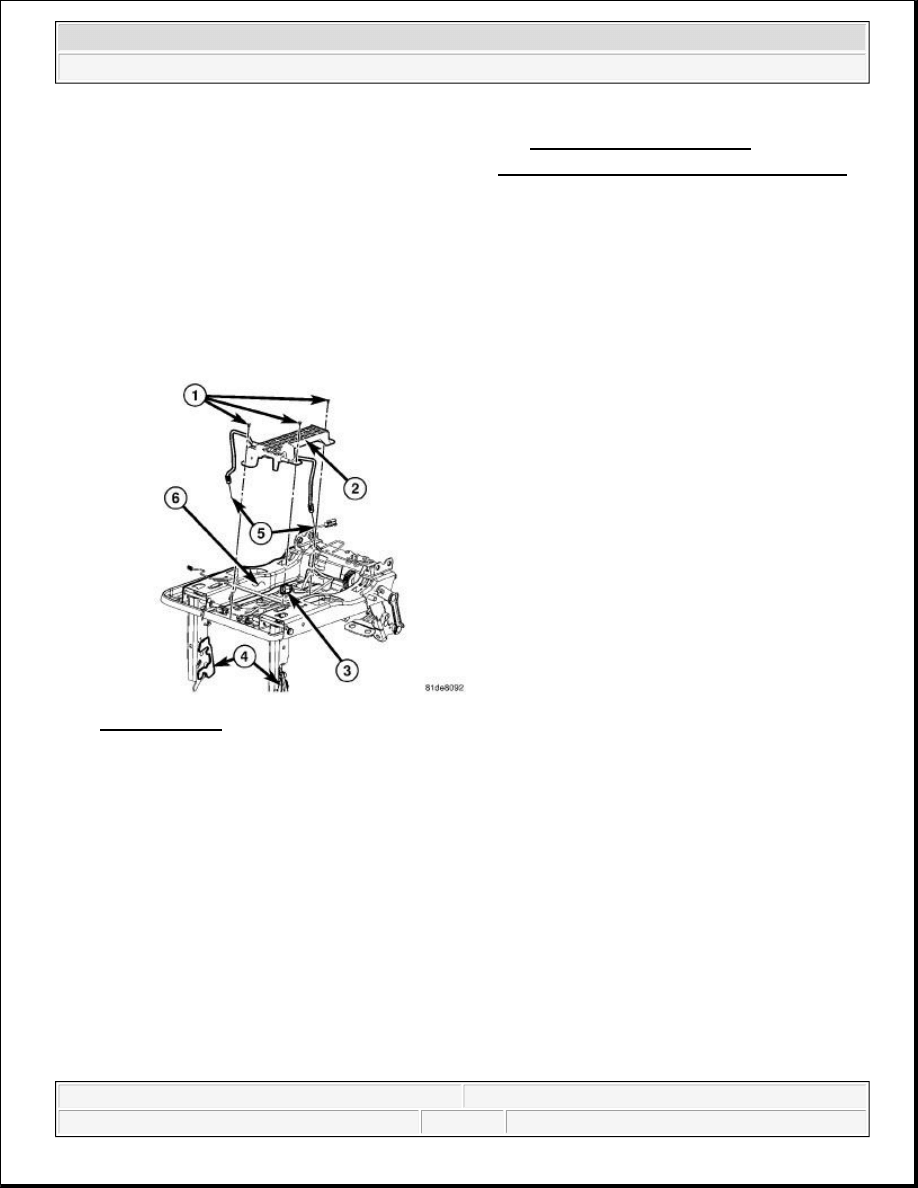
Fig. 4: Seat Pan
Courtesy of CHRYSLER LLC
4. Remove the pushpin retainers (1) securing the seat leg latch release actuator and cable assembly (2) to the
seat pan (6).
5. Disconnect the seat leg latch release actuator and cable assembly electrical connector (3).
6. Pull the seat leg latch release actuator and cable assembly (2) upward and separate it from the seat pan
(6).
INSTALLATION
INSTALLATION
2009 Dodge Grand Caravan SE
2009 ACCESSORIES & EQUIPMENT Power Seats, Third Row - Service Information - Grand Caravan, Town & Country
steve
Monday, May 23, 2011 2:13:15 PM
Page 8
© 2006 Mitchell Repair Information Company, LLC.
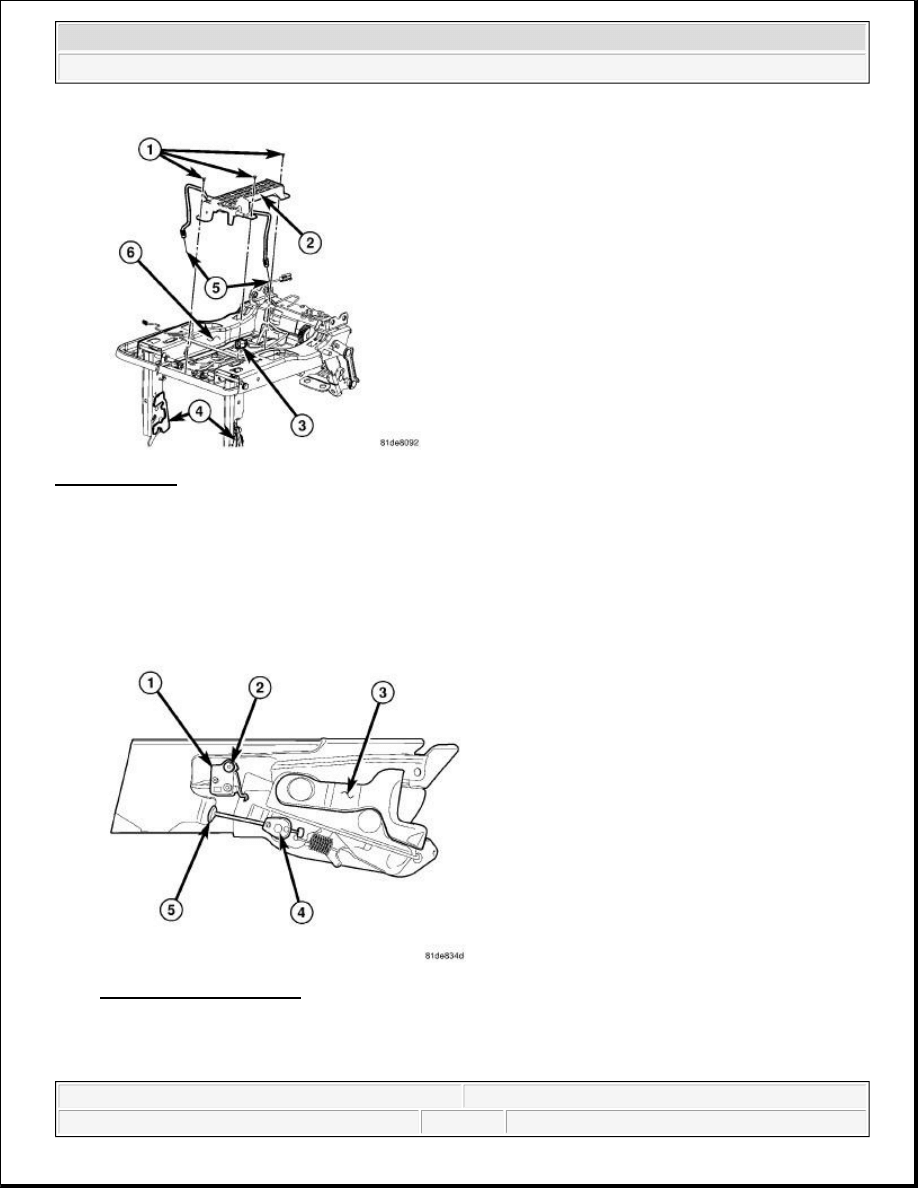
Fig. 5: Seat Pan
Courtesy of CHRYSLER LLC
1. Position the seat leg latch release actuator and cable assembly (2) onto the seat pan (6).
2. Connect the seat leg latch release actuator and cable assembly electrical connector (3).
3. Install the pushpin retainers (1) securing the seat leg latch release actuator and cable assembly (2) to the
seat pan (6).
Fig. 6: Latch Components
Courtesy of CHRYSLER LLC
4. Install the cable assembly onto the seat leg.
a. Route the cable assembly through the seat pan and down the seat leg (3).
2009 Dodge Grand Caravan SE
2009 ACCESSORIES & EQUIPMENT Power Seats, Third Row - Service Information - Grand Caravan, Town & Country
steve
Monday, May 23, 2011 2:13:15 PM
Page 9
© 2006 Mitchell Repair Information Company, LLC.
b. Install the cable sleeve onto the seat leg cable retaining bracket (5).
c. Push the cable connector (4) up to secure it onto the latch stud.
d. Install the tie strap holding the switch wire harness and leg latch release cable to the seat leg
assembly (3).
e. Repeat this procedure for the other seat leg.
5. Install the seat cushion and cover assembly. Refer to Body/Seats/COVER, Seat Cushion - Installation .
6. Install the third row power folding seat. Refer to Body/Seats/SEAT - Installation .
7. Perform the third row power folding seat recliner calibration. See Electrical - Power Systems/Power
Seats - Standard Procedure. Verify proper seat operation.
MODULE
REMOVAL
REMOVAL
Fig. 7: Seat Cushion Pan
Courtesy of CHRYSLER LLC
1. Remove the 60 percent third row power folding seat. Refer to Body/Seats/SEAT - Removal .
2. Remove the seat cushion and cover assembly to expose the seat cushion pan (2). Refer to
Body/Seats/COVER, Seat Cushion - Removal .
3. Remove the pushpin retainers (1) securing the module and bracket (4) to the seat pan (2).
NOTE:
The third row power folding seat module is located in the 60 percent seat
cushion pan. The following steps should be performed on the 60 percent seat
only.
2009 Dodge Grand Caravan SE
2009 ACCESSORIES & EQUIPMENT Power Seats, Third Row - Service Information - Grand Caravan, Town & Country
steve
Monday, May 23, 2011 2:13:15 PM
Page 10
© 2006 Mitchell Repair Information Company, LLC.
4. Disconnect the module electrical connectors (3).
Fig. 8: Third Row Power Folding Seat Module
Courtesy of CHRYSLER LLC
5. Remove the third row power folding seat module from the module bracket.
a. Push the module (1) forward to release the retaining tabs (4).
b. Continue to push the module forward to release the mounting knobs (2) from the module bracket
(3).
c. Separate the module from the bracket.
INSTALLATION
INSTALLATION
2009 Dodge Grand Caravan SE
2009 ACCESSORIES & EQUIPMENT Power Seats, Third Row - Service Information - Grand Caravan, Town & Country
steve
Monday, May 23, 2011 2:13:15 PM
Page 11
© 2006 Mitchell Repair Information Company, LLC.
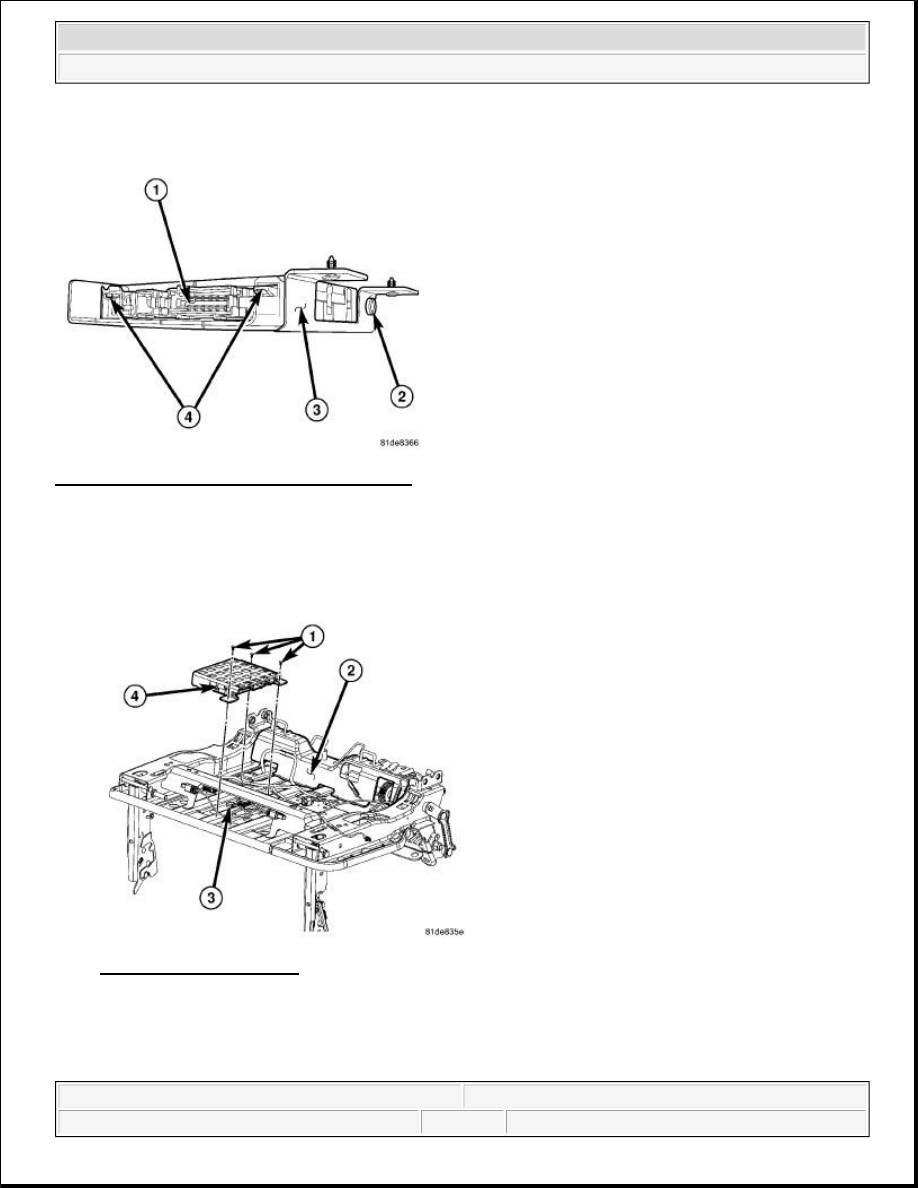
Fig. 9: Third Row Power Folding Seat Module
Courtesy of CHRYSLER LLC
1. Position the third row power folding seat module (1) onto the module bracket (3). Ensure the mounting
knobs (2) and retaining tabs (4) are aligned with the appropriate slots in the bracket (3).
2. Push the module into the bracket until the mounting knobs (2) and retaining tabs (4) are fully seated.
Fig. 10: Seat Cushion Pan
Courtesy of CHRYSLER LLC
3. Connect the module (4) electrical connector (3).
4. Position the third row power folding seat module and bracket (4) onto the seat pan (2) and secure with the
pushpin retainers (1).
2009 Dodge Grand Caravan SE
2009 ACCESSORIES & EQUIPMENT Power Seats, Third Row - Service Information - Grand Caravan, Town & Country
steve
Monday, May 23, 2011 2:13:15 PM
Page 12
© 2006 Mitchell Repair Information Company, LLC.
5. Install the seat cushion and cover assembly. Refer to Body/Seats/COVER, Seat Cushion - Installation .
6. Install the third row power folding seat. Refer to Body/Seats/SEAT - Installation .
7. Perform the third row power folding seat recliner calibration. See Electrical - Power Systems/Power
Seats - Standard Procedure. Verify proper seat operation.
MOTOR, RECLINER, POWER FOLDING SEAT
REMOVAL
REMOVAL
Fig. 11: Third Row Power Folding Seat Recliner Motor Components
Courtesy of CHRYSLER LLC
1. Remove the effected third row power folding seat. Refer to Body/Seats/SEAT - Removal .
2. Remove the seat back cushion and cover assembly. Refer to Body/Seats/PANEL, Outer Trim Ring -
Removal .
3. Remove the screw (2) securing the recliner motor (1) to the cross talk tube protect bracket (4).
4. Remove the two screws (6) securing the cross talk tube protect bracket (4) to the recliner assembly (5).
NOTE:
The procedure for replacing the recliner motor assembly is the same for both
the 60 and 40 third row power folding seats. The following steps should be
performed only on the seat with the inoperative recliner motor assembly.
2009 Dodge Grand Caravan SE
2009 ACCESSORIES & EQUIPMENT Power Seats, Third Row - Service Information - Grand Caravan, Town & Country
steve
Monday, May 23, 2011 2:13:15 PM
Page 13
© 2006 Mitchell Repair Information Company, LLC.
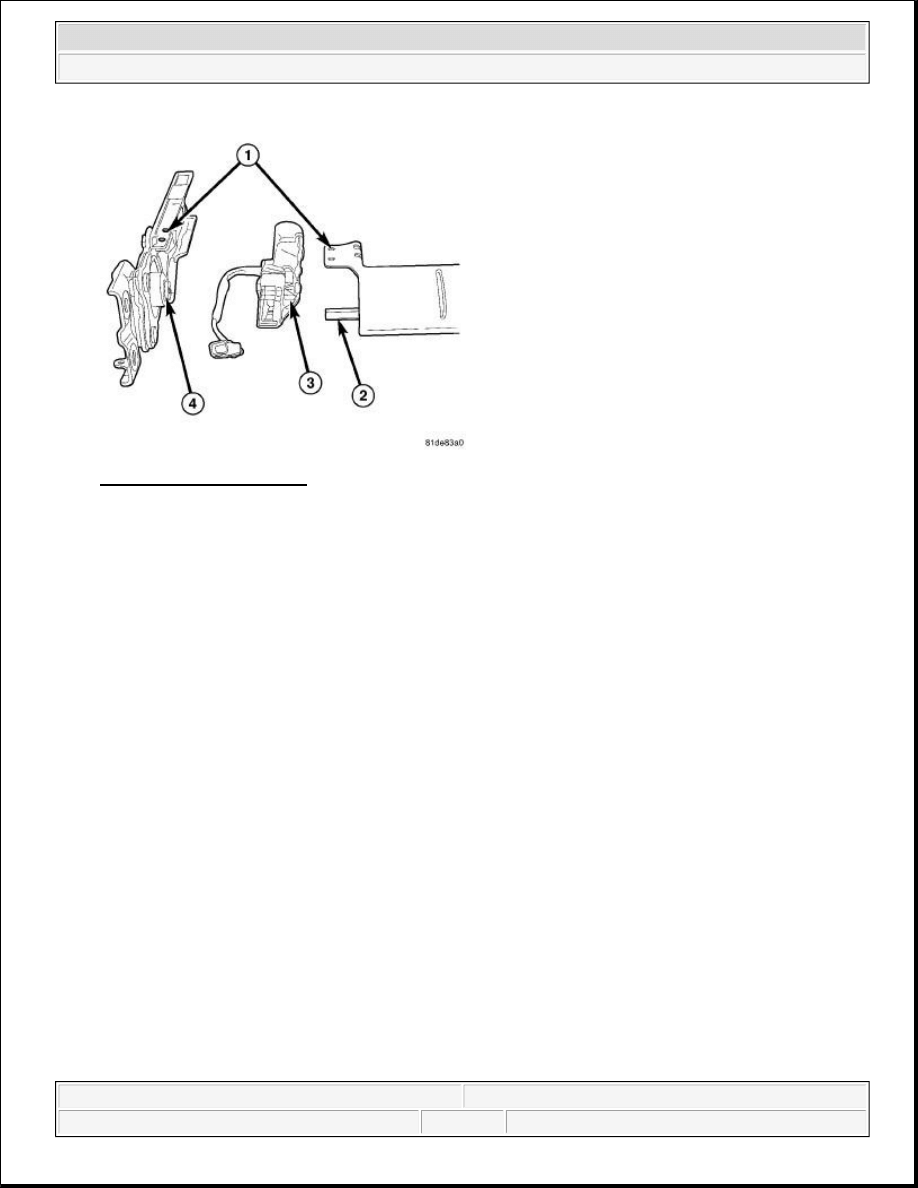
Fig. 12: Recliner Assembly
Courtesy of CHRYSLER LLC
5. Carefully separate the recliner assembly (4) from the cross talk tube protect bracket and recliner torque
rod (2) and set aside.
6. Carefully twist the recliner motor (3) forward to clear the cross talk tube protect bracket and slide the
motor off the recliner torque rod (2).
INSTALLATION
INSTALLATION
NOTE:
Take care not to disturb the recliner mechanism any more than necessary
to remove the motor. Improper part alignment on installation can result in
poor seat recliner operation.
2009 Dodge Grand Caravan SE
2009 ACCESSORIES & EQUIPMENT Power Seats, Third Row - Service Information - Grand Caravan, Town & Country
steve
Monday, May 23, 2011 2:13:15 PM
Page 14
© 2006 Mitchell Repair Information Company, LLC.

Fig. 13: Recliner Assembly
Courtesy of CHRYSLER LLC
1. Carefully align and insert the recliner torque rod (2) into the recliner motor (3).
2. Continue to push the recliner motor onto the torque rod until it is past the mounting surface on the cross
talk tube protect bracket.
3. Carefully align and insert the recliner torque rod (2) into the recliner assembly (4).
4. Continue to push the recliner assembly onto the torque rod until the screw holes are aligned with those on
the cross talk tube protect bracket (1).
CAUTION: Take care when assembling the recliner mechanism parts. Improper part
alignment on installation can result in poor seat recliner operation.
2009 Dodge Grand Caravan SE
2009 ACCESSORIES & EQUIPMENT Power Seats, Third Row - Service Information - Grand Caravan, Town & Country
steve
Monday, May 23, 2011 2:13:15 PM
Page 15
© 2006 Mitchell Repair Information Company, LLC.
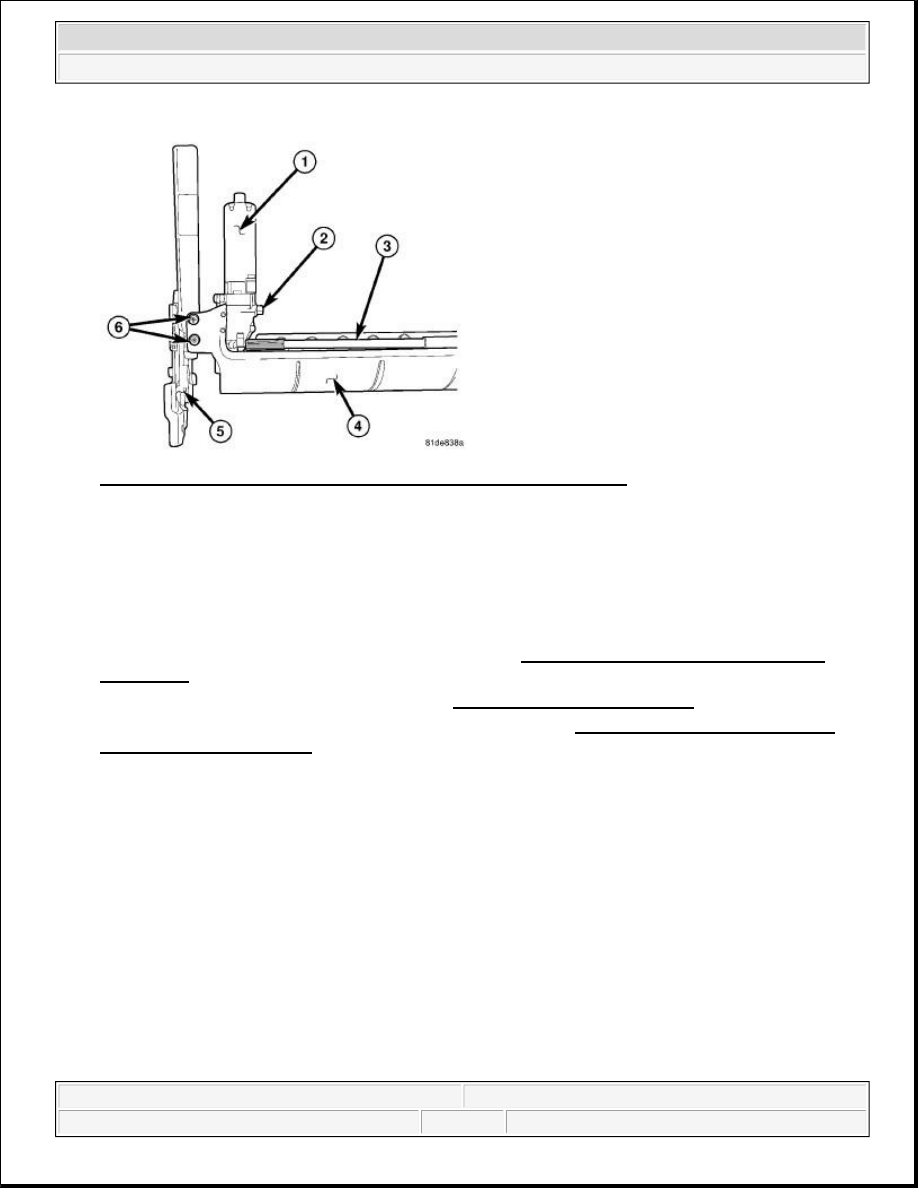
Fig. 14: Third Row Power Folding Seat Recliner Motor Components
Courtesy of CHRYSLER LLC
5. Install the two screws (6) securing the cross talk tube protect bracket (4) to the recliner assembly (5).
Tighten the screws to 2.5 N.m (22 in. lbs.).
6. Carefully twist the recliner motor (1) rearward to align the mounting bolt hole with the weld nut on the
cross talk tube protect bracket (4).
7. Install the recliner motor bolt (2). Tighten bolt to 9 N.m (80 in. lbs.).
8. Install the seat back cushion and cover assembly. Refer to Body/Seats/PANEL, Outer Trim Ring -
Installation .
9. Install the third row power folding seat. Refer to Body/Seats/SEAT - Installation .
10. Perform the third row power folding seat recliner calibration. See Electrical - Power Systems/Power
Seats - Standard Procedure. Verify proper seat operation.
MOTOR, SEAT, POWER FOLDING STOW
REMOVAL
REMOVAL
2009 Dodge Grand Caravan SE
2009 ACCESSORIES & EQUIPMENT Power Seats, Third Row - Service Information - Grand Caravan, Town & Country
steve
Monday, May 23, 2011 2:13:15 PM
Page 16
© 2006 Mitchell Repair Information Company, LLC.
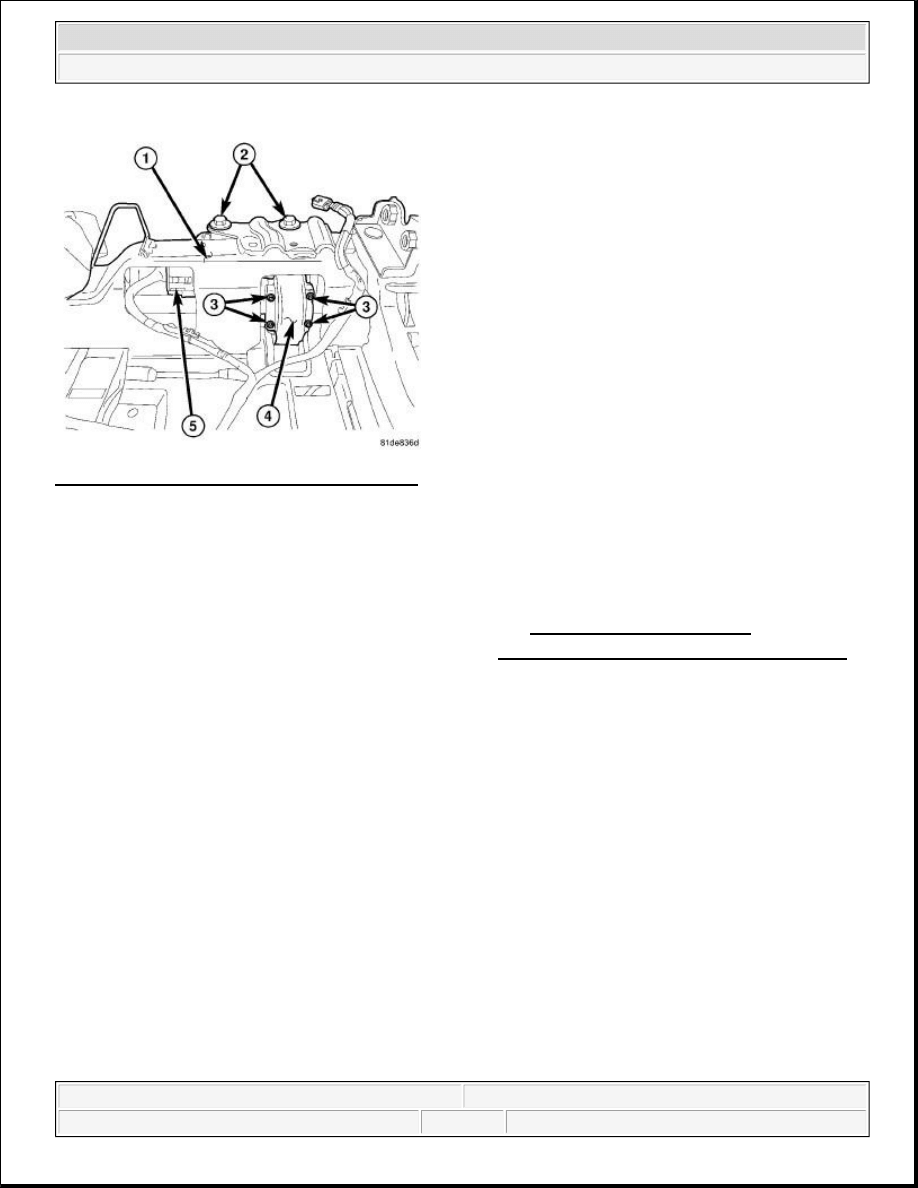
Fig. 15: Gear Cover Retaining Screws & Cover
Courtesy of CHRYSLER LLC
1. Remove the effected third row power folding seat. Refer to Body/Seats/SEAT - Removal .
2. Remove the seat cushion and cover assembly. Refer to Body/Seats/COVER, Seat Cushion - Removal .
3. Remove the four gear cover retaining screws (3) and the gear cover (4).
4. Disconnect the motor electrical connector (5).
5. Remove the two stow motor retaining bolts (2) and separate the motor assembly from the seat frame (1).
INSTALLATION
INSTALLATION
NOTE:
The procedure for replacing the stow motor assembly is the same for both the
60 and 40 third row power folding seats. The following steps should be
performed only on the seat with the inoperative stow motor assembly.
2009 Dodge Grand Caravan SE
2009 ACCESSORIES & EQUIPMENT Power Seats, Third Row - Service Information - Grand Caravan, Town & Country
steve
Monday, May 23, 2011 2:13:15 PM
Page 17
© 2006 Mitchell Repair Information Company, LLC.

Fig. 16: Stow Motor
Courtesy of CHRYSLER LLC
1. Position the third row seat into the vehicle.
2. Install the bolts that secure the hinges at the rear of the seat to the floor panel. Tighten the bolts to 89 N.m
(66 ft. lbs.).
3. Position the stow motor (1) onto the seat frame shaft so that the motor teeth are in contact with the shaft
teeth (2).
4. Grasping the seat bottom, slightly move the seat up or down until the gear teeth mesh and the motor drops
into place.
CAUTION: Damage to the seat stow motor or seat frame may result if the gear teeth
on both assemblies are not aligned properly (2). The seat must be
temporarily reinstalled in the vehicle the ensure proper motor installation.
2009 Dodge Grand Caravan SE
2009 ACCESSORIES & EQUIPMENT Power Seats, Third Row - Service Information - Grand Caravan, Town & Country
steve
Monday, May 23, 2011 2:13:15 PM
Page 18
© 2006 Mitchell Repair Information Company, LLC.
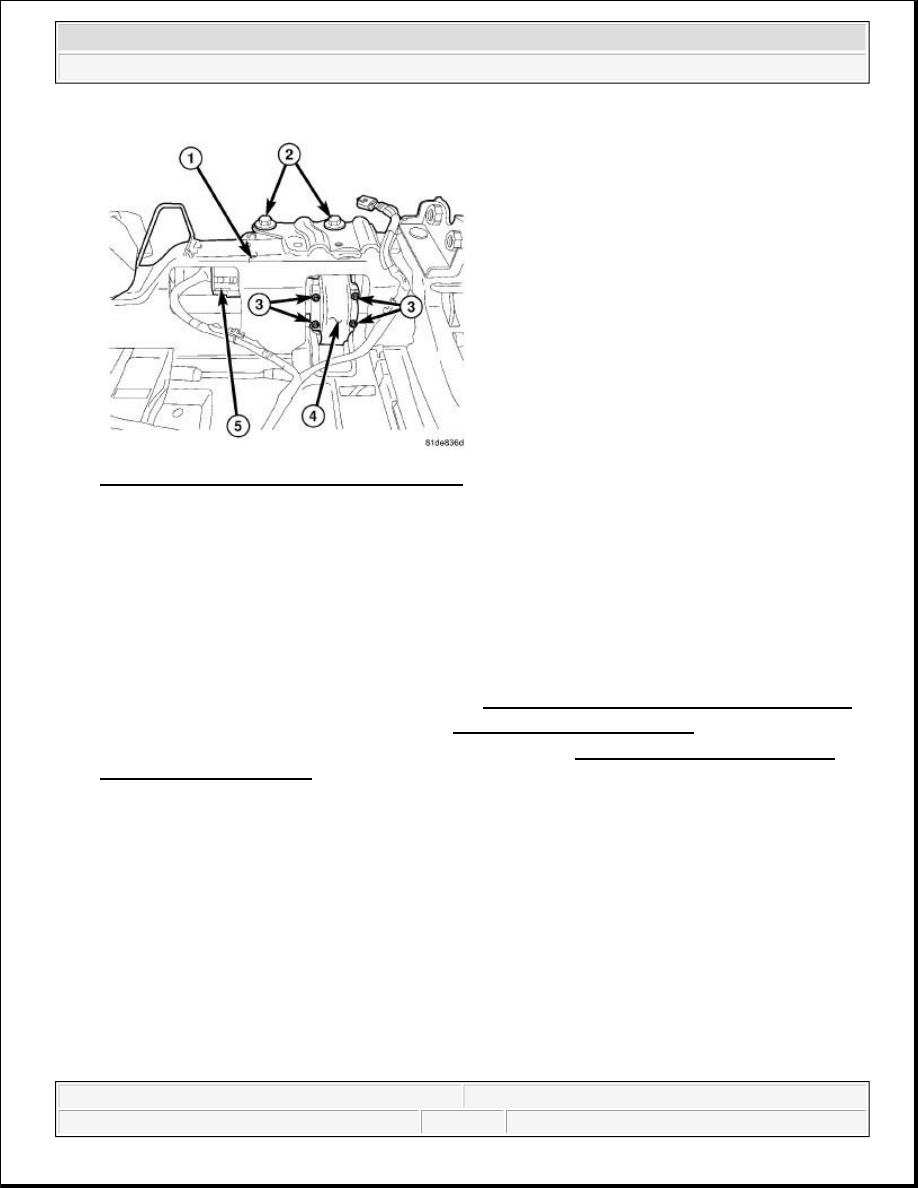
Fig. 17: Gear Cover Retaining Screws & Cover
Courtesy of CHRYSLER LLC
5. Install the gear cover (4) and secure with four retaining screws (3). Tighten the screws to 3.5 N.m (31 in.
lbs.).
6. Grasping the seat bottom, slightly move the seat up or down until the stow motor contacts the mounting
surface on the seat frame (1). Install the two stow motor retaining bolts (2) and tighten to 27 N.m (19 ft.
lbs.).
7. Connect the motor electrical connector (5).
8. Remove the seat from the vehicle.
9. Install the seat cushion and cover assembly. Refer to Body/Seats/COVER, Seat Cushion - Installation .
10. Install the third row power folding seat. Refer to Body/Seats/SEAT - Installation .
11. Perform the third row power folding seat recliner calibration. See Electrical - Power Systems/Power
Seats - Standard Procedure. Verify proper seat operation.
SWITCH, POWER FOLDING SEAT, D-PILLAR
REMOVAL
REMOVAL
2009 Dodge Grand Caravan SE
2009 ACCESSORIES & EQUIPMENT Power Seats, Third Row - Service Information - Grand Caravan, Town & Country
steve
Monday, May 23, 2011 2:13:15 PM
Page 19
© 2006 Mitchell Repair Information Company, LLC.
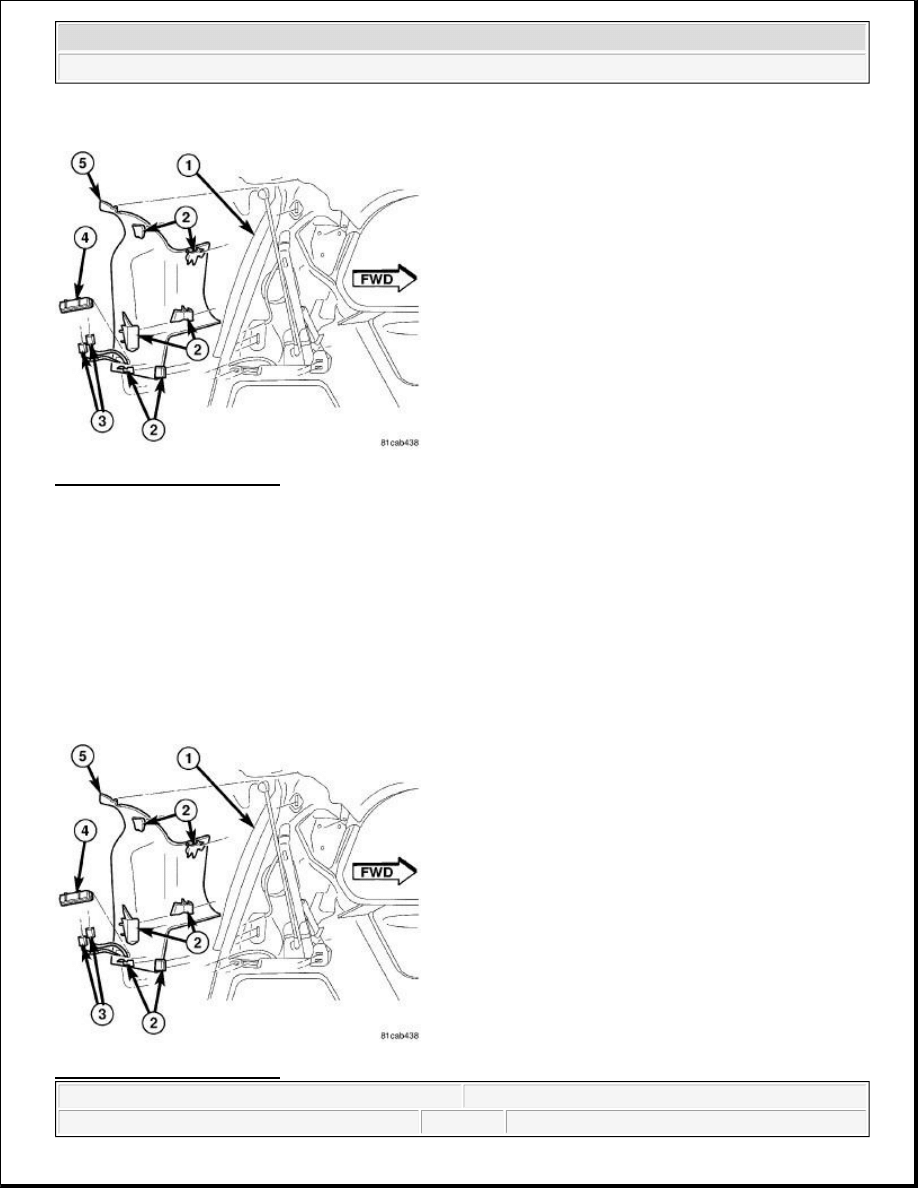
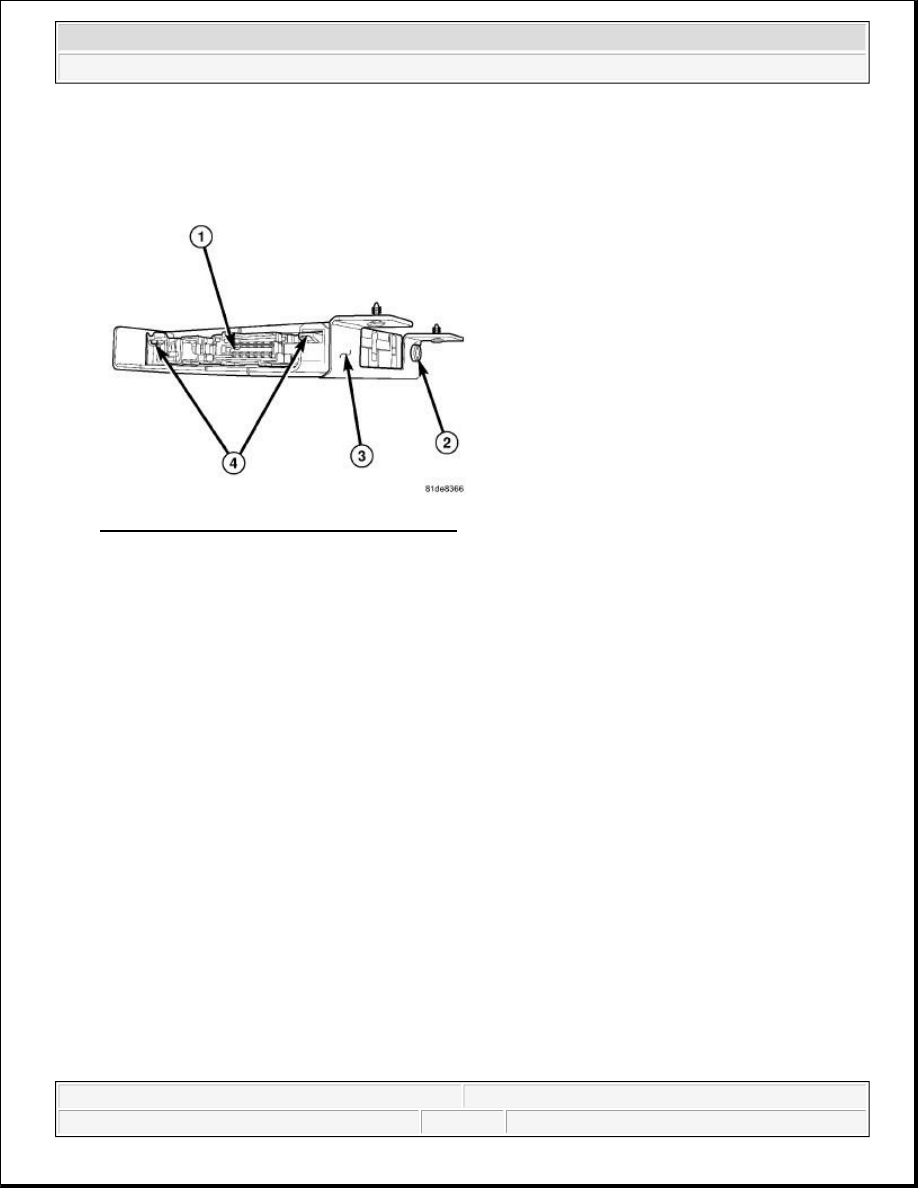
Fig. 18: Upper Trim-D-Pillar
Courtesy of CHRYSLER LLC
1. Disconnect and isolate the battery negative cable.
2. Using a trim stick C-4755 or equivalent, disengage the third row power folding seat switch and bezel (4)
from the upper D-Pillar trim panel (5).
3. Disconnect the switch electrical connector (3) and remove the switch from the vehicle.
INSTALLATION
INSTALLATION
Fig. 19: Upper Trim-D-Pillar
2009 Dodge Grand Caravan SE
2009 ACCESSORIES & EQUIPMENT Power Seats, Third Row - Service Information - Grand Caravan, Town & Country
steve
Monday, May 23, 2011 2:13:15 PM
Page 20
© 2006 Mitchell Repair Information Company, LLC.
Courtesy of CHRYSLER LLC
1. Position the third row power folding seat switch (4) into the left rear of vehicle.
2. Connect the switch electrical connector (3).
3. Push switch into upper D-Pillar trim panel (5) until retaining tabs are fully engaged.
4. Connect the battery negative cable.
5. Using an appropriate scan tool, check and erase any third row power folding seat control module
diagnostic trouble codes related to the D-Pillar switch.
SWITCH, POWER FOLDING SEAT, LEG LATCH ACTUATOR POSITION
REMOVAL
REMOVAL
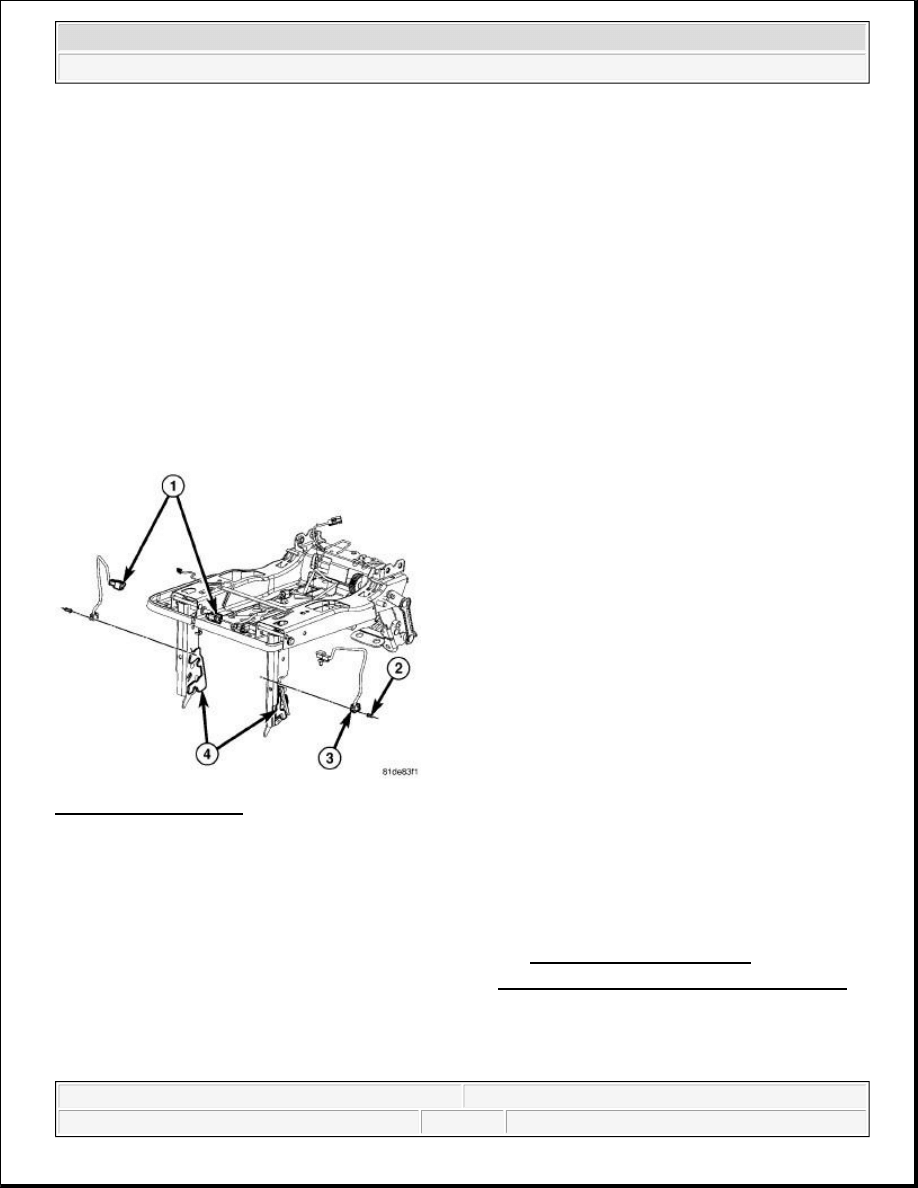
Fig. 20: Effective Switch
Courtesy of CHRYSLER LLC
1. Remove the effected third row power folding seat. Refer to Body/Seats/SEAT - Removal .
2. Remove the seat cushion and cover assembly. Refer to Body/Seats/COVER, Seat Cushion - Removal .
3. Disconnect the electrical connector for the effected switch (1).
NOTE:
The procedure for replacing the seat leg latch position switch is the same for
both the 60 and 40 third row power folding seats. The following steps should be
performed only on the seat with the inoperative seat leg latch position switch.
2009 Dodge Grand Caravan SE
2009 ACCESSORIES & EQUIPMENT Power Seats, Third Row - Service Information - Grand Caravan, Town & Country
steve
Monday, May 23, 2011 2:13:15 PM
Page 21
© 2006 Mitchell Repair Information Company, LLC.
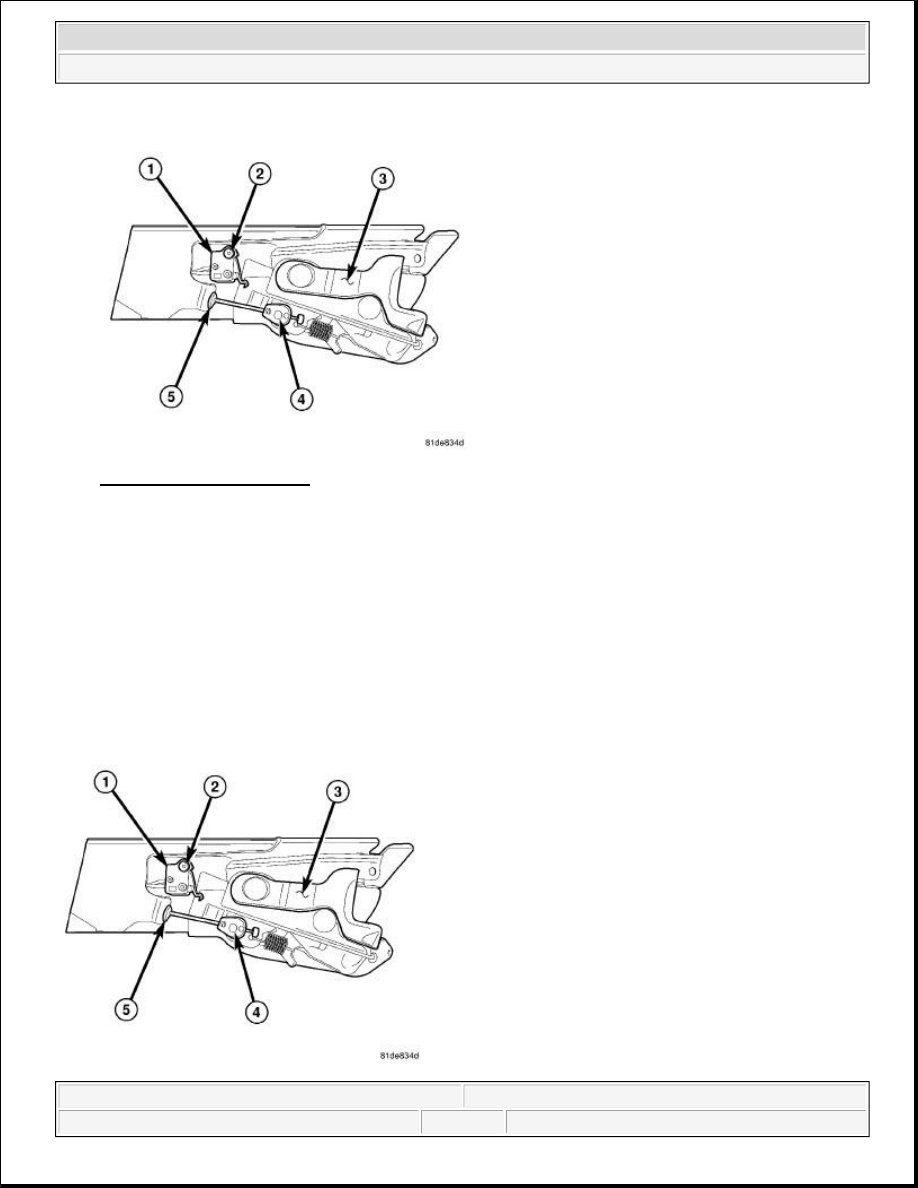
Fig. 21: Latch Components
Courtesy of CHRYSLER LLC
4. Using the appropriate size drill bit, remove the rivet (2) securing the switch (1) to the seat leg assembly
(3).
5. Remove the tie strap holding the switch wire harness and leg latch release cable (5) to the seat leg
assembly.
6. Remove the switch from the seat leg.
INSTALLATION
INSTALLATION
2009 Dodge Grand Caravan SE
2009 ACCESSORIES & EQUIPMENT Power Seats, Third Row - Service Information - Grand Caravan, Town & Country
steve
Monday, May 23, 2011 2:13:15 PM
Page 22
© 2006 Mitchell Repair Information Company, LLC.
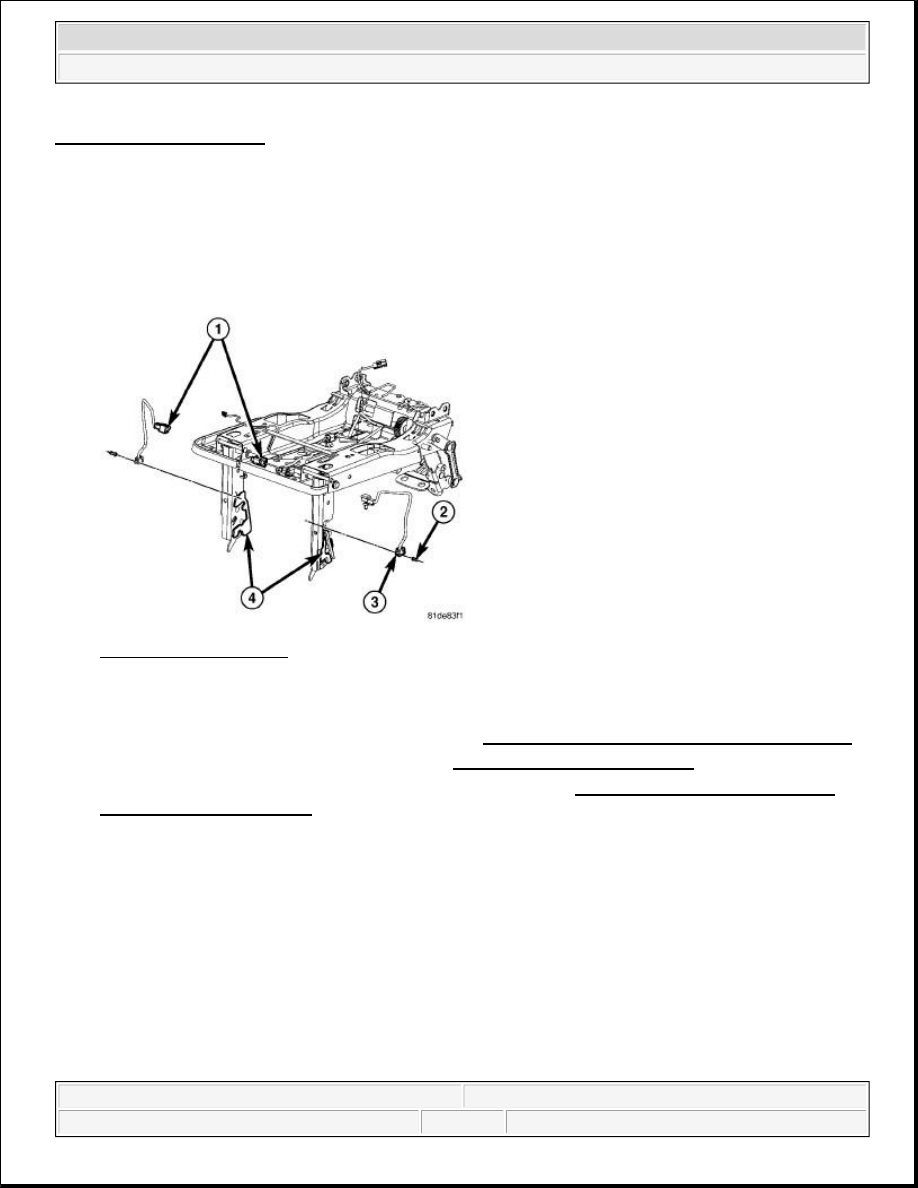
Fig. 22: Latch Components
Courtesy of CHRYSLER LLC
1. Position the switch (1) onto the seat leg assembly (3). Ensure the alignment stud is in the hole on the leg
assembly and that the rivet hole is aligned.
2. Install the retaining rivet (2).
3. Install the tie strap holding the switch wire harness and leg latch release cable (5) to the seat leg assembly.
Fig. 23: Effective Switch
Courtesy of CHRYSLER LLC
4. Connect the switch electrical connector (1).
5. Install the seat cushion and cover assembly. Refer to Body/Seats/COVER, Seat Cushion - Installation .
6. Install the third row power folding seat. Refer to Body/Seats/SEAT - Installation .
7. Perform the third row power folding seat recliner calibration. See Electrical - Power Systems/Power
Seats - Standard Procedure. Verify proper seat operation.
SWITCH, SEAT, THIRD ROW SEAT RECLINER
REMOVAL
REMOVAL
2009 Dodge Grand Caravan SE
2009 ACCESSORIES & EQUIPMENT Power Seats, Third Row - Service Information - Grand Caravan, Town & Country
steve
Monday, May 23, 2011 2:13:15 PM
Page 23
© 2006 Mitchell Repair Information Company, LLC.
Fig. 24: Recliner Switch Retainer Cover
Courtesy of CHRYSLER LLC
1. Remove the effected third row power folding seat. Refer to Body/Seats/SEAT - Removal .
2. Remove outboard side shield.
3. Remove the seat cushion and cover assembly as necessary. Refer to Body/Seats/COVER, Seat Cushion
- Removal .
4. Disengage the recliner switch retaining cover (2) from the retaining tabs (5) on the switch retainer sewn
into the seat cover (1).
5. Slide the switch and retaining cover assembly forward to release it from the two holding tabs (4) and lift
it out of the retainer.
6. Disconnect electrical connector.
7. Separate the switch (3) from the switch retaining cover (2).
INSTALLATION
INSTALLATION
NOTE:
The procedure for replacing the seat recliner switch is the same for both the 60
and 40 third row power folding seats. The following steps should be performed
only on the seat with the inoperative seat recliner switch.
2009 Dodge Grand Caravan SE
2009 ACCESSORIES & EQUIPMENT Power Seats, Third Row - Service Information - Grand Caravan, Town & Country
steve
Monday, May 23, 2011 2:13:15 PM
Page 24
© 2006 Mitchell Repair Information Company, LLC.
Fig. 25: Switch & Retaining Cover Assembly
Courtesy of CHRYSLER LLC
1. Insert the switch (3) into the switch retaining cover (2).
2. Connect electrical connector.
3. Install the switch and retaining cover assembly into the seat cover.
a. Slide the switch and retaining cover assembly (2 and 3) into the two holding tabs (4) of the switch
retainer sewn into the seat cover (1).
b. Push the switch and retaining cover assembly (2 and 3) down until the retaining tabs (5) are fully
engaged.
4. Install the seat cushion and cover assembly. Refer to Body/Seats/COVER, Seat Cushion - Installation .
5. Install the third row power folding seat. Refer to Body/Seats/SEAT - Installation .
6. Perform the third row power folding seat recliner calibration. See Electrical - Power Systems/Power
Seats - Standard Procedure. Verify proper seat operation.
NOTE:
The procedure for replacing the seat recliner switch is the same for both the 60
and 40 third row power folding seats. The following steps should be performed
only on the seat with the inoperative seat recliner switch.
2009 Dodge Grand Caravan SE
2009 ACCESSORIES & EQUIPMENT Power Seats, Third Row - Service Information - Grand Caravan, Town & Country
steve
Monday, May 23, 2011 2:13:15 PM
Page 25
© 2006 Mitchell Repair Information Company, LLC.
Wyszukiwarka
Podobne podstrony:
93ZJ Secc 8R Power Seats
power seats front
prezentacja power media
Power D, zebranie zarządu
karty płatnicze (power point)
elastyczność popytu (power point)
kryptologia w bankowości (power point)
europejski system nagród (power point)
TQM zarządzanie jakością (power point)
V80 Power Management 11May04
Popular Mechanics Repairing Power Antennas
M39h Seats
[ebook renewable energy] Home Power Magazine 'Correct Solar Panel Tilt Angle to Sun'
Iron Maiden Power Slave
McMartin LT2000D Power Amplifier
1 Fragment wywiadu z zespołem Full Power Spirit
Power Source Current Flow Chart
Paralleling Arc Welding Power Sources
Power KSC 570
więcej podobnych podstron