
SETUP MANUAL
CX-One Ver. 1.1
FA Integrated Tool Package
SYSMAC
CXONE-AL@
@@
@C-E
Cat. No. W444-E1-02

CXONE-AL
@@C-E
CX-One Ver. 1.1
FA Integrated Tool Package
Setup Manual
Revised November 2005

iv

v
Notice:
OMRON products are manufactured for use according to proper procedures by a qualified operator
and only for the purposes described in this manual.
The following conventions are used to indicate and classify precautions in this manual. Always heed
the information provided with them. Failure to heed precautions can result in injury to people or dam-
age to property.
!DANGER
Indicates an imminently hazardous situation which, if not avoided, will result in death or
serious injury. Additionally, there may be severe property damage.
!WARNING
Indicates a potentially hazardous situation which, if not avoided, could result in death or
serious injury. Additionally, there may be severe property damage.
!Caution
Indicates a potentially hazardous situation which, if not avoided, may result in minor or
moderate injury, or property damage.
OMRON Product References
All OMRON products are capitalized in this manual. The word “Unit” is also capitalized when it refers to
an OMRON product, regardless of whether or not it appears in the proper name of the product.
The abbreviation “Ch,” which appears in some displays and on some OMRON products, often means
“word” and is abbreviated “Wd” in documentation in this sense.
The abbreviation “PLC” means Programmable Controller. “PC” is used, however, in some Program-
ming Device displays to mean Programmable Controller.
Visual Aids
The following headings appear in the left column of the manual to help you locate different types of
information.
Note Indicates information of particular interest for efficient and convenient opera-
tion of the product.
1,2,3...
1.
Indicates lists of one sort or another, such as procedures, checklists, etc.
OMRON, 2005
All rights reserved. No part of this publication may be reproduced, stored in a retrieval system, or transmitted, in any form, or
by any means, mechanical, electronic, photocopying, recording, or otherwise, without the prior written permission of
OMRON.
No patent liability is assumed with respect to the use of the information contained herein. Moreover, because OMRON is con-
stantly striving to improve its high-quality products, the information contained in this manual is subject to change without
notice. Every precaution has been taken in the preparation of this manual. Nevertheless, OMRON assumes no responsibility
for errors or omissions. Neither is any liability assumed for damages resulting from the use of the information contained in
this publication.

vi

vii
TABLE OF CONTENTS
PRECAUTIONS . . . . . . . . . . . . . . . . . . . . . . . . . . . . . . . . . . .
SECTION 1
Overview . . . . . . . . . . . . . . . . . . . . . . . . . . . . . . . . . . . . . . . . .
SECTION 2
Installation and Uninstallation . . . . . . . . . . . . . . . . . . . . . . .
Revision History . . . . . . . . . . . . . . . . . . . . . . . . . . . . . . . . . . .

viii
TABLE OF CONTENTS

ix
About this Manual:
This manual describes the installation and operation of the CX-One FA Integrated Tool Package and
includes the sections described below.
Please read this manual carefully and be sure you understand the information provided before
attempting to install or operate the CX-One. Be sure to read the precautions provided in the following
section.
Precautions provides general precautions for using the CX-One.
Section 1 provides an overview of the CX-One FA Integrated Tool Package, its contents, and system
requirements.
Section 2 describes how to install and uninstall the software provided in the CX-One.
!WARNING
Failure to read and understand the information provided in this manual may result in per-
sonal injury or death, damage to the product, or product failure. Please read each section
in its entirety and be sure you understand the information provided in the section and
related sections before attempting any of the procedures or operations given.
x
Version Upgrade Information:
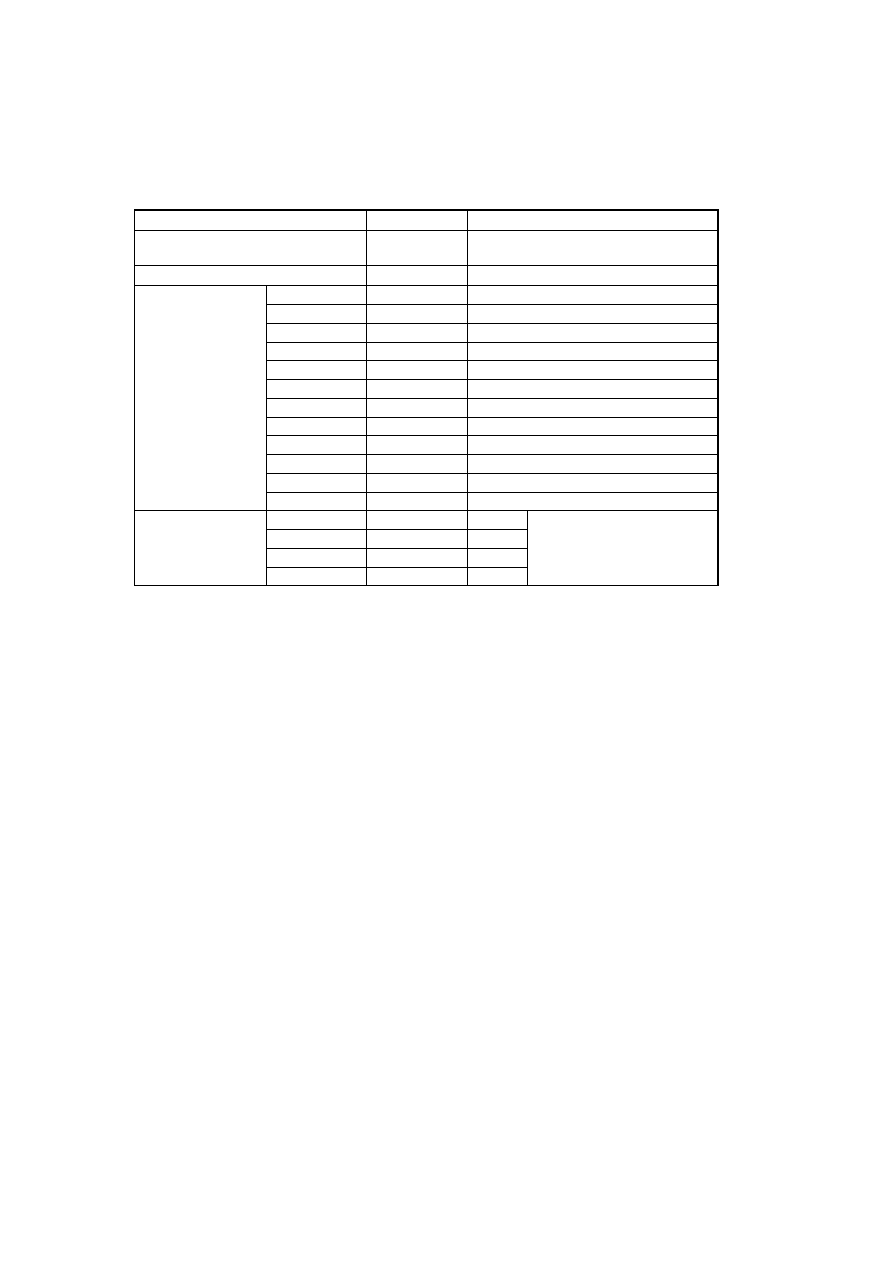
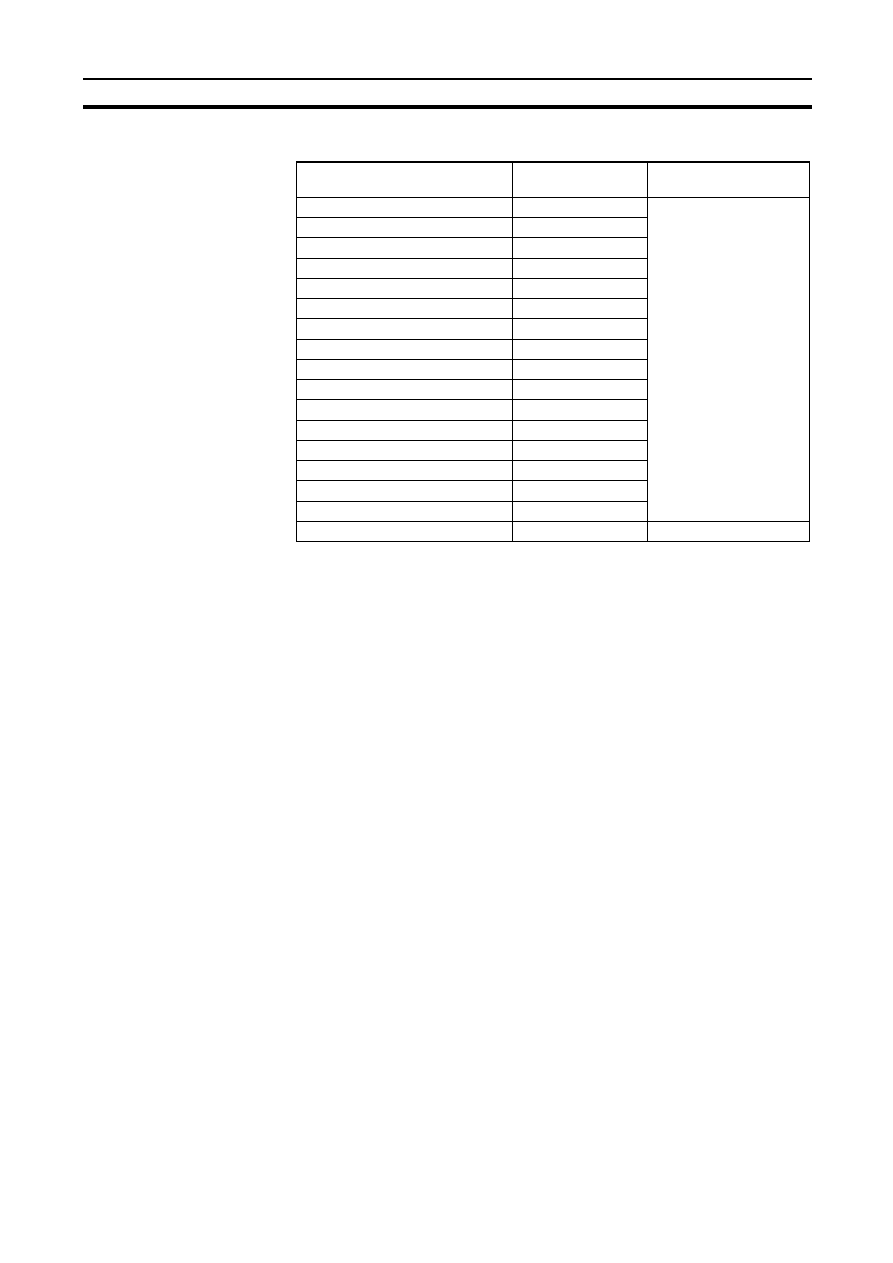
The following have been changed in upgrading the CX-One from version 1.0 to version 1.1.
Item
Ver. 1.0
Ver. 1.1
Hardware space required to install all
of the CX-One software
Approx. 1.6 GB Approx. 1.8 GB
Number of setup disks (CD-ROM)
2 disks
3 disks
Software installed
for the CX-One
CX-Programmer
Ver. 6.0
Ver. 6.1
CX-Integrator
Ver. 1.0
Ver. 1.1
CX-Simulator
Ver. 1.5
Ver. 1.6
NS-Designer
Ver. 6.2
CX-Designer Ver. 1.0
CX-Motion
Ver. 2.2
Ver. 2.22
CX-Motion-NCF
Ver. 1.2
Ver. 1.3
CX-Position
Ver. 2.1
Ver. 2.2
CX-Thermo
Ver. 2.0
Ver. 2.01
CX-Protocol
Ver. 1.6
Ver. 1.61
CX-Process Tool Ver. 4.1
Ver. 5.0
CX-Server
Ver. 2.3
Ver. 2.4
SwitchBox Utility
Ver. 1.6
Ver. 1.61
New software added
to the CX-One
CX-Motion-MCH
---
Ver. 1.0
Refer to 1-3-1 Support Soft-
ware in CX-One and Refer-
ence Manuals for details.
CX-Drive
---
Ver. 1.1
CX-FLnet
---
Ver. 1.0
CX-Profibus
---
Ver. 1.0

xi
Read and Understand this Manual
Please read and understand this manual before using the product. Please consult your OMRON
representative if you have any questions or comments.
Warranty and Limitations of Liability
WARRANTY
OMRON's exclusive warranty is that the products are free from defects in materials and workmanship for a
period of one year (or other period if specified) from date of sale by OMRON.
OMRON MAKES NO WARRANTY OR REPRESENTATION, EXPRESS OR IMPLIED, REGARDING NON-
INFRINGEMENT, MERCHANTABILITY, OR FITNESS FOR PARTICULAR PURPOSE OF THE
PRODUCTS. ANY BUYER OR USER ACKNOWLEDGES THAT THE BUYER OR USER ALONE HAS
DETERMINED THAT THE PRODUCTS WILL SUITABLY MEET THE REQUIREMENTS OF THEIR
INTENDED USE. OMRON DISCLAIMS ALL OTHER WARRANTIES, EXPRESS OR IMPLIED.
LIMITATIONS OF LIABILITY
OMRON SHALL NOT BE RESPONSIBLE FOR SPECIAL, INDIRECT, OR CONSEQUENTIAL DAMAGES,
LOSS OF PROFITS OR COMMERCIAL LOSS IN ANY WAY CONNECTED WITH THE PRODUCTS,
WHETHER SUCH CLAIM IS BASED ON CONTRACT, WARRANTY, NEGLIGENCE, OR STRICT
LIABILITY.
In no event shall the responsibility of OMRON for any act exceed the individual price of the product on which
liability is asserted.
IN NO EVENT SHALL OMRON BE RESPONSIBLE FOR WARRANTY, REPAIR, OR OTHER CLAIMS
REGARDING THE PRODUCTS UNLESS OMRON'S ANALYSIS CONFIRMS THAT THE PRODUCTS
WERE PROPERLY HANDLED, STORED, INSTALLED, AND MAINTAINED AND NOT SUBJECT TO
CONTAMINATION, ABUSE, MISUSE, OR INAPPROPRIATE MODIFICATION OR REPAIR.

xii
Application Considerations
SUITABILITY FOR USE
OMRON shall not be responsible for conformity with any standards, codes, or regulations that apply to the
combination of products in the customer's application or use of the products.
At the customer's request, OMRON will provide applicable third party certification documents identifying
ratings and limitations of use that apply to the products. This information by itself is not sufficient for a
complete determination of the suitability of the products in combination with the end product, machine,
system, or other application or use.
The following are some examples of applications for which particular attention must be given. This is not
intended to be an exhaustive list of all possible uses of the products, nor is it intended to imply that the uses
listed may be suitable for the products:
• Outdoor use, uses involving potential chemical contamination or electrical interference, or conditions or
uses not described in this manual.
• Nuclear energy control systems, combustion systems, railroad systems, aviation systems, medical
equipment, amusement machines, vehicles, safety equipment, and installations subject to separate
industry or government regulations.
• Systems, machines, and equipment that could present a risk to life or property.
Please know and observe all prohibitions of use applicable to the products.
NEVER USE THE PRODUCTS FOR AN APPLICATION INVOLVING SERIOUS RISK TO LIFE OR
PROPERTY WITHOUT ENSURING THAT THE SYSTEM AS A WHOLE HAS BEEN DESIGNED TO
ADDRESS THE RISKS, AND THAT THE OMRON PRODUCTS ARE PROPERLY RATED AND
INSTALLED FOR THE INTENDED USE WITHIN THE OVERALL EQUIPMENT OR SYSTEM.
PROGRAMMABLE PRODUCTS
OMRON shall not be responsible for the user's programming of a programmable product, or any
consequence thereof.

xiii
Disclaimers
CHANGE IN SPECIFICATIONS
Product specifications and accessories may be changed at any time based on improvements and other
reasons.
It is our practice to change model numbers when published ratings or features are changed, or when
significant construction changes are made. However, some specifications of the products may be changed
without any notice. When in doubt, special model numbers may be assigned to fix or establish key
specifications for your application on your request. Please consult with your OMRON representative at any
time to confirm actual specifications of purchased products.
DIMENSIONS AND WEIGHTS
Dimensions and weights are nominal and are not to be used for manufacturing purposes, even when
tolerances are shown.
PERFORMANCE DATA
Performance data given in this manual is provided as a guide for the user in determining suitability and does
not constitute a warranty. It may represent the result of OMRON's test conditions, and the users must
correlate it to actual application requirements. Actual performance is subject to the OMRON Warranty and
Limitations of Liability.
ERRORS AND OMISSIONS
The information in this manual has been carefully checked and is believed to be accurate; however, no
responsibility is assumed for clerical, typographical, or proofreading errors, or omissions.

xiv

xv
PRECAUTIONS
This section provides general precautions for using the CX-One FA Integrated Tool Package.
The information contained in this section is important for the safe and reliable application of the CX-One FA
Integrated Tool Package. You must read this section and understand the information contained before attempting
to set up or operate the CX-One FA Integrated Tool Package.

xvi
Intended Audience
1
1
Intended Audience
This manual is intended for the following personnel, who must also have
knowledge of electrical systems (an electrical engineer or the equivalent).
• Personnel in charge of installing FA systems.
• Personnel in charge of designing FA systems.
• Personnel in charge of managing FA systems and facilities.
2
Safety Precautions
!Caution When performing any of the following operations, always check the network
address and node address of the other node (PLC) and the node address and
unit number of the mounted Unit (PLC CPU Bus Unit or Special I/O Unit) or
the node address of the Component (DeviceNet Master/Slave or Compo-
Way/F Slave), and be sure that these operations can be performed safely for
the current status of the node (Unit or Component):
• Transferring parameter or program data to the other node
• Changing the operating mode of the other node
Unexpected operation may result if parameter or program data is transferred
to the wrong node (DeviceNet Master/Slave or CompoWay/F Slave), the oper-
ating mode of the wrong node is changed, or the other node is not in a suit-
able status to receive the program or parameter data or the operating mode
change.
!Caution Particularly when changing the target PLC to any PLC other than the relay
PLC, check the node address and node number of the target PLC carefully
before executing the change.) Unexpected operation and injury may result if
the wrong PLC is set as the target PLC.
• Changing the operating mode
• Transferring or verifying user-set data link tables
• Transferring or verifying routing tables
• Performing I/O table operations (including transferring CPU Bus Unit or
Special I/O Unit parameters)
Note
Operations performed from the CX-Integrator are performed for the target
PLC, which is not necessarily the same as the relay PLC.
!Caution When transferring parameters that have been created or edited on the com-
puter to actual Units (PLC CPU Bus Units or PLC Special I/O Units) or to
actual components (DeviceNet Masters/Slaves or CompoWay/F Slaves), or
when resetting Units mounted on other PLC nodes or components (DeviceNet
Masters/Slaves or CompoWay/F Slaves) connected via communications with
other PLC nodes, always check the identifying numbers of the actual Units or
Components (i.e., the unit numbers and unit addresses or node addresses)
before executing the transfer or reset. Unexpected operation and injury may
result if parameters are transferred to the wrong Unit or components, or the
wrong Unit or component is reset.

xvii
Safety Precautions
2
Observe the following precautions when using the CX-One.
• When saving or opening a project file, always confirm the location of the
folder and the file name before executing the save or open. The CX-One
automatically switches the folder when saving and opening.
• Before changing the operating mode, always confirm that doing so will not
adversely affect system operation.
• Always check the operation of programs and parameters sufficiently
before using them for actual system operation.
• Confirm that resetting CPU Bus Units, Special I/O Units, and DeviceNet
Master/Slave Units will not adversely affect system operation before
resetting these Units.

xviii
Safety Precautions
2

1
SECTION 1
Overview
This section provides an overview of the CX-One FA Integrated Tool Package, its contents, and system requirements.
The CX-One FA Integrated Tool Package . . . . . . . . . . . . . . . . . . . .
CX-One Features . . . . . . . . . . . . . . . . . . . . . . . . . . . . . . . . . . . . . . .
Confirmation of CX-One Package Contents . . . . . . . . . . . . . . . . . . . . . . . . . .
Confirmation of CX-One Package Contents . . . . . . . . . . . . . . . . . .
User Registration . . . . . . . . . . . . . . . . . . . . . . . . . . . . . . . . . . . . . . .
Support Software in CX-One . . . . . . . . . . . . . . . . . . . . . . . . . . . . . . . . . . . . .
Support Software in CX-One and Reference Manuals. . . . . . . . . . .
Starting Support Software in CX-One . . . . . . . . . . . . . . . . . . . . . . .
System Requirements . . . . . . . . . . . . . . . . . . . . . . . . . . . . . . . . . . . .
Hard Disk Space Requirements for Support Software in CX-One. .

2
Overview of CX-One
Section 1-1
1-1
Overview of CX-One
1-1-1
The CX-One FA Integrated Tool Package
The CX-One FA Integrated Tool Package integrates all of the Support Soft-
ware for OMRON PLCs and Components. Although previously it was neces-
sary to purchase, install, run, and connect online to the PLC separately for the
Support Software for each Unit, the CX-One now provides an integrated
development environment based on the CPS (Component and Network Pro-
file Sheet) for each OMRON Unit or Component. If the CX-One is installed in
a single computer, an integrated operating environment can be used all the
way from setting OMRON PLC Units through system startup and monitoring
to greatly increase system setup efficiency.
1-1-2
CX-One Features
Integrated Software
Management for OMRON
PLCs and Components
• One computer with the CX-One installed provides the Support Software
required to handle any OMRON product.
• All of the Support Software can be installed with a single license.
• Files saved from the various Support Software can be centrally managed
in one location.
Support Software for CPU
Bus Units and Special I/O
Units can be started from
the I/O tables.
When Support Software is started from the I/O tables (i.e., the Unit Configura-
tion Table registered in the PLC), PLC and Unit settings can be inherited so
that they do not have to be re-entered every time Support Software is started.
Component and Network
Profile Sheets (CPS)
• CPU Bus Units and Special I/O Units can be set without concern for
memory addresses and without relying on operation manuals. Parameter
names, selections, and setting ranges are automatically displayed.
• Online, settings for virtual Units on the computer can be compared to the
settings in the actual Units, with any differences displayed in orange in the
comparison results.
• The Unit configuration in I/O tables is displayed using Unit model num-
bers.
• Model and unit version checks can be performed when transferring data
to actual Units.
• Device types on the network can be confirmed using Unit models.
Note
Component and Network Profile Sheet (CPS) files contain CS/CJ-series Unit
definitions or Component definitions within the CX-One. CPS files are pro-
vided in XML format. The CX-One uses CPS files to recognize CS/CJ-series
Units. Settings for CPU Bus Units and Special I/O Units are also created
based on CPS files.
3
Confirmation of CX-One Package Contents
Section 1-2
1-2
Confirmation of CX-One Package Contents
1-2-1
Confirmation of CX-One Package Contents
CX-One Model Number and Contents
CX-One Contents
The contents of CX-One are listed in the following table. Please confirm that
you have received everything.
CXONE-AL
@@C-E CX-One FA Integrated Tool Package
Note
PDF manuals are provided for each Unit.
Name
Model
Installable Support Software
Other included data
CX-One FA Integrated
Tool Package
Ver. 1.1
(CX-One Ver. 1.1)
CXONE-AL
@@C-E CX-Programmer
Ver. 6.1
• OMRON Function Blocks (FB)
• Smart Active Parts (Smart Active Parts)
• CPS files
• Manual (PDF)
CX-Integrator
Ver. 1.1
CX-Simulator
Ver. 1.6
CX-Designer
Ver. 1.0
CX-Motion
Ver. 2.2
CX-Motion-NCF
Ver. 1.3
CX-Motion-MCH
Ver. 1.0
CX-Position
Ver. 2.2
CX-Drive
Ver. 1.1
CX-Protocol
Ver. 1.6
CX-Process Tool
Ver. 5.0
CX-Profibus
Ver. 1.0
Faceplate Auto-Builder for NS Ver. 2.0
CX-Thermo
Ver. 2.0
CX-FLnet
Ver. 1.0
CX-Server
Ver. 2.4
SwitchBox Utility
Ver. 1.6
Installation Disks (CD-ROM)
3 disks
CX-One Introduction Guide (Cat. No. R135)
Printed manuals
and PDF manuals
in the CD-ROM
CX-Programmer Introduction Guide (Cat. No. R132)
CX-Designer Introduction Guide (Cat. No. V089)
Function Block Introduction Guide (Cat. No. R133)
CX-One Setup Manual (Cat. No. W444) (this manual)
PDF manuals in
the CD-ROM
(Only the main
manuals are
listed.)
CX-Programmer Operation Manual (Cat. No. W446)
CX-Programmer Operation Manual: Function Blocks (Cat. No. W447)
CX-Integrator Operation Manual (Cat. No. W445)
CX-Simulator Operation Manual (Cat. No. W366)
CX-Designer User’s Manual (Cat. No. V088)
CX-Motion-NCF Operation Manual (Cat. No. W436)
CX-Motion-MCH Operation Manual (Cat. No. W448)
CX-Position Operation Manual (Cat. No. W433)
CX-Drive Operation Manual (Cat. No. W453)
CX-Protocol Operation Manual (Cat. No. W344)
CX-Profibus Operation Manual (Cat. No. W05E-EN)
CX-Process Tool Software Operation Manual (Cat. No. W372)
Faceplate Auto-Builder for NS Operation Manual (Cat. No. W418)
Smart Function Blocks Reference Manual (Cat. No. W442)
Smart Active Parts Reference Manual (See note. )
CX-Thermo Operation Manual
Online help only
Software License Agreement/User Registration Card
1
4
Confirmation of CX-One Package Contents
Section 1-2
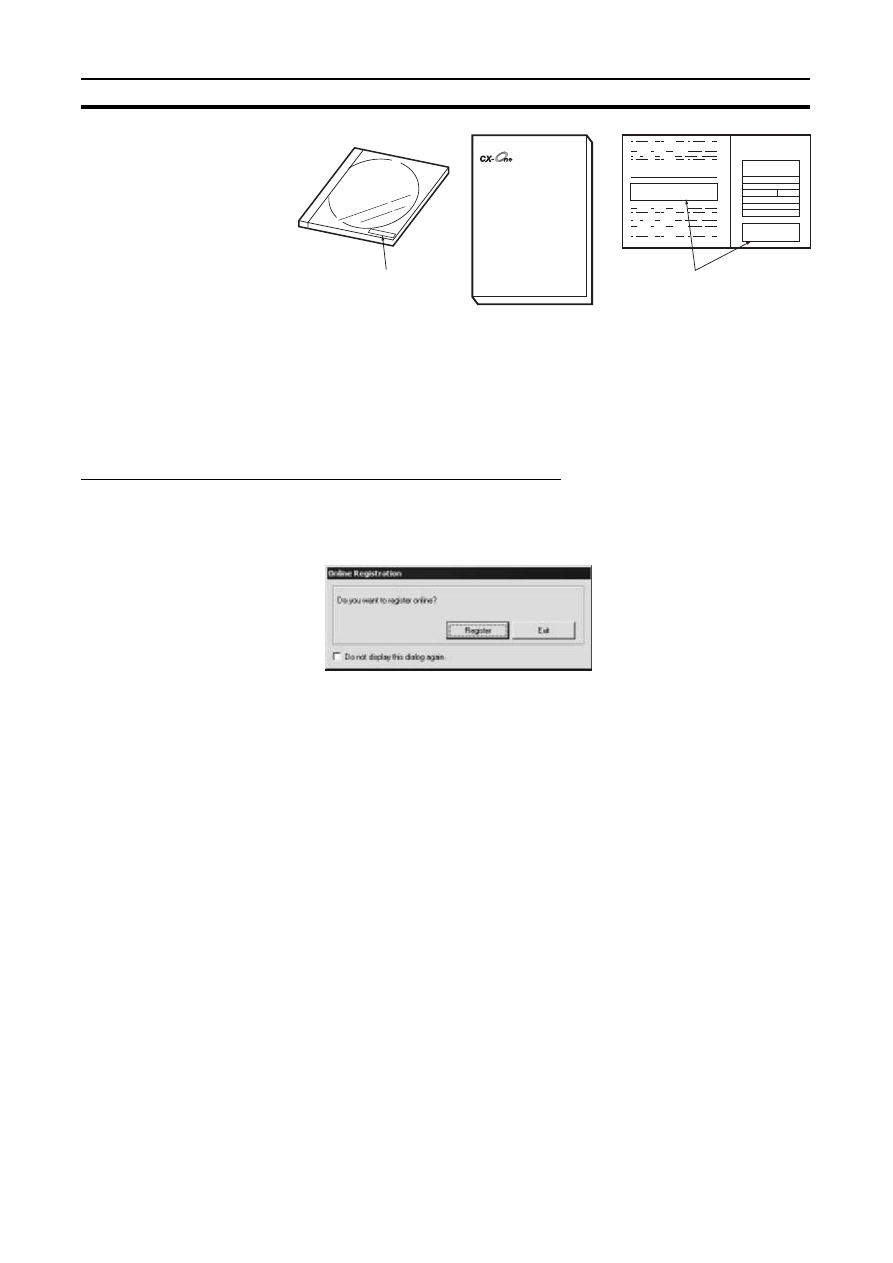
Note
The license number required for installation is printed on the Software License
Agreement/User Registration Card. Place this card in a safe place and be
sure not to loose the license number.
1-2-2
User Registration
Always perform user registration before using the CX-One.
Online User Registration (Internet Connection Required)
Registering from the Online Registration Dialog Box
1,2,3...
1.
The following Online Registration Dialog Box will be displayed after when
computer is restarted upon completion of CX-One installation.
2.
Click the Register Button. A wizard will connect you to the OMRON CX-
One website. (See note.)
Note
If the Exit Button is clicked to cancel online registration, the Online
Registration Dialog Box will be displayed every time Support Soft-
ware in CX-One is started.
3.
Enter the information required for user registration according to the site
windows. Use the product key and license number given on the Software
License Agreement/User Registration Card provided with the CX-One.
4.
After completion of registration, registration confirmation will be sent to the
email address input during the registration procedure.
Note
The Online Registration Dialog Box will be displayed even if online registration
has already been completed. If this happen, select the Do not display this dia-
log again option and click the Exit Button. Also use this procedure in the fol-
lowing cases.
• The Windows login name is different from the registered name.
• User registration was performed using the User Registration Postcard.
User Registration Card
Software License Agreement
The license number is
printed on the cover.
Model number, license number,
and number of licenses are
printed on the card.
CX-One Introduction Guide
FA Integrated Tool Package

5
Support Software in CX-One
Section 1-3
Online Registration from
the CX-Programmer or
other Support Software in
CX-One
OMRON's CX-One website will be displayed if Help - Online Registration is
selected from the menu bar of CX-Programmer or other Support Software in
CX-One. Enter the information required for user registration according to the
site windows. Use the product key and license number given on the Software
License Agreement/User Registration Card provided with the CX-One.
Note
Do not register more than once. For example, if you're returned the card, do
not register online.
Using the User
Registration Postcard
Enter the required information on the User Registration Postcard provided
with the CX-One and send the card.
Note
Approximately two weeks will be required from the time the User Registration
Postcard is posted until confirmation of registration is returned to you. Down-
loading OMRON Standard Libraries and other operations allowed only for reg-
istered users will not be possible during this period.
1-3
Support Software in CX-One
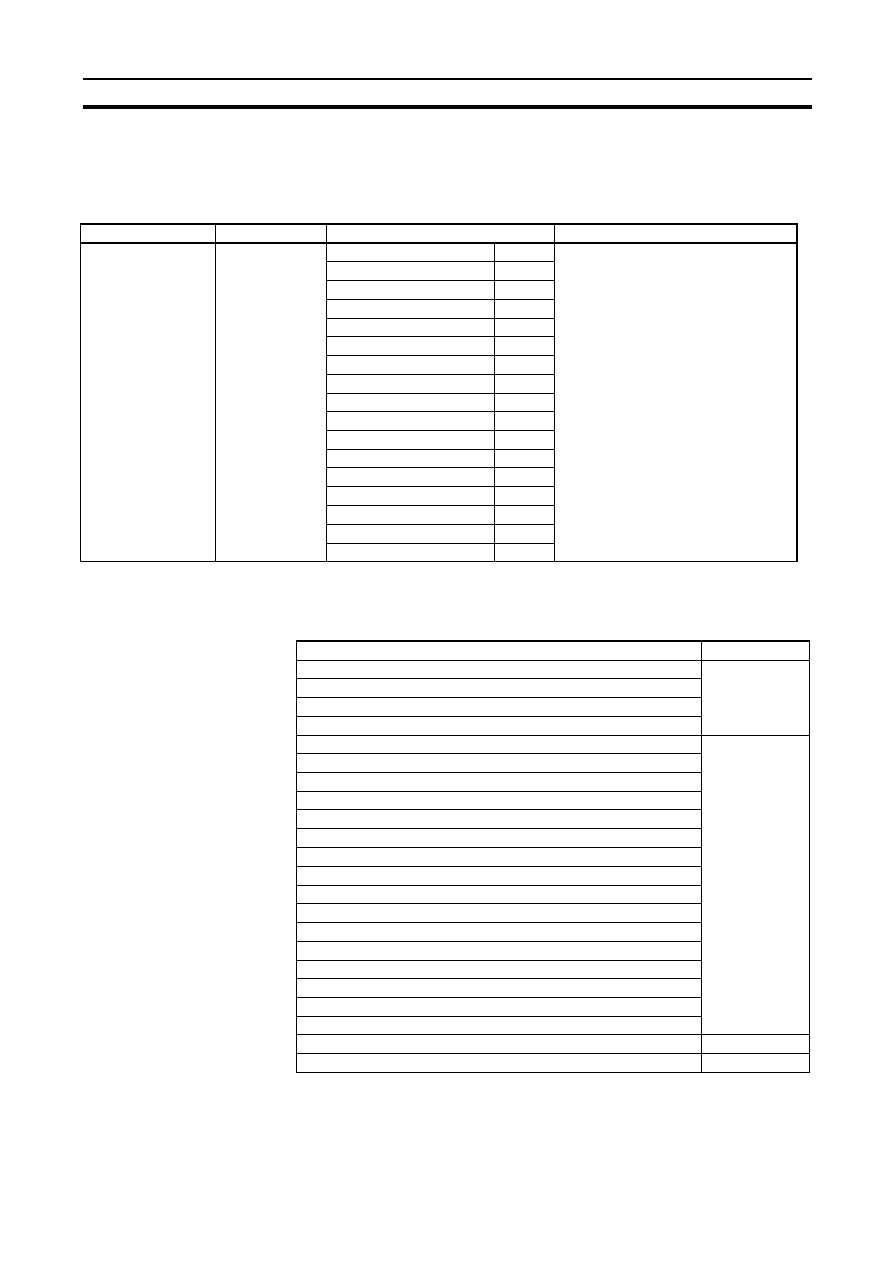
1-3-1
Support Software in CX-One and Reference Manuals
The following tables lists the Support Software that can be installed from CX-
One along with the startup methods and the reference manuals for each.
Support Software
in CX-One
Outline
Startup method within
CX-One
Documentation
(PDF manuals provided
in CD-ROM)
CX-Programmer
Application software to create and debug
programs for SYSMAC CS/CJ/CP-series,
C-series, and CVM1/C-series CPU Units.
Started from a PLC in the
CX-Integrator Network
Configuration Window.
CX-Programmer Opera-
tion Manual (Cat. No.
W446)
CX-Programmer Opera-
tion Manual: Function
Blocks (Cat. No. W447)
CX-Integrator
Application software to build and set up FA
networks, such as Controller Link,
DeviceNet, and CompoWay/F networks.
The Routing Table Component and Data
Link Component can be started from here.
DeviceNet Configuration functionality is also
included.
Started by selecting
Tools - Network Set-
tings from the CX-Pro-
grammer menu bar or
from a CPU Unit in the
CX-Programmer I/O
tables.
CX-Integrator Operation
Manual (Cat. No. W445)
Switch Box Utility
Utility software that helps you to debug
PLCs. It helps you to monitor the I/O status
and to monitor/change present values
within the PLC you specify.
Started from the CX-Pro-
grammer Tools Menu.
Online Help
CX-Protocol
Application software to create protocols
(communications sequences) between
SYSMAC CS/CJ-series or C200HX/HG/HE
Serial Communications Boards/Units and
general-purpose external devices.
Started from a Serial
Communications Board
or Unit in the CX-Pro-
grammer I/O tables.
CX-Protocol Operation
Manual (Cat. No. W344)
CX-Simulator
Application software to simulate SYSMAC
CS/CJ/CP-series CPU Unit operation on
the computer to debug PLC programs with-
out a CPU Unit.
---
CX-Simulator Operation
Manual (Cat. No. W366)
CX-Position
Application software to create and monitor
data for SYSMAC CS/CJ-series Position
Control Units.
Started from a Position
Control Unit in the CX-
Programmer I/O tables.
CX-Position Operation
Manual (Cat. No. W433)
CX-Motion-NCF
Application software to monitor and set
parameters for SYSMAC CJ-series Posi-
tion Control Units and Servo Drivers that
support MECHATROLINK-II communica-
tions.
Started from an NCF
Position Control Unit in
the CX-Programmer I/O
tables.
CX-Motion-NCF Opera-
tion Manual (Cat. No.
W436)

6
Support Software in CX-One
Section 1-3
CX-Motion-MCH
Application software to create data for SYS-
MAC CS/CJ-series MCH Units, create
motion programs, and perform monitoring.
Started from a Motion
Control (MCH) Unit in the
CX-Programmer I/O
tables.
CX-Motion-MCH Opera-
tion Manual (Cat. No.
W448)
CX-Motion
Application software to create data for SYS-
MAC CS/CJ-series, C200HX/HG/HE, and
CVM1/CV-series Motion Control Units, and
to create and monitor motion control pro-
grams.
Started from a Motion
Control Unit in the CX-
Programmer I/O tables.
---
CX-Drive
Application software to set and control data
for Inverters and Servos.
Started from an Inverter
or Servo in the CX-Inte-
grator Network Configu-
ration Window.
CX-Drive Operation Man-
ual (Cat. No. W453)
CX-Process Tool
Application software to create and debug
function block programs for SYSMAC
CS/CJ-series Loop Controllers (Loop Con-
trol Units/Boards, Process Control CPU
Units, and Loop Control CPU Units).
Started from a Loop Con-
troller in the CX-Program-
mer I/O tables.
CX-Process Tool Opera-
tion Manual (Cat. No.
W372)
Faceplate Auto-
Builder for NS
Application software that automatically out-
puts screen data as project files for NS-
series PTs from tag information in function
block programs created with the CX-Pro-
cess Tool.
Started by selecting Exe-
cute - Create Tag File -
Start NSFP from the CX-
Process Tool menu bar
(starts automatically after
execution of the CSV tag
compiler).
Faceplate Auto-Builder
for NS Operation Manual
(Cat. No. W418)
CX-Designer
Application software to create screen data
for NS-series PTs.
Started from a NS-series
PT in the CX-Integrator
Network Configuration
Window.
CX-Designer User’s Man-
ual (V088)
CX-Profibus
Application software for setting the PROFI-
BUS master.
Started from a PROFI-
BUS-DP Unit in the CX-
Programmer I/O tables
CX-Profibus Operation
Manual (Cat. No. W05E-
EN)
CX-Thermo
Application software to set and control
parameters in components such as Temper-
ature Control Units.
Started from a E5
@R,
E5
@N, or E5ZN Temper-
ature Control Unit in the
CX-Integrator Network
Configuration Window.
Online Help
CX-FLnet
Application software for system setting and
monitoring of SYSMAC CS/CJ-series FLnet
Units
Started from a FLnet Unit
in the CX-Programmer
I/O tables.
---
CX-Server
Middleware necessary for CX-One applica-
tions to communicate with OMRON compo-
nents, such, such as PLCs, Display
Devices, and Temperature Control Units.
---
---
PLC Tools (Installed
automatically.)
A group of components used with CX-One
applications, such as the CX-Programmer
and CX-Integrator. Includes the following:
I/O tables, PLC memory, PLC Setup, Data
Tracing/Time Chart Monitoring, PLC Error
Logs, File Memory, PLC clock, Routing
Tables, and Data Link Tables.
Components are started
from the various Support
Software.
Refer to documentation
of individual Support
Software.
Support Software
in CX-One
Outline
Startup method within
CX-One
Documentation
(PDF manuals provided
in CD-ROM)
7
Support Software in CX-One
Section 1-3
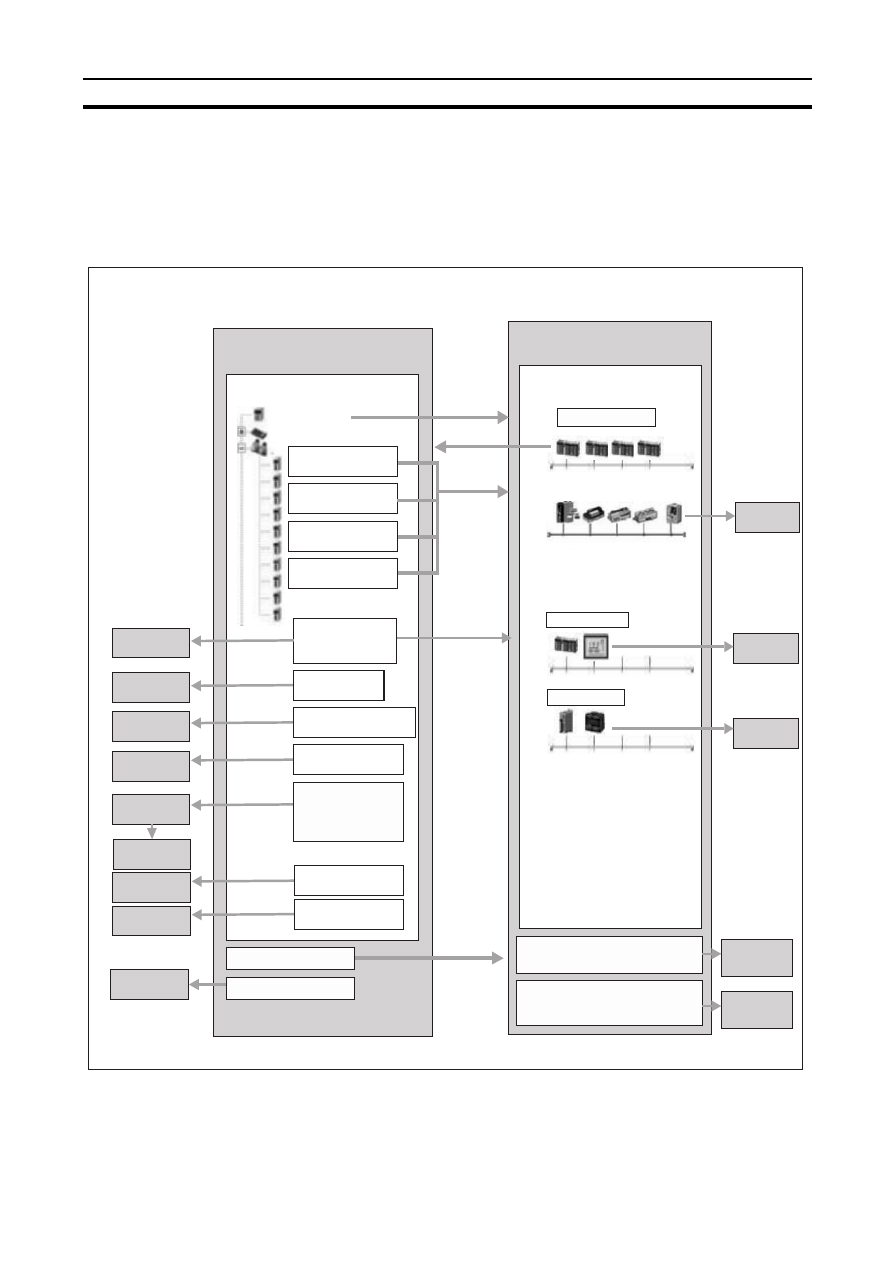
1-3-2
Starting Support Software in CX-One
Support Software in CX-One can be started from the I/O tables in the CX-Pro-
grammer, from the Network Configuration Window in the CX-Integrator, or
from the Tools Menus as shown in the following diagram. This is called the
Specialized Support Tool startup function and it is enabled when the CX-Pro-
grammer and other Support Software is installed from the CX-One.
CX-One Startup Diagram
CX-Programmer
CX-Integrator
I/O Table Window
CS/CJ-series CPU Unit
Start with Settings
Inherited
Start with Settings
Inherited
CPU Rack
Start with Settings
Inherited
Ethernet Unit
(CS1W/CJ1W-ETN
@@)
Controller Link Unit
(CS1W/CJ1W-CLK
@@)
SYSMAC LINK Unit
(CS1W-SLK
@@)
DeviceNet Unit
(CS1W/CJ1W-DRM
@@)
Start with Settings
Inherited
Select CX-Integrator.
CX-Protocol
CX-Position
CX-Motion-NCF
CX-Motion
CX-Process Tool
Start with Settings
Inherited
Select CX-Protocol.
Start with Settings
Inherited
Start with Settings
Inherited
Start with Settings
Inherited
Start with Settings
Inherited
Faceplate Auto-
Builder for NS
Switch Box Utility
Serial Communications
Board/Unit
(CS1W-SCB
@@)
(CS1W/CJ1W-SCU
@@)
Position Control Unit
(CS1W/CJ1W-NC
@@@)
Position Control Unit with MECHA-
TROLINK-II Communications
(CJ1W-NCF
@@)
Motion Control Unit
(CS1W-MC
@@@)
Loop Control Unit/Board
(CS1W-LC001/LCB
@@)
Loop Control CPU Unit
(CJ1G-CPU
@@P)
Process Control CPU Unit
(CS1D-CPU
@@P)
Select Tools - Network Settings.
Select Tools - Switch Box Utility.
Network Configuration Window
CS/CJ-series CPU Unit
Ethernet, Controller Link, or SYSMAC LINK
DeviceNet
NS-series PC (-V1)
Start with Settings
Inherited
NT Link
E5
@@ Temperature
Controller
Start with Settings
Inherited
CompoWay/F
Select Tools - Start Routing Table from the menu bar
or right-click Network Communications Unit in Online
Connection Information Window and select Start Rout-
ing Table from the pop-up menu.
Select Tools - Start Data Link from the menu bar or
right-click Controller Link or SYSMAC LINK Unit in On-
line Connection Information Window and select Start
Data Link from the pop-up menu.
CX-Designer
CX-Thermo
Routing Table
Component
Data Link
Component
CX-Drive
CX-Profibus
PROFIBUS-DP
Master Unit
(CJ1W-PRM
@@)
CX-FLnet
FL-net Unit
(CS1W/CJ1W-FLN
@@)
Started with Settings
Inherited
Start with Settings
Inherited
Start with Settings
Inherited

8
System Requirements
Section 1-4
Starting while Inheriting
Settings
• Setting the device type is not required every time different Support Soft-
ware is started.
• The online connection is also inherited by the newly opened Support Soft-
ware.
• New project files are automatically created for the newly opened Support
Software.
Starting with or without
Inheriting Settings
If Open - Save As is selected after starting Support Software, the save to
folder will be the same as the one used with the CX-Programmer.
1-4
System Requirements
1-4-1
System Requirements
The system requirements for the CX-One are given in the following table.
Note
(1) CX-One Operating System Precaution
The CX-One will not run on Microsoft Windows 95 or any other OS not
listed above. If such an OS is being used on the client computer, the OS
must be upgraded before installing the CX-One. System requirements
and hard disk space may vary with the system environment.
(2) The amount of memory required varies with the Support Software used
in CX-One. Refer to user documentation for individual Support Software
for details.
(3) An RS-232C port is required to connect the Support Software in CX-One
to a PLC. If the computer provides only a USB port, use a CS1W-CIF31
USB-to-RS-232C Conversion Cable. For connecting to the CP Series,
however, an over-the-counter USB cable (type A-B) can be used.
Item
Requirement
Operating system (OS)
(See note 1.)
Japanese or English sys-
tem
Microsoft Windows
98SE
Microsoft Windows
NT (Service Pack 6a)
Microsoft Windows
2000 (Service Pack 3
or higher) or Microsoft
Windows Me
Microsoft Windows
XP
Computer
IBM PC/AT or compatible with a Pentium II 333 MHz or faster processor
(Pentium III 1 GHz or faster recommended.)
Memory
256 MB minimum (See note 2.)
Hard disk
Approx. 1.8 GB or more available space is required to install the complete CX-One package.
Display
SVGA (800
× 600) or better high-resolution display with 256 colors min.
Disk drive
CD-ROM drive
Communications ports
One RS-232C port min. (See note 3.)
Other
Internet access is required for online user registration, including a modem or other hardware
connection method.
9
System Requirements
Section 1-4
1-4-2
Hard Disk Space Requirements for Support Software in CX-One
Note
If the complete CX-One package is installed, approximately 1.8 GB of hard
disk space will be required (including workspace required for installation).
Check available space on your hard disk before installing software.
Support Software in CX-One
Approx. hard disk
space required.
Remarks
CX-Programmer
Approx. 250 MB
Options can be selected
or cleared to install or not
install individual Support
Software.
CX-Integrator
Approx. 100 MB
CX-Position
Approx. 15 MB
CX-Motion
Approx. 40 MB
CX-Motion-NCF
Approx. 100 MB
CX-Motion-MCH
Approx. 100 MB
CX-Drive
Approx. 100 MB
CX-Designer
Approx. 500 MB
CX-Process Tool
Approx. 65 MB
Faceplate Auto-Builder for NS
Approx. 50 MB
CX-Protocol
Approx. 20 MB
CX-Profibus
Approx. 10 MB
CX-Simulator
Approx. 40 MB
CX-Thermo
Approx. 20 MB
CX-FLnet
Approx. 1 MB
Switch Box
Approx. 5 MB
CX-Server and PLC Tools
Approx. 300 MB
Always installed.

10
System Requirements
Section 1-4

11
SECTION 2
Installation and Uninstallation
This section describes how to install and uninstall the software provided in the CX-One.
Confirmations before Installation . . . . . . . . . . . . . . . . . . . . . . . . . . .
Installing the CX-One. . . . . . . . . . . . . . . . . . . . . . . . . . . . . . . . . . . .
Modifying the Installed Support Software in the CX-One . . . . . . . .
Re-installing the Support Software in the CX-One . . . . . . . . . . . . .
Removing all the Support Software in the CX-One . . . . . . . . . . . . .
Uninstalling the CX-Server . . . . . . . . . . . . . . . . . . . . . . . . . . . . . . .

12
Installing the CX-One
Section 2-1
2-1
Installing the CX-One
2-1-1
Confirmations before Installation
Time Requirements
The CX-One FA Integrated Tool Package integrates all of the Support Soft-
ware for OMRON PLCs and Components. If the complete CX-One package is
installed, between approximately 15 and 40 minutes will be required for instal-
lation depending on the performance of the computer.
Example: The complete CX-One package can be installed in approximately
10 minutes with an Intel Celeron 2.2-GHz processor, 512 MB or
RAM, and a 48X CD-ROM drive.
Precautions for
Installation
• Close all programs running on Windows before starting the installation
procedure.
• The CX-One cannot be installed from a network drive, such as a CD drive
or hard disk drive shared on a network. Always install the CX-One from a
CD drive on the computer onto which the software is being installed.
• Do not install onto a compressing drive. Recovery will not be possible if
file corruption occurs.
• Do not stop the setup process in the middle. Copied files may remain in
the installation directory.
• Do not turn OFF or reset the computer in the middle of the installation pro-
cess. Computer data may become corrupted.
• The CX-One cannot be installed on Windows 95.
• For Windows 98, always use Windows 98 Second Edition.
• For Windows 2000, Service Pack 3 or later must be installed. The service
pack can be confirmed by selecting Start - Settings - Control Panel -
System. The service pack will be displayed under System on the General
Tab Page of the System Properties Dialog Box. If a service pack is not
displayed, no service pack has been installed. Refer to Microsoft's web-
site for service pack installation methods.
• On Windows NT 4.0, 2000, or XP, the administrator or a user with admin-
istrator rights must perform the installation. Other users will not have suffi-
cient write permissions and access errors will occur.
• It may be necessary to restart Windows after finishing the installation. If
required, restart Windows according to the messages displayed by the
Installer.
Note
Internet Explorer version 5.0 or higher must be installed in advance to use the
CX-Server Installer. Install Internet Explorer version 5.0 in advance if it is not
already installed.
2-1-2
Installing the CX-One
The following procedure is for installing the CX-One when none of the Sup-
port Software in the CX-One has been previously installed.
Note
If the complete CX-One package is installed, approximately 1.8 GB of hard
disk space will be required (including workspace required for installation).
Check available space on your hard disk before installing software.
1,2,3...
1.
Insert disk 1 of the CX-One installation disks (CD-ROM) into the CD-ROM
drive.
13
Installing the CX-One
Section 2-1
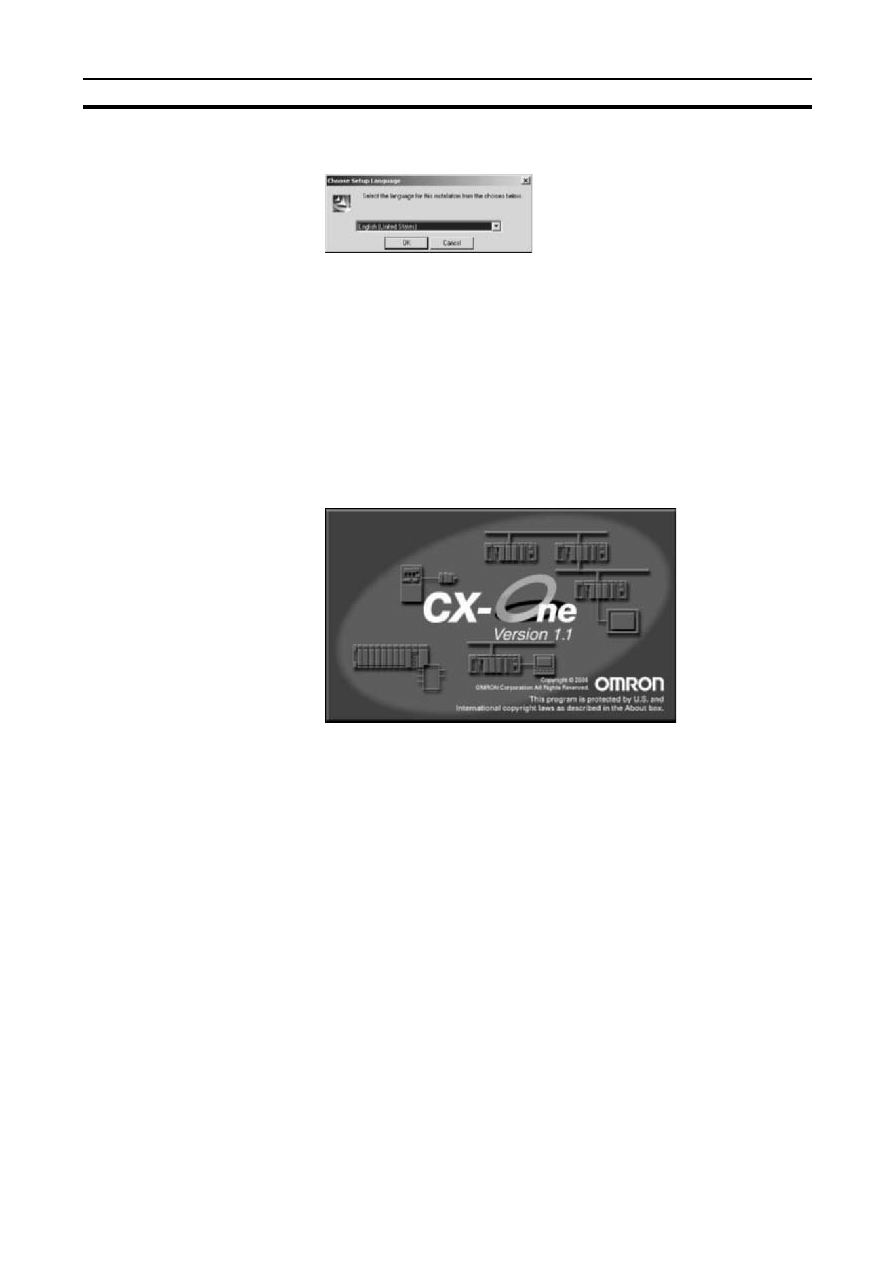
2.
The setup program will start automatically and the Choose Setup Lan-
guage Dialog Box will be displayed.
The language of the operating system running on the computer will be se-
lected automatically.
If the above dialog box is not displayed, double-click the CD-ROM driver
from the Explorer to display it.
Select the language to be installed and then click the OK Button.
Note
Only the CX-Programmer supports languages other than English
and Japanese (including Italian, Spanish, German, French, and
Chinese). If any language other than English or Japanese is select-
ed, the CX-Programmer will be installed in the selected language
and all other software will be installed in English (United States).
When the OK Button is clicked, a splash window for the CX-One will be
displayed, followed by the Setup Wizard.
3.
If the CX-Server is already installed on the computer, the following dialog
box will be displayed as a prompt to delete the older version of the CX-
Server.
Click the OK Button and uninstall the CX-Server. If the Cancel Button is
clicked, CX-One installation will be exited.
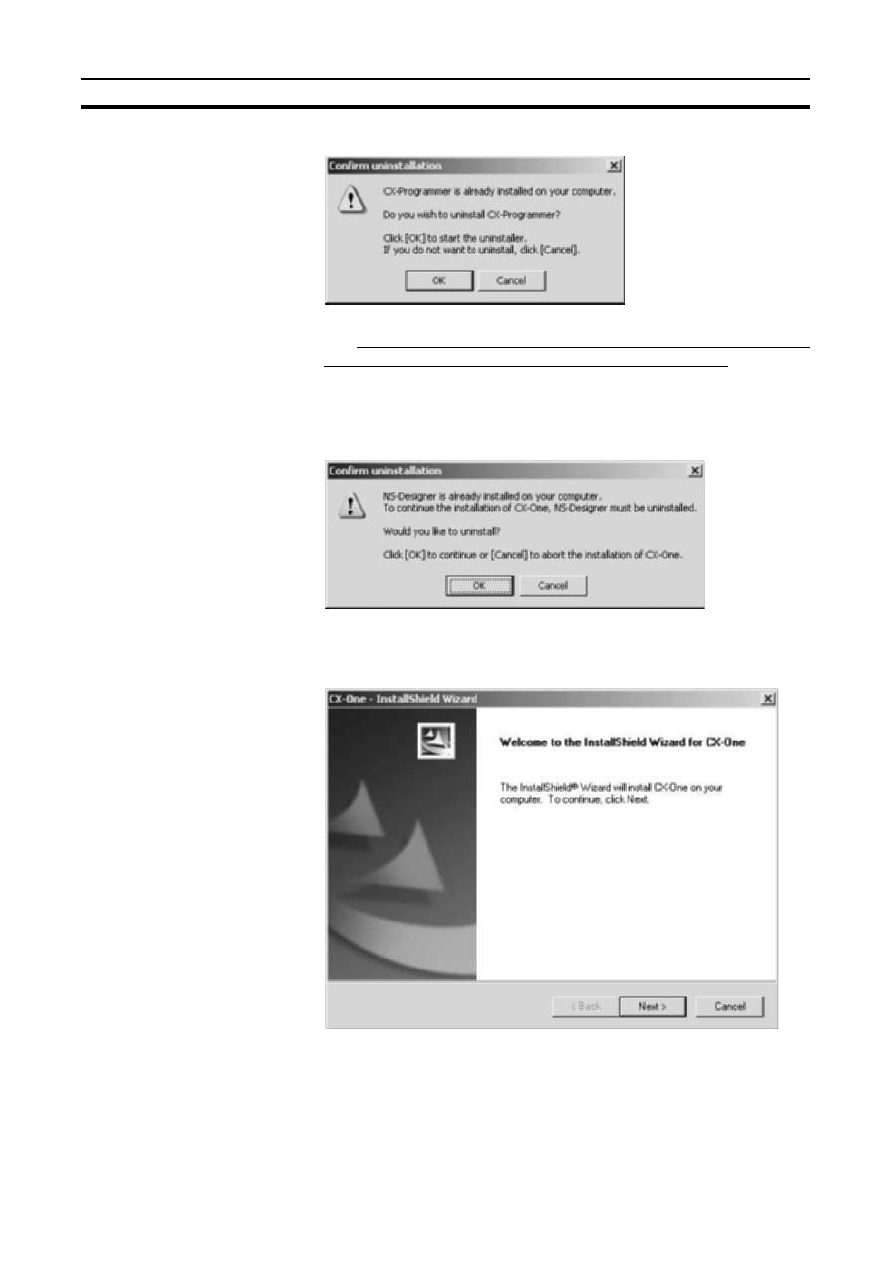
If an earlier version of any of the Support Software is already installed in
the computer, one of the following dialog boxes will be displayed.
14
Installing the CX-One
Section 2-1
Dialog Box When an Earlier Version of the CX-Programmer Is Installed
Click the OK Button and uninstall the earlier version of the CX-Program-
mer. If the Cancel Button is clicked, CX-One installation will continue with-
out uninstalling the earlier version of the CX-Programmer. This would
result in there being two versions of the CX-Programmer installed at the
same time, so we recommend always clicking the OK Button.
Dialog Box When an Earlier Version of Other Support Software Is
Installed
Click the OK Button and uninstall the earlier version of the Support Soft-
ware. If the Cancel Button is clicked, CX-One installation will be canceled.
4.
The CX-One Setup Wizard will be started. Click the Next Button.

15
Installing the CX-One
Section 2-1
5.
The License Agreement Dialog Box will be displayed.
Read the license agreement completely and if you accept all of the terms,
select the I accept the terms of the license agreement Option and click the
Next Button.
6.
The User Information Dialog Box will be displayed.
The default names registered in the computer will be entered for the user
name and company name. Enter the license number and click the Next
Button. The license number is given on the Software License/Registration
Card provided with the product.
16
Installing the CX-One
Section 2-1
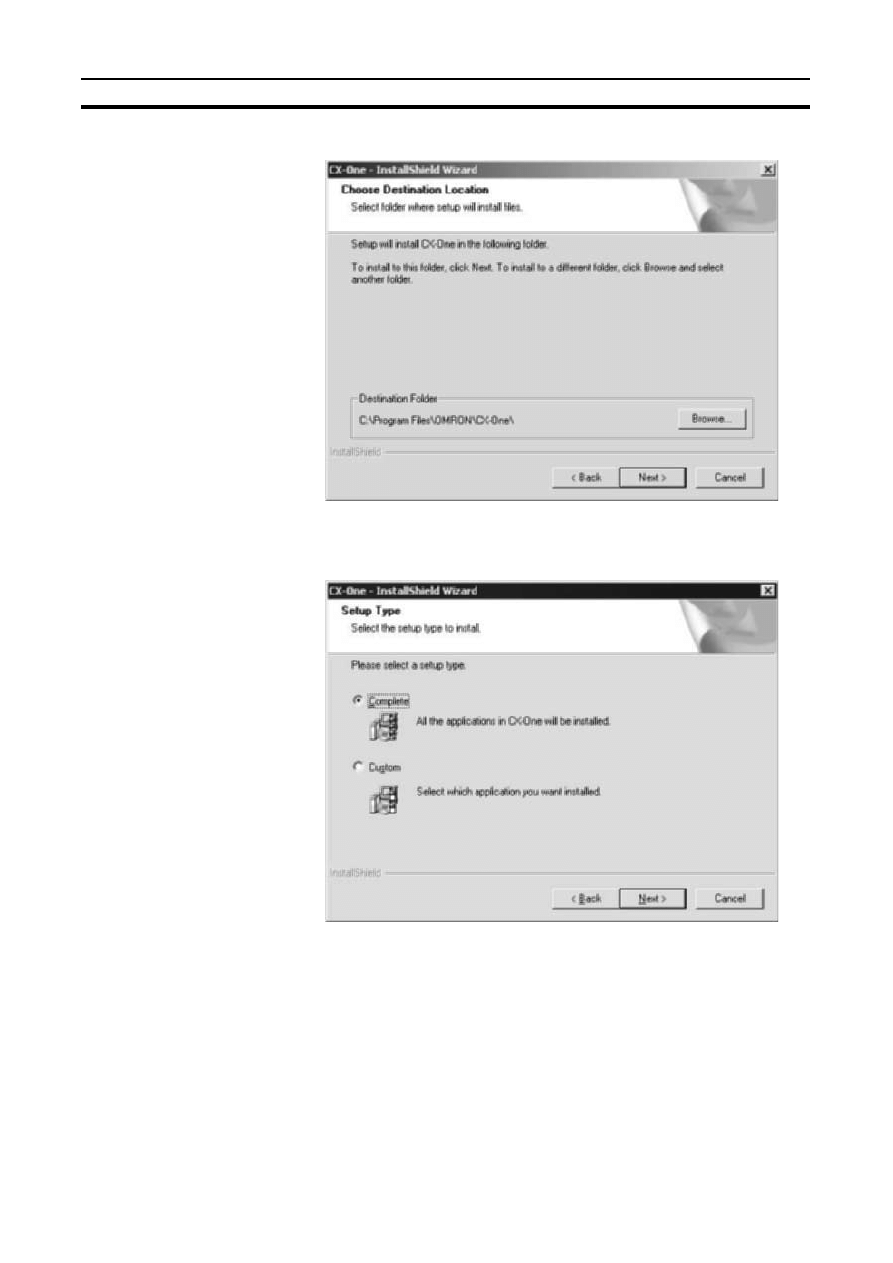
7.
The Choose Destination Location Dialog Box will be displayed.
Select the destination location and click the Next Button. By default, the
CX-One will be installed in C:\Program Files\OMRON\CX-One\.
8.
The Setup Type Dialog Box will be displayed.
Select the Complete or Custom Option and click the Next Button.
Note
(1) CX-One installation will require approximately the same amount of time
(approximately 15 to 40 minutes) regardless of whether Complete or
Custom is selected. As a rule, select Complete and install the entire pack-
age at the same time provided that there is sufficient disk space avail-
able.
17
Installing the CX-One
Section 2-1
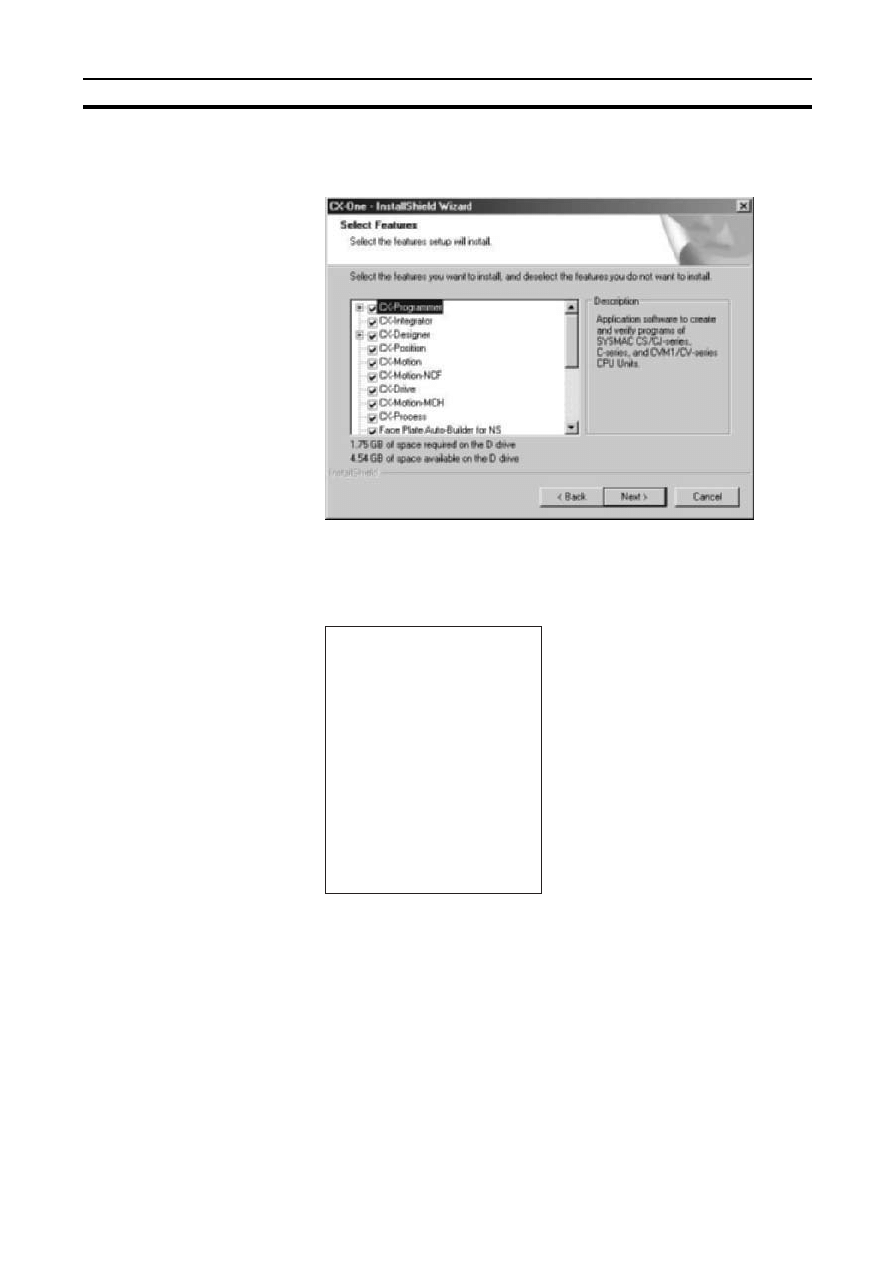
(2) CX-Profibus will normally not be installed. Select Custom and then select
CX-Profibus to install it.
The Select Features Dialog Box will be displayed if Custom was selected.
Note
The above dialog box will not be displayed if Complete is selected.
Proceed to step 9.
Select the features to be installed and click the Next Button.
Options
@ CX-Programmer
@ CX-Integrator
@ CX-Designer
@ CX-Position
@ CX-Motion
@ CX-Motion-NCF
@ CX-Drive
@ CX-Motion-MCH
@ CX-Process
@ Face Plate Auto-Builder for NS
@ CX-Protocol
@ CX-Thermo
@ CX-Simulator
@ SwitchBox
@ CX-Profibus
@ CX-FLnet
@ CX-Server (Selected and grayed out.)
@ PLC Tools (Selected and grayed out.)
18
Installing the CX-One
Section 2-1
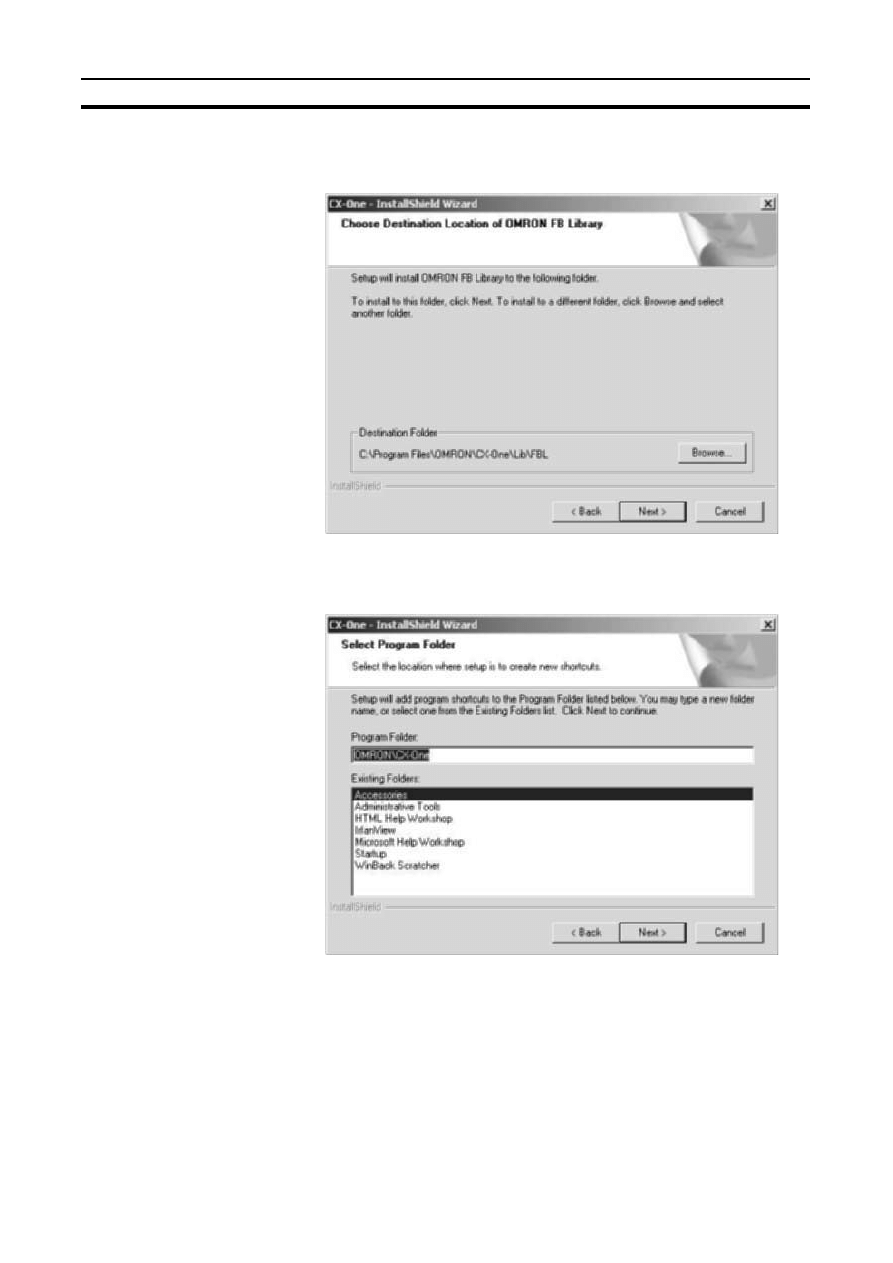
9.
If Complete was selected or if Custom was selected and the Smart FB Li-
brary feature was selected, the Choose Destination Location of the
OMRON FB Library Dialog Box will be displayed.
Check the destination location and click the Next Button. By default, the
Smart FB Library will be install in C:\Program Files\OMRON\CX-One\FBL\.
10. The Select Program Folder Dialog Box will be displayed.
Specify the location to add a shortcut in the program folder of the Windows
Start Menu and click the Next Button.
19
Installing the CX-One
Section 2-1
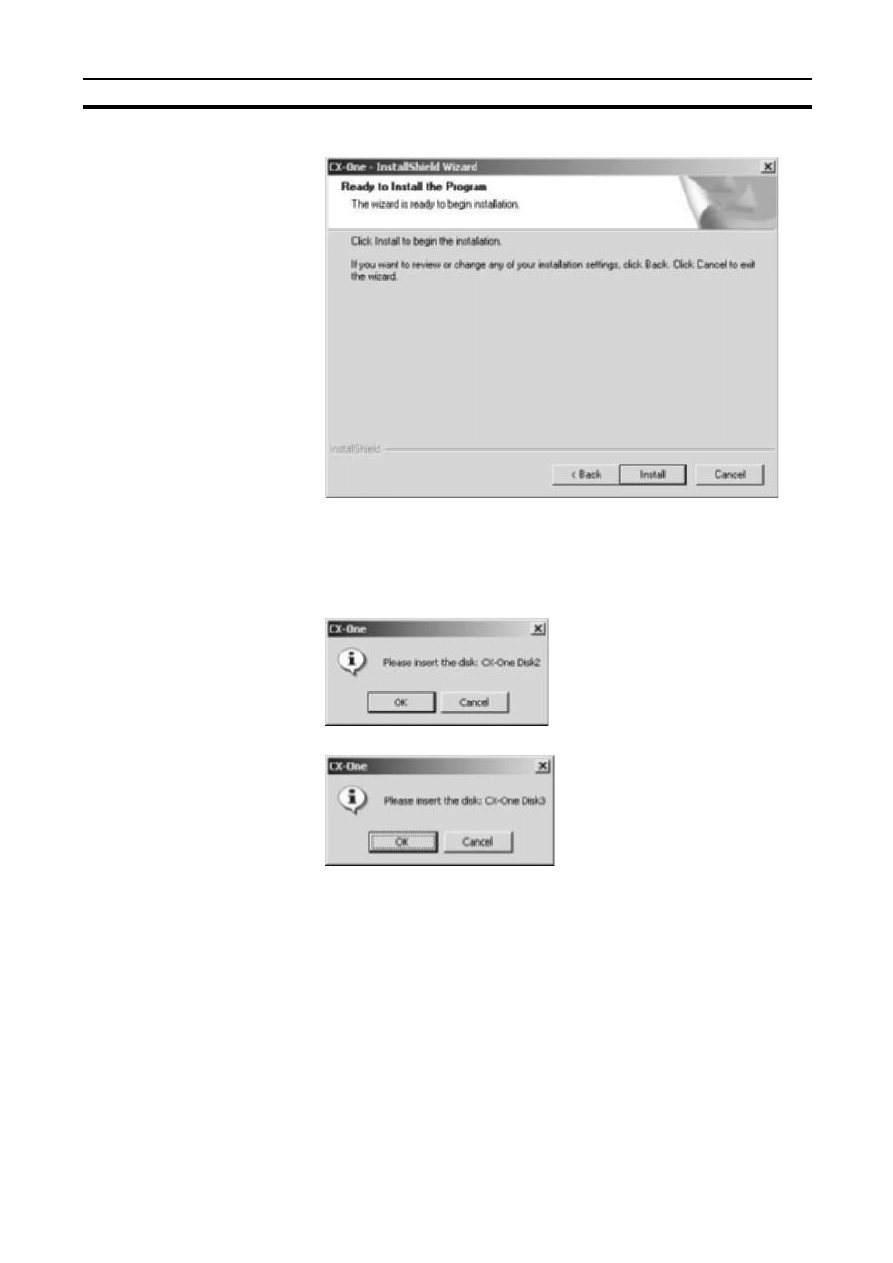
11. The Ready to Install the Program Dialog Box will be displayed.
Click the Install Button. The Installer will start the installation.
To check the installation settings, click the Back Button. To cancel instal-
lation, click the Cancel Button.
12. The following dialog box will be displayed. Replace the installation disk
(CD-ROM) as instructed by the message and click the OK Button.
Alternatively:
20
Installing the CX-One
Section 2-1
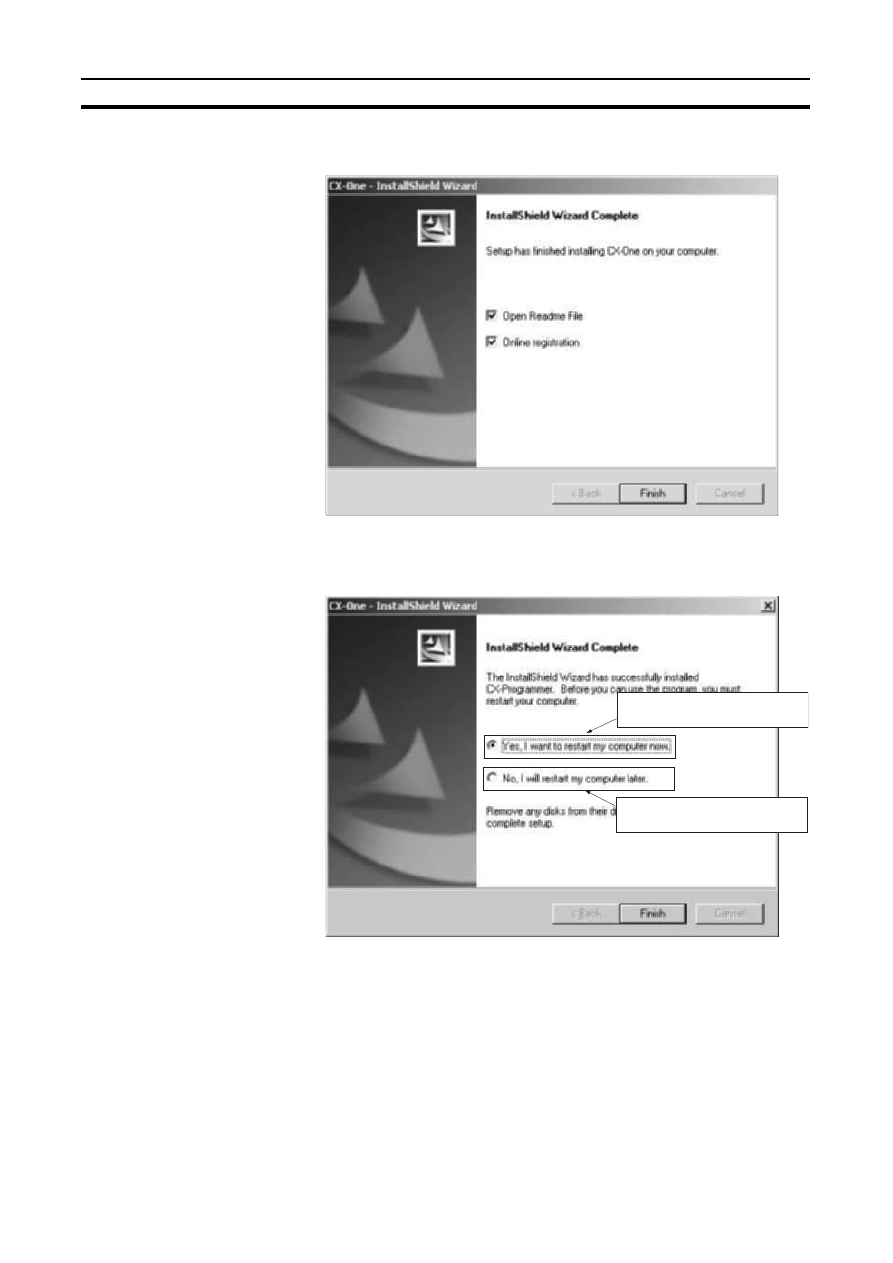
13. The following dialog box will be displayed when the Installer completes the
installation.
Click the Finish Button. The Readme file will be displayed.
The following dialog box will be displayed if restarting the computer is re-
quired.
Select the desired option and click the Finish Button. If the Yes, I want to
restart my computer now Option is selected, the computer will be restarted
and then the Readme file will be displayed.
Note (a) It may be necessary to restart Windows after finishing the instal-
lation. If required, restart Windows according to the messages
displayed by the Installer.
(b) Always read the Readme.txt file before using the CX-One.
Select to restart the computer
immediately (default).
Select to restart the computer
manually at a later time.

21
CX-One Maintenance
Section 2-2
14. The Online Registration Dialog Box will be displayed when the Readme file
is closed.
A wizard will be started and will connect to the OMRON CX-One website
if the Register Button is clicked. (See notes a and b.)
Note (a) If the Exit Button is clicked to cancel registration, the Online Reg-
istration Dialog Box will be displayed every time CX-One Support
Software is started.
(b) Online installation will not be possible if the computer is not con-
nected to the Internet. Enter the required information on the reg-
istration card and mail it in.
This completes installation of the CX-One.
Note
(1) Even if the previous versions for Support Software in the CX-One are un-
installed, the folders for the previous versions will remain in C:\Program
Files\OMRON. By default, the project files and other files that were cre-
ated by the Support Software (e.g., .cxp project files for CX-Programmer)
will be in this directory. If this data is to be used by the CX-One, we rec-
ommended moving the files to suitable folders after installing CX-One.
(2) Any OMRON Support Software or Communications Middleware that is
not included in CX-One will remain installed on the hard disk even after
the CX-One is installed. This will not create any particular problems.
Examples:
• DeviceNet Configurator (Support Software)
• FinsGateway (Communications Middleware)
2-2
CX-One Maintenance
The following maintenance can be performed once the CX-One has been
installed.
1,2,3...
1.
Modifying the installed Support Software in the CX-One
2.
Re-installing the Support Software in the CX-One that was previously in-
stalled
3.
Removing all the Support Software in the CX-One
2-2-1
Modifying the Installed Support Software in the CX-One
The CX-One Support Software that is installed can be modified using the fol-
lowing procedure.
Note
Whenever installing from an individual Support Software CD-ROM any Sup-
port Software that has previously been installed from the CX-One Package,
always uninstall the previous Support Software first. Use the following proce-
dure and clear the selection for only the individual Support Software to be
reinstalled. When the installation procedure has been completed, then install
the Support Software from the individual Support Software CD-ROM. The
22
CX-One Maintenance
Section 2-2
Support Software will not operate properly if it is installed without first unin-
stalling it.
If the version of the CX-Server on the individual Support Software CD-ROM is
lower than the version of the CX-Server bundled with the CX-One, install only
the CX-Position and NOT the CX-Server. (A message will be displayed if the
version is lower.) If a version of CX-Server that is lower than the version with
the CX-One is installed, the CX-One will not operate properly.
1,2,3...
1.
Insert disk 1 of the CX-One installation disks (CD-ROM) into the CD-ROM
drive.
2.
The Choose Setup Language Dialog Box will be displayed and the lan-
guage of the operating system running on the computer will be selected
automatically.
(If the following dialog box is not displayed, double-click the CD-ROM driv-
er from the Explorer to display it.)
Select the language to be installed and then click the OK Button.
3.
A splash window for the CX-One will be displayed, and the installation
modification process will start.
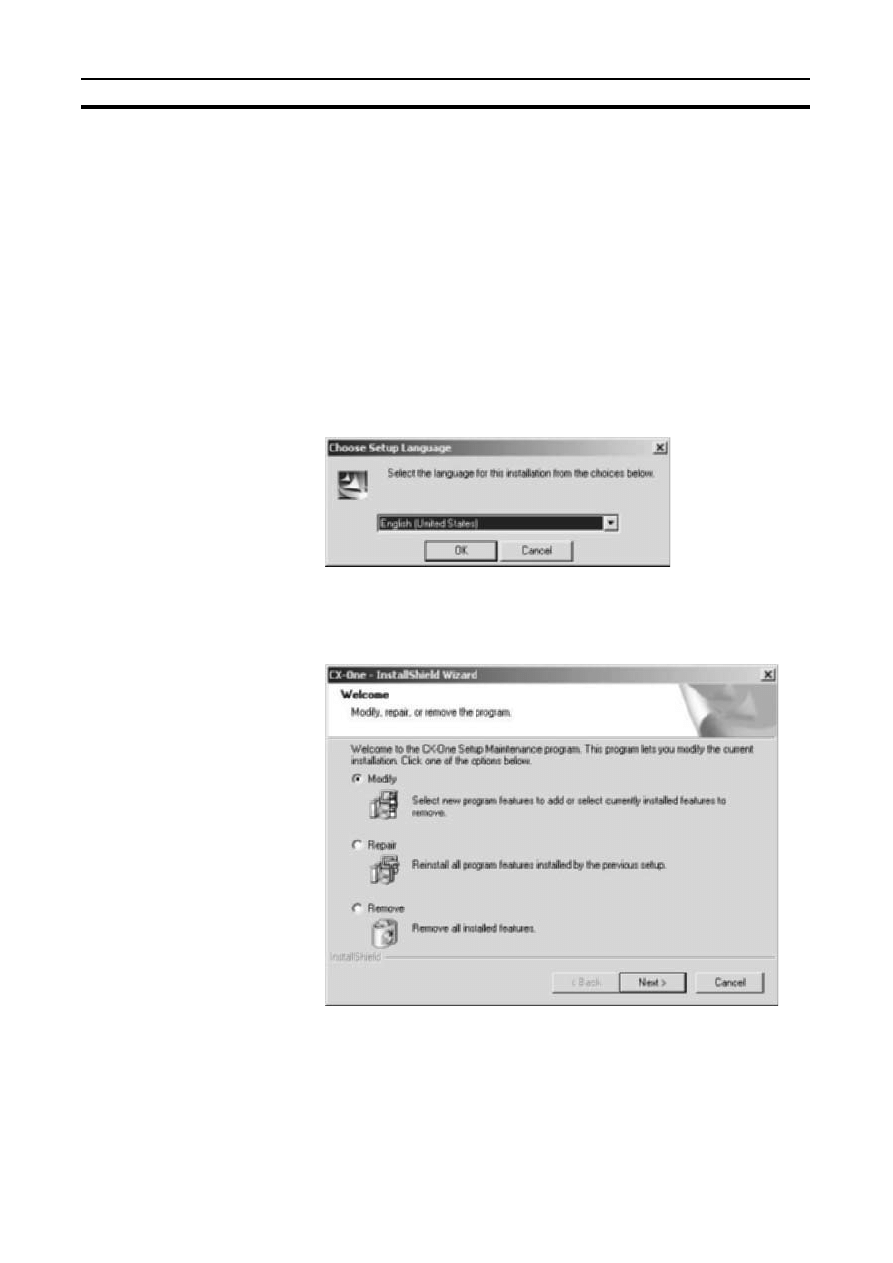
4.
The CX-One Maintenance Wizard will be displayed.
Select the Modify Option and click the Next Button.
23
CX-One Maintenance
Section 2-2
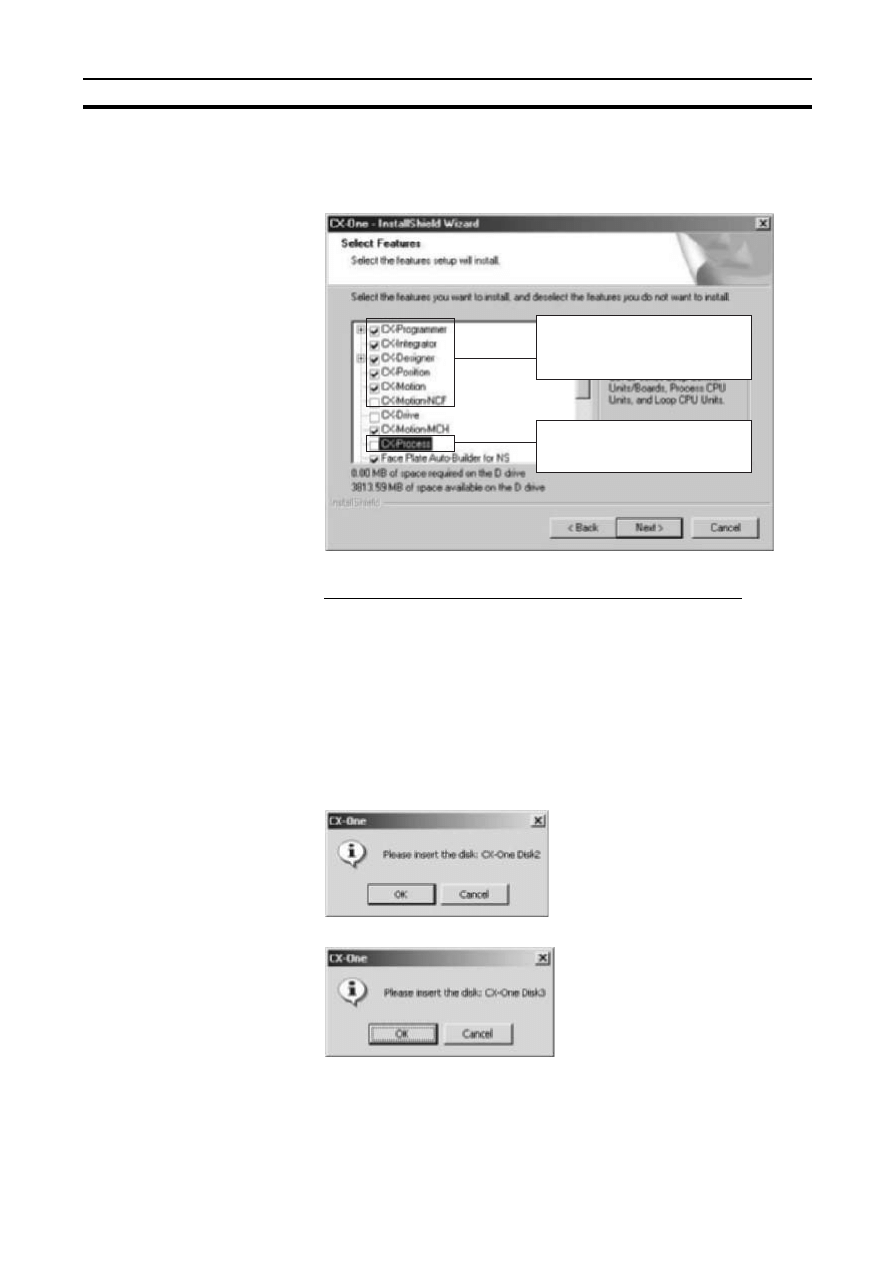
5.
The Select Features Dialog Box will be displayed.
The features that are selected will change depending on the CX-One Sup-
port Software already installed in the computer. The CX-One installation
will be modified according to the features selected here.
• Select the features to be added.
• Be sure that all features that are not to be deleted are selected.
• Clear the selections for features to be removed.
Note
Any Support Software feature that is not selected here will be deleted from the
compute. Check the selections carefully.
Click the Next Button.
The CX-One installation will be modified according to the feature selec-
tions. Continue with the installation procedure according to the messages
displayed by the Installation Wizard.
6.
If either of the following dialog boxes is displayed, replace the installation
disk (CD-ROM) as instructed by the message and click the OK Button.
Alternatively:
Select the features that are to be
added or those that are not to be
deleted.
Clear the selections for features that
are to be deleted.
24
CX-One Maintenance
Section 2-2
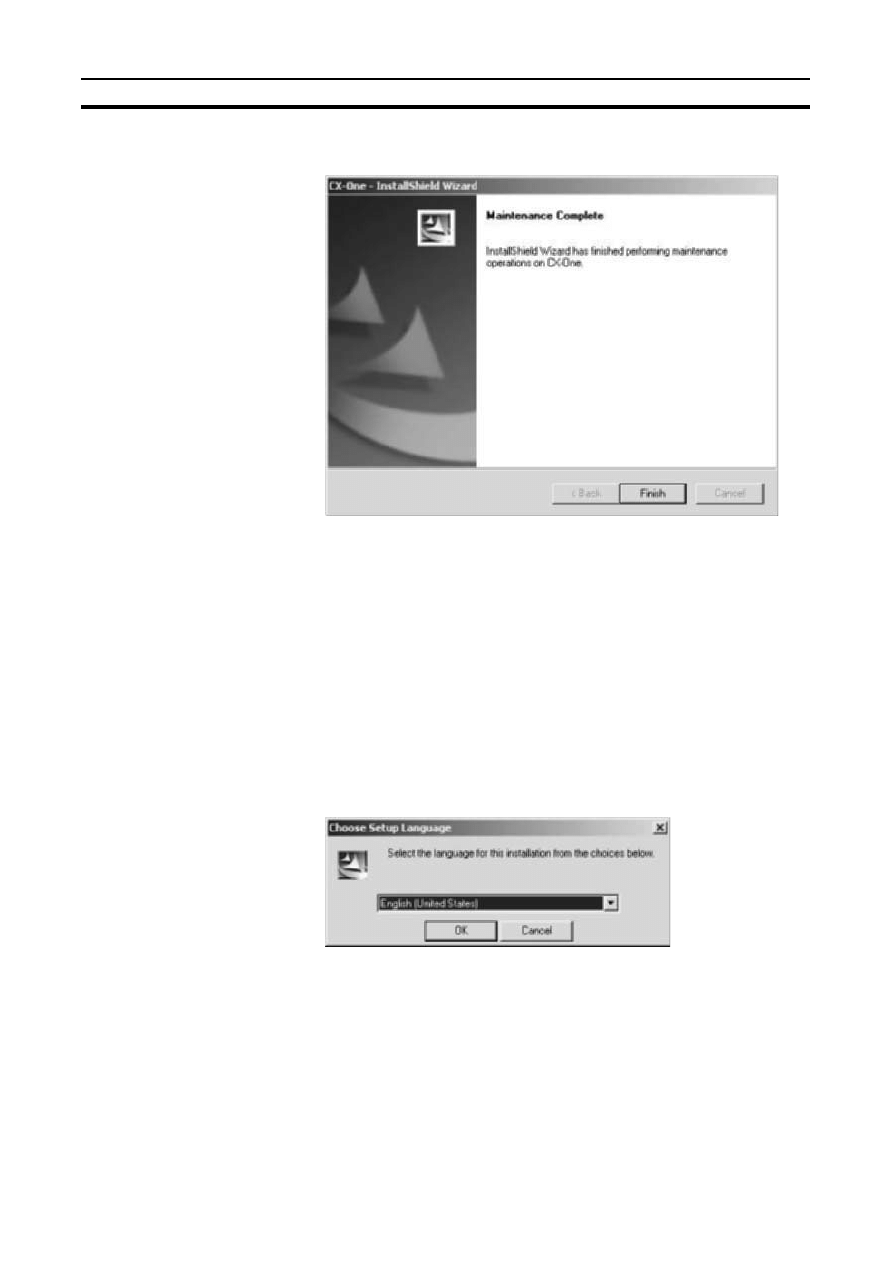
7.
The following dialog box will be displayed when the Installer completes
modifying the installation. Click the Finish Button.
2-2-2
Re-installing the Support Software in the CX-One
The previously installed Support Software can be re-installed using the follow-
ing procedure. This procedure should be used to restore a previous installa-
tion, e.g., if previously installed CX-One Support Software has been deleted
by accident.
1,2,3...
1.
Insert disk 1 of the CX-One installation disks (CD-ROM) into the CD-ROM
drive.
2.
The Choose Setup Language Dialog Box will be displayed and the lan-
guage of the operating system running on the computer will be selected
automatically.
(If the following dialog box is not displayed, double-click the CD-ROM driv-
er from the Explorer to display it.)
Select the language to be installed and then click the OK Button.
25
CX-One Maintenance
Section 2-2
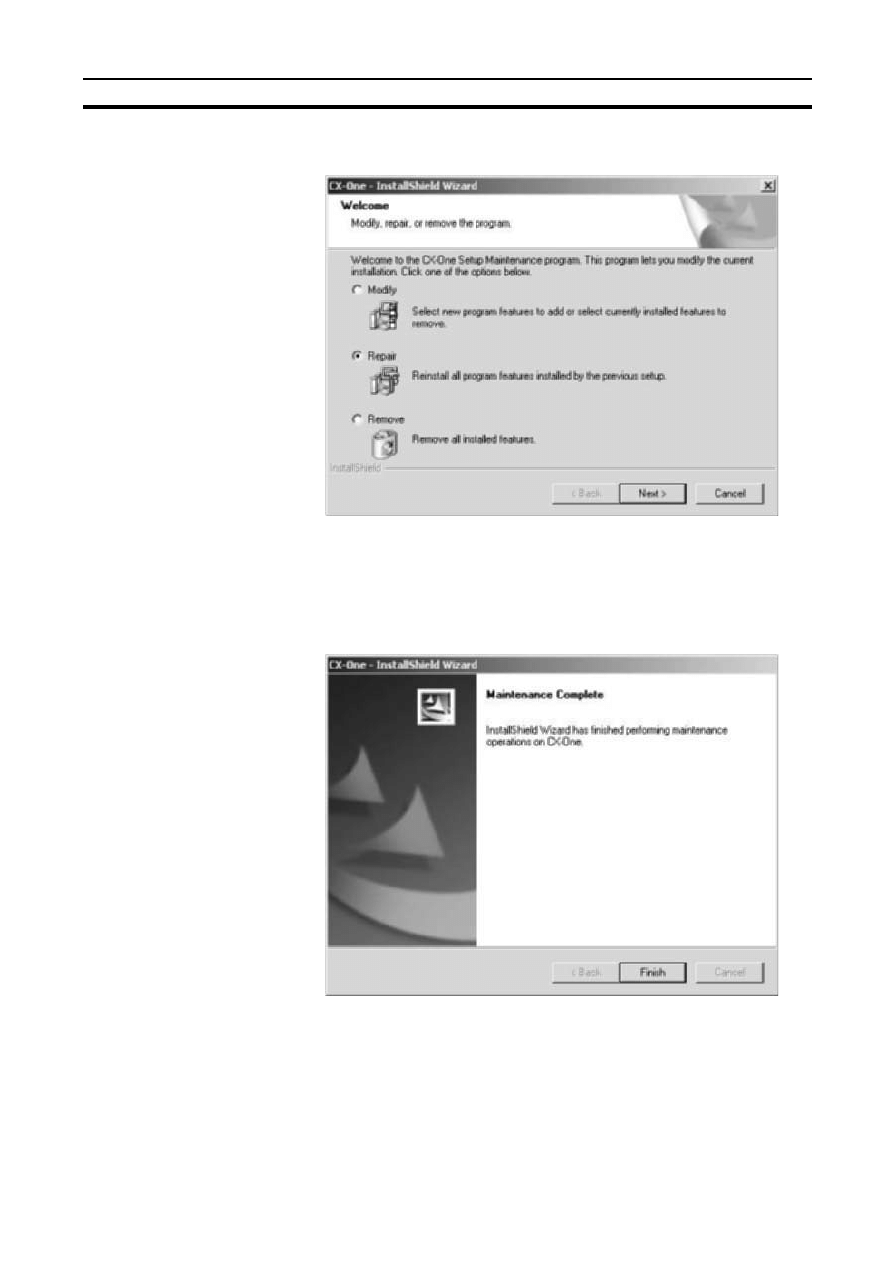
3.
A splash window for the CX-One will be displayed, and the re-installation
process will start. The CX-One Installation Wizard will be displayed.
Select the Repair Option and click the Next Button.
The previously installed CX-One Support Software will be re-installed.
Continue with the installation procedure according to the messages dis-
played by the Installation Wizard.
4.
The following dialog box will be displayed when the Installer completes re-
installing the software. Click the Finish Button.
26
CX-One Maintenance
Section 2-2
2-2-3
Removing all the Support Software in the CX-One
Use the following procedure to delete all of the Support Software in the CX-
One from the computer.
Note
The CX-Server will not be deleted from the computer even if all CX-One Sup-
port Software is deleted. The CX-Server must be uninstalled separately to
delete it.
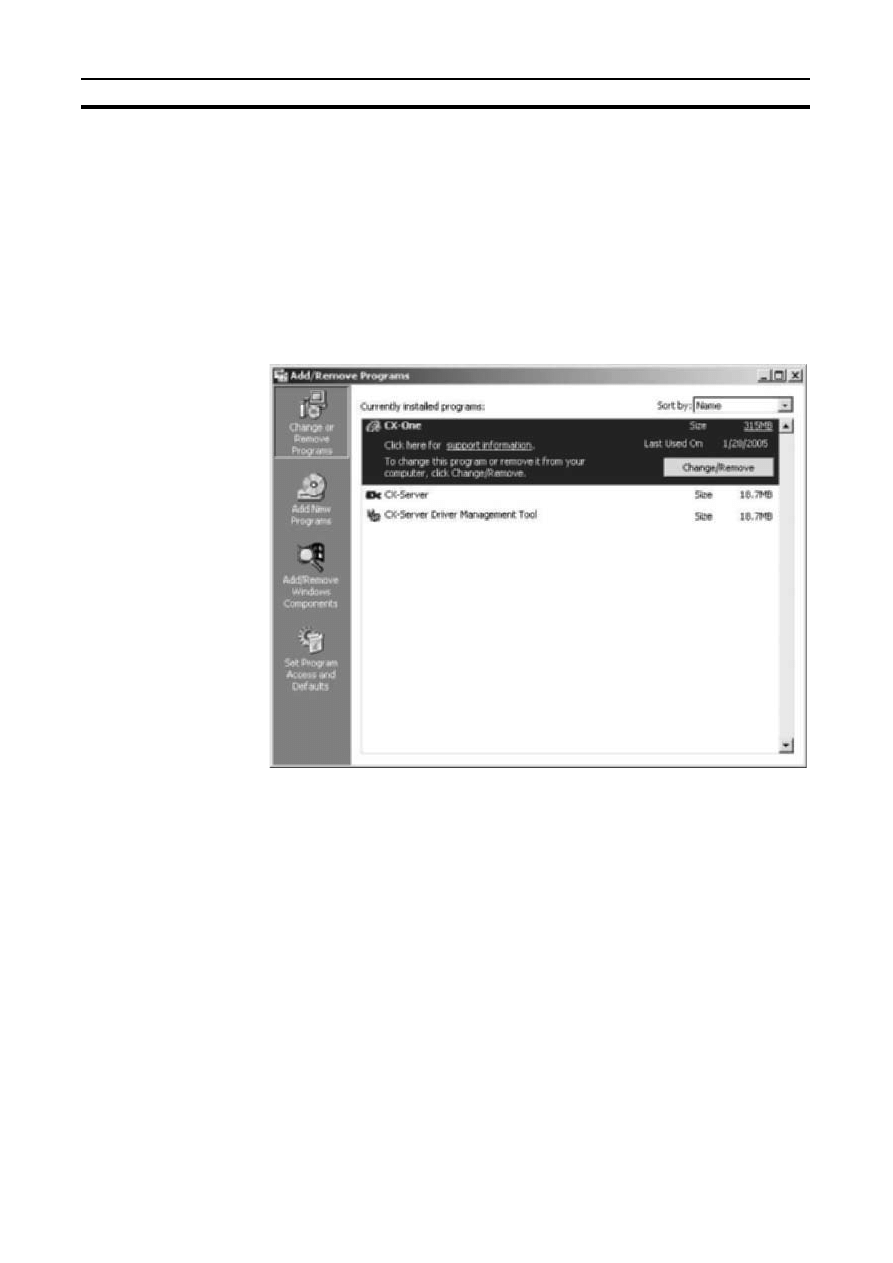
1,2,3...
1.
Select Start - Settings - Control Panel - Add/Remove Programs. The
Add/Remove Programs Dialog box will be displayed.
2.
Select CX-One from the dialog box.
3.
Click the Change/Remove Button.
27
CX-One Maintenance
Section 2-2
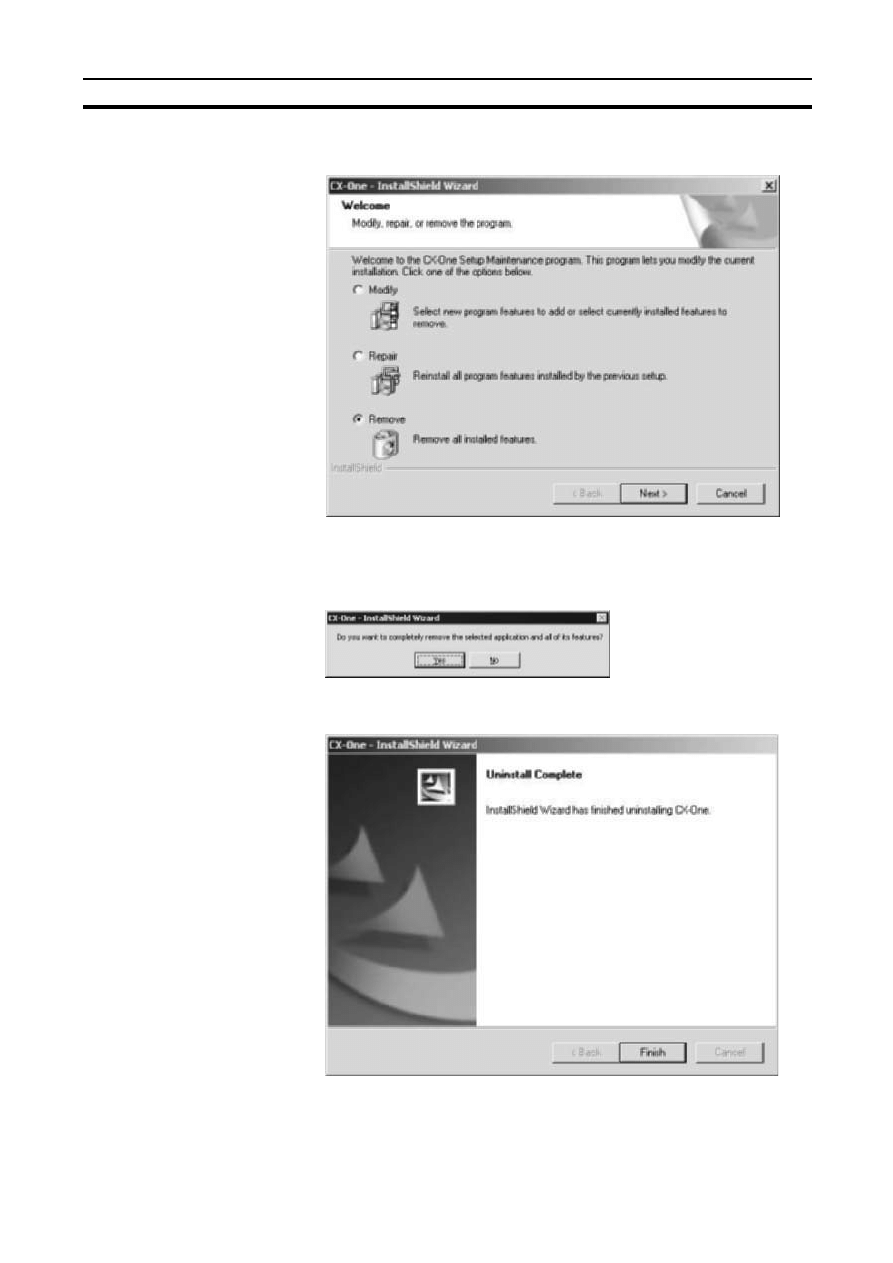
4.
The CX-One Installation Wizard will be displayed. Select the Remove Op-
tion and click the Next Button.
5.
The following dialog box will be displayed to confirm that all CX-One soft-
ware is to be removed. Click the Yes Button to start the Uninstaller that will
delete the CX-One and then follow the messages in the dialog boxes to de-
lete the CX-One.
6.
When the uninstallation has been completed, the following dialog box will
be displayed. Click the Finish Button.
28
CX-One Maintenance
Section 2-2
2-2-4
Uninstalling the CX-Server
Always uninstall the CX-Server Diver Management Tools before uninstalling
the CX-Server.
Note
(1) Do not uninstall the CX-Server if there are other programs on the com-
puter that use it as the communications driver, e.g., the CX-Programmer.
If the CX-Server is uninstalled, it will no longer be possible to use these
other programs.
(2) Do not uninstall the CX-Server while other programs that use it as the
communications driver are running on the computer, e.g., the CX-Pro-
grammer. The CX-Server may not uninstall properly if other programs are
using it.
(3) When uninstalling all of the CX-Server software, always uninstall the CX-
Server Driver Management Tool before uninstalling the CX-Server. If the
CX-Server is uninstalled first, it may no longer be possible to uninstall the
CX-Server Driver Management Tool properly.
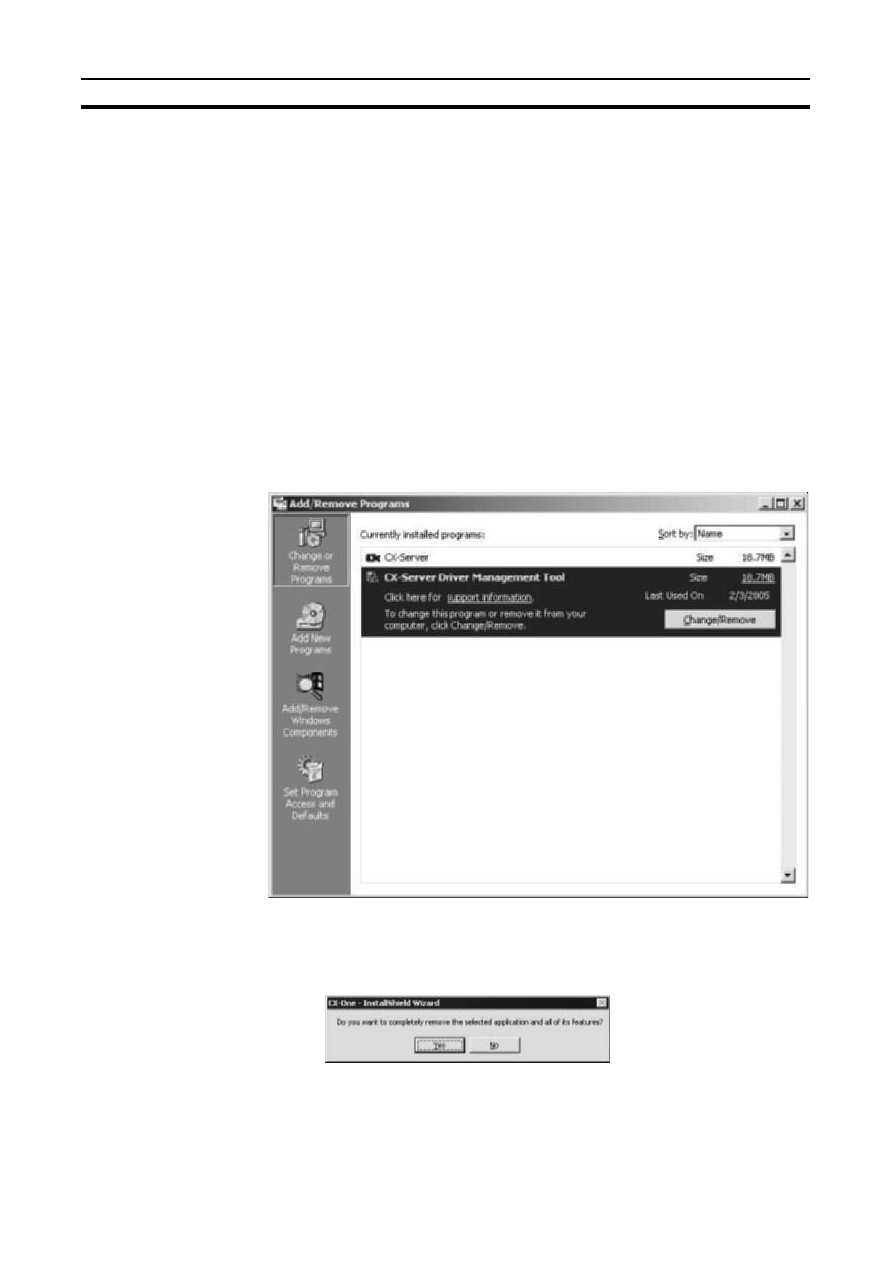
1,2,3...
1.
Select Start - Settings - Control Panel - Add/Remove Programs. The
Add/Remove Programs Dialog Box will be displayed.
Select CX-Server Driver Management Tool from the dialog box and click
the Change/Remove Button.
2.
A file deletion confirmation dialog box will be displayed. Click the Yes But-
ton.
The CX-Server Driver Management Tool will be uninstalled.
29
CX-One Maintenance
Section 2-2
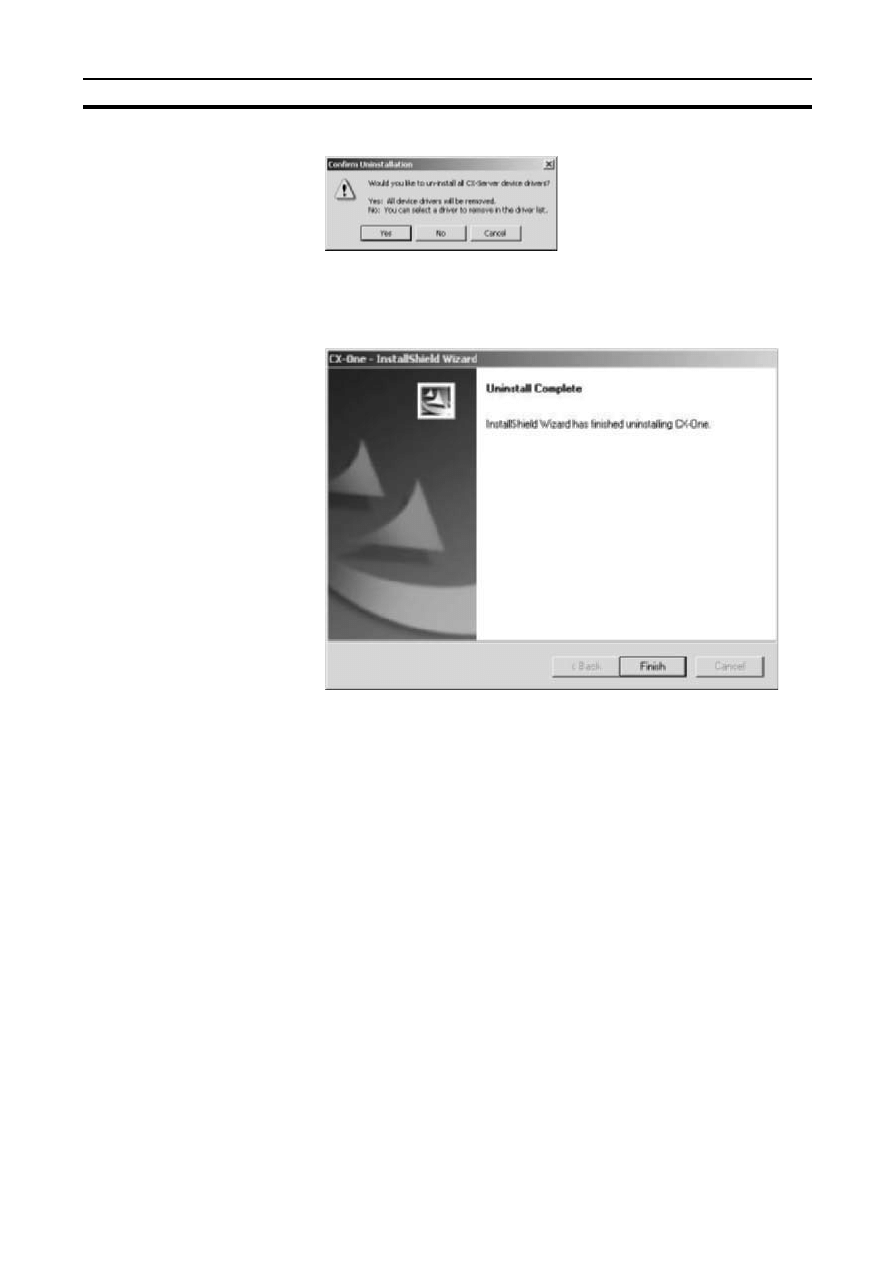
3.
An uninstall confirmation dialog box will be displayed. Click the Yes Button.
4.
The CX-Server will be uninstalled.
When the uninstallation has been completed, the following dialog box will
be displayed. Click the Finish Button. The Add/Remove Programs Dialog
Box will be displayed again.
5.
In the same way, select CX-Server from the Add/Remove Programs Dia-
log Box, click the Change/Remove Button, and uninstall the CX-Server by
repeating steps 2 though 4.
6.
Restart the computer when all programs have been uninstalled.

30
CX-One Maintenance
Section 2-2
31
Revision History
A manual revision code appears as a suffix to the catalog number on the front cover of the manual.
The following table outlines the changes made to the manual during each revision. Page numbers refer to the
previous version.
Revision code
Date
Revised content
01
February 2005
Original production
02
November 2005
Revisions for upgrading from CX-One Ver. 1.0 to Ver. 1.1.
Cat. No. W444-E1-02
Revision code

32
Revision History

OMRON Corporation
Control Devices Division H.Q.
Shiokoji Horikawa, Shimogyo-ku,
Kyoto, 600-8530 Japan
Tel: (81)75-344-7109/Fax: (81)75-344-7149
Regional Headquarters
OMRON EUROPE B.V.
Wegalaan 67-69, NL-2132 JD Hoofddorp
The Netherlands
Tel: (31)2356-81-300/Fax: (31)2356-81-388
OMRON ELECTRONICS LLC
1 East Commerce Drive, Schaumburg, IL 60173
U.S.A.
Tel: (1)847-843-7900/Fax: (1)847-843-8568
OMRON ASIA PACIFIC PTE. LTD.
83 Clemenceau Avenue,
#11-01, UE Square,
Singapore 239920
Tel: (65)6835-3011/Fax: (65)6835-2711
OMRON (CHINA) CO., LTD.
Room 2211, Bank of China Tower,
200 Yin Cheng Zhong Road,
PuDong New Area, Shanghai, 200120 China
Tel: (86)21-5037-2222/Fax: (86)21-5037-2200

Authorized Distributor:
Cat. No. W444-E1-02
Note: Specifications subject to change without notice
Printed in Japan
This manual is printed on 100% recycled paper.
Document Outline
- CXONE-AL__C-E CX-One Ver. 1.1 FA Integrated Tool Package
- About this Manual:
- Version Upgrade Information:
- Warranty
- PRECAUTIONS
- SECTION 1 Overview
- SECTION 2 Installation and Uninstallation
- Revision History
Wyszukiwarka
Podobne podstrony:
cx one short
Instalacja all one mod
DEH P7400MP installation manual EN FR DE NL IT ESpdf
Instalar Windows 98 y XP en un mismo disco duro
Instalacje elektryczne Instalacje niskiego napięcia w domu EN DIY
Instrukcja PSR S970S770 Firmware Installation EN
InstallingtheupgradememorykitintheG450G430MediaGateway=1=AvayaJobAid=en us
Instalacja ProShow Producer 7 0 En
DEH P7400MP installation manual EN FR DE NL IT ESpdf
Instrukcja instalacji AutoData 3 38 EN Windows 10
Manual Instalacion Plafon Audi a4 a3 Con Leds Ambiente En Se
IR3 Installation Guide en
Nokia 22 installation guide en
EN 671 3 Stałe systemy gaśnicze – Instalacje hydrantowe wewnętrzne, konserwacja instalacji hydrantów
Instalacja ProShow Producer 6 0 En
więcej podobnych podstron