
C
opyri
ght
©
2
002 N
oki
a. Al
l rig
h
ts r
e
se
rve
d
.
22
SUPPORT GUIDE
FOR INSTALLING
NOKIA 22

Contents
1.
INTRODUCTION ........................................................................................................... 1
2.
INSTALLATION ............................................................................................................. 1
2.1 INSTALLATION ENVIRONMENT ............................................................................... 1
2.2 CONNECTING NOKIA 22 AND PBX / TELEPHONE SET .......................................... 1
2.3 CONNECTING NOKIA 22 TO GSM NETWORK ......................................................... 1
3.
INTERFACES ................................................................................................................ 2
3.1 TRUNK INTERFACE .................................................................................................. 2
3.1.1 GSM START-UP MODE ...................................................................................... 3
3.1.2 SELECTED LINE ADAPTER ............................................................................... 4
3.2 EXTENSION INTERFACE .......................................................................................... 4
3.2.1 CALL MONITORING............................................................................................ 5
3.2.1.1 Busy tone monitoring .................................................................................... 5
3.2.1.2 Silence monitoring ........................................................................................ 5
3.2.2 GSM START UP MODE ...................................................................................... 5
3.2.3 SELECTED LINE ADAPTER ............................................................................... 6
Legal Notice
Copyright © 2002 Nokia. All rights reserved.
Reproduction, transfer, distribution or storage of part or all of the contents in this document in any form without the
prior written permission of Nokia is prohibited.
Nokia and Nokia Connecting People are registered trademarks of Nokia Corporation. Other product and company
names mentioned herein may be trademarks or tradenames of their respective owners.
Nokia operates a policy of continuous development. Nokia reserves the right to make changes and improvements
to any of the products described in this document without prior notice.
Under no circumstances shall Nokia be responsible for any loss of data or income or any special, incidental,
consequential or indirect damages howsoever caused.
The contents of this document are provided "as is". Except as required by applicable law, no warranties of any
kind, either express or implied, including, but not limited to, the implied warranties of merchantability and fitness
for a particular purpose, are made in relation to the accuracy, reliability or contents of this document. Nokia
reserves the right to revise this document or withdraw it at any time without prior notice.
1
1. INTRODUCTION
This document goes through the settings that are mandatory when installing the Nokia 22
terminal to a Private Branch Exchange (PBX). This document does not contain detailed
technical information on fixed line installations. Hints are given on how to avoid problems
caused by incorrect installation.
2. INSTALLATION
2.1 INSTALLATION
ENVIRONMENT
The Nokia 22 should not be installed very close to a metal ceiling. However, under some
circumstances the installation is possible with an external antenna.
The environmental temperature should be between –10ºC…+55ºC and the humidity between
20 – 70%.
Caution: In order to comply with RF exposure requirements, install the terminal
so that a minimum distance of 20 cm can be maintained between the antenna and
all persons. If you use an external antenna, install the antenna so that a minimum
distance of 20 cm can be maintained between the antenna and all persons, with
antenna gain not exceeding 3 dBi.
2.2 CONNECTING NOKIA 22 AND PBX / TELEPHONE SET
• The wires from the trunk or extension connector should not be installed close to the
antenna or other obstacles that might disturb the audio lines.
• The distance between the PBX (or telephone set) and the Nokia 22 should be more
than 1 meter. The distance between Nokia 22 terminals should be more than 0.3 m. In
case of interference, increase the distance.
• If a multi-pair cable is used, the unused pairs should be grounded from one end.
• Use a twisted pair cable to minimise disturbances.
• Use only the RJ11 6/6 connectors.
Tip: If the Nokia 22 is connected to a PBX, and the B subscriber occasionally
hears part of his/her own speech as an echo, tune the microphone sensitivity
and/or voice volume.
2.3 CONNECTING NOKIA 22 TO GSM NETWORK
Check the field strength on the installation site. If the signal quality is poor, use an external
antenna.
2
If an external antenna is not used, the Nokia 22 should always be installed so that the
antenna can be turned vertically.
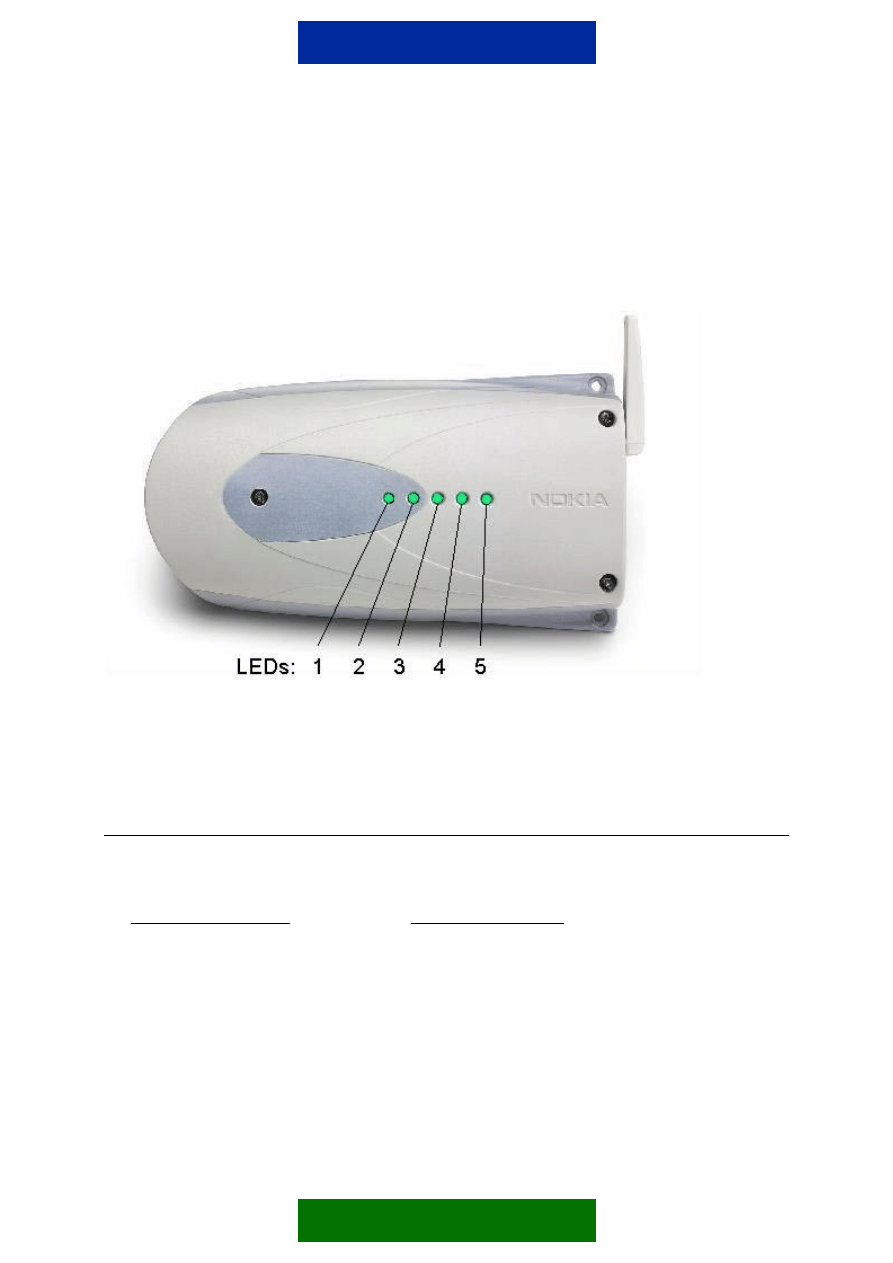
After the Nokia 22 is turned on, check that the LED 3 lights up. If not, use the Nokia 22
Configurator software and select the operator manually.
Depending on the PBX interface where the Nokia 22 terminal is installed, check that the
corresponding LED will turn on. (Led1 = Trunk mode, Led2 = Extension mode).
3. INTERFACES
3.1 TRUNK
INTERFACE
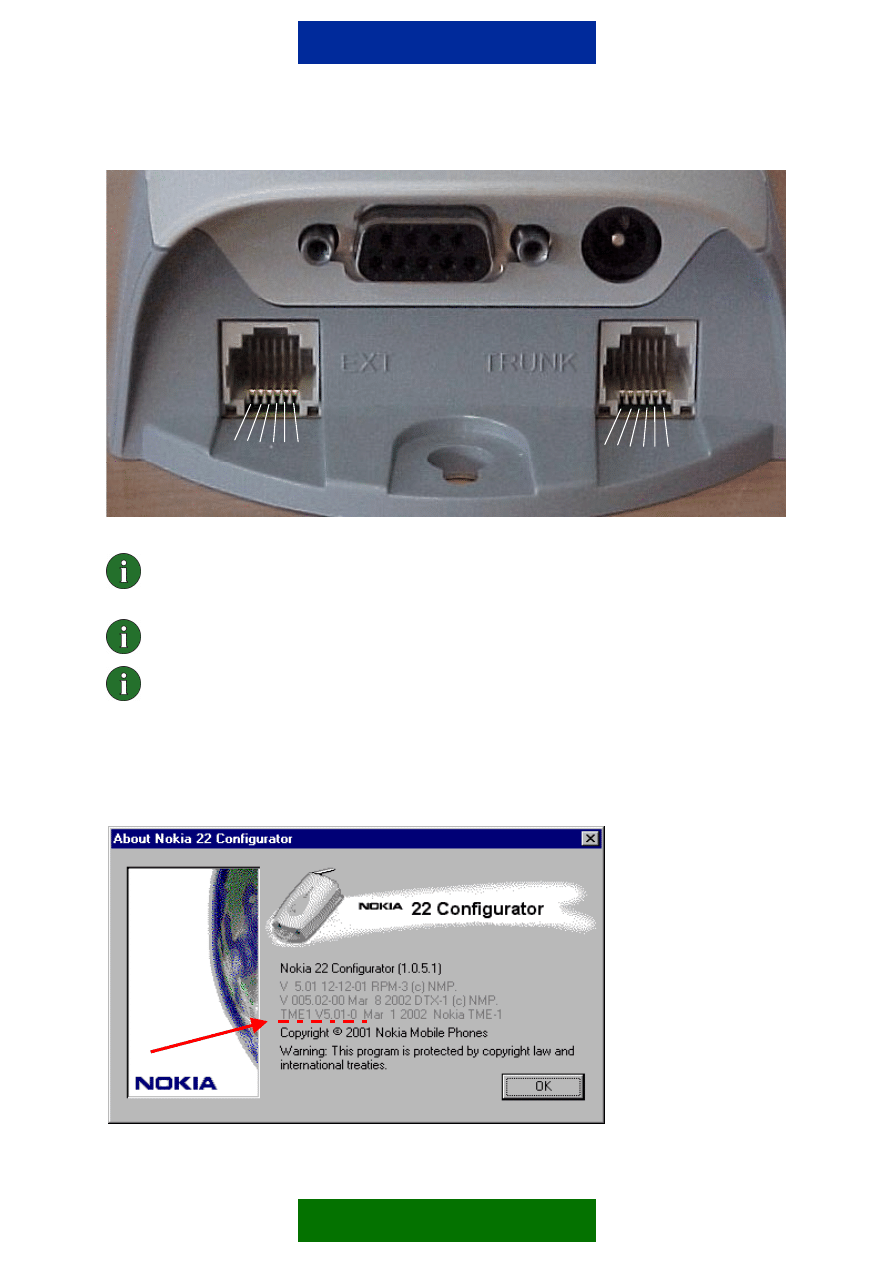
An analog trunk interface of a PBX, or an analog telephone set can be installed to the trunk
connector.
The pin numbers 3 and 4 are TIP and RING. The left most pin of the connector is the ground
connector. Connect pin 1 to the ground if the mains voltage might cause interference.
3
Note: In the figure above the pin numbers equal to the physical connector, not the
wire itself. After the installation, check with a multimeter the resistance between
the ground plate and ground connector of a building. It should be ~0Ω.
Note: If you connect a landline phone to the trunk connector, check that only the
pins 3 and 4 are connected from the Nokia 22 to the telephone set.
Note: The installation is NOT complete until you have set the mandatory settings
required in the trunk mode. See the following chapters.
3.1.1 GSM start-up mode
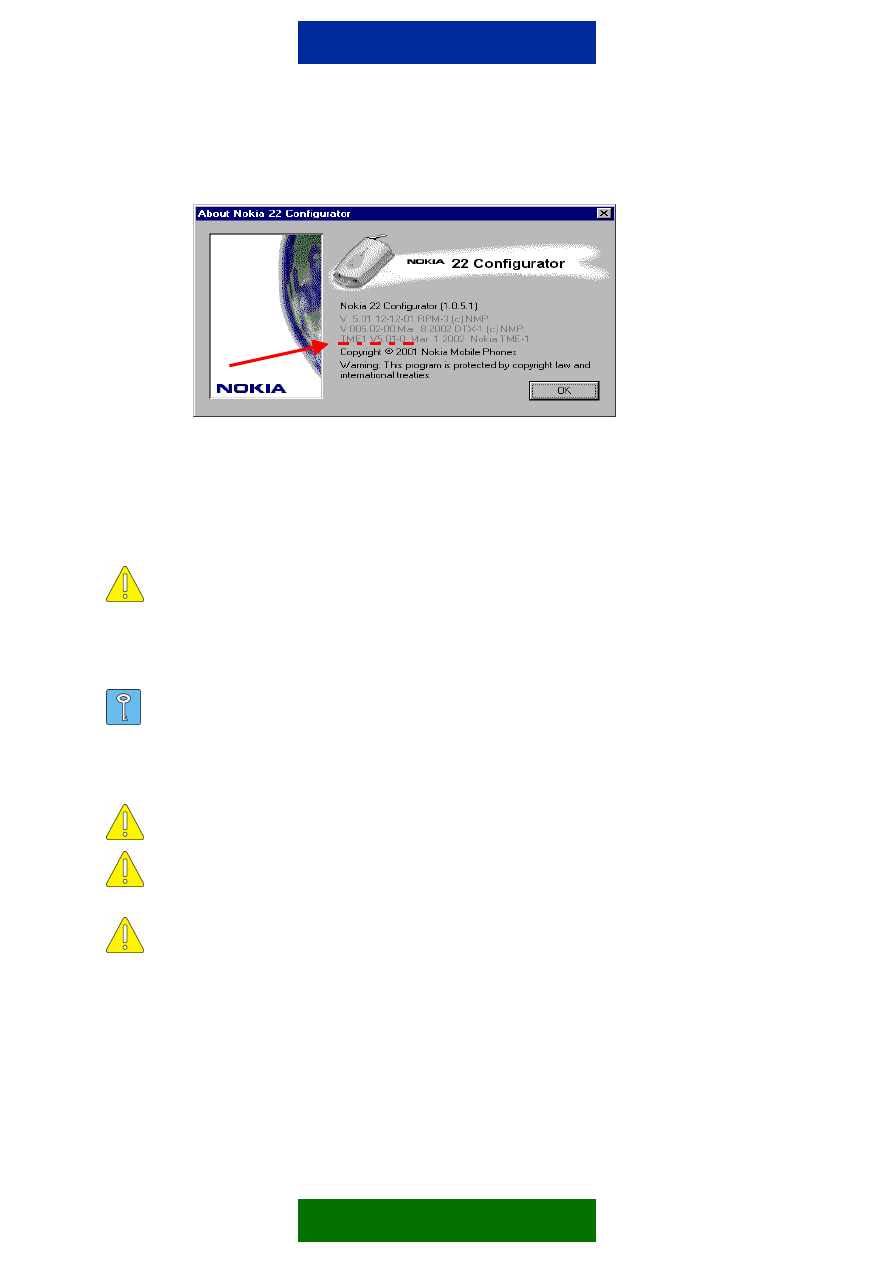
Check with the Nokia 22 Configurator software the firmware version of the Nokia 22. You will
see the following dialog:
1,2,3,4,5,6
1,2,3,4,5,6
4
If the TME-1 version is older than V5.01-0, set the GSM start up mode to Voice mode.
If the RS-232 interface is not needed, set the start up mode to Voice mode.
3.1.2 Selected Line Adapter
Automatic mode or Trunk mode can be selected.
Tip: You can also check polarity reversal, loop interruption time, and ringing
pattern
Caution: Remember to define the appropriate emergency number in the General
settings dialog.
Caution: Remember to set the PIN query to ON, OFF, or AutoPIN.
3.2 EXTENSION
INTERFACE
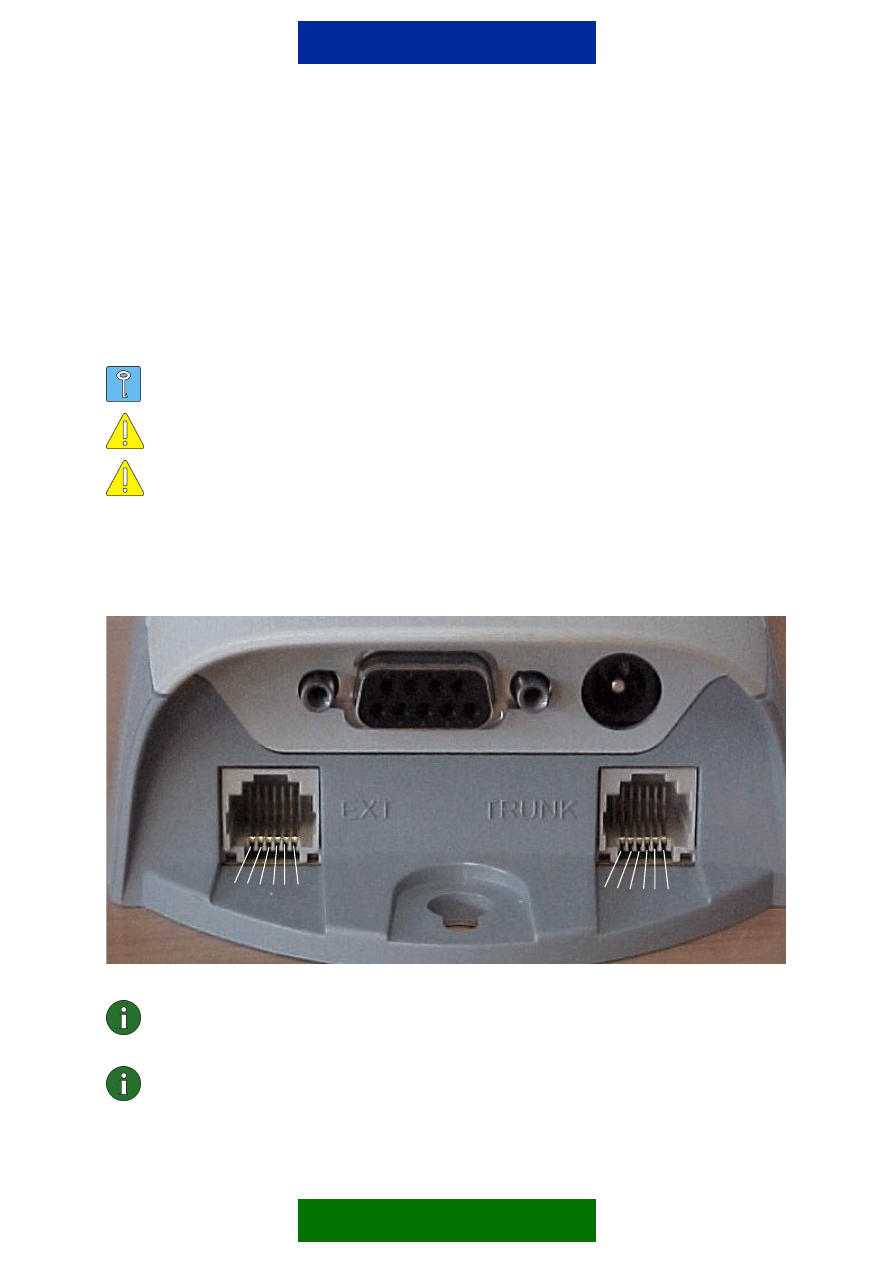
Only an analog extension interface can be connected to the EXT connector.
Only pins 3 and 4 are used as A and B.
Note: In the figure above, the pin numbers equal to the physical connector, not
the wire itself. After the installation, check with a multimeter the resistance
between the ground plate and ground connector of a building. It should be ~0Ω.
Note: The line impedance of the Nokia 22 is 600Ω and the maximum line current
is 120mA.
There are some mandatory settings that should be programmed with Nokia 22 Configurator:
1,2,3,4,5,6
1,2,3,4,5,6

5
3.2.1 Call monitoring
A PBX uses either a busy tone or silence when informing the Nokia 22 that a call is
disconnected. To end the call to the GSM network, set the Nokia 22 to monitor either one of
the signals using the Extension mode settings dialog.
As default, the Nokia 22 monitors for the busy tone.
Tip: Check the signal used by calling from one extension to another. After the call
is answered, the recipient hangs up. Listen whether the PBX provides you a busy
tone or silence.
3.2.1.1 Busy
tone
monitoring
The frequency and the cadence of the busy tone varies between different PBX models. The
frequency that the Nokia 22 detects is between 360Hz - 440Hz.
Since the cadence of the busy tone might also vary, the Nokia 22 has a feature called Tone
Teaching. The Nokia 22 can be set to the learning mode during the installation, whereupon it
will take samples from the busy tone to learn the exact cadence.
After the Nokia 22 has physically been installed to the final position, and other mandatory
settings are made, the learning mode can be activated:
1. Call the extension where the Nokia 22 is installed.
2. After you get the dial tone from the Nokia 22, dial **####**1234#88*own_ext_number#
(own_ext_number is the extension number where you are calling the Nokia 22 from).
3. After the last digit (#), put the receiver down, and wait until the Nokia 22 calls you
back.
4. When the phone in the extension rings, pick up the receiver, and listen to the tone:
• If you hear a busy tone, the learning did not succeed, and you should repeat the
steps.
• If you hear the command query beep (three beeps), the Nokia 22 has learned the
busy tone.
5. Set the hook on, and wait for 60 seconds. The Nokia 22 will reboot itself and is then
ready for use.
Tip: A document describing how to make the Nokia 22 to learn the cadence is
available at www.nokia.com/product support.
3.2.1.2 Silence
monitoring
If you selected silence monitoring, define also the Silent time when disconnected.
3.2.2 GSM start up mode
Check with Nokia 22 Configurator the firmware version of the Nokia 22. You will see the
following dialog:
6
If the TME-1 version is older than V5.01-0, set the GSM start-up mode to Voice mode.
If the RS-232 interface is not needed, set the start-up mode to Voice mode.
3.2.3 Selected Line Adapter
This setting has to be in the Extension line adapter mode.
Caution: After the loss of mains power, the Nokia 22 usually powers up faster
than the PBX. If the Selected Line adapter is set to Automatic, the Nokia 22 will
measure the line voltage in the pins 3 and 4 of the EXT connector. If there is no
line voltage available, the Nokia 22 will start up in the Trunk mode. To avoid this,
the Nokia 22 should be programmed into the extension mode solidly to maintain
the same mode after the mains power loss.
Tip: You can also check:
• Incoming Call: Mode A or Mode B (Mode A as default)
• Outgoing Call: Mode A or Mode B (Mode A as default)
• Dialing mode in case of an incoming call: DTMF or pulse dialling
Caution: Remember to define the appropriate emergency number in the General
settings dialog.
Caution: In case of an incoming call, mode B is recommended. Otherwise the A-
subscriber might be able to select a trunk line and set up a call e.g. to some
special tariff number.
Caution: Remember to set the PIN query to ON, OFF, or AutoPIN.
Wyszukiwarka
Podobne podstrony:
Red Hat Storage 2 0 Installation Guide en US
IR3 Installation Guide en
Red Hat Storage 2 0 Installation Guide en US(1)
Nokia 32 Installation Guide
Nokia 22 ToneTeachingFeature en
installation guide
04 vpuml installation guide
DEH P7400MP installation manual EN FR DE NL IT ESpdf
install guide
Installation Guide
install guide
HP System Management Homepage Installation Guide (September 2008)
gmax tempest install guide
22 culture shock EN
HP System Management Homepage Installation Guide (March 2008)
Installation Guide Licensing gu Nieznany
Installation Guide for WindowsXP
c20h c28h c40h c60h installation guide
installation guide
więcej podobnych podstron