
5/5/03
The material contained herein is subject to U.S. export approval. No export or re-export is permitted without written
approval from the
U.S. Government
.
H A R R I S C O R P O R A T I O N | RF Communications Division
AN/PRC-117F Application Note: Setting up the Radio for SATCOM
HPW Messaging
General Description
High Performance Waveform (HPW) is a satellite waveform that can be used on both wideband
and narrowband UHF satellites. HPW offers high speed, reliable, error free delivery of data. The data
rate for transmission is adaptive to channel conditions, providing the highest possible throughput
automatically. The interface for HPW Messaging is Harris’ RF-6710 application, which is an extension
to Microsoft Outlook. The user simply uses Microsoft Outlook to send messages and files to the desired
end user who also has an AN/PRC-117F with HPW.
This application note will go over a summary of the steps that need to be completed to ensure
a quick, simple and successful setup to get started using the AN/PRC-117F and HPW. The steps
include installing WMT, loading the appropriate COMSEC for use with HPW, programming a net in the
radio for HPW, entering the HPW Time-Of-Day, configuring the RF-6710 Wireless Messaging Terminal
software, and connecting the PC to the radio.
Operational Checklist
Use this checklist if you have already read this entire application note. Otherwise, skip this
checklist for now and read this entire application note to ensure a successful setup.
Loaded KG-84 TEK (Traffic Encryption Key).
Loaded SATELLITE TSK (Transmission Security Key).
Programmed HPW preset into radio.
Entered HPW TOD (Time of Day).
Connected radio to PC using HPW Cable (Harris P/N 10513-0710-A006).
Configured Network Database on the PC correctly, to include your Local Address.
Started WMT (Wireless Messaging Terminal) on the PC.
Verified HPW Protocol Status is ‘IDLE’.
You should be ready to send and receive HPW messages.
Installing Wireless Messaging Terminal
For a full description on the install and setup of the Wireless Messaging Terminal, WMT, or as
it is also known, RF-6710W-HPW, please refer to the Software User’s Guide that can be found on the
installation CD.
NOTE: RF-6710W-HPW WMT Version 2.6 or any other versions of WMT products must be
uninstalled prior to installing a newer version of the RF-6710W-HPW WMT software.
Software Compatibility:
WMT-HPW Version 2.6
•
Operating Systems: Windows NT 4.0 and Service Pack 4 for NT, or Windows 95, or
Windows 98
•
Email Client: Microsoft Outlook 98
WMT-HPW Version 3.2
•
Operating Systems: Windows 2000 (Professional or Server Edition), Windows NT 4.0
and Service Pack 4 for NT, or Windows 98 Second Edition (SE)
•
Email Client: Microsoft Outlook 2000 or Microsoft Outlook 98
WMT-HPW Version 3.2.1
•
Operating Systems: Windows XP, Windows 2000 (Professional or Server Edition),
Windows NT 4.0 and Service Pack 4 for NT, or Windows 98 Second Edition (SE)
•
Email Client: Microsoft Outlook 2002 (XP), Microsoft Outlook 2000, or Microsoft
Outlook 98
H A R R I S C O R P O R A T I O N | RF Communications Division
Basic Installation Steps:
•
Microsoft Outlook must first be installed. Check the software compatibility above for
proper versions. Microsoft Outlook must be configured for Corporate or Workgroup
(not Internet Only). This can be changed or verified by opening Microsoft Outlook and
selecting the Tools menu, then Option, click on the Mail Services tab, click on the
Reconfigure Mail Support button, and selecting Corporate or Workgroup.
•
To install the WMT-HPW software, insert the CD into the CD-ROM drive and the WMT
Installation Wizard screen will appear. Select Yes to accept the licensing terms and
then click Next. Click Next again on the following screen. Click Go on the following
screen to start the install.
•
The next step in the installation is to install the modem driver needed for the PC to
communicate with the radio. This is slightly different for the few versions of WMT-HPW:
WMT-HPW Version 3.2.1 (Windows 2000 or XP)
•
This version automates the process form Windows 2000 and Windows XP using the
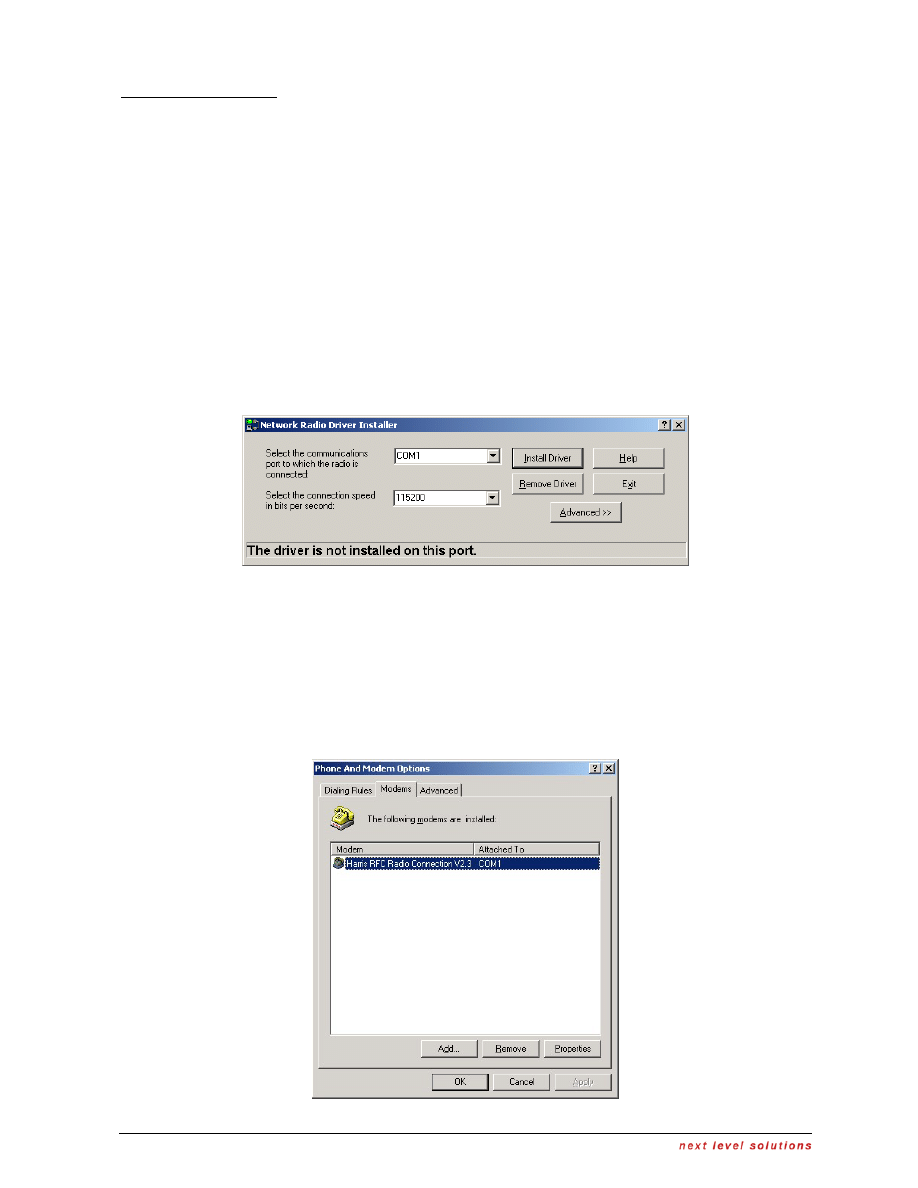
Network Radio Driver Installer (NRDI), shown in Figure 1.
•
Select the COM Port you intend to use for the connection to the radio. Leave the
connection speed at 115200 bps. Leave the Advanced options as is and click the
Install Driver button.
Figure 1. – NRDI Application
•
Once the Modem is installed, the installation is straightforward by following the
directions on the screen.
WMT-HPW Version 3.2.1 (Windows 98SE) and WMT-HPW Version 3.2 (any Windows)
•
The install is less automated with these combinations and will be outlined with on
screen help windows. These can be confusing to use, so the steps are outlined here in
Figures 2 - 10.
•
The Phone and Modems Options window (which can also be found in the Control
Panel) will appear. See Figure 2.
Figure 2. – Phone and Modem Options
H A R R I S C O R P O R A T I O N | RF Communications Division
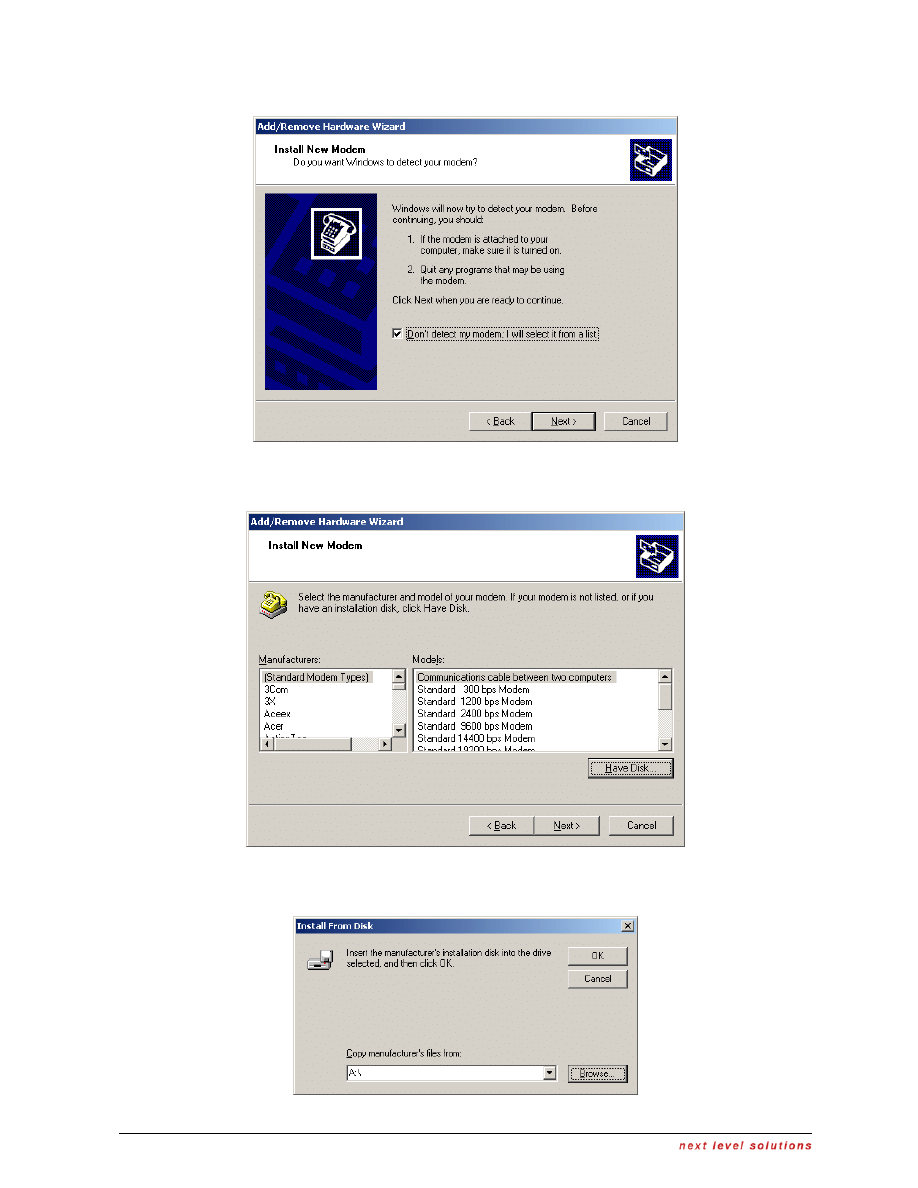
•
Click the Add button, which will start the Add/Remove Hardware Wizard. See Figure 3.
Figure 3. – Add/Remove Hardware Wizard
•
Select Don’t detect my modem; I will select it from a list and click Next. See Figure 4.
Figure 4. – Modem Selection
•
Click the Have Disk button to select the driver from the install CD. See Figure 5.
Figure 5. – Install from Disk window
H A R R I S C O R P O R A T I O N | RF Communications Division
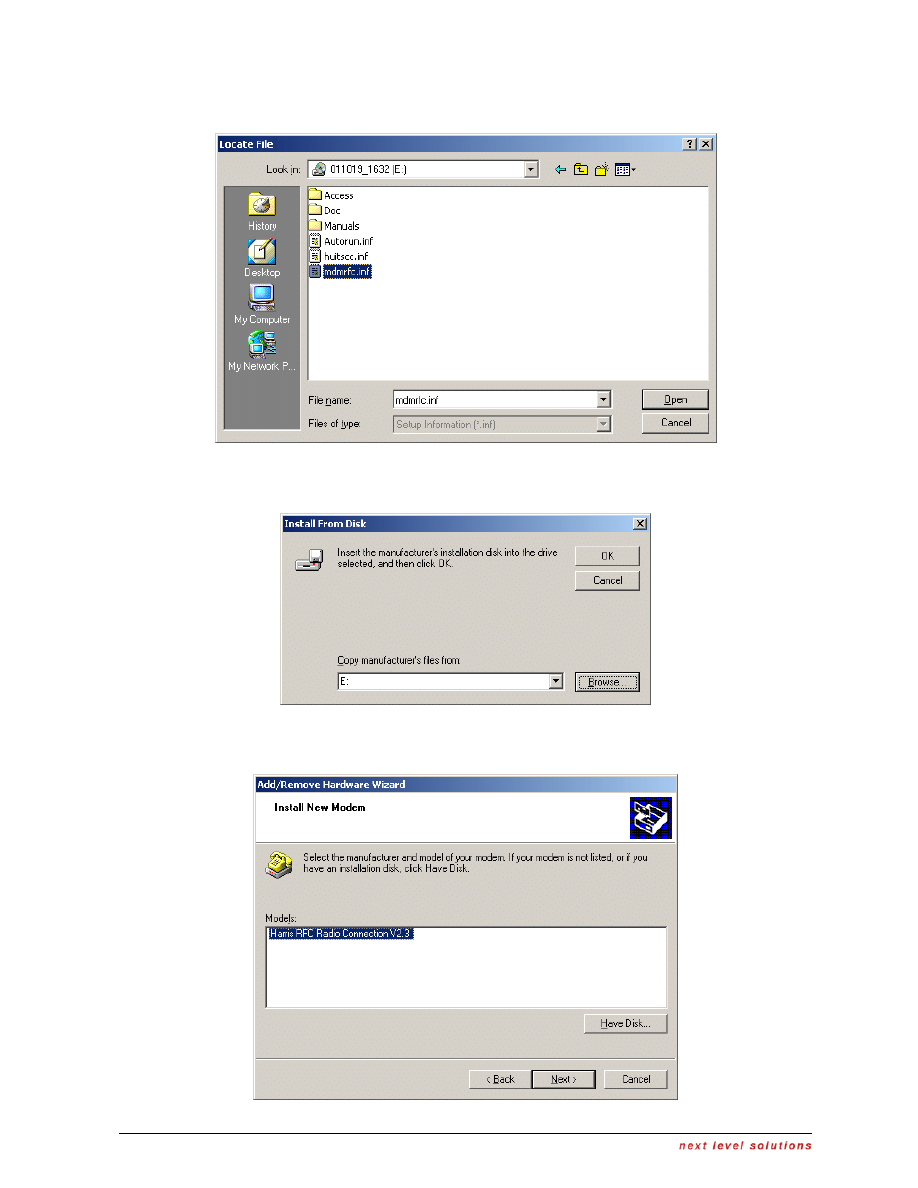
•
Click the Browse button to select the Install CD and select the mdmrfc.ini file. See
Figure 6.
Figure 6. – Locate File window
•
Select the mdmrfc.ini file and click the Open button. See Figure 7.
Figure 7. – Install from Disk window
•
Click OK button to proceed. See Figure 8.
Figure 8. Radio Modem Selection

H A R R I S C O R P O R A T I O N | RF Communications Division
•
Select the Harris RFC Radio Connection and click Next. See Figure 9.
Figure 9. – COM Port Selection
•
Select the COM Port that is intended to be used for the connection to the radio and
click Next. Click Finish on the following window. See Figure 10.
Figure 10. – Installed Modem
•
Once the Modem is installed, the installation is straightforward by following the
directions on the screen.
WMT-HPW Version 2.6 (any Windows)
•
This application note will not go into detail with the installation of WMT-HPW Version
2.6 as it is becoming obsolete. Please refer to the Software User’s Manual on the
install CD for details on installation.
H A R R I S C O R P O R A T I O N | RF Communications Division
Operating WMT for the First Time:
Upon completion of the install, WMT will reboot your PC. Once the PC is rebooted, a few
initialization type activities need to be completed.
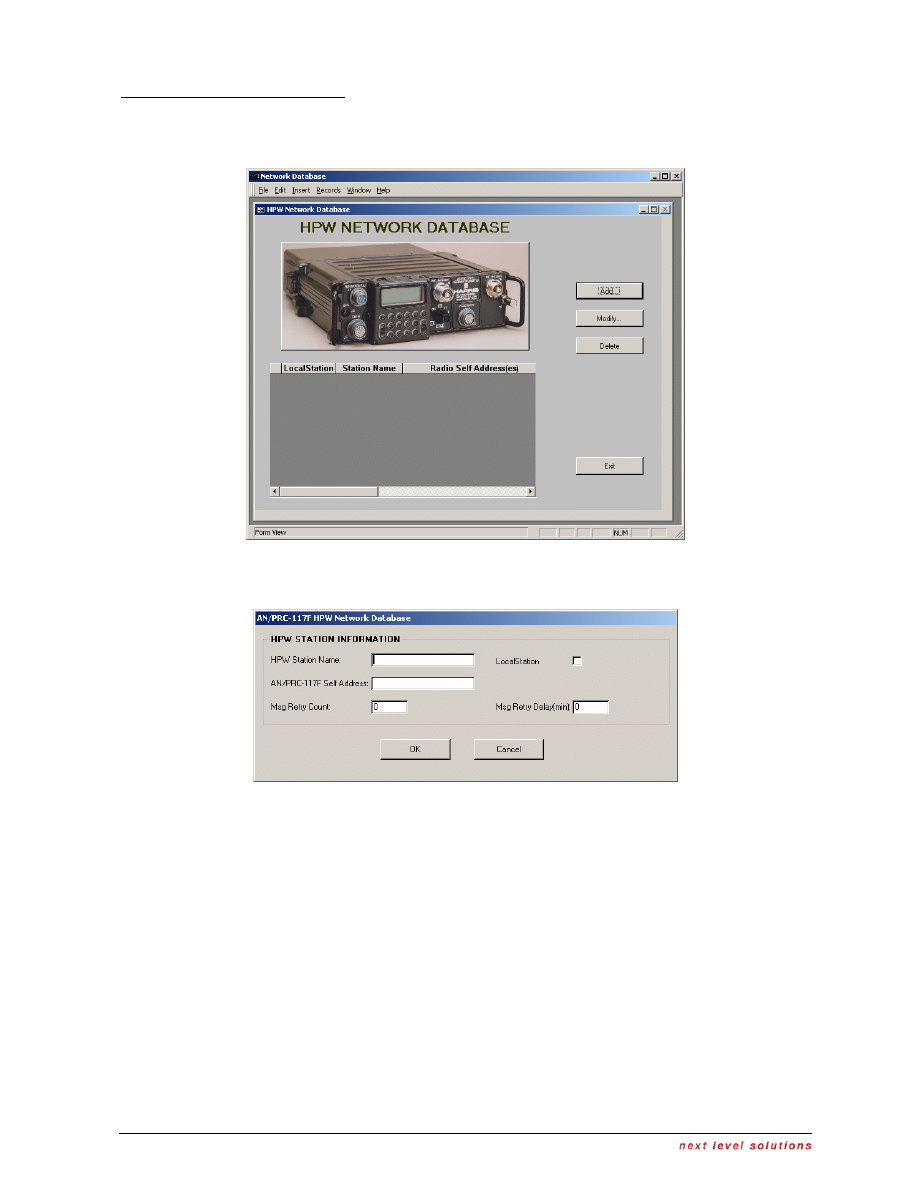
•
First, the Network Database must be configured. See Figure 11.
Figure 11. – Network Database
•
Click the Add button to add Network Stations. See Figure 12.
Figure 12. – Adding Stations
•
Once all the stations have been added, click on the Exit button. The Wireless
Messaging Settings will then need to be configured. Click OK on the Welcome screen.
See Figure 13.
H A R R I S C O R P O R A T I O N | RF Communications Division
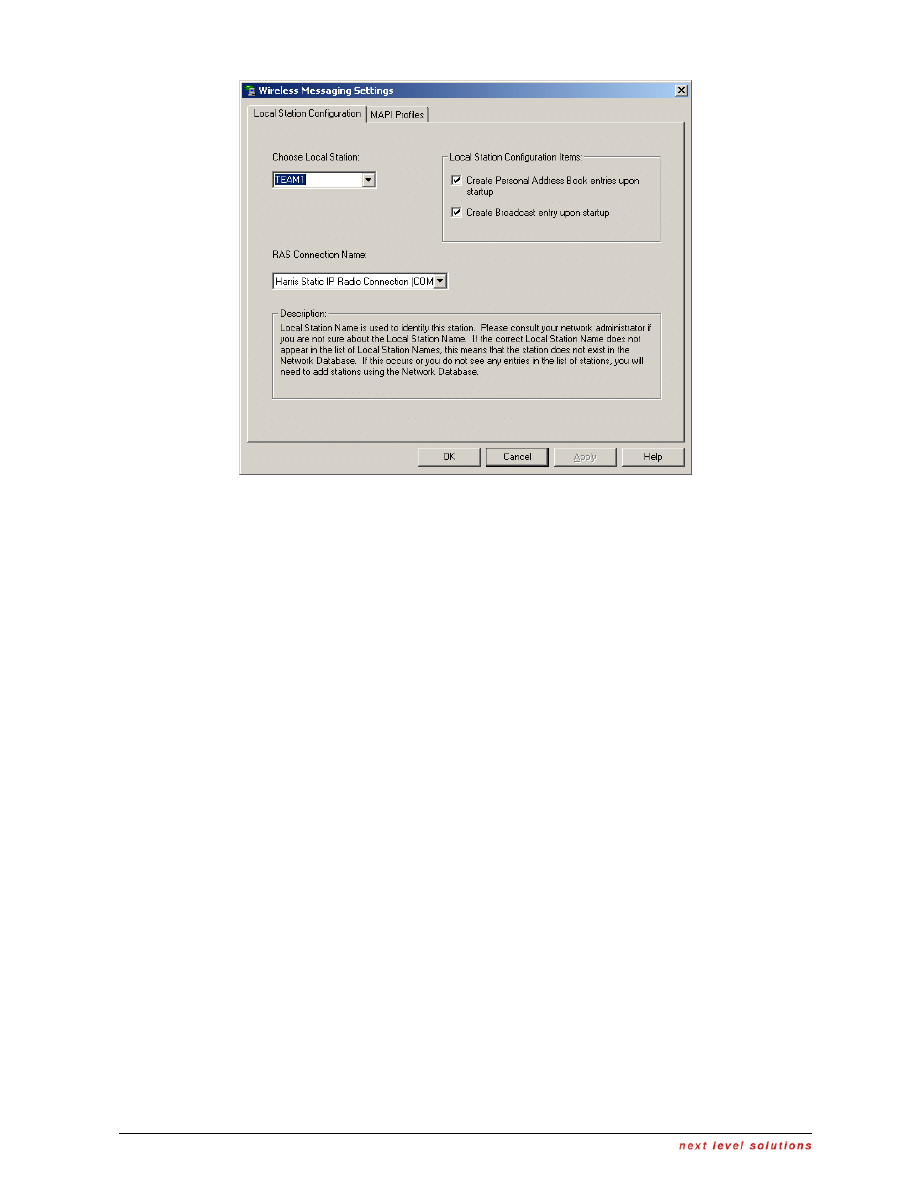
Figure 13. Wireless Messaging Settings
•
Make sure your Local Station is selected properly. Verify that you want a Broadcast
station created. Click OK.
•
WMT-HPW is not completely configured for operation. Let’s move onto the radio setup.
Loading the COMSEC
To load the radio with the appropriate COMSEC, follow the steps outlined below. The KG-84
TEK and the satellite orderwire TSK, which is used for timing purposes, will be loaded. The example
shown here will be with a Common Fill Device (CFD), such as a KYK-13 or KYX-15. The procedure for
loading with a Data Transfer Device (DTD), the AN/CYZ-10, or a KOI-18 CFD is very similar with the
exception that the fill is initiated from the fill device rather than the radio.
NOTE: The fill device should be attached to the radio after the function switch has been put into
the LD position and the radio displays the FILL MENU. The fill device should be removed from
the radio before the function switch is taken out of the LD position as well.
NOTE: The SATELLITE TSK is required regardless of the radio mode, PT or CT.
1. Rotate the function switch to the PT or CT position.
2. Allow radio to complete initializing.
3. Rotate function switch to LD position.
4. Select FILL DEVICE as KYK-13. Press ENT.
5. Connect FILL Device to the ADF PORT ( J1) of the radio.
6. Select CRYPTO TYPE as KG-84. Press ENT.
7. Select KEY TYPE as TEK. Press ENT.
8. Select desired KEY NUM: 01 to 25. Press ENT.
NOTE: This is the COMSEC key position that corresponds to the key position
programmed during Net Programming.
9. Press ENT to initiate the fill.
10. Select MORE FILL DATA? as YES to load additional CRYPTO.
11. Press CLR to select a different CRYPTO TYPE.
12. Select CRYPTO TYPE as SATELLITE. Press ENT.
13. Select KEY TYPE as TSK. Press ENT.
14. Select desired KEY NUM: 01 to 25. Press ENT.
NOTE: This is the COMSEC key position that corresponds to the HPW TRANSEC KEY
ID programmed during Net Programming.

H A R R I S C O R P O R A T I O N | RF Communications Division
15. Press ENT to initiate the fill.
16. Select MORE FILL DATA? – NO
17. Disconnect Fill Device from the radio.
18. Change the function switch back to the PT or CT position.
Programming a Net for HPW
This example describes how to program a SATCOM HPW data preset using KG-84 Mode 1
encryption. Alternative preset programming choices will be noted at each step in the sequence. HPW
nets require a KG-84 TEK, a SATELLITE TSK, and the TOD to be loaded (must be +/- 30 seconds of
other HPW stations).
1. Press
PGM.
a. Select
NORM. Press ENT.
b. Select
NET. Press ENT.
c. Input desired Net number to modify. Press ENT.
d. Select
ACTIVATE IN LIST? - YES. (If NO, Net not displayed with PRE +/-) Press ENT.
e. Select
NET TYPE as SATCOM (Up/Down arrow buttons). Press ENT.
2. Select
FREQ. Press ENT. NOTE: Input preset information from left to right, top to bottom.
a. Enter
FREQUENCY CODE (3 digit code if known or 999 for manual entry). Press ENT.
b. Enter/Verify
RECEIVE FREQUENCY. Press ENT.
c. Enter/Verify
TRANSMIT FREQUENCY. Press ENT.
d. Select
RECEIVE ONLY? – NO. (If YES, then radio will not transmit). Press ENT.
3. Cursor
to
COMSEC. Press ENT.
a. Select
CRYPTO MODE as KG-84. Press ENT.
NOTE: Must choose KG-84 or NONE for HPW presets.
b. Select
ENCRYPTION KEY (i.e. TEK 01). Press ENT.
NOTE: This selection determines which TEK, from the COMSEC loading
procedure, will be applied to the preset.
c. Select
SYNCHRONIZATION as REDUNDANT (MODE 1). Press ENT.
NOTE: Must choose MODE 1 for HPW presets.
d. Select
HPW TRANSEC KEY ID (i.e. 01). Press ENT.
NOTE: This selection determines which SATELLITE TSK, from the COMSEC
loading procedure, will be applied to the preset.
4. Cursor
to
DATA/VOICE. Press ENT.
a. Select
MODULATION as HPW. Press ENT.
b. Select
BAUD RATE as required by satellite type to NB, WB, or UFO.
NOTE: NB should be selected for all 5 kHz channels. WB should be selected for
FLTSAT 25 kHz channels. UFO should be selected for UFO 25 kHz channels.
c. Select
ENABLE TCPIP as NO. Press ENT.
NOTE: This option is only present if the radio is configured to include the optional
Embedded SATCOM IP capability. Choose NO for HPW WMT operations. Choose
YES for HPW IP operations.
5. SQUELCH is not a selectable item for an HPW preset.
6. Cursor
to
POWER. Press ENT.
a. Select
TX POWER LEVEL. Press ENT.
7. Cursor
to
NAME. Press ENT.
a. CHANGE NAME - Enter a name for this preset (up to 12 characters). Press ENT.
8. Press
PRE +/- or CLR to exit net programming and return to operating net.
Entering HPW Time of Day
HPW uses a Time-of-Day based TRANSEC (TSK) to cover protocol information such as the
source address, destination address, and priority of a message. The current ‘seconds’ position of the
radio’s HPW TOD is passed over-the-air in the protocol headers. The receiving radio’s HPW TOD must

H A R R I S C O R P O R A T I O N | RF Communications Division
be within +/- 30 sec of the transmitting radio for it to uncover the protocol header correctly. The two
radios must be using the same TRANSEC keys (just as they must use the same COMSEC keys when
sending cipher-text traffic). The TRANSEC covering is done whether the crypto mode switch is in CT or
PT.
1. Press
OPT.
a. Select
TIME.
b. Select
HPW.
c. Select
USER_ENTRY or GPS_SYNC.
2. Load the Time of Day.
If
USER_ENTRY is chosen:
a. Use the number keys on the KDU to enter the time.
b. Hit
ENT to start the clock at the new time.
If
GPS_SYNC is chosen:
a. Connect GPS unit to the J2 port.
b. Select
GPS_SYNC and press ENT.
NOTE: The GPS unit can be either a PLGR or NMEA compatible
device (i.e. Garmin 12 Series commercial type unit). The radio needs
to be configured for the type of GPS unit that is being used. This is
done by pressing the PGM, selecting CFIG, selecting GPS, and
choosing the GPS unit you are using. The default is PLGR.
Once the time is entered, use the CLR button to exit out of the time menu and then again to
exit out of the options menu. At this point the radio should be completely configured for HPW. Make the
active net the HPW net that was just programmed to begin using the HPW Messaging Terminal
software.
Configuring the Wireless Messaging Terminal Software
WMT can be reconfigured after installation and the first time setup using the three icons that get
installed on the PC desktop when installing the RF-6710 WMT software. They are Wireless Messaging
Settings, Network Database, and Repair and Compact.
The Wireless Messaging Settings should have the following settings:
•
Local Station – This is your HPW address and should be one of the addresses defined
in the Network Database. This address should also not be set as any other user’s local
station that you wish to communicate with.
•
MAPI Profiles – Should have “Event Log Profile”, “HF Gateway Subsystem”, and
“Wireless Message Terminal” profiles defined. If not, simply click “Recreate Wireless
Profile” and accept the defaults.
The Network Database is where all HPW addresses in your communications network are
defined. Your local address as well as all destinations must be defined here. The available address
range is 1 – 65535. Address 0 is reserved for broadcast communications in which there are no
acknowledgements from receiving stations. The HPW Station Name can be what ever you wish. The
network database file is stored at “c:\program files\harris rf communications\wmt\ld_wmt.mdb”.
Repair and Compact is used to repair a database damaged by unpredictable operation such as
power loss or other interruptions. Compacting rearranges how the database file is stored on file.
Microsoft Outlook should have the Personal Address Book updated with the HPW Station
Names. Open the Microsoft Outlook Address Book and click on the “New Entry” tab and select “Other
Address”. The new entry needs to have the “Display name” and “E-mail address” defined as the HPW
Station Name. The “E-mail type” needs to be defined as “Harris”. The Personal Address Book file
created for HPW is stored at “c:\program files\harris rf communications\wmt\exchange\wmt.pab”. Note
that WMT-HPW Version 3.2 and Version 3.2.1 will add these automatically if the option is selected in
the Wireless Messaging Settings.
Note: Whenever changes are made to the Personal Address Book in Microsoft Outlook or to the
Local Address in Wireless Messaging Settings, the PC should be restarted so as to allow
Microsoft Outlook and WMT to work properly together.

H A R R I S C O R P O R A T I O N | RF Communications Division
Connecting the Radio to the PC
The AN/PRC-117F radio should be connected to the PC using the HPW Cable (Harris P/N
10513-0710-A006). The connection between the radio and PC is a Point-to-Point (PPP) connection that
uses Dial-Up Networking. You can verify that the Dial-Up Networking Connection is setup properly by
doing the following:
Windows 98:
•
Open up ‘My Computer’ from the PC’s desktop and double-click on the ‘Dial-Up
Networking’ icon.
•
Right click on the ‘Harris Radio Connection’ and select ‘Properties’.
•
Verify that the connection speed is 115200. The format is 8 data bits, no parity, 1 stop
bit, and no flow control (usually under the advanced options).
•
To verify the proper networking parameters, open the ‘Control Panel’ and double-click
on the ‘Network’ icon.
•
Choose the ‘Dial-Up Adapter’ and select ‘Properties’.
•
Under the ‘Advanced’ tab, make sure that ‘IP Packet Size’ is set to ‘Large’ and not
‘Automatic’. This can have an effect on attachments if not set properly.
•
The Internet Protocol (TCP/IP) properties should be setup to specify the IP address as
10.0.0.2. The advanced TCP/IP settings should not have IP header compression
selected for the PPP link.
Windows 2000:
•
Open the ‘Control Panel’ and double-click on the ‘Network and Dial-Up Connections’
icon.
•
Right click on the ‘Harris Radio Connection’ and select ‘Properties’.
•
Under the “General’ tab, click the ‘Configure’ button and verify that the connection
speed is 115200. All ‘Hardware Features’ should not be selected.
•
Under the ‘Networking’ tab, click the ‘Settings’ button and verify all the ‘PPP Settings’
are not selected and click ‘OK’.
•
Select the ‘Internet Protocol (TCP/IP)’ from the components list and click the
‘Properties’ button.
•
Verify that the IP address is set to 10.0.0.2 and then click on the ‘Advanced’ button.
•
Verify that the ‘Use IP header compression’ is not selected.
Once the settings have been verified, double clicking on the ‘Harris Radio Connection’ can test
the connection to the radio. If successful, the connection status should change to ‘Connected’. If the
connection fails, verify that the cable is connected to the proper COM port on the PC and to the J3 port
of the radio. Verify you are using the correct cable. The radio should be turned on into PT, CT, or TD
mode. The current net does not have to be configured for HPW, nor does COMESC need to be loaded
for this test to be conducted, but will need to be configured when using the RF-6710 WMT software for
HPW operations.
Frequently Asked Questions
•
Q: Why does the Harris Protocol Status window report that the protocol state is “Not in HPW
Mode”? A: The active net on the radio is not an HPW net.
•
Q: Why does the Harris Protocol Status window report that the protocol state is
“Unoperational”? A: The cable may not be connected properly. The Dial-Up Networking
connection properties may be wrong. See the “Connecting the Radio to the PC” section of this
application note and verify the correct parameters are set.
•
Q: Why does the message I just finished receiving not show up in the Inbox and the Event Log
reports “Failure to decrypt message”? A: The KG-84 TEK is not the same at the transmitting
radio as your radio.
•
Q: Why does the Harris Protocol Status window report that received probes are from erroneous
and changing HPW addresses? A: The HPW Time of Day in your radio is offset by more than
30 seconds from the transmitting radio.
•
Q: Why aren’t I seeing probes from a transmitting station or acknowledges back from a
receiving station? If a voice check on a non-HPW net is successful, the Satellite TSK is most
likely not the same between your radio and the user with whom you are trying to communicate.
Wyszukiwarka
Podobne podstrony:
(Atheism, Humanism) Sam Harris An Atheist Manifesto
0415300983 Routledge Cause and Chance Causation in an Indeterministic World Dec 2003
HOYLE, D (2003) ISO 9000 2000 An A Z Guide
Harrison, Harry An Alien Agony
Sobczyński, Marek Borderlands in Africa as an asylum for war and political refugees (2003)
2003 03 what becomes an icon most
J Michael Bishop How to Win the Nobel Prize, An Unexpected Life in Science (2003)
Harris, Sam On the Freedom to Offend an Imaginary God
Cisco Press An Introduction to IP Security (IPSec) Encryption (2003)
Harrison, Harry An Alien Agony
ĐHĐN Giáo Trình Cấu Trúc Dữ Liệu Và Giải Thuật (NXB Đà Nẵng 2003) Phạm Anh Tuấn, 72 Trang
2003 Is coming to an Eng 2003 Zbliża się do inż
AUDIO NOTE AN TT2
ostre stany w alergologii wyklad 2003
Brasil Política de 1930 A 2003
Technologia spawania stali wysokostopowych 97 2003
Pirymidyny 2003
KONSERWANTY 2003
więcej podobnych podstron