FEATURE
52
LINUX MAGAZINE
Issue 20 • 2001
In this workshop Tim
Schürmann shows us
how to edit videos
once they’ve been
transferred onto a
Linux system. For this
we’ll be using the
Free video editing
program Broadcast
2000c.
T
o stave off the boredom that the mere mention
of holiday videos instils, it’s a good idea to
enhance your video before inviting the in-laws
round to watch it. Since modern cameras usually
store films in digital form, it seems like a good idea to
transfer them into the computer and edit them there.
By making use of the corresponding video editing
programs, videos can also be professionally enhanced
by adding a few skilfully placed effects.
Under Linux, there are now two video editing systems
courting the favour of users. One is the relatively simple
to use, commercial program MainActor from the
company MainConcept (http://www.mainconcept.de).
The competing candidate goes by the name of
Broadcast 2000c and is now available in its third version.
Unlike MainActor, Broadcast 2000c is in fact available
Free on the Internet. It may not be quite so simple to
use, though, which is a good enough reason for a little
workshop, to help make your first tentative steps into
Broadcast a bit easier.
Requirements
To be able to use Broadcast you will first need a video
source. This can be a video camera or a video
recorder. Your computer will also need to have a
suitable hardware interface. Broadcast can cope with
both TV cards for analogue sources and FireWire
cards for digital sources. In either case Linux must
support the corresponding hardware.
If you wish to use an analogue camera or a video
recorder, the way to go is to use a TV card. You should
find how to operate this under Linux in the manual for
your distribution under the heading of “Installing the
TV card”. Incidentally, unlike MainActor, Broadcast is
unable to edit video materials read in by dvgrab.
On the software side you will need XFree86, which
should not be Version 4.0.0. Users of SuSE Linux 7.0
will be affected by this problem; the only remedy for
this is to change to a different version (e.g. the older
version 3.x). Otherwise Broadcast refuses to start. You
may need to consult the documentation on your
distribution about this. Furthermore, the
Enlightenment Sound-Daemon (the package esound)
must be installed on your system. This software
should not only come with all the most common
distributions, but should also be installed as standard.
Installation
Provided Broadcast comes with your distribution, you
can use the corresponding package management
tool. Otherwise you can find a ready-made rpm
archive at http://www.heroinewarrior.com. Make sure
before starting the program that both your selected
interface card (TV or FireWire card) as well as your
sound card will work under Linux.
Start
If your distribution has no entry for Broadcast in the
start menu, you can call up the program by opening
a terminal window, entering bcast and then pressing
Return. If your hardware has been installed correctly,
four windows will now open: Bcast: Video out is
responsible for a preview of the edited video
material, Bcast: Levels shows the volume of the
sound, Console lets you add effects to the video or
sound material and the main window takes on the
central role of the arranger.
A question of attitude
The basic settings of Broadcast can be found in the
main window under the Settings/Preferences... menu
Workshop: Video editing with
Broadcast 2000c
THE
FINE ART
OF CUTTING
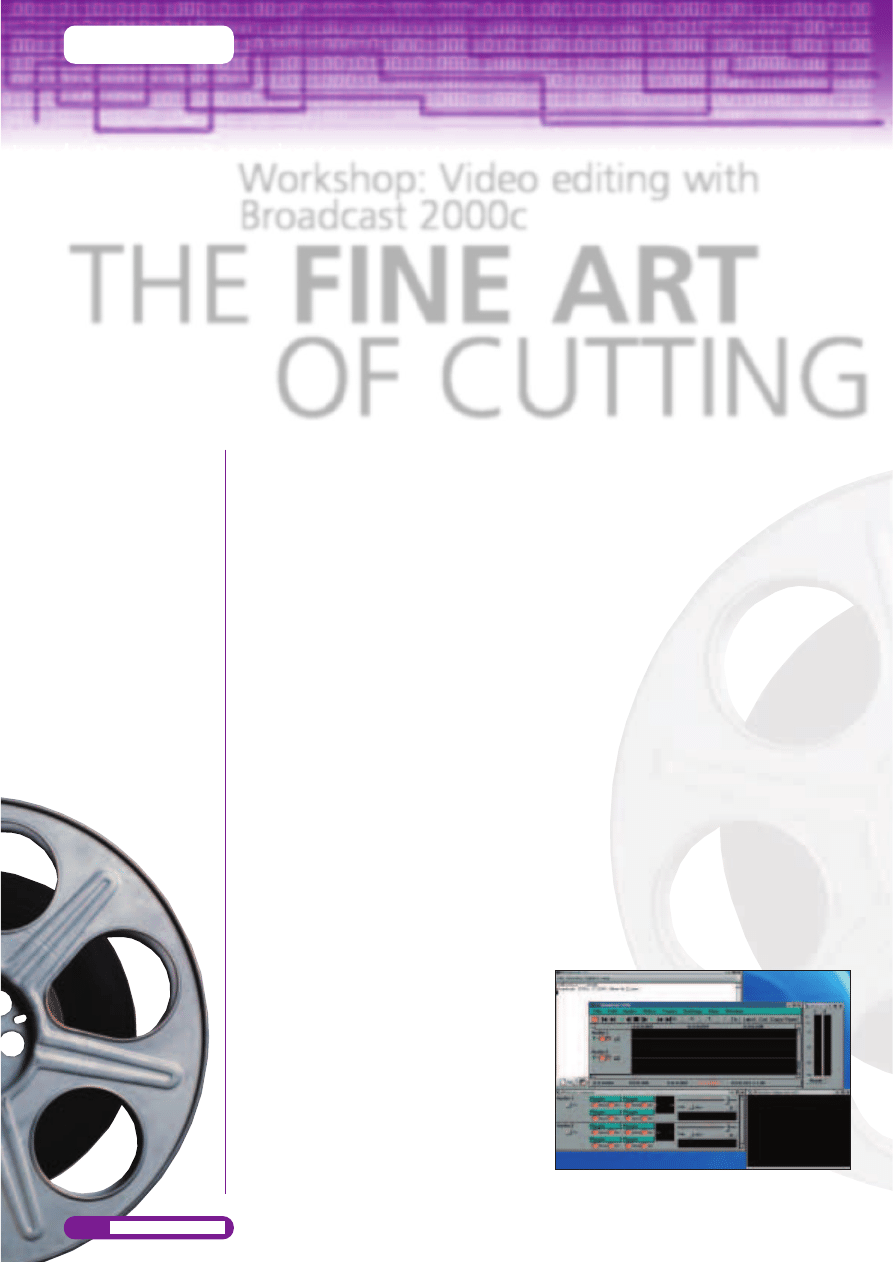
Figure 1: When Broadcast starts for
the first time, four windows open
FEATURE
53
LINUX MAGAZINE
Issue 20 • 2001
item. Click in the left-hand area on the button
marked Audio In. OSS should now be set under
Record Driver. This is the right value if the sound is to
be read in via your sound card. Generally, this is the
case for all analogue sources. If you have a digital
video camera, which transfers your data to the
computer via a FireWire card, at this point you should
select the value IEEE1394. Once the sound source has
been correctly configured, it’s time for the image:
click in the left-hand section on Video and under
Record driver and select the desired recording source.
In the case of a TV card this is Video4Linux, and for a
FireWire card it’s IEEE1394 (see Figure 2).
If you want to record the contents of the desktop,
the selection to make at this point is Screencapture.
But this latter only makes sense in very rare cases
(e.g. for training videos) and, on the grounds of
speed, should only be done at low screen resolutions.
By the way, LML3 stands for a special video editing
card, which is distributed by the firm Linux Media
Labs (linuxmedialabs.com) on the Internet. Once you
have made all the settings for the recording, close the
settings window with a click on OK.
Quiet, please...
Before the video material can be read in, first create a
new project via File/New.... In the window which
pops up, enter the values shown in Figure 3.
The dimensions of your video (Track Size, Output
Size) will depend on the material involved or on the
size in which you later wish to output the video. The
standard PAL resolution is 720x576 pixels. This is also
used for digital video material. Owners of a digital
camera should therefore select this resolution. If,
during recording or playback, you find there are
misfires or jumps, as an alternative you could also use
a resolution of 352x288 pixels. This format is also used
on VideoCDs and because of its smaller size it is a lot
less greedy in terms of memory. After clicking on OK,
the data entered here will be used as initial values.
To start recording, click on the red symbol at the
far left of the toolbar in the main window. A new
window will then appear, prompting you to enter a
filename. The video film which is then recorded will
be saved later in this file.
Under the input box, there
is a button to define the
memory format. Quicktime
should be specified here as
standard. Apple’s memory
format for video films acts as
the standard format in
Broadcast. Please note that
in all other formats offered
here either only the sound
(WAV and PCM) or images
(as a series of individual
image files – JPEG list) are
recorded. For our purposes,
you should retain the default
setting at this point.
The rest of the buttons inside this window can be
used to make detailed settings for the recording
activity. Those working with analogue video material
may be interested in the Video/Options settings. Here
you can choose between different compression
methods, which may have a positive effect on the
hard drive space required. However, too powerful a
compression will also be detrimental to image quality.
If you’ve picked IEEE1394 as the recording source
then this item will not be available to you: digital
video is already compressed on the video tape in the
so-called DV format and is therefore copied by
Broadcast directly from the camera onto the hard
drive. You should take note though, that one second
of film in DV format takes up 3.5Mb of space.
After clicking on Do it, a window will then open
which offers symbols similar to those on a video
recorder. If you’re using analogue material, which is
played into the computer via a TV card, you must first
select the correct input for the TV card. Click on the
Channel button in the Video in window then click
Add.... Again, a window will open, in which you can
set the data of the channel thus created. Under Title,
enter any name you like; under Norm select PAL; and
under Frequency table select PAL_EUROPE. Under
Analogue video
The
images in the film are
recorded in the form of an
electromagnetic signal on
appropriate storage media,
such as a magnetic
videotape.
Digital video
Unlike
analogue video, the film’s
images are stored as a
sequence of ones and
zeroes. This allows the
video material to be saved
on the hard drive as a file
and edited using the
computer.
PAL
British transmission
standard for colour TV
signals.
Figure 2: You must set these values when working with a
digital camera and a FireWire interface
Figure 3: A new project is
created. For the project in
this article, you should
select these values
Figure 4: In the case of
analogue video material
you have to give details of
the format in this window
prior to recording
FEATURE
54
LINUX MAGAZINE
Source you should finally set the input or channel
from which you would like to record the video
material.
Which value must be selected here depends on
your TV card and should be described in the
associated instructions. Now click on OK, mark in the
window Channels the newly created entry and click
Select – which selects the channel. Close the window
by clicking on OK.
...and action!
In order to start recording, first put your camera into
playback mode and then click on the symbol with the
red circle. To stop recording, click on the symbol with
the black box. If you wish to tell Broadcast to only
record for a
specified length of
time, first set the
Recording Mode to
Timed and under
Duration enter the
appropriate period
of time. You can
then start the
recording by
clicking the recording symbol.
Owners of a digital camera, who are reading in
their film via a FireWire card, should take note that
Broadcast doesn’t co-operate perfectly with all
devices. In our test there were some problems with
Sony Digital 8 cameras: Broadcast flatly refused to
read out the video material. Unfortunately the
documentation has nothing to say about which
cameras work and which don’t – all you can do here
is give it a try.
Before the film is saved, you can watch it with the
aid of the other symbols in the preview window. Only
when you feel it is satisfactory should you save it with
a click on the Save button. Otherwise all you need do
is start recording again.
As soon as your film has been saved, it should
have been added directly into the main window.
Before you start editing there, you should firstly also
record a second film. We will be fading these two
video clips into each other, for practice.
Image for image
If you’ve already recorded the two films and they’re
not shown in the main window, first create a new,
empty project via File/New... and load both videos via
File/Append.... Contrary to Load, Append adds a
video to the existing ones; Load on the other hand
creates a new project, containing the single file
selected by the user. Either way, there should now be
two videos displayed in the main window.
Each film is laid down on a track of its own; these
are provided with the name “Video” and an
incremental number. If you’ve added the videos via
Append you should find two video tracks with the
names Video 1 and Video 2. Similarly, in the main
window you will find tracks for the sound (“Audio”),
which are incrementally numbered in the same way.
You can change the name of a track to suit your own
requirements: to do this, simply click on the track
name and enter a new one.
Like a proper reel of film, a video also consists of
individual images or frames. With the PAL standard
used in the UK, the speed is 25 frames per second.
Broadcast shows videos within the main window like
film reels playing out. The start time is always shown
on the left and the end is on the right. Since it can
become fairly tedious with long films to get from one
end of a film reels to the other, Broadcast supports
various stages of enlargement: you can set these on
the top edge with the triangular symbols (marked X,
Y and T). Simply try out all the buttons here to see
what happens. The time strip under the toolbar
serves as an aid to orientation on which you can also
read off later how long the finished edited film will
run. Finally, one more tip: if you click on the Fit
button in the toolbar the enlargement factor is
automatically adjusted so that all videos fit easily into
the main window.
Before we come to the actual editing of our
videos, let’s take another look at the bar at the left
edge of the screen. Not only is the name of a track
listed here, but there are also four symbols for each
track. If the green rectangle is selected, this track will
be picked during playback. In the same way, the red
button says that an editing or recording function just
executed should also be applied to this track. You can
change the time bar in the right-hand section via the
button marked with a D: if this is selected, in the
case of a video track the individual images of the
video saved there, or in the case of a soundtrack, the
frequencies will be shown. Before selecting this
button you should consider the fact that this type of
display, especially on slow computers, can require a
great deal of computing time.
Editing
As already mentioned, both of our videos are to be
played one after the other in the finished film, with a
small fade leading from the first video into the
second. There are two ways of doing this. If all you
want is for the first video to slowly disappear and at
the same time for the second one to fade in, you can
Figure 5: By using these
two windows, you can
store your video material
on the hard drive: with
the left one you control
the recording, and the
right shows a preview of
the image just recorded
Figure 6: This is how the two videos
added to the main window should
look before editing
Issue 20 • 2001
FEATURE
55
LINUX MAGAZINE
Issue 20 • 2001
use a menu function. For this to be applied, both
films must be immediately one after the other in the
same track. First, decide on the sequence. On all
tracks, except for the track holding the second film,
deselect the small red recording symbol already
mentioned – by doing so you are making sure that
only the second film will be cut out. On each film the
start and finish should be marked by two small blue
rectangles. Double-click between the two blue
rectangles on the track of the second film: the latter
should now be marked white.
Alternatively, but a bit less precisely, you can also
achieve this by first going to the start of the film with
the mouse pointer, pressing the left mouse button,
holding it down, dragging the mouse to the end of
the film and then releasing the mouse button. Now
click on the Cut button in the toolbar. Since we wish
to add it to the track of the first film, deselect the red
recording button again in all tracks, except for the
track holding the video material for the first film.
Now place the white mark, with a single mouse click,
immediately behind the blue triangle on the end of
the first film. Click on the button marked Paste in the
toolbar, and the video which was previously cut out
should now have been added behind the first film.
In order to assign the fade, mark both videos with
the mouse. All you need do is include both videos in
the marking (Figure 9). Now select the menu item
Video/Feather Edits. A window now opens in which
you can define the duration of the fade in images.
For one second select 25 images. After clicking OK
the fade will be calculated. To look at the film, first
rewind it to the beginning with the video recorder
symbols and start it with a click on the green triangle.
The preview is outputted in the window of the same
name. On slow computers, the result can be a bit
jumpy on playback. This is because Broadcast
calculates the fade in real time.
Provided your film has audio tracks, you should
repeat the procedure with the corresponding audio
tracks. Here, too, you can fade the sound in and out
– although the associated command is hidden behind
the menu item Audio/Feather Edits.
The second way
The fade described above is
adequate for simple cases,
but special effects cannot be
done like this. In order to
realise somewhat more
extravagant fade effects, we
need the film back on two
different video tracks again. To do this you can either
cut out the second film again and paste it onto its
own original track, or create a new project and
import both films again.
Again, decide on the sequence of the two videos.
You should also ensure that only the recording head
of the track for the second film is activated. Mark the
video, cut it and paste it a little before the end of the
first film. The videos should now be on two different
tracks, offset from each other slightly (Figure 10). The
entire overlapping area will later act as the fade.
Please note that Broadcast has inserted a blank space
at the start of the now offset second film.
Move the playback to the beginning and start it.
You will note that the video on the lower track is
always played back completely, while the one lying
on top of it is only partly played back. This is because
Broadcast stores the films as if they were in a stack –
the same applies to the audio tracks. The sequence
can be altered via the menu items Tracks/Move tracks
up or Move tracks down. In the first case all tracks
for which the record button is selected are moved up
by one track, and in the second case they move
down. In this menu you can also delete tracks or add
them to each other (Concatenate tracks). For our
example, make sure that the second film is located
on a track below that of the first film (Figure 10).
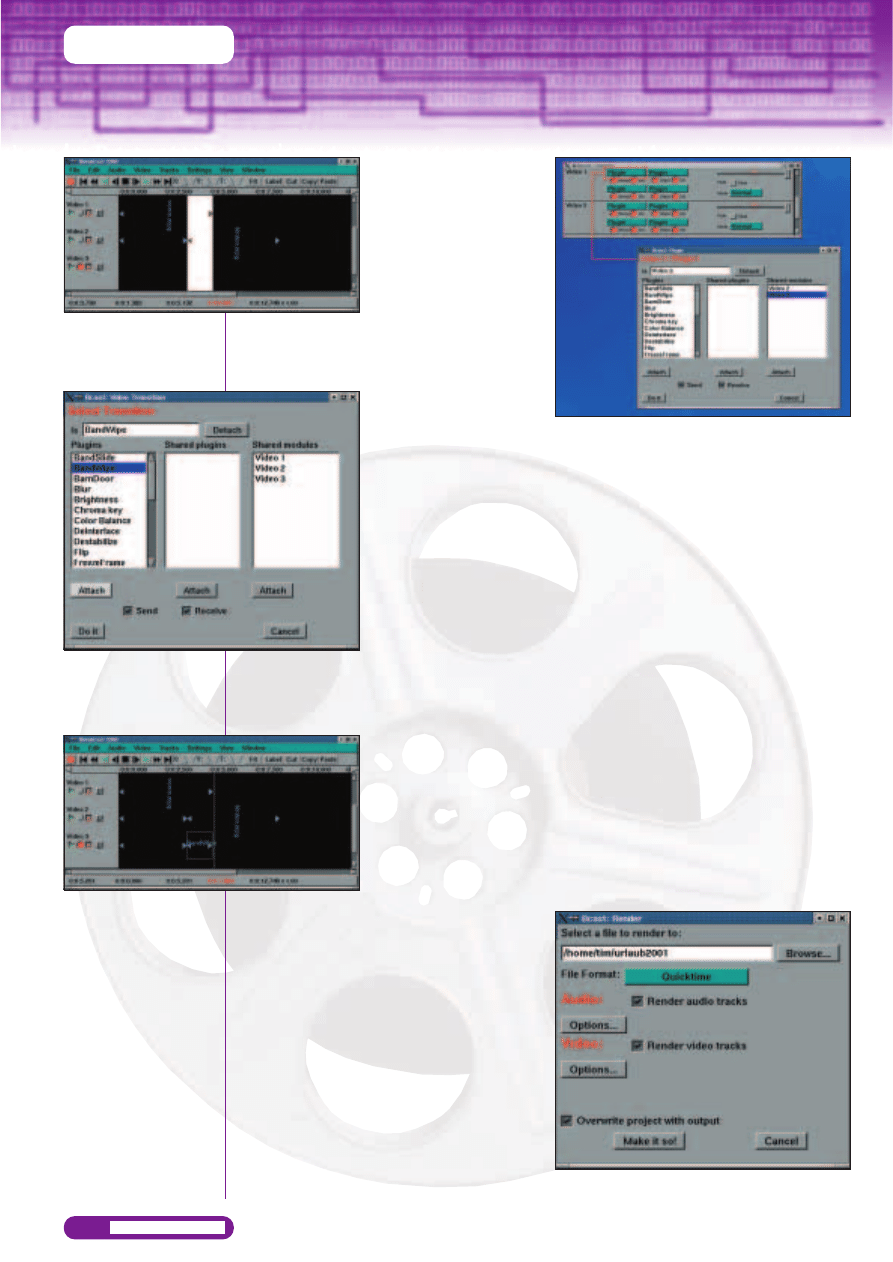
The “console” is responsible for adding effects. If
you cannot see this, select Window/Show Console. In
this you will find precisely one unit for each track with
four green buttons and a slider. Each of the four
buttons can record one effect, which will be applied
Figure 7: The marked film area (white). Also note the
deselected recording button on the left side for video 1
Figure 8: By cutting and pasting, the second film has been
moved into the track of the first film
Figure 9: The area marked white states which videos are
affected by the fade function from the menu. We are
specifying 25 images as the duration of the fade
Figure 10: For a more
complex fade the second
film should be placed
offset with respect to the
first film
FEATURE
56
LINUX MAGAZINE
Issue 20 • 2001
to the whole track. Here is an
example: click in the Video 1
area on the first button at
top left and select Attach....
Another window opens, from
which you can pick one of
the effects on offer in the
left-hand list, e.g. Whirl. Click
on Attach to assign the effect
to the track and close the window via Do it. With
some filters a settings window will now be displayed.
Start playback in the main window in order to view
the results of the effect. You can get rid of the effect
again by clicking in the
console on the corresponding
button and selecting Detach
from the menu.
Consolidation
measures
Effects can thus be assigned
to individual tracks with the
aid of the console.
Unfortunately this always
affects the whole track and
not an individual area, which
is what we need for our
fade. We are going to
manage this with what seems at first glance to be a
somewhat unusual trick: we divert the video material
onto a third track, on which there is a film which is
exactly as long as our fade. Since we are laying the
third track right at the
bottom, the fade will then
be played back in place of
the other two videos. For our
example this looks as
follows: use Video/Add track
to create a new, blank track.
Make sure that this track is
beneath all other video
tracks and that the recording button is selected on
this track only. Now mark the area in which the fade
is to take place (the area in which the videos overlap).
From the menu, select Video/Paste Transition. A
window opens in which you can select an effect for
the fade. For our example select from the left-hand
list BandWipe, click on Attach and then on Do it. In
the main window the fade is marked as a green box.
If you were to start playback now, nothing would
change compared with the previous situation: the
effect which was laid on the new video track does
not yet “know” which video material it should use.
To tell it, click in the console on the first green button
(top left) of the area belonging to the first video and
select Attach.... In the right-hand list mark the Video
3 entry, click on Attach under this list and then on Do
it (Figure 14). By doing this we are making the track
with the first video send its material to the Video 3
track. The effect saved there can then produce the
fade from the material received.
Project management
Now save the project via File/Save as.... Please note
that at this point, Broadcast is only saving the
arrangement of tracks and/or effects, not the actual
videos. These remain in their original condition and
can also be used several times. Unfortunately this also
has the drawback that the original films must always
stay in their positions on the hard drive.
To create a finished video from the arranged film,
use the menu command File/Render. A window
opens which displays the same structure as the
window shown when recording the video raw
material.
If you’ve made all the necessary settings (don’t
forget to activate Render audio tracks and/or Render
video tracks), you just need to click on Make it so!,
and Broadcast calculates the finished film. You can
play this back with an appropriate playback program
on any computer. Please bear in mind that this
computing process may take quite some time.
Figure 11: The area marked
white shows how long and
at which point our more
complex fade should occur
Figure 12: For the
complex fade, select
BandWipe. By clicking
on the Attach button,
you assign the effect
Figure 13: The BandWipe fade is
shown in the main window as a
small green box. It is the same
length as the previous white
marking
Figure 14: With these settings, you are making track 1 send
the material saved on it to track 3
Figure 15: This window appears when
rendering the finished video
Wyszukiwarka
Podobne podstrony:
GRABBING AUDIO AND VIDEO STREAMING FILES FROM THE WEB
2002 05 Rights and Wrongs
2002 05 10
2002 05 37
2002 3 MAY Lasers in Medicine and Surgery
2002 05 22
2002 05 26
2002 05 23
2002 05 45
2002 05 38
2002 05 rozszODP
2002 05 28
2002 05 Osla laczka Nieznany
więcej podobnych podstron