5
Creating Realistic Water Without Particles
in Cinema 4D R13
Dogacan Bilgili
on Apr 23rd 2013 with
1 Comment
Tutorial Details
•
•
Software:
Maxon Cinema 4D
•
Difficulty: Intermediate
•
Estimated Completion Time: 30 Minutes
Download Source Files
•
Source files for this tutorial are available to Premium members.
Get a
Premium Membership
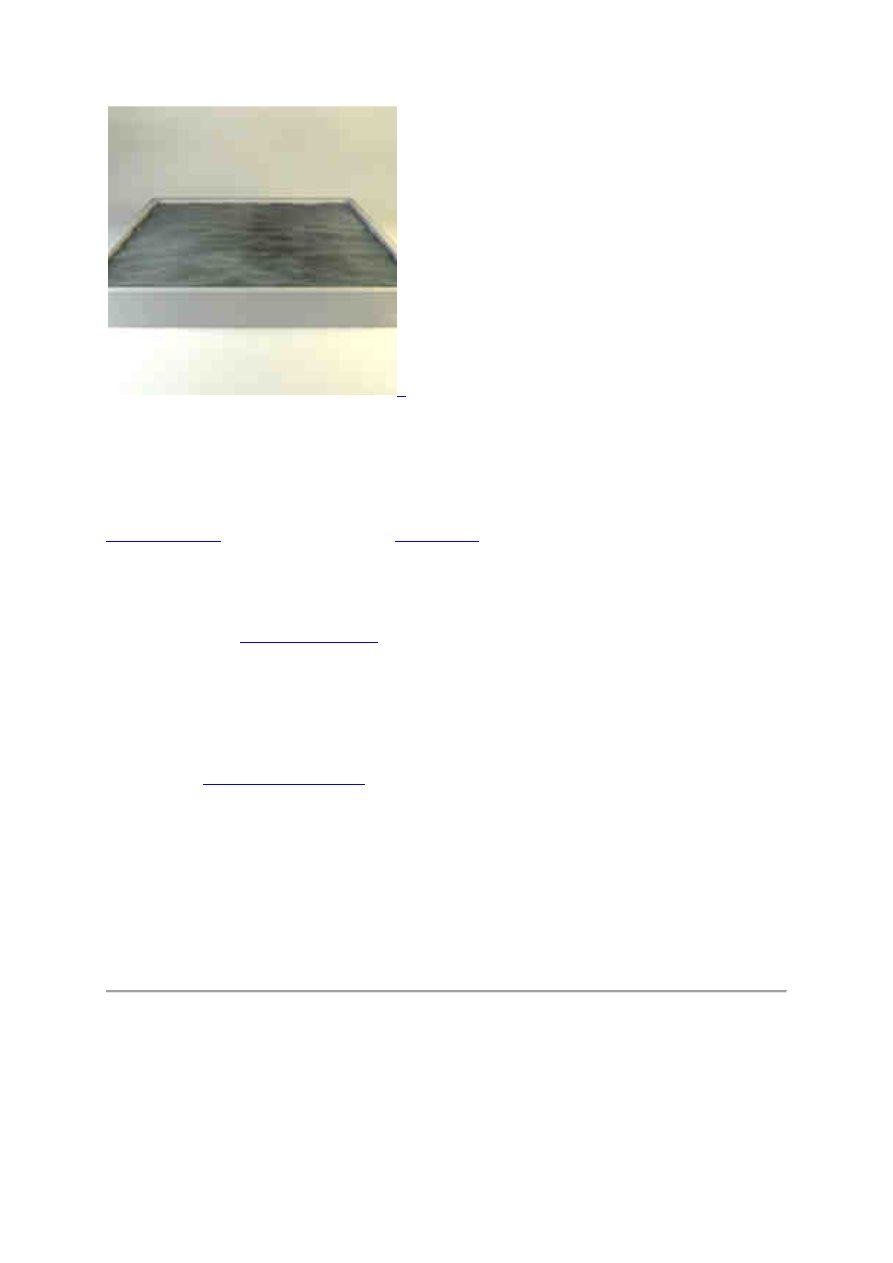
Final Product What You'll Be Creating
Creating a realistic water effect often requires a huge amount of particles, which can simply
be too much to handle. However, when your desire is to achieve a realistic stationary water
effect, there’s no need to deal with particles at all. In this tutorial, Dogacan Bilgili will explain
how to create a convincing, realistic water effect using some of Cinema 4D’s simple tools.
Resulting in a great looking, animated water surface that’s much easier to work with.
Scene Assembly
Step 1
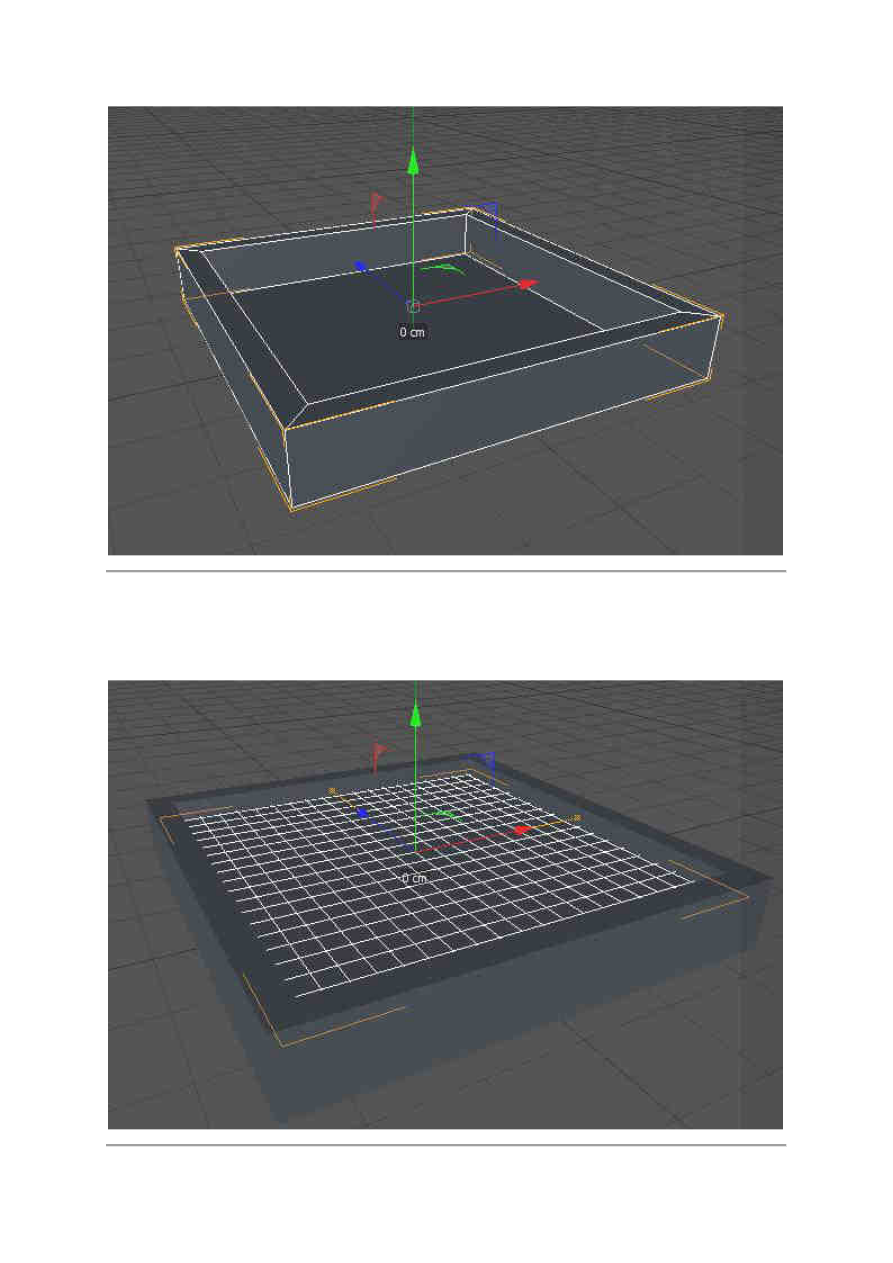
To start, create a shape as shown below. Since it’s pretty simple, I won’t be showing you how
to create it. Just use the Extrude and Extrude Inner tools.
Step 2
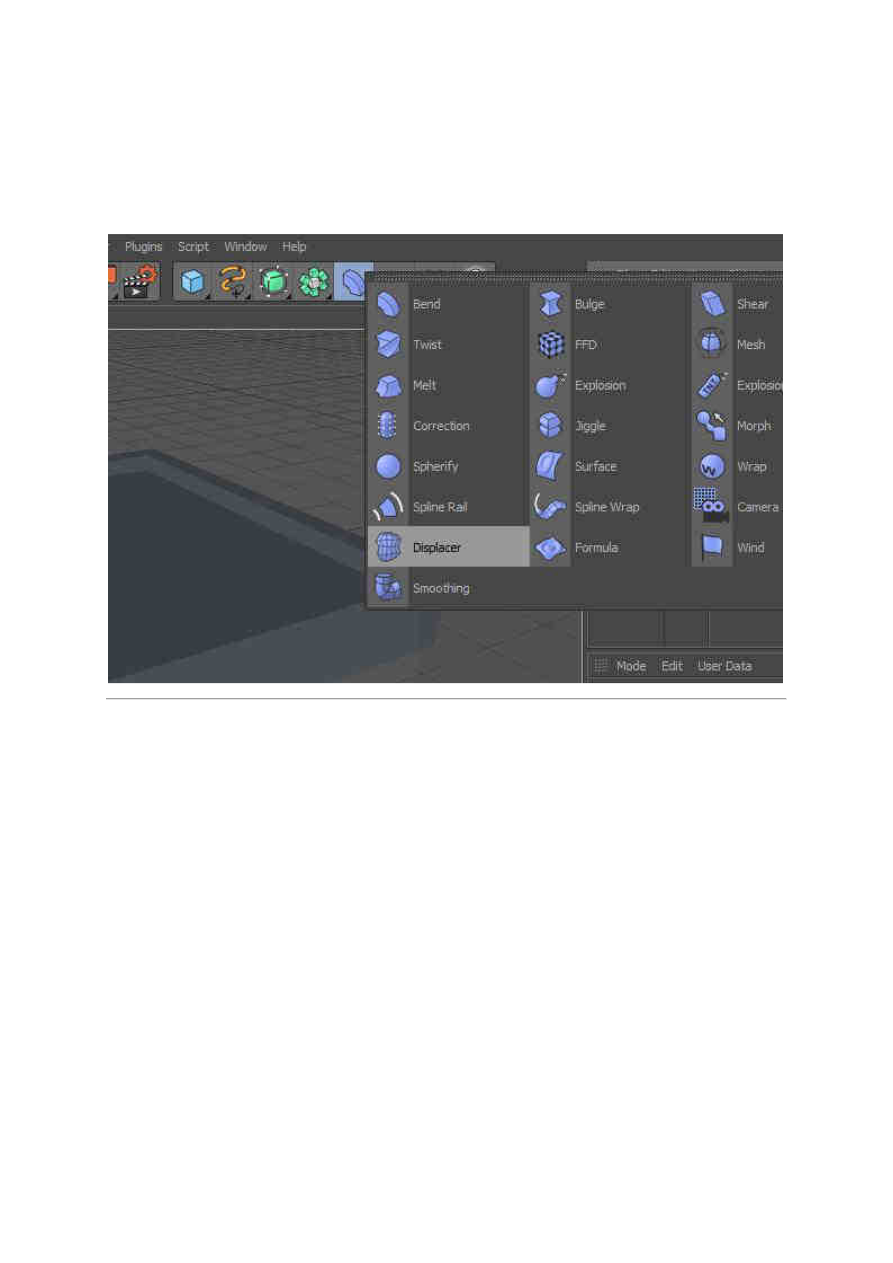
Next, create a Plane object and fit it into the previously created object. Let’s call it a “pool”.
Creating the Water Surface
Step 1
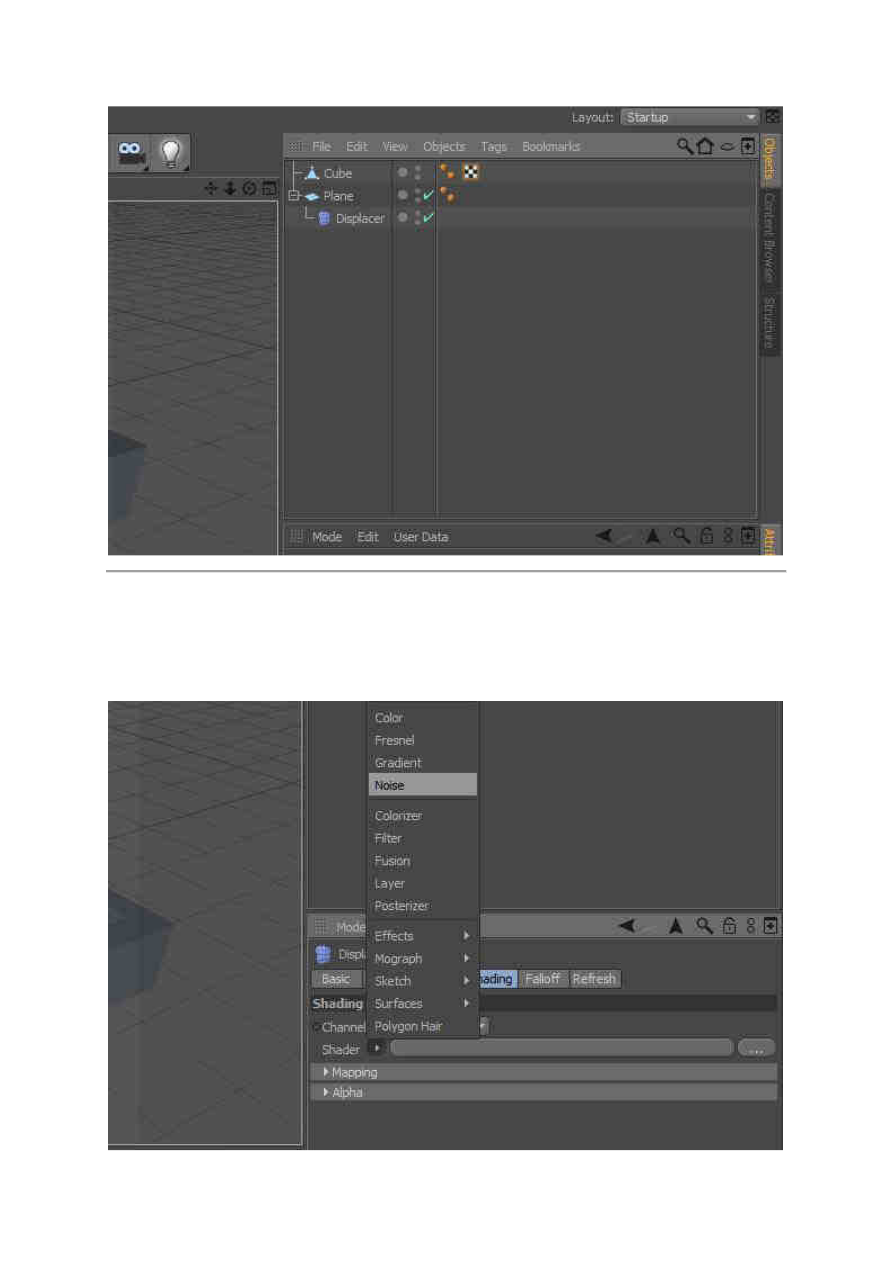
Add a Displacer to the scene.
Step 2
Now drag and drop it onto the Plane object in the object manager screen. In other words,
make the Displacer the child of the Plane object.
Step 3
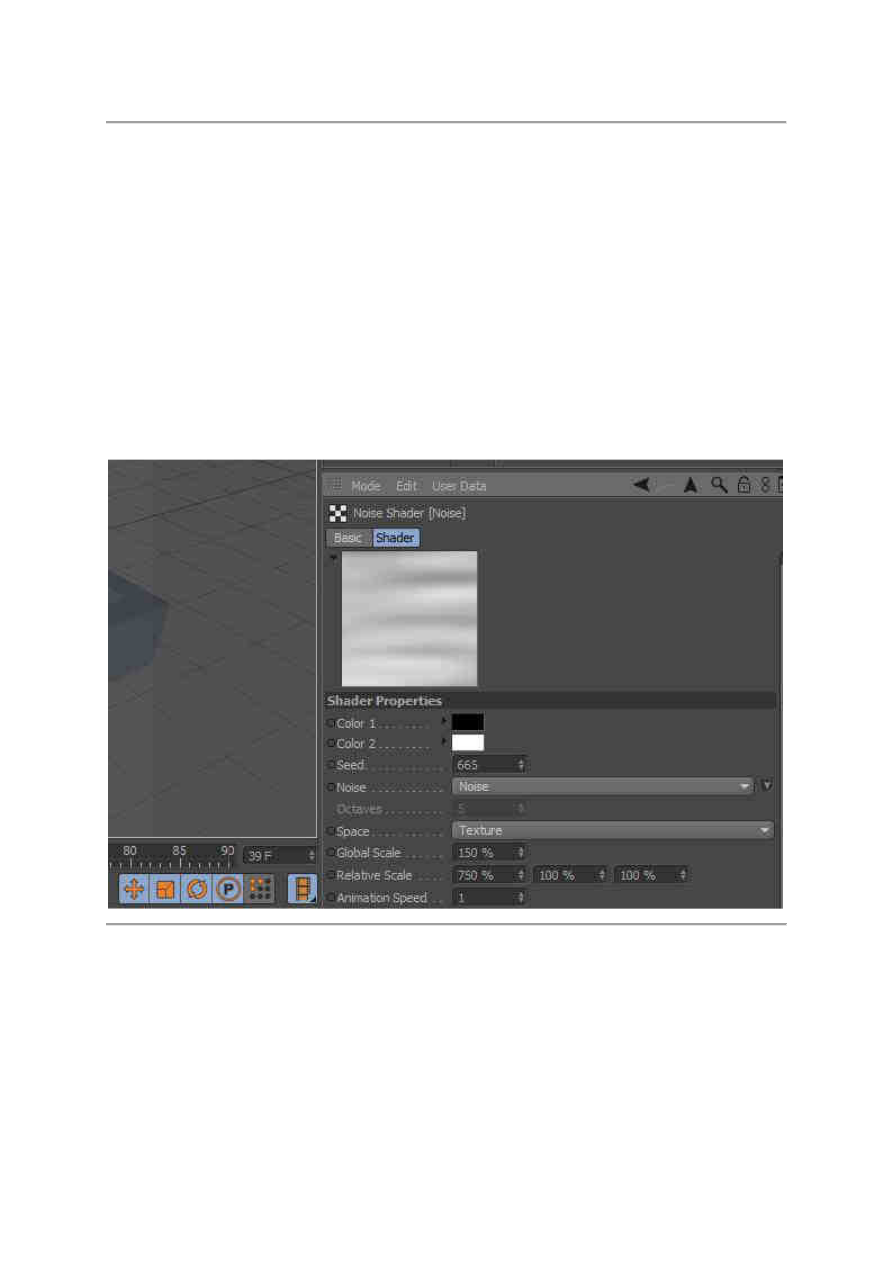
Select the Displacer object, and under the Shading tab, add a Noise shader from the list which
appears when the little arrow is clicked.
Step 4
Now click on the Noise to access the further editing options. There are lots of settings to play
with. However I won’t be explaining all of them, but I will be touching on the ones we will
need for our water effect and its animation attributes.
So, first of all, we need to adjust the shape appearance of the noise effect to make it look like
water. In order to do that, we basically need to play with the Scale options. The first option is
Global Scale, this one is for uniform scaling. The second one is Relative Scale, this one lets
you to adjust the U,V and W directions independently.
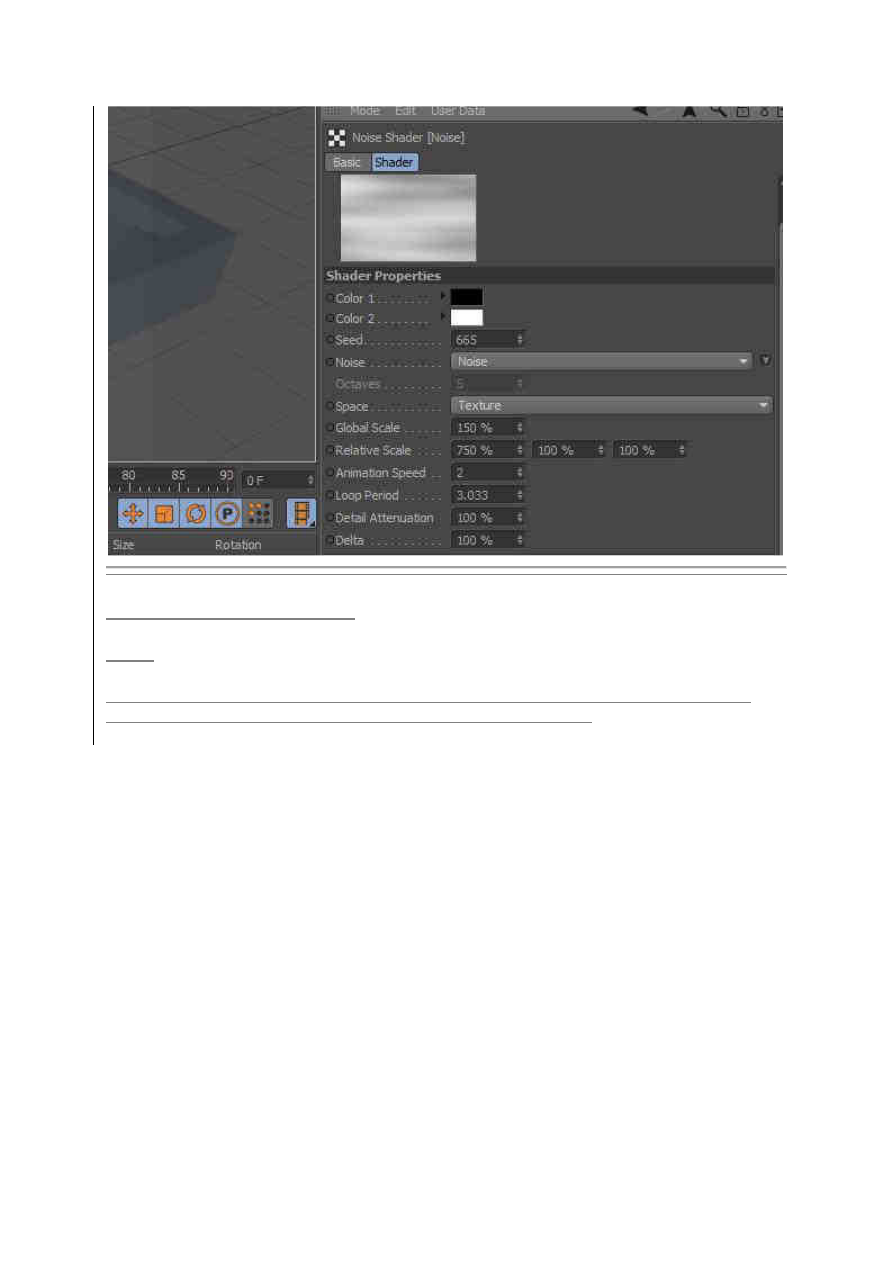
Set the Global Scale to 150% and the Relative Scale to 750% (only the first one, leave the
2nd and 3rd ones as they are.) You have to play around with these settings for sure, to get the
effect you desire.
Step 5
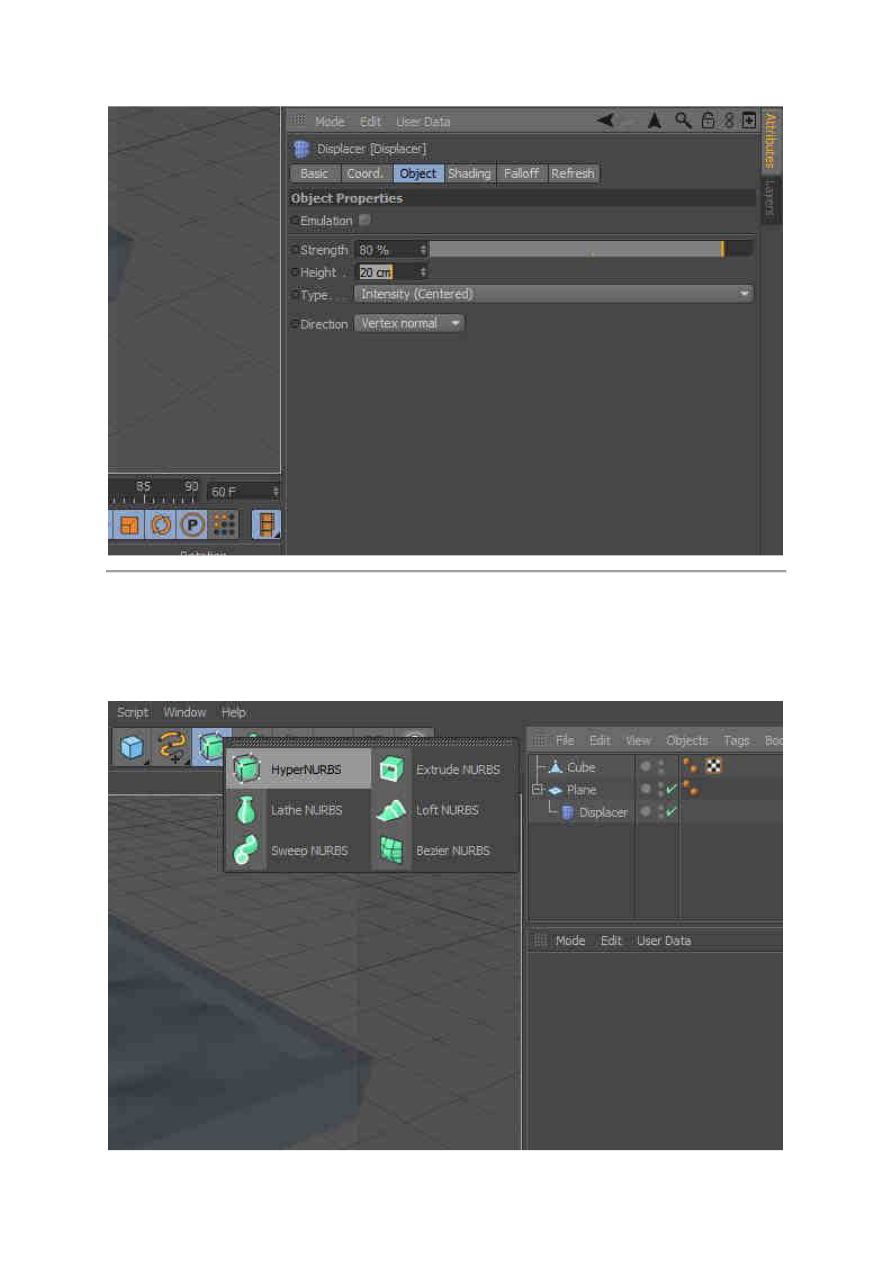
Now jump to the Object tab of the Displacer object. Set the Strength and the Height as you
wish. I think what they do is plain to see. The values I’ve set are; 80% for Strength, and 20cm
for Height.
Step 6
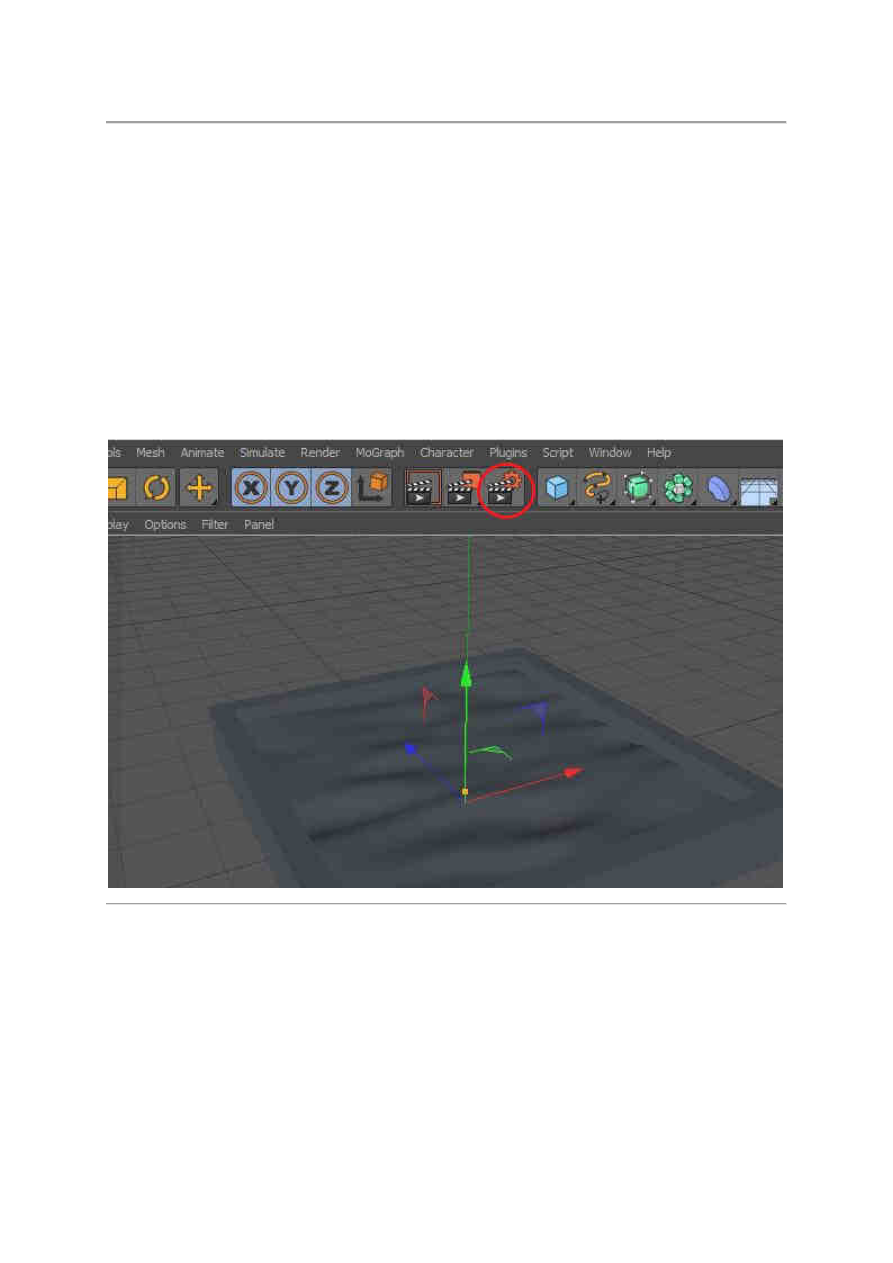
For a better resolution, it would be better to use a HyperNURBS object. So add it to the Object
manager and place your “water” (which is the plane object), under the HyperNURBS.
Step 7
So far I’ve showed the settings related to the appearance of the effect. Now what I’m going to
point out is related to the animation loop of the effect. That’s to say, whenever you put this
animation into a loop (let’s say 90 frames per second and make it a gif.) You may want it’s
ending frame to match with the starting frame, so the transition will be seamless.
Before showing the settings, let me teach you the simple underlying math. Suppose you set
the Frame Rate to 30 and the scene has 91 single frames starting from 0 to 90. This means
that the duration for this animation will be “91/30 = 3.0333“, because each second shows 30
frames.
Now by clicking the button shown below, open the Render Settings window.
Step 8
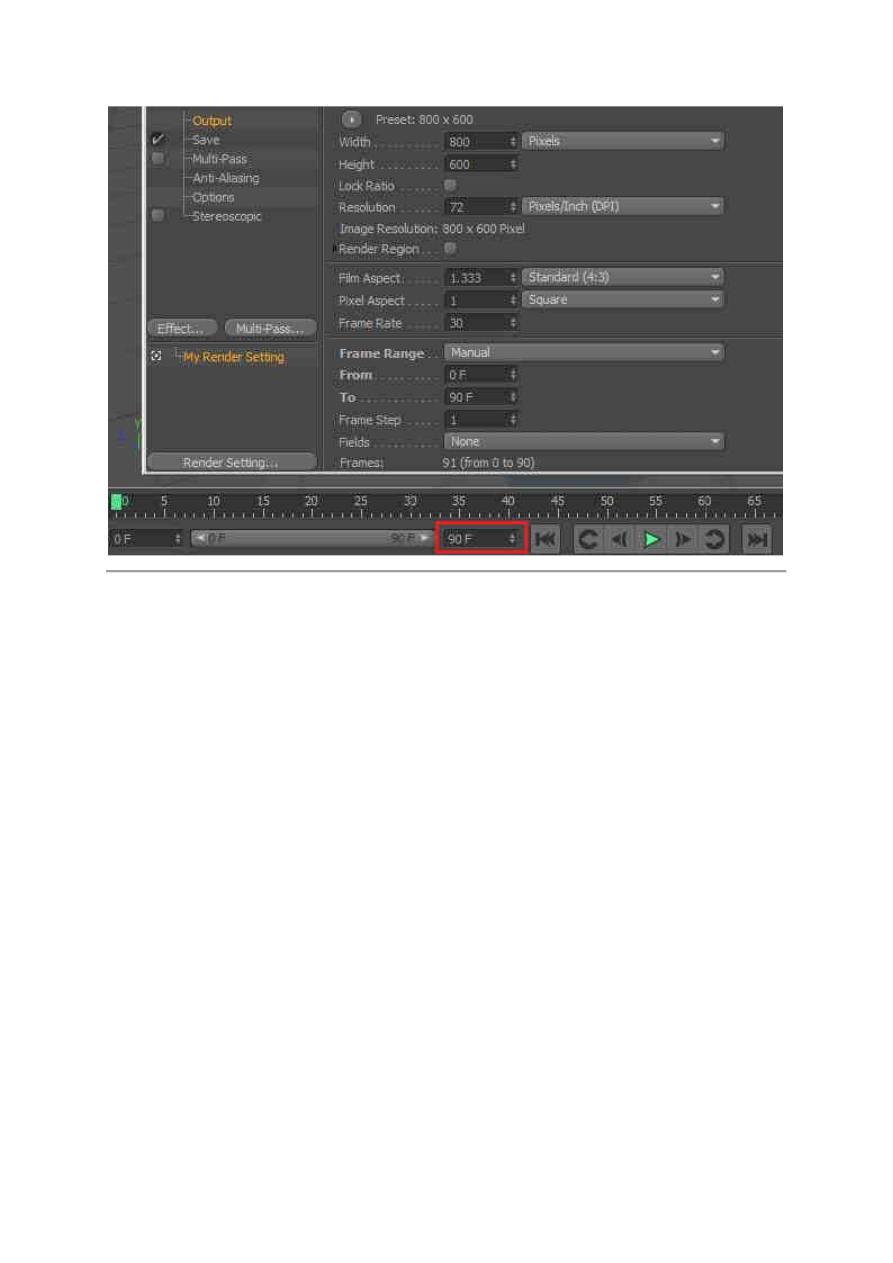
Here under the Output tab, you’ll see Frame Rate. It must be 30 by default, so leave it as it is.
Just below that, the Frame Range is shown with “From” and “To” parameters. You can set
them as you wish, but don’t forget to change the settings in the scene as well (as shown
below.)
Step 9
Now, I’m assuming you set the Frame Rate to 30 and the Frame Range From: 0 To: 90. So,
91/30 = 3.0333 is the number we’ll use for the loop time. So jump into the Noise shader
parameters and set the Loop Period to 3.0333. You can also change the Animation Speed if
you wish, by changing the related option. Now hit the Play button and when the animation
wraps back to frame 0, you will see that the transition is seamless.
Creating the Water Material
Step 1
Now for the sake of realism, one of the most important parts is the material. Create a new
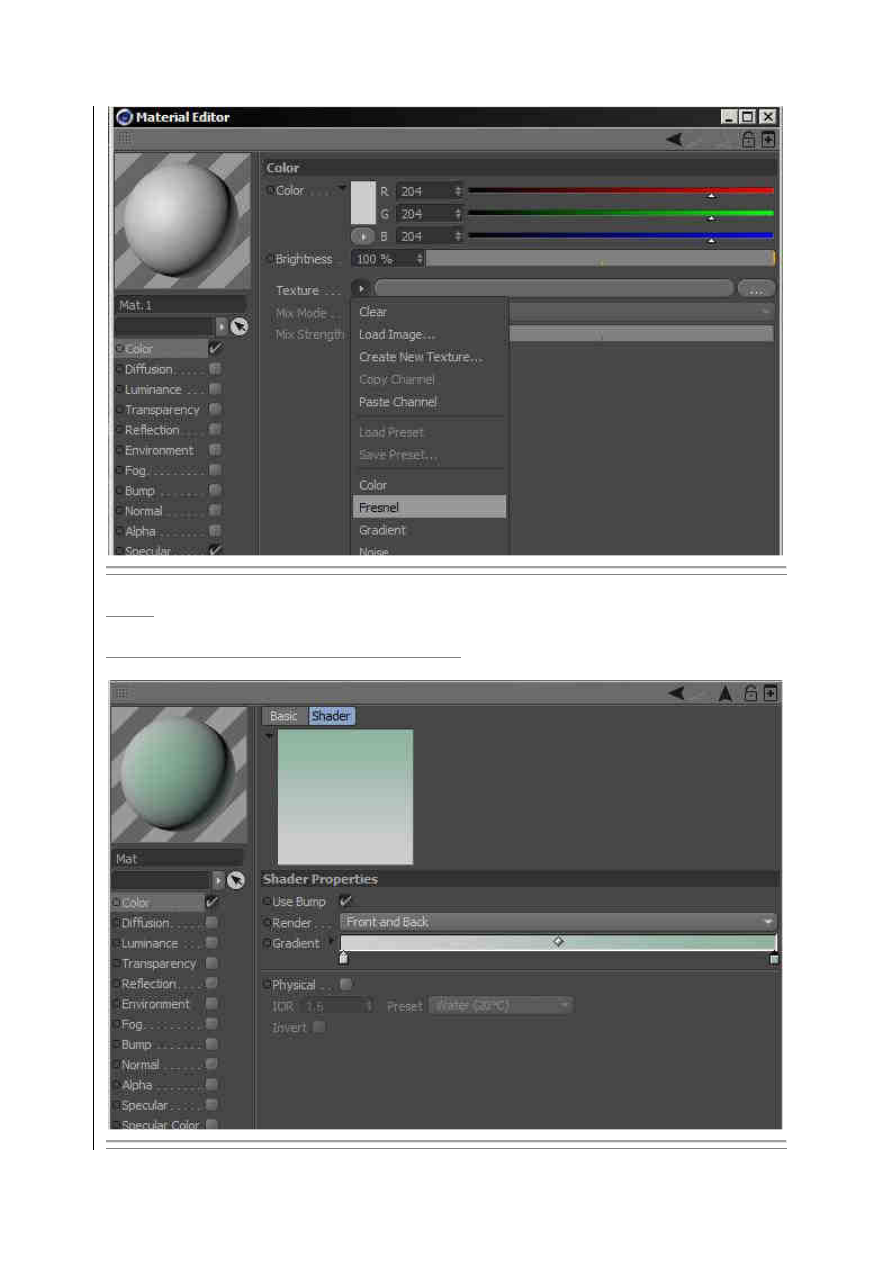
material. Go to the Color channel and add a Fresnel as the Texture.
Step 2
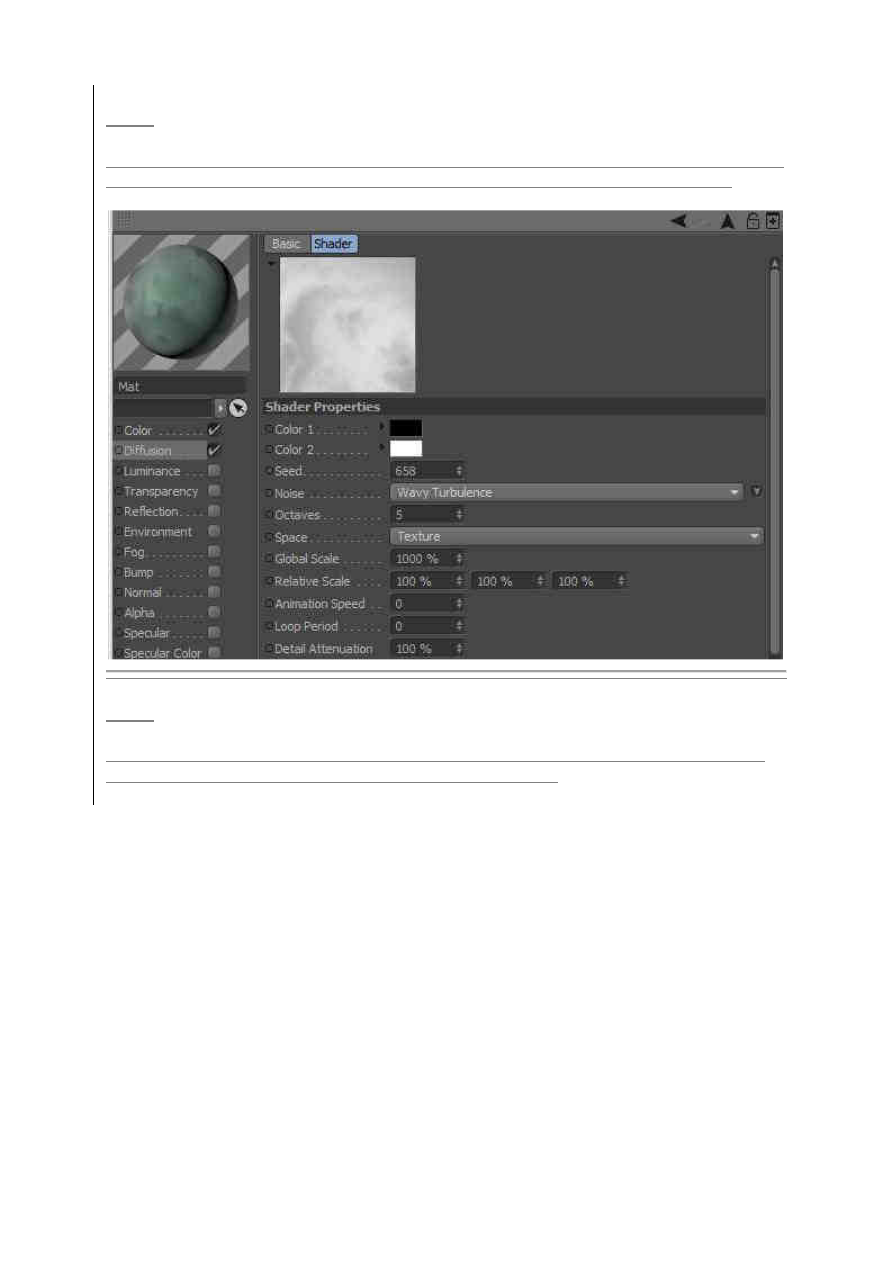
Change the colors of the texture as shown below.
Step 3
Switch to the Diffuse channel. Here add a Noise channel as we added the Fresnel before. Then
choose Wavy Turbulence for the Noise type and increase the Global Scale to 1000%.
Step 4
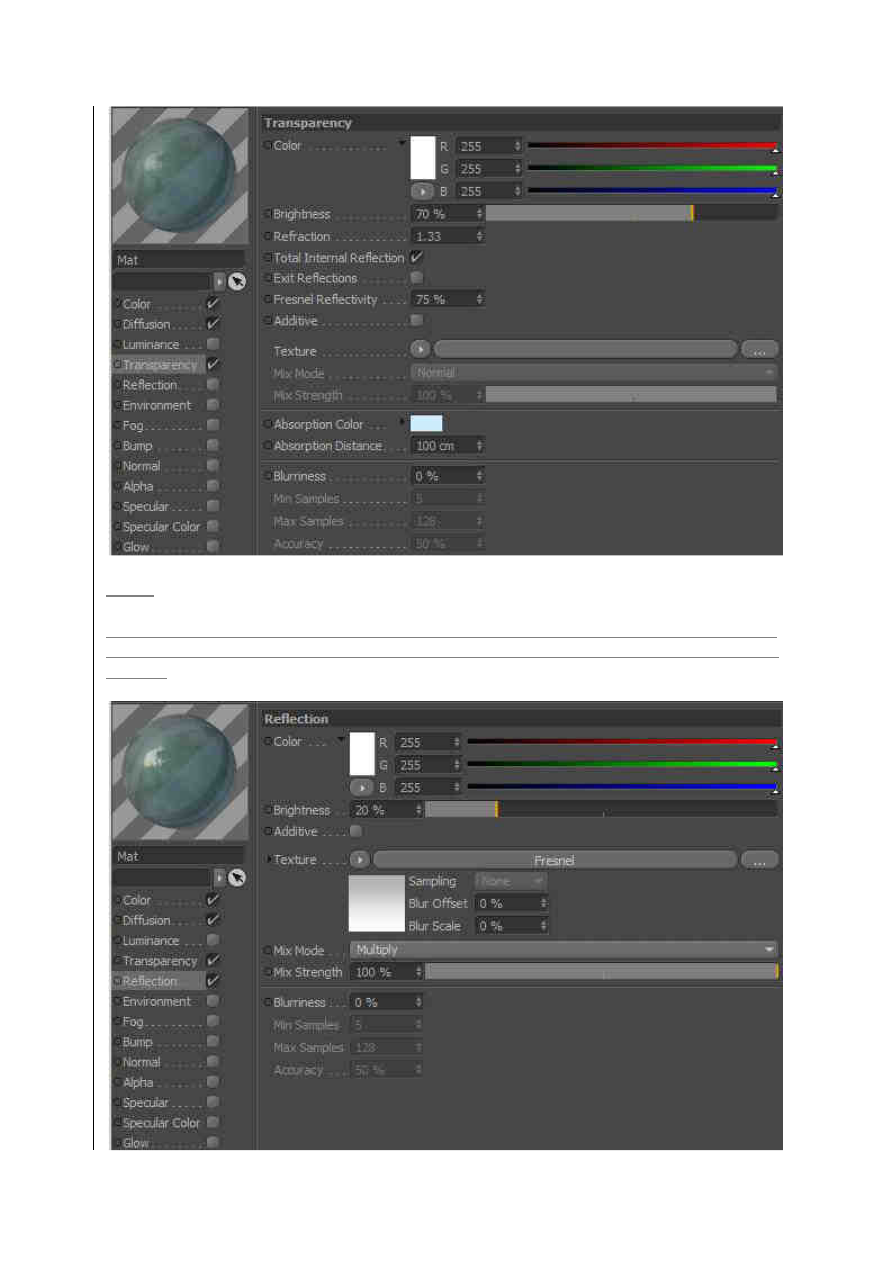
As for the Transparency channel. The Brightness is set to 70%, Refraction to 1.33, Fresnel
Reflectivity to 75% and the Absorption Color as shown below.
Step 5
Now turn on the Reflection channel and use the Fresnel texture again, with the colors shown.
Decrease the Brightness to 20%, and change the Mix Mode to Multiply. And that’s it for this
channel.

Step 6
Now jump to the Bump channel. Here add a layer as a texture. Then get into it, by clicking on
it. Here add two Noise shaders.
Step 7
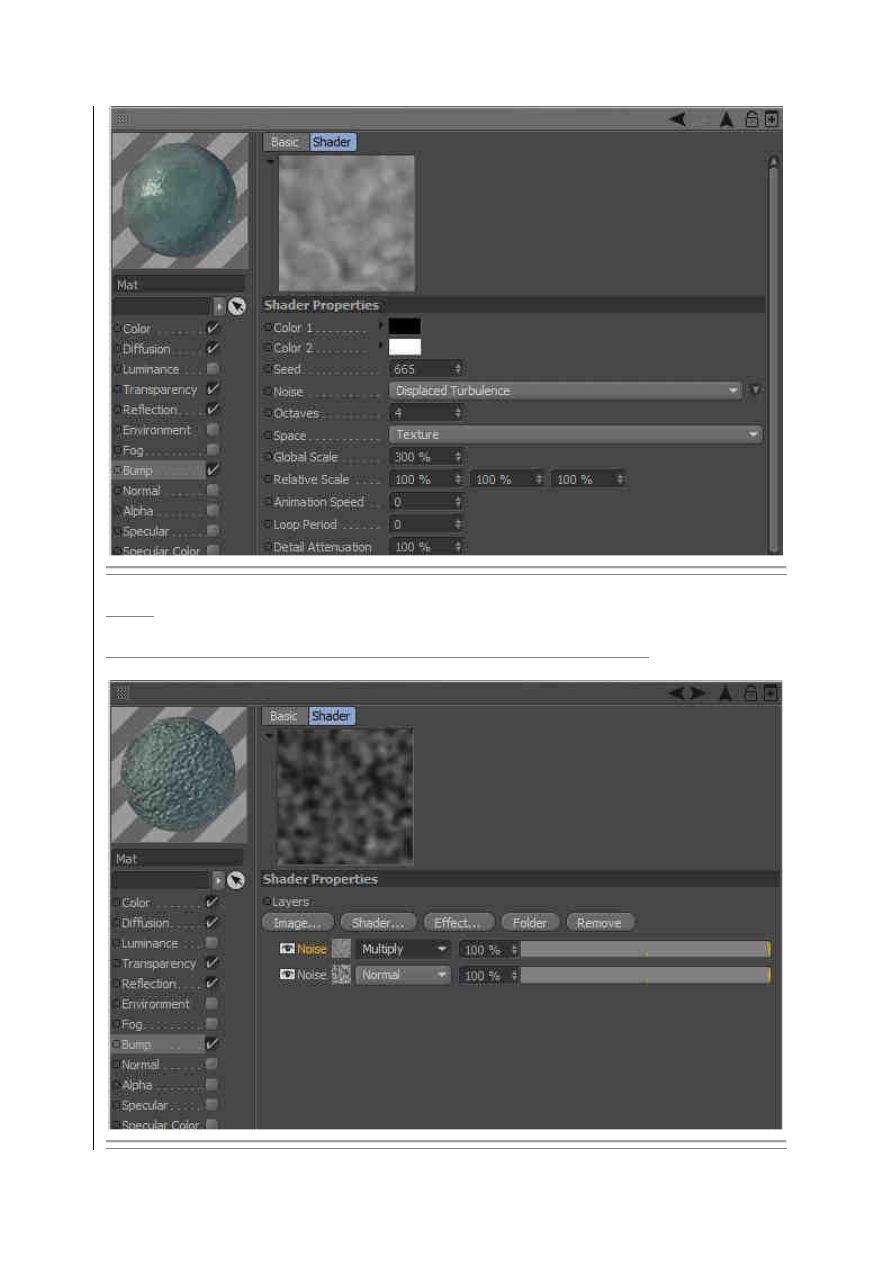
Click on the first Noise shader and under it’s settings, set it’s Noise channel to Displaced
Turbulence, Global Scale to 300% and Octaves to 4.
Step 8
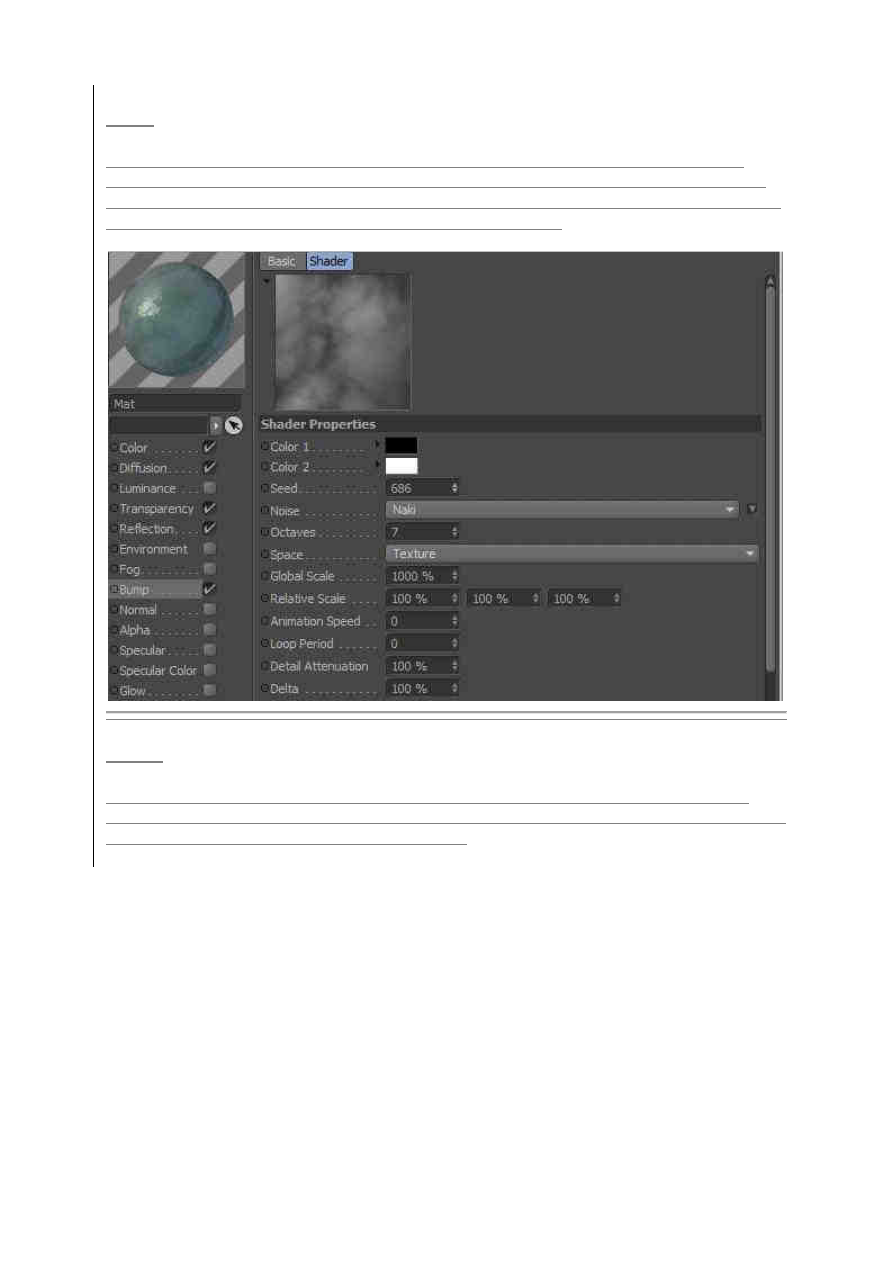
Now go back to and change the type of Noise for this channel, to Multiply.
Step 9
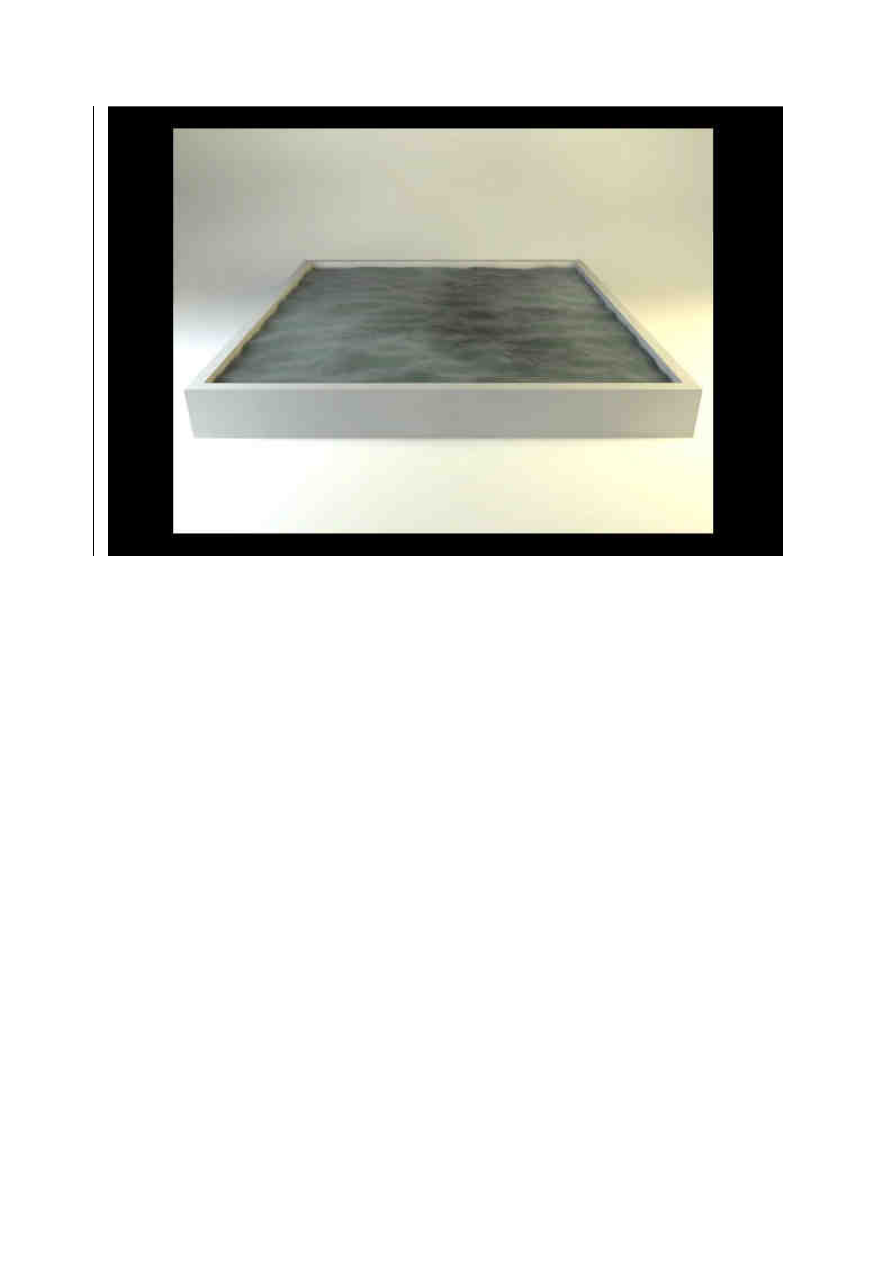
Click on the second Noise shader. The settings for it are as follows; Noise: Naki, Global
Scale: 1000%, Octaves: 7, Seed: 686 (here the seed is a random number.) I mean when you
change this number, the created result will vary in accordance, so you may change the seed to
see a different result. It doesn’t make a huge difference though.
Step 10
Now turn On the Specular Channel, and change the Width and Height to 20% and 200%
respectively. Render your scene with appropriate lighting and use Global illumination in order
to achieve the best results for your water material.
Wyszukiwarka
Podobne podstrony:
Realistyczna woda
Realistyczna woda
TUTORIALE Woda, ogień, dym
Ochrona budowli przed wodą i wilgocią gruntową
Kopia woda
woda plus oplaty
Tajemnice szklanki z wodą 1
Środowisko bytowania woda, powietrze, gleba 2
woda 2 druk
Realism
WODA PITNA kolokwium
Jak zrobić prosty trik z wodą
bugzilla tutorial[1]
freeRadius AD tutorial
Alignmaster tutorial by PAV1007 Nieznany
free sap tutorial on goods reciept
02 Biochemia woda
więcej podobnych podstron