
Pro/ENGINEER
®
Wildfire™ 2.0
Pro/NC-SHEETMETAL
TM
Help Topic Collection
Parametric Technology Corporation

Copyright © 2004 Parametric Technology Corporation. All Rights Reserved.
User and training documentation from Parametric Technology Corporation (PTC) is subject to the copyright laws of the
United States and other countries and is provided under a license agreement that restricts copying, disclosure, and use
of such documentation. PTC hereby grants to the licensed user the right to make copies in printed form of this
documentation if provided on software media, but only for internal/personal use and in accordance with the license
agreement under which the applicable software is licensed. Any copy made shall include the PTC copyright notice and
any other proprietary notice provided by PTC. This documentation may not be disclosed, transferred, modified, or
reduced to any form, including electronic media, or transmitted or made publicly available by any means without the
prior written consent of PTC and no authorization is granted to make copies for such purposes.
Information described herein is furnished for general information only, is subject to change without notice, and should
not be construed as a warranty or commitment by PTC. PTC assumes no responsibility or liability for any errors or
inaccuracies that may appear in this document.
The software described in this document is provided under written license agreement, contains valuable trade secrets
and proprietary information, and is protected by the copyright laws of the United States and other countries. It may not
be copied or distributed in any form or medium, disclosed to third parties, or used in any manner not provided for in the
software licenses agreement except with written prior approval from PTC. UNAUTHORIZED USE OF SOFTWARE
OR ITS DOCUMENTATION CAN RESULT IN CIVIL DAMAGES AND CRIMINAL PROSECUTION.
Registered Trademarks of Parametric Technology Corporation or a Subsidiary
Advanced Surface Design, Behavioral Modeling, CADDS, Computervision, CounterPart, EPD, EPD.Connect,
Expert Machinist, Flexible Engineering, HARNESSDESIGN, Info*Engine, InPart, MECHANICA, Optegra,
Parametric Technology, Parametric Technology Corporation, PartSpeak, PHOTORENDER, Pro/DESKTOP, Pro/E,
Pro/ENGINEER, Pro/HELP, Pro/INTRALINK, Pro/MECHANICA, Pro/TOOLKIT, Product First, PTC, PT/Products,
Shaping Innovation, and Windchill.
Trademarks of Parametric Technology Corporation or a Subsidiary
3DPAINT, Associative Topology Bus, AutobuildZ, CDRS, Create
Collaborate Control, CV, CVact, CVaec,
CVdesign, CV-DORS, CVMAC, CVNC, CVToolmaker, DataDoctor, DesignSuite, DIMENSION III, DIVISION,
e/ENGINEER, eNC Explorer, Expert MoldBase, Expert Toolmaker, GRANITE, ISSM, KDiP,
Knowledge Discipline in Practice, Knowledge System Driver, ModelCHECK, MoldShop, NC Builder, Pro/ANIMATE,
Pro/ASSEMBLY, Pro/CABLING, Pro/CASTING, Pro/CDT, Pro/CMM, Pro/COLLABORATE, Pro/COMPOSITE,
Pro/CONCEPT, Pro/CONVERT, Pro/DATA for PDGS, Pro/DESIGNER, Pro/DETAIL, Pro/DIAGRAM,
Pro/DIEFACE, Pro/DRAW, Pro/ECAD, Pro/ENGINE, Pro/FEATURE, Pro/FEM-POST, Pro/FICIENCY,
Pro/FLY-THROUGH, Pro/HARNESS, Pro/INTERFACE, Pro/LANGUAGE, Pro/LEGACY, Pro/LIBRARYACCESS,
Pro/MESH, Pro/Model.View, Pro/MOLDESIGN, Pro/NC-ADVANCED, Pro/NC-CHECK, Pro/NC-MILL,
Pro/NCPOST, Pro/NC-SHEETMETAL, Pro/NC-TURN, Pro/NC-WEDM, Pro/NC-Wire EDM,
Pro/NETWORK ANIMATOR, Pro/NOTEBOOK, Pro/PDM, Pro/PHOTORENDER, Pro/PIPING,
Pro/PLASTIC ADVISOR, Pro/PLOT, Pro/POWER DESIGN, Pro/PROCESS, Pro/REPORT, Pro/REVIEW,
Pro/SCAN-TOOLS, Pro/SHEETMETAL, Pro/SURFACE, Pro/VERIFY, Pro/Web.Link, Pro/Web.Publish,
Pro/WELDING, Product Development Means Business, ProductView, PTC Precision, Shrinkwrap,
Simple
Powerful Connected, The Product Development Company, The Way to Product First, Wildfire,
Windchill DynamicDesignLink, Windchill PartsLink, Windchill PDMLink, Windchill ProjectLink, and
Windchill SupplyLink.
Patents of Parametric Technology Corporation or a Subsidiary
Registration numbers and issue dates follow. Additionally, equivalent patents may be issued or pending outside of the
United States. Contact PTC for further information.
6,665,569 B1 16-December-2003
6,625,607 B1 23-September-2003
6,580,428 B1 17-June-2003
GB2354684B 02-July-2003
GB2384125 15-October-2003
GB2354096 12-November-2003
6,608,623 B1 19 August 2003
GB2353376 05-November-2003
GB2354686 15-October-2003
6,545,671 B1 08-April-2003
GB2354685B 18-June-2003
6,608,623 B1 19 August 2003
6,473,673 B1 29-October-2002
GB2354683B 04-June-2003
6,447,223 B1 10-Sept-2002
6,308,144 23-October-2001
5,680,523 21-October-1997
5,838,331 17-November-1998
4,956,771 11-September-1990
5,058,000 15-October-1991
5,140,321 18-August-1992
5,423,023 05-June-1990
4,310,615 21-December-1998
4,310,614 30-April-1996
4,310,614 22-April-1999
5,297,053 22-March-1994
5,513,316 30-April-1996
5,689,711 18-November-1997
5,506,950 09-April-1996
5,428,772 27-June-1995
5,850,535 15-December-1998
5,557,176 09-November-1996
5,561,747 01-October-1996
Third-Party Trademarks
Adobe is a registered trademark of Adobe Systems. Advanced ClusterProven, ClusterProven, and the ClusterProven
design are trademarks or registered trademarks of International Business Machines Corporation in the United States
and other countries and are used under license. IBM Corporation does not warrant and is not responsible for the

operation of this software product. AIX is a registered trademark of IBM Corporation. Allegro, Cadence, and Concept
are registered trademarks of Cadence Design Systems, Inc. Apple, Mac, Mac OS, and Panther are trademarks or
registered trademarks of Apple Computer, Inc. AutoCAD and Autodesk Inventor are registered trademarks of
Autodesk, Inc. Baan is a registered trademark of Baan Company. CADAM and CATIA are registered trademarks of
Dassault Systemes. COACH is a trademark of CADTRAIN, Inc. DOORS is a registered trademark of Telelogic AB.
FLEX
lm is a trademark of Macrovision Corporation. Geomagic is a registered trademark of Raindrop Geomagic, Inc.
EVERSYNC, GROOVE, GROOVEFEST, GROOVE.NET, GROOVE NETWORKS, iGROOVE, PEERWARE, and
the interlocking circles logo are trademarks of Groove Networks, Inc. Helix is a trademark of Microcadam, Inc.
HOOPS is a trademark of Tech Soft America, Inc. HP-UX is a registered trademark and Tru64 is a trademark of the
Hewlett-Packard Company. I-DEAS, Metaphase, Parasolid, SHERPA, Solid Edge, and Unigraphics are trademarks or
registered trademarks of Electronic Data Systems Corporation (EDS). InstallShield is a registered trademark and
service mark of InstallShield Software Corporation in the United States and/or other countries. Intel is a registered
trademark of Intel Corporation. IRIX is a registered trademark of Silicon Graphics, Inc. LINUX is a registered
trademark of Linus Torvalds. MatrixOne is a trademark of MatrixOne, Inc. Mentor Graphics and Board Station are
registered trademarks and 3D Design, AMPLE, and Design Manager are trademarks of Mentor Graphics Corporation.
MEDUSA and STHENO are trademarks of CAD Schroer GmbH. Microsoft, Microsoft Project, Windows, the
Windows logo, Windows NT, Visual Basic, and the Visual Basic logo are registered trademarks of
Microsoft Corporation in the United States and/or other countries. Netscape and the Netscape N and Ship's Wheel
logos are registered trademarks of Netscape Communications Corporation in the U.S. and other countries.
Oracle is a
registered trademark of Oracle Corporation. OrbixWeb is a registered trademark of IONA Technologies PLC. PDGS is
a registered trademark of Ford Motor Company. RAND is a trademark of RAND Worldwide. Rational Rose is a
registered trademark of Rational Software Corporation. RetrievalWare is a registered trademark of Convera
Corporation. RosettaNet is a trademark and Partner Interface Process and PIP are registered trademarks of
“RosettaNet,” a nonprofit organization. SAP and R/3 are registered trademarks of SAP AG Germany. SolidWorks is a
registered trademark of SolidWorks Corporation. All SPARC trademarks are used under license and are trademarks or
registered trademarks of SPARC International, Inc. in the United States and in other countries. Products bearing
SPARC trademarks are based upon an architecture developed by Sun Microsystems, Inc. Sun, Sun Microsystems, the
Sun logo, Solaris, UltraSPARC, Java and all Java based marks, and “The Network is the Computer” are trademarks or
registered trademarks of Sun Microsystems, Inc. in the United States and in other countries. TIBCO, TIBCO Software,
TIBCO ActiveEnterprise, TIBCO Designer, TIBCO Enterprise for JMS, TIBCO Rendezvous, TIBCO Turbo XML,
TIBCO Business Works are the trademarks or registered trademarks of TIBCO Software Inc. in the United States and
other countries. WebEx is a trademark of WebEx Communications, Inc.
Third-Party Technology Information
Certain PTC software products contain licensed third-party technology: Rational Rose 2000E is copyrighted software
of Rational Software Corporation. RetrievalWare is copyrighted software of Convera Corporation. VisTools library is
copyrighted software of Visual Kinematics, Inc. (VKI) containing confidential trade secret information belonging to
VKI. HOOPS graphics system is a proprietary software product of, and is copyrighted by, Tech Soft America, Inc.
G-POST is copyrighted software and a registered trademark of Intercim. VERICUT is copyrighted software and a
registered trademark of CGTech. Pro/PLASTIC ADVISOR is powered by Moldflow technology. Moldflow is a
registered trademark of Moldflow Corporation. The JPEG image output in the Pro/Web.Publish module is based in part
on the work of the independent JPEG Group. DFORMD.DLL is copyrighted software from Compaq Computer
Corporation and may not be distributed. METIS, developed by George Karypis and Vipin Kumar at the University of
Minnesota, can be researched at http://www.cs.umn.edu/~karypis/metis. METIS is © 1997 Regents of the University of
Minnesota. LightWork Libraries are copyrighted by LightWork Design 1990–2001. Visual Basic for Applications and
Internet Explorer is copyrighted software of Microsoft Corporation. Parasolid © Electronic Data Systems (EDS).
Windchill Info*Engine Server contains IBM XML Parser for Java Edition and the IBM Lotus XSL Edition. Pop-up
calendar components Copyright © 1998 Netscape Communications Corporation. All Rights Reserved.
TECHNOMATIX is copyrighted software and contains proprietary information of Technomatix Technologies Ltd.
Technology "Powered by Groove" is provided by Groove Networks, Inc. Technology "Powered by WebEx" is provided
by WebEx Communications, Inc. Oracle 8i run-time and Oracle 9i run-time, Copyright © 2002–2003 Oracle
Corporation. Oracle programs provided herein are subject to a restricted use license and can only be used in
conjunction with the PTC software they are provided with. Apache Server, Tomcat, Xalan, and Xerces are technologies
developed by, and are copyrighted software of, the Apache Software Foundation (http://www.apache.org) – their use is
subject to the terms and limitations at:
http://www.apache.org/LICENSE.txt. Acrobat Reader is copyrighted software of
Adobe Systems Inc. and is subject to the Adobe End-User License Agreement as provided by Adobe with those
products. UnZip (© 1990-2001 Info-ZIP, All Rights Reserved) is provided “AS IS” and WITHOUT WARRANTY OF
ANY KIND. For the complete Info-ZIP license see ftp://ftp.info-zip.org/pub/infozip/license.html. Gecko and Mozilla
components are subject to the Mozilla Public License Version 1.1 at http://www.mozilla.org/MPL. Software distributed
under the MPL is distributed on an "AS IS" basis, WITHOUT WARRANTY OF ANY KIND, either expressed or
implied. See the MPL for the specific language governing rights and limitations. The Java™ Telnet Applet

(StatusPeer.java, TelnetIO.java, TelnetWrapper.java, TimedOutException.java), Copyright © 1996, 97 Mattias L.
Jugel, Marcus Meißner, is redistributed under the GNU General Public License. This license is from the original
copyright holder and the Applet is provided WITHOUT WARRANTY OF ANY KIND. You may obtain a copy of the
source code for the Applet at http://www.mud.de/se/jta (for a charge of no more than the cost of physically performing
the source distribution), by sending e-mail to leo@mud.de or marcus@mud.de—you are allowed to choose either
distribution method. The source code is likewise provided under the GNU General Public License. GTK+The GIMP
Toolkit are licensed under the GNU LGPL. You may obtain a copy of the source code at http://www.gtk.org, which is
likewise provided under the GNU LGPL. zlib software Copyright © 1995-2002 Jean-loup Gailly and Mark Adler.
OmniORB is distributed under the terms and conditions of the GNU General Public License and GNU Library General
Public License. The Java Getopt.jar, copyright 1987-1997 Free Software Foundation, Inc.; Java Port copyright 1998 by
Aaron M. Renn (arenn@urbanophile.com), is redistributed under the GNU LGPL. You may obtain a copy of the
source code at http://www.urbanophile.com/arenn/hacking/download.html. The source code is likewise provided under
the GNU LGPL. Mozilla Japanese localization components are subject to the Netscape Public License Version 1.1 (at
http://www.mozilla.org/NPL). Software distributed under NPL is distributed on an "AS IS" basis, WITHOUT
WARRANTY OF ANY KIND, either expressed or implied (see the NPL for the specific language governing rights and
limitations). The Original Code is Mozilla Communicator client code, released March 31, 1998 and the Initial
Developer of the Original Code is Netscape Communications Corporation. Portions created by Netscape are Copyright
© 1998 Netscape Communications Corporation. All Rights Reserved. Contributors: Kazu Yamamoto
(kazu@mozilla.gr.jp), Ryoichi Furukawa (furu@mozilla.gr.jp), Tsukasa Maruyama (mal@mozilla.gr.jp), Teiji Matsuba
(matsuba@dream.com).
UNITED STATES GOVERNMENT RESTRICTED RIGHTS LEGEND
This document and the software described herein are Commercial Computer Documentation and Software, pursuant to
FAR 12.212(a)-(b) (OCT’95) or DFARS 227.7202-1(a) and 227.7202-3(a) (JUN’95), is provided to the US
Government under a limited commercial license only. For procurements predating the above clauses, use, duplication,
or disclosure by the Government is subject to the restrictions set forth in subparagraph (c)(1)(ii) of the Rights in
Technical Data and Computer Software Clause at DFARS 252.227-7013 (OCT’88) or Commercial Computer
Software-Restricted Rights at FAR 52.227-19(c)(1)-(2) (JUN’87), as applicable. 012304
Parametric Technology Corporation, 140 Kendrick Street, Needham, MA 02494 USA

v
Table Of Contents
Foundation Modules ........................................................................................ 1
Pro/NC-SHEETMETAL.................................................................................... 1
Using Pro/NC-SHEETMETAL ........................................................................ 1
Manufacturing Model ................................................................................. 3
Manufacturing Process ............................................................................... 9
Sheet Metal Manufacturing Populate ...........................................................14
Manufacturing Information ........................................................................19
Turret Manager ........................................................................................21
Machine Zones and Clamps .......................................................................32
Nesting...................................................................................................36
NC Sequencing ........................................................................................43
NC Post-Processing ..................................................................................50
Post-Processing Deliverables......................................................................53
External Post Processors ...........................................................................59
Pro/NC-Check ..........................................................................................62
Press Punch NC Sequences........................................................................64
Contouring NC Sequences .........................................................................73
Shear NC Sequence..................................................................................78
Slitting NC Sequences...............................................................................79
Manufacturing Parameters.........................................................................81
CL Output and Menus ...............................................................................98
Automation Data Files............................................................................. 106
Interactive Path Control .......................................................................... 111
CL Command Syntax Menus .................................................................... 114
Naming Convensions .............................................................................. 118
Index ......................................................................................................... 121

1
Foundation Modules
Pro/NC-SHEETMETAL
Using Pro/NC-SHEETMETAL
About Sheet Metal Manufacturing
Sheet Metal Manufacturing creates the data necessary to drive an NC machine tool to
machine parts from a sheet workpiece. It does this by providing the tools that let the
manufacturing engineer set up the manufacturing model, and then follow a logical
sequence of steps to progress from the manufacturing model to ASCII CL data files
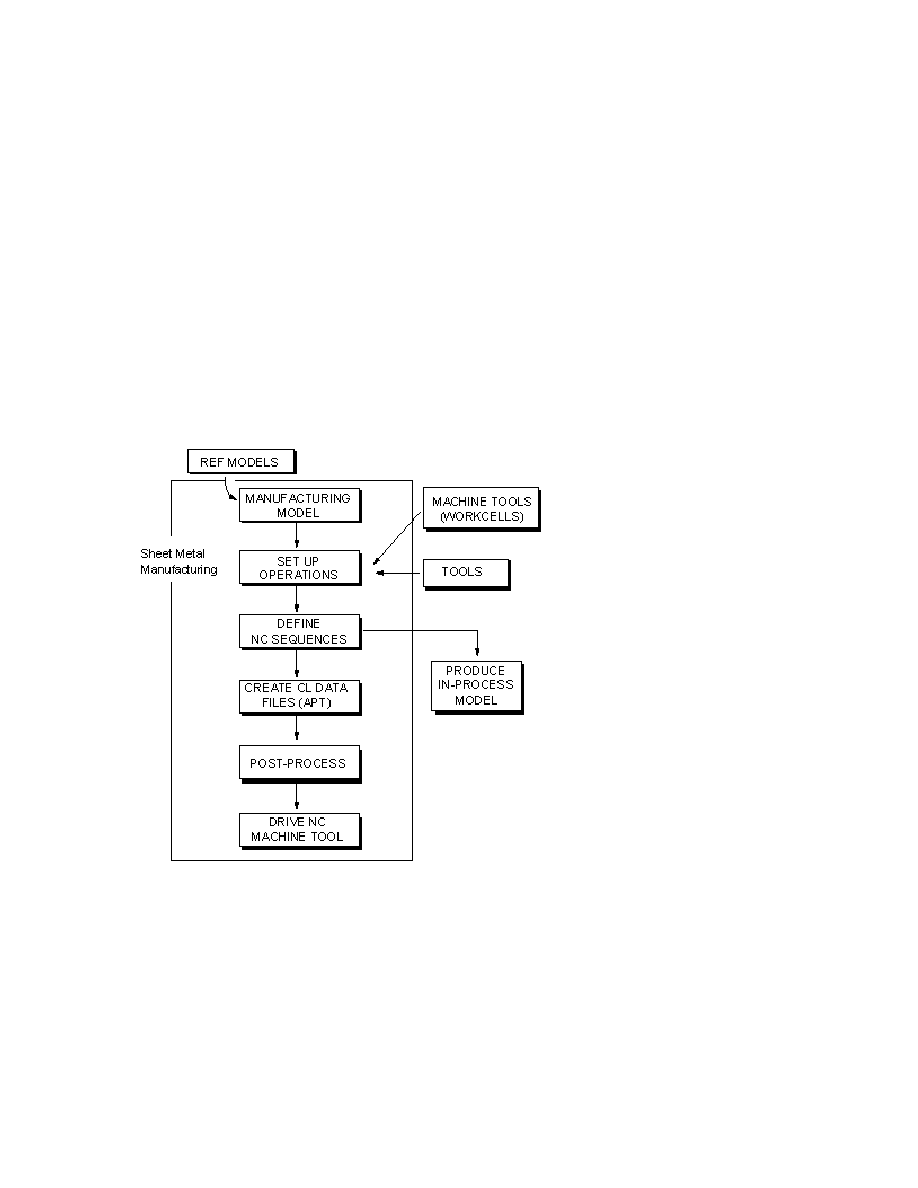
that can be post-processed into NC machine data. The following illustration
summarizes the Sheet Metal Manufacturing process.
The Sheet Metal Manufacturing Process
To Enter Manufacturing Mode
To work in manufacturing mode, you have to retrieve an existing manufacturing
model or create a new one. To start up with a new manufacturing model, you need a
reference model (or models).
Note: The workpiece is created "on the fly."

Pro/NC-SHEETMETAL
TM
- Help Topic Collection
2
Create these in Sheet Metal mode before entering Manufacturing.
Pro/NC-SHEETMETAL Configuration Options
About Configuring Pro/NC-SHEETMETAL
Pro/NC-SHEETMETAL configuration options enable you to customize your sheet metal
design environment. For example, you might specify constants for neutral bend lines,
enable corner relief notes and punch axis points, set directory locations, or define
certain material behavior in your sheet metal design.
See the Pro/SHEETMETAL online Help for descriptions of all applicable sheet metal
configuration options.
pro_mf_clamp_dir
Specifies the directory where the manufacturing clamps are found.
You must type the full directory path for Value, for example, c:\program
files\ptc\clamp
.
Model Tree
About the Model Tree
You can display a graphical hierarchy of a manufacturing model in the form of a
Model Tree window. When you create or retrieve a manufacturing model, the system
displays the Model Tree window.
To Display Manufacturing Features in a Model Tree Window
In the Model Tree, click Tree > Show > Expand All. The system displays all the
manufacturing features in the Model Tree at all levels.
To Display Parent/Child Relationships in the Model Tree Window
In the Model Tree, select a feature. Right-click the feature and select Info >
Parent/Child. Reference Information Window appears. The parents and
children of the current selected feature are displayed.
To Select Features to Display in the Model Tree Window
1. In the Model Tree, click Tree > Settings > Tree filters. The Model Tree Items
dialog box opens.
2. Under Feature Types click the MFG tab.
3. Select the feature type(s) you want to show in the Model Tree. The following
options are available:
• Operation
Foundation Modules
3
• Workcell
• Sequence
• Mfg Geometry
• Material Removal
• Show all features—If you select this option, the checkmarks next to all the
options above disappear. The Model Tree will contain all the features (including
regular Pro/ENGINEER features) in the manufacturing assembly and in all the
components.
4. Click OK.
Manufacturing Model
About Manufacturing Model
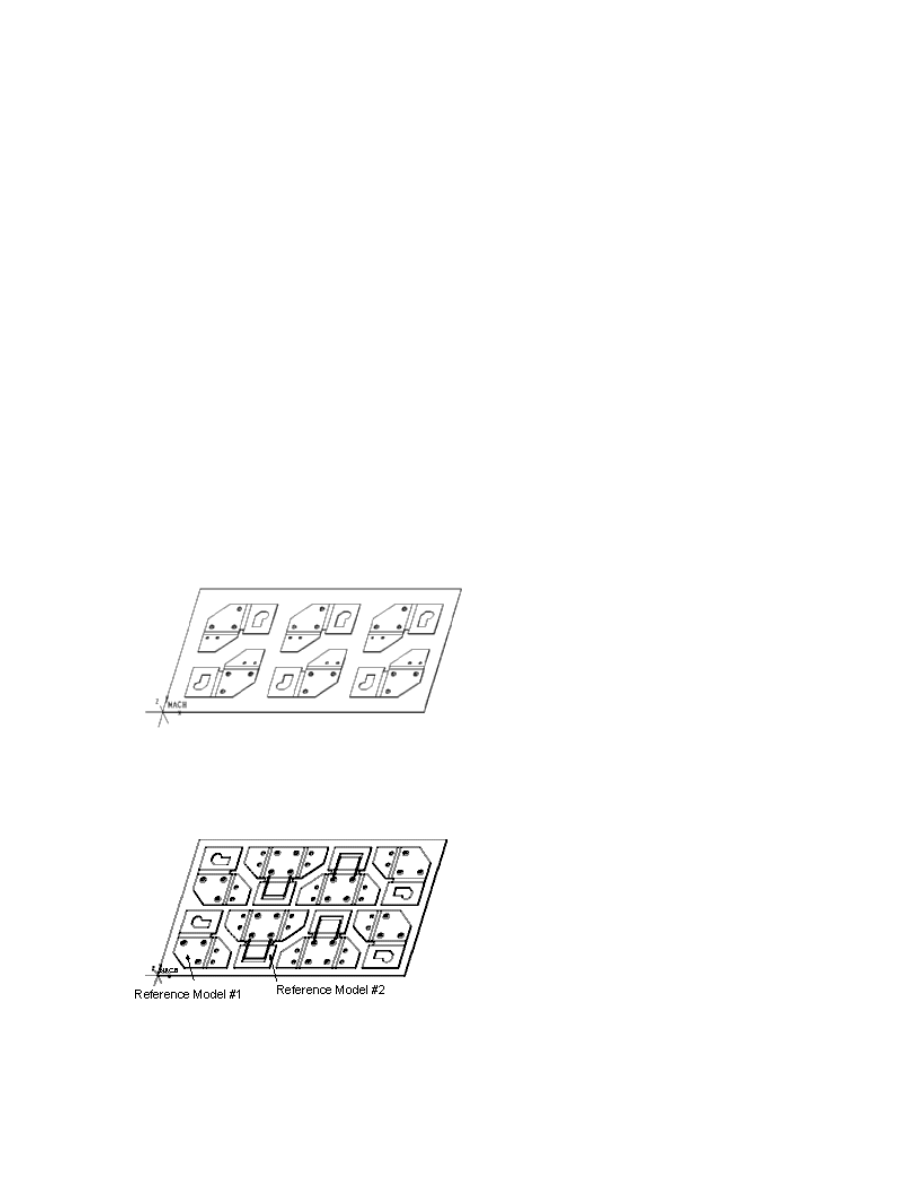
Place the reference model(s) in the desired locations on the workpiece to create a
manufacturing model. Use either the nesting functionality or the regular assembly
placement commands. (See the following illustration). You can create NC sequences
by referencing geometry of design model(s).
Sheet Metal Manufacturing Model
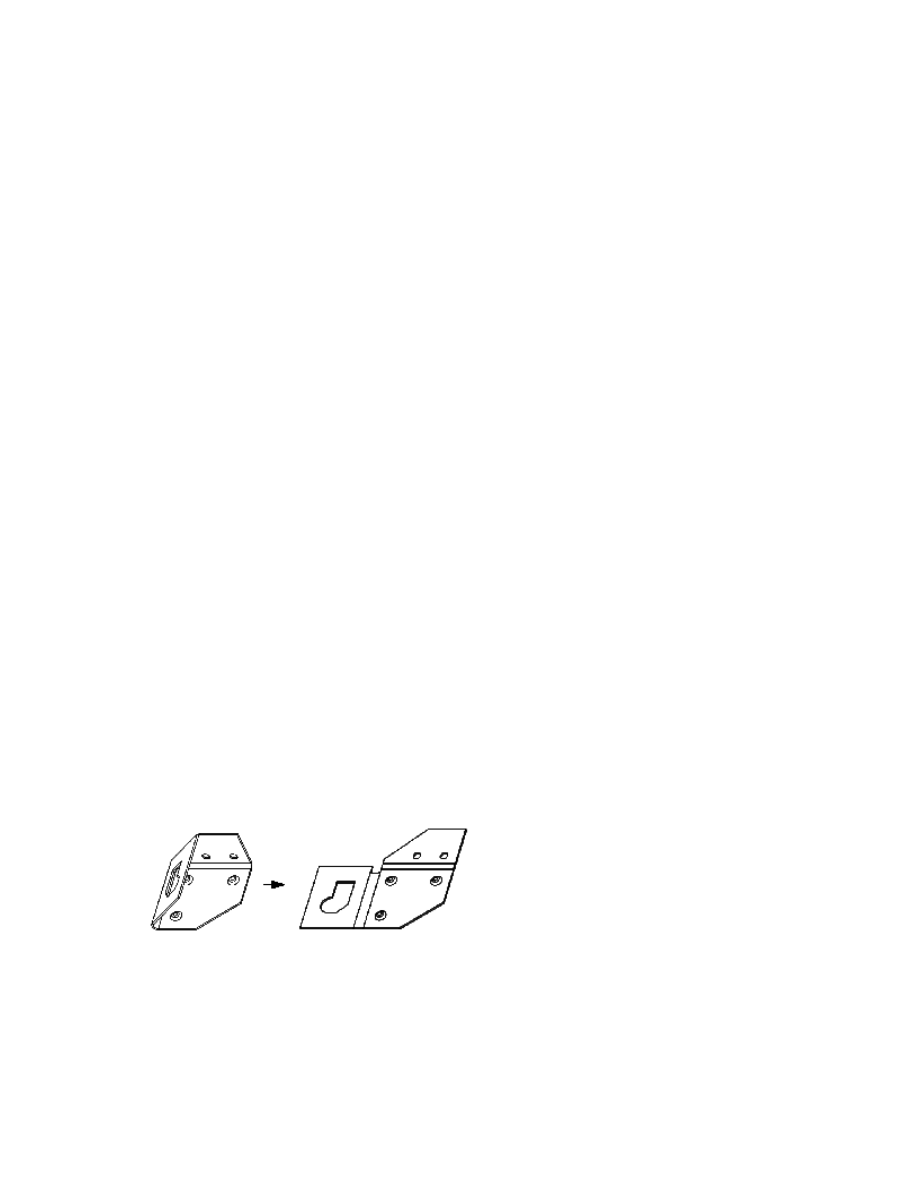
You can use different design models as reference parts within a single manufacturing
model. (See the following illustration.)
Sheet Metal Manufacturing Model—Multiple Reference Models
Pro/NC-SHEETMETAL
TM
- Help Topic Collection
4
Creating the Sheet Metal Manufacturing Model
The sheet metal manufacturing model is an assembly that consists of a sheet metal
workpiece with one or more design (reference) models attached to it.
The sheet metal workpiece represents the raw sheet metal stock that is machined by
the NC sequences. It is the base component of the sheet metal manufacturing
assembly.
To Create a New Manufacturing Model
1. Click FILE > New. The New dialog box opens.
2. Select Manufacturing from the Type list and Sheetmetal from the Sub-Type
list.
3. Type a name in the Name box for the new manufacturing model.
4. Click OK. The manufacturing model is created.
Using Assembly Commands
The Components menu in the Parts tabbed page enables you to assemble
reference parts to the workpiece using the regular assembly placement commands
instead of the nesting functionality, as well as perform other assembly actions on
individual members of the manufacturing model.
Note: You cannot create parts in Sheet Metal Manufacturing mode.
Design Model
The Design (Reference) Model, represents the finished product and is used as the
basis for all NC sequences. Select features, surfaces, grain orientation and edges on
the design model as references for each NC sequence. Referencing the geometry of
the design model sets up a parametric relationship between the design model and
the workpiece. When the design model is changed, all associated NC sequences are
updated to reflect the change.
The Design (Reference) Model
Before using a sheet metal part as a manufacturing reference model, make sure that
it is unbent into the flat state. Add an Unbend All feature if necessary.
To Retrieve an Existing Manufacturing Model
1. Click FILE > Open. The File Open dialog box opens.

Foundation Modules
5
2. Select the desired file.
3. Click OK.
To Modify a Manufacturing Model
You can manipulate the workpiece and the reference models as any other part. You
can modify their features, redefine their features, suppress their features, etc. To do
this, choose Modify from the SMT MFG menu and use the following options:
• Mod Part—Create, delete, suppress features, and modify dimensions of the
design model or the workpiece. Use Pick or Query Sel to select the part to
modify.
The following two options (Mod Ref and Mod Work) make the process of
selection easier.
• Mod NC Seq—Create, delete, suppress features and modify dimensions of the
NC sequence
• Mod Pattern—Create, delete, suppress features and modify dimensions of the
pattern.
• Mod Assem—Create, delete, suppress assembly features and modify dimensions
of the manufacturing assembly.
• Mod Subasm—Create, delete, suppress assembly features and modify
dimensions of the manufacturing subassembly.
• Mod Dim—Modify any and all dimensions (part, assembly, nesting, etc.).
Regenerating a part recalculates the geometry of a part after modifications.
To Regenerate a Manufacturing Model
1. To perform regeneration in Manufacturing mode, click Regenerate from the
Parts tabbed page in the SMT MFG MACHINING dialog box. The PRT TO
REGEN and SELECT PARTS menus appeaar.
2. Select parts to regenerate. Select Automatic.
When you select the workpiece for regeneration, the REGEN TYPE menu appears
with the following options:
o Normal—Regenerate a part normally.
o Slow—Regenerate a part, and displays the part and tool path after
regenerating each manufacturing feature.
o Step—Regenerate a part, waits for user input after regenerating, and
displays each manufacturing feature.
o Supp Fail—Automatically suppress any features that fail upon
regeneration, along with their children.

Pro/NC-SHEETMETAL
TM
- Help Topic Collection
6
o Compute CL—Specify if you want the CL data to be recalculated at
regeneration time.
When you specify normal regeneration, the workpiece regenerates as any other part.
The part feature currently regenerates in the following form: Regenerating
part.prt feature 10 out of 20
. This process continues with no user input until all
modified features regenerate. At this time, the regenerated part appears.
Slow Regeneration
When you specify slow regeneration, the workpiece regenerates and appears one
feature at a time. When you regenerate an NC sequence, the cutter path and tool
display. After the first feature regenerates and displays, there is a short pause, then
the next feature regenerates.
This process continues until all modified features regenerate.
Step Regeneration
When you specify step regeneration, the workpiece regenerates and appears one
feature at a time. After each feature displays, you must enter a carriage return <CR>
to continue regeneration. Continue this process to step through the regeneration of
all modified features.
Regeneration Options
If you select Supp Fail, the system automatically suppresses any features and NC
sequences that fail upon regeneration, along with their children. To select the Supp
Fail option, click it once; a check mark (
✓) appears. To turn the check mark off, click
once more.
If a check mark next to the Compute CL option is on, the system recalculates CL
data every time it regenerates an NC sequence. To reduce the regeneration time,
turn it off. If Compute CL is off, only workpiece geometry regenerates. When you
choose CL Data, Output, the system reports any errors that may occur with CL
data.
To Change the Coordinate System
The coordinate system is defined in the Wrkcell tabbed page of the SMT MFG
MACHINING dialog box. You can, however, switch to another coordinate system at
any time during the manufacturing process.
1. Click the WRKCELL tabbed page in the SMT MFG MACHINING dialog box.
2. Click Select from the Csys menu.
3. Select the desired coordinate system.
The workpiece automatically regenerates, and the system recalculates CL data for all
existing NC sequences with respect to the new coordinate system.

Foundation Modules
7
To Change the Units of a Manufacturing Model
1. From the SMT MFG MACHINING dialog box, click Setup > Model Setup >
Units. The Units Manager dialog box opens.
2. Change the model units as desired. The following options are available:
o Set—Set the system of units.
o New—Create a customized system units using the Systems of Units
Definition dialog box.
o Copy—Copy the selected system of units using the Copy System of Units
dialog box.
o Edit—Edit the selected system of units using the Systems of Units
Definition dialog box.
o Delete—Delete the selected system of units.
o Info—Obtain information about the selected system of units.
3. Click Close.
To Define a Manufacturing UDF
1. From the SMT MFG MACHINING dialog box, click Utilities> Feature > UDF
Library. The UDF menu appears.
2. Click Create.
3. Specify the name for the group. The UDF OPTIONS menu appears.
4. Select an option from the UDF OPTIONS menu:
o Stand Alone—The UDF is functional by itself.
o Subordinate—The UDF is driven by the current model.
5. Define the UDF elements as you would when creating a group of part features.
Select manufacturing features (NC sequences and material removal features) to
be grouped.
6. If a features’ group is referenced by selected NC sequences, the MFG UDF REF
menu appears. Select one of the following options:
o Design UDF—Use a reference group of features to resolve references. If
only one design UDF is referenced, it is selected automatically, otherwise
select a group to use.
o Ref Part—Use the reference part to resolve references.
o None—Stores no reference information.
If no design UDF is referenced, the MFG UDF REF menu does not appear. You
must select a reference part to use. If you do not want to select a reference part,
click Done Sel without selecting a part.

Pro/NC-SHEETMETAL
TM
- Help Topic Collection
8
7. After you successfully define the group, Pro/ENGINEER automatically stores the
information.
Note: If you specify a reference design UDF, Pro/ENGINEER does not prompt you for
the corresponding placement references; they are resolved automatically.
To Place a Previously Defined Group in Another Manufacturing
Model
1. From the SMT MFG MACHINING dialog box, click Utilities > Feature >
Group.
2. Click Create from the GROUP menu.
3. Click From UDF Lib from the CREATE GROUP menu.
4. Retrieve the group by name. The PLACE OPTS menu appears.
5. Select if the group is to be Independent or UDF Driven. You are prompted to
enter group elements.
As you answer the prompts for group elements, the WHICH REF menu appears.
Select one of the following options:
o Alternate—Select a reference for the current element.
o Same—Use the same reference as in the reference part. This option
appears only if the group contains a reference part information, and this
reference part is present in the current manufacturing assembly.
o Skip—Skip the current prompt without selecting a reference. After you
answer all the other prompts, the system enables you to redefine the
skipped element.
Note: The Skip option is available only for UDFs created in Release 16.0 and
later.
6. After the UDF placement is completed, a namelist menu of all NC sequences
included in the group appears. Check off one or more NC sequences whose tool
or parameters you want to modify (you can use Select All). The MOD NC SEQ
menu appears with the following options:
o Tool—Changes the tool.
o Parameters—Modifies the NC sequence parameters.
Click Done when finished.
Note: If you skip some of the prompts, the appropriate user interface is invoked
to enable you to redefine the skipped element.
7. The GRP PLACE menu then appears. Select one or more of the following
options:
o Redefine—Redefines all elements related to the skipped prompts.

Foundation Modules
9
o Show Result—Previews the group.
o Info—Displays information about the group being created in the
Information Window.
Choose Done from the GRP PLACE menu to finalize the group.
8. The group is placed in the new model.
Manufacturing Process
About the Manufacturing Process
A sheet metal manufacturing process consists of the following basic steps:
1. Set up the manufacturing database. It may contain such items as workcells
(machine tools) available, tooling, site parameters, etc. If you do not want to set
up all your database up front, go directly into the machining process and define
any of the items above when you need them.
2. Define an operation. An operation setup may contain the following components:
• Operation name
• Workcell (machine tool)
• Coordinate system for CL output
• Operation comments
• Operation parameters
The system prompts you to specify a workcell and a coordinate system before
you can create NC sequences (the coordinate system is usually defined earlier, at
the time the reference parts are nested in the workpiece). Other setup
components are optional.
3. Create NC sequences under the specified setup. Each NC sequence is a series of
tool motions with the addition of specific post-processor words that are not
motion-related but required for the correct NC output. The system automatically
generates a tool path based on the NC sequence type (e.g., Nibble Edge, Form,
etc.), reference geometry, and manufacturing parameters. For Contouring, you
can generate various types of tool paths by referencing model geometry. You can
also apply more low level control, if you like, by:
• Modifying tool paths generated by the system (e.g., clipping, extending,
reversing direction).
• Interactively adjusting the tool path. For Contouring, this includes defining
approach, exit, corner conditions, shakeaways, and CL commands. For other
sheet metal NC sequence types, you can skip or reorder hits that the system
generates. You can also insert non-motion CL commands for any type NC
sequences.

Pro/NC-SHEETMETAL
TM
- Help Topic Collection
10
4. You are required to define NC sequences for only one instance of a reference part
on the workpiece. The Populate functionality enables you to copy these tool paths
to all other occurrences of this reference part in the manufacturing model.
For each completed NC sequence, you can create a material removal feature, either
by making the system automatically remove material (where applicable), or by
manually constructing a regular Pro/ENGINEER feature on the workpiece (Slot, Hole,
etc.).
SMT Manufacturing Info Box
Once you choose Manufacturing from the Info menu, the SMT Manufacturing
Info dialog box containing the current manufacturing information appears. You can
view specific manufacturing information by selecting items in the filter list.
About SMT MFG MACHINING
Use the SMT MFG MACHINING dialog box to create the data necessary to drive an
NC machine tool to manufacture parts from a sheet metal workpiece. Functions such
as nesting, tool setup, optimizing, and NC sequencing are controlled using the
following buttons located in the SMT MFG MACHINING dialog box.
Parts
• Nesting—Nest Parts manually on the sheet metal workpiece.
• Automation—Enter the Autonesting mode.
• Components—Assemble parts on the sheet metal workpiece.
• Regenerate—Regenerate the manufacturing assembly using different modes.
Wrkcell
• Csys—Select new machine Csys data.
• Parameter—Specify workcell parameters.
• Zones—Define machine zones, pads, clamps, cosmetic features, and so forth.
• Turret—Define or modify the turret manager.
Oper
• Create—Create a new operation.
• Retrive—Retrive an existing operation.
NC Seq
• Populate—Populate NC sequences.
• Auto—Create Autotool NC sequences.

Foundation Modules
11
• Optimize—Optimize the CL output.
• New—Create a new NC sequence.
• CL Output—Open NCL player to output CL file.
To Create a New Workcell
1. Select the Wrkcell tabbed page from the SMT MFG MACHINING dialog box.
2. Click Create to create a new workcell.
3. Select the workcell type from the Type drop-down menu. The following options
are available:
o Punch—Perform Nibble Edge, Nibble Area, Punch, Form, and Shear NC
sequences. These NC sequence types are jointly referred to as Punch NC
sequences.
o Laser—Perform laser NC sequences.
o Laser-Punch—Perform laser and punch NC sequences.
o Flame—Perform flame NC sequences.
o Flame-Punch—Perform flame and punch NC sequences.
4. Once you have specified the workcell type, you can choose the following options:
o Name—Specify the name of the workcell. The system automatically assigns
the default name (MACH01, MACH02, etc.).
o Parameters—Specify the workcell parameters in the SMM PARAMETERS
dialog box.
o Turret—Set up the turret associated with the workcell in the TURRET
MANAGER dialog box. This enables you to set stations to be indexable or
not, and specify tools and orientation for these stations (optional).
o Csys—Specify a coordinate system for CL data output.
o Zones—Create a machine zone.
o Comment—Create a comment.
If you do not select any other options, the new workcell has a default name
(MACH01, MACH02, etc.), a default set of parameters, and no tools associated
with it. All the tools that you subsequently use for the NC sequences performed
on this workcell are associated with the workcell.
To Retrieve a Workcell
1. Select the Wrkcell tabbed page from the SMT MFG MACHINING dialog box.

Pro/NC-SHEETMETAL
TM
- Help Topic Collection
12
2. Click Retrieve. The Open dialog box appears with a list of names for the current
working directory (or for the library directory, if pro_mf_workcell_dir has been
set).
3. Select the name of the workcell from the list.
4. Click OK.
To Modify, Redefine or Delete Workcells
1. Select the Wrkcell tabbed page from the SMT MFG MACHINING dialog box.
2. Select the workcell to modify.
3. Change the Name, Comment, or Parameters options as desired or click
Operate > Delete to delete the workcell.
To Modify an Existing Cell
1. Select the Part tabbed page from the SMT MFG MACHINING dialog box.
2. Click Redefine from NESTING menu.
3. Cyan rectangles enclose currently defined cells. Select one of the models in the
cell to modify it. The NEST CELL menu appears with the following options:
o Add Part—Bring a new reference part into the manufacturing model and
the current cell (as described above).
o Drag Part—Modify placement of a part currently in the cell. Select a part to
drag. The PART PLACE menu appears enabling you to change the drag
origin or increments. Select the desired options and click Done. Then place
the part using the mouse buttons.
o Delete Part—Remove a part currently included in the cell from the cell and
from the manufacturing model.
o Note: The first part in a cell cannot be removed.
o Nest Info—Provide nesting information (similar to the Info option in the
NEST menu).
To Save a Workcell
1. Select the Wrkcell tabbed page from the SMT MFG MACHINING dialog box.
2. Select the workcell to be saved.
3. Click Operate > Save. The workcell is saved in the current working directory (or
in the library directory, if pro_mf_workcell_dir has been set) as
<workcellname>.gph
.

Foundation Modules
13
Saving/Retrieving Workcells
Workcells are saved as user-defined features (groups) that contain a single feature
(the workcell).
The configuration file option pro_mf_workcell_dir enables you to specify a library
directory for workcells. There, the workcell files are available to all users for retrieval
into their manufacturing processes. The value of the option is the path name
(absolute path is recommended) of the directory where the workcell files are stored.
To Change a Pattern of Cells
1. Select the Part tabbed page from the SMT MFG MACHINING dialog box.
2. Click Multiply > Define from the NESTING menu.
3. Cyan rectangles enclose currently defined cells. Click Select from the SELECT
FEAT menu. Select one of the models in the cell to multiply it. The INCR TYPE
menu appears with the following options:
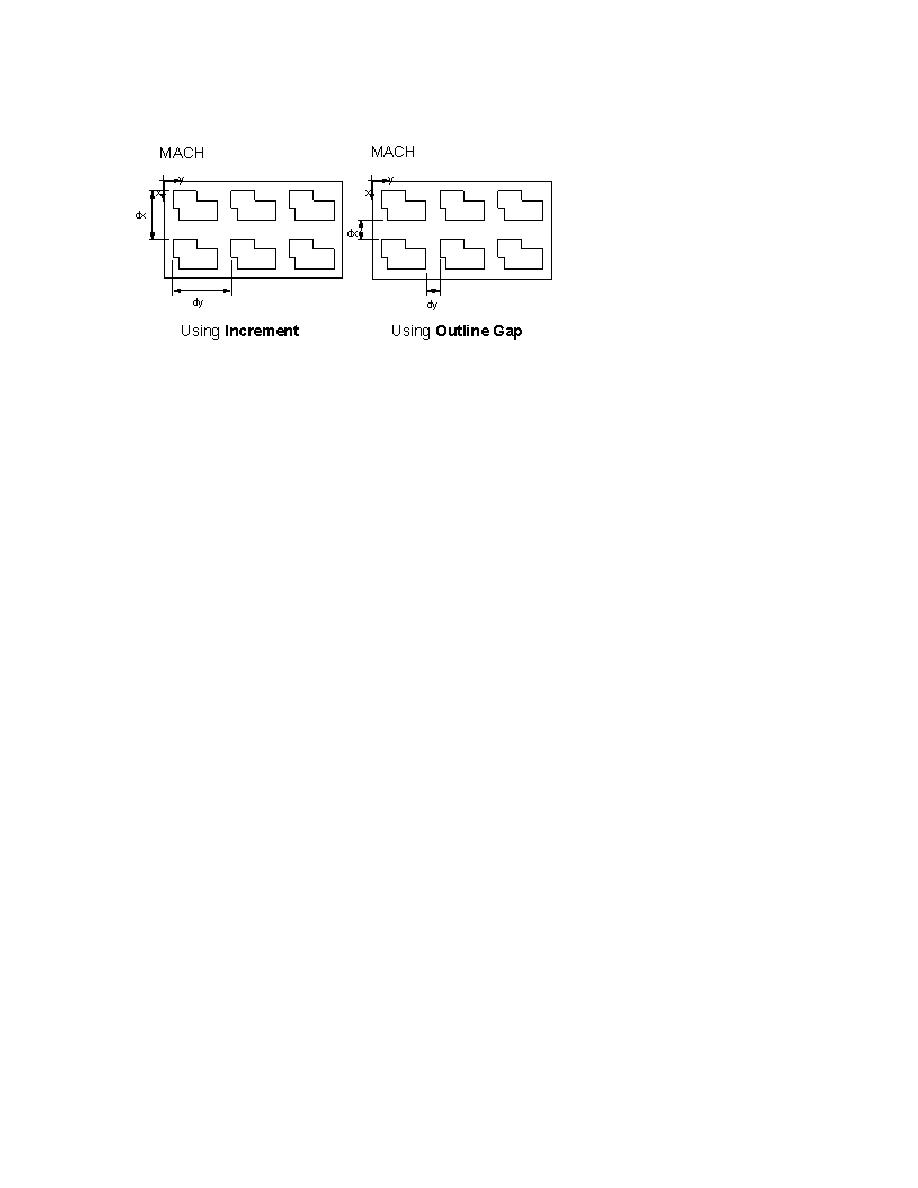
o Outline Gap—Enables you to enter dimensions as gaps between the cell
outlines.
o Increment—Uses incremental dimensions between the cells (the way
ordinary patterns work) to construct the pattern.
o XY Pattern—Creates a bidirectional pattern.
o X Pattern—Creates a pattern along the x-axis of the Machine Csys only.
o Y Pattern—Creates a pattern along the y-axis of the Machine Csys only.
o Fill Sheet—Automatically calculates at regeneration time the number of
instances in each direction based on specified gaps or increments, the
dimensions of the workpiece, and the outline of the cell selected for
nesting.
o Number—Specifies the number of instances in each direction of the
pattern.
4. After you select the options you want, click Done. You are prompted to enter
values according to the selected options.
5. Specify translation along the x- and y-axes.
After you create a nesting, use the Mod Dim option from the MANUFACTURE >
Modify menu, similar to pattern dimensions, to modify all dimensions associated
with it (increments or gaps, number of instances if applicable).
Pro/NC-SHEETMETAL
TM
- Help Topic Collection
14
Increment vs. Outline Gap
Group Operations and Workcells
You can include operation and workcell features when you create a manufacturing
UDF. When you place such a group:
The default names for the operation and workcell you create in the new model are
OP_CPY###
or MACH_CPY##, respectively (for example, OP_CPY010 and MACH_CPY01).
All the parameters and tools associated with the workcell are copied. If tools with the
same IDs already exist in the new model, a message appears and the workcell tools
are not copied.
The NC sequences that reference this operation and workcell in the original model
automatically retain these references.
To Specify Comments for an Operation or NC Sequence
1. Select the Oper tabbed page from the SMT MFG MACHINING dialog box.
2. Click Comment. A system window appears.
3. Type the desired comment.
4. Click OK.
Sheet Metal Manufacturing Populate
About Sheet Metal Manufacturing Populate
The SMM POPULATE dialog box contains the following tabs that enable you to
perform three main functions.
• Populate—Populates the NC sequences from the master part to all of its
instances. This allows you to cut all the parts on a worksheet after creating NC
sequences on the master parts.
• Subroutine—Subroutines the NC sequences by reducing the CL data file size by
defining and dynamically selecting subroutines.
Foundation Modules
15
• Order—Orders the NC sequence output by defining an optimum flow of tools for
the workpiece.
To Populate NC Sequences
The Populate tab, located in the SMM POPULATE dialog box, enables you to
populate NC sequences from a single master part to all of its instances on the
workpiece. You can include or exclude a part from population.
Pro/ENGINEER must be informed that an NC sequence references a model before
population of an NC sequence. The populated NC sequence mimics the pattern of the
reference model instances on the workpiece. This relationship is established
automatically for automatically created NC sequence types. All references are used
to create a reference part for manually created NC sequences.
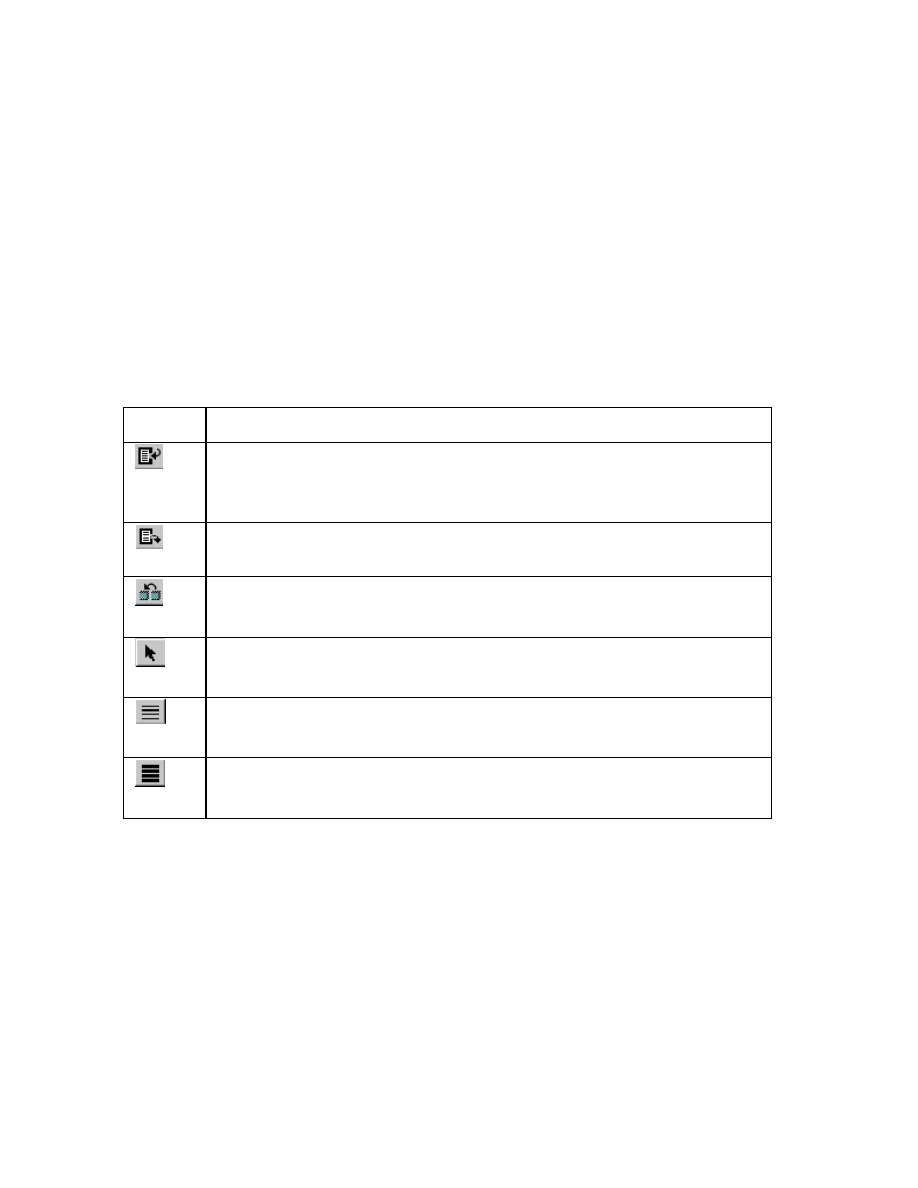
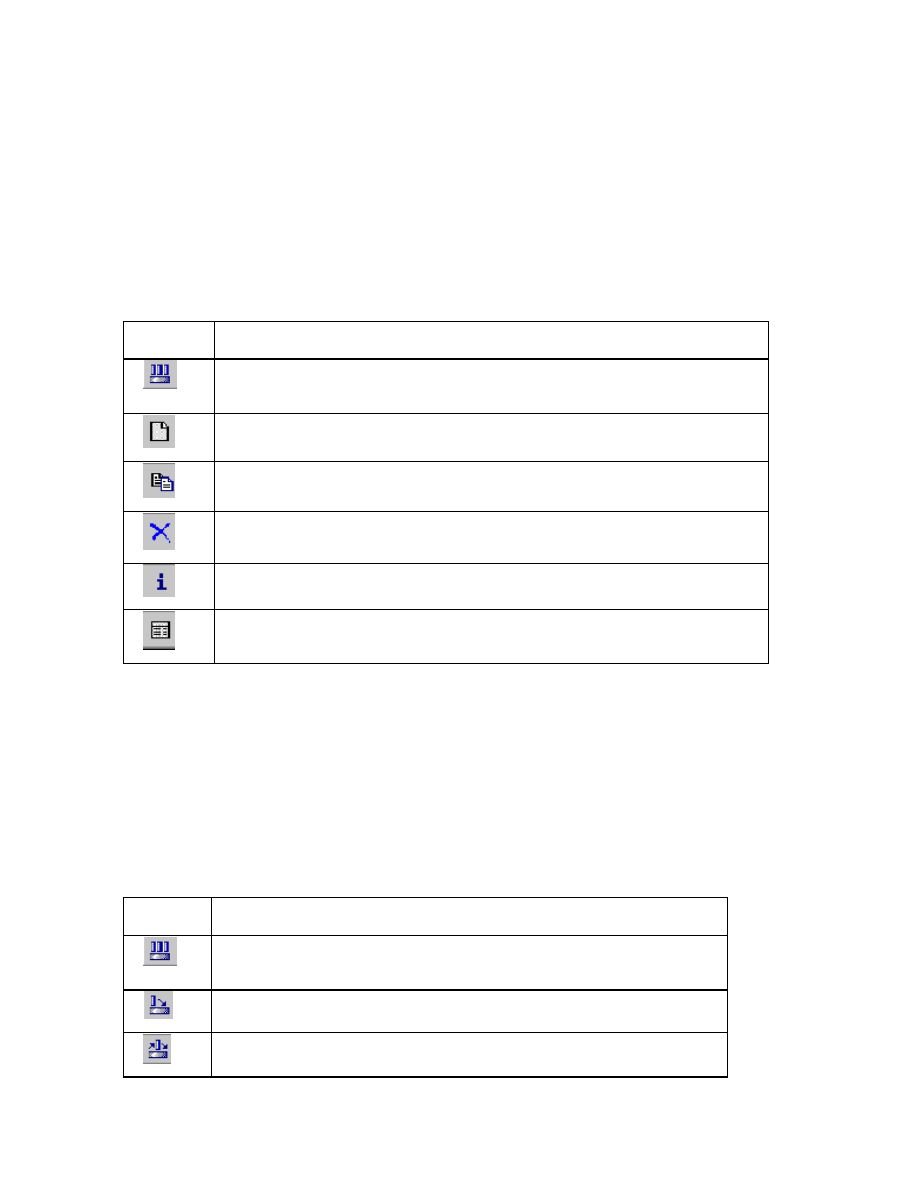
The following functions are present in the Populate tabbed page:
Use To
Set selected NC sequences to be populated and include items to the
list.
Set selected NC sequences to be unpopulated and exclude items from
the list.
Change reference part for selected NC sequence.
Select item from the list.
Select item from the screen.
Select all items in the list.
The NC Seq > POPULATE menu allows you to select one or more of the following
options.
Note: A populate feature exists if a blue mark, located next to the POPULATE
button, is present.
• Create—Creates a new populate feature.
• Delete—Deletes a populate feature.
• Redefine—Redefines a populate feature.
• Suppress—Suppresses a populate feature.
Pro/NC-SHEETMETAL
TM
- Help Topic Collection
16
• Resume—Resumes a previously suppressed populate feature.
• Info—Obtains information about the populate feature.
The Status column of the list located in the Populate tab indicates the populate
status of an NC sequence . The status of an NC sequence can be as follows:
•
—To populate the NC sequence.
•
—To unpopulate the NC sequence.
•
—You must indicate the reference part for the populate feature to determine
how to populate the sequence from one location to the entire worksheet.
If the workcell parameter AUTO_POPULATABLE is set to Yes, all newly created NC
sequences are automatically included in the populated feature. The default is No. If
the workcell parameter AUTO_POPULATABLE is set to Yes, the system prompts you at
the time you define the NC sequence to select a reference part to use to create the
tool path for all duplicate parts (if AUTO_POPULATABLE is No, then the system will
issue this prompt when you include such an NC sequence in the populate feature).
There can be only one populate feature in a manufacturing process. It is
automatically reordered to come after all the NC sequence features in the workpiece.
When you create new NC sequences, the populate feature automatically updates to
include them provided AUTO_POPULATABLE is set to Yes.
To Order NC Sequences
The Order tab, located in the SMM POPULATE dialog box, allows you to create an
efficient tool-path flow over the workpiece. This reduces the overall cycle time of the
operation. Order does not break up an NC sequence. It outputs complete sequences
and subroutines in an efficient manner.
Order contains the following functions.
• Origin Order—Accept the original system supplied order.
• Part by Part—Adjust the NC sequence output order.
• Scan Order—Allow for scan type ordering.
• Manual Order—Manually set the part order from a list of parts.
• Default Order—Accept the parts system supplied feature number order.
• Reduce X Moves—Incrementing the X coordinate and going back and forth in
the X direction.
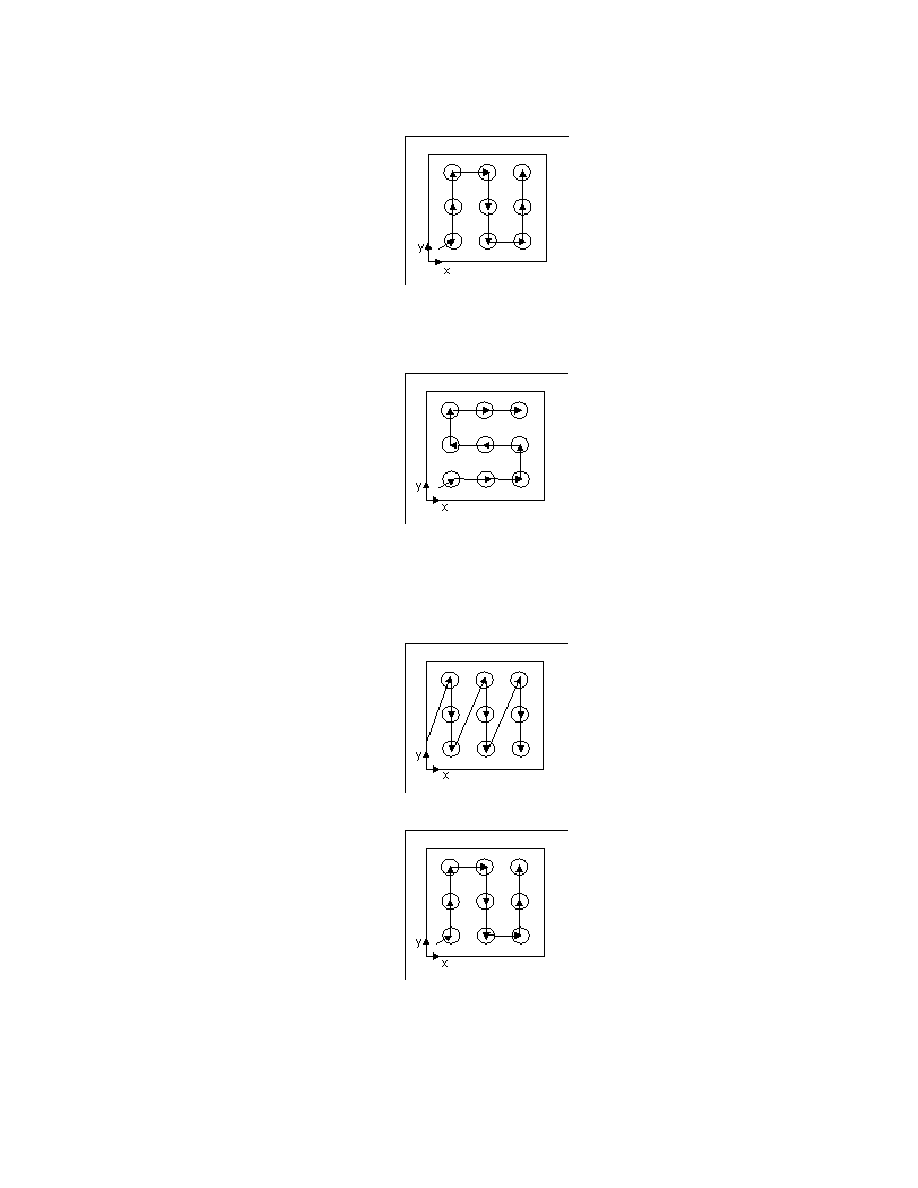
Foundation Modules
17
Reducing X Moves
• Reduce Y Moves—Incrementing the Y coordinate and going back and forth in
the Y direction.
Reducing Y Moves
• Tolerance—Maximum allowable distance between scan part outline points in the
reduced direction (during scan only).
• Scan Move Direction—Scan in one or both directions.
Scanning in One Direction
Scanning in Both Directions
• Scan Part Outline Point—Select the left, center, or right location on the part
that is identified by the tolerance.
• Scan Start Corner—Set the corner of the workpiece to start the NC sequence.
Pro/NC-SHEETMETAL
TM
- Help Topic Collection
18
To Subroutine NC Sequences
Subroutine programming allows you to create NC sequences, place them as macros
at the beginning of the CL file, and then call them from the main body of the CL file
as many times as needed. You can automatically create subroutines for all specified
parts in the nest. This enhancement reduces the size of CL files, making them easier
for the controller to handle and for the programmer to read and edit. Once you set
up a process environment, individual NC sequences can be set for subroutine output.
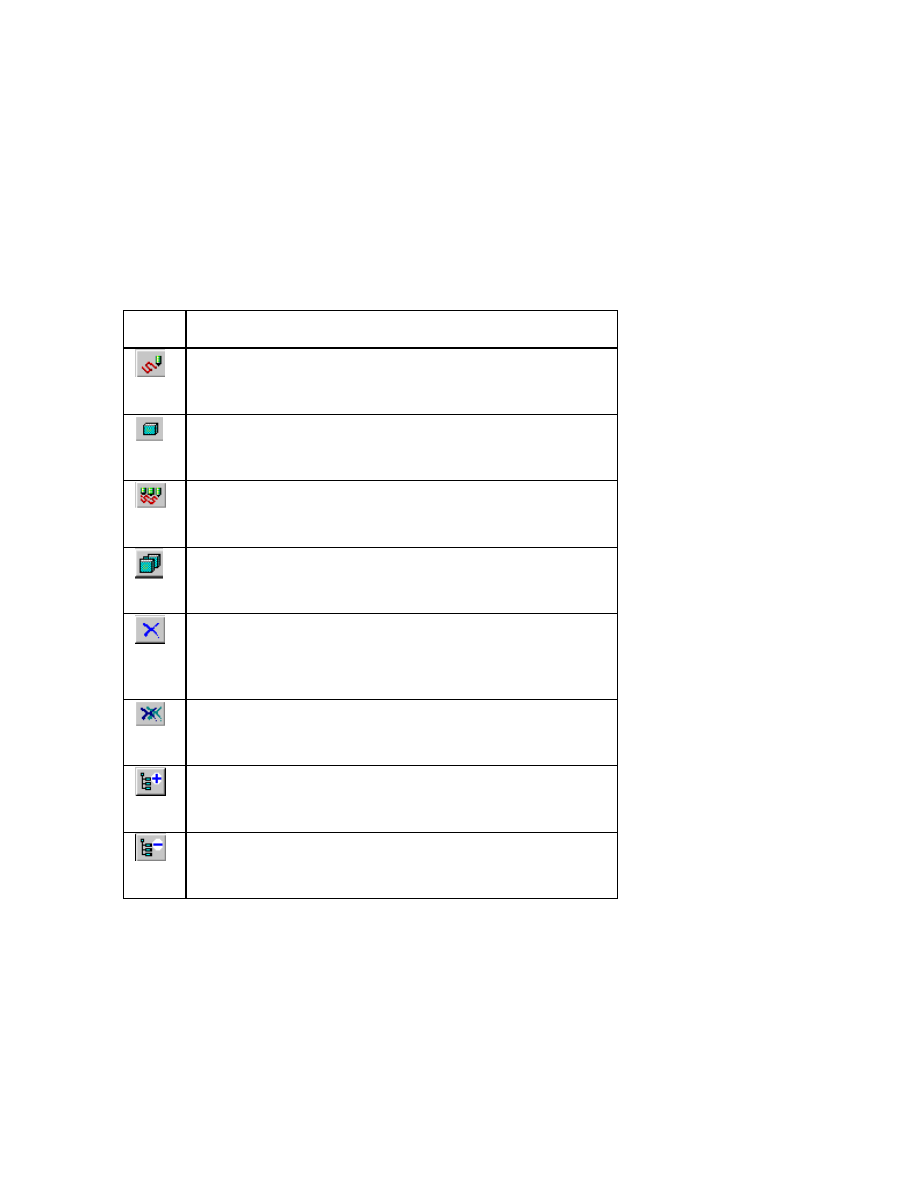
Click the options located in the Subroutine tabbed page to perform the following
functions.
Use To
Create single sequence subroutines.
Create single sequence subroutines.
Automatically create sequence subroutines.
Automatically create all group subroutines.
Exclude selected sequences and delete selected
subroutines.
Delete all subroutines.
Expand all tree nodes.
Collapse all tree nodes.
Also, click the following options located in the Subroutine tabbed page to reorder
the subroutines:
• Definition Placement—To place the subroutine at Top, Default, or Bottom of
the selected subroutine.
• Enumerate—To select all subroutines.
• Rotation Step—To specify the value for step rotation of subroutine.
Foundation Modules
19
Manufacturing Information
About Manufacturing Information
You can view manufacturing information about your model using the SMT
Manufacturing Info dialog box. To open the dialog box, click Info >
Manufacturing.
The SMT Manufacturing Info dialog box can display the following information:
• Manufacturing
• Workcell
• Operation
• NC Sequence
You can choose what information to view by selecting the desired filters and
generating a report. The report, which is displayed on the screen, can be edited and
saved. The file is saved in the current directory as <manufacturename>.ppl.
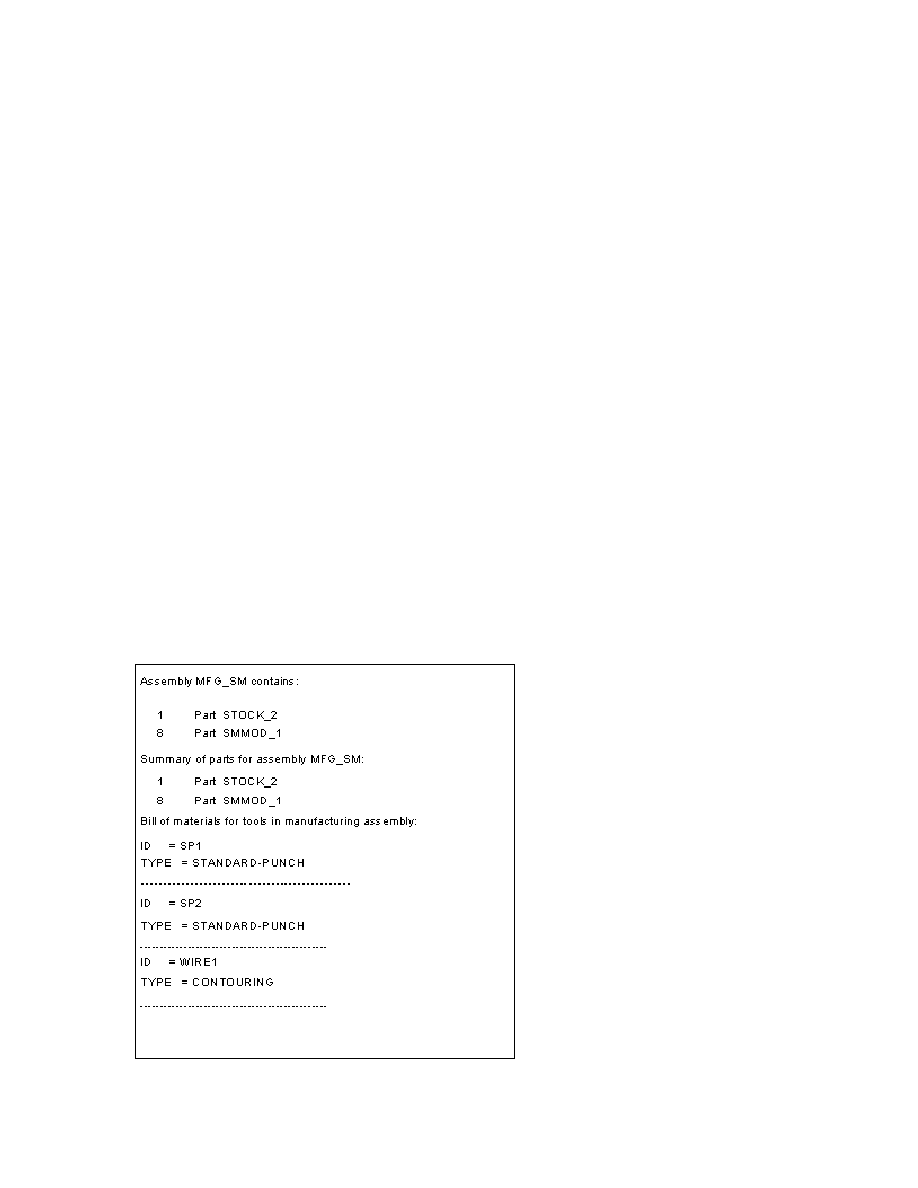
Bill of Materials
The Bill of Materials option in the Info menu generates a bill of materials (BOM)
for the manufacturing model and lists all the tools added to the model. If a tool
model is used, the model name, usage, and BOM for the model are output to the
manufacturing BOM. The following illustration shows an example of a manufacturing
BOM.
Sample Manufacturing BOM

Pro/NC-SHEETMETAL
TM
- Help Topic Collection
20
To Generate Nesting Information
1. From the SMT MFG MANUFACTURING dialog box, click Parts.
2. Click Automation. The SMT MFG AUTOMATION dialog box opens.
3. Click Info > Placing Info. The SMM AUTOMATION INFO dialog box opens.
The dialog box summarizes percent and area information.
To Create a Sheetmetal Manufacturing Report
1. Click INFO > Manufacturing. The SMT Manufacturing Info dialog box
appears.
2. Select which model filters you want to include in your report.
3. Click Apply. The report is created.
Note: Depending upon the report, the system also generates most of the following
additional information:
• Manufacturing type (part or assembly)—State (if any), the design model
name, the workpiece name, and the date. Parts are labeled if they are either
generic or an instance.
• For each NC sequence—The NC sequence number and the workpiece feature
number associated with the NC sequence; the operation name, the workcell
name and type, the number of axes, and the NC sequence type.
To Include Pre and Post Machining Files
You can use parameters to specify the pre and post files. Under the Oper tabbed
page of the SMT MFG MACHINING dialog box, you can find these parameters. You
can include user-defined macros, like setting the post-processor registers, at the
very beginning and the very end of an NC sequence CL file, using the two
parameters:
• PRE_MACHINING_FILE—Enter the name of the file you want to include at the very
beginning of the CL file.
• POST_MACHINING_FILE—Enter the name of the file you want to include at the
very end of the CL file.
Enter file names without the extension. If you specify the file in the config.pro file
it should have the extension .ncl, or the default CL file extension.
The contents of these files are included in the CL file of the current NC sequence
between $$ —> BLOCK_START and $$ —> BLOCK_END. When you use the Input option
in the CL DATA menu to read a CL file, these contents are ignored.
Notes:
• Both of these files are included into a CL file before it goes to the post-processor.
• If these parameters are set at the operation level, pre- and post-machining files
are added to each NC sequence included in the operation.
Foundation Modules
21
Turret Manager
About Turret Manager
The Turret Manager controls tools and stations of a sheet metal manufacturing
workcell. To define a workcell turret, you must first create stations and then add
tools to the stations.
You can access the Turret Manager by clicking Wrkcell > Turret in the SMTMFG
MACHINING dialog box. Options in the TURRET MANAGER dialog box perform the
following general functions.
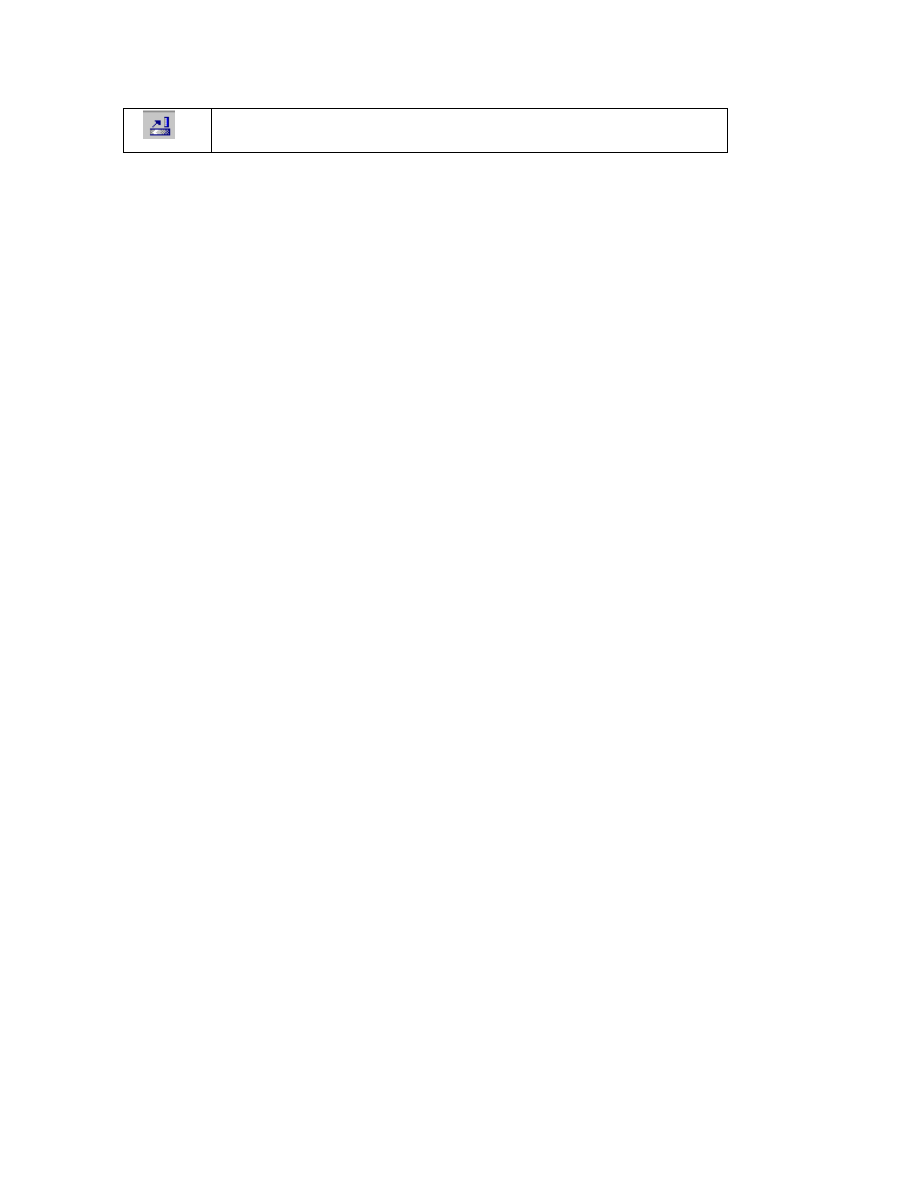
Use To
Switch the turret manager dialog box between the tool and station
manager environments.
Create a new station or open the Tool setup dialog box.
Create a new station or tool by copying the selected item.
Delete a station or tool.
Retrieve information on stations or tools.
Customize the list of stations or tools in the dialog box.
Additional Turret Manager functions include the following:
• Tool Setup—Activate the TOOL SETUP dialog box for creating new tools.
• Tool Section—Display the cross-section of the currently selected tool.
About Station Manager Within Turret Manager
The Station Manager, which is part of the Turret Manager, is used to control
stations of a workcell turret. Buttons associated with Station Manager perform the
following general functions.
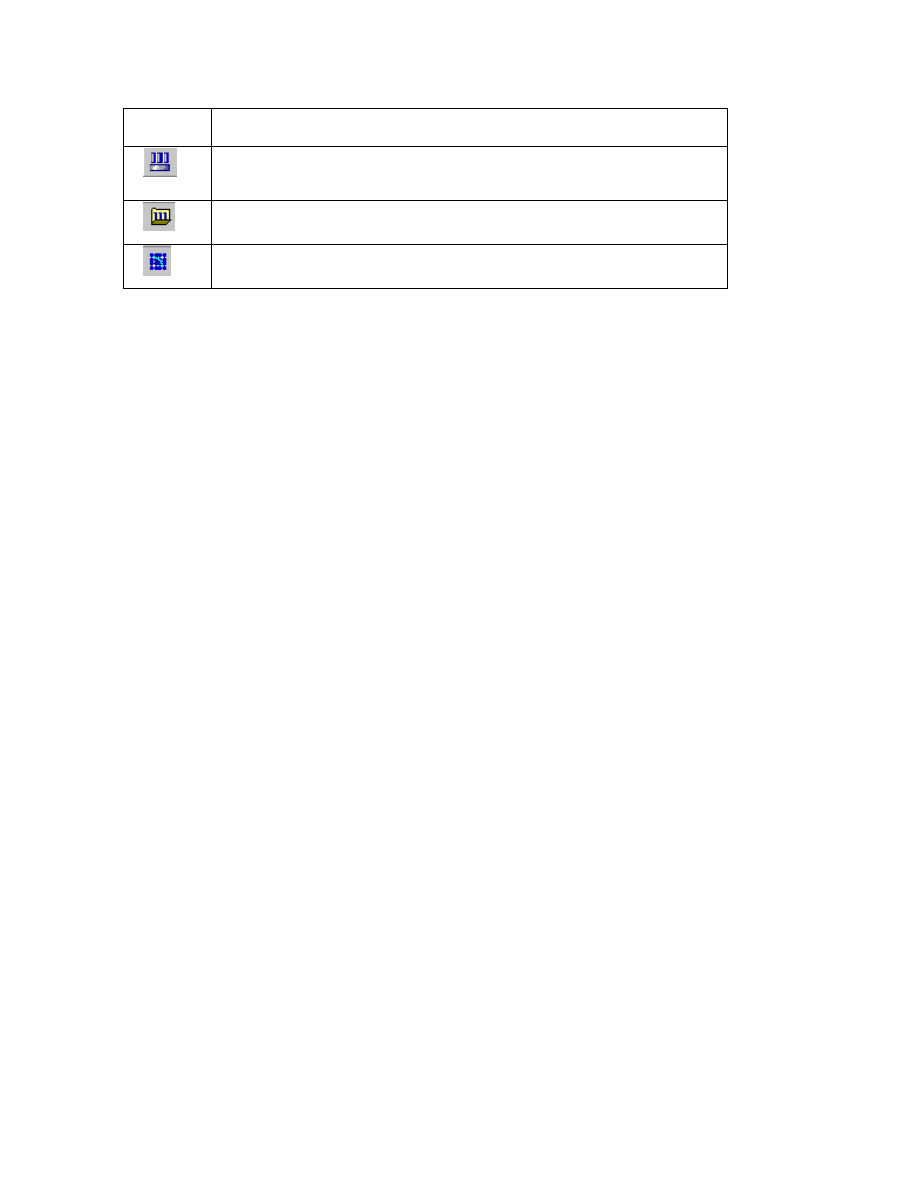
Use To
Switch the Turret Setup dialog box between tool and station
setup environments.
Load a tool in the selected station.
Move a tool from one station to another.
Pro/NC-SHEETMETAL
TM
- Help Topic Collection
22
Unload a tool from a station.
The Station Manager consists of a menu bar and toolbar with the following options:
STATIONS
• Create—Create a new tool station.
• Copy—Copy a tool station.
• Delete—Delete a tool station.
UTILITIES
• Customize List—Customize the list of stations in the dialog box.
• Load Tool—Load a tool into a station.
• Reload Tool—Reload a tool into a station.
• Unload Tool—Unload a tool into a station.
• Tool List—Switch the Turret Setup dialog box between tool and station setup
environments.
Additional Station Manager functions include the following:
• Station—Set the station number.
• Indexability—Set the station as indexable or fixed.
• Orientation—Set the angle of a nonindexable station.
• Marked—Mark the tool by adding a magenta dot by its name in the station
manager. Tools automatically loaded by the system, such as Punch UDF, Form,
and indexed tools are automatically marked.
• Locked—Protect the station from modification or deletion.
• Tool—Display information on the loaded tool if one exists in the station.
• In Use—Display if the tool is currently in use by an NC sequence.
• Comment—Display comments defined in the tool setup dialog.
• Holder—Display the current holder name and size in the station.
About Tool Manager Within Turret Manager
The Tool Manager, which is part of the Turret Manager, is used to control tools of
a workcell turret. Options associated with Tool Manager perform the following
general functions.
Foundation Modules
23
Use To
Switch the Turret Setup dialog box between Tool and Station
setup environments.
Access a tool catalog.
Define a tool shape.
Define a tool shape using the following options:
• Retrieve Shape—Retrieves a tool parameter file.
• Create Shape—Creates a tool shape with Sketcher.
• Modify Shape—Modifies a tool shape.
• Rename Shape—Renames a tool shape.
• Save Shape—Saves a tool shape.
• Shape Prompts—Sets up user defined prompts for the shapes dimensions.
STATION
• Create—Creates a new tool.
• Copy—Copies the selected tool.
• Delete—Deletes the selected tool.
INFO
• Where Used—Shows a report indicating where the tool is used in the NC
sequence.
UTILITIES
• Customize List—Customizes the information window.
• Load Tool—Loads a tool into a station.
• Reload Tool—Reloads a tool into a station.
• Unload Tool—Unloads a tool into a station.
• Station List—Opens the station setup environment.
SORT
• Sorts tool order in the list by holder, tool name, tool type, tool usage, area,
station, or orientation.
Pro/NC-SHEETMETAL
TM
- Help Topic Collection
24
TOOL CATALOG
• Searches and retrieves tools from the tool catalog.
About Tool Holder Within Turret Manager
The Tool Holder, which is part of the Turret Manager, contains information about
tool holders. Click
to open the HOLDER SIZE LIST dialog box. The following
options are available.
Use To
UNDO last changes step by step.
Remove the selected holder from the list.
Edit the selected holder from the list.
Add a new holder size to the list.
Clear the holder size.
Tool Setup
About Tool Setup
During a typical manufacturing session, the operator selects specific tools to create
the product. The tools are placed in a machine turret and are subsequently used
during the NC sequence. In Pro/NC-SHEETMETAL, similarly, tools must be selected
and loaded into a turret before an NC sequence is possible.
Each workcell has an associated turret, which can be configured with a variety of
tools. Tools are created, edited, and selected using the TURRET MANAGER dialog
box. The Turret Manager allows you to setup tools and tool stations. You can
access the TURRET MANAGER dialog box by selecting Turret from the Workcell
tabbed page. Click the Tool Setup check box to open the TOOL SETUP dialog box.
The TOOL SETUP dialog box contains different types of tools used in the NC
sequence. Additional Tool Setup functions include the following:
TOOL
• Retrieve—Retrieve a tool parameter file.
• Save—Save a tool parameter file.
• Create—Create a tool.
Foundation Modules
25
CUSTOMIZE
• Attachment
• Colapsible
Tool Types
There are six types of tools available. Each tool type can be selected using the Tool
Type menu located in the TURRET MANAGER dialog box. The following tools are
available:
Tool
Type
Description
Use to contour laser or flame NC sequences
Use for Nibble Edge, Nibble Area, Shear, and Point Punch
NC sequences.
Define tools automatically for Form NC sequences. At the time
you define the form feature, you have an option to specify a
tool name; this name then appears as the tool name in turret
tables, manufacturing information. In order to supply the tool
name, you must define a coordinate system, which is used as a
punch location. You must create this coordinate system in the
form reference part prior to the definition of the form feature.
Use for Punch UDF NC sequences only. A Punch or Notch
feature section automatically defines punch type tools.
Use to design a Solid Punch tool in part mode for custom
applications.
Use for Shear NC sequences only. The Shear tool has a zero
width and is a straight line whose length is defined by the Tool
Length parameter. The dimension of the tool along the z-axis
of the workpiece is specified by the Tool Height parameter.
Standard Punch Tool Shapes
The standard punch tool is located in the TOOL SETUP dialog box. To access the
TOOL SETUP dialog box, click Wrkcell > Turret then click the Tool Setup check
box. The standard punch tool is available in a variety of shapes. Modify tool shapes
by typing dimensions in text boxes.
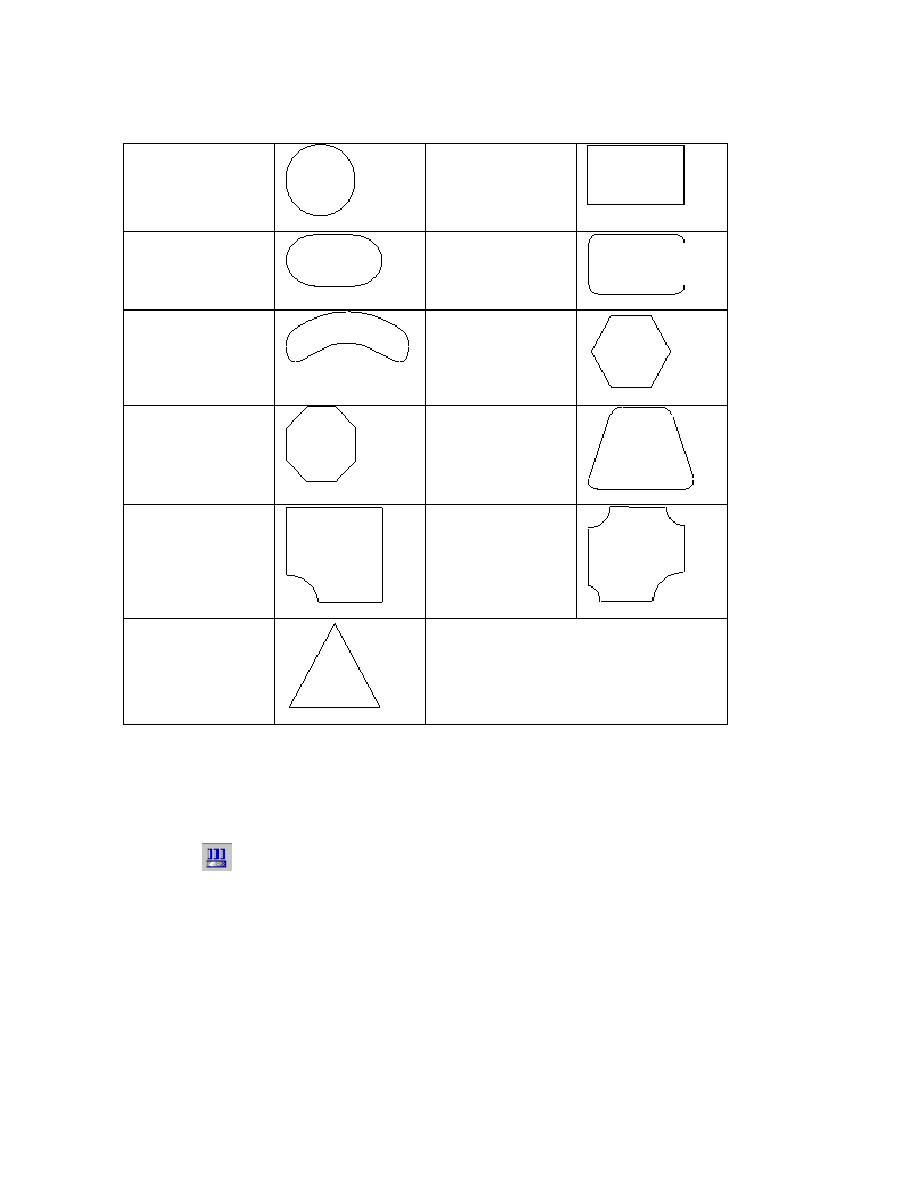
Click the Shape drop-down list box located in the TOOL SETUP dialog box to see
the following available tool shapes:
Pro/NC-SHEETMETAL
TM
- Help Topic Collection
26
Standard Punch Tool Shapes
Round
Rectangular
Obround
Boxround
Banana
Hexagon
Octagon
Trapazoid
Corner1r
Corner4r
Triangle
Click the Tool Section check box
to display the cross-section of the
currently selected tool.
To Create a New Tool
1. Select the Wrkcell tabbed page from the SMT MFG MACHINING dialog box.
2. Click Turret. The TURRET MANAGER dialog box opens.
3. Click
to open the tool manager environment.
4. Click Tool > Create or the Tool Setup check box. The TOOL SETUP dialog box
opens.
5. Select the desired tool type and parameters.
6. Click Done.
Note: You must save the tool parameter file if you want to retrieve the tool later. A
new tool can be stored in either the tools library, if it is set, or in your current
working directory.

Foundation Modules
27
To Edit a Tool
1. Click the Wrkcell tabbed page from the SMT MFG MACHINING dialog box.
2. Click Turret. The TURRET MANAGER dialog box opens.
3. Click
to open the tool manager environment.
4. Click the Tool Setup check box. The TOOL SETUP dialog box opens.
5. Retrieve the desired tool if necessary.
6. Select the desired tool in the information window.
7. Edit the tool parameters in the Tool Setup dialog box..
Note: You must save the tool parameter file if you want to retrieve the tool later.
To Save Tools
1. Click the Wrkcell tabbed page from the SMT MFG MACHINING dialog box.
2. Click Turret. The TURRET MANAGER dialog box opens.
3. Click
to open the tool manager environment.
4. Click the Tool Setup check box. The TOOL SETUP dialog box opens.
5. Select a tool. Edit the tool parameters as desired.
6. Click Tool > Save.
The tool is stored in the tools library, if it is set, or in your current working
directory, in a file named <tool_id>.tpm. The tool can be used in any
manufacturing model.
Note: Prior to Release 12.0, the default extension for the tool parameter files was
.tprm. Old files with this extension are recognized by the system as tool parameter
files, and they are retrievable. Whenever a tool parameter file is stored, however, it
has the .tpm extension.
To Retrieve Tools
1. Click the Wrkcell tabbed page from the SMT MFG MACHINING dialog box.
2. Click Turret. The TURRET MANAGER dialog box opens.
3. Click
to open the tool manager environment.
4. Click the Tool Setup check box. The TOOL SETUP dialog box opens.
5. Click Tool > Retrieve. The Open dialog box appears.
6. Select the desired tool and click Open.

Pro/NC-SHEETMETAL
TM
- Help Topic Collection
28
To Delete a Tool
1. Click the Wrkcell tabbed page from the SMT MFG MACHINING dialog box.
2. Click Turret. The TURRET MANAGER dialog box opens.
3. Click
to open the tool manager environment.
4. Click the Tool Setup check box. The TOOL SETUP dialog box opens.
5. Select the tool to be deleted from the information window.
6. Click
. The tool is deleted from the turret.
Note: Deleting a tool removes it from the turret. It does not, however, erase the
tool file.
Tool Parameters
Each tool has a corresponding set of parameters, listed in the Turret Setup dialog
box, which define its geometry. The tool schematic shows the form and dimensions
of the tool. Click Show to display the tool. The following parameters are available:
Note: Some parameters are not available for specific tools.
• Corner Radius—The corner radius of the tool. The default tool section has a
rectangular shape defined by the Tool Width and Tool Length parameters. A
Corner Radius value that is less than both Tool Width/2 and Tool Length/2, will
generate a tool that has a rectangular shape with rounded corners. A Corner
Radius value that is equal to the Tool Width/2 with Tool Width lesser than the
Tool Length, will generate an obround.
• Tool Length—The length of the tool along the x-axis, or along the edge for
Nibble Edge NC sequences.
• Tool Width—The width of the tool along the y-axis, or normal to the edge for
Nibble Edge NC sequences.
• Tool Height—The height of the tool along the z-axis of the workpiece coordinate
system.
• Units—The units of the tool. Inch, foot, millimeter, and centimeter units are
available.
• Comment—Optional comments. A text string stored with the tool parameters.
This text is for information only.
• Name—The tool’s name. The tool parameters are stored in the file
<tool_name>.tpm
, which is used throughout the manufacturing process to
identify the tool uniquely. The name must be less than 32 alpha numeric
characters long.
• Type—The type of tool. Standard Punch, UDF Punch, Form, Shear, Contour, and
Solid Punch tools are available.
• Station—The tool location in the turret.

Foundation Modules
29
• Indexability—Specifies if the tool is indexable.
• Holder Size—Specifies the radius of the tool holder.
Tool Library
You can set up the tool library directory to store manufacturing tools. The
configuration file option is:
pro_mf_tprm_dir <pathname>
Note: To avoid problems, use the complete pathname.
Using Library Parts
If you use a Solid Punch for a Point Punch NC sequence, specify it using a tool model
(i.e., a Pro/ENGINEER part), with the following restrictions:
You must create the tool part as a single extruded protrusion. This should be the first
feature. The section of this protrusion (2D) is copied into the manufacturing and
used for tool simulation.
This section must have one coordinate system (a sketcher coordinate system, not a
coordinate system feature). Use this coordinate system to place the tool at each
datum point you select.
Tool Path
About Tool Path
Cutter Location (CL) data files are generated from the tool paths specified within
Sheet Metal Manufacturing NC sequences. Each NC sequence generates a separate
tool path.
To Display the Tool Path
1. From the SMT MFG MACHINING dialog box, select the NC Seq tabbed page.
2. Select an NC sequence.
3. Click CL Output. The SMT MFG NCL PLAYER appears.
4. Click Play to view the tool path.
5. To set the delay, click OPTIONS > Set Delay. The PLAY SPEED dialog box
appears.
6. Move the slider to set the delay.

Pro/NC-SHEETMETAL
TM
- Help Topic Collection
30
Notes:
• When displaying the tool path, the dotted line represents the geometrical center
of the tool. In some cases, the display may not reflect the exact coordinates in
the generated Pro/CLfile.
• The configuration option cl_arrow_scale enables you to control the size of the
tool path arrow for Contouring NC sequences. The default is 1. If you set it to 0,
the arrows do not display. Specifying any other positive number scales the arrow
accordingly.
• Click Stop to abort the cutter path display at any time.
To Adjust the Tool Path
1. From the NC Seq tabbed page, select the desired NC sequence.
2. Click OPERATE > Redefine. The SMT NC SEQUENCE dialog box appears.
3. To change the order of the strokes/hits in the tool path, select the Change
Order element and click Define. The ORDER HITS dialog box appears with the
following options:
a. Under
Start Point, select one of the following:
o Select—Select the first hit within the NC sequence tool path and specify
the direction using the TOOL PATH DIR menu. Select any hit, including
those in the middle of the tool path, as the start point.
o Delete—Delete a defined starting point.
b. Select the Sort by Next Closest to automatically select the next closest
edge to be machined after completing the previous edge.
c. Under
Hit stroke(s), select one of the following:
o Reorder—Select strokes to indicate the order in which they should be
output.
o Order by Default—Revert to the default order of strokes
o Reverse—Select strokes to reverse the order of hits within a stroke.
o Unreverse Last—Undo last reversed order of hits within a stroke.
4. To remove hits, select the Remove Hits element and click Define. The REMOVE
HITS dialog box appears with the following options:
o Single—Removes individual hits.
o From To—Removes a series of hits.
o Restore Last—Restores the last deleted hit(s).
5. To insert CL commands at specific hits, select the CL Command element and
click Define. Insert CL commands as desired.
6. To finish the tool path, click Done from the SMT NC SEQUENCE dialog box.

Foundation Modules
31
To Optimize the Tool Path Manually
Any portions of the tool path that are not automatically optimized can be optimized
manually using the Adjust Path functionality.
1. From the NC Seq tabbed page, click Optimize > Redefine. The SMM Optimize
dialog box opens.
2. Select a set to optimize from the Opsets list.
3. Click Adjust Path. The following options are available:
o Remove Duplicate Hits—Remove duplicated hits from the tool path.
o Remove Duplicate Cut Lines — Remove duplicate cut lines from the tool
path.
o Remove hits—Removes hits from the tool path using the REMOVE HITS
dialog box.
o Reverse NC Seq—Select NC sequence tool paths to reverse direction of
the whole path.
o CL Command—Opens the SMM CL COMMAND dialog box. This enables
you to insert CL commands at selected hits.
4. From the SMM Optimize dialog box, click OK.
When the Tool Path Will and Will Not Be Recomputed
The tool path recomputes if one of the following situations occur:
• Manufacturing or tool parameters that affect the tool path (i.e., computation of
the GOTO points on the tool path) are changed. For example, OVERLAP_DIST
affects the tool path computation, while CUT_FEED does not.
• NC sequence setup references (Edge, Shake Away) are newly defined or
changed.
• Dimensions associated with the NC sequence reference items (surfaces, edges)
are changed.
• Cut motion dimensions are changed.
• A cut is defined for interactive cut motion.
• Nibble edge or cut motion ends are adjusted.
• Redo is used for corner conditions.
• Tool path for cut motions is recomputed if the parent NC sequence is changed.
Unless any of the changes listed have been made, the tool path is not recomputed if
the tool path storage is enabled.
When the tool path is recomputed, the new data is appended to the tool path file, so
the file grows with every tool path computation. When the model regenerates, the

Pro/NC-SHEETMETAL
TM
- Help Topic Collection
32
system performs "purging" of the tool path file and removes old (invalid) tool paths,
to reduce the size of the tool path file.
Adjusting the Tool Path
This functionality is applicable to Punch Press type NC sequences only.
The tool path for any Punch Press NC sequence consists of a series of hits. Hits
indicate each location where the tool makes contact with the workpiece and removes
material; they appear as small red circles. For Nibble Edge and Nibble Area NC
sequences, a succession of hits composes a stroke, which is the other element of the
tool path. A stoke is a succession of hits along an edge of a reference model, or in a
line across an area. Strokes appear as a series of hits connected by a line; the first
hit in the stroke displays as a small, filled red circle.
Machine Zones and Clamps
About Machine Zones and Clamps
At setup time, you can define machine zones and locate clamps in a sheet metal
manufacturing model. A machine zone is the area that can be machined without
repositioning the workpiece. The workpiece can be repositioned in one direction only,
along either the x-axis or the y-axis of the machine coordinate system. If you want
to switch the direction of repositioning, delete the existing machine zone definition
and create a new one. You can also redefine an existing machine zone.
CL Output
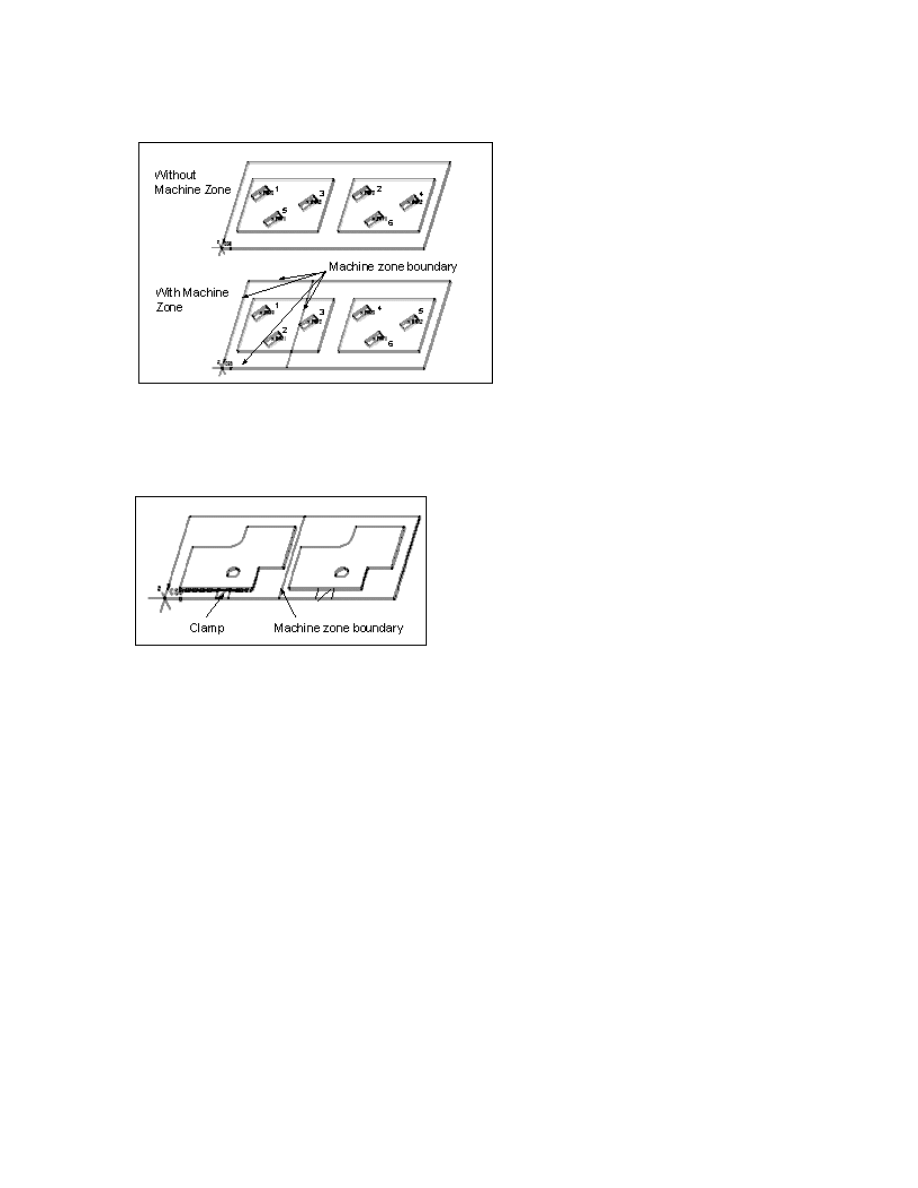
Machine zones and clamps affect the CL output. When you create an NC sequence
with a machining zone defined and clamps positioned:
The order of CL data generation is changed. All geometry inside the zone is
machined first; then the zone, together with the clamps, is translated along the
appropriate direction and all geometry inside its new location is machined. The
following illustration shows the order of punching with and without the machining
zone. If an edge or area to be nibbled crosses the zone boundary, CL data is also
generated only for the part inside the boundary; then, as the machine zone is
translated, the rest of the edge/area is machined.
Foundation Modules
33
Order of CL Generation
Clamps are avoided in cutter location output. The minimum distance between the
center of the tool and the clamp boundary = clearance - distance + (1/2 tool
width diameter)
.
Avoiding Clamps
To Define Machine Zones
1. Click Wrkcell in the SMT MFG MACHINING dialog box.
2. Select the workcell with which you want to associate the machine zone.
3. Click Zones > Create. The MACHINE ZONE dialog box opens. Select one or
more of the following options:
o Zone Csys—Enables you to define or change the machine coordinate
system.
o Translate Direction—Specify the direction in which the workpiece is
repositioned.
o Workpiece Size—Displays the size of the workpiece.
o Zone Size—Enables you to customize the size of the zone by X and Y axis.
o Zone’s Offsets—Offsets the machine zone.
o Automatic Adjusting—Adjusts the size of a machine zone if it does not fit
on a workpiece.

Pro/NC-SHEETMETAL
TM
- Help Topic Collection
34
o Automatic Reposition—Determines if the workpiece can be repositioned
automatically to machine-omitted hits (under clamps).
o Zone Intersection—Click this check box to specify zone offsets.
o Preview—Enables you to preview the feature before it is actually created.
4. Select either X Axis or Y Axis from Translate Direction to specify the direction
in which the workpiece is repositioned.
5. Type the zone size in the Zone Size box. This is the zone dimension along the
selected axis. Along the other axis, the zone extends the entire size of the
workpiece.
When first created, all zones have the same size. Pro/ENGINEER creates as many
zones as necessary to cover the whole workpiece along the selected axis.
6. To change the zone size, change the value in the customized Zone Size box.
Whenever you modify the zone size, Pro/ENGINEER recalculates the number of
zones necessary to cover the whole workpiece.
7. Click Done.
Creating Clamps
A clamp section may consist of only a single closed loop of sketched entities. Its
location is defined as X and Y offsets from the machine zone origin. You can also
specify a rotation angle.
There are two valid types of clamps: Machine Clamp, and Reposition Pad. Use
machine clamps to calculate avoidance and reposition clamps for visualization
purposes.
The Zones drop-down menu contains the following options:
• Create—Create the machine zones.
• Modify—Modify the selected clamp.
• Delete—Delete all the machine zones.
To Create a Clamp
1. Select the Wrkcell tabbed page from the SMT MFG MACHINING dialog box.
2. Click Zones > Clamp > Create Clamp. The MACHINE CLAMP dialog box
opens.
3. Click Sketch to define a new clamp or Retrieve to retrieve an existing clamp. If
clamps are already present in the manufacturing model, you can select them by
clicking Use Prev.
4. If you want to modify the dimensions of the clamp, click Mod Dim. The system
displays the clamp dimensions. Select the dimension you want to modify. Type
the new value and click Done Sel.

Foundation Modules
35
5. You can position a clamp using the following options:
• X Offset—Enter a value for the x offset from Machine Csys. (Press <CR> after
typing in the value.)
• Y Offset—Enter a value for the y offset. (Press <CR> after typing in the value.)
• Angle—Enter the angle of rotation of the clamp about the anchor point. (Press
<CR> after typing in the value.)
• Drag—Place the clamp using the following mouse buttons:
o LEFT—Finalizes the placement of the clamp.
o MIDDLE—Pauses. The LinearIncr and AngularIncr options change drag
increments. The effect is similar to the grid snap in Sketcher (e.g., you
might want to enter a rotational increment of 90). A drag increment of 0, at
any point, is equivalent to "grid snap off." Click Done to continue the
placement process. To bring the clamp back to the Machine Csys location,
click Quit.
o RIGHT—Switches between dragging and rotating the clamp.
• Clearance Distance—Define the amount of clearance between a toolholder and
a clamp (clearance distance + 1/2 length width diameter = distance of CL from
clamp edge).
6. Click Done.
To Create a Reposition Pad
1. Select the Wrkcell tabbed page from the SMT MFG MACHINING dialog box.
2. Click Zones > Pad > Create Pad. The REPOSITION PAD dialog box opens.
3. Click Sketch to define a new pad or Retrieve to retrieve an existing pad.
4. If you want to modify the dimensions of the pad, click Mod Dim. The system
displays the pad dimensions. Select the dimension you want to modify. Type the
new value and click Done Sel.
5. You can position a pad using the following options:
• X Offset—Enter a value for the x offset from Machine Csys. (Press <CR> after
typing in the value.)
• Y Offset—Enter a value for the y offset. (Press <CR> after typing in the value.)
• Angle—Enter the angle of rotation of the pad about the anchor point. (Press
<CR>
after typing in the value.)
• Drag—Place the pad using the mouse buttons as follows:
o LEFT—Finalizes the placement of the pad.
o MIDDLE—Pauses. The LinearIncr and AngularIncr options change drag
increments. The effect is similar to the grid snap in Sketcher (e.g., you

Pro/NC-SHEETMETAL
TM
- Help Topic Collection
36
might want to enter a rotational increment of 90). A drag increment of 0, at
any point, is equivalent to "grid snap off." Click Done to continue the
placement process. To bring the pad back to the Machine Csys location,
click Quit.
o RIGHT—Switches between dragging and rotating the pad.
6. Click Done.
To Create a Cosmetic Section
1. Select the Wrkcell tabbed page from the SMT MFG MACHINING dialog box.
2. Click Zones > Cosmetic > Create Cosmetic. The COSMETIC SECTION dialog
box opens.
3. Click Sketch to define a new cosmetic or Retrieve to retrieve an existing
cosmetic.
4. You can position a cosmetic using the following options:
• X Offset—Enter a value for the x offset from Machine Csys. (Press <CR> after
typing in the value.)
• Y Offset—Enter a value for the y offset. (Press <CR> after typing in the value.)
• Angle—Enter the angle of rotation of the pad about the anchor point. (Press
<CR>
after typing in the value.)
• Drag—Place the pad using the mouse buttons as follows:
o LEFT—Finalizes the placement of the pad.
o MIDDLE—Pauses. The LinearIncr and AngularIncr options change drag
increments. The effect is similar to the grid snap in Sketcher (e.g., you
might want to enter a rotational increment of 90). A drag increment of 0, at
any point, is equivalent to "grid snap off." Click Done to continue the
placement process. To bring the pad back to the Machine Csys location,
click Quit.
o RIGHT—Switches between dragging and rotating the pad.
5. Click Done.
Nesting
About Nesting Reference Models
Nesting functionality enables you to add, move, and pattern reference parts in a
Sheet Metal manufacturing model.
Nesting is based on cells. A cell consists of one or more reference parts. A cyan
rectangle encloses the reference part(s) to make it easily recognizable during nesting
procedures. Only reference parts you add during the nesting process are in a cell.

Foundation Modules
37
When you select Nesting from the Parts tabbed page, the following commands are
available:
• Create—Define a new cell for nesting reference parts.
• Redefine—Redefine an existing cell by adding, moving, or deleting reference
parts.
• Delete—Delete an existing cell. You can remove all parts included in the cell
from the manufacturing model. The system prompts you to confirm your
selection if you choose this command.
• Blank—Remove a cell from the display of the manufacturing model.
• Unblank—Redisplay a blanked cell. If more than one cell is blanked, the
CHOOSE menu appears. The CHOOSE menu includes the commands Accept,
Next, Previous, and Quit. Use one of these commands to select the cell(s) that
you want to unblank.
• Multiply—Create a pattern of cells.
• Modify Dims—Enable you to modify all dimensions, including drag distances and
angles, as well as nesting gaps and increments.
• Info—Provide information on the total area of sheet metal, total area of nested
parts, wasted area, and percentage of wasted sheet over total sheet surface. It
also lists the names of the reference parts, and how many parts of this name are
currently placed on the sheet.
To Create an MFG Model
1. Click Parts tabbed page from the SMT MFG MACHINING dialog box. Click
Automation.
2. From the SMT MFG AUTOMATION dialog box, click FILE > Load. The LOAD
SETUP dialog box opens. Select the attributes you want to load and click OK.
The Open dialog box opens.
3. Locate the desired .dat file and click Open.
4. Click Done. The Make SMT MFG dialog box opens.
5. Select either Single or Multiple sheets, and Save Remainder File, if desired.
6. Click OK. The MFG model is created.
To Reference Parts from Existing MFG Models
1. From the Parts tabbed page on the SMT MFG MACHINING dialog box, click
Automation. The SMT MFG AUTOMATION dialog box appears.
2. From the Order tabbed page, click Load > Parts From MFG. The Open dialog
box opens.

Pro/NC-SHEETMETAL
TM
- Help Topic Collection
38
3. Select the manufacturing file you want and click Open. The manufacturing model
appears in a window.
4. Select the part you want from the part list. The chosen part is highlighted in the
window.
5. Click OK. The manufacturing model and the chosen reference part appear in the
Order tab page window.
6. If you are satisfied with the default values, click Preview. The system places the
parts into the workpiece.
Note: The default offset and number of instances are defined in the Defaults tabbed
page.
To Load and Set Parts
1. From the SMT MFG AUTOMATION dialog box, select the Order tabbed page.
2. Click LOAD. The following options are available:
o Parts from MFG—Load parts from an existing manufacturing model.
o Cell of Parts—Load previously nested parts.
o Part w/o NC seqs—Load parts without defined NC sequences.
o DXF File—Load a DXF file.
3. Select the desired file from the Open dialog box. You can view the part by
clicking Show.
4. Click Setup. The Part Setup dialog box opens.
5. Modify the part setup as desired.
To Define a New Cell
1. Select the Parts tabbed page from the SMT MFG MACHINING dialog box.
2. Click Create from the NESTING menu.
3. Click Add Part from the NEST CELL menu.
4. The Open dialog box appears. Select the part.
5. The PART PLACE menu appears with the following options:
• DragOrigin—Create or select a coordinate system on the reference part (the
reference part is displayed in a sub-window). All Nesting data is with respect to
this origin.
• LinearIncr—Enable you to enter a value for the linear drag increment.
• AngularIncr—Enable you to enter a value for the rotational drag increment.

Foundation Modules
39
Specifying the linear and angular drag increments is optional. The effect is similar
to the grid snap in Sketcher (e.g., you might want to enter the rotational
increment of 90). Entering a drag increment of 0, at any point, is equivalent to
"grid snap off."
6. The highlighted contour of the reference part starts following the cursor as you
move it. The tip of the cursor corresponds to the position of the coordinate
system origin. Place the part using the mouse buttons:
• LEFT—Finalizes the placement of the part.
• MIDDLE—Pauses. The LinearIncr and AngularIncr options are available for
you to change the drag increments. You cannot, however, change the drag origin
at this point. Click Done to continue the placement process. To quit the whole
process of adding a part, click Quit.
• RIGHT—Switches between dragging and rotating the part.
To Retrieve a Setup File
1. From the Parts tabbed page of the SMT MFG MACHINING dialog box, click
Automation. The SMT AUTOMATION dialog box appears.
2. From the SMT MFG AUTOMATION dialog box, click FILE > Load. The LOAD
SETUP dialog box opens.
3. Select the attributes you want to load and click OK. The OPEN dialog box opens.
4. Locate the desired .dat file and click Open.
To Set the Workpiece Size
1. From the SMT MFG AUTOMATION dialog box, select the WP Size tabbed page.
2. Set the Workpiece Size, Border Size, and Grain Direction options as desired.
3. Click Done.
To Modify Automation Options
In the SMT MFG AUTOMATION dialog box, click Options. Select one or more of
the following options:
• Display Options—Opens the SHOW SETUP dialog box. Select the required
display option.
• Warning Selection—Opens the WARNING SELECTION dialog box. This dialog
box enables you to select specific error messages for checking incoming parts.
Select one or more of the following messages:
o Thickness—Part thickness is different from the workpiece thickness.
o NC Seq Type—Sequences associated with the part are incompatible with
the chosen cell type.

Pro/NC-SHEETMETAL
TM
- Help Topic Collection
40
o Parts with Absent Tools—The part cannot be manufactured with the
selected tools.
o NC Seqs with Absent Tools—The NC Sequence cannot be manufactured
with the selected tools.
o Indexable Tools—Tool not available in turret or indexable station.
o Tool Type—Incompatible tool type selected.
o NC Seq with Ext Refs—NC and data part references are not available.
o Part Size—Selected part is larger than the workpiece.
• Load/Save Items—Opens the SAVE/LOAD ITEMS dialog box. Select the
required items to load or save.
• List Columns—Enables you to customize field columns using the CUSTOMIZE
LIST dialog box.
To Generate Nesting Information
1. From the SMT MFG MANUFACTURING dialog box, click Parts.
2. Click Automation. The SMT MFG AUTOMATION dialog box opens.
3. Click Info > Placing Info. The SMM AUTOMATION INFO dialog box opens.
The dialog box summarizes percent and area information.
Autonesting
About Autonesting
Autonesting is an advanced system of sheet metal nesting. It provides dynamic
packaging capabilities, which allow you to package sheet metal reference parts
(along with existing NC sequences, if desired) and cells of parts from existing
manufacturing models automatically.
You can easily change the number of the nested instances, customize the offsets
between the models, and select nesting algorithms to create an ideal balance of
performance and packaging optimization.
SMT MFG Automation Dialog Box
The SMT MFG AUTOMATION dialog box controls the entire autonesting process. It
consists of a menu bar, 4 tabbed pages, and 3 buttons.
You can access the SMT MFG dialog box by clicking Automation on the Parts
tabbed page.

Foundation Modules
41
Buttons
There are 3 buttons available in the dialog box:
• Done—Complete the autonesting process and create the new manufacturing
model.
• Cancel—Quit the autonesting process.
• Preview—Preview the nest.
To Set Autonesting Defaults
1. From the Parts tabbed page on the SMT MFG MACHINING dialog box, click
Automation. The SMT MFG AUTOMATION dialog box appears.
2. From the SMT MFG AUTOMATION dialog box, select the Defaults tabbed page.
The following options are available:
• Quantity—Determine the quantity of parts.
• Grain Alignment (check-box)—Align the part to the grain.
• Flip Allowance (check-box)—Allow part flip.
• Offsets—Click one of the following options:
o Outer—Set to the default profiling tool width.
o Inner—Set to the inside profiling tool width.
• Rotation Angle—click one of the following options:
o Any—All angles are valid.
o Step—Rotate the model in 90 degree increments, or steps. The default step
is 90 degrees.
• Priority Weights—Sets the default priority weights.
• Clustering (check-box)—Invokes True Shape nesting
• Max Length—Maximum length of the cluster. The machine zone size is the
default value.
• Max Width—Maximum width of the cluster. The machine zone size is the default
value.
• Repeat Factor—Specify the amount of time to optimize the cluster.
• Use Holes (check-box)—Invokes part-in-part nesting.
• Minimal Hole Area—The minimum hole size for part-in-part nesting.
3. Modify the defaults as desired.

Pro/NC-SHEETMETAL
TM
- Help Topic Collection
42
Part Order Control
About Part Order Control
Part order control is exclusive to the autonesting function. You can prioritize the
order of nesting for specific parts selected in the order list. Part order control is
especially useful during high volume production when large part quantities are
involved. Specified quantities of particular parts are prioritized to control the nesting
of all parts. You can assign different priorities for the same part to minimize or avoid
nesting.
Prioritizing the nesting of parts is determined by a numbering scale from 0 to 100.
The least priority is 0 and the most is 100.
To Control Part Nesting Order
Perform the following steps to control the priority of nested parts.
1. After you nest parts onto your sheet metal workpiece using the Autonesting
function, click the Order tabbed page from the SMT MFG AUTOMATION dialog
box.
2. Type a priority number in the order list under the Prty column or double-click the
part name to open the Part Setup dialog box. Type the desired priority number
and count.
Note: Right-click part name and click Copy. Two rows are added under the part
name. You can specify multiple priorities and subquantities for the part.
3. Determine the priority weight.
4. Click Done. The MAKE SMT MFG dialog box opens.
5. Select single or multiple sheets. Click OK.
To Control the Priority Weight
Use Priority Weight to adjust the effect of the priority value to the overall
production. The priority numbering scale for priority weight is in .01 increments from
0
to 1. Use the number 0 to turn the priority off and 1 to use priorities as specified in
the order list. Values between 0 and 1 consider material utilization as well as the
specified priority.
1. After you nest parts onto your sheet metal workpiece using the Autonesting
function, click the Defaults tabbed page from the SMT MFG AUTOMATION
dialog box.
2. Type the priority weight value in the Priority Weight text box or drag the
rotation wheel to the desired value.
3. Click Done.
Foundation Modules
43
NC Sequencing
About NC Sequences
An NC sequence is a workpiece feature that represents a single tool path. You must
set up a process environment before creating an NC sequence. The type of workcell
defines the types of NC sequences available, as shown in the following table.
NC
Sequence
Punch Laser Laser-
Punch
Flame Flame-
Punch
X X X X
X X X X
X X X
X X X
X X X
X X X
X X X
X X X
X X X
X X X

Pro/NC-SHEETMETAL
TM
- Help Topic Collection
44
When you create an NC sequence, a dialog box corresponding to the NC sequence
type is displayed. Each of these dialog boxes has the following options:
• Parameter—Open the parameter tree.
• Comment—Type comments regarding NC sequences.
• Define—Specify the tool, parameters, and geometric references. You can also
apply some low-level control depending on the NC sequence type.
• Info—Display parameter and NC sequence information.
• Preview—Display the tool path for the NC sequence prior to completion of the
NC sequence. Available after all elements have been defined.
• Done—Completes creation of the current NC sequence.
• Cancel—Terminates the creation of the current NC sequence after confirmation.
• Next—Completes the current NC sequence and starts creating another Nibble
Edge NC sequence with the same tool and parameters.
To Create a Reference Manufacturing Pattern
1. From the SMT MFG MACHINING dialog box, click UTILITIES > Feature >
Pattern>Create. The SELECT FEAT menu appears.
2. Click one of the following:
• Select—Select a feature from the Pro/ENGINEER graphics window.
• Operation—The SEL MENU menu appears. Select the required operation.
• NC Sequence—The NC SEQ LIST menu appears. Select the required NC
Sequence. The PRO PAT TYPE menu appears. Select one of the following:
o Csys Pattern—The PAT TYPE menu appears. Specify values for Translate
and Rotate.
o Dim Pattern—Select a feature from the Pro/ENGINEER graphics window.
The reference manufacturing pattern is automatically generated.
About Auto Tool NC Sequences
The Auto menu in the NC Seq tabbed page enables you to create punch, form, and
contouring NC sequences automatically. The following options are available:
• Punch UDF—Automatically creates Punch NC sequences to machine all the
punch/notch features present in the reference part(s).
• Forming—Automatically creates Form NC sequences to machine all the form
features present in the reference part(s).
• Tool Shape—Automatically creates Punch NC sequences by matching the tool
shape of the Standard Punch tools in the Turret with reference part geometry
(holes and slots). Partial matching on the outside contour of the reference part

Foundation Modules
45
can also be performed; for example, if the tool size matches the radius of a semi-
circular notch, this notch is included in the Auto Tool sequence.
• Nibbling— Automatically selects all edges for nibbling sequencing form NC
Sequences. You can setup multi-tool nibbling and modify individual nibbling
sequences created from the sequence group.
• Contouring—Automatically creates Form NC sequences to machine all the
Contour features present in the reference part(s). The contouring toolpath is
based on part profiles and workcell parameters.
• Approach Punch—Automatically creates Form NC sequences to machine all the
Approach Punch features present in the reference part(s).
If there are no Punch/Notch or Form features present, specific Tool options will be
unavailable.
Unlike a regular Tool Shape NC sequence, which matches the tool shape to all part
geometry, the Auto Tool Shape punches holes and slots, but does not machine
contours created as a Punch or Notch feature. This ensures that there is no
overlapping between the automatically created Punch NC sequences.
About Manufacturing User-Defined Features (Groups)
This functionality enables you to create the NC sequences necessary to manufacture
a group of features (UDF) only once. You can then group NC sequences and place
them in any other models that contain the same reference features’ group.
If you do not reference a design UDF, the information about the reference part is
stored with the group. If you then place the group in another manufacturing model
that contain the same reference part, you have an option to automatically resolve
the placement references.
About Auxiliary NC Sequences
Auxiliary NC sequences produce a point-to-point tool path. They can be used to
specify the connecting tool motions and change the tool axis orientation, if needed,
between two machining NC sequences. They also allow you to access the on-machine
probe functionality, and are available for any workcell.
Note: You do not have to specify a tool for an Auxiliary NC sequence. You can create
Tool Motions even though no tool is specified.
To Create an Auxiliary NC Sequence
1. Click the NC Seq tabbed page from the SMT MFG MACHINING dialog box.
2. Select the NC sequence with which you want to associate the auxiliary NC
sequence.
3. Click New > Auxiliary. Click Contouring or Punching.
4. The SMT NC SEQUENCE dialog box opens.

Pro/NC-SHEETMETAL
TM
- Help Topic Collection
46
5. Click Tool and Define. From the TURRET SETUP dialog box, define the tool and
click Done.
6. Click Define Path and Define. The AUXILIARY SETUP dialog box opens.
a. Under
Create, you can select one of the following options:
o Sketch—To sketch the defined path.
o Go Home—To define the go home point as the defined path.
o Goto Pnt—To define the go to point.
o Go Delta—To define the x and y offset for the defined path.
b. If desired, you can check the Insert Before check box to insert the new
defined path before the last defined path.
c. Under
Modify, you can select one of the following options:
o Dims—To modify the dimensions of the previously defined paths.
o Delete—To delete a defined path.
7. To use the any of the optional elements, click the optional element you want,
then click Define.
8. The following options are also available:
o Name—Name the NC sequence.
o Parameters—Edit the NC sequence parameters.
o Comment—Add a comment.
o Info—Displays NC sequence and parameter information.
o Next—Go to the next auxiliary NC sequence.
o Preview—View the tool motion using the SMT MFG NCL PLAYER.
9. Click Done. The auxiliary NC sequence is created.
Modifying NC Sequences
About Modifying NC Sequences
NC sequences and material removal features, like any workpiece or assembly
feature, can be deleted, suppressed, and resumed etc.
To Redefine NC Sequences
1. From the SMT MFG MACHINING dialog box, select the NC Seq tabbed page.
2. Select the NC sequence to redefine.
3. Choose OPERATE > Redefine. The SMT NC SEQUENCE dialog box appears.
Foundation Modules
47
4. Select the item you want to redefine. Click Define. Modify as desired.
5. Click Done.
Note: An NC sequence cannot be redefined if it has been patterned or has children
(e.g., material removal). Both must be must be deleted first.
To Reorder NC Sequences
1. From the SMT MFG MACHINING dialog box, click NC Seq.
2. Select the NC sequence to reorder.
3. Click OPERATE > Reorder.
4. Use
or
to move the NC sequence up or down, respectively.
5. Click
.
Note: The Populate feature is automatically reordered to come after the last NC
sequence.
To Pattern an NC Sequence
1. From the SMT MFG MACHINING dialog box, select the NC Seq tabbed page.
2. Select the NC sequence to be patterned.
3. Click OPERATE > Pattern > Create. The PAT TYPE menu appears.
4. Click Rotate or Translate to select patterning type in first direction.
If you click Translate, click Enter from the ENTER VAL menu and enter
displacement in the X-direction. If you do not want a displacement in this
direction, choose 0.000000 from the ENTER VAL menu. Repeat for the Y-
direction.
If you click Rotate, click Enter from the ENTER VAL menu and enter rotation
angle.
5. Click Enter from the ENTER VAL menu and enter total number of instances in
this direction.
6. Select the patterning type in second direction, or if you want a unidirectional
pattern, click None. If you want a bidirectional pattern, repeat actions in steps 4
and 5 for the second pattern direction.
7. Click Quit from the PAT TYPE menu to abort the patternization of an NC
sequence about a coordinate system.
Notes:
• Patterning in a second direction uses the same coordinate system as specified for
the first direction.
Pro/NC-SHEETMETAL
TM
- Help Topic Collection
48
• If you select an NC sequence for patterning that already has a pattern defined,
an error message appears. Delete the existing pattern and then define a new
pattern.
• Coordinate patterns can reference either the NC Sequence or the Machine
coordinate system. They can be unidirectional or bidirectional. For each direction
you can specify either displacement along the X- and Y-axes, or rotation about
Z-axis.
To Reorder Sequences
You can reorder output sequences and group them by NC sequence name, tool, or
reference part.
1. From the NC Seq tabbed page, click Optimize > Redefine. The SMM Optimize
dialog box opens.
2. Select a set to optimize from the Optsets window.
3. Click Order. The following options are available:
o Manual Order—Specify the order of performing the NC sequences
manually in the SMT NC SEQ ORDER dialog box.
o Part Order—Specify the order of reference parts in the SMM PART
ORDER dialog box.
o Type Priority—Specify the order based on types in the SMM TYPE ORDER
dialog box.
o Tool Change—Specify the order of tools in the SMM TOOL ORDER dialog
box.
o Tool Travel—Specify the order of travels in the SMM TRAVEL ORDER
dialog box.
4. Depending on the option selected, NC sequence names, tool names, or reference
part names (including all the nested instances) are listed in an editor window of
the dialog box. Use the following options to reorder them as desired:
o
—Move the name selected in the editor window up by one position.
o
—Move the name selected in the editor window down by one position.
o
—Specify the new position for the name selected in the editor window .
If you move to a lower position on the list, the selected name is placed
after the new position picked; if you move to a position higher on the list,
the selected name is placed before the position picked.
o
—Specify a new position for the name selected in the editor window by
entering a new position number.
5. Click OK.

Foundation Modules
49
6. From the SMM Optimize dialog box, click OK. The sequence is reordered.
To Reorder Sets
1. From the NC Seq tabbed page, click Optimize > Redefine. The SMM
OPTIMIZE dialog box opens.
2. From the Optsets window, select the set to move. Move the set to the desired
position using the
and
arrows.
3. Click OK.
Operations
About Operations
An operation is a series of NC sequences that use a particular machine tool
(workcell). It is also a workpiece feature that contains the following information:
• Name
• Workcell to be used
• Coordinate system for CL output
• Comments (optional)
• A set of manufacturing parameters that are used by NC sequences created within
this operation (optional)
When you create the NC sequences and material removal features, they contain a
reference to the current operation name. Operation setting is modal, i.e., once an
operation is created, it stays current until another operation is created or activated.
Workcells
A workcell is a workpiece feature that specifies a machine tool by:
• Name
• Type
• A set of parameters
• Turret set-up
• Machine zones
• Coordinate system
The workcell type you use determines the types of NC sequences that you can create
(e.g., Punch Press enables you to perform Nibbling, Punch, and Form NC sequences).
To Activate an Operation
1. Select the Oper tabbed page from the SMT MFG MACHINING dialog box.

Pro/NC-SHEETMETAL
TM
- Help Topic Collection
50
2. Choose the desired operation from the list. The operation is activated in the
Pro/ENGINEER graphics window.
Note: Once you activate an operation, it stays current until you create or activate
another operation. All newly created NC sequences are included in this operation.
NC Post-Processing
About NC Post Processing
Pro/NCPOST is a post-processor generation system designed for end users having no
software programming expertise. It can accommodate various flame contouring,
laser contouring, wire edm, punch press, lathe and mill machine types that have up
to five axes of continuous path control.
Use the QUEST facility to create a full representation of a numerically controlled (NC)
machine and its controller. QUEST stores this information in a database that can be
used by GENER.
GENER uses the information about the NC machine to convert the points and vectors
of a cutter location (CL) file into the joint locations and machine codes of an NC
control tape file.
The principal input for GENER is the CL file generated by Sheet Metal Manufacturing.
GENER can post-process a CL file for any NC machine in the your database. The
MACHIN can be used to select the post-processor, or a post-processor explicitly
requested. In either case, GENER gets all necessary information about the NC
machine from the database.
GENER outputs an NC control tape file that is ready for either punching to paper
tape, or transmission to the NC machine via DNC network. Other software controls
the actual transmission process. GENER also outputs a verification list that the NC
programmer can use to check for problems, and the NC machine operator can use to
follow the progress of the program.
Execution of the Post-Processor
From within Sheet Metal Manufacturing, you can:
• Select which post-processor to use.
• Execute post-processors with option to run CL file.
• Execute post-processors with options directly upon output of tool path.
Post Processor Verbose Window Display
The Verbose option activates a windows display. You have the ability to see CL
input, tape output, macro trace messages, console I/O, and general statistics during
GENER processing. A designated window contains each of the above items. The
ncpost.pro file contains definitions that control which windows are displayed.

Foundation Modules
51
Interaction with the verbose windows is available either through use of the mouse or
the keyboard. The following operations are supported:
• d
Toggle tape detail—Press the d key to toggle how often stepping occurs in the
tape output window. The two modes are every register or every block. The
default at start-up is every block. Stepping at every register tells you which order
the software outputs registers (i.e. linears before feed rate) so that macros can
be written (for example with PPFUN/11 to force block purging) with an
understanding of the register output order.
• <right mouse button>
Step mode toggle—Press the right mouse button, or the escape key, to toggle
GENER between single step mode and normal execution mode. When step mode
is on, post-processing can be single stepped to provide a better understanding of
the processing flow. When step mode is off, processing continues uninterrupted.
• <left mouse button>
Single step—Press the left mouse button in the desired window when step mode
is on to cause GENER to stop after the next line of output to the selected window.
• <middle mouse button>
Window toggle—Press the middle mouse button in a selected window to turn
output to the selected window on and off.
NC Post-Processors of Sheet Metal Manufacturing
In order to create and run post-processors for Sheet Metal manufacturing, you have
to have a licence for Pro/NCPOST-SHEETMETAL or Pro/NCPOST-ADVANCED. Each of
these includes a standard set of NC post-processors, and also enables you to create
your own posts for punch press and 2-axis contouring.
Post-Processor Error Messages
GENER detects errors caused by invalid post-processor commands, inappropriate
control of the NC machine and incompatibilities due to invalid QUEST responses. In
all cases, processing of the CL file continues until the FINI record is read.
Error messages are textual. They identify a problem (or event), the severity of the
problem, and any corrective action taken. Also listed are statistical and positional
information for the error. For example:
Warning: CUTCOM Option LENGTH is not supported by this machine and cannot be
simulated. Option ignored
SEVERITY(04) ISN(0035) CLREC(0041) ERRNUM(01524001)
Error messages contain three items: the type, text and status line. If the error
occurs from within a macro, there may also be a message that indicates the position
of the error within the macro. An additional line may also be output that indicates
that the macro was terminated due to a serious error.
There are four types of error messages: Message, Warning, Error and Fatal. The
message and warning type errors are generated when an unexpected event occurs
for which the post-processor can correct. Error and fatal type messages are

Pro/NC-SHEETMETAL
TM
- Help Topic Collection
52
generated when the post-processor detects an error that it cannot correct or make
an assumption about.
The text portion of the error message begins with the post-processor word that
generated the error message. The text body contains the error description, that
includes any corrective action taken. For example, suppose the user coded the
command LOADTL/1,OSETNO,3. During post-processing, the following message was
output:
Warning: CUTCOM [Called by LOADTL] Option LENGTH is not supported by this
machine and cannot be simulated. Option ignored.
SEVERITY(04) ISN(0035) CLREC(0041) ERRNUM(01524001)
The OSETNO option on the LOADTL command invoked a call to the CUTCOM
command that handles cutter length compensation. However, the CUTCOM logic
detected that cutter length compensation was not supported and it output the
appropriate error message. This particular example is one of an error message
generated on an indirect call. GENER tracks all indirect calls and places them at the
beginning of the error message text.
The error status line is output after the text portion of the error message. Four items
display on this line. They are the error severity (SEVERITY), internal sequence
number (ISN), the CL record number (CLREC) and the GENER error number
(ERRNUM). The error severity indicates the severity level of the message and may
have any value between 0 and 99. A value between 0 and 3 signifies a "message." A
value between 4 and 7 signifies a warning message. A value between 8 and 15
signifies an error message. Finally, a value between 16 and 99 signifies fatal
message. The ISN points to the original APT source statement that caused the error.
The CLREC is the Section III record number generated by the APT CL-Editor on which
the error was found. The error number refers to the GENER system error number.
If the error occurs while processing a macro line, the macro is identified and the
macro line causing the error is output. If an error occurs while evaluating a macro
expression or executing a special macro command and the severity is greater or
equal to 8, a TERMAC statement is generated to exit the macro and the following
message is output:
*** TERMAC generated due to error(s).
Error File Utility
The error file utility permits you to customize error messages output by GENER. The
file ncp160.err contains a list of all error messages used by GENER. Each error
message consists of three fields; number, severity and text.
Do not modify the error number field because this is the number that GENER uses to
find a particular error. You may modify all other information. The severity field
specifies the severity of the error message. A severity from 0 through 3 signifies a
message; warnings are from severity 4 through 7; errors from 8 through 15; and
fatal errors from 16 and up. A negative severity disables the output of an error
message. The message field specifies the text associated with an error number. The
message text does not have a length limitation. A typical message appears as
follows:

Foundation Modules
53
\ 01003004 4 MULTAX/ON with no Y-axis on this lathe.
Tool orientation may not be satisfied.
Any line that starts with an exclamation mark (!) is a comment. Lines that start with
a back slash (\) define an error message. Error message definitions can continue
from one line to the next and ignore any extra spacing characters.
To Generate an MCD File
1. From the SMT MFG MACHINING dialog box, select the NC Seq tabbed page.
2. Select the desired NC sequence.
3. Click CL Output. The SMT MFG NCL PLAYER appears.
4. Click FILE > Post Process. The PP OPTIONS menu appears. Select one of the
following options:
o Verbose—Invoke the verbose display of post-processing.
o Trace—Trace all macros and CL records in the listing file.
o MACHIN—Use the post-processor file for the machine specified in the
MACHIN statement of the CL file. If this option is not checked off, the
system prompts you to select a post-processor from the namelist menu of
all available post-processors.
5. Click Done. The post-processor is invoked with the specified options. The post-
processed file is named <fname>.tap, where <fname> is the name of the CL file
being processed.
Post-Processing Deliverables
Output NC Program Data
The output NC program data is in 8-bit noparity ASCII format. You control the
character count by the block_size definition file symbol. The block size is written as a
formatted number in the range 00 through 99, followed by a space, followed by the
contents of the actual NC tape block. The three byte size header is not included in
the block size count.
Records may or may not contain end-of-block characters, rewind-stop characters,
leader, trailer and man-readable data. You control these, along with many other
format details, from within the Output Format section of QUEST. Other format
options configurable from the definitions file include the tape_format (variable, fixed
or packed), tape_recl (tape record length), tape_seq (tape sequence numbering),
tape_eor
(tape end-of-record character), dnc_format (variable, fixed or packed),
dnc_recl
(dnc record length), dnc_seq (dnc sequence numbering), and dnc_eor
(dnc end-of-record character).
By default, the system creates the tape file in the current directory with the same
name as the CL file, and an extension of tap. The system may create two tape files

Pro/NC-SHEETMETAL
TM
- Help Topic Collection
54
for 4-axis lathes, in which case the second file name is the same as the first, with a
file extension of tp2. There is no mechanism to override the second tape file name.
If you define the configuration option pro_mf_cl_dir, the system creates the
deliverable in the directory specified by this option.
Output NC Program Listing
The post-processor listing file contains the complete program listing, including timing
data, diagnostics, tape listing, operator messages, etc. You control these, along with
many other format details, from within the Display Format section of QUEST.
Two output formats are supported: FCC and list. You can control the format by the
output_format definition file symbol. The FCC format, which stands for Fortran
Carriage Control, reserves the first character of each line for page formatting
purposes. GENER outputs a 1 in this position to advance to a new page, a 0 to
double space an output line, and a blank for regular single spacing. You can print this
file on any printer or driver recognizing FCC output. The list format does not reserve
a character for carriage control. Instead, a form-feed character is output at the start
of a record to advance to a new page. All other records are output one per line.
The page length is configurable from the definitions file with the lines_per_page
variable.
By default, the system creates the listing file in the current directory with the same
name as the CL file, and an extension of lst.
Identification Page
When GENER is run, an unnumbered identification page is output for control
purposes. This page identifies the GENER software version and modification level, the
name of the input CL file, the creation date of the QUEST generated post-processor,
the database from which the post-processor was read, the software version of the
database, the names of macro libraries being used if applicable and, optionally, the
NC control tape program identification string (commonly called a PID).
For example:
ICAM Technologies Corporation
(c) Copyright 1995
Pro/NCPOST GENER Release 18.0-9550
Source: 3axtest.ncl.1
Quest: MILL501.104;4
Created 01-Jul-1996 12:00:30.00
Using /usr/francois/work/ncpost.dbf
Release 18.0
PID: 9001
This header page shows that Release 18.0 modification level of GENER is being run.
You must reference this number (whatever appears in the listing file) when you
communicate problems with the product to Parametric Technology Corporation
support personnel.
The input CL file is named TEST.NCL.

Foundation Modules
55
The MILL501 post-processor was either explicitly requested by the user, or it was
determined by scanning through the 3axtest.ncl.1 file for a MACHIN CL record. This
post-processor was created just after noon on July 1, 1996. The post-processor
database is located in the directory /usr/francois/work/ncpost.dbf and was
created using Release 18.0 of Pro/NCPOST.
A PID string was specified when GENER was executed, or a default PID string was
defined by the post-processor creator (using QUEST). In either case, the value
written to the NC control file is 9001.
GENER cannot use a database that is created using a different version of
Pro/NCPOST. Attempting to do so results in an error message and processing aborts.
However, no harm is done to the old database. The QUEST utility can be used to
update the database to the new version level if necessary.
From time to time, new GENER and QUEST software may be released at the same
version level but at a higher modification level. When a post-processor created at a
lower level of QUEST is run on a higher level of GENER, warning messages may be
displayed indicating that problems exist. Specific instructions to alleviate this
problem are always provided with the new software release. One sure way of
eliminating this problem is to run the new software release of QUEST and regenerate
the post-processor.
The NC Control Tape Listing
The GENER verification file always contains an NC control tape listing. This is
provided as a reference for the NC machine operator. The tape listing is an exact
copy of what appears on the tape file except that man readable are omitted.
The verification file may also contain status information listed in column format
beside the NC control tape.
You can control the width and length of pages. Use Pro/NCPOST to control the width
of a page. Use the lines_per_page symbol in the definition file to set the length of
the page.
Title Block
The title block at the top of each page displays the page number, run date, post-
processor name, and PARTNO string. The post-processor title appears on the first
page only.
Occasionally instead of a PARTNO string, the text Undefined PARTNO appears. This
happens when a PARTNO command is not found within the first 20 records of the CL
file.
Display Data
The NC control tape data (as it would appear in the tape file) is located at the left
hand side of each page. A single block is output at a time. The dollar sign ($)
character replaces non-printing characters so as to not interfere with the printer,
however the tape file contains the true characters.

Pro/NC-SHEETMETAL
TM
- Help Topic Collection
56
The right hand side of each page may contain status information in column format.
Control the appearance of this information by responses in the General
Description—Display Format section of Pro/NCPOST QUEST. A header appears
above each status column. Descriptions of the various status types follow:
nnAXIS:
Displays the position of the named axis, in normalized machine coordinates, at the
end of the NC command block.
Linear axes are output in machine units using the right hand rule (i.e. reversed axes
are output with a normal sign convention). Primary linear axes are identified in the
header by X, Y and Z; secondary linears by U, V and W; and the extending axis by E.
Rotary axes values are output in degrees regardless of the actual units used by the
machine. Sign conventions follow the right hand rule. Rotary head axes are identified
by A, B and C; rotary tables by A’, B’ and C’; and the nutating axes by N and N2.
Rotary axis positions shown in the display are actual positions and may not match
the tape output where values of 360 degrees or greater occur.
If there is not enough space to display all axes in unique status columns, GENER
uses the same column for similar axes (i.e., Z, W and E) outputting 2 or 3 lines of
status information for each NC command block. The first line of linears lists primary
axes; the second line lists secondary axes, the third lists the extending axis under
the Z-axis column. The first line of rotaries lists the head axes; the second line lists
the table axes; the nutating axes always appears in their own column.
TIP VEL:
Displays the calculated velocity of the tip of the cutting tool with respect to the part
coordinate system. Normally this value matches the requested feedrate in the CL file.
A value of zero is output on blocks that do not contain motion instructions. This
column is not available for punch presses.
RPM:
Displays the calculated revolutions per minute of the spindle at the end of the NC
command. A value of zero is output when the spindle is stopped. Negative values can
indicate CCLW rotation if the creator of the post-processor specifically requests this
feature. This column is not available for punch presses.
TIME:
Displays the elapsed machining time in hh:mm:ss (absolute) format or the delta
block time in mmm:ss.ss (incremental) format.
nnnn ACT:
Displays the actual machining time in absolute or incremental format for the MAIN
and SIDE heads of a 4-axis merging lathe. Actual machining time does not include
the time spent waiting for a synchronization event.

Foundation Modules
57
CL:
Displays the number of the CL record that result in the NC instruction block being
output. This provides a cross reference between CL records and NC commands. A
value of zero is used during start-up processing.
ISN:
Displays the Internal Sequence Number of the APT statement (or CAD/CAM
instruction) that create the CL records that result in the NC instruction block being
output. This provides a cross reference between the original APT program statements
and NC commands. A value of zero is used during start-up processing and also when
information concerning ISN numbers is not provided in the CL file (which is common
with some CAD/CAM systems).
HITS:
Displays the number of hits per tape block. This column is available for punch press
machines only.
Summary Data
The last few lines on each page optionally contain an accumulated tape length and
machining time summary. Tape length is output in feet, meters or kilobytes,
depending on the post-processor units and output format. The reel number is
included where applicable. Machining time is in hh:mm:ss format.
You can request a second type of summary line in QUEST to report the total
machining time for the tool when a tool change occurs. The time is broken down to
show times for positioning, cutting, miscellaneous and, for merging lathes, idle time.
The summary line precedes the tape blocks that perform the tool change. Note that
this type of summary is not available for punch press machines.
Program Summary
An NC program summary can be found at the end of the verification listing. An
interim summary is also provided for each reel in a multi-reel program. These
include tooling, machine travel, machining time and diagnostic summaries.
Tooling Summary
The tooling summary is optional. It supports up to five independent automatic tool
changers (ATC) on a single milling or turning machine. For each ATC the summary
lists all tools that are loaded. Information for each tool includes identity number,
pocket number, diameter, length, gripper size, diameter and length compensation
switch numbers, minimum and maximum feeds, and feed, rapid, miscellaneous and
total times.
Punch presses have a nibble and punching summary for each tool along with the
machining times.
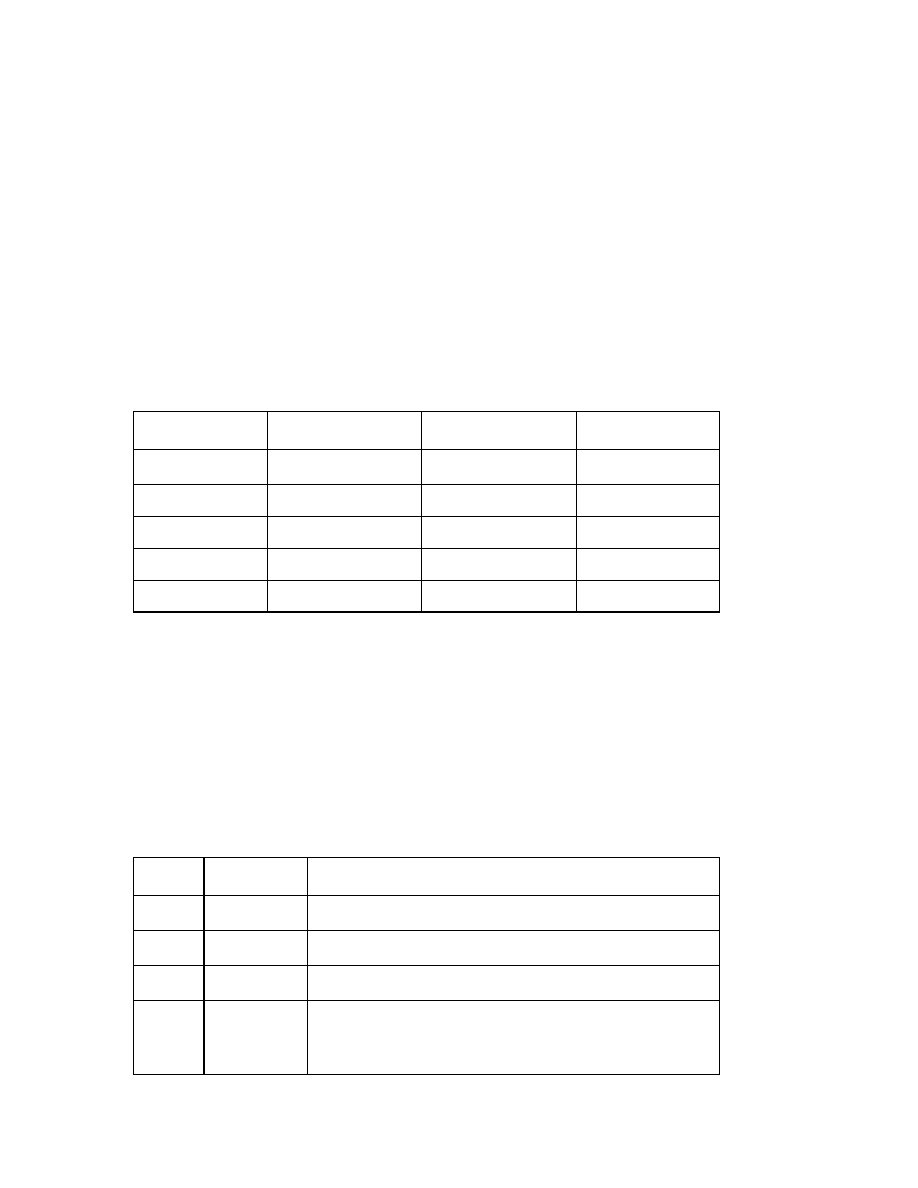
Pro/NC-SHEETMETAL
TM
- Help Topic Collection
58
The less than 132 column format of the tool summary displays one half of the
information for all tools, followed by the second half of the information for the same
set of tools. The 132 (or greater) column format lists all the information for each tool
in one line. The tooling summary appears only if the post-processor creator
specifically requests it.
Tool Travel Summary
The tool travel summary always appears. It lists the minimum, maximum and total
travel for all axes. The tool travel is with respect to the machine coordinate system
in effect at the end of the program (or reel). Use the ORIGIN, TRANS and POSTN
post-processor commands to control the machine coordinate system.
For example, the travel summary for a mill might be:
TOOL TRAVEL SUMMARY:
AXIS MINIMUM
MAXIMUM
TOTAL
X -2.50000
2.50000
5.00000
Y -2.50000
2.50000
5.00000
Z -1.50000
2.00000
3.50000
A’ 0.00000
0.00000
0.00000
B’ 0.00000
0.00000
0.00000
Note: Linear axis travels are in machine units. Rotary axis values are in degrees.
Machining Time
The machining time summary is optional. It lists, in hh:mm:ss format, the time
spent positioning, cutting, on miscellaneous operations, and for merging lathes the
time spent at idle time. Also for merging lathes, the times for both heads are listed
independently.
In the following example, the total time spent at feed was 42 seconds. This
accounted for over 97% of the total machining time.
MACHINING TIME SUMMARY:
Type HH:MM:SS
Percent
Rapid 00:00:01 2.135
Feed 00:00:42 97.865
Misc 00:00:00 0.000
Total
00:00:43
Note that for punch presses, the RAPID and FEED
lines are replaced by POSITIONING and
PUNCHING.
Foundation Modules
59
Diagnostic Summary
The diagnostic summary is optional. There are two
types of diagnostic summary, either or both of which
can appear, controlled by answers in QUEST.
The basic summary lists the number of diagnostics
that occurred in each message class. If no diagnostics
occurred, the summary states that fact. There are
four classes of diagnostics:
• Messages are informational only.
• Warnings indicate problems which have been
corrected automatically.
• Errors are uncorrectable problems that probably
result in an unusable NC control tape.
• Fatal errors indicate severe problems.
In the following example, 3 warnings and 2 errors
occurred. There were no informational messages nor
were there fatal errors.
DIAGNOSTIC SUMMARY:
Type Total
Message 0
Warning 3
Error 2
Fatal 0
Total 5
The detailed summary lists by message category, a
compilation of all diagnostics that have occurred in
the program. For each diagnostic type, a count of the
number of occurrences and a page reference of the
first occurrence is given.
External Post Processors
About External Post-Processors
The following post-processors are certified for use with Sheet Metal Manufacturing CL
Data files:

Pro/NC-SHEETMETAL
TM
- Help Topic Collection
60
• Other post-processor reading APT should also, with little additional code, be able
to process Sheet Metal Manufacturing CL files.
• If you have CAM-POST installed, you can directly set-up the post-processors and
generate MCD files from within Sheet Metal Manufacturing.
• If you have IntelliPost installed, you can configure post-processors, generate
MCD files, and look at the output files from within Sheet Metal Manufacturing.
IntelliPost
IntelliPost Post-Processor Set Up
After you install IntelliPost, the following options appear in the MFG SETUP menu:
• Configure—Enable you to configure the post. When finished configuring, if you
wish to test the post, select the exit command that writes the file but does not
actually exit (see the IntelliPost manual). You can then click Post Process
(described in the next bullet) and a new window appears to run the post. When
you wish to exit the Configure step, reactivate the CONFIG window and do the
full exit.
• Post Process—Enable you to post-process a CL file using a given data file. A
pop-up window appears requesting a selection of MILL or LATHE. After this
selection, the post-processor requests a CL file name and a post data (.dat) file.
You can leave the current Post Process window and select the List Files
(described in the next bullet) to get a list of CL files, and then return to this
window to enter the name. After processing is complete, the window disappears.
• List Files—Enable you to view the MCD output files (*.PPR and *.PCH) and to list
the CL files. A sub-menu appears from which you can select the file type to view.
If you select the CL file type, a list of CL files appears. If you select one of the
MCD file types, you can select a specific file to view.
Generating IntelliPost MCD Files
There are three places in the system where MCD files can be generated:
• When setting-up the post-processor the generation function is provided to give
you a place to configure the post, process it, and fine tune the post-processor
data file.
• When outputting the tool path, use CL Data, Output, File, by then select the
MCD File option from the Output Type menu. The generation function is
provided there to enable you to create and store an MCD file at the same time
you store the CL file. You do not exit the menu or enter other menus.
• From inside the CL PLAYER, it is possible to perform a FILE / OPEN and then
select a previously saved NCL File with the browser. Then you can launch the
Post Processing:
o Post Process—Enables you to process an existing CL file. A window
requests the CL file name and the post data (.dat) file.

Foundation Modules
61
Direct External Post-Processing with IntelliPost
IntelliPost is integrated with Sheet Metal Manufacturing to enable you to configure
and run the post-processor without leaving Sheet Metal Manufacturing. This is
accomplished by means of the Pro/DEVELOP package that enables access to
functions and data within the Sheet Metal Manufacturing system. The integration to
IntelliPost is supported by Software Magic.
Install IntelliPost separately from Pro/ENGINEER and connect by means of written
instructions and script files that are specific to the platform. you must obtain the
licensing and authorizations from Software Magic prior to using the interface.
The integrated IntelliPost enables you to:
• Create customized post-processors.
• Select which custom post-processor to run.
• List the resultant MCD and PPR files.
• Test post-processors by configuring and executing the post-processor
interactively.
• Execute the post-processor when outputting the tool path.
CAM-POST
CAM-POST Post-Processor Set Up
When you click SETUP > PProcessor, the system invokes CAM-POST QUEST to let
you set up post-processors.
Generating CAM-POST MCD files
To generate an MCD file from a CL file:
1. From the SMT MFG NCL PLAYER, open the desired CL file.
2. Click FILE > Post Process. The PP OPTIONS menu appears. The following
options are available:
• Verbose—Invoke the verbose display of post-processing. If you check off this
option, the post-processor is invoked with the -v option.
• Trace—Trace all macros. If you check off this option, the post-processor is
invoked with the -tra=cm option.
• MACHIN—Use the post-processor file for the machine specified in the MACHIN
statement of the CL file. If you check off this option, the post-processor is
invoked with the -po=1 option. If you do not check off this option, the system
prompts you to select a post-processor from the namelist menu of all available
post-processors. The post-processor is then invoked with the po=<ppname>
option, where <ppname> is the name of the post-processor selected.

Pro/NC-SHEETMETAL
TM
- Help Topic Collection
62
• PID—Use the process identification. If you check off this option, the system
prompts you for the process identification string. The post-processor is then
invoked with the pid=<pidstring> option, where <pidstring> is the string
entered at the prompt. The string should not contain any spaces.
3. Click Done. The post-processor is invoked with the specified options. The post-
processed file is named <fname>.tap, where< fname> is the name of the CL file
being processed.
Direct External Post-Processing with CAM-POST
CAM-POST is integrated in Sheet Metal Manufacturing to enable you to directly set-
up the post-processors and generate MCD files.
In general, Pro/ENGINEER and CAM-POST are installed separately. CAM-POST must
be installed and authorized prior to using the Sheet Metal Manufacturing interface.
To specify that the post-processor is present, set the following configuration option:
campost_dir <postpathname>
where <postpathname> is the CAM-POST load point directory.
From within Sheet Metal Manufacturing, you can:
• Create post-processors.
• Select which post-processor to use.
• Execute post-processors with option to run CL file.
• Execute post-processors with options directly upon output of tool path.
Pro/NC-Check
About the NC Check Process
You can perform NC Check:
• At the time you create an NC sequence, to check the current tool path. This
option is only available for Laser and Flame NC sequences.
• After you create the NC sequence (any type) or operation, by selecting NC Check
from the CL DATA menu. The system prompts you for a CL file name. At this
point, you can either select an existing file, or create a new one.
• When you edit the CL data.
NC Check is implemented for all Punch Press NC sequences except Form, and for
Contouring NC sequences. If the type of tool you use in an NC sequence is
STANDARD PUNCH, each tool position you specify with GOTO creates a punch in the
workpiece.
If you use a tool model, it is replaced by the default tool of appropriate type, as
defined by the tool parameter values. The material is removed according to the
actual tool shape and motion, i.e., all scallops left by the tool passes are displayed.

Foundation Modules
63
Do not confuse the automatic material removal simulation with the NC Check
process:
Material Removal
NC Check
Permanently removes material from
the workpiece and creates a new
feature.
Simulates material removal for
display purposes only; does not
create geometry
Is based on a set of assumptions
and may produce simplified
representation of material removal,
depending on the NC sequence type
Always takes into account the actual
tool path and shape
To Run NC Check When You Create an NC Sequence
When you create a Laser or Flame NC sequence, you can run it through the NC
Check process to check your current tool path.
1. From the SMT MFG MACHINING dialog box, select the NC Seq tabbed page.
2. Select the desired NC sequence to check.
3. From the SMT NC SEQUENCE dialog box, click Preview. The SMT MFG NCL
PLAYER appears.
4. Click OPTIONS > NC Check.
5. Click Play. The system starts running the current CL data through NC Check.
To Run NC Check After You Create an NC Sequence
At any time in your manufacturing process, you can run the CL data of an existing
NC sequence through the NC Check process to check the tool path and resulting
geometry. Running several NC sequences on top of each other without Refresh gives
you a comprehensive picture of workpiece geometry after machining. CL data for all
the NC sequences you are going to run must be output to CL files prior to starting
the NC Check process.
1. From the SMT MFG MACHINING dialog box, select the NC Seq tabbed page.
2. Select the desired NC sequence to check.
3. Click CL Output. The SMT MFG NCL PLAYER dialog box opens.
4. Click OPTIONS > NC Check.
5. Click Play. The system starts running the specified CL file. Once the NC Check
process is completed (or aborted), you can run another NC sequence file.

Pro/NC-SHEETMETAL
TM
- Help Topic Collection
64
Press Punch NC Sequences
To Create a Form NC Sequence
1. From the SMT MFG MACHINING dialog box, click NC Seq.
2. Click New > Forming. The SMT NC SEQUENCE dialog box opens. Select one or
more of the following options:
o Name—Specify a name for the NC sequence. This name replaces the
default NC sequence name.
o Parameters—Specify manufacturing parameters.
o Comment—Specify comments about the NC sequence.
o Info—Displays a summary of the NC sequence and parameter information.
o Next—Go to the next NC sequence.
o Preview—View the NC sequence using the SMT MFG NCL PLAYER.
3. Define form element.
4. Select a reference part to create a Form NC Sequence.
5. Select forms to create a From NC Sequence.
6. Click Done Sel.
7. If required, click CL Command and click Define. This inserts new CL commands
at selected hits.
8. Click Done.
Note: All Form features included in an NC sequence must use the same tool.
To Specify Overhang Points
1. In the SMT NC SEQUENCE dialog box, click the Overhang element and click
Define. The Overhang Definition dialog box opens.
2. Click Add.
3. Select a vertex within the selected chain of edges. You cannot select chain
endpoints.
4. If you want the overhang to be the same for both directions, select the Same for
both directions check-box.
5. Specify the Overhang Distance.
6. Click OK.

Foundation Modules
65
To Select Edges and Specify Check Edges
Selecting Edges
You can select noncontinuous edges, chains, and loops using the SELECT EDGES
dialog box. Select the NC Seq tabbed page from the SMT MFG MACHINING dialog
box. Click New > Nibbling. Select Check Edges and click Define. The SELECT
EDGES dialog box appears.
The SELECT EDGES dialog box contains the following options:
• Include—Include edges.
• Exclude—Exclude previously selected edges, chains, or loops.
• Edge—Select individual edges of reference parts.
• Chain—Select a chain of edges. You are prompted to select the first edge. Then
the whole loop is highlighted and you are prompted to select the second edge.
One of the chains between the two edges is highlighted in red.
• Loop—Select a closed loop of edges (e.g., the whole perimeter of the reference
part) by selecting an edge that belongs to the loop. The system finds the whole
loop based on the selected edge and highlights it. With this selection method, if
you later modify geometry of the reference part but leave the original edge intact
the system regenerates the nibbling NC sequence around the new contour.
• Show Edges—Display edges selected for the NC sequence (e.g., after Repaint).
Nibbling NC Sequences
About Nibble Area NC Sequences
The Nibble Area NC sequence creates a point-to-point tool path across a sketched
area. The tool path is broken down into smaller elements called strokes that are in
turn broken down into hits, the smallest elements of the tool path. Hits indicate each
location where the tool makes contact with the workpiece and removes material. A
succession of hits in a line across an area composes a stroke. Strokes are displayed
as a series of hits connected by a line.
Use the OVERLAP_DIST parameter to specify the overlap distance between the next
and the previous hit. The STEP_OVER parameter defines the distance between the
strokes. If STEPOVER_ADJUST is set to YES, by default, the step-over distance is
adjusted to make both the beginning and the end of the cutter path close to the
sketched boundaries.
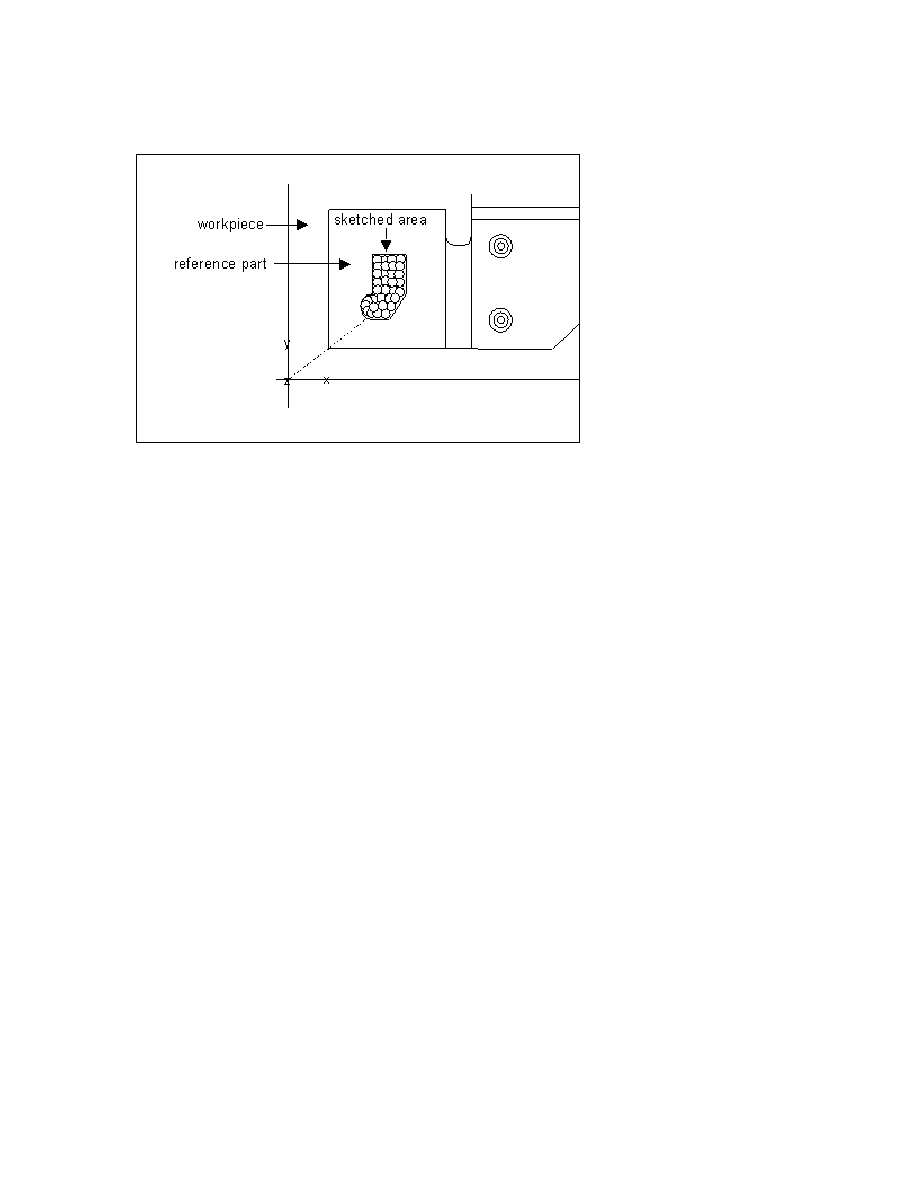
Pro/NC-SHEETMETAL
TM
- Help Topic Collection
66
Nibble Area NC Sequence
If you select a tool for the NC sequence that is too big to fit into a portion of the
sketched area without gouging, this portion is not nibbled. This is reflected in CL data
output. However, the material is shown as removed from the whole sketched area.
Use CL data display or Pro/NC-CHECK to verify the NC sequence. You can either
modify the original NC sequence to use a smaller tool, or split the area and create
two separate nibbling NC sequences.
To Create a Nibble Area NC Sequence
1. From the SMT MFG MACHINING dialog box, select the NC Seq tabbed page.
2. Click New > Nibble Area. The SMT NC SEQUENCE dialog box opens. The
following options are available:
o Name— Enter a name for the NC sequence. This name replaces the default
NC sequence name.
o Parameters—Specify manufacturing parameters.
o Comment—Use the system editor to enter comments about the NC
sequence.
o Info—Displays a summary of NC sequence and parameter information.
o Next—Go to the next NC sequence.
o Preview—View the NC sequence using the SMT MFG NCL PLAYER.
3. From the TURRET MANAGER dialog box, define the tool and click Done. The
sketcher window appears.
4. Define the nibble area in the sketcher window and the reference in the
References dialog box.
5. To use any of the optional elements, choose the one you want, then click Define.
The following options are available:

Foundation Modules
67
o Profile Tool—Specify a second tool for profiling operations.
o Scan Type—Specify the nibble area tool path.
o Remove Hits—Select hits to be deleted from the tool path.
o Change Order—Change the order of the strokes and hits within the stroke.
o CL Command—Insert CL commands at selected hits.
6. Click Done.
About Nibble Edge NC Sequences
The Nibble Edge NC sequence creates a point-to-point tool path along selected
edges. The tool path is broken down into smaller elements, called strokes, that in
turn are broken down into hits, the smallest elements of the tool path. Hits indicate
each location where the tool makes contact with the workpiece and removes
material; they display as small red shapes. A succession of hits comprises a stroke,
that is the other element of the tool path. A stroke is a succession of hits along an
edge of a reference model. When the tool path is generated, strokes display as a
series of hits connected by a line; the first hit in the stroke displays as a small, filled
red shape. These shapes indicate the position of the center of the tool; the distance
between the hits is calculated based on the actual tool size. You can specify the
distance by which each following hit overlaps the previous one using the
OVERLAP_DIST
parameter.
You can choose form a selection of shapes to perform the nibble edge NC sequence.
A single sequence can contain multiple tools. Tools can be automatically or manually
assigned to an edge, loop or chain as needed. Special tools can be used to punch
corners.
By default, the tool path along each edge is equal to the edge length. You can
specify shake-away points or vertices (Nibble Edge Tool Path:b) and overhang
vertices (Nibble Edge Tool Path:c), where the tool path is trimmed or extended by a
specified distance, respectively. You can specify different shakeaway and overhang
distances for different points within the same NC sequence. For overhang vertices,
you can also specify different overhang distances along the two edges of a vertex.
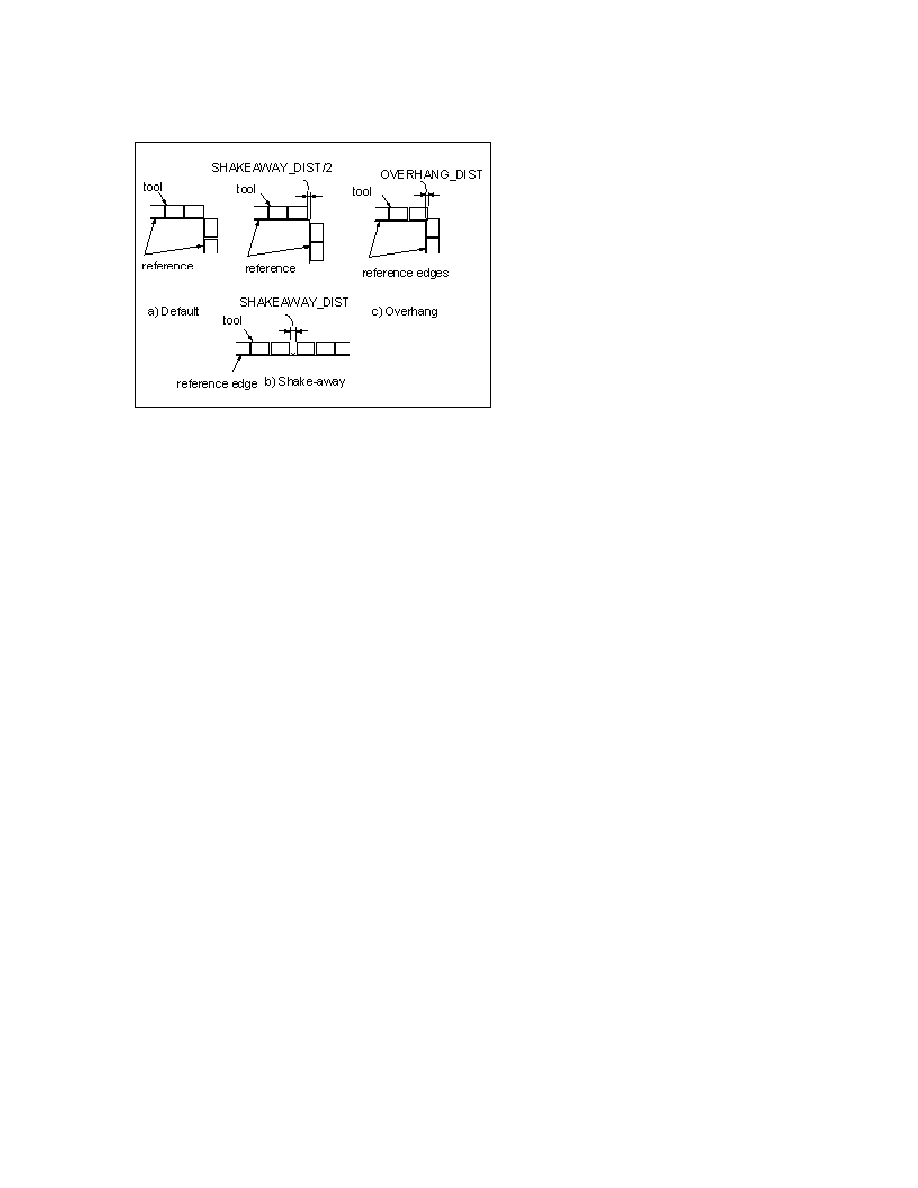
Pro/NC-SHEETMETAL
TM
- Help Topic Collection
68
Nibble Edge Tool Path
If you select a tool for the NC sequence that is too big to nibble some of the edges
without gouging, the tool path along these edges is not created. This is reflected in
CL data output and in the material removal simulation. You can then either modify
the original NC sequence to use a smaller tool, or create a separate nibbling NC
sequence for these edges.
To Create a Nibble Edge NC Sequence
1. From the SMT MFG MACHINING dialog box, click NC Seq.
2. Click New > Nibbling. The SMT NC SEQUENCE dialog box and the TURRET
SETUP dialog box open.
3. Select one or more of the following options from the SMT NC SEQUENCE dialog
box:
o Name— Specify a name for the NC sequence. This name replaces the
default NC sequence name.
o Parameters—Specify manufacturing parameters.
o Comment—Specify comments about the NC sequence.
o Info—Displays a summary of the NC sequence and parameter information.
o Next—Go to the next NC sequence.
o Preview—View the NC sequence using the SMT MFG NCL PLAYER.
4. From the TURRET SETUP dialog box, define the tool, and click Done. The
SELECT EDGES dialog box opens.
5. Select the required edge, chain, or loop and click Done.
6. To use any of the optional elements from the SMT NC SEQUENCE dialog box,
select the one you want, and click Define. Select one or more of the following
options:

Foundation Modules
69
o Check Edges—Excludes some of the edges from gouge checking.
o Shake Away—Specify the shake-away placements and sizes.
o Overhang—Specify the overhang placements and sizes.
o Multiple Tool—Specify the tools from the MULTIPLE TOOLS dialog box.
o Remove Hits—Select hits to be deleted from the tool path.
o Change Order—Change the order of the strokes and hits within the stroke.
o CL Command—Inserts new CL commands at selected hits.
7. Click Done.
About Multiple Tool Nibbling
You can simplify the creation of nibbling NC sequences necessary to punch out part
profiles by using multiple tools. To access Multiple Tool, select Multiple Tool from
the options in the SMT NC SEQUENCE dialog box, and click Define. The MULTIPLE
TOOLS dialog box opens with the following options:
TOOLS
• Nibbling—Manually assigns tools to edges.
GEOMETRY
o Change Tool for Edge—Assigns a new tool for a single edge.
o Specify Edges for Tool—Assigns edges for the selected tool.
• Auto Select—Automatically assigns tools to edges.
• Recognize—Manually assigns edges to tools.
GEOMETRY
o Exclude Edge/Vertex—Excludes an edge or vertex for a specified tool.
o Include Edge/Vertex—Includes an edge or vertex for a specified tool.
• Show Section—Displays the tool section.
• Add New—Select a new tool from the TOOL LIST dialog box.
• Remove—Select a tool to remove it from the TOOL LIST dialog box.
PARAMETERS
Assign manufacturing parameters to individual tools.

Pro/NC-SHEETMETAL
TM
- Help Topic Collection
70
Autonibbling
About Autonibbling
Autonibbling is an advanced system of sheet metal nibbling. Autonibbling allows you
to automatically select all edges for nibbling sequencing. You can setup multi-tool
nibbling and modify individual nibbling sequences created from the sequence group.
The CONTOUR SELECTION dialog box contains controls for the autonibbling
functions. The following options are available:
SELECTION METHOD
• Automatic—Automatically contour your selection.
• Manual—Manually exclude contour selections.
• Show—Show selected contours.
USE CONTOURS
• Outer—Select to process outer contours.
• Inner—Select to process inner contours.
TOTAL and SELECTED
Displays total number of edges selected.
To Create an Autonibbling Sequence
1. Click the NC Seq tab from the SMT MFG MACHINING dialog box.
2. Click Auto > Nibbling. The TURRET MANAGER dialog box opens.
3. Load desired tools then click Done. The CONTOUR SELECTION dialog box
opens with the following options:
o Selection Method—Enter automatic or manual contouring method.
o Show—Show selected contours.
o Use Contours—Select to process inner or outer contours.
o Total—Number of contours found.
o Selected—Number of contours selected.
4. Click Done. The SMT NC SEQUENCE dialog box opens. Click Preview to
preview the nibbling sequence using the SMT MFG NCF PLAYER or Done to
complete.

Foundation Modules
71
Punch NC Sequences
About Punch NC Sequences
Tool path for Punch NC sequences consists of separate hits at specified locations.
There are three types of Punch NC sequences:
• Punch Point—Create punches by referencing datum points as the hit locations.
This NC sequence can use either a Standard Punch, defined by a .tpm file, or a
library part.
• Tool Shape—Automatically creates punches on holes or slots that match the
shapes of the tools in the turret. This NC sequence can also use either a Standard
Punch or a library part.
• Punch UDF—Create punches by referencing Punch or Notch features in the
reference model. This NC sequence can only use the tool of type Punch defined
by the Punch or Notch feature section.
To Create a Punch NC Sequence by Referencing Datum Points
1. In the SMT MFG MACHINING dialog box, click NC Seq.
2. Click New > Punch Point. The SMT NC SEQUENCE dialog box and the
TURRET SETUP dialog box open.
3. Select one or more of the following options:
o Name—Specify a name for the NC sequence. This name replaces the
default NC sequence name.
o Parameters—Specify manufacturing parameters.
o Comment—Specify comments about the NC sequence.
o Info—Displays a summary of the NC sequence and parameter information.
o Next—Go to the next NC sequence.
o Preview—View the NC sequence using the SMT MFG NCL PLAYER.
4. In the TURRET SETUP dialog box, define the tool and click Done.
5. To specify datum points, click PUNCH PNTS > Add. The SEL PNCH PNT menu
appears. Select one of the following options:
o Select—Selects existing datum points.
o Create—Creates datum points on the fly. Datum points created using this
option belong to the workpiece.
6. Click Remove in the PUNCH PNTS menu to clear selected datum points.
7. Click Show in the PUNCH PNTS menu to highlight datum points that are
currently included in the NC sequence.

Pro/NC-SHEETMETAL
TM
- Help Topic Collection
72
8. If required, click CL Command and click Define. This inserts new CL commands
at selected hits.
9. Click Done.
To Create a Punch NC Sequence by Referencing Tool Shape
For this type of NC sequence, the punch locations are determined by matching the
reference part geometry (edge contours) with the shape of the tool. Define the tool
shape either by the tool parameters or the tool part geometry. A good example of
this NC sequence is using a round punch to punch all the existing holes of a certain
diameter: once the tool shape is specified, all the holes that can be punched with it
are selected automatically.
The system performs partial matching as well, i.e., matches a circular tool to all arcs
with the same radius, including those on the outer contour of the reference part (i.e.,
Notches).
Note: This type of Punch NC sequence can also be created automatically using the
Auto Tool option.
1. From the SMT MFG MACHINING dialog box, select the NC Seq tabbed page.
2. Click New > Tool shape. The SMT NC SEQUENCE dialog box opens and the
SELECT PART menu appears. The following options are available:
o Name— Enter a name for the NC sequence. This name replaces the default
NC sequence name.
o Parameters—Specify manufacturing parameters.
o Comment—Use the system editor to enter comments about the NC
sequence.
o Info—Displays a summary of NC sequence and parameter information.
o Next—Go to the next NC sequence.
o Preview—View the NC sequence using the SMT MFG NCL PLAYER.
3. From the TURRET SETUP dialog box, define the tool and click Done.
4. Click Select from the SELECT PART menu. Select an appropriate reference part.
The system finds all edge contours that match the tool shape and generates a
default tool path by creating a hit at each matching location. If no matches are
found an error message is displayed.
5. Click Done.
6. To use any of the optional elements, choose the one you want, then click Define.
The following options are available:
o Remove Hits—Select hits to be deleted from the tool path.
o Change Order—Change the order of the strokes and hits within the stroke.
o CL Command—Insert CL commands at selected hits.

Foundation Modules
73
7. Click Done.
To Create a Punch NC Sequence by Referencing Punch Features
Each Punch or Notch feature has a specific tool that defines its shape. The system
prompts you to enter the tool name and symmetry flag when you define the group
for a Punch feature creation. This tool information, as well as the coordinate system
included in the section sketch, is used in creating a Punch NC sequence. All Punch or
Notch features included in the NC sequence must have the same tool information.
1. From the SMT MFG MACHINING dialog box, click NC Seq.
2. Click New > Punch UDF. The SMT NC SEQUENCE dialog box opens and
SELECT PART menu appears.
3. Select one or more of the following options from the SMT NC SEQUENCE dialog
box:
o Name—Specify a name for the NC sequence. This name replaces the
default NC sequence name.
o Parameters—Specify manufacturing parameters.
o Comment—Specify comments about the NC sequence.
o Info—Display a summary of the NC sequence and parameter information.
o Next—Go to the next NC sequence.
o Preview—View the NC sequence using the SMT MFG NCL PLAYER.
4. Define punch element.
5. Select a reference part to create a Punch NC Sequence.
6. Select punches to create a Punch NC Sequence.
7. Click Done Sel.
8. If required, click CL Command and click Define. This inserts new CL commands
at selected hits.
9. Click Done.
Contouring NC Sequences
About Contouring
Contouring is a manufacturing NC sequence that enables you to cut along a selected
contour. Sheet Metal Manufacturing provides two types of Contouring NC sequences:
• Laser—Use laser/plasma cutting.
• Flame—Use flame cutting.

Pro/NC-SHEETMETAL
TM
- Help Topic Collection
74
The user interface for these NC sequences is the same. The parameter files and tools
for the two NC sequence types are interchangeable.
CL data output for the Contouring NC sequences differs in the following way:
For Laser contouring, POWER / ON is output at the beginning of the cut motion and
POWER / OFF
is output at the end.
For Flame contouring, TORCH / ON is output at the beginning of the cut motion and
TORCH / OFF
is output at the end.
To Create a Contouring NC Sequence
1. From the SMT MFG MACHINING dialog box, click NC Seq.
2. Click NEW > Contouring (you must be in a Contouring or Hybrid workcell). The
SMT NC SEQUENCE dialog box and the SMT CUT MOTION dialog box open.
3. Select one or more of the following options from the SMT NC SEQUENCE dialog
box:
o Name—Specify a name for the NC sequence. This name replaces the
default NC sequence name.
o Parameters—Specify manufacturing parameters.
o Comment—Specify comments about the NC sequence.
o Info—Displays a summary of the NC sequence and parameter information.
o Next—Go to the next NC sequence.
o Preview—View the NC sequence using the SMT MFG NCL PLAYER.
4. In the SMT CUT MOTION dialog box, select the desired edge, chain or loop and
click Done.
5. Specify the Contour Definition as follows:
o Contour Type—Select Outer or Inner contouring.
o Use Offset—Select to use offset for contouring.
o Flip direction—Click to flip the direction of contouring.
o Use CutCom—Select to use cutter compensation.
o Start Edge—Click Select and select the edge for starting the contouring.
o Select a point on the X-Y axes to start contouring.
o Lead in—Selects the point at which contouring starts.
First Point—Contouring starts at the first point of the start edge.
Middle Point—Contouring starts at the middle point of the first edge.
Foundation Modules
75
6. To use any of the optional elements from the SMT NC SEQUENCE dialog box,
select the one you want, and click Define. You can select one or more of the
following options:
o Approach/Exit—Specify the approach and exit motions.
o Corner Conditions—Add a corner condition for NC Sequence.
o Shakeaway Points—Specify the shake-away points.
o CL Command—Insert CL commands at selected hits.
7. Click Done.
To Add a Corner Condition for a Contouring NC Sequence
1. From the NC Seq tabbed page, select the desired NC sequence.
2. Click OPERATE > Redefine. The SMT NC SEQUENCE dialog box opens.
3. Select Corner Conditions and click Define. The CORNER CONDITIONS dialog
box opens.
4. Click the type of Concave Corners and Convex Corners that you want to apply
to the part and specify the required values for the corresponding corners.
5. If required, click
and set the dwell time.
6. Click Preview to view the results.
7. Click Corner Info.
8. Use
or
to highlight a specific corner. Highlighted corners can be edited or
deleted as required.
9. If required, highlight a specific corner and click Delete to delete the corner.
10. Click Done.
To Specify Shake-Away Points
1. From the SMT NC SEQUENCE dialog box, click Shake Away and click Define.
The SMT SHAKEAWAY dialog box opens.
2. Specify the shakeaway Width and Offset.
3. If desired, select Automatic Creation and enter the shakeaway distance.
4. Alternatively, click Add New. Select a shake-away location (chain endpoints are
not allowed) within the selected chain of edges. Enter the shakeaway distance.
5. If desired, click Delete and select one of the following:
o Delete Sel.—Delete Shakeaway point by selection.
o Delete Last—Delete latest created shakeaway point.

Pro/NC-SHEETMETAL
TM
- Help Topic Collection
76
o Delete All—Delete all shakeaway points.
6. Click Done.
To Specify the Approach and Exit Motion
1. From the NC Seq tabbed page, select the required NC sequence.
2. Click OPERATE > Redefine. The SMT NC SEQUENCE dialog box opens.
3. Select Approach/Exit and click Define. The APPROACH/EXIT MOTION dialog
box opens. Select one or more of the following options:
• Click the type of Lead In position that you want.
o First Point of Start Edge—Starts the cut at the first point of the start
edge.
o Middle Point of Start Edge—Starts the cut in the middle of the start
edge.
• Click the type of Approach Motion that you want, and specify the required
values, if any, into the corresponding boxes.
o None—Uses the default approach motion.
o Linear—Sets the desired approach distance and angle.
o Tangent—Sets the desired approach radius and angle.
• Click the type of Exit Motion that you want, and specify the required values, if
any, into the corresponding boxes.
o None—Uses the default approach motion.
o Linear—Sets the desired approach distance and angle.
o Tangent—Sets the desired approach radius and angle.
4. Click Preview to view the results.
5. Click Done.
Dimension Patterns
Dimension patterns of Contouring NC sequences can be created if the NC sequence
contains a cut motion with dimensions that can be used to drive the pattern.
Reference Patterns
You can create a reference manufacturing pattern when the NC sequence to be
patterned references a patterned feature. The functionality is similar to creating
Reference patterns of features in regular Pro/ENGINEER.

Foundation Modules
77
NC sequences with a sketched cut section may be Reference patterned only if the
section sketch for the NC sequence is created with Use Edge and references edges
of a patterned feature.
After you pattern an NC sequence (using either pattern type), an Automatic material
removal feature based on it can be reference patterned.
Autocontouring
About Autocontouring
Autocontouring is an advanced system of sheet metal contouring. Autocontouring
allows you to automatically create laser or flame contouring NC sequences to cut all
the features of single or nested parts. The workcell parameters in Autocontouring are
used to automatically create NC sequences. These NC sequences include approach
and exit motions, corner conditions, and shakeaways that can be manually
manipulated.
Example: Approach punches can automatically be added at pierce locations for
approaches or shakeaways.
To Create an Autocontouring Sequence
1. From the SMT MFG MACHINING dialog box, click NC Seq.
2. Click Auto > Contouring. You must be in a Contouring or Hybrid workcell. The
SMT NC SEQUENCE dialog box and the CONTOUR SELECTION dialog box
open.
3. Select one or more of the following options from the CONTOUR SELECTION
dialog box:
o Selection Method—Select Automatic or Manual contouring method.
o Show—Show selected contours.
o Use Contours—Select to process Inner or Outer contours.
o Use Offset—Click this check box to use offset.
o Total—Displays the number of contours found.
o Selected—Displays the number of contours selected.
o Start Edge—Click Select and select the required edge, chain, or loop, and
click Done.
4. To use any of the optional elements from the SMT NC SEQUENCE dialog box,
select the one you want, and click Define. Select one or more of the following
options:
o Approach/Exit—Specify the approach and exit motions.
o Corner Conditions—Add a corner condition for NC Sequence.

Pro/NC-SHEETMETAL
TM
- Help Topic Collection
78
o Shakeaway Points—Specify the shake-away points.
o Cutter compensation—Specify the cutter compensation.
5. Click Done.
To Specify Cutter Compensation
1. In the SMT NC SEQUENCE dialog box, click Cutter compensation, and click
Define. The CUTTER COMPENSATION dialog box opens.
2. Click the Use CutCom check box.
3. Specify values for Register, Tangent, and Normal.
4. Click Done.
Shear NC Sequence
About Shear NC Sequences
The Shear NC sequence creates a point-to-point tool path along a sketched contour.
The tool path is broken down into smaller elements called strokes that in turn are
broken down into hits. Hits are the smallest elements of the tool path. Hits indicate
each location where the tool makes contact with the workpiece and removes
material. A succession of hits along an entity of the sketched contour composes a
stroke. When the tool path is generated, strokes appear as a series of hits connected
by a line. The distance between the hits is calculated based on the actual tool size.
Use the OVERHANG_DIST parameter to specify the distance by which each hit overlaps
the previous one. By default, the tool path along each entity in the sketched contour
is equal to the length of the entity. You can specify shake-away points or vertices
and overhang vertices, where the tool path is, respectively, trimmed or extended by
a specified distance, similar to Nibble Edge NC sequence. These distances are defined
by NC sequence parameters SHAKEAWAY_DIST and OVERHANG_DIST.
Shearing NC sequences can be performed using either a Standard Punch type tool,
or a special Shear type tool, that has width equal to zero. Use the CYCLE/SHEAR
command to output the tool path. Other manufacturing parameters for Shear NC
sequences are similar to those for Nibble Edge.
To Create a Shear NC Sequence
1. From the SMT MFG MACHINING dialog box, select the NC Seq tabbed page.
2. Click New > Shear. The SMT NC SEQUENCE dialog box opens. The following
options are available:
o Name—Enter a name for the NC sequence. This name replaces the default
NC sequence name.
o Parameters—Specify manufacturing parameters.

Foundation Modules
79
o Comment—Use the system editor to enter comments about the NC
sequence.
o Info—Displays a summary of NC sequence and parameter information.
o Next—Go to the next NC sequence.
o Preview—View the NC sequence using the SMT MFG NCL PLAYER.
3. From the TURRET SETUP dialog box, define the tool and click Done. The
sketcher window appears.
4. Sketch the shear NC sequence location. The sketch must contain a single
continuous non-intersecting chain of entities, open or closed. If you are using a
Shear type tool, the sketched contour must consist of straight lines only. Select a
reference in the References dialog box. Click Done.
5. To use any of the optional elements, choose the one you want, then click Define.
The following options are available:
o Shake Away—Specify the shake-away points.
o Overhang—Specify the overhang points.
o CL Command—Insert CL commands at selected hits.
6. Click Done.
To Specify a Shakeaway Definition
1. From the SMT NC SEQUENCE dialog box, click the Shake Away element and
click Define. The Shakeaway Definition dialog box opens.
2. Click Add.
3. Select a vertex within the selected chain of edges. You cannot select chain
endpoints. The Length Ratio of the vertex is displayed.
4. If required, you can change the length ratio of the selected vertex.
5. Type the Shakeaway Distance.
6. Click OK.
Slitting NC Sequences
About Slitting NC Sequences
The Sheet Slitting NC Sequence allows you to cut scrap sheetmetal material into
manageable pieces for unloading. After you finish cutting and punching the required
parts from a sheet, a big flimsy remnant of unused material remains on the machine.
This unused material may contain sharp corners and edges and may be difficult and
dangerous to handle.

Pro/NC-SHEETMETAL
TM
- Help Topic Collection
80
Using the Laser Slitting Sequences, you can create straight line cuts on the unused
material and break the material into smaller, manageable pieces.
To Create a Slitting NC Sequence
1. In the SMT MFG MACHINING dialog box, click NC Seq.
2. Click New > Slitting. The SMT NC SEQUENCE dialog box opens.
3. Select one or more of the following options from the SMT NC SEQUENCE dialog
box:
o Name— Specify a name for the NC sequence. This name replaces the
default NC sequence name.
o Parameters—Specify manufacturing parameters.
o Comment—Specify comments about the NC sequence.
o UD Pprint—Specify user defined PPrint statement
o Info—Display a summary of the NC sequence and parameter information.
o Next—Go to the next NC sequence and not Slitting NC Sequence.
o Preview—View the NC sequence using the SMT MFG NCL PLAYER.
4. To define a tool for the Slitting NC Sequence, select Tool in the SMT NC
SEQUENCE dialog box and click Define. The TURRET MANAGER and TOOL
SETUP dialog boxes open.
5. Select the Laser type of tool and click Done.
6. Select Cut Lines in the SMT NC SEQUENCE dialog box and click Define. The
SMM SLIT DEFINE dialog box opens.
7. Specify cut lines to slit the scrap material.
Use the following to provide details about the cutting lines along which the laser
slitting should occur:
o Cut Axis—Defines the slitting lines orientation along the x- or y-axis.
o Stock Allow—Specifies the permissible amount of stock distance. The
slitting occurs at the specified distance away from the cut parts. This is to
avoid any damage to the cut parts.
o Definition—Defines the cut lines to create a slitting tool path. You can
define the cut lines by using by number, manually, or by offset.
The default is by number. In the Number of slits box, type a value to
specify the number of cut lines. A Slitting NC Sequence is created with the
specified number of equally spaced cut lines.
To define the offset distance between cut lines, select by offset in the
Definition box. Type a value in the Offset between slits box to specify
the distance between the cut lines. A Slitting NC Sequence is created with
Foundation Modules
81
the specified offset distance between consecutive cut lines and from the
first edge of the sheet. The number of cut lines are calculated based on the
specified offset distance and the sheet size.
To specify cut lines at the desired locations on the sheet, select manually
in the Definition box. A table appears at the bottom of the SMM SLIT
DEFINE dialog box listing each cut line to be created. Specify details about
the cut line and the offset distance between each of them in the table. Use
the thumbwheel to adjust the value.
Use
or
to add or remove items, respectively, from the table. Click
OK.
8. Select Scan Type in the SMT NC SEQUENCE dialog box and click Define. The
SMM SCAN TYPE dialog box opens.
9. Define a direction for the slitting tool path scan using the following options:
o Move Directions—Specifies the scan direction while slitting.
One—Scans in one direction only while slitting.
Both—Scans in both directions wile slitting.
o Start Corner—Select a corner for starting the scan for slitting.
10. If required, click CL Command and click Define. This inserts new CL commands
at the selected points.
11. Click Done.
Manufacturing Parameters
Setting Parameters
You can access manufacturing parameters, by clicking MFG PARAMS > Options.
You can select these parameters when you create, modify or redefine an NC
sequence.
You can either set all the parameters for an NC sequence manually, one-by-one,
automatically, or initialize the parameters file from the database.
To Initialize the NC Sequence Parameters
There are several ways to initialize the NC sequence parameters:
• If a site, corresponding to the type of the NC sequence, has been activated
(whether by associating it to the workcell or by using the Activate option), it is
automatically used to initialize the parameters. You can use the Site option in the
Mfg Params menu to retrieve parameters of another site appropriate for the
current NC sequence. Note that retrieving site parameters does not activate the
site for subsequent NC sequences.

Pro/NC-SHEETMETAL
TM
- Help Topic Collection
82
• If parameters have been set at the operation level, they are carried over to the
NC sequence level automatically.
• Retrieve an existing NC sequence-specific parameters file. Click Retrieve from
the Mfg Params menu and select a file name from the Data Files menu. This
menu contains all the appropriate type files in the current directory, or in the
library directory, if set. If the file resides in another directory, select Names and
enter path and name for the file to be retrieved. The search will be started in the
pro_mf_param_dir
directory, if set; otherwise, in your current working directory.
Note: If the retrieved file contains some parameters inapplicable to the current
NC sequence, these parameters are listed in the INFO window.
• Retrieve the set of parameters used for the previous NC sequence. The Use Prev
option is available only after you have created at least one NC sequence.
Note: You can use the Set option at any time to modify the parameter values.
Parameter Inheritance
All levels of manufacturing features automatically inherit their parameters from an
upper-level feature, unless you explicitly modify (customize) a parameter at the
current level. That is, Cut Motions and Tool Motions inherit their parameters from the
parent NC sequence, while NC sequences may (under certain circumstances) inherit
their parameters from sites.
The following the rules apply to the NC sequence parameter inheritance:
• If, at the time of creating an NC sequence, a site of appropriate type is
associated with the current workcell, the NC sequence will inherit the parameters
of this site. This is called implicit inheritance. If you later modify the parameters
of the site, the NC sequence parameter values will be updated accordingly. Also,
if you later replace the associated site with another one, or change the workcell
associated with the operation, the NC sequence parameters will update to the
values in the new site associated with the workcell.
• If you initialize the NC sequence parameters using a site other than the one
associated with the workcell, then the NC sequence will inherit the parameters of
this site. This is called explicit inheritance. If you later modify the parameters of
the site, the NC sequence parameter values will be updated accordingly.
However, changing the site associated with the workcell, or the workcell itself,
will not affect the parameters of this NC sequence.
• If you initialize the NC sequence parameters using the Retrieve option in the
SMM PARAMETERS dialog box, these parameters will be marked as customized.
• Click the Parameters option from the SMT NC SEQUENCE dialog box. The SMM
PARAMETERS dialog box appears. If you modify parameter values using this
dialog box, parameters will be marked as customized.
Parameters marked as inherited will updated automatically all the way down if you
change a parameter value at the upper level. However, if you have explicitly
modified a parameter value at a certain level, this parameter will be marked as
customized and will not change when you modify parameters at an upper level.

Foundation Modules
83
Customized parameters can also be inherited by the lower-level features. In other
words, if you modify CUT_FEED at the NC sequence level, it will no longer change if
you later modify CUT_FEED in the parent site file, but the Cut Motion CUT_FEED will
update to the new NC sequence value (unless you explicitly customize it at the Cut
Motion level, too).
When you look at the parameters of an NC sequence, Cut Motion, or Tool Motion, the
inherited parameter values appear in parentheses. However, if you save a
parameters file to disk, this file will list all the parameters without parentheses
(because when you retrieve this file into another NC sequence or Cut Motion, these
parameters will be marked as customized).
Modifying the NC Sequence Parameters
The Parameters option from the SMT NC SEQUENCE dialog box enables you to set
or modify parameters for the NC sequence. If you have initialized the parameters, all
or some of the parameter values are filled. You can then modify them to suit this
specific NC sequence.
To Include a Parameter in a Relation
1. From the SMT MFG MACHINING dialog box, click Setup > Relations. The
Relations menu appears.
2. Under Look in, select the required element.
3. Select the reference part or the workpiece or both to display dimensions in
symbolic form.
4. Click Parameter > Add Parameter and specify the relation using the required
parameters, dimensions, or expressions.
5. Click OK.
To Set or Modify NC Sequence Parameters
1. From the SMT MFG MACHINING dialog box, select the NC Seq tabbed page.
2. Select the desired NC sequence.
3. Click OPERATE > Redefine. The SMT NC SEQUENCE dialog box opens.
4. Click Parameters. The SMM PARAMETERS dialog box opens with a complete
set of parameters corresponding to the NC sequence type. The parameters are
listed under branches that can be collapsed or expanded.
5. Select the desired parameter. The value appears in the input panel at the top of
the dialog box. Depending on the parameter type, do the following:
• If the parameter has a numeric value, enter a new value and press <CR>.
You can enter a mathematical expression, which may contain other parameters in
the same NC sequence. For example, if you enter:
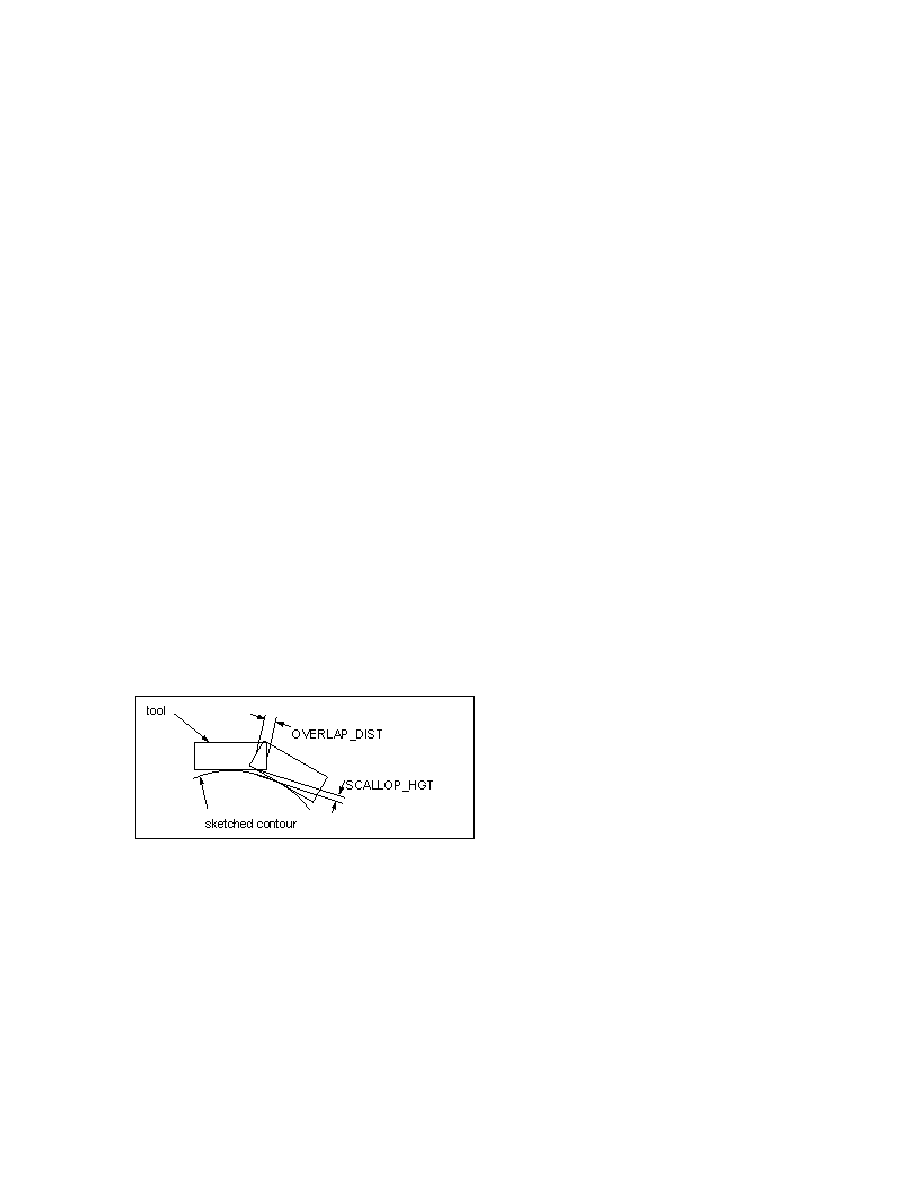
Pro/NC-SHEETMETAL
TM
- Help Topic Collection
84
OVERLAP_DIST LENGTH * 0.2
the overlapping distance is based on the size of the current tool (if the tool is
later changed, OVERLAP_DIST is also updated).
You can also include relations, model dimension symbols (in assembly format,
e.g., d12:0) and user-defined parameters that are already defined in relations for
the model.
• When modifying a parameter that has a string value, such as SCAN_TYPE, select
the arrow to the right of the input panel. A drop-down list appears with all
possible values for this parameter. Scroll to the value you want (to display it in
the input panel), then press <CR>.
6. To save changes, click FILE > Save.
7. Click FILE > Done to finish.
Shear Specific Parameters
Cut Parameters
SCALLOP_HGT
Together with OVERLAP_DIST, can be used to control the next tool position with
respect to the previous one (see SCALLOP_HGT and OVERLAP_DIST). The default
SCALLOP_HGT
is 0, in which case the respective tool positions are defined by the
OVERLAP_DIST
parameter value. If you specify a non-zero value for SCALLOP_HGT, the
system computes the overlap distance using this value, then compares it with the
OVERLAP_DIST
value you specified, and uses the lesser of the two.
SCALLOP_HGT and OVERLAP_DIST
OVERLAP_DIST
Defines the overlapping of successive tool hits. Specify OVERLAP_DIST as an absolute
value in the units of the workpiece. The default is 0.
MAX_OVERLAP_DIST
Enables you to specify the maximum overlapping of successive tool hits. Specify as
an absolute value in the units of the workpiece. The default is a dash (-),which
means to ignore.
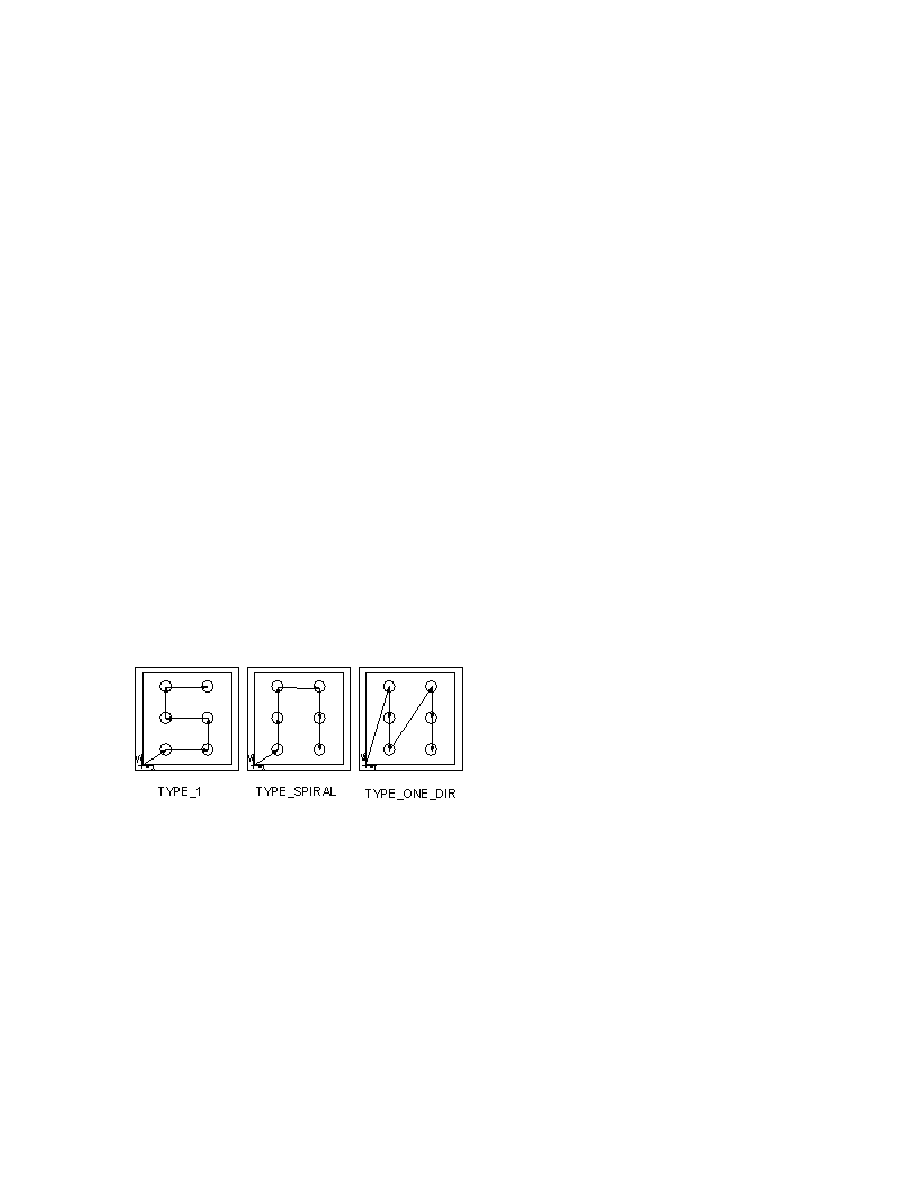
Foundation Modules
85
SHAKEAWAY_DIST
Defines the default distance to be left on both sides of a shake-away point or vertex.
Specify SHAKEAWAY_DIST as an absolute value in the units of the workpiece.
OVERHANG_DIST
Defines the default distance to go past the edge on each side of an overhang vertex.
Punch Specific Parameters
Cut Options
SCAN_TYPE
Defines how the system scans the punch instances:
• TYPE_1 (the default)—Increment the y coordinate and goes back and forth in the
x direction.
• TYPE_SPIRAL—Clockwise, starts from the instance nearest to the coordinate
system.
• TYPE_ONE_DIR—Increment the x coordinate and decrements the y.
The scan algorithm applies to the whole workpiece. It does not matter if the punch
instances belong to the same reference part or to different ones.
SCAN_TYPE
Machine
TOOL_ORIENT
Defines the angular orientation of the punch tool when creating a Punch NC
sequence referencing datum points. The default value is 0.

Pro/NC-SHEETMETAL
TM
- Help Topic Collection
86
Contouring Specific Parameters
Feeds
• CUT_FEED—The rate at which the tool moves into the workpiece. The default
CUT_FEED
is -1.
• CUT_UNITS—IPM (inches per minute-default), FPM (feet per minute), MMPM
(millimeters per minute), FPR (feet per revolution), IPR (inches per revolution),
MMPR (millimeters per revolution).
• ARC_FEED—Enable you to control the cut feed around arcs. If set to a dash (-)
(the default), the CUT_FEED value is used. If set to 0, the RAPID statement is
output before the CIRCLE statement.
• FREE_FEED—The feed rate used for rapid traverse (RETRACT_UNITS are used for
rapid feed rate units). If FREE_FEED is set to 0, the RAPID command is output to
the CL file. The default FREE_FEED is a dash (-), in which case the CUT_FEED is
used.
Cut Params
• STOCK_ALLOW—The amount of stock left after the NC sequence. The default is -1.
• SHAKEAWAY_DIST—Define the distance to be left on each side of a shake-away
point or vertex. SHAKEAWAY_DIST is specified as an absolute value in the units of
the workpiece.
• BURN_IN_OFFSET—Together with the tool parameter CUTTER_DIAM, defines the
trajectory of the center of the tool with respect to desired geometry. The default
is 0.
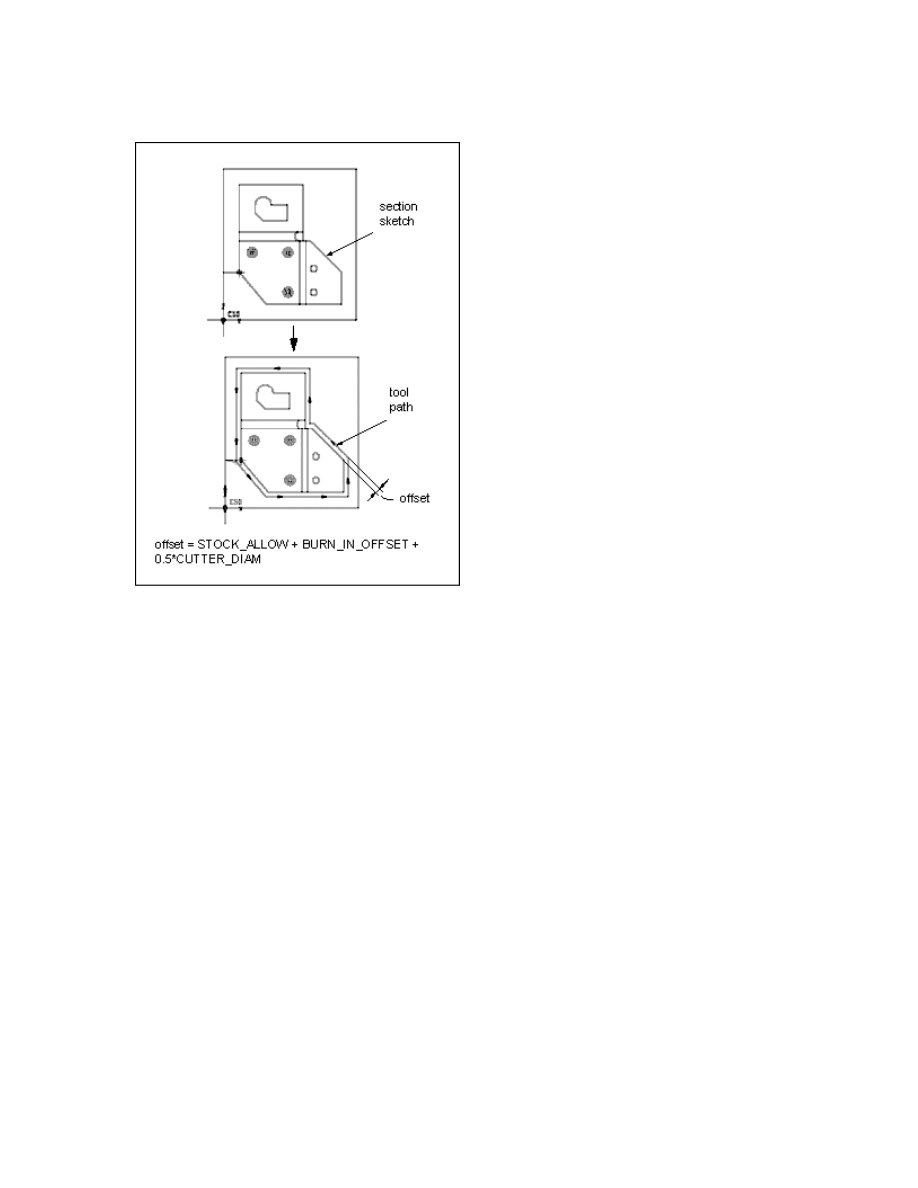
Foundation Modules
87
Offsetting the Tool Path
• CORNER_LENGTH—Define the size (the side length) of the parallelograms added to
the tool path when corner condition is specified. The default is 0.
• CORNER_ANGLE—For a sharp corner, the angle of the parallelogram equals the
angle between the adjourning entities, and the CORNER_ANGLE value is ignored.
However, if you add a corner condition between two tangent entities, the angle of
the parallelogram is defined by the CORNER_ANGLE parameter. The default is 0.
• CONCAVE_RADIUS—The radius for a round corner condition at a concave corner.
• CONVEX_RADIUS—The radius for a round corner condition at a convex corner.
• CHAMFER_DIM—The size of a chamfer for a chamfer corner condition.
Machine
• COOLANT_OPTION—ON, OFF (default), FLOOD, MIST, TAP, or THRU.
• COOLANT_PRESSURE—NONE (default), LOW, MEDIUM, HIGH.
CIRC_INTERPOLATION
Specifies the format in which the tool path along a circular edge is output to the CL
file. The options are:
• POINTS_ONLY (default)—Use this format for machines that have no interpolation.
The tool just moves along the edge, according to the tolerance value.
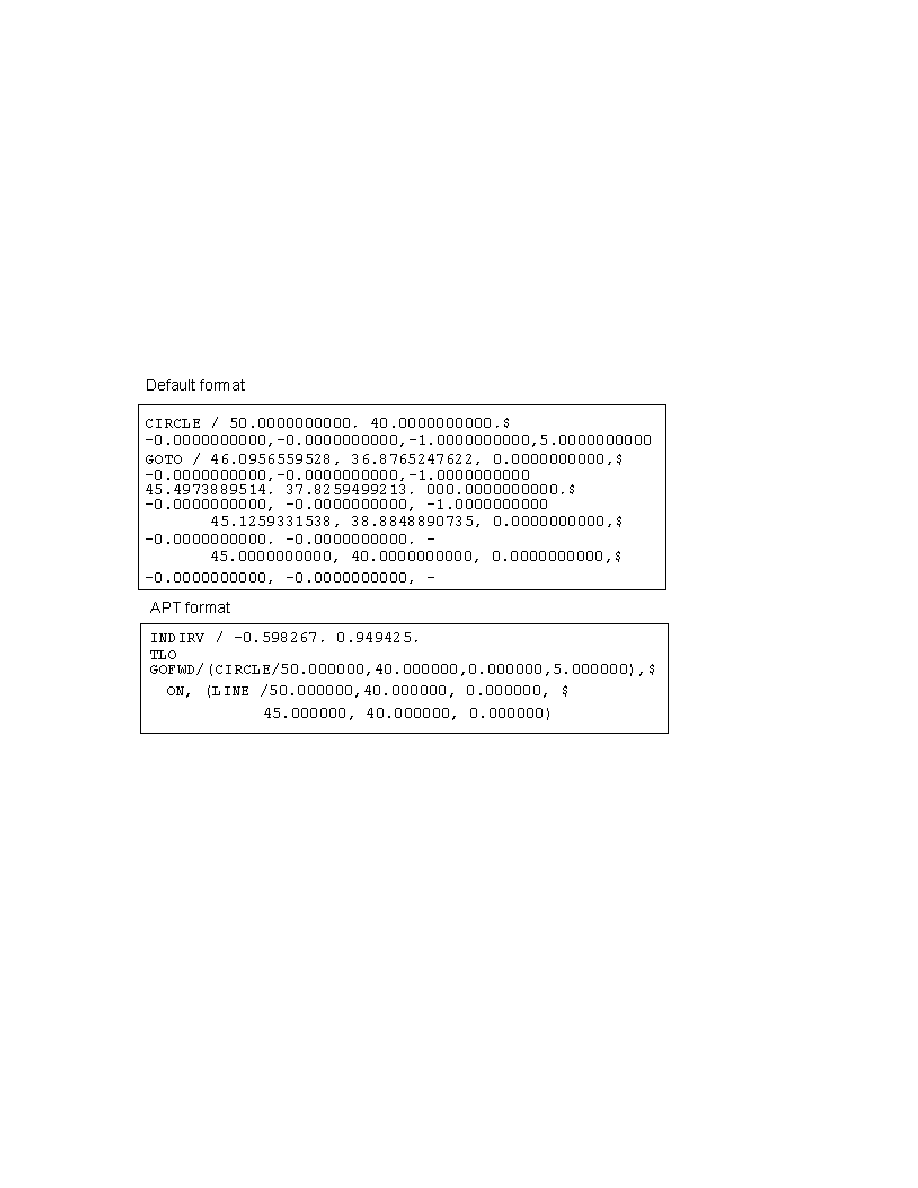
Pro/NC-SHEETMETAL
TM
- Help Topic Collection
88
• ARC_ONLY—Use this format for machines that have full circular interpolation. Only
the CIRCLE statement and the minimum number of points necessary for post-
processing are output to the CL file.
• POINTS_&_ARC—Use this format for machines that have incremental circular
interpolation. The CIRCLE statement and the maximum number of points
according to the tolerance value are output to the CL file.
• APT_FORMAT—Use it if your post-processor expects the CIRCLE statement to be in
the APT format. The default format for the CIRCLE statements in
Pro/MANUFACTURING is different from the APT format (see the following
illustration).
CIRCLE Statement Formats
• NUMBER_OF_ARC_PTS—Specify the number of points to be output to the CL file if
CIRC_INTERPOLATION
is set to ARC_ONLY. The default is 3.
• CUTCOM—Control tool compensation. Does not reverse material side if you reverse
direction. The options are:
o ON—turns on the tool compensation in the CL file. The compensation is
Right or Left, depending on CUT_TYPE and SPINDLE_SENSE.
o OFF (the default)—no tool compensation provided. CUTCOM statements are
not output for cut motions.
o Entry/Exit
• APPROACH_DISTANCE—Specifythe length of approach motions for Contouring NC
sequences. The default is 0.
• EXIT_DIST—Specify the length of exit motions for Contouring NC sequences. The
default is 0.
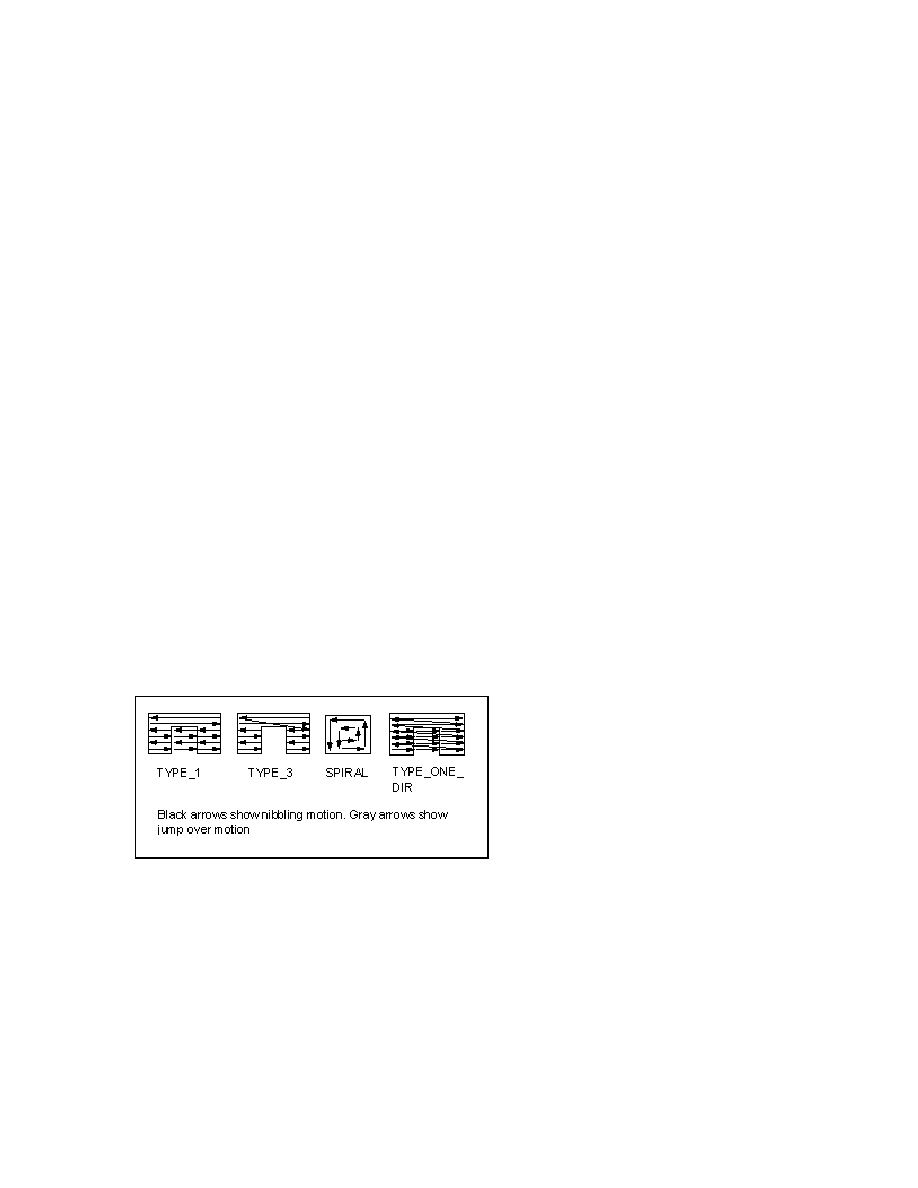
Foundation Modules
89
• ENTRY_ANGLE—Specifythe entry angle for a linear lead in, and the arc angle for a
radial lead in.
• EXIT_ANGLE—Specifythe exit angle for a linear lead out, and the arc angle for a
radial lead out.
• ENTRY_RADIUS—Specify the radius for a radial lead in.
• EXIT_RADIUS—Specify the radius for a radial lead out.
Nibble Area Specific Parameters
Cut Options
• SCAN_TYPE—Refer to the way the tool scans the sketched section and avoids
islands:
o TYPE_1—The tool continuously moves across the section, jumping over
encountered islands.
o TYPE_3—The tool scans continuous zones defined by the island geometry in
turn, moving around the islands. Upon completing one zone, the tool may
jump over to nibble the remaining zones.
o TYPE_SPIRAL—Generate a spiral cutter path.
o TYPE_ONE_DIR—The tool moves in one direction only. At the end of each
cutting pass it retracts and jumps over to the opposite side of the section,
to start the next pass in the same direction. Avoiding islands is the same as
in TYPE_1.
SCAN_TYPE
• ROUGH_OPTION—Control whether a profiling motion occurs during a Nibble Area
NC sequence. The options are:
o ROUGH_ONLY (the default)—Create an NC sequence where the tool scans the
whole area with no profiling.
o ROUGH_&_PROF—Create an NC sequence that scans the whole area, then
profiles the contour.
o PROF_ONLY—Only profiling is done. In this case, the STEP_OVER and
STEP_OVER_ADJUST
parameters are not used; the whole profile is machined

Pro/NC-SHEETMETAL
TM
- Help Topic Collection
90
using the SCALLOP_HGT, OVERLAP_DIST, and MAX_OVERLAP_DIST
parameters.
o STEPOVER_ADJUST—If set to YES (the default), adjusts the step-over distance
during the NC sequence to make both the beginning and the end of the cutter
path close to the sketched boundaries. The adjusted step-over distance does not
exceed the STEP_OVER value. If set to NO, no adjustment is made.
Cut Params
• STEP_OVER—Control the distance between the strokes (see SCALLOP_HGT and
OVERLAP_DIST
). The default STEP_OVER is -1.0.
• PROF_OVERLAP_DIST—Define the overlapping of successive tool hits for profile
nibbling. PROF_OVERLAP_DIST is specified as an absolute value in the units of the
workpiece. The default is 0.
• ROUGH_OVERLAP_DIST—Define the overlapping of successive tool hits for rough
nibbling. ROUGH_OVERLAP_DIST is specified as an absolute value in the units of the
workpiece. The default is 0.
• PROF_SCALLOP_HGT—Can be used to control both the distance between the
strokes and between the hits within a stroke for profile nibbling. The default
PROF_SCALLOP_HGT
is 0, in which case the distance between the strokes is
controlled by the STEP_OVER parameter, and the distance between the hits is
controlled by the PROF_OVERLAP_DIST parameter. If a non-zero value is specified
for PROF_SCALLOP_HGT, the system computes the step-over distance and the
overlap distance using this value, then compares, respectively, with STEP_OVER
and PROF_OVERLAP_DIST you specified, and uses the lesser value for each case.
• ROUGH_SCALLOP_HGT—Can be used to control both the distance between the
strokes and between the hits within a stroke. The default ROUGH_SCALLOP_HGT is
0, in which case the distance between the strokes is controlled by the STEP_OVER
parameter, and the distance between the hits is controlled by the
ROUGH_OVERLAP_DIST
parameter. If a non-zero value is specified for
ROUGH_SCALLOP_HGT
, the system computes the step-over distance and the
overlap distance using this value, then compares, respectively, with STEP_OVER
and ROUGH_OVERLAP_DIST you specified, and uses the lesser value for each case.
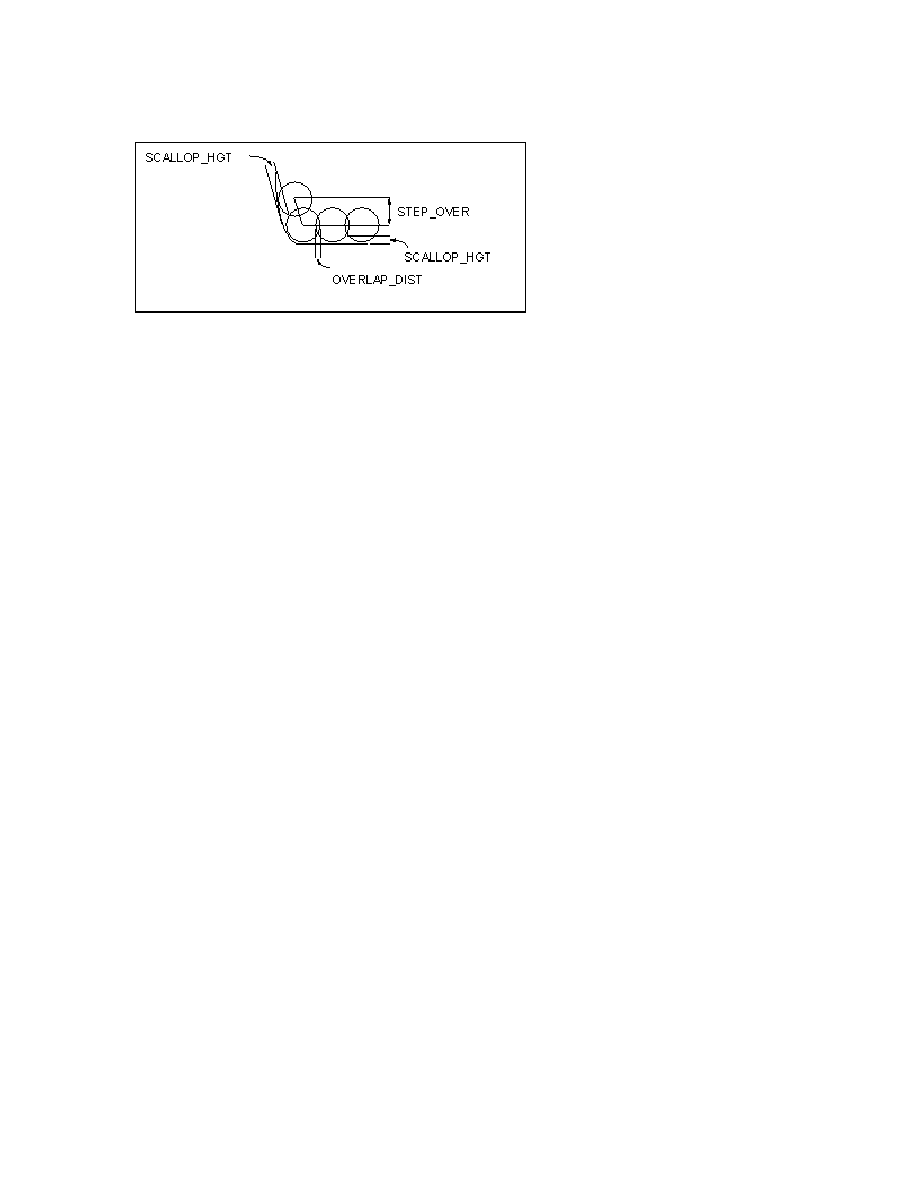
Foundation Modules
91
SCALLOP_HGT, STEP_OVER, and OVERLAP_DIST
Nibble Edge Specific Parameters
Cut Options
• OUTPUT_TYPE—Affects the CL Data output. If the value is POINT_BY_POINT (the
default), the cutter path is output as a sequence of GOTO statements. If the value
is CYCLE_NIBBLE, the tool path for linear entities is output using the
CYCLE/NIBBLE
commands. For example, the cutter path for a single straight edge
is output as follows:
o CYCLE / NIBBLE, n—(where n - number of hits, i.e., number of
punches to be made from the previous hit position to the
position specified by the subsequent GOTO statement)
o GOTO / x1, y1, z1—(to the beginning of the entity)
o GOTO / x2, y2, z2—(to the end of the entity)
o CYCLE / NIBBLE, OFF
Once a CYCLE/NIBBLE command is encountered, the same number of hits are
used for each subsequent GOTO statement until another CYCLE/NIBBLE command
or CYCLE/NIBBLE, OFF is reached.
Cut Params
• NE_SCALLOP_HGT—Together with OVERLAP_DIST, SCALLOP_HGT can be used to
control the next tool position with respect to the previous one (see SCALLOP_HGT
and OVERLAP_DIST). The default SCALLOP_HGT is 0, in which case the respective
tool positions are defined by the OVERLAP_DIST parameter value. If a non-zero
value is specified for SCALLOP_HGT, the system computes the overlap distance
using this value, then compares it with the OVERLAP_DIST value you specified,
and uses the lesser of the two.
• NE_OVERLAP_DIST—Define the overlapping of successive tool hits. OVERLAP_DIST
is specified as an absolute value in the units of the workpiece. The default is 0.
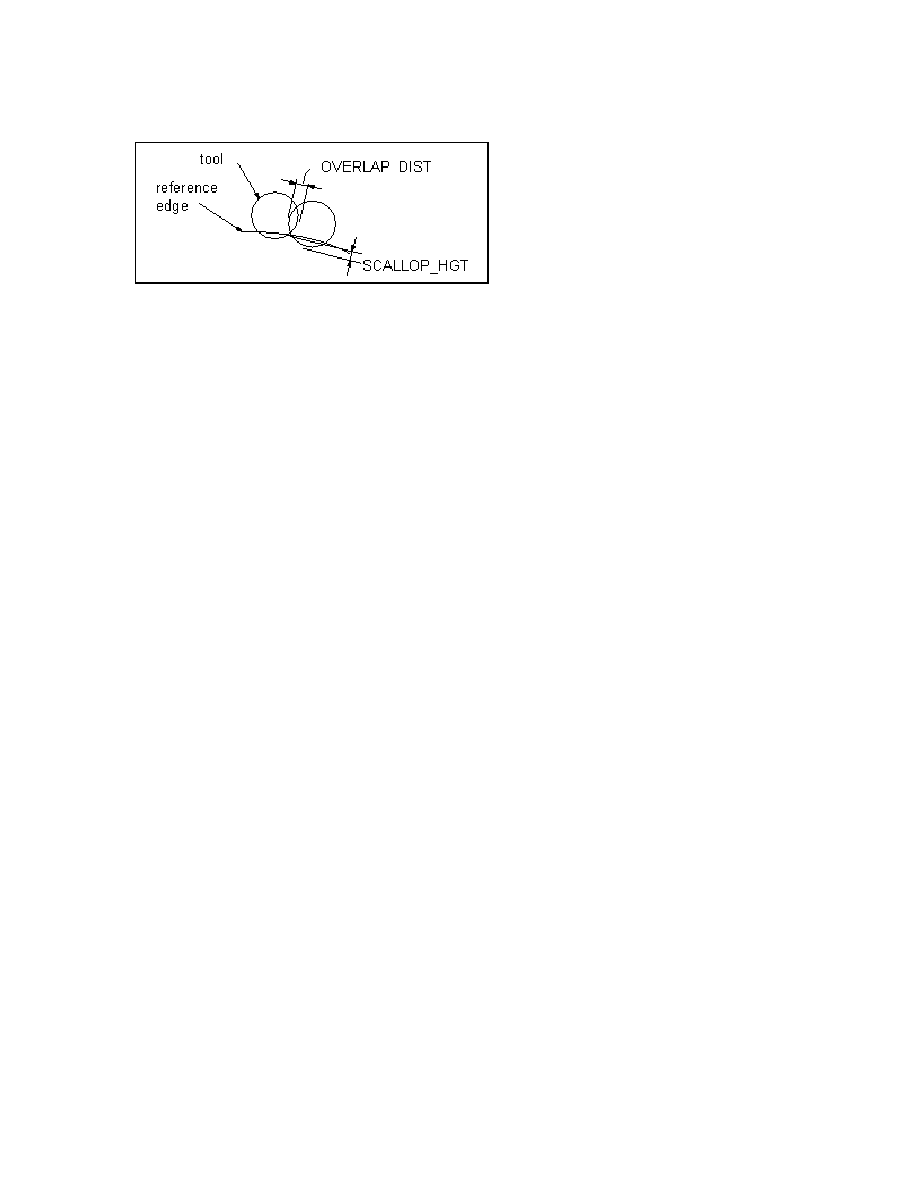
Pro/NC-SHEETMETAL
TM
- Help Topic Collection
92
SCALLOP_HGT and OVERLAP_DIST
• MAX_OVERLAP_DIST—Enable you to specify the maximum overlapping of
successive tool hits. It is specified as an absolute value in the units of the
workpiece. The default is a dash (-), which means to ignore.
• NE_SHAKEAWAY_DIST—Define the default distance to be left symmetrically on both
sides of a shake away point or vertex. This value can be modified individually for
each shake-away point or vertex. SHAKEAWAY_DIST is specified as an absolute
value in the units of the workpiece.
• NE_OVERHANG_DIST—Define the default distance to go past the edge on each side
of an overhang vertex. This value can be modified individually for each overhang
vertex. OVERHANG_DIST is specified as an absolute value in the units of the
workpiece.
Machine
• NE_LOCKED_TOOL_ORIENT—If the parameter is set to any value other than a dash
(-) (the default), only linear entities that require tool orientation equal to this
value are machined. The parameter value represents the angle to the X-axis of
the Machine Csys. For example, to machine all edges parallel to the X axis of the
Machine Csys, set LOCKED_TOOL_ORIENT to 0.
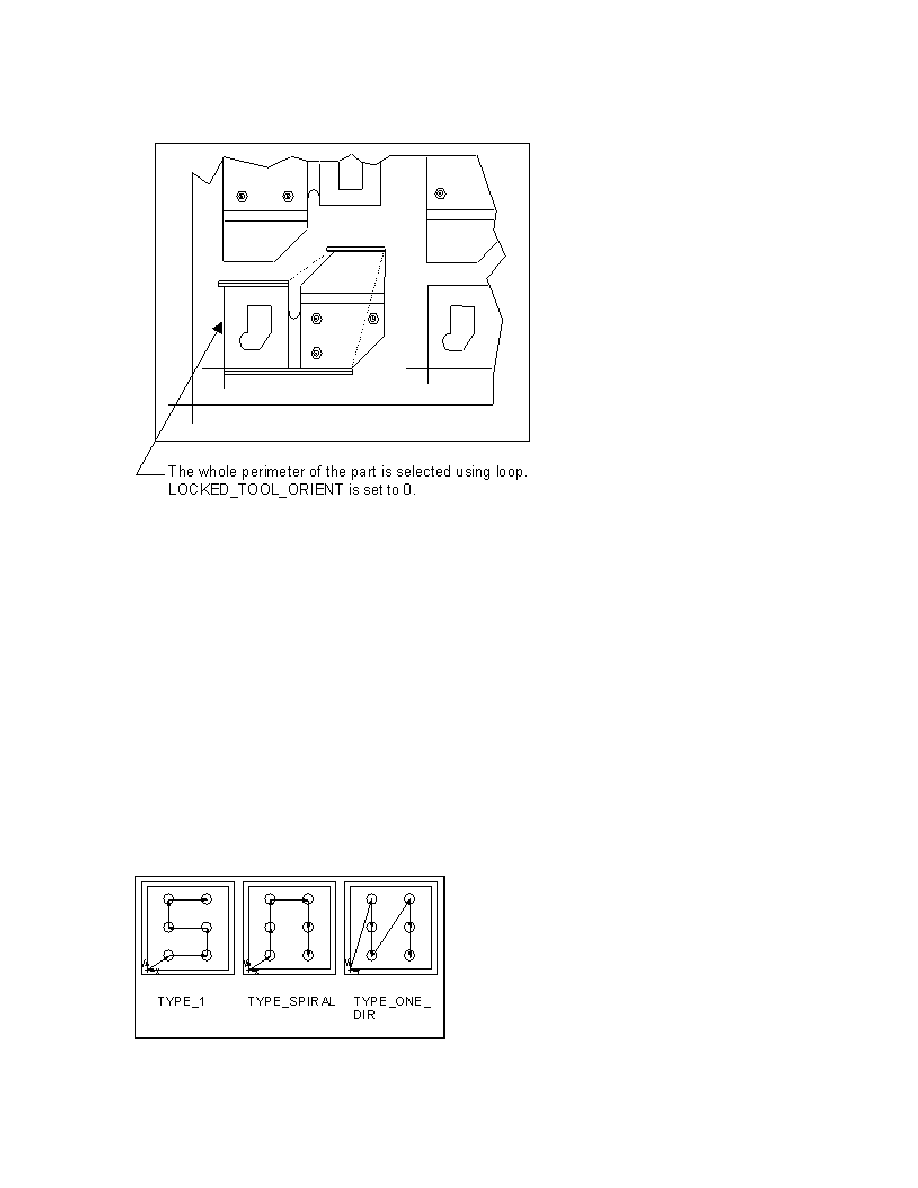
Foundation Modules
93
Machining Edges with Specified Orientation
Form Specific Parameters
Cut Options
• SCAN_TYPE—Define how the system scans the form instances:
o TYPE_1 (the default)—Increments the y coordinate and goes back and forth
in the x direction.
o TYPE_SPIRAL—Clockwise, starts from the instance nearest to the coordinate
system.
o TYPE_ONE_DIR—Increments the x coordinate and decrements the y.
o The scan algorithm applies to the whole workpiece. It does not matter if the
form instances belong to the same reference part or to different ones.
SCAN_TYPE

Pro/NC-SHEETMETAL
TM
- Help Topic Collection
94
Using Parameters in Relations
You can drive NC sequence and tool parameters by other parameters or part
dimensions using relations.
The NC sequence parameter syntax is:
Parameter syntax
Where
Example
PARAM_NAME:FID_#
PARAM_NAME
—the
parameter name
#
—the internal feature
ID of the NC sequence.
STEP_OVER:FID_22 =
d6:1 * 0.1
PARAM_NAME:TID_ID
PARAM_NAME
—the
parameter name,
ID
—the TOOL_ID.
STEP_OVER:FID_22 =
CUTTER_RADIUS:TID_NIB
1 * 1.1
If a parameter is driven by a relation, the system puts a note next to it in the
parameters file. If you modify a relation-driven parameter, the parameter value is
reset upon regeneration.
Options Tool Info and NC Seq Info in the Relations menu, accessible in
Manufacture mode only, facilitate using tool and NC sequence parameters in
relations. They display parameters (including ID) for a selected tool or NC sequence,
respectively.
Parameters Library
Your NC sequence parameters can be stored in a parameter library. They are
available to all users for retrieval into their manufacturing processes, to modify, or
set up new NC sequences. The configuration file option to use is:
pro_mf_param_dir <pathname>
Always enter the complete pathname to the parameter library in the configuration
file to avoid problems when you work in different directories with Pro/ENGINEER. For
example:
pro_mf_param_dir /usr/users/params
Workcell Parameters
Workcell parameters can be set, saved, and retrieved using the same procedures as
for NC sequence parameters. The default extension for a workcell parameter file is
.cel. The workcell parameters are the same for all workcell types. When you choose
Retrieve from the Mfg Params menu, only files with .cel extension appear in the
list.
The workcell parameters (except AUTO_POPULATABLE and TOOL_CHG_COMMAND) are for
information purposes only; they are not used for setting the NC sequence
parameters or CL data output.
The following parameters can be specified for a workcell:

Foundation Modules
95
• MACHINE_ID—The machine ID. The default is a dash (-).
• LOCATION—The machine location. The default is a dash (-).
• CONTROLLER—The controller name. The default is a dash (-).
• RAPID_FEED_RATE—The feed rate used for rapid traverse. The default is a dash (-
).
• RAPID_FEED_UNIT -- IPM (default), FPM, MMPM, FPR, IPR, MMPR.
• TOOL_CHANGE_TIME—Time needed for changing a tool. The default is a dash (-).
• CELL_X_MIN —Minimum size of a workcell along its x-axis.
• CELL_X_MAX—Maximum size of a workcell along its x-axis.
• CELL_Y_MIN—Minimum size of a workcell along its y-axis.
• CELL_Y_MAX—Maximum size of a workcell along its y-axis.
• CELL_MAX_FEED—Maximum allowable feedrate for the workcell.
• MAX_TURRET_SIZE—Maximum allowable turret size for the workcell.
• AUTO_POPULATABLE—If set to YES, all newly created NC sequences are
automatically included in the Populate feature. The default is NO.
• TOOL_CHG_TYPE—Defines the tool change type for the workcell: TURRET (default)
or CHANGER.
• TOOL_CHG_COMMAND—Specifies if tool rotation is to be considered a tool change
command when minimizing tool changes. Note that this parameter only affects
the default setting in the menu; you can make the appropriate selection directly
at the time of tool path optimization, independent of the setting of this
parameter. The values are LOAD (default) and LOAD_&_ROTATE.
Values for CELL_X_MIN, CELL_X_MAX, etc., should be the actual dimensions that
indicate the extent of the workcell relative to the machine coordinate system. For
instance, if a workcell is 60 inches wide, and the origin of the machine coordinate
system is located halfway between the ends, the value of CELL_X_MIN should be -
30 and the value of CELL_X_MAX should be 30.
If you display or otherwise output the CL data for an NC sequence that exceeds
the limitations of the workcell in which it is defined, the Information Window
appears. The window contains a list of the values of the limits that have been
exceeded and their corresponding actual values in the manufacturing model.
When you dismiss the Information Window, the CL data displays in its current
state.
• FROM_OUTPUT—Specifies how the FROM statement will be output to an operation
CL data file:
o NO_FROM_S (default)—No FROM statements are output. If a From point is
specified, its location is output as FREE_FEED, GOTO.

Pro/NC-SHEETMETAL
TM
- Help Topic Collection
96
o FIRST_FROM—A FROM statement is output at the beginning of the file. It
corresponds to the location of the From point, if specified, or to the first
location on the tool path for the first NC sequence. All other NC sequences
are added to the operation without a FROM statement. For a workcell with
two heads, there will be two FROM statements: one for Head1 and one for
Head2.
o ALL_SEQ_FROM_S—FROM statements are output at the beginning of each NC
sequence. For the first NC sequence, this FROM statement corresponds to
the location of the operation From point, if specified, or to the first location
on the tool path for this NC sequence.
Common Parameters
About Common Parameters
Those that are NC sequence-specific are listed in the appropriate NC sequence
sections. They are listed under a heading that corresponds to the menu options you
use to set up the parameters.
Notes:
• You must supply a value for all parameters that have a default of -1.
• Some parameters may have a value of dash (-) which means that the parameter
is not used
. Usually a system default or another parameter is used instead. The
dash (-) value is only acceptable for those parameters that have it as a default.
• Length units for NC sequence parameters (where applicable) are the same as the
units of the workpiece. If the workpiece units are changed using the Same Size
option (so that the dimension values are changed), all the appropriate
parameters of currently existing NC sequences are also scaled.
Name
• MACH_NAME—The machine name as required in post-processing.
• MACH_ID—The machine ID as required in post-processing.
• NCL_FILE—The prefix given to the CL file generated by the NC sequence.
• PRE_MACHINING_FILE—Enter the name of the file you want to include at the very
beginning of the CL file. The file must be located in your current working
directory and have the extension .ncl. The default is a dash (-), i.e., none.
• POST_MACHINING_FILE—Enter the name of the file you want to include at the
very end of the CL file. The file must be located in your current working directory
and have the extension .ncl. The default is a dash (-), i.e., none.
Cut Options
• APPROXIMATE_SPLINES—Indicate whether or not you want to approximate spline
edges with arcs when creating CL data output for edge nibbling or contouring NC
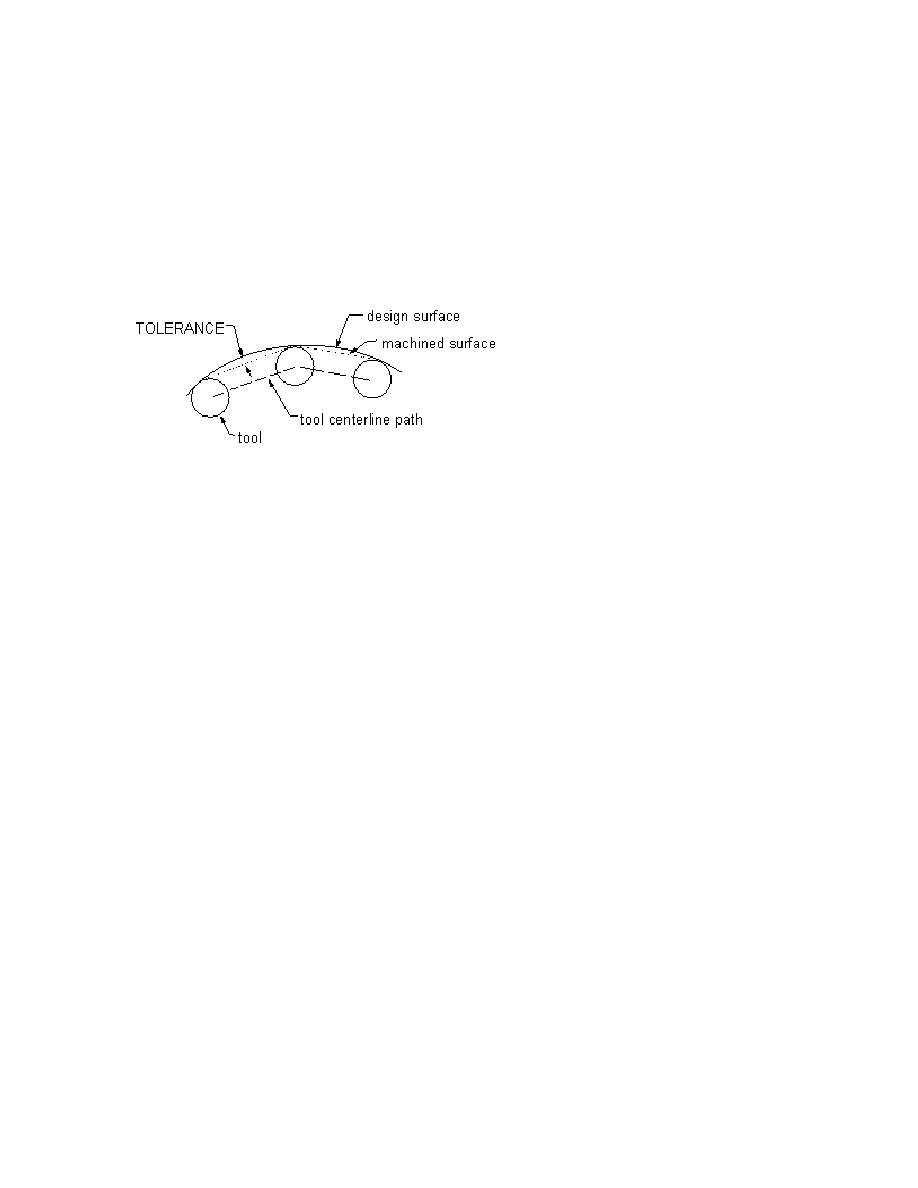
Foundation Modules
97
sequences. The default value is NO; if you specify a value of YES, the spline
edges are approximated.
Cut Params
• TOLERANCE—Machine tools move in small straight line increments to approximate
curved geometry. The maximum distance that the straight line path deviates
from the curved geometry is set by TOLERANCE. The default TOLERANCE is -1.
Cut Param Tolerance
Machine
• REQ_MACHINE_POWER—Specifies the amount of power necessary for an NC
sequence, and can be later used in relations. The default is 0.
Note: The REQ_MACHINE_POWER parameter is inapplicable for Contouring NC
sequences.
• TRAP_STATUS—Controls the output of the UNLOAD command to the NC sequence
CL file. If TRAP_STATUS is set to ON, the UNLOADcommand is output at the end of
the NC sequence. The default TRAP_STATUS is OFF.
Note: The TRAP_STATUS parameter is inapplicable for Contouring NC sequences.
• END_STOP_CONDITION—Specifies the stop command is issued at the end of the CL
data output for an NC sequence:
• NONE (default)—No command is issued.
• OPSTOP—The OPSTOPcommand is issued.
• PROGRAM_STOP—The STOP command is issued.

Pro/NC-SHEETMETAL
TM
- Help Topic Collection
98
CL Output and Menus
CL Commands
About CL Commands
The SMM CL Command dialog box enables you to include specific post-processor
commands for NC output. These commands are output to the NC sequence CL file. If
you add a tool motion command, the corresponding motion is shown in the tool path
display on the screen.
When entering CL commands, you can enter parameters, preceded by an ampersand
sign (&). If there is a corresponding parameter defined in relations, its value is used
in the CL command. If the parameter is not found, the system prompts you to enter
the type and value of the parameter, and this parameter is added to the relations.
This way, the CL command can be changed at the top level (through Relations).
To Find a CL Command
1. Click the NC Seq tabbed page from the SMT MFG MACHINING dialog box.
Select an NC sequence.
2. Select CL Command and Define. The SMT CL COMMAND dialog box appears.
3. From the Command List window, select the desired command ID.
4. Click EDIT > Find. The FIND LINE dialog box opens.
5. Enter a search string and click Find.
Note: If a block of commands has been added, only the first command appears
in the search list, followed by the number of lines in the block. For example, if
you choose FEDRAT/1.000000, IPR (2 lines) from the namelist menu, locations
of all two-line blocks that start with the FEDRAT/1.000000, IPR command are
shown, even if the other commands in the block are different.
To Insert a New CL Command
1. From the SMT NC SEQUENCE dialog box, select the CL Command element and
click Define. The SMM CL COMMAND dialog box opens.
2. Type the command name in the Command ID window.
3. Using the Command Wizard, select the desired commands. You can edit
commands in the Command Edit Area window.
4. Place the CL command using the placement buttons. The following options are
available:
o
—Click the tool path to select the command placement. You can pick
anywhere on the tool path as it is defined so far; note that you cannot click
a cut motion that is not yet incorporated in the tool path.

Foundation Modules
99
o
—The CL command is output before the first cutter position of the NC
sequence (or the first cutter position of the operation if you are optimizing
an operation tool path).
o
—The CL command is output after the last cutter position of the NC
sequence (or the last cutter position of the operation if you are optimizing
an operation tool path).
5. Click FILE > Save to save the CL command.
6. Click FILE > Quit to finish.
Supported CL Data Commands
If you add multiple command lines at a certain point, they are treated as a "block"
i.e., you are able to move, copy, or delete only the whole block of command lines.
You can specify only one CL command at the beginning or end of the tool path (it can
have multiple lines). Therefore, if you repeatedly try to select the Beginning or End
option, a message informs you that a command already exists at this location, and
you can modify it. Use the Command option in the MODIFY CMD menu to add the
appropriate lines to the existing CL command, as described below.
To Delete a CL Command
1. Click the NC Seq tabbed page from the SMT MFG MACHINING dialog box.
Select an NC sequence.
2. Select CL Command and Define. The SMT CL COMMAND dialog box appears.
3. From the Command List window, select the CL command you want to delete.
4. Click EDIT > Delete. The CL command is deleted.
Note: If the selected location contains a block of commands, the whole block is
deleted.
To Modify a User-Defined CL Command
1. Select the NC Seq tabbed page form the SMT MFG MACHINING diaolg box.
Select the required NC sequence.
2. From the SMT NC SEQUENCE dialog box, select the CL Command element and
click Define. The SMM CL COMMAND dialog box opens.
3. Locations of the previously added user-defined CL commands are highlighted in
cyan. Select the command to modify from the Command List window.
4. Edit the CL command as desired in the Command Edit Area window.
5. Click FILE > Save to save the CL command.
6. Click FILE > Quit to finish.

Pro/NC-SHEETMETAL
TM
- Help Topic Collection
100
CL Data Files
About CL Data Files
Cutter Location (CL) data files are generated from the cutter paths specified within
Sheet Metal Manufacturing NC sequences. Each NC sequence generates a separate
CL file; you can also output a single file for a whole operation. These CL data files
can then be passed to machine-specific or generic post-processors for NC tape
generation or DNC communications.
Generating Machine Control Data (MCD) files is discussed in About Post Processing.
CL Data Library
You can automatically store your NC sequence CL data files in a CL data library. This
serves as a central collection point for the CL files produced. You can retrieve the CL
files from the CL data library post-process or re-display. The configuration file option
to use is:
pro_mf_cl_dir <pathname>
Always specify the complete path name to the CL data file library to avoid problems
when using Pro/ENGINEER in different directories.
CL Data Files
To access the CL data files, click CL Output from the SMT MFG MACHINING dialog
box.
NC Aliases
The NC Aliases command in the Setup menu in the SMT MFG MACHINING dialog
box enables you to establish aliases for CL commands. NC aliases are useful if the
post-processor that you use does not support the default CL commands output by
Pro/ENGINEER. The NC aliases substitute a command you provide into the CL data.
The NC alias may also include additional CL data associated with the command, as
well as dimensions, user-defined parameters, and text. NC aliases are saved in a file
with the extension ".ncd." NC alias files are stored automatically whenever the
manufacturing model is saved.
Four CL commands are supported for aliasing: MFGNO, PARTNO, LOADTL, PIERCE and
CLAMP
. You cannot enter additional CL commands into this list to assign them aliases.
NC aliases employ functionality similar to that of drawing notes: you can specify
dimensions, parameters, or other fields to be output in the CL command.
For example:
CL Command
(system default)
User Command (NC alias)
LOADTL
MACRO_LOAD : &nc_full_arg with &d1 and

Foundation Modules
101
¶m1 and ¶m2
where:
• LOADTL— default CL command output by Pro/ENGINEER. For this example, the
complete output statement is: LOADTL / 3, LENGTH, 5.0.
• MACRO_LOAD—CL command being substituted for LOADTL.
• &nc_full_arg— output that follows the / in the output. In this example, it is 3,
LENGTH
, 5.0 (
see above). The individual fields in this string can be output using
&nc_arg[arg_num] (with arg_num beginning at 1). For instance, &nc_arg2 would
output LENGTH.
• d1— dimension value.
• param1 / param2—user-defined parameters; & indicates that their values should
be displayed (as in drawing notes). For this example, the value of param1 is BLUE
and the value of param2 is GREEN.
The output in the CL data file reads: MACRO_LOAD : 3, LENGTH, 5.0, with 10.00 and
BLUE
and GREEN
Note: When you use Pro/TABLE to define an NC alias, it must be contained on a
single line.
To Save CL Data to a File
1. From the SMT MFG MACHINING dialog box, select the NC Seq tabbed page.
2. Select an NC sequence.
3. Click CL Output. The SMT MFG NCL PLAYER appears.
4. Click FILE > Save. The CL data is saved.
5. Click Close.
Note: A CL data file extension can be set to something other than .ncl. Use the
following configuration file option: ncl_file_extension <file extension>
(without ‘.’)
File extension length can be up to three characters. If you specify a longer file
extension, it is truncated and a warning is issued.
To View CL Data Files
1. From the SMT MFG MACHINING dialog box, select the NC Seq tabbed page.
2. Select the desired NC sequence.
3. Click CL Output. The SMT MFG NCL PLAYER appears.
4. Select NC Program Text. The NC sequence CL data is displayed.

Pro/NC-SHEETMETAL
TM
- Help Topic Collection
102
To Convert CL Files
The Pro/ENGINEER editor can handle lines up to 80 characters long. Therefore, the
CIRCLE
statements and GOTO statements with an axis (i, j, k vector) are broken in
two lines, with the continuation character ($) output automatically at the end of the
first line.
Before sending CL files to the post-processor, you might need to convert them to the
format without the continuation character using the command pro_ncl_cvt. To
convert CL files:
1. In the directory where your CL file resides, type:
pro_ncl_cvt
2. Type the CL file name.
3. Type a different name for the output file.
To Use Search in a CL Data File
1. From the SMT MFG NCL PLAYER, click Edit > Find. The FIND LINE dialog box
opens.
2. Type the search string and click Find.
To Input a CL Data File and Display the Tool Path
1. From the SMT MFG MACHINING dialog box, select the NC Seq tabbed page.
2. Select an NC sequence.
3. Click CL Output. The SMT MFG NCL PLAYER appears.
4. Click FILE > Open. The OPEN dialog box opens.
5. Select the desired CL data file.
6. Click Open.
To Output CL Data Using Pro/BATCH
1. In your system window, type [
pro_batch]. The system displays the Pro/BATCH
dialog window.
2. Typethe name of the batch file and the command to use with Pro/BATCH (that is,
the command you use to start up Pro/ENGINEER), in the appropriate input fields
at the bottom of the window.
3. Click File > Browse. The system displays the File Browser window.
4. Set the filter in the File Browser window to manufacture file (*.mfg). Select the
manufacturing model(s) and click Add Objects.
5. Add as many models as you want, then click Close Browser.
6. Highlight the manufacturing model entries in the Pro/BATCH dialog window.

Foundation Modules
103
7. From the main menu, click Options > Set Action > clfile. The system updates
the Action column for the selected objects to clfile.
8. Highlight a model entry and click Options > Set Option. The system displays
the Set Option - clfile dialog box.
9. Select type of output:
• By operation.
• By NC sequence.
10. If outputting by operation, enter operation name.
11. If outputting by NC sequence, select how you want to specify it:
• If selecting by name, click By Name and type the NC sequence name.
• If selecting by number, click By Number and type the NC sequence number.
12. Enter the name of CL file to output to.
13. Click OK.
14. Set up the other manufacturing models by repeating steps 8 through 13.
15. Save the batch file (File > Save).
16. Click Schedule > Start the task and specify the number of hours before the
system starts executing the file. Click OK.
17. Click File > Exit to exit from the Pro/BATCH dialog window.
To Output CL Data with Rotation or Translation
1. From the SMT MFG NCL PLAYER, click OPTIONS > Transform. The
TRANSLATE/ROTATE dialog box opens.
2. Click Rotate or Translate.
3. Type the value for rotation or translation and click Add.
Note: CL data rotations and translations are cumulative. You can repeat Steps 2
to 3 as many times as necessary to change the CL output location.
Miscellaneous CL Output Information
About PPRINT Setup
You must set up a PPRINT table to output sheet metal model information to CL files.
The PPRINT table contains all the items that can be output through PPRINT. The
status value determines if you want to output an item or not. Entering a Print value
will output the item. You can add an optional comment to be output along with the
item.
Pro/NC-SHEETMETAL
TM
- Help Topic Collection
104
Whenever you output CL data to file, the system checks the PPRINT table. If any flag
is set to yes and the appropriate information is available, the corresponding PPRINT
command outputs to the CL file.
1. Click Setup > PPRINT in the SMT MFG MACHINING dialog box to open the
SMM PPRINT SETUP dialog box.
Use To
Set the status value to
Print.
Set the status value to
Skip.
Add a comment to the
item.
To Set Up a PPRINT Table
From the SMT MFG MACHINING dialog box, click SETUP > PPRINT. The PPRINT
menu appears with the following options:
• Retrieve—Retrieve an existing PPRINT table from the current working directory.
• Save—Save the current PPRINT table for later use. The system prompts you for
the file name. The file has an extension .ppr and is stored in the current working
directory.
Whenever you output CL data to a file, the system checks the PPRINT table. If any
flag is set to YES and the appropriate information is available, the corresponding
PPRINT command outputs to the CL file.
The following items are output once per CL file:
• PART_NAME
• DATE_TIME
• SCALE
• TRANSLATE
• ROTATE
The following items are output once per operation:
• OPERATION_NAME
• OPERATION_COMMENTS
• UDF_NAME
• TURRET
The following items are output once per NC sequence:

Foundation Modules
105
• NC_SEQUENCE_NAME
• FEATURE_ID
• SEQUENCE_TYPE
• CUT_FEEDRATE_&_UNITS
• ARC_FEEDRATE_&_UNITS
• FREE_FEEDRATE_&_UNITS
• SCAN_TYPE
The following items are output once per LOADTL or TURRET statement:
• TOOL_NAME
• TOOL_COMMENTS
• TOOL_PARAMETERS
The TOOL_COMMENTS string is obtained depending on the type of the tool:
• In case of a Standard Punch, from the TOOL_COMMENT parameter in the
parameters file.
• In case of a Library part, from the part parameter TOOL_COMMENT.
• In case of a Form or a Punch, from the TOOL_COMMENT parameter of the
referenced feature (Form or Punch/Notch).
To Copy an Existing CL Command to a New Location
1. Click the NC Seq tabbed page from the SMT MFG MACHINING dialog box.
Select an NC sequence.
2. Select CL Command and Define. The SMT CL COMMAND dialog box appears.
3. From the Command List window, select the CL command you want to copy.
4. Click EDIT > Copy. A copy of the command, named Nameless, appears in the
Command List window.
5. Name, edit, and place the CL command as desired.
6. Click FILE > Save to save the CL command.
7. Click FILE > Quit to finish.
To Change the CL Display Status
1. From the SMT MFG NCL PLAYER, click Options. The following choices are
available:
• Display Tool—Select operations and NC sequences to display tool only.
• Display Path—Select operations and NC sequences to display path only.

Pro/NC-SHEETMETAL
TM
- Help Topic Collection
106
2. The display is updated.
To Include Pre and Post Machining Files
You can use parameters to specify the pre and post files. Under the Oper tabbed
page of the SMT MFG MACHINING dialog box, you can find these parameters. You
can include user-defined macros, like setting the post-processor registers, at the
very beginning and the very end of an NC sequence CL file, using the two
parameters:
• PRE_MACHINING_FILE—Enter the name of the file you want to include at the very
beginning of the CL file.
• POST_MACHINING_FILE—Enter the name of the file you want to include at the
very end of the CL file.
Enter file names without the extension. If you specify the file in the config.pro file
it should have the extension .ncl, or the default CL file extension.
The contents of these files are included in the CL file of the current NC sequence
between $$ —> BLOCK_START and $$ —> BLOCK_END. When you use the Input option
in the CL DATA menu to read a CL file, these contents are ignored.
Notes:
• Both of these files are included into a CL file before it goes to the post-processor.
• If these parameters are set at the operation level, pre- and post-machining files
are added to each NC sequence included in the operation.
Automation Data Files
About Automation Data Files
You can save sheet metal automation data files to be used for autonesting and
populating NC sequences. These automation files contain superfluous information not
required for implementation. Therefore, you must structure these files before
implementing all or some of the data into the SMT MFG Automation dialog box. A
standard ASCII file will allow you to import data from external MRP systems. The
following ASCII automation data files can be generated:
• Workpiece Size
• Control and default values
• Cluster Control
• Order List

Foundation Modules
107
Automated Data File Headings and Variables
Category Heading
Variable Name
Value
Description
WORKPIECE SIZE
Unit
Inch/ Foot / mm/cm/ m
Length
#.###
WP dimensions
Width
#.###
Thickness
#.###
Left
#.###
Border offsets
Right
#.###
Top
#.###
Bottom
#.###
Direction
Unused / X axis / Y axis
CONTROL AND DEFAULT VALUES
Quantity
#
Default quantities of parts

Pro/NC-SHEETMETAL
TM
- Help Topic Collection
108
Offset
#.###
Outer offset
HoleOffs
#.###
Internal hole offset
Rotation
Any / #.##
Flip
Yes / No
Allow part flip
Grain
Yes / No
Align to grain
View
Front / Top / ISO / Default
Part
Yes / No
Show part polygon
Rough
Yes / No
Show part rough polygon
Outline
Yes / No
Show cluster outline
CLUSTER CONTROL
Usage
Yes / No
Allow true shape nesting
Length
#.###

Foundation Modules
109
Nesting dims
Width
#.###
Factor
#
Quality factor
Use Hole
Yes / No
Allow part-in-part nesting
Hole Area
#.###
Minimum hole area for part-in-part
WORKCELLS AND OPERATIONS
Workcell Name
Name of workcell to be used
Operation Name
Name of manufacturing operation
ORDER LIST
Mfg Name
Part Name
File name
Can be dxf file name
Id
Ordered
#
No parts to nest
Priority
Offset
#.###
Part Outer offset
HoleOffs
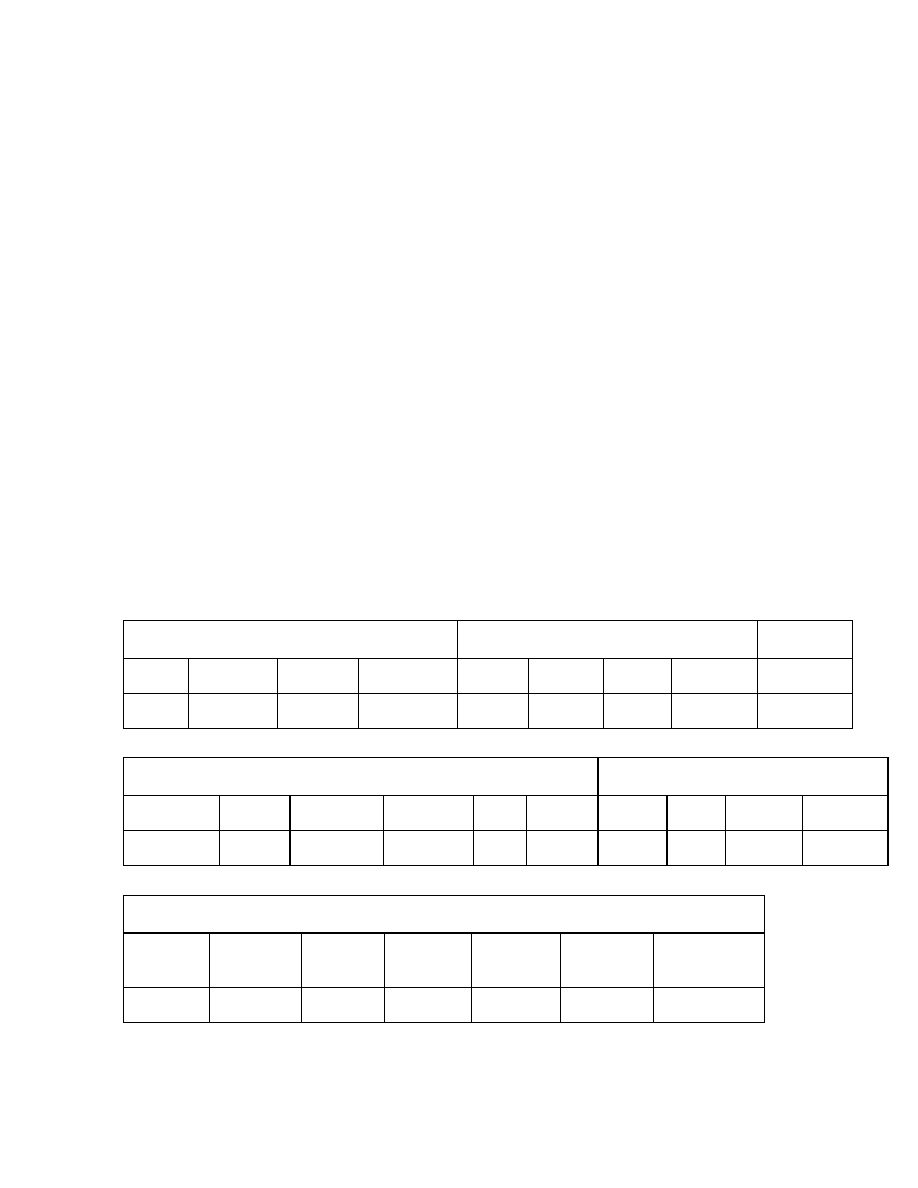
Pro/NC-SHEETMETAL
TM
- Help Topic Collection
110
#.###
Part internal hole offset
Rotation
#.##
Part rotation
Flip
Yes / No
Allow part flip
Grain
Yes / No
Align part grain
Nested
#
Example: Sheet Metal Automation Data Files
The following are examples of sheet metal automation data files.
WORKPIECE SIZE
WORKPIECE BORDER
GRAIN
Unit Length Width Thickness Left Right Top Bottom Direction
Inch 120.000 60.000 0.125
0.000 0.000 0.000 0.000 Unused
CONTROL AND DEFAULT VALUES
DEFAULT DISPLAY
Quantity Offset HoleOffs Rotation Flip Grain View Part Rough Outline
1 0.000
0.000 Any No
No
Front
Yes
No Yes
CLUSTER CONTROL
CLUSTERING
Usage Length Width Factor Use
Hole
Hole
Area
Complete
Yes - - 3 No
0.000 No
Foundation Modules
111
ORDER LIST
MAIN
Mfg Name
Part Name
Id
Ordered
-
-
-
DESIGN_PART_1
DESIGN_PART_2
DESIGN_PART_DFX
-
-
-
24
15
25
CONTROL RESULT
Priority Offset HoleOffs Angle Rotation Flip Grain Nested
-
-
-
-
-
-
-
-
-
0.000
0.000
0.000
-
-
-
No
No
No
No
No
No
24
15
25
Interactive Path Control
About Optimizing the Operation Tool Path
The Optimize option in the NC Seq tabbed page enables you to interactively
optimize the tool path for a whole operation:
You can optimize different portions of the operation tool path using different rules.
• The rules for automatic optimization include:
o Specifying the starting position for each set
o Minimizing tool change and tool rotations
o Minimizing tool travel
o Removing duplicate hits and cut lines
• The operation tool path can be sorted by:
o Order of creation of NC sequences
o Tool order
o Part order
Any portions of the tool path that are not automatically optimized can be optimized
manually using the Adjust Path functionality.

Pro/NC-SHEETMETAL
TM
- Help Topic Collection
112
If a Populate feature has been created, Optimize operates on the result produced by
Populate. It is therefore automatically reordered to come after Populate in the
workpiece feature sequence.
Note: The Rules and Order Seqs options are mutually exclusive. If you select Order
after the tool path has been optimized using Rules, you are prompted it you want to
delete the rules, and visa versa.
To Manipulate Optimization Sets
1. Click NC Seq in the SMT MFG MANUFACTURING dialog box.
2. Click Optimize > Create or Optimize > Redefine. The SMM OPTIMIZE dialog
box opens.
3. Use one or more of the following options to create and modify optimization sets:
o Remove Duplicate Hits—Removes duplicate punches in the tool path.
o Remove Duplicate Cut Lines—Removes duplicate laser cuts in the tool
path.
o Create—Defines a new optimization set.
o Delete—Deletes a previously defined optimization set.
o Modify—Modifies an existing optimization set using the OPTIMIZE Set
Edit dialog box.
o Reverse—Reverses the order of a selected optimization set.
o Order—Reorders a selected optimization set.
o Adjust Path— Use this functionality to manually optimize any portions of
the tool path that are not automatically optimized.
Remove Hits—Select hits using the REMOVE HITS dialog box. The
selected hits are removed from the tool path.
Reverse NC Seq—Select a tool path to reverse the NC sequence.
CL Command—Select a CL Command from SMM CL COMMAND dialog
box to adjust the tool path.
To Create an Optimization Set
1. From the NC Seq tabbed page, click Optimize > Create. The SMM OPTIMIZE
dialog box opens.
2. Click Create. Click Punch Optset or Contour Optset. The OPTIMIZE SET
EDIT dialog box opens. The dialog box lists NC sequence information and
contains the following options:
•
—Specify hits to include in the optimization set.
Foundation Modules
113
•
—Specify hits to exclude from the optimization set.
•
—Select hits by using the mouse on the screen.
•
—Select hits by using the mouse in the editor window.
• By Tool—Select all hits a certain tool performs (the tool names are listed in a
selection menu).
• By Part—Select all hits to machine a certain reference part. Use the GET SELECT
menu options to select the part.
• By Type—Select all hits that belong to a certain NC sequence type. The NCS
TYPES menu lists all Punch Press NC sequence types. Select the type you want.
•
—Select all hits.
3. Click Done to finish defining the optimization set.
To Specify Rules for Automatic Optimization of a Set
1. From the NC Seq tabbed page, click Optimize > Redefine. The SMM Optimize
dialog box opens.
2. Under Optsets, select a set or sets to optimize from the list. If one does not
exist, click Create to define a new set.
o To reorder the highlighted set or sets, click
or
in the SMM Optimize
dialog box.
o To define the optimization rules for the highlighted set or sets, click Order.
The SMM Order dialog box opens.
3. Adjust the order as necessary by selecting the appropriate box or boxes:
o Manual Order—Set priorities based on manual selections.
o Part Priority— Set priorities based on type using the movement arrows.
An item at the end of the list has minimal priority.
o Tool Change—The system minimizes tool changes and group index
(ROTATE /) moves within a tool change based on whether Rotate&Load or
Load Only is selected. The TOOL_CHG_COMMAND workcell parameter
value defines default selection.
o Tool Travel—The system uses the concept of Next Closest to minimize
tool motion between hits. Depending on the option selected, the system
automatically goes to the next closest sequence, stroke, or hit.
Note: You can inverse the order of Tool Change and Tool Travel by clicking
.
4. Click Specify to further define the optimization rule behavior.

Pro/NC-SHEETMETAL
TM
- Help Topic Collection
114
5. Click OK.
To Create or Redefine an Operation
1. Click Oper in the SMT MFG MACHINING dialog box.
2. If some operations have already been set up, a namelist menu appears with the
names of all existing operations. The current operation is highlighted. Click
Operate > Redefine to redefine the operation.
3. Click Wrkcell in the SMT MFG MACHINING dialog box. Select one or more of
the following options:
o Create—Set up a new workcell.
o Retrieve—Retrieve a previously defined workcell into the manufacturing
process.
o Csys—Specify a coordinate system for CL data output.
o Comments—Add operation comments (see below).
o Parameters—Initialize parameters at the operation level. The parameters
that you can initialize at this point are: NCL_FILE, PRE_MACHINING_FILE,
and POST_MACHINING_FILE.
o Zones—Specify machine zone for the workcell.
4. Click the Wrkcell tab in the SMT MFG MACHINING dialog box to choose a
workcell associated with an active operation.
5. Select the required workcell.
6. Click the Oper tab. The workcell name is displayed next to the operation.
CL Command Syntax Menus
About CL Command Syntax Menus
Sheet Metal Manufacturing provides you with an ability to manually add commands
to CL data when customizing the tool path for an NC sequence.
There are three ways to input a CL command:
• Menus—Build the command by selecting APT keywords from the system-supplied
or user-defined menus, and entering necessary values. As you select a command,
you can follow it with the optional specifiers, or choose QUIT OPTIONS to
complete the command and move to the next line.
• Keyboard—Enter it from the keyboard. If the entered line is invalid, you will get
the error message.
• From File—Read in a file containing the CL command lines.
This appendix describes using the syntax menus.
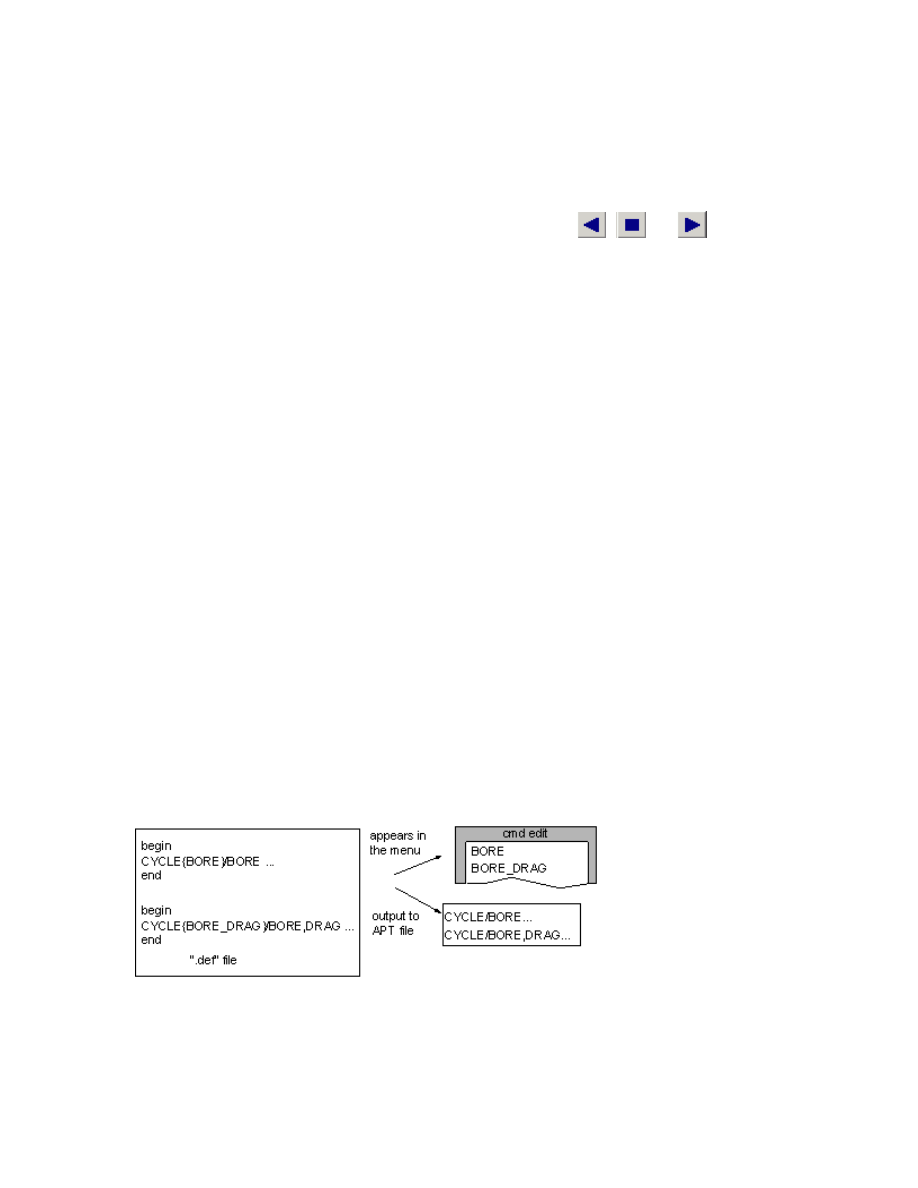
Foundation Modules
115
Using the Syntax Menus
The keyword menus are built according to the APT syntax. The Command Wizard
window of the SMM CL COMMAND dialog box represents a topical index. Selecting
an option from this menu brings up another menu containing all major keywords for
selected topic. Nothing is output to the APT file yet. If you change your mind, or
cannot find the desired keyword in this topic, you can use
,
, or
to return
to the main menu, then select another topic. Selecting an option starts outputting an
APT command. You cannot quit until the command is completed. If you are not
satisfied, delete or change the erroneous line.
Each option a major APT keyword. If there are parameters required (such as point
coordinates, etc.), you will be prompted accordingly. Enter values for these
parameters. These are optional, so you can specify as many as you like. If the
completed command contains an error, you will get an error message.
Creating Definition Files
The rules for creating a menu definition file are:
• Each entry (except the first) must contain a valid APT syntax string, starting with
the word begin and terminated with the word end.
• The first entry, also contained between begin and end, must be the "topic name",
which will appear in the topic index cmd edit menu.
• The syntax string must start with a major keyword (such as CYCLE, GOTO, etc.). If
parameters (minor keywords or user input) are required, they must follow after
the slash (the slash may be replaced by a blank space).
Example: CYCLE/BORE
• If the parameter is a value that should be input at run time, it must be preceded
with a pound sign (#).
Example: CLDIST/#CLDIST
• Normally, the major keyword will appear as the second-level cmd edit menu
option. However, you can specify a different word for the menu option, by
inserting it in curly brackets {} between the major keyword and the slash. For
example:
• All optional parameters should be included in square brackets [ ]. If an optional
parameter has attributes, they must be included in the same brackets. For
example: CYCLE/BORE[,RAPTO,#RAPTO_r]

Pro/NC-SHEETMETAL
TM
- Help Topic Collection
116
• If some of the options are mutually exclusive, they must all be included in the
same brackets, and separated by pipe "|". For example:
CYCLE/BORE[,IPM|,MMPM|,IPR|,MMPR,#FEDRAT_f]
• To specify multiple input, use "...". Any value followed by "..." will be prompted
for repeatedly, until you enter <CR> without supplying a value. For example:
CYCLE/AUTO,DEEPBK,#FEDTO_z,#FEDRAT_f[,INCR,#INCR_d...]
• To change the order of precedence when parsing the parameters, use
parentheses. The default order of precedence is from left to right. For example:
CYCLE/BORE[,IPM|,MMPM|,IPR|,(MMPR,#FEDRAT_f)
]
results in specifying the FEDRAT_f value only for MMPR, whereas without the
parentheses each of the mutually exclusive options will have the FEDRAT_f
attribute.
Syntax Reference Table
The following is a quick syntax reference table. See the set of rules above for
detailed usage explanations and examples.
Symbol Usage
/
Separates the major command word from the parameters
(minor keywords or user input). May be replaced by a
blank space.
,
Separates the parameters.
[] Encloses
optional
parameters.
|
Separates mutually exclusive parameters.
()
Changes the order of precedence when parsing the
parameters.
{}
Used to specify a menu option name other than the
major keyword.
# label
Precedes a parameter value that must be input at run
time. Label is used in the prompt.
<> label
Precedes a string of text that must be input at run time.
Label is used in the prompt.
...
Designates multiple input. The previous label will be
prompted for until a blank line is entered.
Menu Syntax
When creating your own definition files, keep in mind that the words appearing in the
cmd edit menus must comply with the Pro/ENGINEER menu syntax. Each item must
be unique in the menu. For example, if you have two different commands with the

Foundation Modules
117
same major keyword, specify an alternate name in the curly brackets {} for at least
one of them.
The maximum number of characters in a menu item allowed by the system is 19.
You may want to use only 12 characters to fit in the standard Pro/ENGINEER menu,
or modify your menu width.
Note: Because of proportional text width on SUN workstations, the number of
uppercase characters that will fit in the standard Pro/ENGINEER menu may be less
than 12.
Compiling Definition Files
When all the definition files are created, they must be compiled to transfer them to
the .syn files. The command to compile a definition file is:
pro_mcs_comp < filename.def
options:
-p
print the results. The menu tree of the compiled file will be output on the screen. If
there are any errors, the compiler will inform you, otherwise a message: Finish
(reading) NO ERRORS
will be output to the screen before the menu tree creation.
-i
specify the filename, pro_mcs_comp -i filename.def
The compiler creates the corresponding .syn file in your current directory.
Note: The pro_mcs_comp command is located in the obj subdirectory of the machine-
specific directory under the Pro/ENGINEER loadpoint, for example
proe/sun4/obj/pro_mcs_comp
.
Index File
The index file cmdsyn.ndx must contain the names (including the extension) of all
the .syn files created. This file basically defines the contents of the first, index, cmd
edit menu. The first entries of the files included in the cmdsyn.ndx file will appear
as options in the index cmd edit menu, and as you select an option, the appropriate
second-level cmd edit menu will be displayed.
To Customize Your Syntax Menus
1. Create the menu definition files. They must have an extension .def.
2. Compile the menu definition files to transfer them to the .syn files.
3. Include all the .syn file names into the index file cmdsyn.ndx.
To Change Feed Rate at Some Point Along the Tool Path
1. Select an NC Sequence. The SMT NC SEQUENCE dialog box opens.

Pro/NC-SHEETMETAL
TM
- Help Topic Collection
118
2. Click CL Command and click Define. The SMM CL COMMAND dialog box
opens.
3. Click a command and use
to place the CL command at the select point of the
tool path, or use
to place the CL command at the beginning of the tool path,
or use
to place the CL command at the end of the tool path.
4. Select Movement in Command Wizard window.
5. Select FEDRAT/.
6. Specify the required value for feed ratio.
7. Click Done.
System-Supplied Syntax Menus
Sheet Metal Manufacturing provides two sets of system-supplied menu structures:
ISO and AI. ISO is the default. If you want to use the AI menu structure, use the
configuration option:
pro_mfg_cmdsyn_dir proe/mfg_cmdsyn_ai
where proe is the Pro/ENGINEER loadpoint on your system.
Defining Your Own Syntax Menus
You can replace the system-supplied syntax menu structure (used to add lines in
editor) with your own.
The default directory for syntax menu files can be specified using the config.pro
option pro_mfg_cmdsyn_dir. Sheet Metal Manufacturing will look for the syntax files
in the following order:
1. in the current directory,
2. in the default directory, if it is set, and
3. in the system directory.
The system directory for the .syn files is proe/mfg_cmdsyn, where proe is the
Pro/ENGINEER loadpoint.
Naming Convensions
Naming Conventions
The following naming conventions are used in this optional module:
File Extension
File Type
.asm Assembly
file

Foundation Modules
119
.aux
Auxiliary parameter data file
.cel
Machine parameter data file
.dat
Data files created for editing, such as relations
data
.drw Drawing
file
.edm
Contouring parameter data file
.gph
User-defined feature file (including workcells)
.inf
Information data file
.memb
Assembly member information file
.mfg Manufacturing
process
file
.mtn
Tool motion parameter file
.ncd
CL syntax alias file
.nck
NC Check image file
.ncl
CL data file (including pre- and post-machining
files)
.plt Plot
file
.ppl
Route sheet data file
.ppr
PPRINT settings table file
.prt Part
file
.ptd
Part family table file
.sec Section
file
.shd
Shade display file
.sit
Site parameter data file
.smt
Parameter data file for all Punch Press NC
sequences
.tph
Tool path storage file
.tpm Tool
parameter
file


121
Index
A
About Autonibbling ....................... 70
About Part Order Control ............... 42
About SMT MFG MACHINING .......... 10
Activate
OPERATION............................... 49
Activate....................................... 49
Add
OVERHANG ............................... 64
SHAKEAWAY ............................. 75
Add .......................................64, 75
Add Part
NEST CELL ................................ 38
Add Part ...................................... 38
All
SET EDIT ................................ 112
All ............................................ 112
Alternate
WHICH REF ................................. 8
Alternate ....................................... 8
AngularIncr.................................. 38
Approach..................................... 76
APPROACH_DISTANCE .................. 86
APPROXIMATE_SPLINES ................ 96
ARC_FEED ................................... 86
AUTO_POPULATABLE..................... 94
Autocontouring........................77, 78
Automated Data File Headings and
Variables ................................ 107
Automation................................ 106
Autonesting
SMT MFG Automation dialog box ..40
Autonesting..................................40
B
Beginning
LOCATE CMD .............................98
Beginning.....................................98
Blank
ZONE SETUP..............................34
Blank...........................................34
BOM ............................................19
Build Path
including post ............................98
Build Path ....................................98
BURN_IN_OFFSET .........................86
By Names
ORDER SEQS .............................48
By Names ....................................48
By Part
SET EDIT ................................ 112
By Part ...................................... 112
By Parts
ORDER SEQS .............................48
By Parts.......................................48
By Tool
SET EDIT ................................ 112
By Tool ...................................... 112
By Tools
ORDER SEQS .............................48
By Tools.......................................48

Pro/NC-SHEETMETAL
TM
- Help Topic Collection
122
By Type
SET EDIT ................................ 112
By Type..................................... 112
C
CELL_MAX_FEED .......................... 94
CELL_X_MAX ............................... 94
CELL_X_MIN ................................ 94
CELL_Y_MAX................................ 94
CELL_Y_MIN ................................ 94
CHAMFER_DIM ............................. 86
CIRC_INTERPOLATION .................. 86
Circular interpolation..................... 86
CL Command ............................... 98
CL commands
defining syntax menus.............. 117
system ................................... 117
using syntax menus ................. 114
CL commands ............................ 114
CL data
library .................................... 100
using parameters....................... 98
CL data ................................ 98, 100
CL DATA menu ........................... 100
CL file ....................................... 100
cl_arrow_scale ............................. 29
Clustering
Defaults Tabbed Page ................. 41
Clustering.................................... 41
Comment
CELL SETUP .............................. 11
OPERATION............................... 14
SEQ SETUP................................14
Comment ............................... 11, 14
Common Parameters .....................96
Component ................................... 5
Compute CL .................................. 5
CONCAVE_RADIUS ........................86
Configure .....................................61
Contouring ............................. 73, 77
CONTROLLER................................94
CONVEX_RADIUS ..........................86
COOLANT_OPTION ........................86
COOLANT_PRESSURE ....................86
Coordinate system
change....................................... 6
Coordinate system ......................... 6
Corner Conditions .........................75
CORNER_ANGLE ...........................86
CORNER_LENGTH..........................86
Create
GROUP....................................... 8
SEL PNCH PNT ...........................71
WORKCELL ................................11
ZONE SETUP..............................34
Create ....................................... 112
Create Cell ...................................36
Creating the Sheet Metal
Manufacturing Model.................... 4
Csys
CELL SETUP ...............................11
Csys ............................................11
CUT_FEED....................................86

Index
123
CUT_UNITS.................................. 86
CUTCOM...................................... 86
D
Define
CELL ........................................ 38
GROUP ....................................... 7
Define ..................................... 7, 38
Del Multiply ................................... 6
Delete
WORKCELL................................ 12
ZONE SETUP ............................. 34
Delete ......................................... 12
Delete Cell ................................... 36
Delete Part
NEST CELL ................................ 12
Delete Part .................................. 12
Delete Set ................................. 112
Design model ................................. 4
Design UDF.................................... 7
Done Oper ................................. 114
Down
SORT LIST ................................ 48
Down .......................................... 48
Drag Part
NEST CELL ................................ 12
Drag Part .................................... 12
DragOrigin................................... 38
Duplication ......................... 111, 112
E
Edge
EDGE SEL TYPE ......................... 65
Edge ...........................................65
Editor Pick.................................. 112
End
LOCATE CMD .............................98
End .............................................98
END_STOP_CONDITION .................96
ENTRY_ANGLE ..............................86
ENTRY_RADIUS ............................86
Example Sheetmetal Automation Data
Files ....................................... 110
Exclude
SET EDIT ................................ 112
Exclude...................................... 112
EXIT_ANGLE.................................86
EXIT_DIST ...................................86
EXIT_RADIUS ...............................86
F
Fill Sheet .....................................13
Find
CL Command .............................98
Find ............................................98
Flame
WORKCELL ................................11
Flame .................................... 11, 73
Flame cutting ...............................73
Flip Allowance
Defaults Tabbed Page .................41
Flip Allowance...............................41
Form
AUTO TOOLING ..........................44
Form ...........................................44

Pro/NC-SHEETMETAL
TM
- Help Topic Collection
124
FREE_FEED .................................. 86
FROM_OUTPUT............................. 94
G
Global gouge avoidance
area nibbling ............................. 65
edge nibbling ............................ 67
Global gouge avoidance............65, 67
Grain Alignment
Defaults Tabbed Page ................. 41
Grain Alignment ........................... 41
I
Include
SET EDIT ................................ 112
Include...................................... 112
Increment
INCR TYPE ................................ 13
Increment ................................... 13
Info
ADJUST HITS ............................ 30
AUTO SELECT............................ 75
SMT OPTIMIZE .......................... 31
TOOL SETUP ............................. 24
Info ............................................ 36
L
Laser
WORKCELL................................ 11
Laser .....................................11, 73
LEAD_RADIUS.............................. 86
LinearIncr.................................... 38
List Files...................................... 61
Load
Order Tabbed Page .....................38
Load............................................38
LOCATION....................................94
LOCKED_TOOL_ORIENT .................91
M
Mach Csys
OPERATION ............................. 114
Mach Csys.................................. 114
MACH_ID .....................................96
MACH_NAME ................................96
MACHIN .......................................59
Machine maximums.......................94
MACHINE_ID ................................94
Machining zone .............................32
Make SMT MFG dialog box ..............37
Manufacture
assembly.................................... 3
clamps ......................................32
design model .............................. 3
machining process ....................... 9
machining zone ..........................32
manufacturing model ................... 3
NC sequence..............................43
parameters................................81
workpiece................................... 3
Manufacture .................................. 3
Manufacturing
Info ..........................................19
Manufacturing...............................19
MAX_OVERLAP_DIST .....................91
MAX_TURRET_SIZE .......................94

Index
125
Menus ....................................... 114
MFG PARAMS menu ...................... 81
mfg_modal_command_file ........... 117
Mod Assem .................................... 5
Mod Dim ....................................... 5
Mod Part ....................................... 5
Mod Ref......................................... 5
Mod Work ...................................... 5
Model Tree .................................... 2
Modify
WORKCELL................................ 12
ZONE SETUP ............................. 34
Modify....................................12, 34
Modify Dims................................... 6
Modifying the NC Sequence
Parameters ............................... 83
Move
SORT LIST ................................ 48
Move .......................................... 48
Multiply ......................................... 6
N
Name
CELL SETUP .............................. 11
OPERATION............................. 114
Name.......................................... 11
NC Aliases ................................. 100
NC Check .................................... 63
NC Seq Info ................................. 83
NC sequence
auxiliary ................................... 45
create ...................................... 43
initializing..................................81
modify ......................................46
slitting ......................................79
NC sequence ................................83
NCL_FILE .....................................96
ncl_file_extension ....................... 101
Nest ............................................36
Nest Info
NEST CELL ................................12
Nest Info......................................12
Next Closest
SET ORDER ...............................30
Next Closest .................................30
None
MFG UDF REF.............................. 7
PAT TYPE ..................................47
None ............................................ 7
Normal
REGEN TYPE ............................... 5
Normal ......................................... 5
Number
INCR TYPE.................................13
Number .......................................13
NUMBER_OF_ARC_PTS ..................86
O
Offsets
Defaults Tabbed Page .................41
Offsets.........................................41
Optimize .................................... 111
Outline Gap ..................................13
OUTPUT_TYPE ..............................91

Pro/NC-SHEETMETAL
TM
- Help Topic Collection
126
OVERHANG_DIST ......................... 91
OVERLAP_DIST ............................ 91
P
Parameter Inheritance................... 82
Parameters
CELL SETUP .............................. 11
common ................................... 96
using in relations ....................... 94
Parameters .................................. 83
Path
SMT Tool Path Display .............. 105
Path.......................................... 105
PID............................................. 59
Plasma cutting ............................. 73
Position
SORT LIST ................................ 48
Position ....................................... 47
Post Process ................................ 59
POST_MACHINING_FILE ................ 96
PProcessor................................... 59
PRE_MACHINING_FILE .................. 96
pro_mf_cl_dir ............................ 100
pro_mf_param_dir........................ 94
pro_mf_tprm_dir .......................... 25
pro_mf_workcell_dir ..................... 13
pro_mfg_cmdsyn_dir .................. 117
Punch
WORKCELL................................ 11
Punch ......................................... 11
Punch NC sequence
automatically created ................. 44
Punch NC sequence .......................71
Punch Point
PUNCH TYPE ..............................71
Punch Point ..................................71
Punch UDF
PUNCH TYPE ..............................71
Punch UDF ...................................71
R
RAPID_FEED_RATE........................94
RAPID_FEED_UNITS ......................94
Redefine Set............................... 112
RedefineCell .................................36
RedefMultiply................................36
Ref Part
MFG UDF REF.............................. 7
Ref Part ........................................ 7
Ref Pattern...................................44
RefModelFeat
AUTO TOOLING ..........................44
RefModelFeat................................44
REGEN TYPE menu ......................... 5
Regeneration
normal ....................................... 5
slow .......................................... 5
step........................................... 5
Regeneration ................................. 5
Remove Hits
ADJUST PATH ............................31
Remove Hits.................................31
Reorder
SET ORDER ...............................30

Index
127
Reorder ....................................... 30
REQ_MACHINE_POWER ................. 96
Retrieve
MFG PARAMS .............................. 4
SETUP FILE ............................... 39
WORKCELL................................ 11
Retrieve ............................. 4, 11, 39
Reverse
SET ORDER ............................... 30
Reverse....................................... 30
Reverse NC Seq ........................... 31
Rotate
CUT PATH ............................... 103
PAT TYPE .................................. 47
Rotate.................................. 47, 103
Rotation Angle
Defaults Tabbed Page ................. 41
Rotation Angle ............................. 41
ROUGH_OPTION........................... 89
Rules
OPT SETS ............................... 113
Rules ........................................ 113
S
Same
WHICH REF ................................. 8
Same ............................................ 8
Save
WORKCELL................................ 12
Save ........................................... 12
SCALLOP_HGT ............................. 91
SCAN_TYPE ................................. 89
Screen Pick ................................ 112
Select
LOCATE CMD .............................98
SEL PNCH PNT ...........................71
SET ORDER ...............................30
WORKCELL .............................. 114
Select ....................... 30, 71, 98, 114
Set
MFG PARAMS .............................83
Set..............................................83
Set up
manufacturing database ............... 9
manufacturing parameters...........81
PPRINT table.....................103, 104
Set up .......................................... 9
Setting Parameters........................81
Shakeaway............................. 75, 79
SHAKEAWAY_DIST .................. 86, 91
Show Set ................................... 112
Skip
WHICH REF ................................ 8
Skip ............................................. 8
Slow............................................. 5
SMT MFG Automation dialog box
Cancel ......................................40
Done ........................................40
Preview.....................................40
warning selection .......................39
SMT MFG Automation dialog box .....40
Stand Alone
UDF OPTIONS ............................. 7

Pro/NC-SHEETMETAL
TM
- Help Topic Collection
128
Stand Alone ................................... 7
Start
SET RULES.............................. 113
Start ......................................... 113
Step ............................................. 5
STEP_OVER ................................. 89
STEPOVER_ADJUST ...................... 89
STOCK_ALLOW............................. 86
Subordinate
UDF OPTIONS ............................. 7
Subordinate ................................... 7
Supp Fail ....................................... 5
T
To Control Part Nesting Order......... 42
To Control the Priority Weight ........ 42
To Create an Autonibbling Sequence 70
TOLERANCE ................................. 96
Tool
Setup ....................................... 24
SMT Tool Path Display .............. 105
Tool .......................................... 105
Tool Changes ............................. 113
Tool Info ..................................... 21
Tool Parameters
comment .................................. 21
corner radius............................. 21
holder size ................................ 21
indexability ............................... 21
name ....................................... 21
station...................................... 21
tool height ................................ 21
tool length.................................21
tool width ..................................21
Turret Setup dialog box...............21
type .........................................21
units.........................................21
Tool Parameters............................24
Tool Shape
AUTO TOOLING ..........................44
PUNCH TYPE ..............................71
Tool Shape ...................................25
Tool Travel ................................. 113
Tool Types
contouring.................................25
forming .....................................25
shear ........................................25
solid punch ................................25
standard punch ..........................25
ud punch...................................25
UDF punch ................................25
Tool Types ...................................25
TOOL_CHANGE_TIME ....................94
TOOL_CHG_COMMAND ..................94
TOOL_CHG_TYPE ..........................94
TOOL_ORIENT ..............................85
Tools
library.......................................25
Tools ..................................... 21, 25
Trace...........................................53
Translate
CL Data................................... 103
PAT TYPE ..................................47

Index
129
Translate ................................... 103
TRAP_STATUS.............................. 96
Turret Manager
copy line................................... 21
create ...................................... 21
customize screen ....................... 21
delete ...................................... 21
delete line................................. 21
Info menu................................. 21
modify...................................... 21
purge unused ............................ 21
retrieve .................................... 21
save......................................... 21
Tool menu ................................ 21
Utilities menu ............................ 21
where used ............................... 21
Turret Manager ............................ 21
U
Unblank ...................................... 36
Undo
SET EDIT ................................ 112
Undo......................................... 112
Up
SORT LIST ................................ 48
Up .............................................. 48
Use CurOper.................................. 8
Using Parameters in Relations.........94
V
Verbose .......................................53
W
Workcell
OPERATION ............................. 114
Workcell .................................... 114
Workcell Parameters......................94
Workpiece ..................................... 3
X
X Pattern
INCR TYPE.................................13
X Pattern .....................................13
XY Pattern
INCR TYPE.................................13
XY Pattern....................................13
Y
Y Pattern
INCR TYPE.................................13
Y Pattern......................................13
Z
Zones
CELL SETUP ...............................11
Zones ..........................................11

Wyszukiwarka
Podobne podstrony:
Pro Engineer Wildfire 2 0 Sheetmetal
Mechanika Plynow Lab, Sitka Pro Nieznany
Corel Paint Shop Pro X Obrobka zdjec cyfrowych cwiczenia
marcinstolp pro
Mechanika Budowli pro 2
algorytmy, programy, jezyki pro Nieznany (2)
Krakow nowapr1 nowa kryt1,2 pro Nieznany
fiz egzamin opracowanie pro
1d analiza interasariuszy, pro Nieznany
IDX PRO
katalog nobiles pro
aqua pro io pl 1109
Ansmann Powerline 4 Pro PL
Dolby Surround eller Dolby Surround Pro Logic
Gradiente PRO 2000
Pro Prochloraz 450 EC
więcej podobnych podstron