Building A Lemonade Stand Project Level: Advanced This brightly coloured refreshment cart will bring a taste of the Caribbean to any neighbourhood. Whether entertaining or selling lemonade kerbside, you and your kids can enjoy and use this project all summer. Lowe's is happy to provide this information as a service |
|
|
|
áFor more step-by-step photos and a different look, SEE ADDITONAL INFORMATION Step 1: Assemble the two-door cabinet according to manufacturer's instructions. Step 2: Gently pry away cabinet backing. Replace the backing with pine board cut to 30 x 30 inches for durability. Step 3: Measure to centre of cabinet top, and drill a 1 1/2-inch-diameter hole. Measure to centre of cabinet shelf, and drill another 1 1/2-inch-diameter hole. Then measure to centre of tabletop, and drill a 1 1/2-inch-diameter hole. Step 4: Drill pilot holes in base of cabinet for casters. Using galvanized carriage bolts, affix casters to cabinet base from the inside. Secure casters with locker washers and hex nuts on the outside. Step 5: Prime all pieces of the cabinet except the top and the underside of the tabletop. Step 6: Select a panel to use as a marquee, and cover with two coats of chalkboard paint. Frame panel with scalloped wood trim, and decorate with simple stripes. Step 7: Paint front of cabinet using your favourite bright colours. We used a citrus theme.
Add a rack to the side for towels and baskets.
Step 8: Paint tabletop using a stencil and other designs. Step 9: Using 1 1/2-inch wood screws, attach the tabletop from the inside of the cabinet up through the tabletop. Step 10: Spray paint two hooks and two wooden knobs, and attach to cabinet when dry. Note: Drill hole 1/4 inch to the outside of the original hole to allow for new knob size. Step 11: Apply a clear polyurethane sealer to the whole piece to protect the finish. Step 12: Using a drop cloth to protect the work area, lay umbrella canvas on flat surface. Step 13: Paint stripes and a scallop design using acrylic paints mixed with water.
Stencils add a decorative touch to the top.
Step 14: Stencil pattern to match tabletop. Step 15: Using a saw, remove 6 inches from the bottom of the umbrella stand to balance the weight of the umbrella and cabinet. Step 16: Attach pole anchor in bottom of cabinet to hold umbrella firmly in place. Placing 2 10-pound bags of sand in the bottom of the cabinet when rolling on an uneven surface prevents tipping. á
ADDITIONAL INFORMATION |
|
|
Step 1A: Apply wood glue to the outer sides of the cabinet. Step 1B: Attach the unfinished cabinet skins to the outer sides of the wall cabinet using wood glue. Allow to dry. Place bricks or other heavy objects on top to hold panels in position until glue sets, approximately 30 minutes. |
Step 2: Cut paint-grade 1/2-inch-thick plywood to 30 x 30 inches, and attach to back of cabinet with wood glue and finishing nails. This adds support for balance to the cabinet.

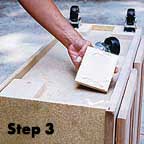
Step 3: Turn cabinet upside down, and glue four corner blocks, cut from a 1 x 6, to fill the lip and to create a base for casters.
Step 4: To find centre of cabinet top, place an "X" from corner to corner. Drill a 1 1/2-inch-diameter hole. (Note: Umbrellas poles may vary in diameter, so check yours, and drill holes accordingly.) To find the centre of the tabletop, place it on top of the cabinet. With your measuring tape, balance the space at an equal distance, and trace the rectangle onto the tabletop. Use the "X" method again to find the approximate centre of the tabletop. Drill hole in tabletop.
Step 5: Drill pilot holes in corner blocks through cabinet base for casters. Using 1 3/4-inch galvanized carriage bolts; affix casters to cabinet base from the outside. Secure casters with locker washers and hex nuts on the inside.
Step 6: Prime all pieces of the cabinet and tabletop.
Step 7: Paint the tabletop and cabinet inside and out. Let dry completely.
Step 8: Using 2 1/2-inch wood screws, attach the tabletop from the inside of the cabinet.
Step 9: Add painted decorative touches to the front of cabinet and tabletop as you wish. Your choice of umbrella may help you determine what to paint.
Step 10: Apply a clear polyurethane sealer to the whole piece to protect the finish.
Step 11: Spray paint two wooden knobs and the hooks; attach to cabinet when dry.
Step 12: Using a saw, remove up to 6 inches from the bottom of your umbrella pole to balance the weight of the umbrella and cabinet.
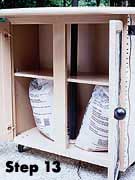
Step 13: Attach a pole anchor to inside base of the cabinet to hold umbrella in place. Poles and pole anchors vary in size, so check your umbrella. Place two 20- to 40-pound bags of sand in the bottom of cabinet for stability.
Wyszukiwarka
Podobne podstrony:
Szkol Wykład do Or
Corel Paint Shop Pro X Obrobka zdjec cyfrowych cwiczenia
1970 01 01 Kant039s 039perpetual peace039 utopia or political guide
Or Archiwista
Audyt wewnetrzny (SGHowy) Stand Nieznany (2)
Or Wózek widłowy, Ocena-Ryzyka-DOC
Or Dekarz, Ocena-Ryzyka-DOC
Shop for chemia kosmetyczna ksi
Or Budownictwo promotor
Or Kasjer na stacji paliw
Artistic Wire Green or Magenta Single Spiral Bead Necklace & Earrings
o pomocy państwa w spłacie niektórych kredytów mieszkaniowych, udzielaniu premii gwarancyjnych or UK
2015 OR ─çw
Cipriani Invisible Relligion or Diffused Religion in Italy
or wyklad 1 id 339025 Nieznany
Or Kamieniarz
arkusz ang stand pr cz2 A
Or Rybak id 339013 Nieznany
lumber cut off stand
wi─Öcej podobnych podstron