Manual Transmission/Transaxle and Clutch - General Information -
Manual Transaxle and Clutch
Mondeo 2007.5 (02/2007-)
Diagnosis and Testing
General Equipment
Inspection and Testing
1.
1. Verify the customer concern.
2.
2. Visually inspect for obvious signs of mechanical or electrical damage.
3.
3. Resolve any obvious causes for a concern found during the visual inspection before carrying out any further tests.
4.
4. If the concern persists, check the symptoms and proceed according to the Ford approved diagnostic tool instructions.
Inspection and Verification - Manual Transaxle
The following checks should be carried out before repairing or installing a new transaxle.
The inspection and verification of manual transmission concerns can be considered in three main areas.
Gear Shifting Concerns
Clutch does not operate correctly.
External gearshift mechanism REFER to:
External Controls
(308-06B Manual Transmission/Transaxle External Controls - Vehicles With: 5-Speed Manual Transaxle - MTX75, Description and
Operation),
External Controls
(308-06C Manual Transmission/Transaxle External Controls - Vehicles With: 6-Speed Manual Transaxle - MMT6, Description and
Operation).
Transmission noise concerns
Check the engine and transmission mountings for sufficient clearance to the transmission and the body.
Other noises except gearshift noises
Go through the driving situations/tests described in the table below under the conditions described there and answer each part of the diagnosis with a "Yes"
or "No".
NOTE: If the response to one or more diagnoses is "Yes", the transmission must be removed and the dual mass flywheel checked according to GO to
Pinpoint Test
E.
.
Fluid Leakage Concerns
Check that the leaking fluid is actually transmission fluid and not hydraulic fluid (from the hydraulically operated clutch) or engine oil.
Check the transmission fluid level. If necessary, drain off any excess fluid.
Locate the oil leak with the aid of a fluorescent test fluid and an ultraviolet inspection lamp.
Clean the transaxle and the adjacent areas carefully before road testing.
Symptom Chart – General Concerns
Ford approved diagnostic tool
Item
No.
Situation, test / diagnosis
Yes No
1
Driving situation:
0
0
Road test the vehicle. Accelerate the vehicle with maximum torque in 5th or 6th gear. REFER to:
Specifications
(308-01B Clutch - Vehicles With: 5-Speed Manual Transaxle - MTX75, Specifications),
Specifications
(308-01C Clutch - Vehicles With: 6-Speed Manual Transaxle - MMT6, Specifications),
Specifications
(308-01D Clutch - Vehicles With: 6-Speed Manual Transaxle - M66, Specifications).
Diagnosis:
Are there extremely harsh vibrations from the powertrain? Vibrations disappear when the accelerator pedal is released briefly.
1a
Driving situation:
0
0
Road test the vehicle. Drive the vehicle in simulated "stop and go" mode (1st gear). Check for transmission rattle during gentle acceleration and
deceleration.
Diagnosis:
Are there noises from the powertrain in driving situations between idling speed and a maximum of 2000 rev/min which occur at a specific, vehicle-
dependent vehicle/engine speed?
2
Driving situation:
0
0
Raise the vehicle. Check all engine/transmission and exhaust mountings with the engine not running, while starting the engine and when it is idling.
Diagnosis:
Does the engine/transmission shake severely or make rattling noises during starting? Longer time before engine reaches idle speed. Renew any
damaged components (engine/transmission or exhaust mountings) and redo the test.
3
Driving situation:
0
0
Check the front axle driveshafts and the manual transmission. Lock the wheels and apply the parking brake. Start the engine, engage 1st gear and
slowly release the clutch pedal while the engine idles.
Diagnosis:
Engine speed does not drop, power not transferred, vehicle does not move.
4
Driving situation:
0
0
Start engine, put shift lever in neutral and slowly release the clutch. Switch off the engine.
Diagnosis:
Hard metallic noise as the engine stops, coming from the manual transmission during the last engine revolution before the engine finally stops, is
NOT caused by the dual mass flywheel. On vehicles with a diesel engine and without an intake manifold flap solenoid valve, the concern (harsh,
metallic noise) cannot be resolved by installing a new dual mass flywheel. In diesel engines with an intake manifold flap solenoid valve, check the
operation of the solenoid valve.
If a clattering noise is detected as the engine is switched off with the clutch pedal depressed, check the transmission housing for grease residues
(more than 2 grams) from the dual mass flywheel (remove the starter motor and check the bell housing).
Symptom
Possible Sources
Action
High-effort gear
shifting in one or more
gears
Synchronizer ring or
synchronization damaged
*
INSTALL a new synchronizer hub with synchronizer ring set and INSTALL a new gear wheel
belonging to the synchronizer unit as necessary.
Because of various changes and the difficulty in estimating the level of wear, a complete new
installation (as described above) is recommended.
*
-
Clutch does not operate correctly.
*
CHECK the clutch function and the brake fluid level.
*
Internal gearshift mechanism
*
Remove the internal gearshift mechanism and check the components. - RENEW.
*
Clashing or scratching
noise during gear
shifting
Synchronizer hub or synchronizer
ring damaged
*
INSTALL a new synchronizer hub with synchronizer ring set and INSTALL a new gear wheel
belonging to the synchronizer unit as necessary.
Because of various changes and the difficulty in estimating the level of wear, a complete new
installation (as described above) is recommended.
*
-
Clutch does not operate correctly.
*
CHECK the clutch function and the brake fluid level.
*
Strona 1 z 10
2012-08-09
http://127.0.0.1:8888/wsm/js/procedure.do?variantId=1449&proc-uid=G510462&gui...
Symptom Chart - Transaxle noises
Gear engagement not
functioning correctly
External gearshift mechanism
damaged
*
CHECK the external gearshift mechanism for damage. If no concern is determined, REMOVE the
transmission.REFER to:
Transmission - 1.8L Duratorq-TDCi (74kW/100PS) - Lynx/1.8L Duratorq-TDCi (92kW/125PS)
- Lynx
(308-03B Manual Transmission/Transaxle - Vehicles With: 5-Speed Manual Transaxle
- MTX75, Removal),
Transmission - 2.0L Duratec-HE (107kW/145PS) - MI4/2.0L Duratec-HE Flex Fuel
(107kW/145PS) - MI4
(308-03B Manual Transmission/Transaxle - Vehicles With: 5-Speed
Manual Transaxle - MTX75, Removal),
Transmission - 1.8L Duratorq-TDCi (74kW/100PS) - Lynx/1.8L Duratorq-TDCi (92kW/125PS)
- Lynx
(308-03C Manual Transmission/Transaxle - Vehicles With: 6-Speed Manual Transaxle
- MMT6, Removal),
Transmission - 2.0L Duratorq-TDCi (100kW/136PS) - DW-C/2.0L Duratorq-TDCi
(85kW/115PS) - DW/2.0L Duratorq-TDCi (103kW/140PS) - DW
(308-03C Manual
Transmission/Transaxle - Vehicles With: 6-Speed Manual Transaxle - MMT6, Removal),
Transmission - 2.5L Duratec (162kW/220PS) - VI5
(308-03D Manual Transmission/Transaxle
- Vehicles With: 6-Speed Manual Transaxle - M66, Removal).
*
Gear jumps out of
engagement while
driving
Missing snap rings;
synchronization components
damaged or worn clutch splines
*
INSTALL a new gear set, synchronizer unit and selector fork as necessary. CHECK the
transmission for damage, particularly to the sliding sleeve.
*
Incorrect sliding sleeve; worn
clutch splines
*
INSTALL a new gear set, synchronizer unit and selector fork as necessary. CHECK the
transmission for damage, particularly to the sliding sleeve.
*
Selector forks
*
RENEW gear wheels, sliding sleeves and selector forks as necessary. CHECK the transmission for
damage, particularly to the sliding sleeve.
*
Gearshift lever feels
loose
Gearshift lever fixing.
*
Check the external gearshift mechanism; replace if necessary. Check gear lever mounting,
external gearshift mechanism and shift cables; tighten if necessary. REFER to:
External Controls
(308-06B Manual Transmission/Transaxle External Controls - Vehicles
With: 5-Speed Manual Transaxle - MTX75, Description and Operation),
External Controls
(308-06C Manual Transmission/Transaxle External Controls - Vehicles
With: 6-Speed Manual Transaxle - MMT6, Description and Operation).
*
Internal gearshift mechanism
*
Check the internal shift mechanism for play at the transmission.
*
Symptom
Possible Sources
Action
Gear wheels banging when shifting
Clutch worn
*
Check clutch
REFER to: (308-01B Clutch - Vehicles With: 5-Speed Manual Transaxle -
MTX75)
Clutch
(Diagnosis and Testing),
Clutch
(Diagnosis and Testing),
Clutch
(Diagnosis and Testing).
*
*
Air in the clutch system;
fluid loss
*
Check the clutch system for leaks. Check the clutch master cylinder bleed
screw for blockage. Remove any blockage from the clutch master cylinder bleed
screw and bleed the clutch system as necessary.
REFER to:
Manual Transaxle and Clutch
(308-00 Manual
Transmission/Transaxle and Clutch - General Information, Diagnosis and
Testing).
*
Slight buzzing, rattling or metallic scraping
noise from the transmission at 2500 to 3500
rpm when on overrun or driving without load
(particularly in 2nd and 3rd gear)
Rotational vibration from
the engine not sufficiently
damped by the clutch.
*
These noises do not affect the operation and durability of the transaxle.
*
Engine speed-dependent
transmission noise
*
CHECK transmission input shaft bearings. REMOVE the transmission REFER to:
Transmission - 1.8L Duratorq-TDCi (74kW/100PS) - Lynx/1.8L Duratorq-
TDCi (92kW/125PS) - Lynx
(308-03B Manual Transmission/Transaxle -
Vehicles With: 5-Speed Manual Transaxle - MTX75, Removal),
Transmission - 2.0L Duratec-HE (107kW/145PS) - MI4/2.0L Duratec-HE
Flex Fuel (107kW/145PS) - MI4
(308-03B Manual Transmission/Transaxle -
Vehicles With: 5-Speed Manual Transaxle - MTX75, Removal),
Transmission - 1.8L Duratorq-TDCi (74kW/100PS) - Lynx/1.8L Duratorq-
TDCi (92kW/125PS) - Lynx
(308-03C Manual Transmission/Transaxle -
Vehicles With: 6-Speed Manual Transaxle - MMT6, Removal),
Transmission - 2.0L Duratorq-TDCi (100kW/136PS) - DW-C/2.0L Duratorq-
TDCi (85kW/115PS) - DW/2.0L Duratorq-TDCi (103kW/140PS) - DW
(308-
03C Manual Transmission/Transaxle - Vehicles With: 6-Speed Manual
Transaxle - MMT6, Removal),
Transmission - 2.5L Duratec (162kW/220PS) - VI5
(308-03D Manual
Transmission/Transaxle - Vehicles With: 6-Speed Manual Transaxle - M66,
Removal).
*
Vehicle speed-dependent
transmission noise
*
CHECK driveshaft tripod joints. REFER to: (205-04 Front Drive Halfshafts)
Front Halfshaft LH
(Removal and Installation),
Front Halfshaft RH
(Removal and Installation).
*
Steering angle-dependent
transmission noise
*
CHECK differential splines for damage. Turn the differential bevel gears against
one another. For this purpose, REMOVE the differential.
REFER to:
Front Halfshaft LH
(205-04 Front Drive Halfshafts, Removal and
Installation) /
Front Halfshaft RH
(205-04 Front Drive Halfshafts, Removal and Installation).
*
The engine and transaxle
assembly is in contact with
the body.
*
Look for points of contact and REPAIR as necessary.
*
Collar screws –
engine/gearbox
*
TIGHTEN the transmission bolts.REFER to:
Transmission - 1.8L Duratorq-TDCi (74kW/100PS) - Lynx/1.8L Duratorq-
TDCi (92kW/125PS) - Lynx
(308-03B Manual Transmission/Transaxle -
Vehicles With: 5-Speed Manual Transaxle - MTX75, Installation),
Transmission - 2.0L Duratec-HE (107kW/145PS) - MI4/2.0L Duratec-HE
Flex Fuel (107kW/145PS) - MI4
(308-03B Manual Transmission/Transaxle -
Vehicles With: 5-Speed Manual Transaxle - MTX75, Installation),
Transmission - 1.8L Duratorq-TDCi (74kW/100PS) - Lynx/1.8L Duratorq-
TDCi (92kW/125PS) - Lynx
(308-03C Manual Transmission/Transaxle -
Vehicles With: 6-Speed Manual Transaxle - MMT6, Installation),
Transmission - 2.0L Duratorq-TDCi (100kW/136PS) - DW-C/2.0L Duratorq-
TDCi (85kW/115PS) - DW/2.0L Duratorq-TDCi (103kW/140PS) - DW
(308-
03C Manual Transmission/Transaxle - Vehicles With: 6-Speed Manual
Transaxle - MMT6, Installation),
Transmission - 2.5L Duratec (162kW/220PS) - VI5
(308-03D Manual
Transmission/Transaxle - Vehicles With: 6-Speed Manual Transaxle - M66,
Installation).
*
Transaxle fluid level low.
*
Check the transmission fluid level.
*
Transaxle bearings and
gear wheels (usually on
high-mileage vehicles).
*
REMOVE the transaxle. CHECK the bearings and gear wheels and INSTALL new
components as necessary.REFER to:
Transmission - 1.8L Duratorq-TDCi (74kW/100PS) - Lynx/1.8L Duratorq-
TDCi (92kW/125PS) - Lynx
(308-03B Manual Transmission/Transaxle -
Vehicles With: 5-Speed Manual Transaxle - MTX75, Removal),
Transmission - 2.0L Duratec-HE (107kW/145PS) - MI4/2.0L Duratec-HE
*
Strona 2 z 10
2012-08-09
http://127.0.0.1:8888/wsm/js/procedure.do?variantId=1449&proc-uid=G510462&gui...
Symptom Chart - Oil leakage
Symptom Chart - Clutch
Pinpoint test
Flex Fuel (107kW/145PS) - MI4
(308-03B Manual Transmission/Transaxle -
Vehicles With: 5-Speed Manual Transaxle - MTX75, Removal),
Transmission - 1.8L Duratorq-TDCi (74kW/100PS) - Lynx/1.8L Duratorq-
TDCi (92kW/125PS) - Lynx
(308-03C Manual Transmission/Transaxle -
Vehicles With: 6-Speed Manual Transaxle - MMT6, Removal),
Transmission - 2.0L Duratorq-TDCi (100kW/136PS) - DW-C/2.0L Duratorq-
TDCi (85kW/115PS) - DW/2.0L Duratorq-TDCi (103kW/140PS) - DW
(308-
03C Manual Transmission/Transaxle - Vehicles With: 6-Speed Manual
Transaxle - MMT6, Removal),
Transmission - 2.5L Duratec (162kW/220PS) - VI5
(308-03D Manual
Transmission/Transaxle - Vehicles With: 6-Speed Manual Transaxle - M66,
Removal).
Rattling or vibration noises.
External selector
mechanism
*
CHECK the external gearshift mechanism.
*
Front or rear engine
mounting defective
*
CHECK front or rear engine mounting; RENEW if necessary.
*
Symptom
Possible Sources
Action
Fluid
Leakage
Oil seals or O-ring seals
*
CHECK the mating surfaces and INSTALL a new.
*
Fluid leak between the clutch-side and
transmission-side housing halves.
*
DISASSEMBLE the transmission and clean the mating faces. CHECK the surfaces for damage.
Seal the transmission using WSK-M2G348-A5 sealer.
*
Fluid leak at transmission housing bolt
*
Tighten transmission housing bolts to specified tightening torque.
*
Symptom
Possible Sources
Action
Clutch slipping
No clutch pedal free play
Clutch diaphragm springs broken
Clutch disc facing broken
Hardened or oiled clutch disc facing surface.
*
*
*
*
GO to Pinpoint Test
A.
*
Clutch chatter or shudder
Engine mounting defective
Tilted clutch disc
*
*
GO to Pinpoint Test
B.
*
Clutch disengages too late or not at all; high-effort gear
shifting
Insufficient fluid.
Air in hydraulic system.
Excessive clutch pedal free play
Clutch diaphragm springs broken
Clutch disc deformed or broken
Corrosion on clutch disc splines
Insufficient or no grease on the transmission input shaft and clutch disc
splines
*
*
*
*
*
*
*
GO to Pinpoint Test
C.
*
Clutch pedal pulsating
Uneven diaphragm spring fingers
Frequency modulator defective (if present)
*
*
GO to Pinpoint Test
D.
*
Excessive noise
Release bearing defective
Driveshaft guide bearing
Excessive crankshaft end play.
*
*
*
GO to Pinpoint Test
E.
*
Fluid Leakage
Clutch master cylinder
Clutch slave cylinder
Hydraulic lines in area of engine and transmission
*
*
*
GO to Pinpoint Test
F.
*
PINPOINT TEST A : CLUTCH SLIPPING
TEST
CONDITIONS
DETAILS/RESULTS/ACTIONS
A1: TEST CLUTCH SLIPPAGE
Lock the wheels and apply the parking brake.
1
Ignition switch in position III.
2
Start the engine, depress the clutch pedal and engage fourth gear.
3
Run the engine at approx. 2000 rpm.
4
Release the clutch pedal slowly.
5
Does the engine stall when the clutch pedal is fully released?
Yes
Clutch OK.
No
GO to A2
.
A2: CHECK CLUTCH PEDAL FREE PLAY
Measure the clutch pedal free play.
1
Depress the clutch pedal by hand until an increase in resistance is clearly felt, then release the clutch pedal again.
2
Is the clutch pedal free play approx. 10 mm?
Yes
Clutch pedal free play OK.
No
GO to A3
.
A3: CHECK THE CLUTCH DIAPHRAGM SPRING
Remove the transmission. CHECK the clutch diaphragm spring. REFER to:
Transmission - 2.0L Duratec-HE (107kW/145PS) - MI4/2.0L Duratec-HE Flex Fuel (107kW/145PS) - MI4
(308-03B Manual
Transmission/Transaxle - Vehicles With: 5-Speed Manual Transaxle - MTX75, Removal),
Transmission - 1.8L Duratorq-TDCi (74kW/100PS) - Lynx/1.8L Duratorq-TDCi (92kW/125PS) - Lynx
(308-03B Manual
Transmission/Transaxle - Vehicles With: 5-Speed Manual Transaxle - MTX75, Removal),
Transmission - 2.0L Duratorq-TDCi (100kW/136PS) - DW-C/2.0L Duratorq-TDCi (85kW/115PS) - DW/2.0L Duratorq-TDCi
(103kW/140PS) - DW
(308-03C Manual Transmission/Transaxle - Vehicles With: 6-Speed Manual Transaxle - MMT6, Removal),
Transmission - 2.5L Duratec (162kW/220PS) - VI5
(308-03D Manual Transmission/Transaxle - Vehicles With: 6-Speed Manual Transaxle
- M66, Removal).
1
Is the clutch diaphragm spring broken?
Yes
Renew the clutch set.
No
GO to A4
.
A4: TEST CLUTCH FRICTION DISK
Remove the clutch disc and clutch pressure plate.
1
Is the clutch disc contaminated with oil or the clutch pressure plate broken?
Yes
CHECK the engine and transmission for leaks.INSTALL a new clutch disc and pressure plate.
No
CHECK system operates correctly
PINPOINT TEST B : CLUTCH CHATTER OR SHUDDER
Strona 3 z 10
2012-08-09
http://127.0.0.1:8888/wsm/js/procedure.do?variantId=1449&proc-uid=G510462&gui...
TEST CONDITIONS
DETAILS/RESULTS/ACTIONS
B1: TEST CLUTCH CHATTER OR SHUDDER
Ignition switch in position III.
1
Start the engine, depress the clutch and engage first gear.
2
Run the engine at between 1200 rpm and 1500 rpm.
3
Release the clutch pedal slowly.
4
Does the vehicle jerk when it starts off?
Yes
GO to B2
.
No
Clutch OK.
B2: TEST ENGINE/TRANSAXLE ISOLATOR, ROLL RESISTOR
Check the engine/transaxle mountings isolator and roll resistor for damage or loose bolts.
1
Is the engine/transaxle isolator or roll restrictor loose or damaged?
Yes
TIGHTEN the bolts or INSTALL new bolts as necessary. CHECK system operates correctly
No
GO to B3
.
B3: TEST CLUTCH PRESSURE PLATE
Remove clutch pressure plate.
1
Is the clutch pressure plate damaged?
Yes
RENEW the clutch set.
No
GO to B4
.
B4: TEST CLUTCH FRICTION DISK
CHECK the clutch disc.
1
Does the clutch disc show evidence of damage due to tilting?
Yes
RENEW the clutch set.
No
CHECK flywheel.
PINPOINT TEST C : CLUTCH DISENGAGES TOO LATE OR NOT AT ALL
TEST
CONDITIONS
DETAILS/RESULTS/ACTIONS
C1: CHECK FLUID LEVEL
Check brake fluid level
1
Is the brake fluid level between the MAX and MIN marks on the brake fluid reservoir?
Yes
GO to C2
.
No
Fill with brake fluid, CHECK the brake and clutch systems for leaks.
C2: CLUTCH DISENGAGES TOO LATE OR NOT AT ALL
Bleed the clutch system.
1
Does the clutch show improved disengaging characteristics following bleeding of the system?
Yes
Clutch OK.
No
GO to C3
.
C3: CHECK CLUTCH PEDAL FREE PLAY
Measure the clutch pedal free play.
1
Depress the clutch pedal by hand until an increase in resistance is clearly felt, then release the clutch pedal again.
2
Is the clutch pedal free play approx. 10 mm?
Yes
GO to C4
.
No
CHECK that the clutch pedal moves freely; remove if necessary.
C4: CHECK THE CLUTCH DIAPHRAGM SPRING
Remove the transmission and CHECK the clutch diaphragm spring.REFER to:
Transmission - 1.8L Duratorq-TDCi (74kW/100PS) - Lynx/1.8L Duratorq-TDCi (92kW/125PS) - Lynx
(308-03B Manual
Transmission/Transaxle - Vehicles With: 5-Speed Manual Transaxle - MTX75, Removal),
Transmission - 2.0L Duratec-HE (107kW/145PS) - MI4/2.0L Duratec-HE Flex Fuel (107kW/145PS) - MI4
(308-03B Manual
Transmission/Transaxle - Vehicles With: 5-Speed Manual Transaxle - MTX75, Removal),
Transmission - 1.8L Duratorq-TDCi (74kW/100PS) - Lynx/1.8L Duratorq-TDCi (92kW/125PS) - Lynx
(308-03C Manual
Transmission/Transaxle - Vehicles With: 6-Speed Manual Transaxle - MMT6, Removal),
Transmission - 2.0L Duratorq-TDCi (100kW/136PS) - DW-C/2.0L Duratorq-TDCi (85kW/115PS) - DW/2.0L Duratorq-TDCi
(103kW/140PS) - DW
(308-03C Manual Transmission/Transaxle - Vehicles With: 6-Speed Manual Transaxle - MMT6, Removal),
Transmission - 2.5L Duratec (162kW/220PS) - VI5
(308-03D Manual Transmission/Transaxle - Vehicles With: 6-Speed Manual Transaxle
- M66, Removal).
1
Is the clutch diaphragm spring broken?
Yes
RENEW the clutch set. TEST the system for normal operation.
No
GO to C5
.
C5: TEST CLUTCH FRICTION DISK
Remove the clutch disc.
1
Is the clutch disc bent or broken?
Yes
RENEW the clutch set.
No
GO to C6
.
C6: CHECK THE SPLINES ON THE CLUTCH DISC FOR INSUFFICIENT LUBRICATION AND/OR SIGNS OF CORROSION
CAUTION: Do not use solvent cleaners to clean the inside of the clutch housing or the transmission input shaft. A lint-free damp cloth should be used
for cleaning. Failure to follow this instruction may result in incorrect clutch operation.
CHECK the splines on the clutch disc for insufficient or no grease and/or signs of corrosion.
1
Is there insufficient or no grease and/or signs of corrosion on the splines of the clutch disc?
Yes
CLEAN the splines of the clutch disc.
GO to C7
.
No
CHECK the splines of the transmission input shaft for damage or insufficient or no grease and signs of corrosion. CLEAN and lubricate the
splines on the clutch disc with the specified lubricant as required. CLEAN the splines of the transmission input shaft. If the transmission input
shaft is damaged, REPLACE the components as required. TEST the system for normal operation.
C7: CHECK THE SPLINES ON THE CLUTCH DISC FOR SIGNS OF DAMAGE OR SIGNIFICANT FRICTION
CAUTION: Do not use solvent cleaners to clean the inside of the clutch housing or the transmission input shaft. A lint-free damp cloth should be used
Strona 4 z 10
2012-08-09
http://127.0.0.1:8888/wsm/js/procedure.do?variantId=1449&proc-uid=G510462&gui...
for cleaning. Failure to follow this instruction may result in incorrect clutch operation.
CHECK the splines on the clutch disc for damage or signs of significant friction.
1
Are there signs of damage or significant friction on the splines of the clutch disc?
Yes
RENEW the clutch set. Lubricate the splines of the clutch disc with the specified lubricant as required. TEST the system for normal operation.
No
CHECK the splines of the transmission input shaft for damage or insufficient or no grease and/or signs of corrosion. CLEAN and lubricate the
splines on the clutch disc with the specified lubricant as required. CLEAN the splines of the transmission input shaft. If the transmission input
shaft is damaged, REPLACE the components as required. TEST the system for normal operation.
PINPOINT TEST D : CLUTCH PEDAL PULSATING
TEST
CONDITIONS
DETAILS/RESULTS/ACTIONS
D1: CHECK THE BELLEVILLE SPRING FINGERS FOR UNIFORMITY
Remove the transmission. REFER to:
Transmission - 1.8L Duratorq-TDCi (74kW/100PS) - Lynx/1.8L Duratorq-TDCi (92kW/125PS) - Lynx
(308-03B Manual
Transmission/Transaxle - Vehicles With: 5-Speed Manual Transaxle - MTX75, Removal),
Transmission - 2.0L Duratec-HE (107kW/145PS) - MI4/2.0L Duratec-HE Flex Fuel (107kW/145PS) - MI4
(308-03B Manual
Transmission/Transaxle - Vehicles With: 5-Speed Manual Transaxle - MTX75, Removal),
Transmission - 1.8L Duratorq-TDCi (74kW/100PS) - Lynx/1.8L Duratorq-TDCi (92kW/125PS) - Lynx
(308-03C Manual
Transmission/Transaxle - Vehicles With: 6-Speed Manual Transaxle - MMT6, Removal),
Transmission - 2.0L Duratorq-TDCi (100kW/136PS) - DW-C/2.0L Duratorq-TDCi (85kW/115PS) - DW/2.0L Duratorq-TDCi
(103kW/140PS) - DW
(308-03C Manual Transmission/Transaxle - Vehicles With: 6-Speed Manual Transaxle - MMT6, Removal),
Transmission - 2.5L Duratec (162kW/220PS) - VI5
(308-03D Manual Transmission/Transaxle - Vehicles With: 6-Speed Manual Transaxle
- M66, Removal).
CHECK the diaphragm spring fingers for uniformity.
1
Are the diaphragm spring fingers all at the same height?
Yes
Check the frequency modulator and RENEW if necessary (if present)
No
RENEW the clutch set.
PINPOINT TEST E : EXCESSIVE NOISE
TEST CONDITIONS
DETAILS/RESULTS/ACTIONS
E1: CHECK THE TRANSMISSION AT IDLING A)
Ignition switch in position III.
1
Start the engine.
2
Depress the clutch pedal fully.
3
Is the noise apparent when the clutch is operated?
Yes
GO to E3
.
No
There is a problem with the transaxle. REFER to Symptom Chart(s).
E2: CHECK THE TRANSMISSION AT IDLING B)
1
Are the noises coming from the pedal box?
Yes
Go to "Service – Clutch Pedal".
No
GO to E3
.
E3: TEST CLUTCH RELEASE BEARING
Check the release bearing for wear and corrosion.
1
Are there signs of wear or rust?
Yes
INSTALL a new clutch release bearing.
No
CHECK the crankshaft for excessive end float.Are there still noises?
GO to E5
.
E4: ENGINE SELECTION – DIESEL ENGINES
1
Does the engine have a 1.8L diesel engine or a 2.0L diesel engine?
Yes
Vehicles with a 1.8L diesel engine
GO to E5
. Vehicles with a 2.0L diesel engine
GO to E13
.
No
GO to E22
.
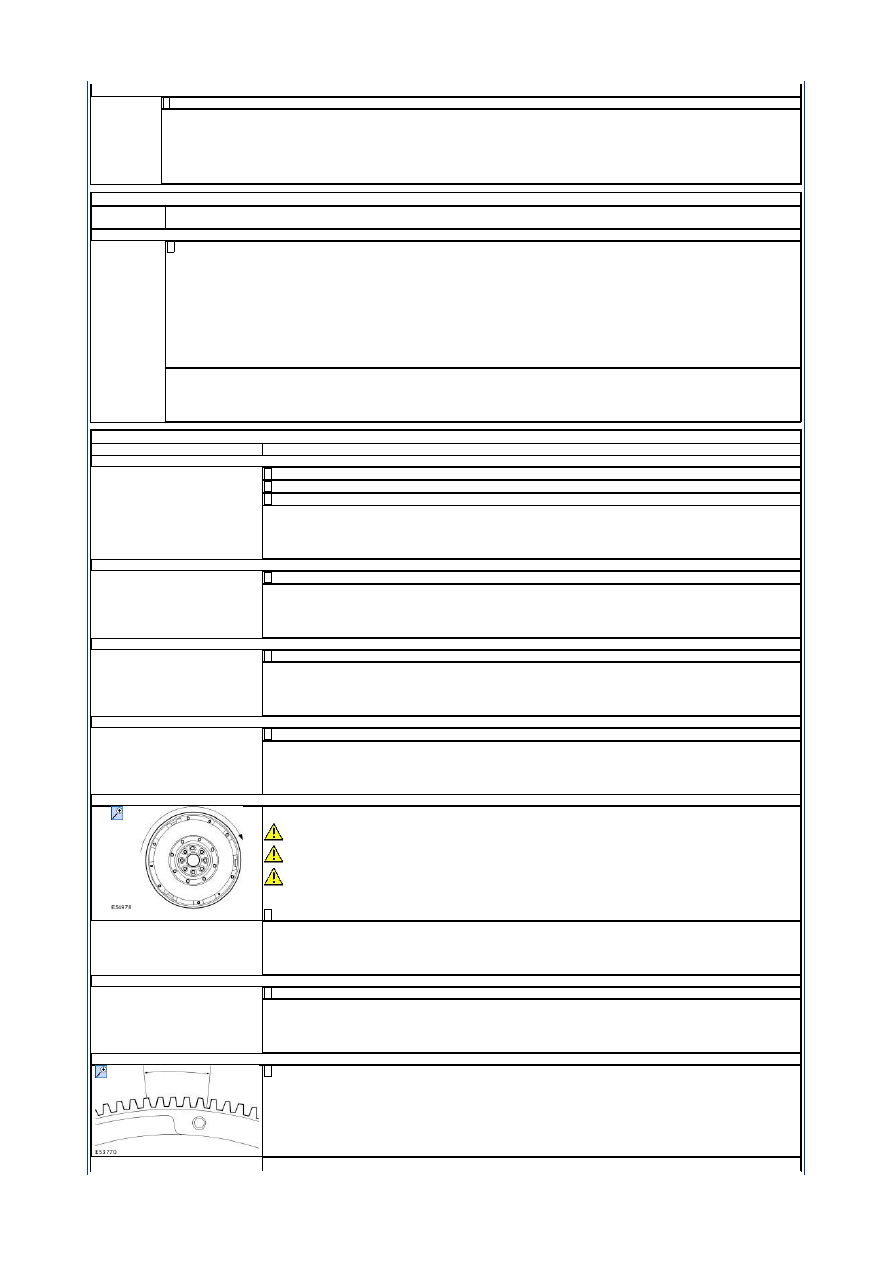
E5: CHECK THE ROTATION OF THE SECONDARY MASS OF THE DUAL MASS FLYWHEEL
CAUTIONS:
Do not rework or machine the dual mass flywheel if it is distorted.
Do not clean the dual mass flywheel with any kind of liquid. Use only a dry cloth to clean the flywheel.
Do not clean the gap between the primary and secondary mass. Only clean the bolt connection surface and the
clutch surface.
NOTE: Discoloration is not a reason in itself to replace the dual mass flywheel.
Remove the clutch disc and clutch pressure plate.
1
Can the secondary mass be turned freely by more than 15 teeth?
Yes
INSTALL A NEW dual mass flywheel.
No
GO to E8
.
E6: CHECK THE SPRING RESISTANCE
Twist the secondary mass in both directions.
1
Can spring resistance be felt in both directions?
Yes
CONTINUE
No
INSTALL A NEW dual mass flywheel.
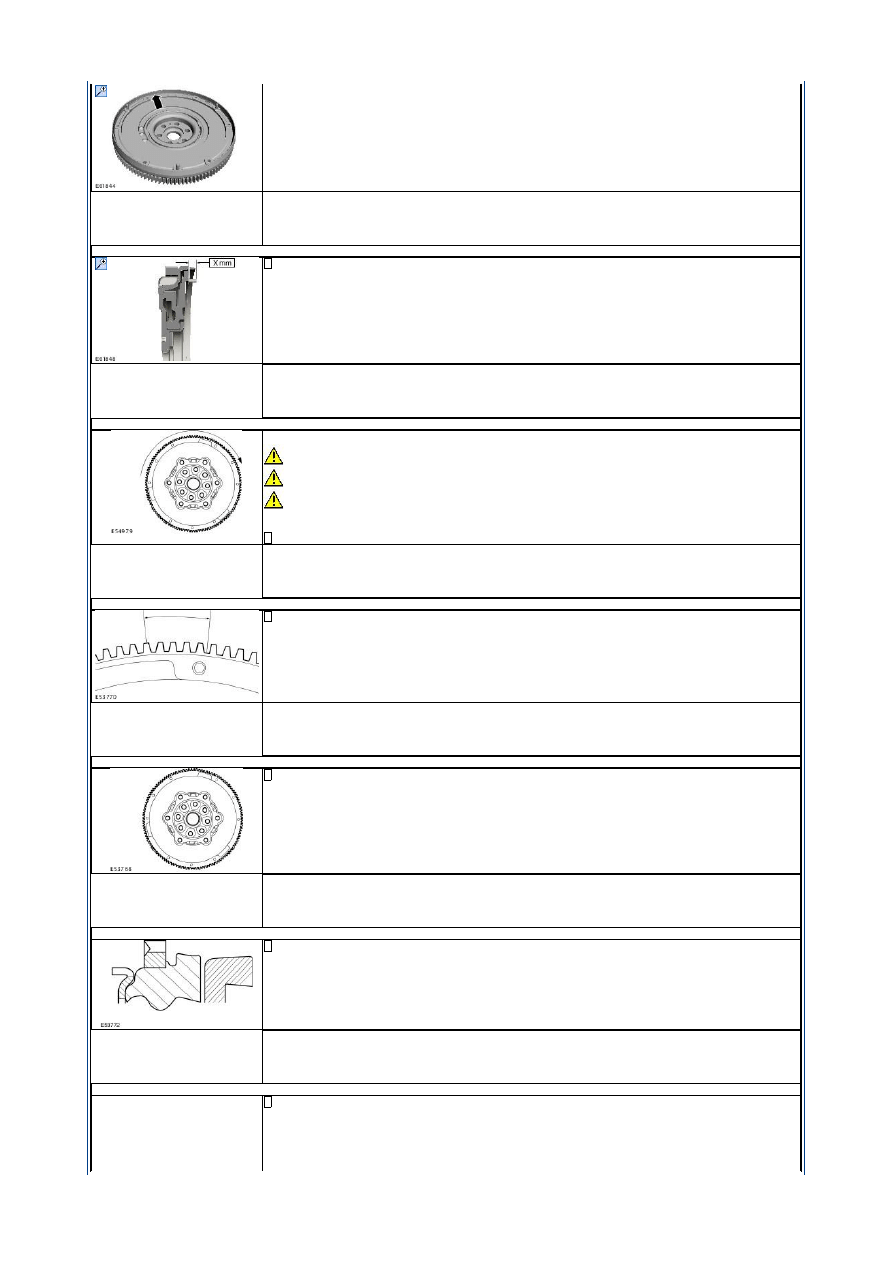
E7: ROTATION OF THE DUAL-MASS FLYWHEEL
Secure the primary side. Twist the secondary side in a clockwise direction until spring resistance is felt and release.
Mark the rest position on the primary and secondary sides. Then twist the secondary side in a counter-clockwise
direction until spring resistance is felt and release. Mark the new rest position on the primary side. Count the number
of teeth between the marks for both directions on the toothed ring.
1
Are more than 5 teeth counted?
Strona 5 z 10
2012-08-09
http://127.0.0.1:8888/wsm/js/procedure.do?variantId=1449&proc-uid=G510462&gui...
Yes
INSTALL A NEW dual mass flywheel.
No
GO to E8
.
E8: CHECK THE DUAL-MASS FLYWHEEL
Perform a visual inspection of the dual mass flywheel.
1
Is the dual mass flywheel free of damage?
Yes
GO to E9
.
No
INSTALL A NEW dual mass flywheel.
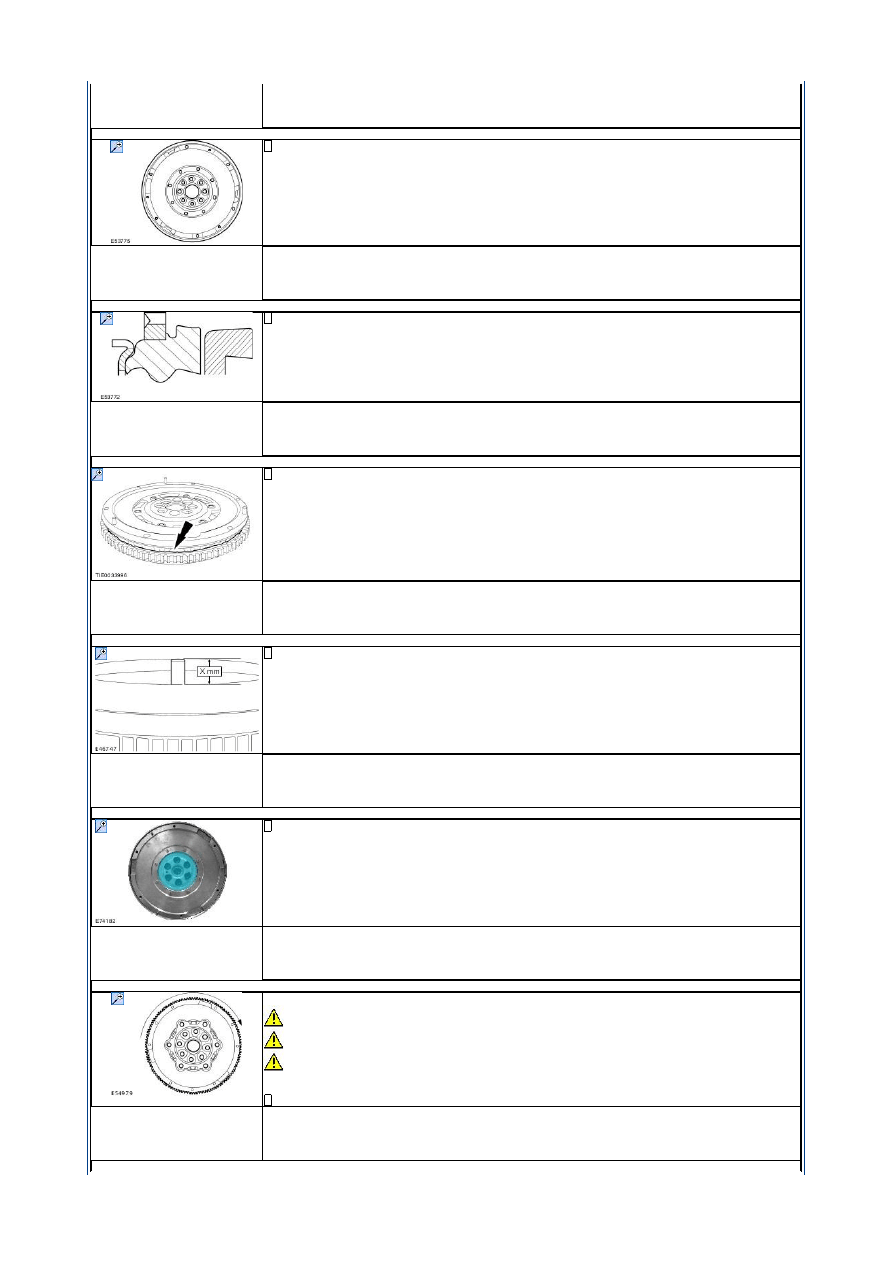
E9: CHECK THE TOOTHED RING OF THE DUAL-MASS FLYWHEEL
Perform a visual inspection of the toothed ring of the dual mass flywheel.
1
Perform a visual inspection of the toothed ring of the dual mass flywheel.
Yes
GO to E10
.
No
INSTALL A NEW dual mass flywheel.
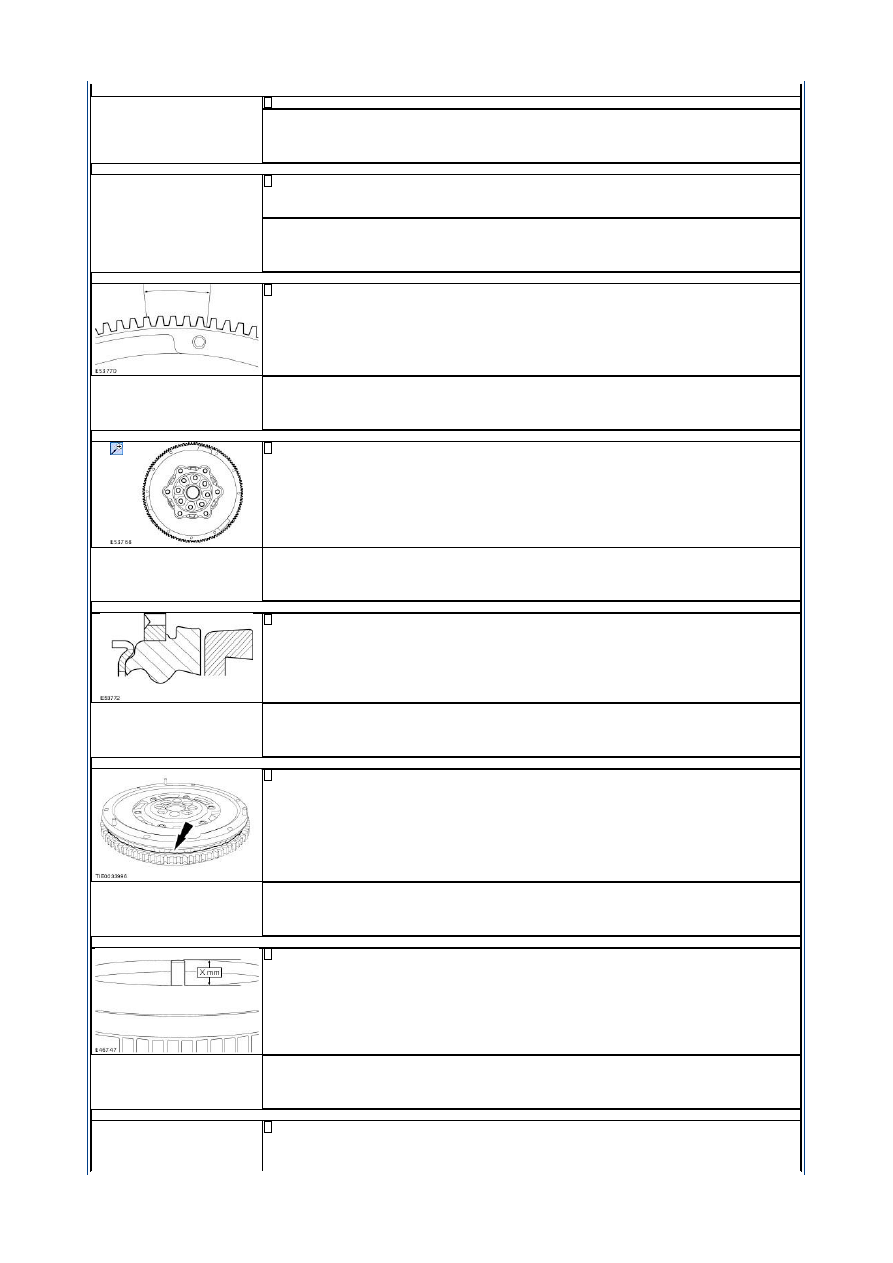
E10: CHECK THE WELD SEAM OF THE DUAL-MASS FLYWHEEL
Visually inspect the weld seam of the dual mass flywheel to check for loss of grease.
1
Is a clear loss of grease visible at the weld seam of the dual mass flywheel?
Yes
INSTALL A NEW dual mass flywheel.
No
GO to E11
.
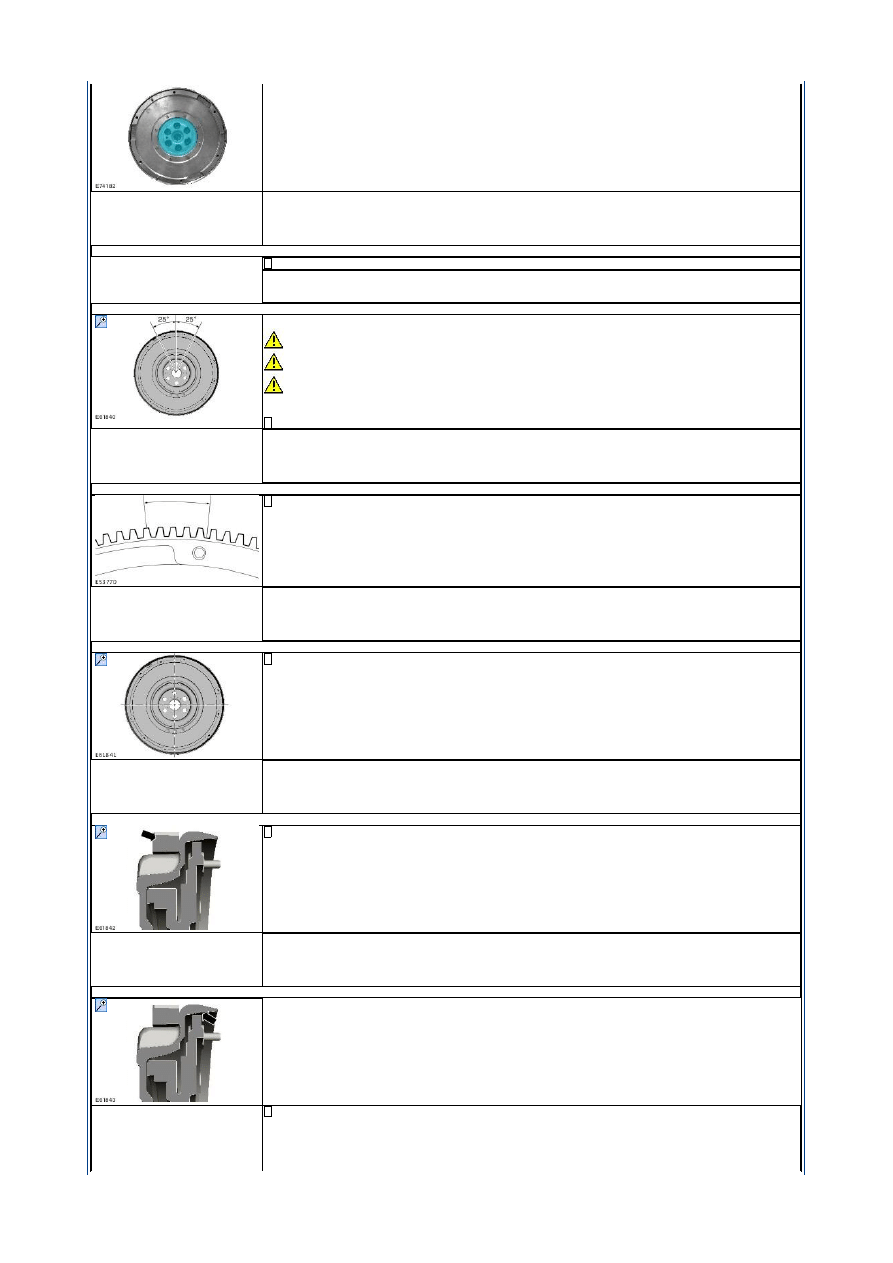
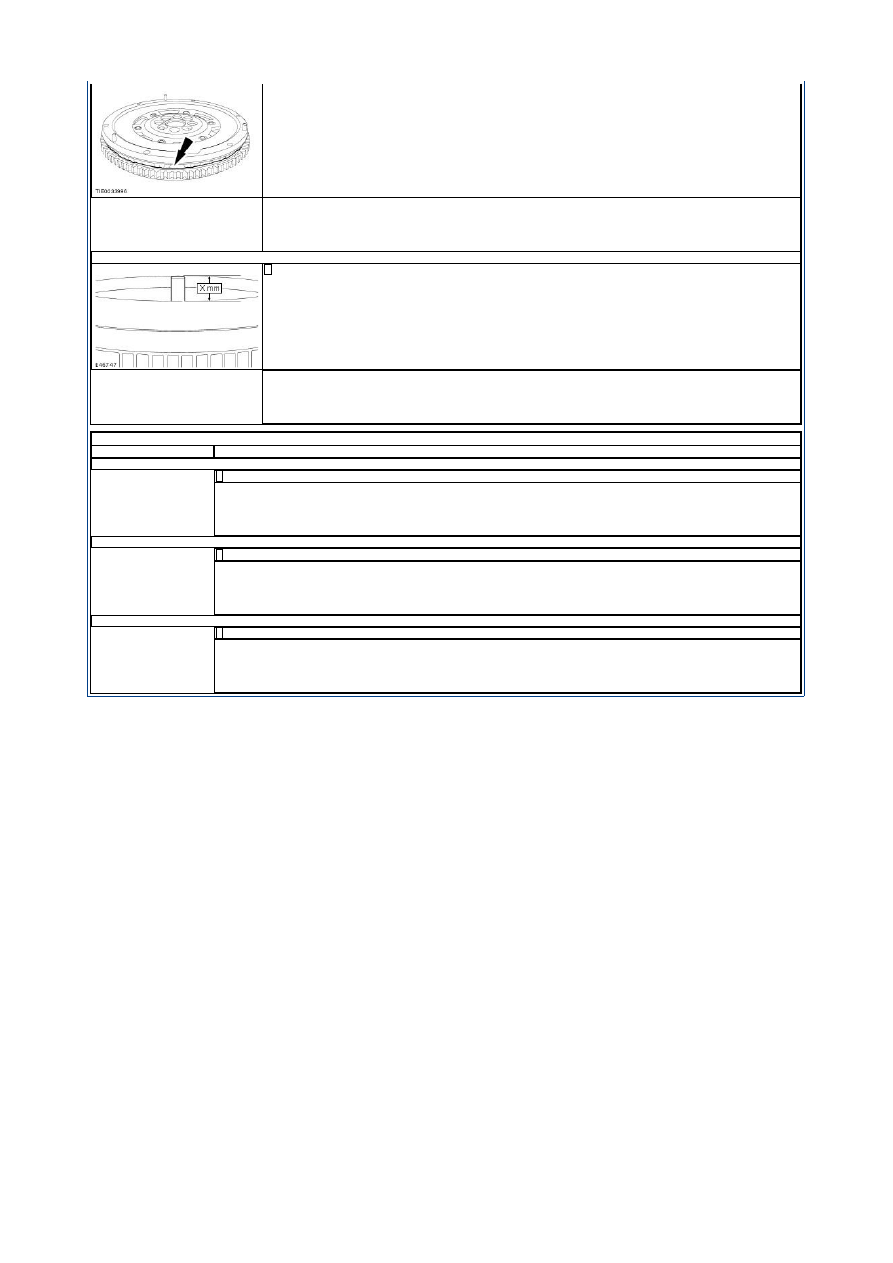
E11: GUIDE PINS OF THE DUAL-MASS FLYWHEEL
Check the installation of the guide pins of the dual-mass flywheel.
1
Are the guide pins for the dual mass flywheel present, and do they all have the same length?
Yes
GO to E12
.
No
INSTALL A NEW dual mass flywheel.
E12: DISCOLORATION OF THE DUAL MASS FLYWHEEL DUE TO OVERHEATING
Check the dual mass flywheel for discoloration due to overheating.
1
Is any discoloration evident in the marked area?
Yes
INSTALL A NEW dual mass flywheel.
No
The dual mass flywheel is OK.
E13: CHECK THE ROTATION OF THE SECONDARY MASS OF THE DUAL MASS FLYWHEEL
CAUTIONS:
Do not rework or machine the dual mass flywheel if it is distorted.
Do not clean the dual mass flywheel with any kind of liquid. Use only a dry cloth to clean the flywheel.
Do not clean the gap between the primary and secondary mass. Only clean the bolt connection surface and the
clutch surface.
NOTE: Discoloration is not a reason in itself to replace the dual mass flywheel.
Remove the clutch disc and clutch pressure plate.
1
Can the secondary mass be turned freely by more than 15 teeth?
Yes
INSTALL A NEW dual mass flywheel.
No
GO to E17
.
Strona 6 z 10
2012-08-09
http://127.0.0.1:8888/wsm/js/procedure.do?variantId=1449&proc-uid=G510462&gui...
E14: CHECK THE SPRING RESISTANCE
Twist the secondary mass in both directions.
1
Can spring resistance be felt in both directions?
Yes
GO to E17
.
No
GO to E15
.
E15: CENTER THE FRICTION CONTROL DISC
Secure the primary side with Special Tool 303-254. Gradually turn the secondary side in one direction against the
resistance until spring resistance to the force applied by hand is felt on both sides. If it is not possible to reach the
spring resistance on both sides, gradually turn the secondary side in the opposite direction in the way described
above.
1
Is it possible to find a middle position with spring resistance on either side?
Yes
CONTINUE
No
INSTALL A NEW dual mass flywheel.
E16: ROTATION OF THE DUAL-MASS FLYWHEEL
Secure the primary side. Twist the secondary side in a clockwise direction until spring resistance is felt and release.
Mark the rest position on the primary and secondary sides. Then twist the secondary side in a counter-clockwise
direction until spring resistance is felt and release. Mark the new rest position on the primary side. Count the number
of teeth between the marks for both directions on the toothed ring.
1
Are more than 5 teeth counted?
Yes
INSTALL A NEW dual mass flywheel.
No
GO to E17
.
E17: CHECK THE DUAL-MASS FLYWHEEL
Perform a visual inspection of the dual mass flywheel.
1
Is the dual mass flywheel free of damage?
Yes
GO to E18
.
No
INSTALL A NEW dual mass flywheel.
E18: CHECK THE TOOTHED RING OF THE DUAL-MASS FLYWHEEL
Perform a visual inspection of the toothed ring of the dual mass flywheel.
1
Perform a visual inspection of the toothed ring of the dual mass flywheel.
Yes
GO to E19
.
No
INSTALL A NEW dual mass flywheel.
E19: CHECK THE WELD SEAM OF THE DUAL-MASS FLYWHEEL
Visually inspect the weld seam of the dual mass flywheel to check for loss of grease.
1
Is a clear loss of grease visible at the weld seam of the dual mass flywheel?
Yes
INSTALL A NEW dual mass flywheel.
No
GO to E20
.
E20: GUIDE PINS OF THE DUAL-MASS FLYWHEEL
Check the installation of the guide pins of the dual-mass flywheel.
1
Are the guide pins for the dual mass flywheel present, and do they all have the same length?
Yes
GO to E21
.
No
INSTALL A NEW dual mass flywheel.
E21: DISCOLORATION OF THE DUAL MASS FLYWHEEL DUE TO OVERHEATING
Check the dual mass flywheel for discoloration due to overheating.
1
Strona 7 z 10
2012-08-09
http://127.0.0.1:8888/wsm/js/procedure.do?variantId=1449&proc-uid=G510462&gui...
Is any discoloration evident in the marked area?
Yes
INSTALL A NEW dual mass flywheel.
No
The dual mass flywheel is OK.
E22: ENGINE SELECTION – PETROL ENGINES
1
Does the vehicle have a 2.0L petrol engine or a 2.5L petrol engine?
Yes
Vehicles with a 2.0L petrol engine
GO to E23
. Vehicles with a 2.5L petrol engine
GO to E29
.
E23: CHECK THE ROTATION OF THE SECONDARY MASS OF THE DUAL MASS FLYWHEEL
CAUTIONS:
Do not rework or machine the dual mass flywheel if it is distorted.
Do not clean the dual mass flywheel with any kind of liquid. Use only a dry cloth to clean the flywheel.
Do not clean the gap between the primary and secondary mass. Only clean the bolt connection surface and the
clutch surface.
NOTE: Discoloration is not a reason in itself to replace the dual mass flywheel.
Remove the clutch disc and clutch pressure plate.
1
Can the secondary mass be turned freely by more than 15 teeth?
Yes
INSTALL A NEW dual mass flywheel.
No
GO to E25
.
E24: ROTATION OF THE DUAL-MASS FLYWHEEL
Secure the primary side. Twist the secondary side in a clockwise direction until spring resistance is felt and release.
Mark the rest position on the primary and secondary sides. Then twist the secondary side in a counter-clockwise
direction until spring resistance is felt and release. Mark the new rest position on the primary side. Count the number
of teeth between the marks for both directions on the toothed ring.
1
Are between 1 and 3.5 teeth counted?
Yes
GO to E25
.
No
INSTALL A NEW dual mass flywheel.
E25: CHECK THE DUAL-MASS FLYWHEEL
Perform a visual inspection of the dual mass flywheel.
1
Is the dual mass flywheel free of damage?
Yes
GO to E26
.
No
INSTALL A NEW dual mass flywheel.
E26: CHECK THE TOOTHED RING OF THE DUAL-MASS FLYWHEEL
Perform a visual inspection of the toothed ring of the dual mass flywheel.
1
Perform a visual inspection of the toothed ring of the dual mass flywheel.
Yes
GO to E27
.
No
INSTALL A NEW dual mass flywheel.
E27: CHECK DUAL MASS FLYWHEEL FOR GREASE LEAKAGE
Visually inspect the weld seam of the dual mass flywheel to check for loss of grease.
1
Strona 8 z 10
2012-08-09
http://127.0.0.1:8888/wsm/js/procedure.do?variantId=1449&proc-uid=G510462&gui...
Is a clear loss of grease visible at the weld seam of the dual mass flywheel?
Yes
INSTALL A NEW dual mass flywheel.
No
GO to E28
.
E28: GUIDE PINS OF THE DUAL-MASS FLYWHEEL
Check the installation of the guide pins of the dual-mass flywheel.
1
Are the guide pins for the dual mass flywheel present, and do they all have the same length?
Yes
The dual mass flywheel is OK.
No
INSTALL A NEW dual mass flywheel.
E29: CHECK THE ROTATION OF THE SECONDARY MASS OF THE DUAL MASS FLYWHEEL
CAUTIONS:
Do not rework or machine the dual mass flywheel if it is distorted.
Do not clean the dual mass flywheel with any kind of liquid. Use only a dry cloth to clean the flywheel.
Do not clean the gap between the primary and secondary mass. Only clean the bolt connection surface and the
clutch surface.
NOTE: Discoloration is not a reason in itself to replace the dual mass flywheel.
Remove the clutch disc and clutch pressure plate.
1
Can the secondary mass be turned freely by more than 15 teeth?
Yes
INSTALL A NEW dual mass flywheel.
No
GO to E31
.
E30: ROTATION OF THE DUAL-MASS FLYWHEEL
Secure the primary side. Twist the secondary side in a clockwise direction until spring resistance is felt and release.
Mark the rest position on the primary and secondary sides. Then twist the secondary side in a counter-clockwise
direction until spring resistance is felt and release. Mark the new rest position on the primary side. Count the number
of teeth between the marks for both directions on the toothed ring.
1
Are more than 8 teeth counted?
Yes
INSTALL A NEW dual mass flywheel.
No
GO to E31
.
E31: CHECK THE DUAL-MASS FLYWHEEL
Perform a visual inspection of the dual mass flywheel.
1
Is the dual mass flywheel free of damage?
Yes
GO to E32
.
No
INSTALL A NEW dual mass flywheel.
E32: CHECK THE TOOTHED RING OF THE DUAL-MASS FLYWHEEL
Perform a visual inspection of the toothed ring of the dual mass flywheel.
1
Perform a visual inspection of the toothed ring of the dual mass flywheel.
Yes
GO to E33
.
No
INSTALL A NEW dual mass flywheel.
E33: CHECK THE WELD SEAM OF THE DUAL-MASS FLYWHEEL
Visually inspect the weld seam of the dual mass flywheel to check for loss of grease.
1
Strona 9 z 10
2012-08-09
http://127.0.0.1:8888/wsm/js/procedure.do?variantId=1449&proc-uid=G510462&gui...
Is a clear loss of grease visible at the weld seam of the dual mass flywheel?
Yes
INSTALL A NEW dual mass flywheel.
No
GO to E34
.
E34: GUIDE PINS OF THE DUAL-MASS FLYWHEEL
Check the installation of the guide pins of the dual-mass flywheel.
1
Are the guide pins for the dual mass flywheel present, and do they all have the same length?
Yes
The dual mass flywheel is OK.
No
INSTALL A NEW dual mass flywheel.
PINPOINT TEST F : FLUID LEAKAGE
TEST CONDITIONS
DETAILS/RESULTS/ACTIONS
F1: CHECK THE CLUTCH SLAVE CYLINDER
Check the clutch master cylinder for leaks.
1
Is the clutch master cylinder OK?
Yes
GO to F2
.
No
RENEW the clutch master cylinder.
F2: CHECK THE CLUTCH SLAVE CYLINDER
Check the clutch slave cylinder for leaks.
1
Is the clutch slave cylinder OK?
Yes
GO to F3
.
No
INSTALL a new clutch slave cylinder.
F3: INSPECT SYSTEM HYDRAULIC LINES
Check the hydraulic lines in area of engine and transmission for loose or damaged unions.
1
Are the clutch hydraulic lines OK?
Yes
CARRY OUT a road test to verify the customer concern.
No
REPAIR or INSTALL new components as necessary. CARRY OUT a road test.
Strona 10 z 10
2012-08-09
http://127.0.0.1:8888/wsm/js/procedure.do?variantId=1449&proc-uid=G510462&gui...
Wyszukiwarka
Podobne podstrony:
Diagnostyka usterek sprzęgła, - !!! SKRZYNIE BIIEGÓW AUTOMATYCZNE I MANUALNE !!! -
Diagnoza, załączanie sprzęgieł
Diagnoza uszkodzeń dwumasowego koła zamachowego
C5 (X7) D6AY01KAP0 9 23 07 2013 Pomoc w diagnostyce Manualna (mechaniczna) skrzynia biegów i sp
diagnostyka
T 3[1] METODY DIAGNOZOWANIA I ROZWIAZYWANIA PROBLEMOW
Przedmiot PRI i jego diagnoza przegląd koncepcji temperamentu
DIAGNOSTYKA FIZJOLOGICZNA I 1
Dyslipidemie diagnoza JH
Diagnostyka i leczenie kaszlu
05 Badanie diagnostyczneid 5649 ppt
Diagnoza Funkcjonalna
Rola badań dodatkowych w diagnostyce chorób wewnętrznych wykład
Diagnoza rynku warzyw i owocow
Diagnoza rozne podejscia teoretyczne
więcej podobnych podstron