
8.2.6d
8.2.6d Transforming
Objects (Illustrator)
1-2
Fundamentals of Web Design 1.2—-Lab 8.2.6d
Copyright
2002, Adobe Systems, Inc.
8.2.6d Transforming Objects (Illustrator)
Scaling objects
You scale objects by enlarging or reducing them horizontally (along the x axis)
and vertically (along the y axis) relative to a fixed point of origin that you
designate. If you don’t designate an origin, the objects are scaled from their
center points. You’ll use three methods to scale the logo and two objects copied
from the logo.
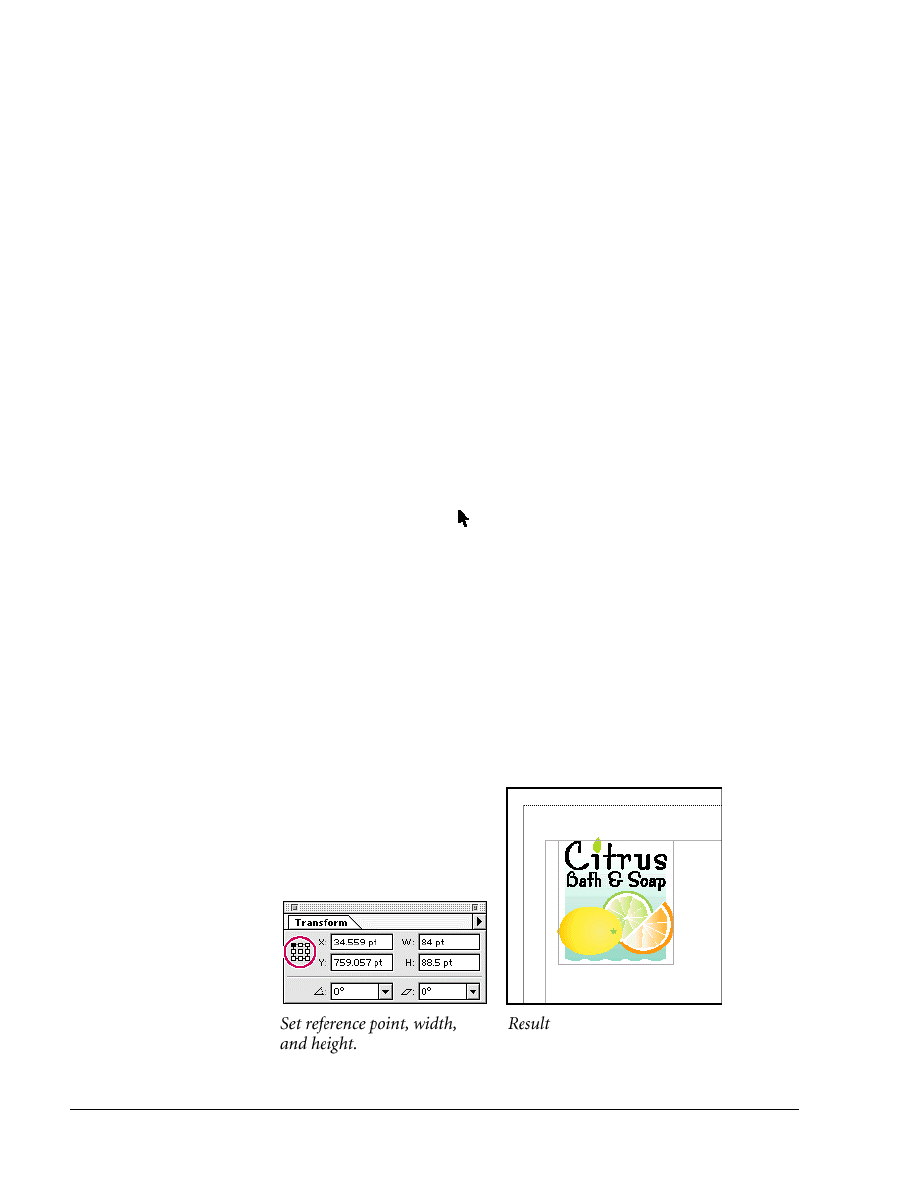
First you’ll use the Transform palette to scale down the logo by entering new
dimensions and designating the point of origin from which the logo will scale.
1. Choose File > Open to open the start1.ai file in the 8_2_6d/Start folder.
2. This start file has been saved with the rulers showing, custom swatches
added to the Swatches palette, and blue guidelines for scaling the logo and
objects on the letterhead.
3. Choose File > Save As, name the file Letterhd.ai and click Save. In the
Illustrator Native Format Options dialog box, select Illustrator 10
Compatibility and click OK.
4. Using the selection tool (
) in the toolbox, click the logo to select the
group of objects (type, background, lemon, orange slice, lime slice) that make
up the logo.
5. Choose Window > Transform to display the Transform palette.
The Transform palette contains a small grid of squares or reference points that
represent points on the selection’s bounding box.
6. Click the reference point in the top left corner of the grid (as shown in the
illustration) to set the point of origin from which the objects will scale. Type
84 in the W text box, press Tab and type 88.5 in the H text box, and then
press Enter or Return to scale down the logo to fit in the blue guideline.
By default, the ruler units of measure are set to points.
Copyright
2002, Adobe Systems, Inc.
Fundamentals of Web Design 1.2—Lab 8.2.6d
1-3
To scale an object proportionally, enter a value in either the W or the H text
box, hold down Ctrl (Windows) or Command (Mac OS), and press Enter or
Return to automatically calculate the equivalent value for the other text box.
Next you’ll copy the background object in the logo and scale the new object by
dragging its bounding box to fit the background of the letterhead.
7. With the logo still selected, choose Object > Ungroup to ungroup the larger
group in the logo. (Smaller subgroups remain grouped.)
Ungrouping the background object from the other objects lets you make copies
that are separate from the group.
8. Using the selection tool (
), click away from the logo to deselect it, and
then click below the word Bath to select the light-blue background object in
the logo. Hold down Alt (Windows) or Option (Mac OS) and drag from the
center of the object down to copy the object and move it to the bottom left
corner of the page, aligning it with the guides.
Holding down Alt/Option as you drag an object duplicates it.
Next you’ll make this background object the background for the page.
9. Shift-drag the top right corner of the new object’s bounding box up to the
top right side of the blue letterhead guide, to just below the return address.
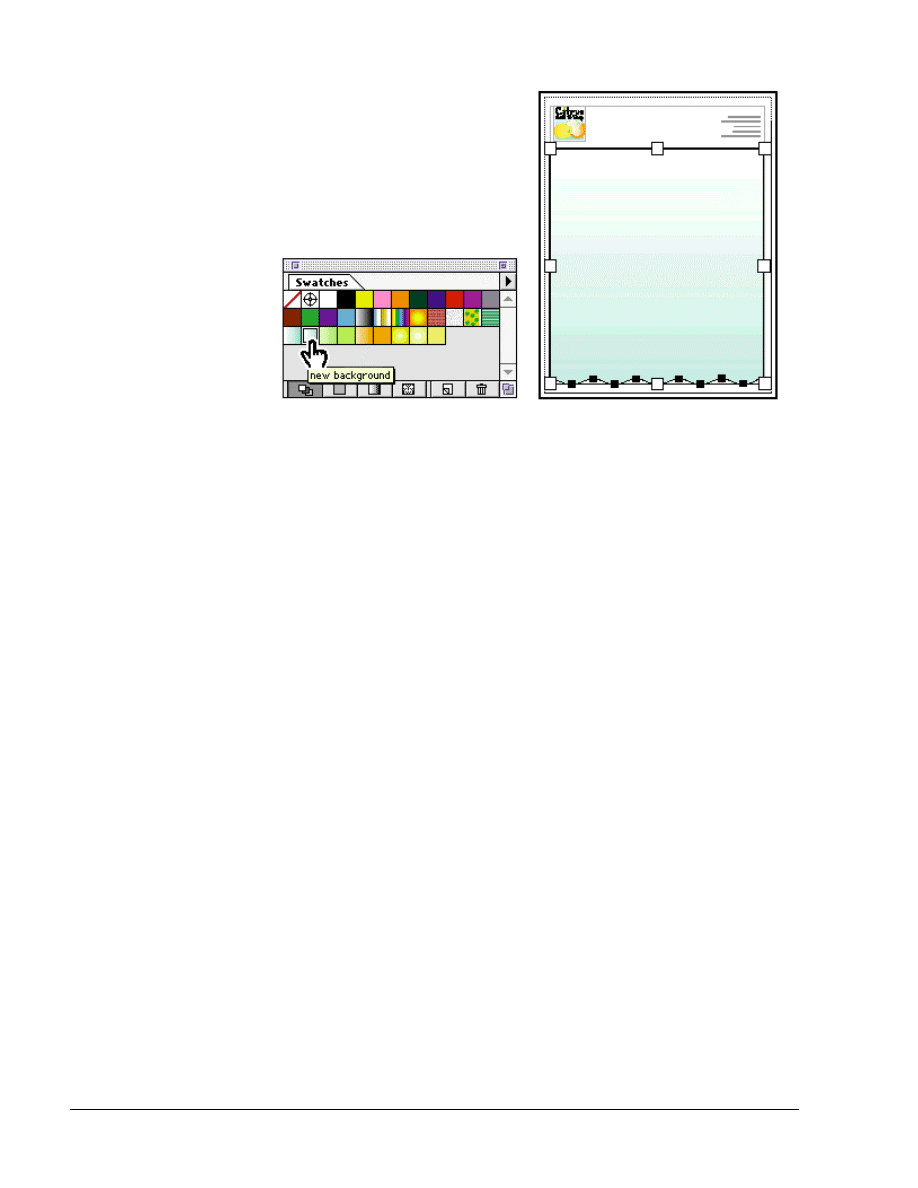
You’ll use the Swatches palette to paint the background with a lighter gradient
that we provided.
10. Click the Swatches tab to bring the palette to the front of its group. With the
background selected, hold the pointer over the swatches in the Swatches
palette until you see their names. Then click the New Background swatch in
the third row to paint the object with a lighter gradient.
1-4
Fundamentals of Web Design 1.2—-Lab 8.2.6d
Copyright
2002, Adobe Systems, Inc.
11. With the background object still selected, choose Object > Lock > Selection
to deselect the object and lock it. Locking the background object makes it
easier to select other objects you’ll add to the artwork.
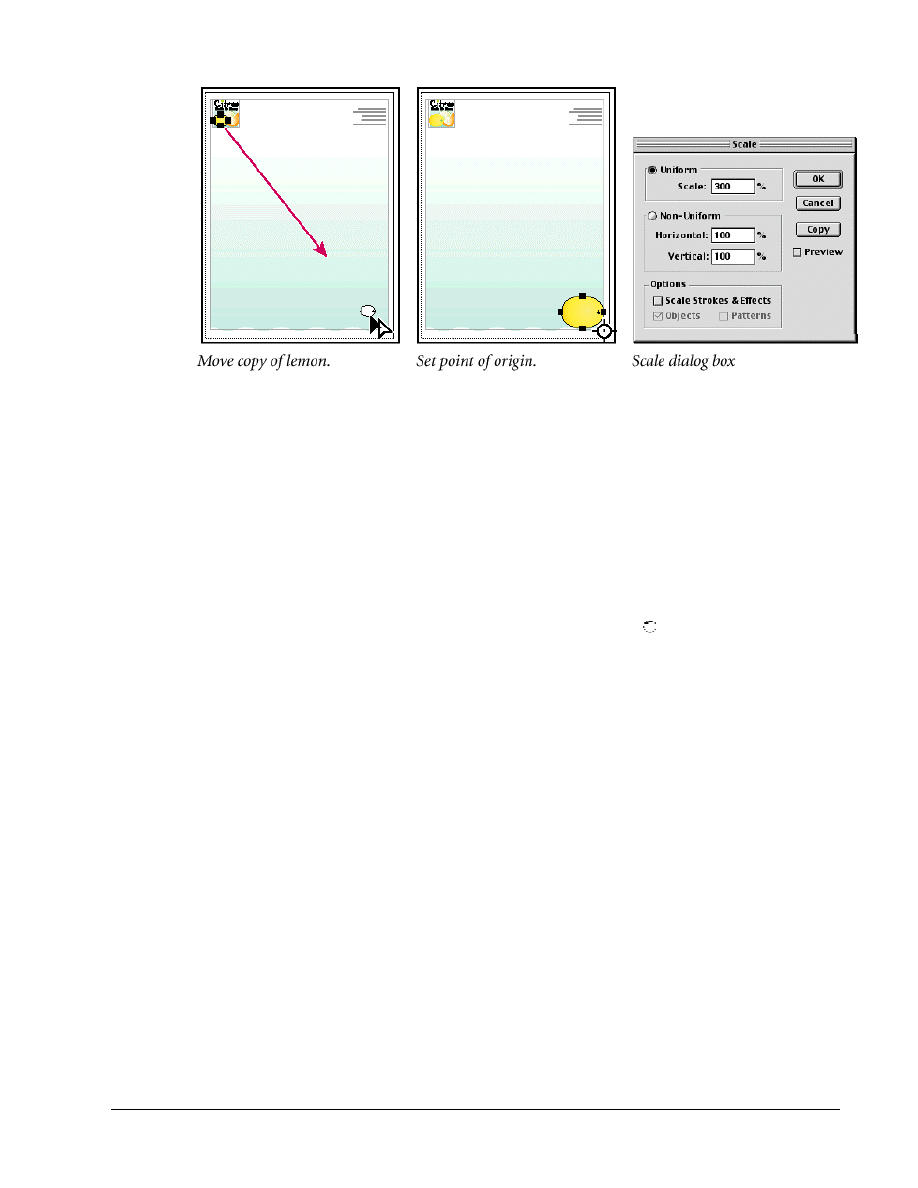
The lemon is two objects grouped together in the logo. Now you’ll copy the
lemon and place it in the bottom corner of the letterhead.
12. Select the lemon in the logo, and Alt-drag (Windows) or Option-drag (Mac
OS) to copy and move the new lemon to the bottom right corner of the
letterhead guide.
You’ll use the scale tool to resize the new lemon and designate a fixed point of
origin from which to scale.
13. Select the scale tool in the toolbox, hold down Alt (Windows) or Option
(Mac OS), and click the bottom right corner point of the letterhead guide.
Clicking the corner point of the guide sets the point of origin from which the
lemon will scale. Holding down Alt/Option as you click displays the Scale
dialog box.
14. In the Scale dialog box, type 300% in the Scale text box and click OK to
make the lemon three times as large.
Copyright
2002, Adobe Systems, Inc.
Fundamentals of Web Design 1.2—Lab 8.2.6d
1-5
Rotating objects
Objects are rotated by turning them around a designated point of origin. You can
rotate objects by displaying their bounding boxes and moving the pointer to one
of the outside corners. Once the rotate pointer appears, just click to rotate the
object around its center point. You can rotate objects using the Transform palette
to designate a point of origin and rotation angle. You can also rotate objects by
using the rotate tool and either choosing a rotation angle or dragging to adjust an
object visually.
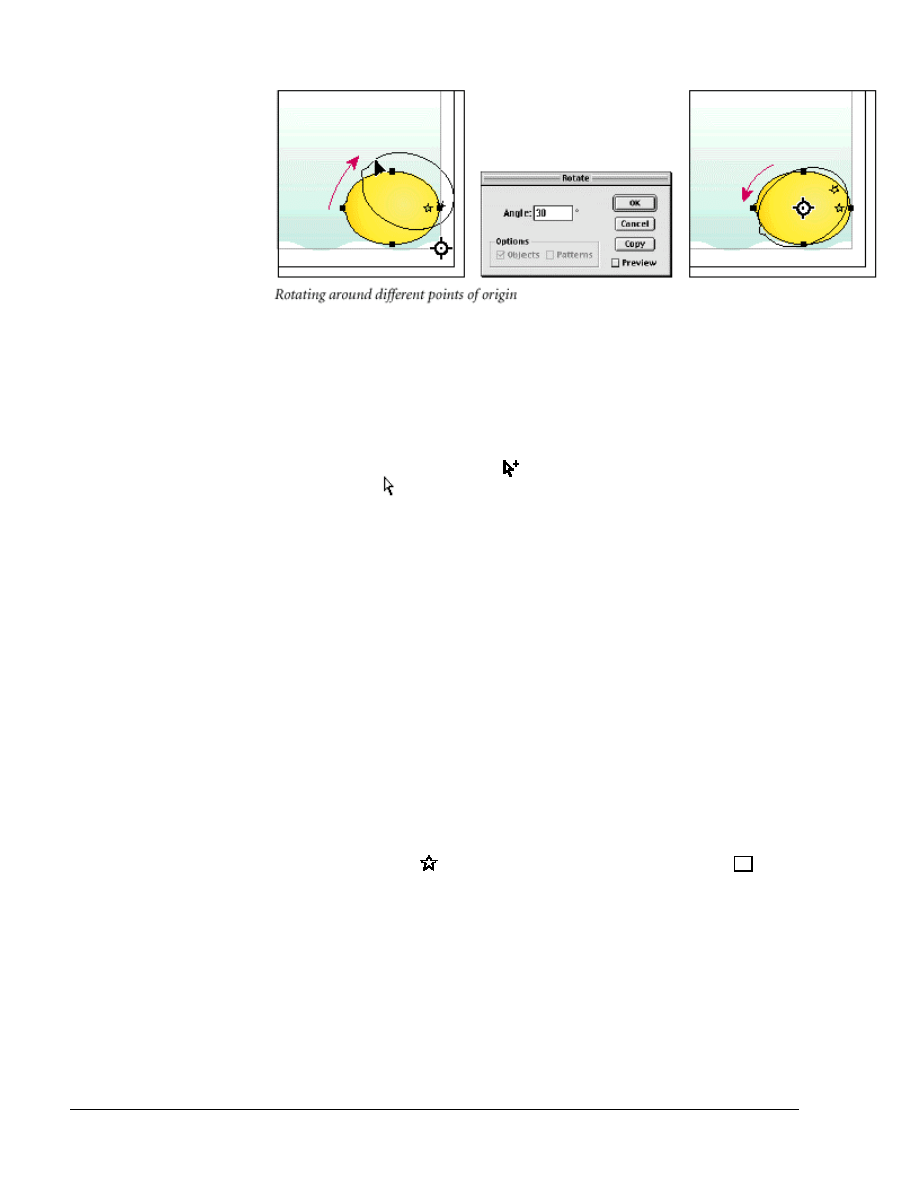
You’ll rotate the lemon 30° around its center point using the rotate tool.
1. With the lemon selected, select the rotate tool (
) in the toolbox.
Notice that the lemon’s point of origin is still at the bottom right corner of the
letterhead.
2. Select the lemon and begin dragging it. Notice how the movement is
constrained to a circle rotating around the point of origin. Continue dragging
until the lemon is in its original position on the letterhead, and then release
the mouse button.
3. Now, with the lemon still selected, double-click the rotate tool in the
toolbox.
When an object is selected and you double-click the rotate tool in the toolbox,
the object is rotated exactly from the center of the object. (This also applies to
the scale tool.)
4. In the Rotate dialog box, type 30 in the Angle text box, and click OK to
rotate the lemon 30° around its center point.
1-6
Fundamentals of Web Design 1.2—-Lab 8.2.6d
Copyright
2002, Adobe Systems, Inc.
Now you’ll select one of the objects within the lemon without ungrouping the
lemon so you can paint the lemon with a lighter color.
The group-selection tool lets you select individual objects or subgroups within a
group.
5. Select the group-selection tool (
) from the same group as the direct-
selection tool (
) in the toolbox. Hold down Shift and click the stem’s core
(not the body of the lemon) to deselect it.
6. With the body of the lemon selected, click a color in the Color palette or a
swatch in the Swatches palette to paint it with a lighter gradient. (We used
the Pale Yellow gradient swatch.)
7. Choose File > Save.
Distorting objects
Various tools and filters let you distort the original shape of objects in different
ways. For example, the wavy line on the bottom of the background object in the
logo and on the letterhead was created by applying the Zig Zag distort filter to
the straight edge.
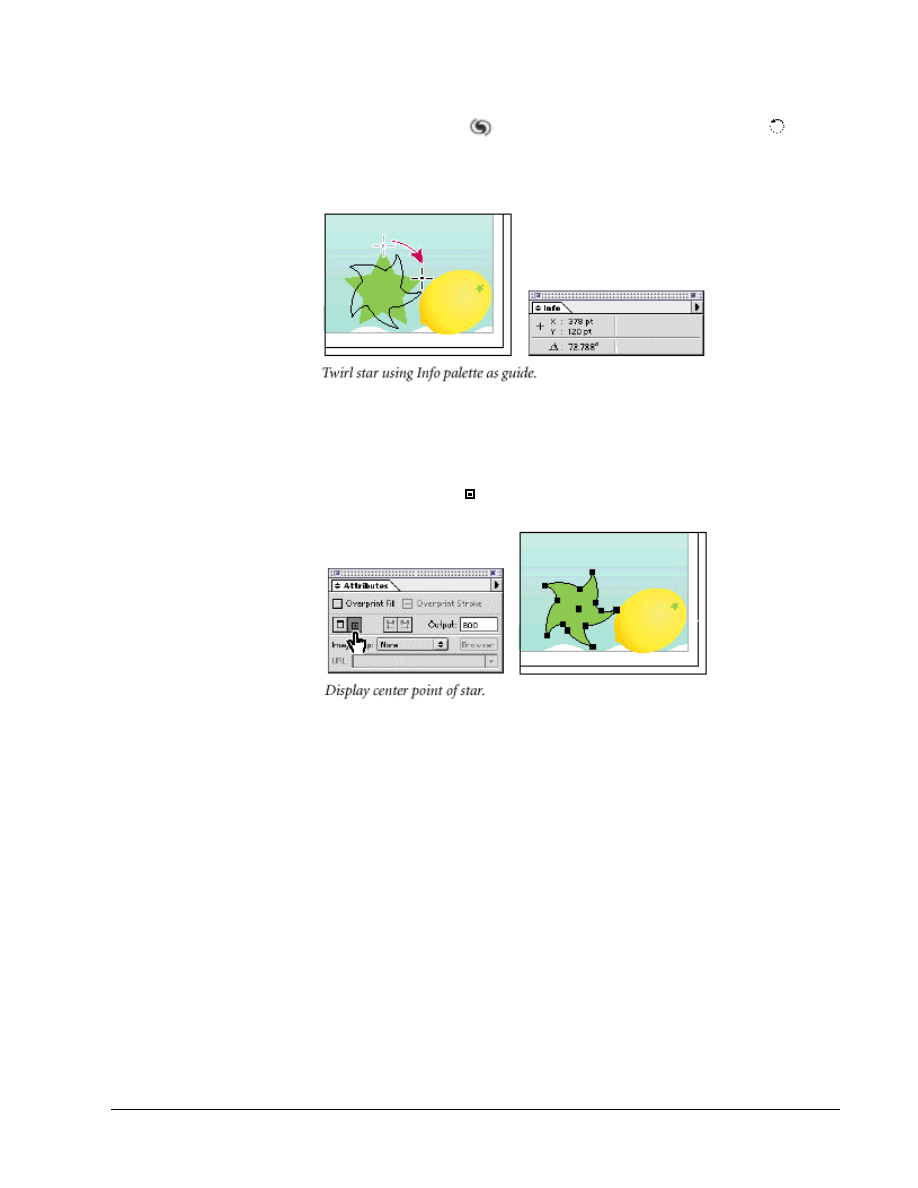
Now you’ll create a flower using the twist tool to twist the shape of a star and
the Pucker & Bloat distort filter to transform another star in front of it.
To begin, you’ll draw a star for part of the flower and use the twirl tool and Info
palette to distort it.
1. Select the star tool (
) from the same group as the rectangle tool (
) in
the toolbox, and position the pointer in the artwork next to the lemon. Drag
the tool to draw a five-pointed star that’s about the same size as the lemon.
The star is painted with the paint attributes of the last selected object (in this
case, the lemon).
2. With the star still selected, click a color swatch in the Swatches palette to
paint the star with that color. (We selected the Lime Green swatch in the
Swatches palette.) Leave the stroke unpainted.
3. Click the Info tab behind the Navigator palette or choose Window > Info to
display the Info palette.
Copyright
2002, Adobe Systems, Inc.
Fundamentals of Web Design 1.2—Lab 8.2.6d
1-7
The Info palette displays information about the size and position of the selected
object’s bounding box.
4. Select the twist tool (
) from the same group as the rotate tool (
) in the
toolbox and select a point on the star (don’t release the mouse button).
Referring to the Info palette, drag the star’s point to the right (in a clockwise
direction) until the Info palette displays about 72 degrees.
Now you’ll draw another star that’s centered on top of the first star.
5. With the star selected, click the Attributes tab behind the Color palette or
choose Window > Attributes to display the Attributes palette. Then click the
Show Center button (
) to display the star’s center point.
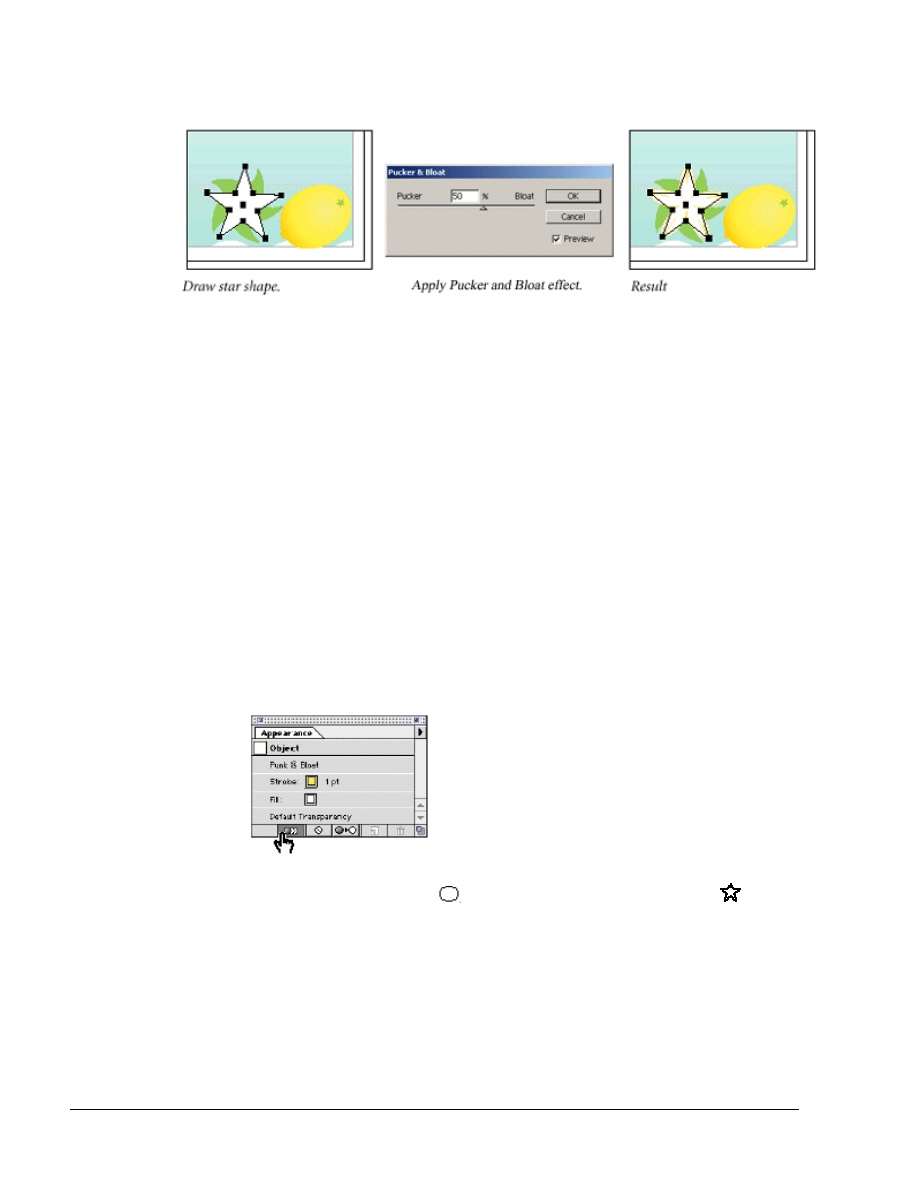
6. Select the star tool again, hold down Alt (Windows) or Option (Mac OS),
and drag from the center point to draw another star over the center of the first
one. Before you release the mouse button, drag the star in an arc to rotate it
so the points appear between the points of the star behind it.
7. Click the Color tab behind the Attributes palette to bring the Color palette to
the front. Click the White color box at the right end of the color bar to paint
the star’s fill with white. Then click the Stroke box to select the star’s stroke,
and click a color in the color bar or in the Swatches palette to paint the star’s
stroke. (We selected the Yellow color swatch.)
Now you’ll distort the star using the Pucker & Bloat filter. This filter distorts
objects inward and outward from their anchor points.
8. With the white star selected, choose Effect > Distort & Transform > Pucker
& Bloat.
The Pucker & Bloat distortion can be applied to objects two ways. Applying it as
a filter permanently distorts the object. Applying it as an effect maintains the
original shape and lets you remove or edit the effect at any time.
1-8
Fundamentals of Web Design 1.2—-Lab 8.2.6d
Copyright
2002, Adobe Systems, Inc.
9. In the Pucker & Bloat dialog box, select the Preview option, and drag the
slider to distort the star (we selected 50%). Click OK.
10. Choose Select > Deselect to deselect the artwork, and choose File > Save.
Shearing objects
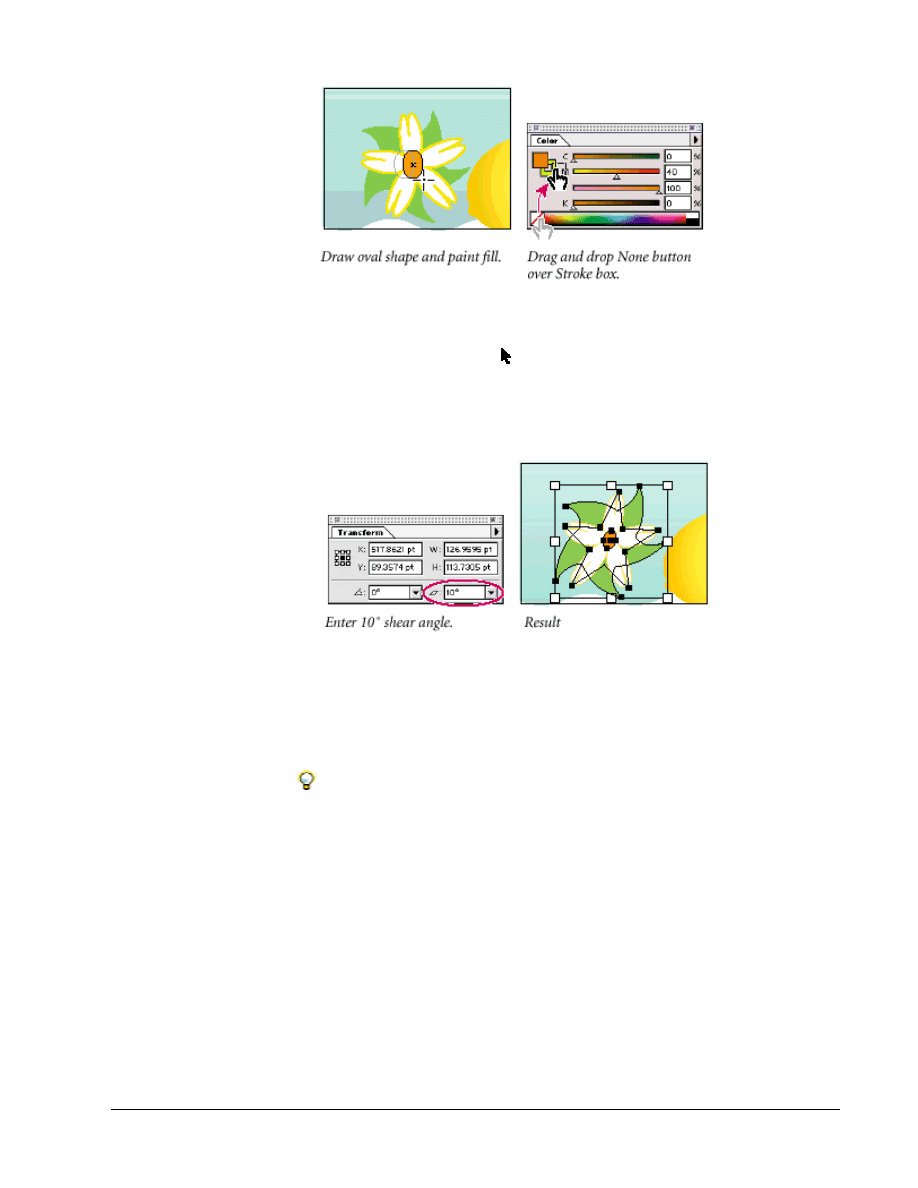
Now you’ll complete the flower with an orange center, scale it, and shear it.
Shearing an object slants, or skews, the sides of the object along the axis you
specify, keeping opposite sides parallel and making the object nonsymmetrical.
1. Click the Appearance tab behind the Info palette to bring the Appearance
palette to the front of its group. (If the Appearance palette isn’t visible on-
screen, choose Window > Appearance to display it.)
The Appearance palette displays the fill, stroke, effects, and transparency of the
last object created. By default the next shape you create will retain all of these
attributes. Since we want the next shape to have different attributes, we will
change this default setting.
2. Click the New Art Maintains Appearance button at the bottom of the
Appearance palette.
The next shape will maintain only the stroke and fill attributes of the last shape.
3. Select the ellipse tool (
) from the same group as the star tool (
) in the
toolbox, and begin dragging to draw a small oval shape for the flower’s
center. Before you release the mouse button, press the spacebar to release the
ellipse tool, and continue dragging to move the oval shape to the center of the
flower. Release the mouse button.
4. Click the Fill box in the toolbox to select the object’s fill. In the Swatches
palette, click the Orange swatch to paint the oval a light orange color.
5. In the Color palette, drag the None icon, and drop it on the Stroke box to
remove the stroke. This action keeps the Fill box selected.
Copyright
2002, Adobe Systems, Inc.
Fundamentals of Web Design 1.2—Lab 8.2.6d
1-9
Now, you’ll shear the flower.
6. Select the selection tool (
), Shift-click to select the three parts of the
flower, and choose Object > Group to group them together.
7. In the Transform palette, type
10
degrees in the Shear text box, and press
Enter or Return to apply the shearing effect on the flower.
8. Type
.75 in in the W text box and .75 in in the H text box to scale the flower
down to three-quarters of an inch.
Although the default unit of measure is set to points, when you type inches or in
in the text boxes, Illustrator calculates the equivalent measurement in points.
To Automatically multiply or divide the size of an object by a number you
specify, enter an asterisk (*) or a slash (/) and a number after the value in either
the W or the H text box, and press Enter or Return to scale the object. For
example, enter /2 after the values in the W and H text boxes to scale the object
by 50%.
9. Using the selection tool, drag the flower next to the lemon in the bottom
right corner of the page.
10. Choose Select > Deselect to deselect the artwork, and then choose File >
Save.
1-10
Fundamentals of Web Design 1.2—-Lab 8.2.6d
Copyright
2002, Adobe Systems, Inc.
Positioning objects precisely
You can use the Transform palette to move objects to exact coordinates on the X
and Y axes of the page and to control the position of objects in relation to the
trim edge.
To learn how to produce crop marks for the trim edge, see “Setting crop
marks and trim marks” in online Help or Chapter 15 in the Adobe Illustrator
User Guide.
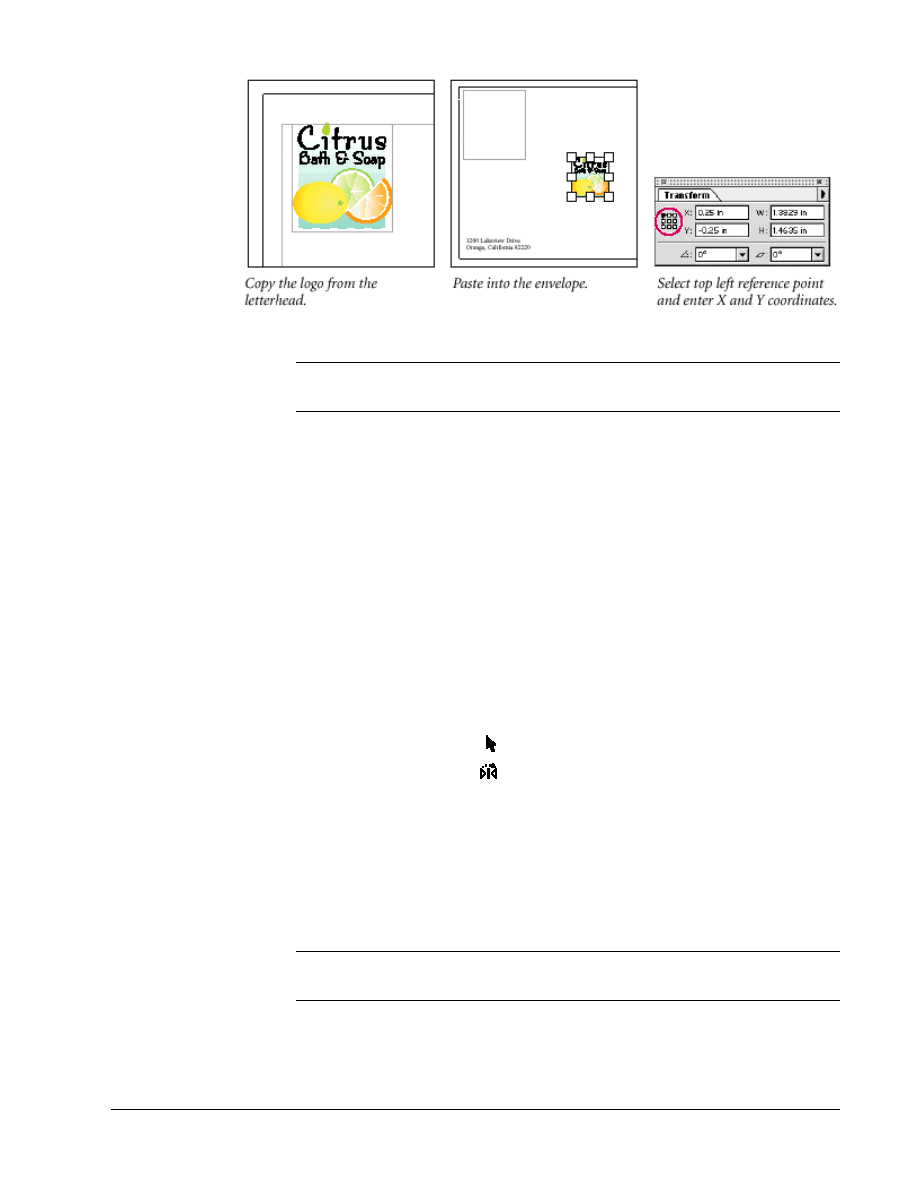
First you’ll paste a copy of the logo into the envelope artwork, and then you’ll
specify the exact coordinates on the envelope for positioning of the pasted logo.
1. Using the selection tool (
), draw a marquee around the logo so that all of
the objects in it are selected.
2. Choose Edit > Copy to copy the logo to the Clipboard.
Now you’ll open the start file for the envelope artwork.
3. Choose File > Open to open the start2.ai file in the Start folder, located
inside the 8_2_6d folder.
4. Choose File > Save As name the file Envelope.ai,. Leave the Format option
set to Adobe Illustrator® Document, and click Save. In the Illustrator Native
Format Options dialog box, select Illustrator 10 Compatibility and click OK.
5. Choose Edit > Paste.
Now you’ll move the pasted logo to the top left corner of the envelope by
specifying the X and Y coordinates in relation to the ruler origin. The ruler
origin is the point where 0 appears on each ruler. We changed the ruler origin in
this file to begin at the top left corner of the envelope and the ruler units to
inches.
For more information, see “Defining ruler units” and “Changing the ruler origin”
in online Help or Chapter 4 in the Adobe Illustrator User Guide.
6. In the Transform palette, click the top left reference point and then type .25
in the X text box and –.25 (a negative coordinate) in the Y text box. Press
Enter or Return to apply the last setting you typed.
Copyright
2002, Adobe Systems, Inc.
Fundamentals of Web Design 1.2—Lab 8.2.6d
1-11
Note
You can also move selected objects to exact X and Y coordinates by choosing
Object > Transform > Move and entering coordinates in the Move dialog box.
7. With the logo still selected, Shift-drag the bottom right corner of the
bounding box to scale the logo and make it fit within the blue square
guideline.
Holding down Shift as you drag scales the objects in the logo proportionally.
8. Click away from the artwork to deselect it, and then choose File > Save.
Reflecting objects
Objects are reflected by flipping them across an invisible vertical or horizontal
axis. Copying objects while reflecting creates a mirror image of the objects.
Similar to scaling and rotating, you designate the point of origin from which an
object will reflect or use the object’s center point by default.
Now you’ll use the reflect tool to make a mirror image of the orange slice in the
logo.
1. Use the selection tool (
) to select the orange slice in the logo.
2. Select the reflect tool (
) in the toolbox, hold down Alt (Windows) or
Option (Mac OS), and click the right edge of the orange slice.
Clicking the edge of the object designates the point of origin. Holding down
Alt/Option as you click displays the Reflect dialog box.
3. In the Reflect dialog box, make sure that the Vertical option is selected and
90 degrees is entered in the Angle text box. Then click Copy (don’t click
OK).
Note
You can also use the Transform palette to reflect selected objects by choosing
Flip Horizontal or Flip Vertical from the palette menu.
4. Click the selection tool to select the bounding box of the new orange slice
and move the object down below the logo. Then Shift-drag the bounding box
to scale the orange slice and make it bigger (as it is in the illustration).
1-12
Fundamentals of Web Design 1.2—-Lab 8.2.6d
Copyright
2002, Adobe Systems, Inc.
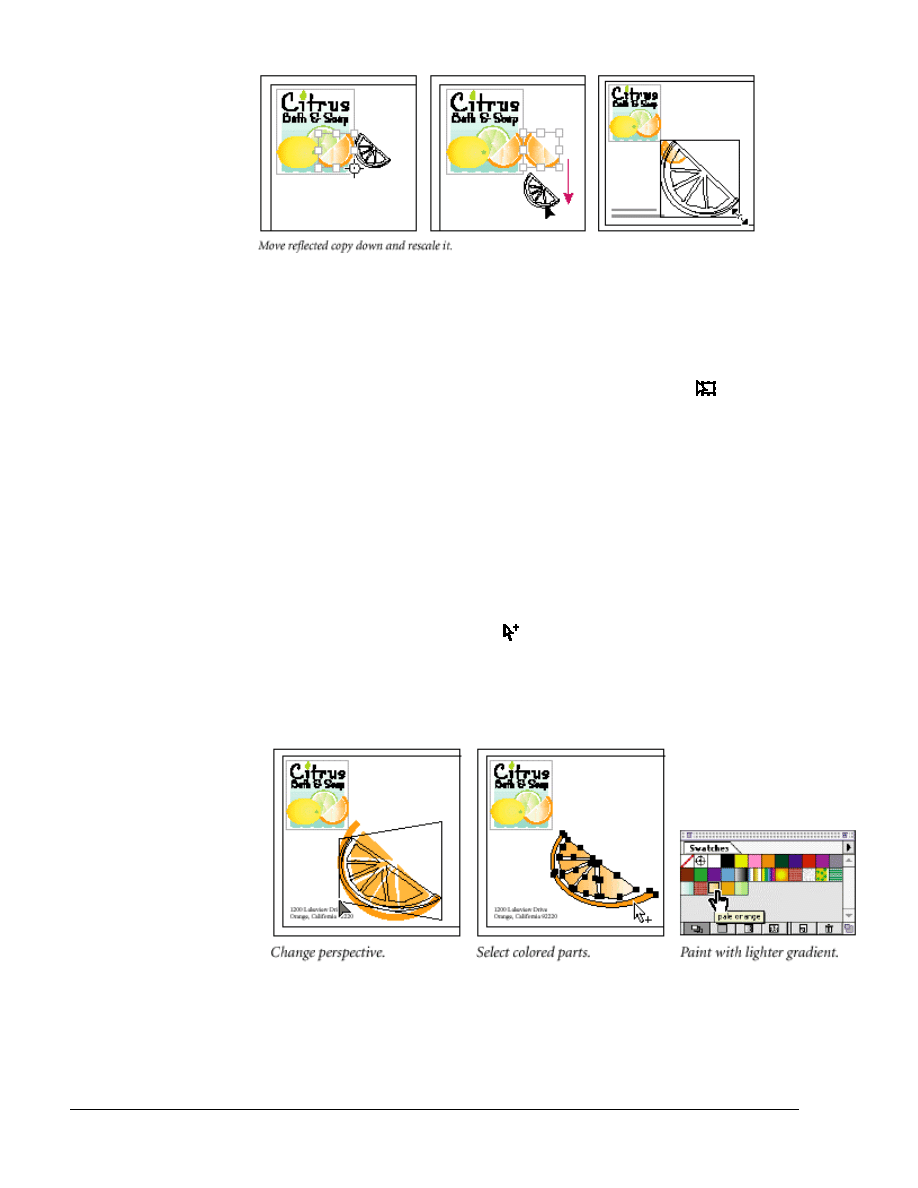
Changing the perspective
Now you’ll use the free transform tool to change the perspective of the orange
slice.
1. With the orange slice selected, select the free transform tool (
) in the
toolbox.
2. Position the double-headed arrow pointer over the bottom left corner of the
object’s bounding box, and select the bottom left corner handle (don’t release
the mouse button). Hold down Shift+Alt+Ctrl (Windows) or
Shift+Option+Command (Mac OS), and slowly drag up to change the
perspective of the object.
Holding down Shift as you drag scales the objects proportionally, holding down
Alt/Option scales from the center point, and holding down Ctrl/Command as you
drag distorts the object from the anchor point or bounding box handle that you’re
dragging.
3. Select the group-selection tool (
) in the toolbox, and click away from the
orange slice to deselect it. Then Shift-click to select the segments of the
orange slice and its rind. (Don’t select the inner white pith of the rind.)
4. In the Swatches palette, select the Pale Orange gradient swatch to paint the
selected objects with a lighter gradient.
5. Choose File > Save.
Copyright
2002, Adobe Systems, Inc.
Fundamentals of Web Design 1.2—Lab 8.2.6d
1-13
Using the free transform tool
The free transform tool is a multipurpose tool that, besides letting you change
the perspective of an object, combines the functions of scaling, shearing,
reflecting, and rotating.
Now you’ll use the free transform tool to transform objects copied from the logo
into a business card.
1. Choose File > Open, and open the start3.ai file in the Start folder, located
inside the 8_2_6/d folder on your hard drive.
2. Choose File > Save As name the file Buscards.ai,. Leave the Format option
set to Adobe Illustrator® Document, and click Save. In the Illustrator Native
Format Options dialog box, select Illustrator 10 Compatibility and click OK.
3. Click the Navigator tab behind the Info palette to bring the Navigator palette
to the front of its group. (If the Navigator palette isn’t visible on-screen,
choose Window > Navigator to display it.) In the Navigator palette, click the
Zoom In button (
) a few times to zoom to 200%, and then move the red
view box over the top left corner of the artwork.
4. Choose the selection tool (
), and click to select the lime slice in the logo.
Then, Alt-drag (Windows) or Option-drag (Mac OS) to make a copy of the
object. Position the new lime slice below and slightly to the right of the logo.
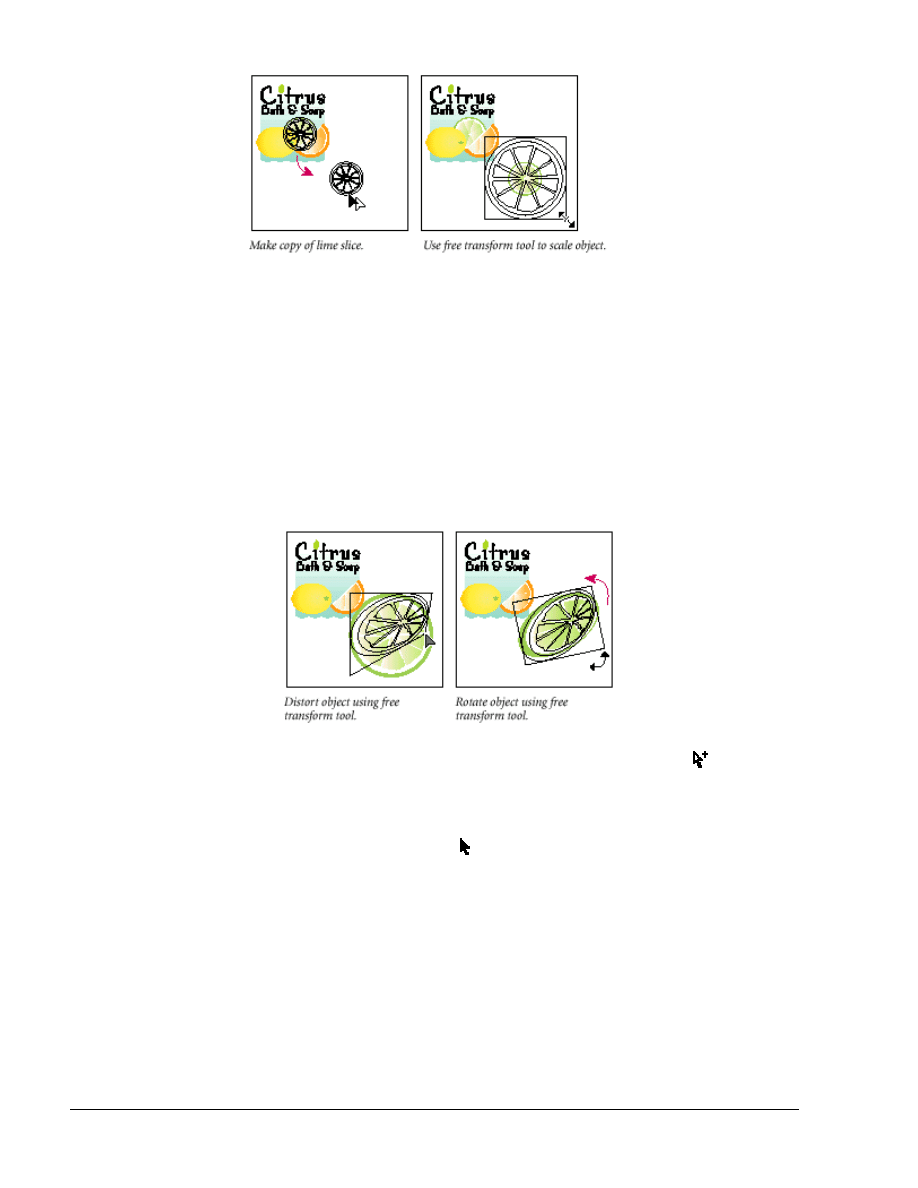
Now you’ll use the free transform tool to scale, distort, and rotate the new lime
slice.
5. With the lime slice still selected, select the free transform tool (
) in the
toolbox. Hold down Shift+Alt (Windows) or Shift+Option (Mac OS), and
drag the bottom right corner down to scale the object from its center and
make the lime slice bigger.
1-14
Fundamentals of Web Design 1.2—-Lab 8.2.6d
Copyright
2002, Adobe Systems, Inc.
Although you can scale objects using the selection tool, scaling with the free
transform tool lets you perform other transformations without switching tools.
6. To distort the lime slice using the free transform tool, select the bottom right
corner of the object’s bounding box—don’t release the mouse button—hold
down Ctrl (Windows) or Command (Mac OS), and slowly drag toward the
opposite corner of the object. (You can use the free transform tool to shear an
object by dragging a side handle rather than a corner handle of the bounding
box.)
7. To slightly rotate the lime slice, position the free transform tool just outside
of the bottom right corner of the object’s bounding box until you see the
rotate pointer, and then drag to rotate the object.
8. With the lime slice selected, select the group-selection tool (
) in the
toolbox and Shift-click the inner white pith of the rind to deselect it. In the
Swatches palette, select the Pale Green gradient swatch to paint the lime slice
with a lighter gradient.
9. Select the selection tool (
), click to select the entire lime slice, choose
Object > Arrange > Send to Back, and then move the object to tuck it under
the logo.
Now you’ll explore a slightly different way of distorting objects. Free Distort
lets you distort a selection by moving any of its four corner points. It can be used
either as a filter to apply a permanent change, or as an effect to apply a change
that can be removed.
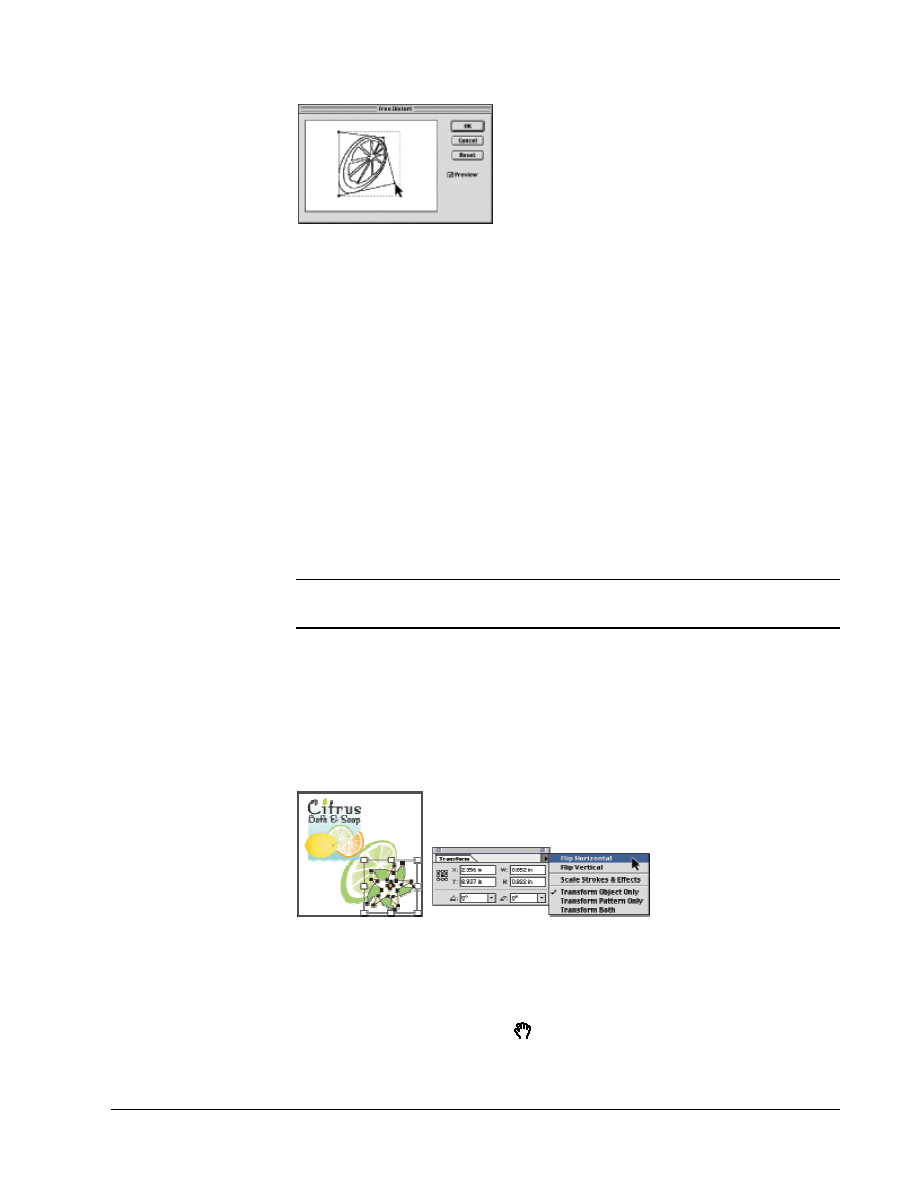
10. With the lime slice still selected, choose Filter > Distort > Free Distort.
11. Turn on the Preview option and drag one or more of the handles to distort
the selection. Click OK.
Copyright
2002, Adobe Systems, Inc.
Fundamentals of Web Design 1.2—Lab 8.2.6d
1-15
12. Click outside of the artwork to deselect it, and choose File > Save.
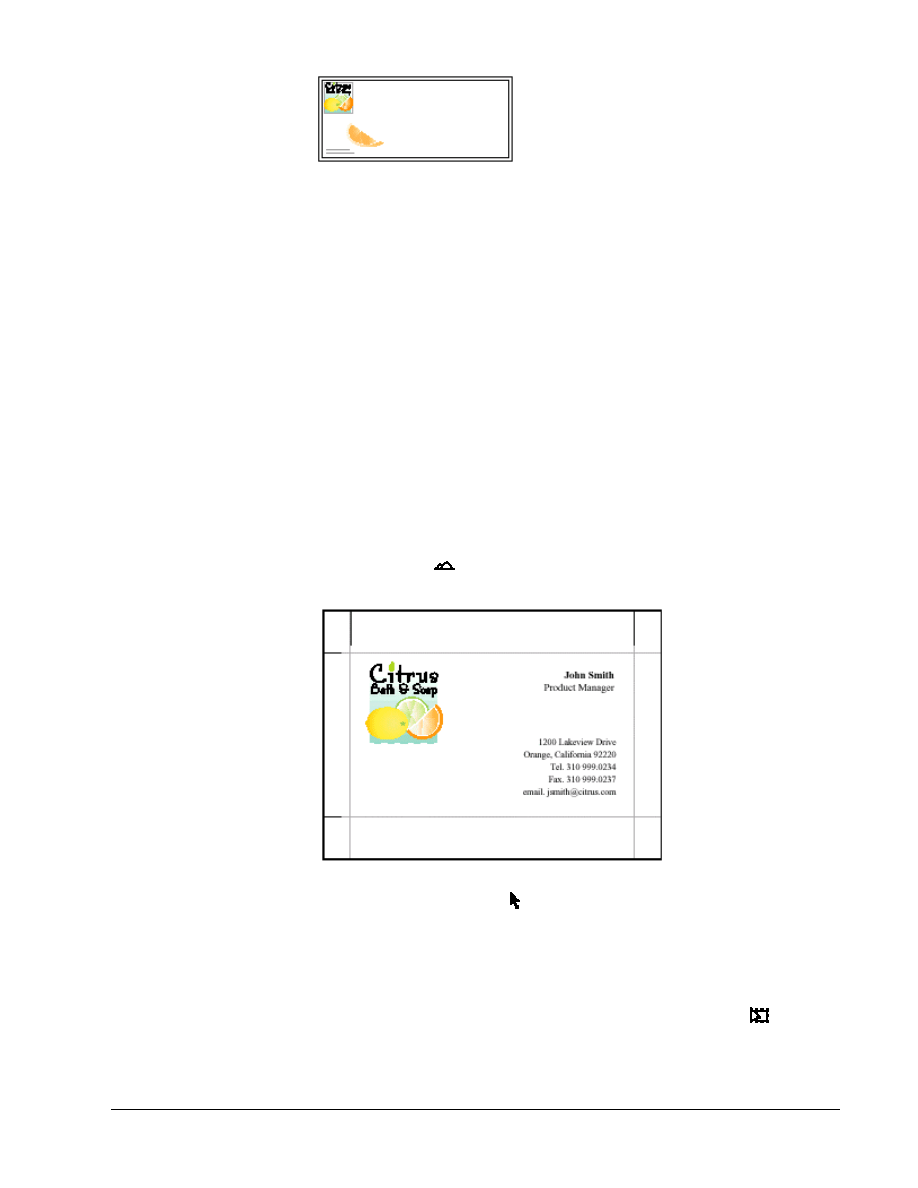
Making multiple transformations
You’ll finish the design of the business card and use the Transform commands to
multiply it nine times for a print layout.
To finish the design, you’ll copy the flower from the letterhead, paste it into the
business card, and reflect it using the Transform palette.
1. Choose Window > Letterhd.ai to display the letterhead document (or choose
File > Open if you closed the file). Select the flower, and choose Edit > Copy
to copy it to the Clipboard.
2. Choose Window > Buscards.ai to display the business card document, and
then choose Edit > Paste to paste the copy of the flower into the business card
layout. Select the flower and move it next to the lime slice.
Note
You can also copy and paste objects between documents by dragging and
dropping them from one window to the other.
3. In the Transform palette, select the center reference point in the small grid
that represents the bounding box to designate the point of origin. Then hold
down the mouse button on the triangle in the top right corner of the palette to
display the palette menu, and choose Flip Horizontal to reflect the selected
object.
4. If necessary, use the selection tool to adjust the position of the lime and the
flower so that they fit within the boundary of the business card.
Now you’ll create multiple copies of the business card in a few easy steps.
5. Double-click the hand tool (
) in the toolbox to zoom out and fit the
artwork in the window.
1-16
Fundamentals of Web Design 1.2—-Lab 8.2.6d
Copyright
2002, Adobe Systems, Inc.
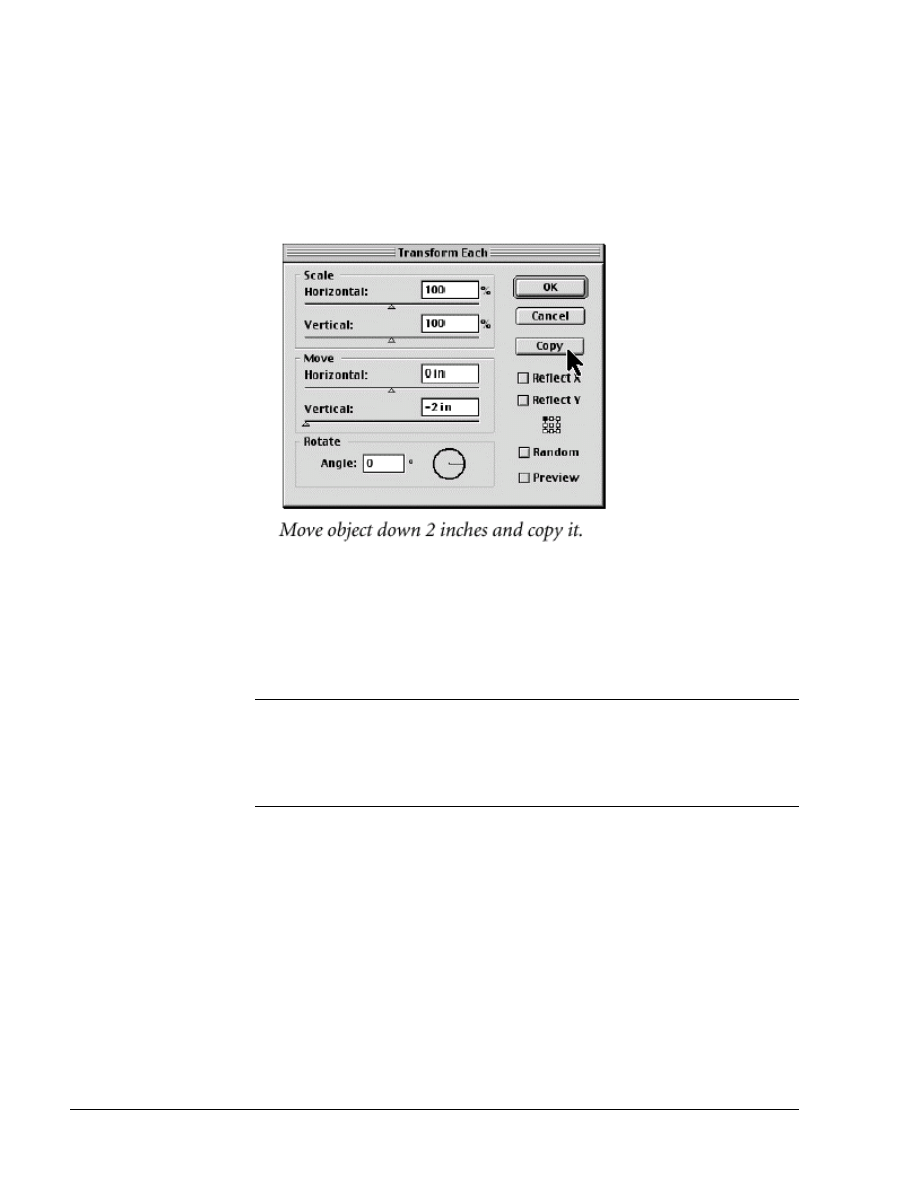
6. Choose Select > All to select all of the objects on the business card, and then
choose Object > Transform > Transform Each.
The Move options in the Transform Each dialog box let you move objects in a
specified or random direction. Now you’ll move a copy of the selected objects
down 2 inches from the original objects.
7. In the Transform Each dialog box, type –2 inches in the Move Vertical text
box, leave the other settings as they are, and click Copy (don’t click OK).
8. Choose Object > Transform > Transform Again to create another copy.
Now you’ll use the keyboard shortcut to repeat the transformations.
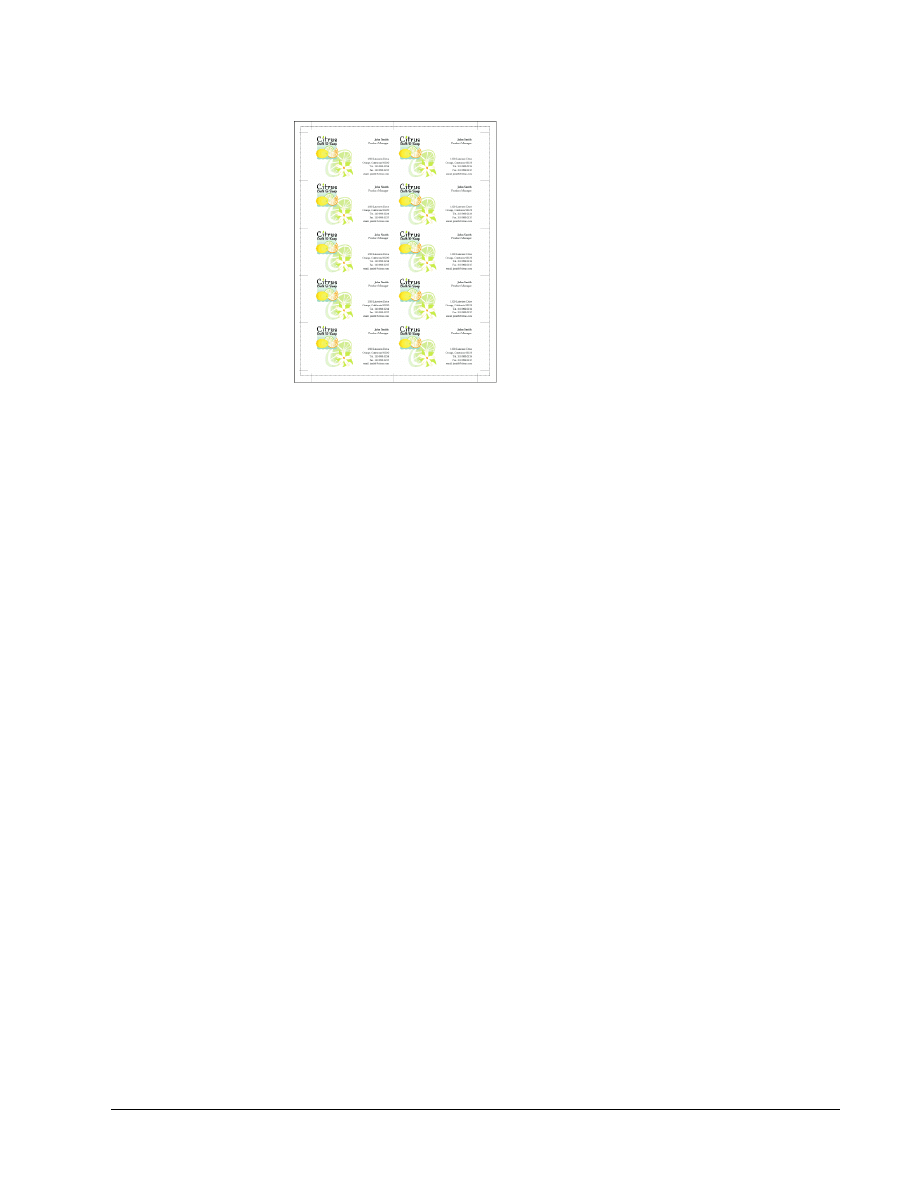
9. Press Ctrl+D (Windows) or Command+D (Mac OS) twice to transform
again two more times, creating a total of five cards in the column.
Note
You can also apply multiple transformations as an effect, including scaling,
moving, rotating, and reflecting an object. After selecting the objects, choose
Effect > Distort & Transform > Transform. The dialog box looks the same as the
Transform Each dialog box. Transforming as an effect has the advantage of
letting you change or remove the transformation at any time.
Next you’ll use some shortcuts to make a copy of the column.
10. Press Ctrl+A (Windows) or Command+A (Mac OS) to select everything on
the five business cards, and right-click (Windows) or Ctrl-click (Mac OS) in
the window to display a shortcut menu. Choose Transform > Transform Each
from the shortcut menu.
11. This time in the Transform Each dialog box, type 3.5 inches in the Move
Horizontal text box and 0 inches in the Move Vertical text box. Leave the
other settings as they are, and click Copy (don’t click OK).
12. To clear the window so that you can view the finished artwork, press Ctrl
(Windows) or Command (Mac OS) and click outside the artwork to deselect
it. Then choose View > Guides > Hide Guides to hide the blue guidelines,
and press Tab to close the toolbox and palettes.
Copyright
2002, Adobe Systems, Inc.
Fundamentals of Web Design 1.2—Lab 8.2.6d
1-17
Pressing Tab toggles between hiding and showing the toolbox and all of the
palettes. Pressing Shift+Tab hides or shows only the palettes.
13. Choose File > Save. Choose File > Close to close the file.
You’ve completed the lesson on transforming objects.
Document Outline
Wyszukiwarka
Podobne podstrony:
Zaczęło się odstrzelenie Galaktyki 6D FLOTA KOSMICZNA ŚWIATŁA
SPRAWKO 4 6D
Mini SAP 4 6D Installation
Wykład 6D 06 05 2014 Ćwiczenie 11 KNR y NORMY NAKŁADÓW RZECZOWYCH (2)
6D.Koniczyna szwedzka, Koniczyna szwedzka (białoróżowa) (Trifolium hybridum L
6d B5EUL44F3QXBX63V7DHCWX3CQZE7USSAM6HWYHQ
5Analiza-6D, Materiały z Uniwersytetu Szczecińskiego i PS (ZUT)
6d) Toxocara
6D schemat Model
kolo rowkowe 6D 535 2d
6d planów ruchu zakładów górniczych
kolo rowkowe 6D 355 2d
6D
6d PhC W2 dodruku
6d(1)
6D Stosowanie PLC w ukł sekw
6d
więcej podobnych podstron