1
DVD to DivX with FlasKMPEG v1.0
Programs you will need
1. VobDec & Danni's GUI
2. FlasKMPEG 0.593 (or greater)
3. DivX Codec (3.11alpha or above)
4. Radium MP3 Codec
5. VirtualDub (optional)
6. Cool Edit or equivalent (optional)
Note:
Most programs will require that Windows Media Player is installed and fully up to date ie. install the Media Players latest upgrade! You
will probably also need Direct X 7.0 installed and Direct X Media (which is different from Direct X and needs to be installed as well).
Step 1. Getting the Film from the DVD
Note:
whenever you name folders or files its always good practice to only use lowercase letters. And never use more than eight letters or
numbers per filename. This applies to folders just as much as anything else.
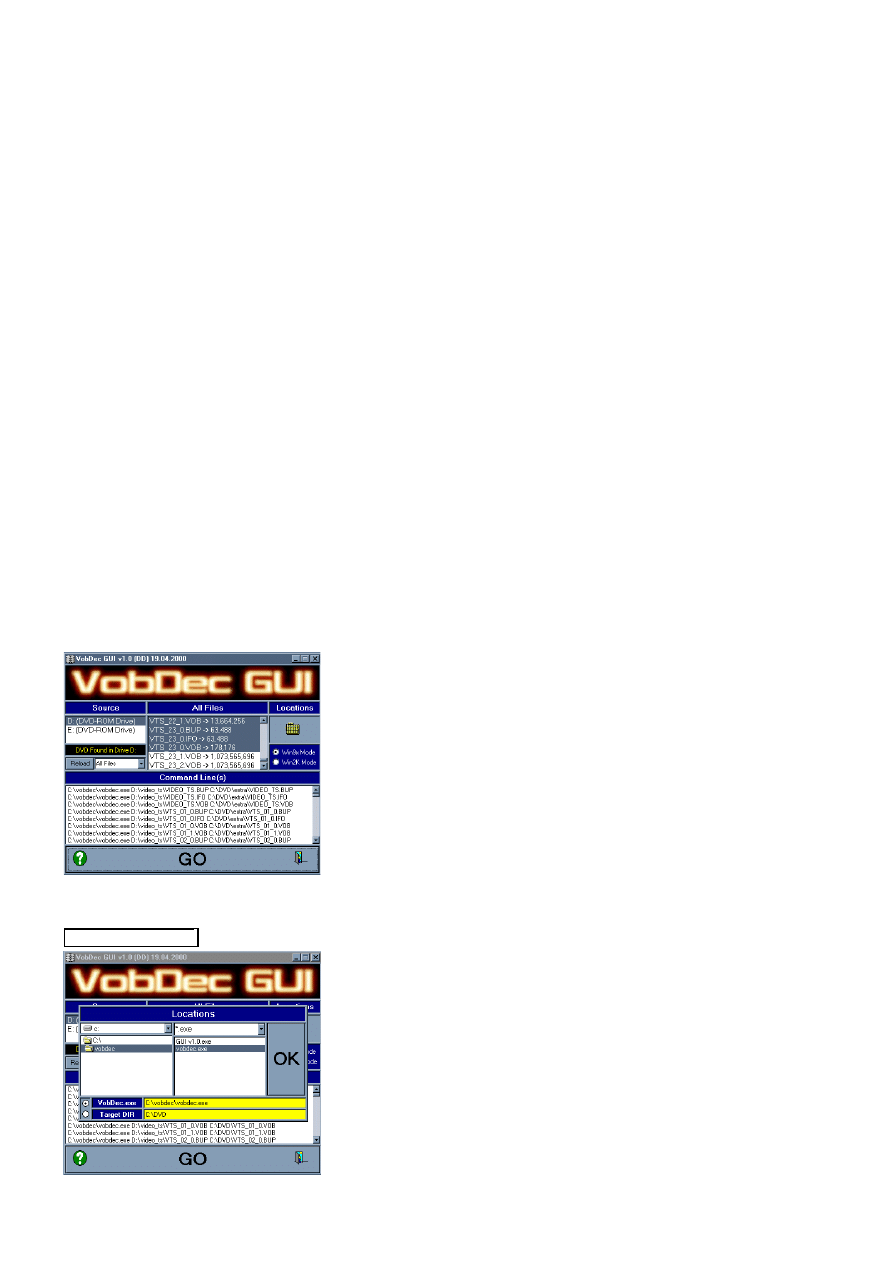
Make a folder on your main drive (usually C:) and call it vobdec. Inside it you will put DVD ripping program files GUI v1.0.exe and
vobdec.exe as seen below:
Make another folder on your C: drive called DVD or something. This is where you will rip your film to.
Put in your DVD film in now and start it playing! Use any DVD player you like (ie. PowerDVD, WinDVD or whatever), this is very important!
Unless the DVD is playing you cannot rip any files! You can pause the DVD player if you want, it doesn't matter. The DVD protection locks
out the CD access unless a real DVD player is using it. This is why we must start the DVD first.
Once started Double click on the GUI and you will get the following box appear. Choose the DVD drive in the Source section of the GUI ie.
"D: (DVD-ROM Drive)". Select EVERY file on the DVD from the "All Files" list.
Now click on the large yellow folder above and the box below will pop up. Show the GUI where the VobDec program is; in this case its:
"C:\vobdec\vobdec.exe". Select the DIR where you wish to save your film ie. C:\DVD.
2
Bingo! Click on the huge GO button and wait 30 mins or so until the whole film is put on your hard drive. This will take between 4 and 8
Gigabytes space so make sure you have enough first.
Step 2. Setting Up FlasKMPEG
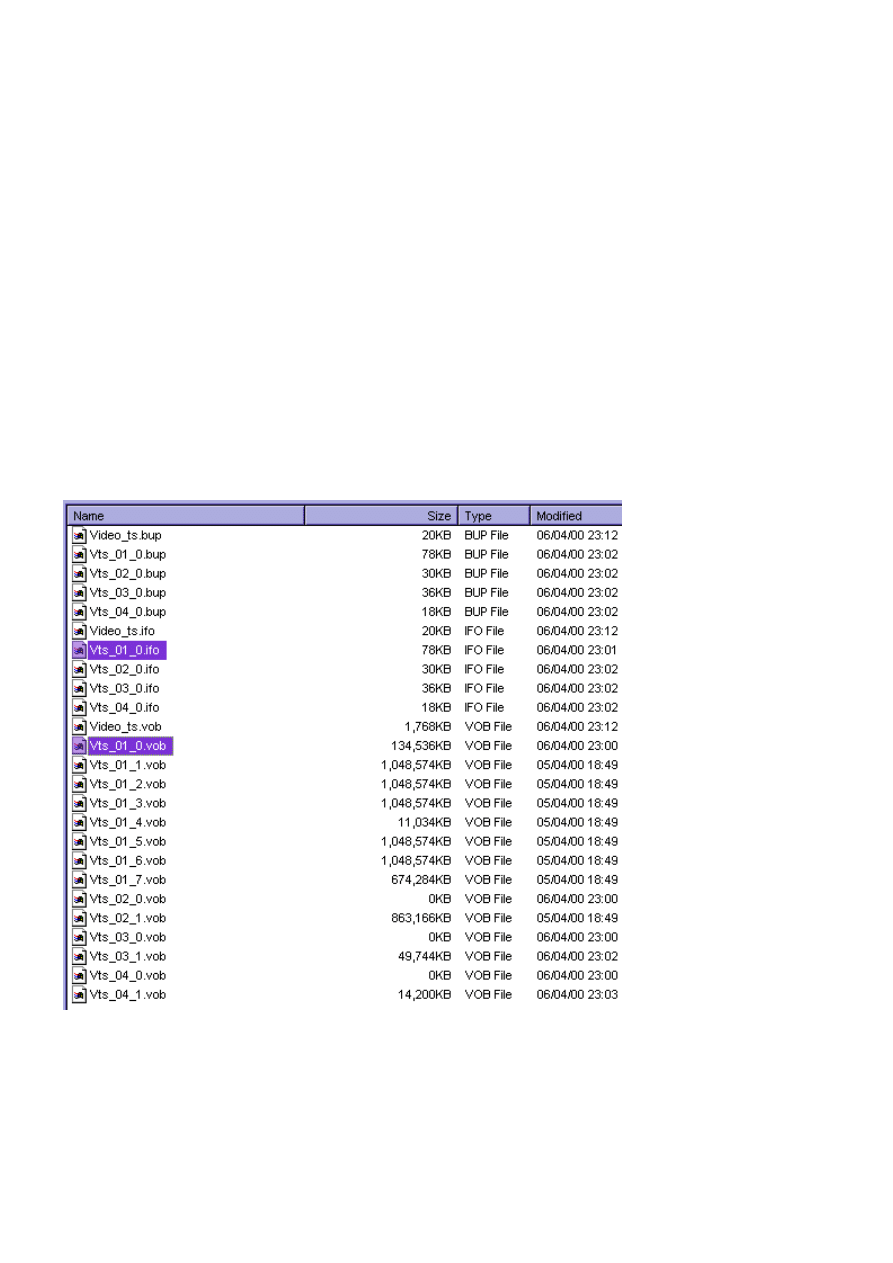
I guess you are wondering what all these file are, right!? We have:
vts_01_1.vob Video Transport Stream (VOB = Video
Objects)
vts_01_0.ifo
Navigational information
vts_01_0.bup Navigational info backup
video_ts.ifo
Secondary navigational information
video_ts.bup Secondary nav info backup
Now you should have something like the picture below in your DVD folder. Look at the names of the largest files. In this example the largest
ones are called Vts_01_
X
.Vob. Some of the other files are quite large too and will be the extra trailers and movie clips that were put on DVD.
To convert this DVD you must open the file that is called Vts_01_0.ifo in FlasKMPEG. These .ifo files contain the playback details of your
movie and are important for getting the files in the right order. Notice how the correct .ifo file for the movie has the same name as the movie
files, ie: Vts_01_
something
.Vob.
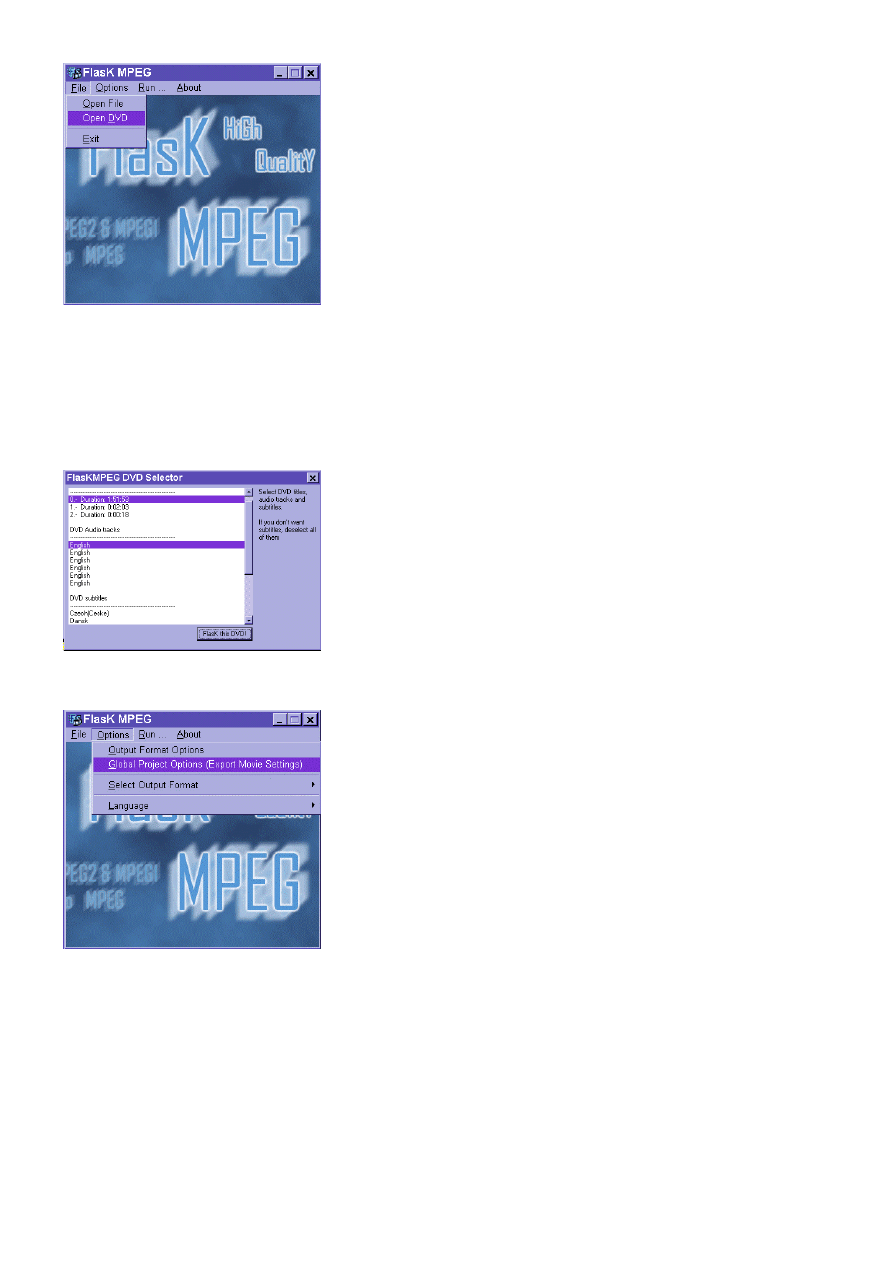
So, if you haven't done so put the FlasKMPEG program folder on your Hard Drive and double click on the FlasKMPEG.exe to start it. Up
pops this friendly looking box. Choose File > Open DVD and search for the folder with the .ifo file called Vts_01_0.ifo as explained above.
Note:
this filename will obviously change depending on the DVD but its easy to spot.
3
Then up will pop something like the picture below. Select the movie Duration, in this case 1.51.53. This will usually be the first one in the list,
but you can see from the length which one to choose. Next choose the language. Obviously they cannot ALL be English so choose the first
and encode a minuet of the film and listen to it. If its not English choose the next in the list, and the next and the next etc., until you find the
correct one. Lastly we have subtitles. I don't usually select any because I don't want them on my movie. If you choose subtitles then you will
not be able to turn them off, they will ALWAYS be on your movie!
Press FlasK this DVD!
Lets choose some settings for the DivX. Go to Global Project Options.
Quickly check the main Video options. Leave the Width and Height alone for now because I will explain how to decide on these later. Usually
Flask will read the DVD and then select the correct Time Base (fps) itself. All PAL movies (Europe) are 25 frames per second, so if you know
your movie is PAL and Flask is set to 29 instead of 25 then change it here. All North American movies are NTSC which is 29.97 fps. As long
a it looks something like below leave all other settings alone.

4
Now on to the Audio tab and select 'Decode audio' and un-check the same as input box. Then select 44100 Hz.
Make sure 'Keep aspect ratio' and HQ Bicubic Filtering is selected. Ignore the rest.
Note:
Bicubic resizing is a way of resizing an image with the minimum loss of detail. The fastest way to shrink a video is simply to grab
spaced out pixels and then put them together again to make a smaller one. This results in a chopped up image so its best to use Bicubic
which uses an algorithm that takes into account all pixels.
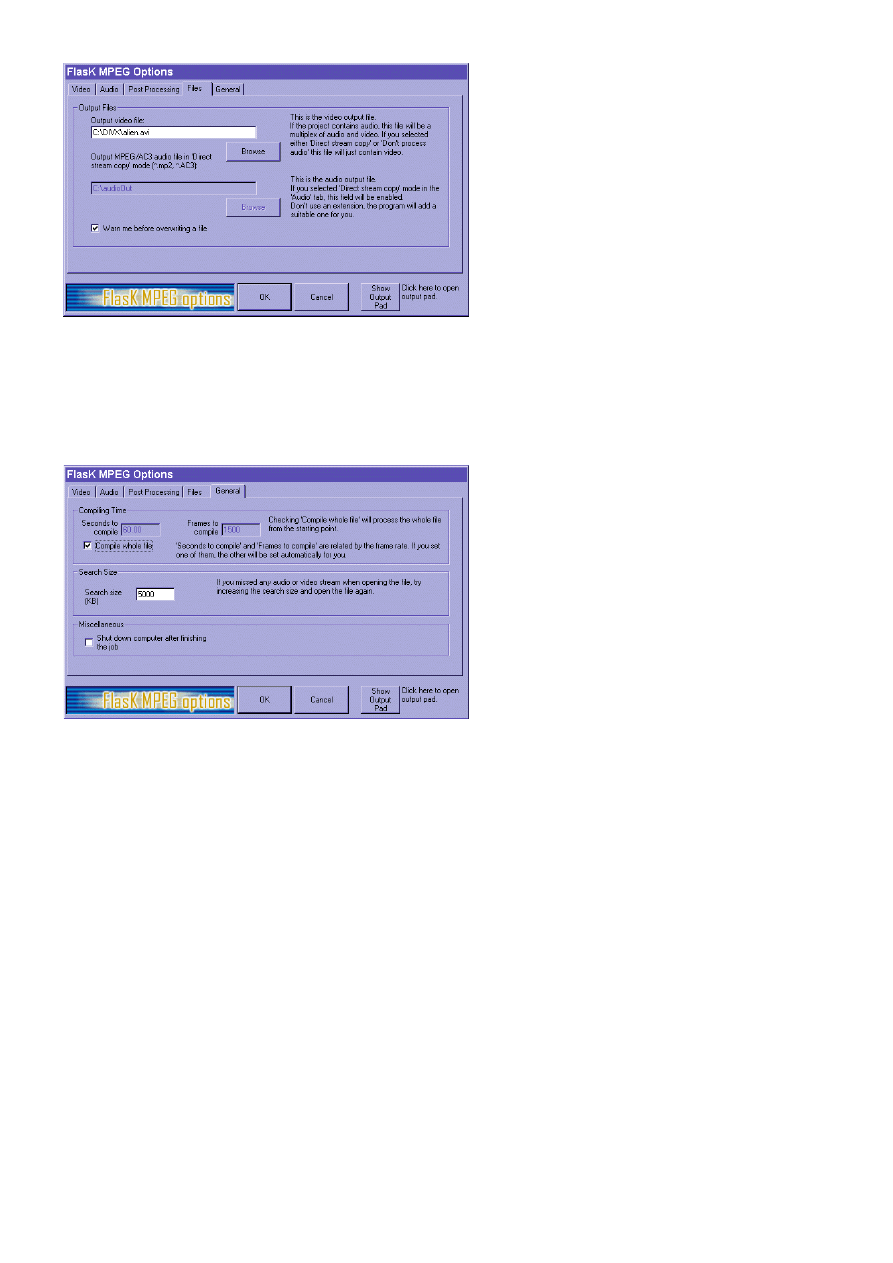
Okay choose the folder where you wish to save your finished movie. Don't worry about the audio section below, it is greyed out because the
audio is done with the video.
5
Make sure the 'Compile whole file' box is checked if you wish to convert the whole film. If you want to test a few mins of the movie first to test
out quality or if the sound is in the correct language or if there is any sound at all! Then you can un-check the box and type in the number of
seconds to convert: 60.00 is a minuets worth of play time and 120.00 will be two mins etc.
Search size! If your movie starts converting but you do not get any sound (as often happens) try increasing the search size number a bit
more and try again.
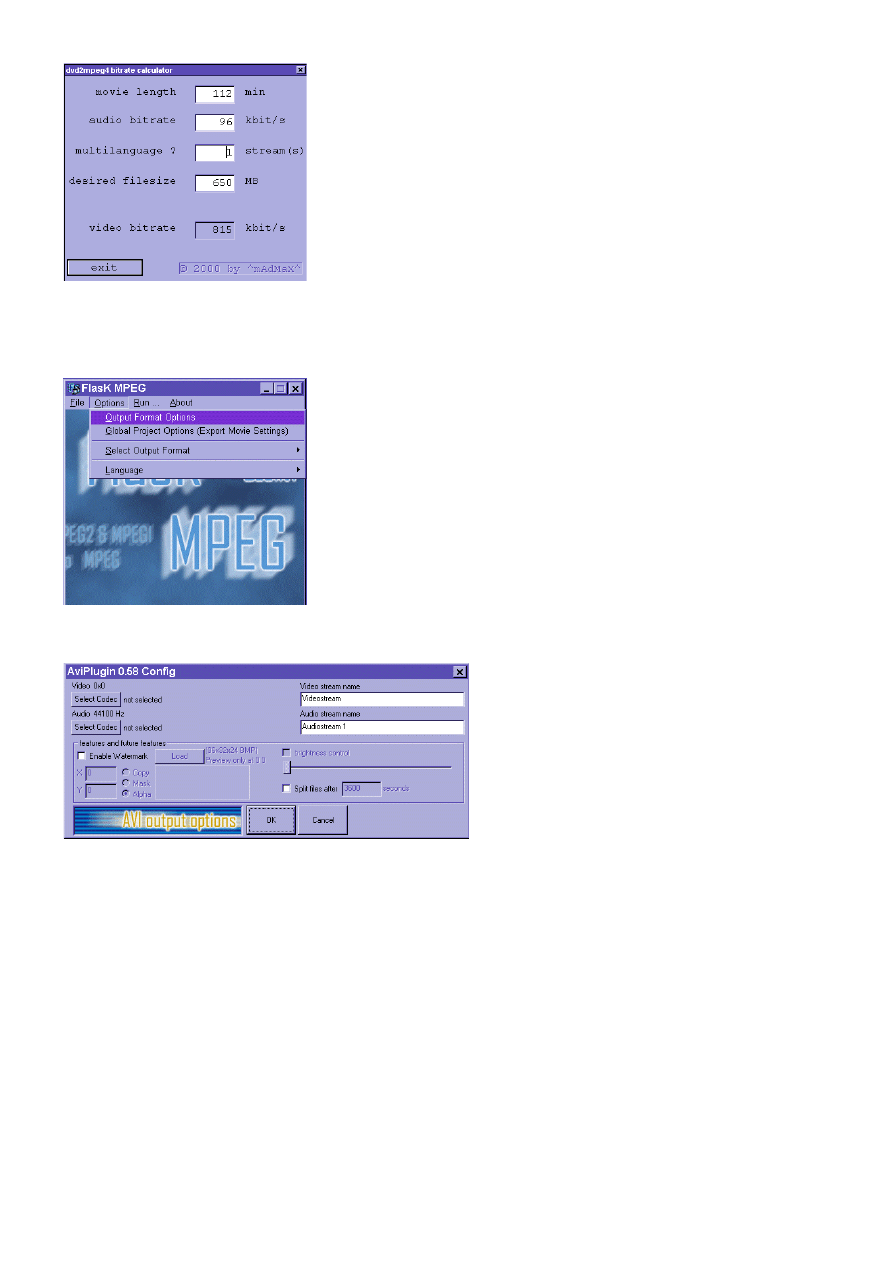
Choosing the Bitrate
The bitrate setting is basically a quality setting. The higher the bitrate the higher the quality of the finished movie. The problem is the higher
the quality the more space it takes. If you wish to fit a 2 hour film on a single CD you are looking at a bitrate of between 600-700. If you are
doing 2 CD's then you can go between a bitrate of 1500 and 2000. To make life easier many bitrate calculators have been made. Here I am
using the ^mAdMaX^ dvd2mpeg calculator.
• Type in the movie length in mins.
• Type in the audio bitrate you will use. I use either be 64 or 96 for Mp3. But a higher amount can be used for music videos though.
• Keep languages to 1 streams unless you intend on doing more.
• Type in the desired filesize. A single CD is 650MB and two CD's are obviously 1300MB.
Bingo! Your bitrate is displayed below, in this case its 815kbps.
6
So what do we do with this information?
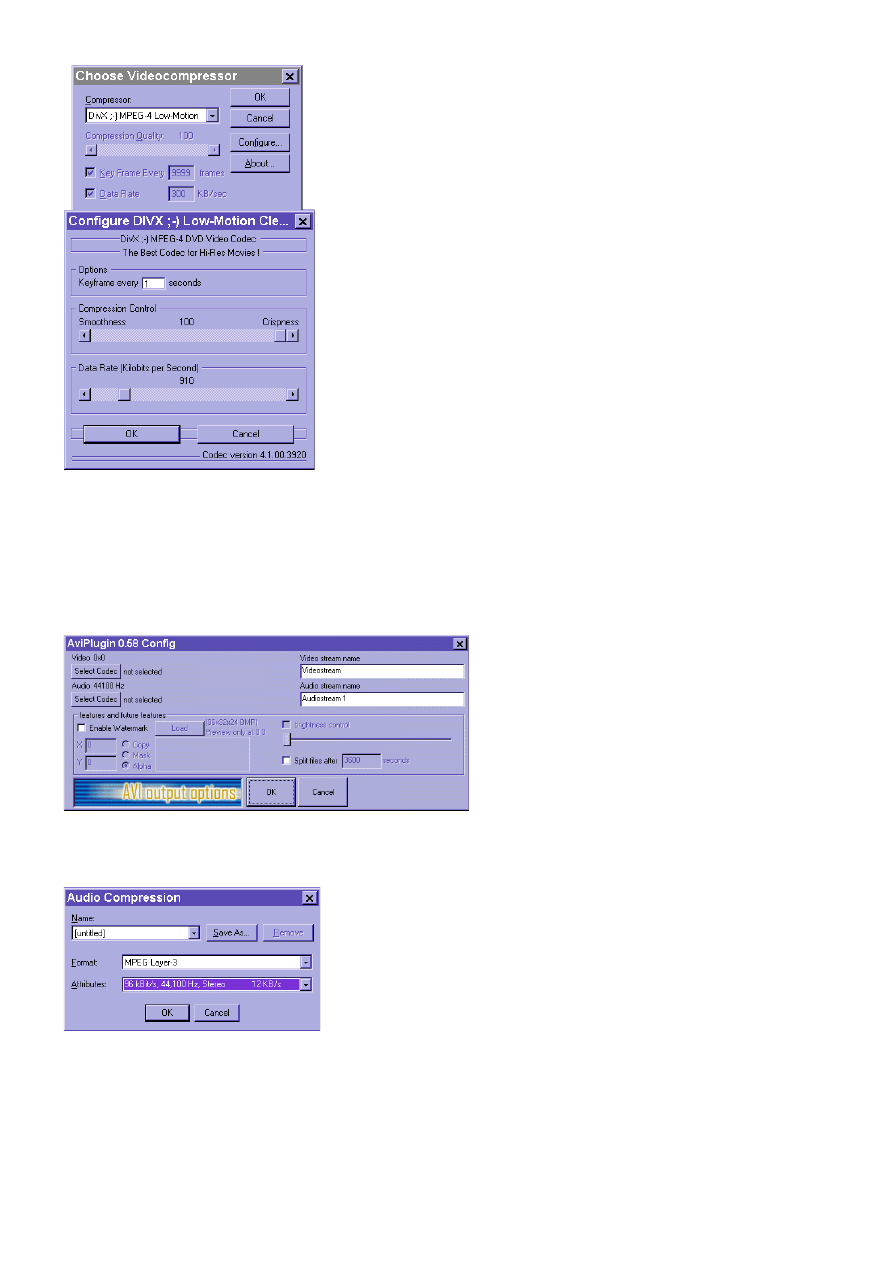
Go to Options > Output Format Options.
Up pops the box below. Ignore everything and press the top Video button saying 'Select Codec'.
Up pops this box below. Choose DivX MPEG-4 Low-Motion and press the Configure button. Keep the Crispness to 100 and Keyframe every
1 seconds. Actually you can set it to between 5 and 10 if space is absolutely vital but I usually set it to 1. Use the slider bar to move the
bitrate level that you got from your calculator. Below is the default amount of 910 but we worked out that our film of 112 mins needs
815kbps. Usually you can do a little more than these calculators say but to be safe use this setting. Press OK.
7
Note:
Setting keyframes to 1 will also take more processing power for your computer, which may cause playback troubles if your computer
is not very fast or doesn't have a very good graphics card. I suggest you do some experiments to see how it turns out. A DivX movie will
require a computer of about 300MHZ to play back correctly. Also, some people say using 75 Crispness gives a better playback, but my
computers seems to do okay or better with 100. Lowering the Crispness will only speed up the conversion slightly but will do nothing to help
picture quality.
Now select the lower Audio button called 'Select Codec'.
If you are converting a music video and need the highest quality audio, Mp3 is still the best. I have set it to 96kbps but you can choose CD
quality 128kps if you wish.
One you have decided click OK.
8
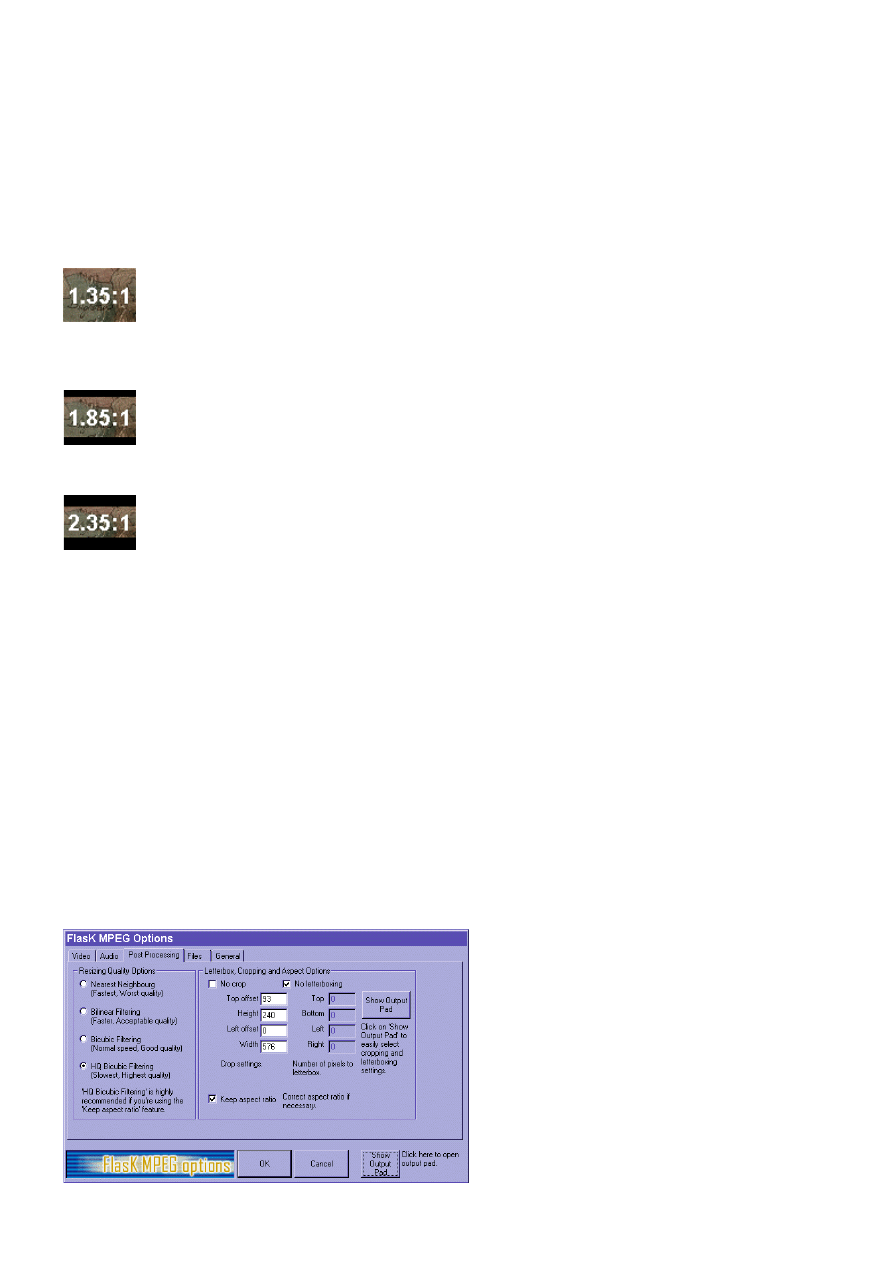
Step 3. Cropping & Resizing the Movie
Loads of people cannot be bothered to crop and resize their movies! I keep seeing people asking for the best "settings" for a DivX. Well they
are overlooking a very important setting - size! Cropping and resizing a movie will not really decrease how much space it will take up by very
much, but it will increase the speed of conversion and it will increase the quality of the finished movie a great deal!!
What sizes are best?
I tend to get best results with the following sizes:
4:3 Standard Aspect Ratio
416 x 304 (best for single CD rip)
512 x 384
Note:
for this format, since there is no cropping, all you need to do is type these numbers into the size part of the video section.
16:9 (1.85.1) Anamorphic
512 x 288
24:10 (2.35.1) Anamorphic (CinemaScope)
576 x 240
Note:
even with the smallest cropping sizes I have aimed to keep slightly above VCD (Mpeg-1 VideoCD) resolution which is considered VHS
video quality. VCD is 352 x 288 PAL and 352 x 240 NTSC. A PAL TV can handle about 576 lines so I'm very close to a TV's full resolution
here anyway. The reason ANY film looks better on TV rather than on a computer is because a computer monitor is designed to isolate and
separate pixels from each other to make sharp crisp lines appear. But a TV will automatically blend lines into each other. Anyone who has a
TV-Out Graphics card will know what I mean; the DivX blocks disappear on a real TV screen!! Some graphics cards have a blend feature
that simulates this effect which is often why your DivX will not look as good on a friend machine.
As you can see, DVD's come in three sizes: full screen (4:3), elongated (16:9) and very elongated (24:10). The size I choose depends on
what aspect ratio the DVD has. This is often written on the back of the DVD case. You can, of course, choose any size you like or just leave
it at DVD size but the rip will go badly in my opinion. I will sometimes go higher when I do 2 CD's but never on a single.
Anyway, since this movie is 24:10, I will show you how I go about cropping and resizing it. The other sizes are resized exactly the same way.
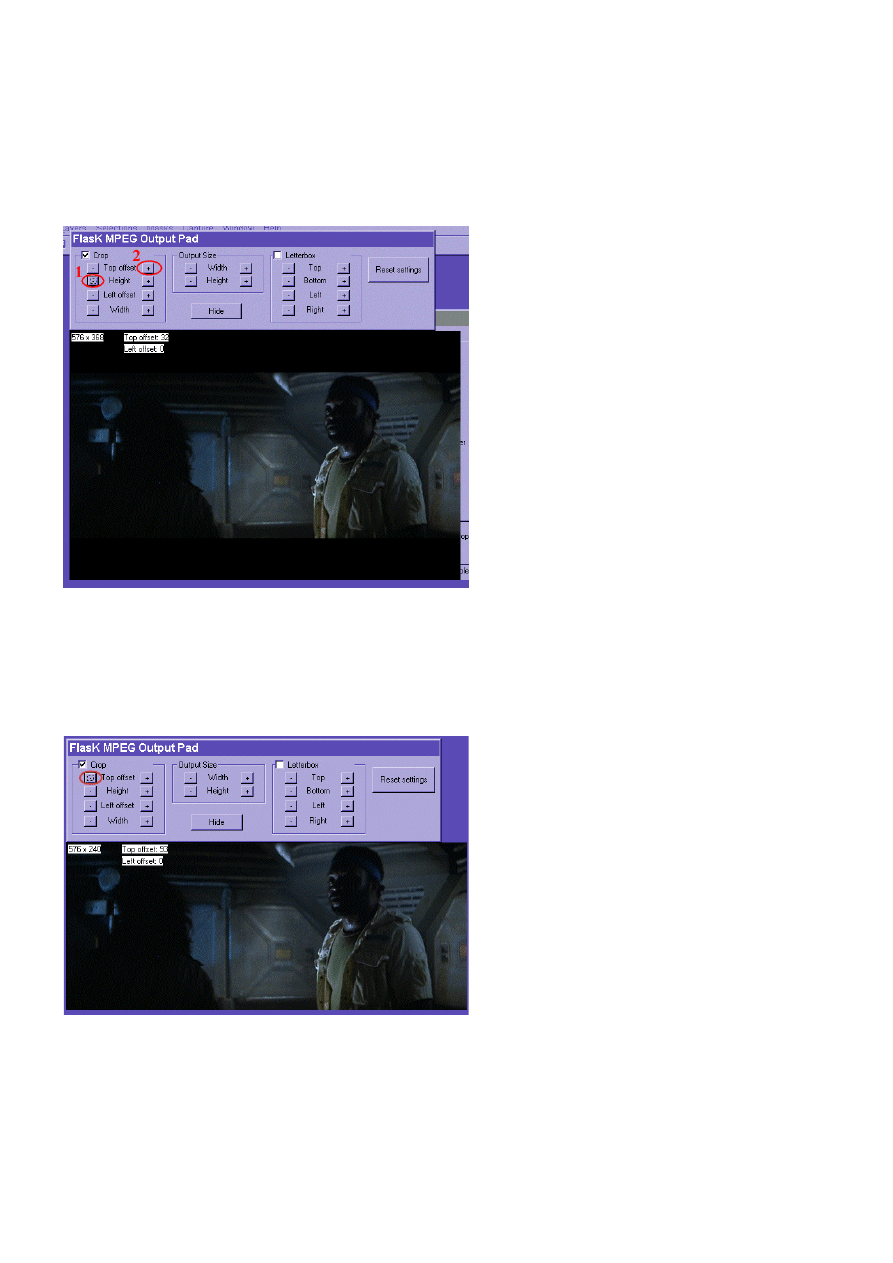
To start cropping press the 'Show Output Pad'. This will bring up a picture of the movie with controls above it that allow you to change its
size and crop out black areas.
Note:
sometimes a black picture will appear. You have been unlucky here because Flask has chosen a picture for you to look at and it just
happens to be a blank frame! You need to select a single vob file from the middle of the movie instead of the .ifo file. This will change the
picture it selects for you. Once you have the size correct reselect the .ifo file again.

9
To summarise what the Output Pad controls do:
Crop - Height & Width
This setting represents an imaginary window in which the picture sits. By either increasing or decreasing the height and width you change
the size of this window. This does not affect the size of the actual picture inside the window.
Height
- Cuts bits from the bottom of the picture in jumps of 16.
+ Adds them back.
Width
- Cuts bits from the right of the picture in jumps of 16.
+ Adds them Back
Crop - Top & Left Offset's
These options move the picture inside the box up, down, left and right. they do not crop the image or change its size.
Top Offset
- Moves the picture down
+ Moves picture up
Left offset
- Moves the Picture Right
+ Moves the Picture Left
Output Size
This option is important because it changes the size of the actual image inside the window.
Width
- shrinks the picture by pulling it in from the right.
+ stretches the picture by pulling it out to the right.
Height
- squashes the image by pulling it up from the bottom
+ stretches the image by pulling it up from the bottom
Reset Settings
This puts the image back to FULL DVD size and is useful if you want to start again because you've the wrong sizes selected.
letterbox
These are basically the same as crop but it resizes the whole image without cropping. Since I am cropping the image I do not use letterbox.
Cropping the film
Okay, I have a 2.35:1 CinemaScope movie. I want not only to resize the picture but to crop out those back parts above and below the film.
Doing this saves quite a bit of wasted memory and will allow you to use a higher bitrate and hence increase the quality of image playback.
When played Fullscreen the cropped movie will still look the same because Media Player adds a black background anyway.
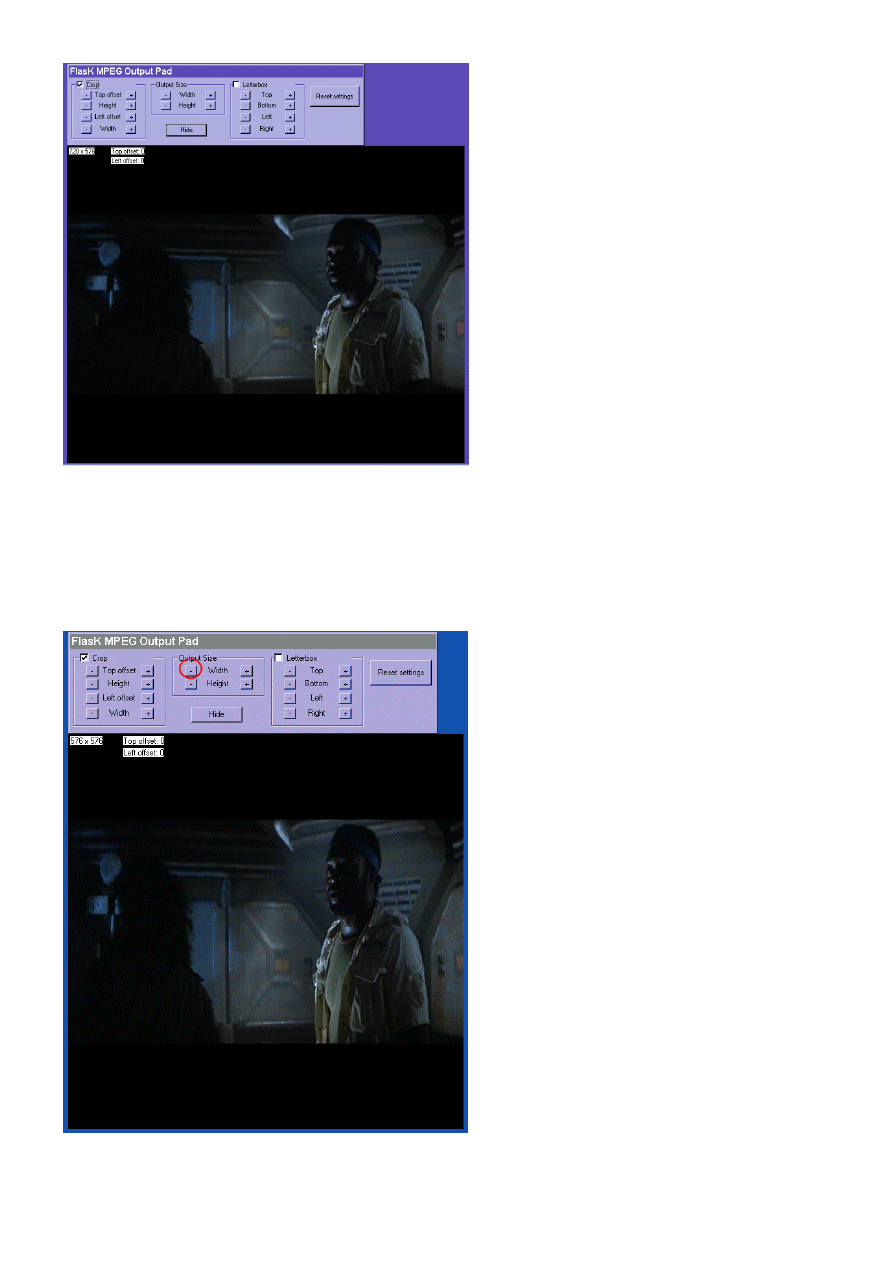
Click on the output pad button to open it and you will see the picture below. Press the Reset settings button to make it appear as it is on the
DVD. Bingo! This picture is far to big for a single CD DivX! Tick the crop box and lets start cropping.
Note:
Flask has the annoying habit of loosing parts of the picture! You will be editing it and suddenly the bottom will disappear or the whole
picture will go white! This isn't actually a problem with the resizing itself, just with the preview it shows you and the DivX will be okay of
course. But the easiest way to "refresh" the image and make it appear clear again is to open Windows Explorer. Maximise it once so it
makes Flask disappear and then minimise it with the minimise button (don't do this by double clicking on the taskbar button). When Windows
Explorer disappears and the Flask image will be as clear as a bell ;-). you need to do this quite often I'm afraid. Its also a good idea to make
sure you have a light background on your desktop so you can see the edges of the picture.
10
But before I crop I will squash the picture by pressing the minus (-) button in the output size section (see red circle in below picture). I
pressed it 9 times until the picture was 576 wide. Notice how the size is displayed on the left of the picture. I always squash sideways first
because usually the DVD will not need cropping on the sides.
Since we resized the image to the left 9 times, to keep the image in perfect aspect ratio (ie. not stretched in any way), we will press the
Height (-) button just below the width 9 times as well (just below the red circle). Remember, always do the same amount for both Height and
Width no matter what size the DVD starts. This way you will always keep the image in the correct aspect ratio.
11
Note:
All my movies are PAL but it has come to my attention that NTSC movies that are converted in Flask can be slightly stretched. Why
this is I do not know, but I suggest you crop the movie and then test a short clip first. If the actual output is wrong then stretch it a bit and test
it again. The output box may look wrong but the finished movie is what matters ;)
Okay, its not always possible to get the exact height that I suggested correct, but you will still get it cropped at the best size for this particular
DVD. Now we will start cropping bits off the bottom, do this a couple of times by pressing the red circle 1 (- Height). Then move the picture
up until the border above disappears. Do this by pressing the red circle 2 a few times. Finally the bottom border will disappear (by using
circle 1).
In this instance I managed to get the exact size I wanted 576 x 240, but this may not be the case for you. Use the - Top Offset (seen below)
plus the + Top Offset (circle 2 above) to get the picture positioned perfectly.
Note:
in terms of compression it is ALWAYS better to crop a few pixels INTO the picture to completely get rid of those black borders. If this
is not possible to do without loosing large chunks of the picture then don't worry, but if you possibly can do it. It is this thin black line between
the picture and the black area that takes the most memory! The rest of the black can be compressed very well!
Okay, that's it! Don't worry if the Flask picture settings are a different size to what it says in the output pad, the cropping overrides anything
Flask had set before.
This is how I always resize my pictures, I have spent a lot of time calculating the correct aspect ratio's and think these sizes work well, at
least for a single CD DVD, which this tutorial is mainly aimed towards. Actually, they work well for both but people just want larger pictures all
the time.
12
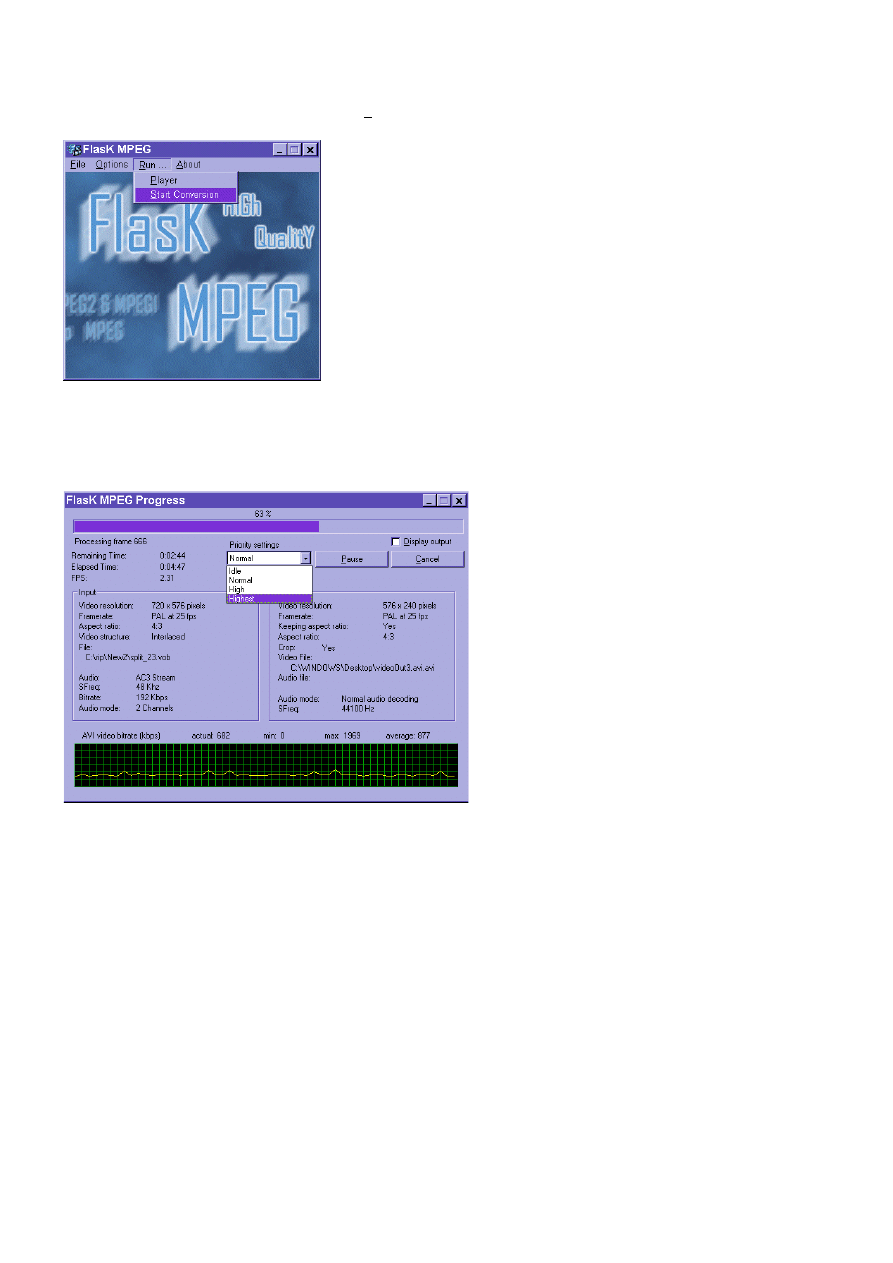
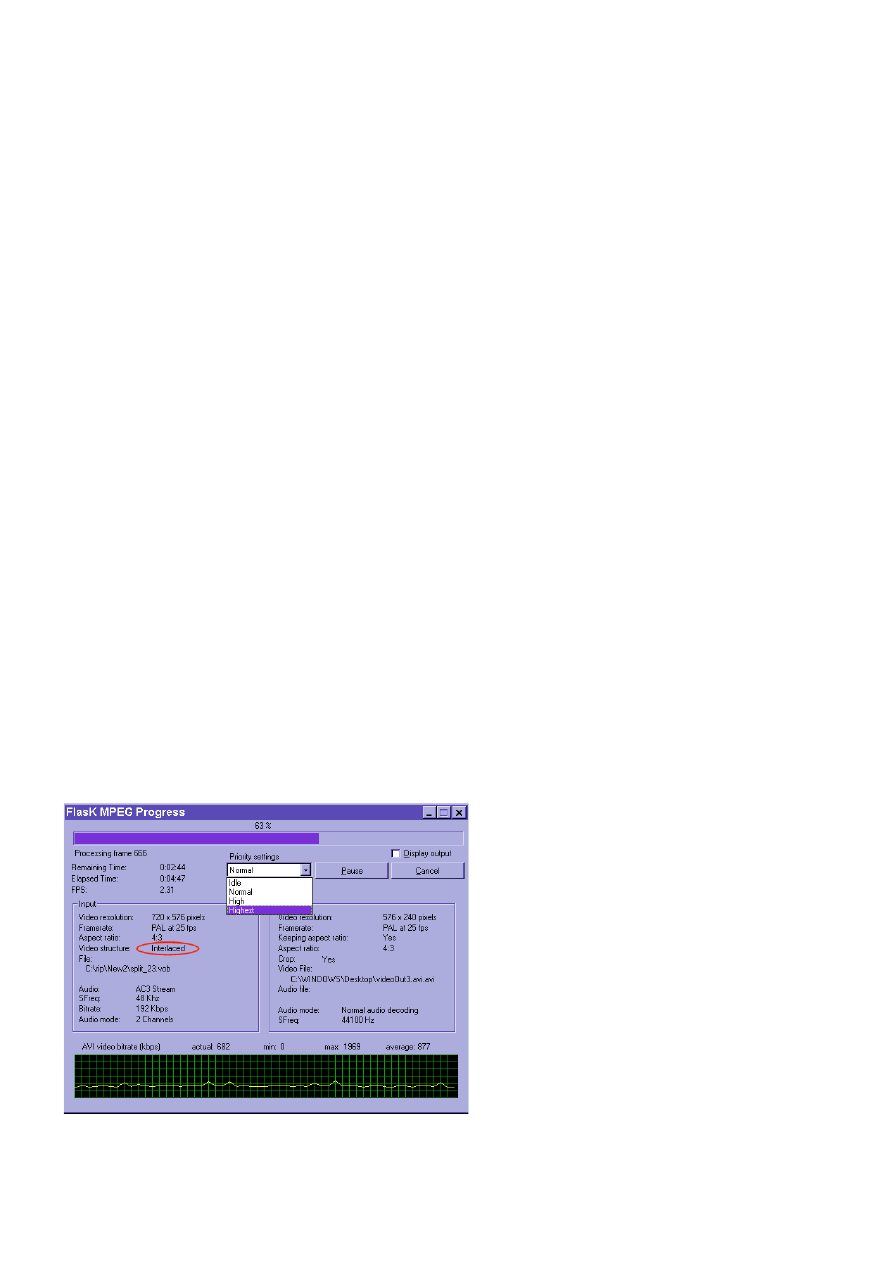
Step 4. Press Go!
Once you have everything set up correctly go to Run > Start Conversion.
Up will pop the following screen. If you are going to leave your computer alone to compress then select Highest in the 'Priority settings'. This
will hog ALL CPU power to make compression faster. Using idle or normal and you will be able to do basic tasks while it is compressing,
such as checking Email etc. Be careful not to do too much because if your computer crashes because of another program then you'll need to
start again. Unchecking the 'Display output' box will also help speed things up a little.
That's it! You will have a perfect movie in 8-15 hours on a 500MHZ computer.
Advanced Methods
Improving Audio Volume
One of the main things that niggle me is often that the sound is not loud enough for me. Because of this I like to open the file in Cool Edit (or
Soundforge or a similar sound editing program) and 'Normalise' the sound. Normalising is a way of increasing the sound volume as loud as it
is possible to do without clipping. Clipping is when bits of the audio are lost because the sound volume has gone off the scale. Obviously if a
sound file is clipped then the quality suffers. This is why to normalise a file is the best option rather than just using the amplify method.
Anyway here is what I do:
Instead of choosing 96kbps stereo Mp3 for audio, I choose 320kbps stereo Mp3. This is because, if Cool Edit is going to decode the Mp3,
normalise it and then re-encode it again as 96kbps (or 64kbps if you want to save more space) then unless you choose a higher quality to
begin with the audio will degrade slightly.
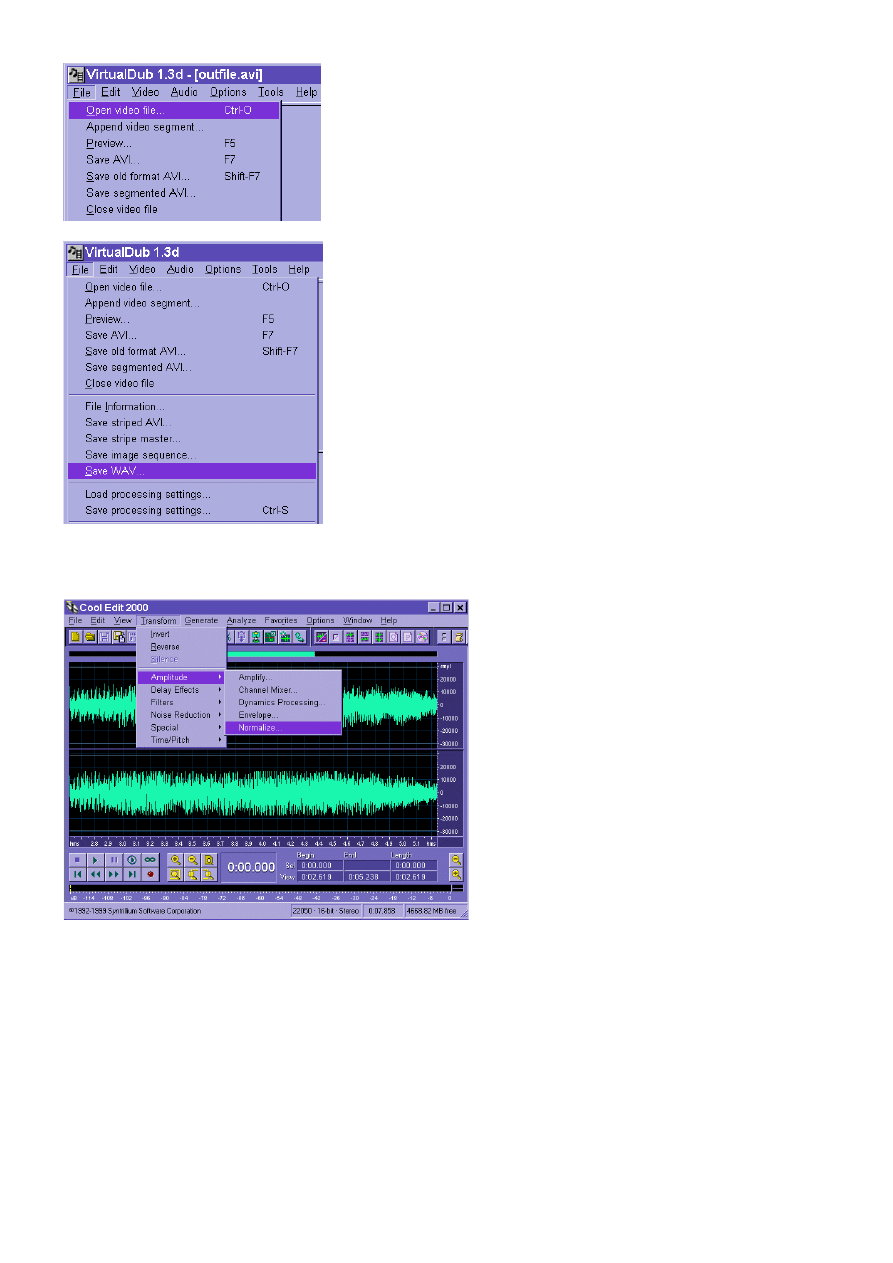
Open the newly converted DivX in VirtualDub and choose: File > Save WAV...
13
Once done, open the wave file in Cool Edit and select: Transform > Amplitude > Normalize... Leave it at default settings and click OK. Then
save the wave and Cool Edit will automatically resave it as Mp3.
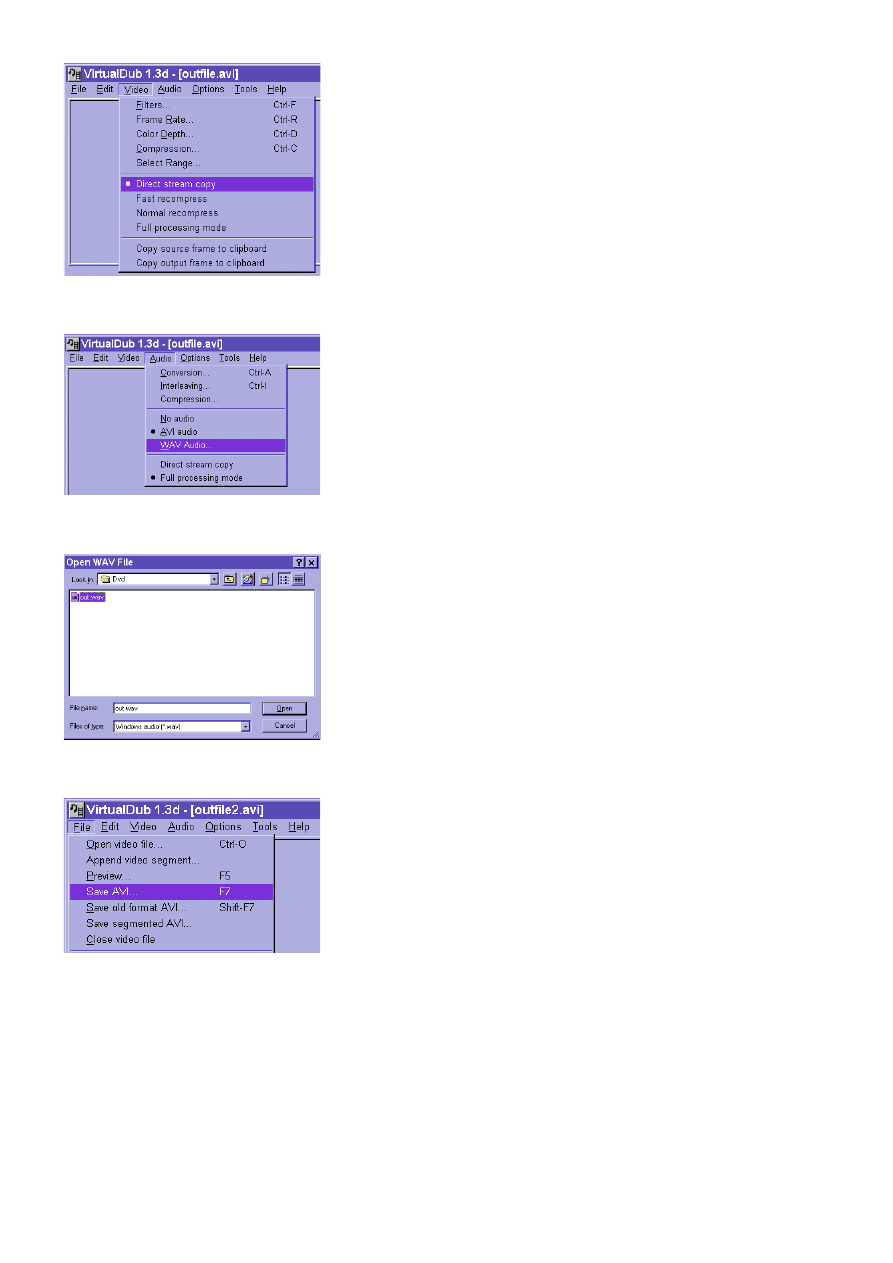
Open your DivX in VirtualDud again. Choose: Video > Direct Stream Copy
14
Also select Audio > WAV Audio... and 'Full processing mode' if the back dot is not beside it already.
Select the file you Normalised and press Open.
Select save AVI and everything should be fine!
Note:
if your movie is still too quiet you can choose normalize 200% or 250% etc. The clipping probably wont notice much anyway. It all
depends on what you think is more important for your DivX.
How to Improve Picture Quality & Convert single Vobs at a time
We have already done all we can to make the picture come out the best it can. But still you find those parts of the film that break up into
blocks. This is usually those action scenes where things blow up and people start running (you can see the kind of films I watch). Anyway,
our only alternative now is to choose a different bitrate for each scene. For example, when someone is just talking and doing nothing else it
is crazy to have 800kbps bitrate when 500kbps would do fine here. If we converted the talking scenes separately from the high action
scenes we could use a higher bitrate on the action scenes. This improves the overall quality of the film but still keeps it small enough to fit on
a single 650MB CD! I have already explained this in my "how to join Avi's " article so I will not explain it again. However, I will explain the
single Vob method I have been trying out.
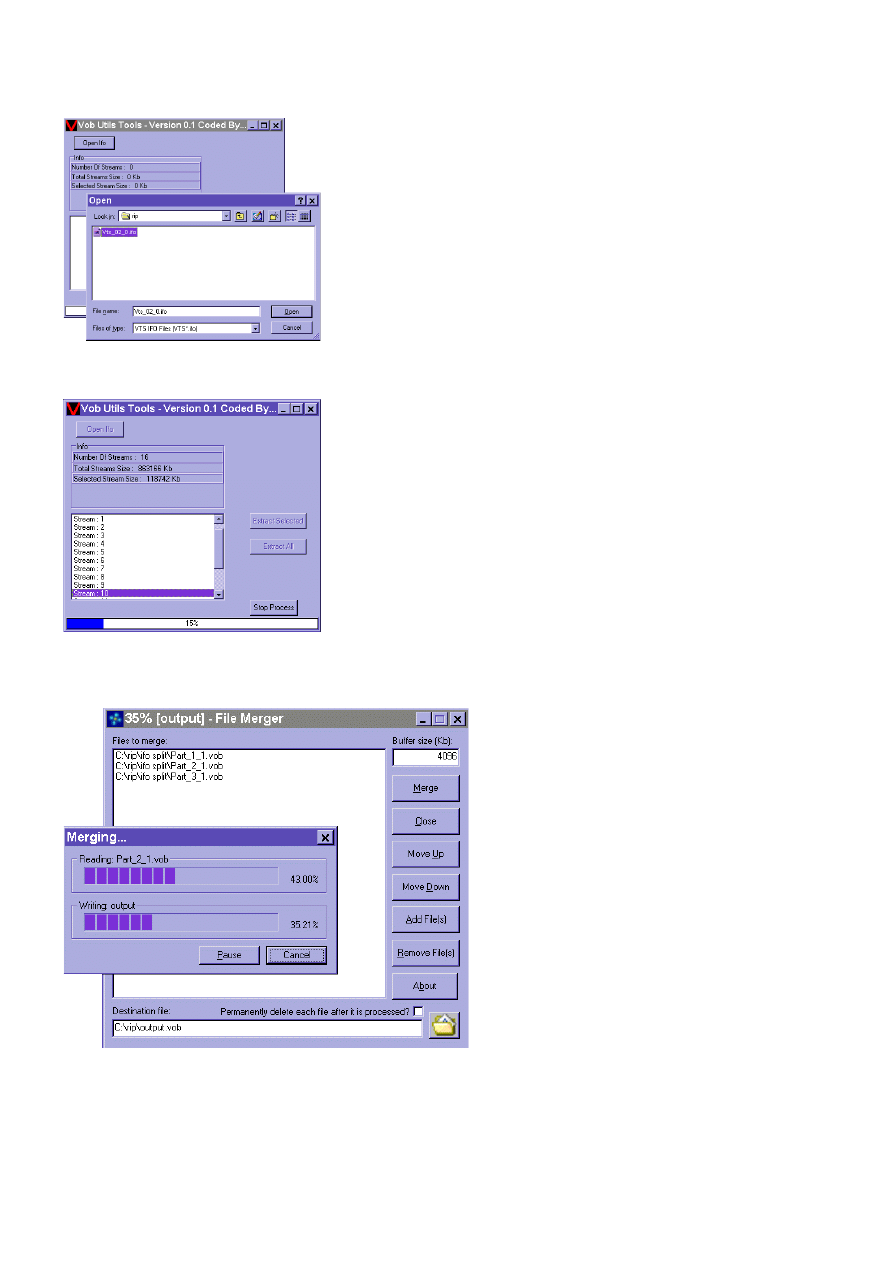
15
Copy the first Vob file from the DVD to your hard drive along with the .ifo file just like you would with Flask. Then use the program called Vob
Utils. It uses the .ifo file to split the Vob files up into sections. Select he .ifo file and click open as shown below.
Press extract all and wait.
Each file will now be split into sections like the chapters on a DVD. Look at each Vob file individually and use File Merger to stick the scenes
together. Don't stick everything together, just make up your own chapters for high action and low action parts.
In the end you may have between 5 and 10 sections of the movie that you wish to convert. Just open each Vob file in Flask separately
(without the .ifo file). Then choose the bitrate that suits that section of the movie. Go very low for low motion say 600kbps and very high for
high motion maybe 1500-2000kbps.
16
Single Vob Conversion
Since these files have been split by the .ifo file I am guessing that they have been split correctly on the keyframe. This means if you can split
your movie like this and convert single chapters you will not get the green garbage and loss of parts that sometimes happens with single Vob
conversions in Flask.
The green garbage problem (what I call Little Green Men) is always found at the start and end of single Vob files. Because the first keyframe
for the next file is often in the previous Vob file it cannot play until it reaches the next keyframe in the list. This results in either a green mess
or/and clipped video.
Note:
this is still only a theory, and I'm not an expert on the Mpeg format or anything, so I'd like to know how many have had success using
this method. Or if I'm talking crap about this keyframe thing!?
Troubleshooting
I've already written quite a lot on using VirtualDub to get sync correct and changing the 48000Hz audio to 44100Hz for better playback etc.,
etc., so I do not need to go into them all again here. I'm gonna do a FAQ's anyway soon so I'll put them all together then and you won't have
to go back 'n' forth in case I said something in one article but not another. But for now, I suppose there are three common problems you will
come across using Flask, these are explained as follows:
1. Flask cannot handle the film at all!
Vary rare for this to happen but when it does happen you must use Mpeg2avi or Mpeg Squeezer (with Avi Plug-in), Graphedit and the Logos
Filter or any other method that works =).
2. The Audio is out of Sync
Audio/Video sync can be thrown out in two major ways. Firstly, and most common is the fact that many video converters especially video
capture cards will drop frames! If there is less frames in a move the video will play for less time than the audio does and hence you get A/V
sync problems. This is a common problem with Mpeg2avi but not usually with FlasKMPEG. With Flask it handles AC3 and Mp3 format very
well. But if you try WMA audio or another format such as ADPCM it messes up. Its the sampling rate that is usually to blame. AC3 is
48000Hz so if you convert to 44100 without using Mp3 or something that Flask "likes" the audio messes up. I say Flask "likes" because it
converts fine in VirtualDub. If you have messed up any audio just try converting it to 48000Hz instead and the reconverting it to WMA in
VirtualDub or something.
3. Jerky Playback
The second biggest gripe people have is jerky playback. This is sometimes due to too many keyframes or too high a bitrate for your
computer to playback correctly. These excuses are often unfounded! What the problem usually is is that the video on the DVD is stored as
progressive and interlaced at the same time! Watch as Flask converts your movie! You will see the section encircled in red below change
from progressive to interlaced. This is usually just a NTSC problem (as are most problems!!) NTSC should be outlawed! To solve this make
sure the framerate is 29.97 NTSC and un-check 'Reconstruct progressive video'.
Wyszukiwarka
Podobne podstrony:
Konwersja RMVB do DIVX dokładny opis jak to zrobić
divx 1 7eiymlwqb6scf7lv3ir2tk43svtnwzgbsaqjrti 7EIYMLWQB6SCF7LV3IR2TK43SVTNWZGBSAQJRTI
divx napisy 2 mfll56pnsr4wqxrhhxbngd
DivX XviD na DVD
Konwersja Filmów Z Płyt Dvd Do Formatu Divx (2)
divx software m376rf7dtxq4pzdrpttjwnmnd3vzj65h5k3hxzy M376RF7DTXQ4PZDRPTTJWNMND3VZJ65H5K3HXZY
divx napisy 1 tsptegb4wegymwvst5mjqcrnl6cekyxr432fira tsptegb4wegymwvst5mjqcrnl6cekyxr432fira TSPTE
divx faq ztxvewilbs4eugnodtcapsjcbwq2hm7ib6uepta ZTXVEWILBS4EUGNODTCAPSJCBWQ2HM7IB6UEPTA
divx 3 s5j5w6j2yu3hrfpjmmqw7o4kpmmex
divx 4 y7pvwsgyia3ugfccmsylpnugugvmb4hkxke3ypy Y7PVWSGYIA3UGFCCMSYLPNUGUGVMB4HKXKE3YPY
Konwersja DIVX do RMVB
divx 2 5RNMAP4KDC537SVXXFQ42KRJYXFJJBWPPQBPZOY
divx flask yftisc6lifmwvwbvnoucpojng
DivX,Xvid+napisy
divx to dvd
Divx 6 6 Pro SN(1)
How To Convert A Divx File To Dvd Mpeg2
Napisy do filmów DivX jednak legalne 2
więcej podobnych podstron