
How to create a Multimedia DivX, VCD or Mini DVD Part 1 :
Basics
INTRODUCTION
So, you want to be really cool, huh! You want all your friends to see the amazing brand new DivX CD
that you made yourself. Neither is this any ordinary DVD rip done by someone who has just learnt
how to press that large GO button on FlasKMPEG =). No, this CD is something special! It looks just
like a real DVD yet it fits two hours onto a single 650 MB CD! It lets you choose another language to
listen to. In fact, it lets you choose three subtitle languages! It even has a detailed chapter list, so you
can jump to your favorite section just like in a commercial DVD! Well, if you do not already know how
to make such a CD yet you're in luck, because I'm going to take you through the process step by
step.
Note: An important note here. If you are reading this file for the first time I must assume you already
know and have been successful in ripping a DVD CD and have been able to convert its video and
audio into a DivX, VCD or MiniDVD format ;). I am also assuming that you have discovered how to
use the subtitle rippers found on this site and have acquired some DVD subtitles that you would like
to incorporate into your own CD. If this is not the case please read my tutorials on subtitle ripping and
DVD ripping before you read on!
In actuality this is a simple "put it all together" kind of tutorial. I also hope in my next article to deal
with some even more advanced procedures, such as creating a title screen where you can choose all
of those extra bits that you'd get on a normal DVD. But for now we will just deal with making the
important parts and not all the bells an whistles ;-).
Note: I do not claim to be infallible, if I explain anything wrong please let me know so I can correct
the mistake ;o).
Step 1. Getting the Second Audio Track to Merge
If you have used FlasKMPEG to get your Divx movie you will be unfamiliar with how to grab just the
audio from a DVD. This is important because it may only take half an hour to grab the secondary
language audio track from a DVD, but the only way to do it with FlasKMPEG (as far as I can tell) is to
process a whole Vob file into another DivX video with another language! As you can imagine this can
take anything upto 24+ hours!! But if you have that kind of time to waste it is just as easy to use a
Flasked videos soundtrack.
To get just the audio you need to use Total Recorder or ac3dec to decode the second language into
one big wave file. This audio track may be French, German or whatever the Vob file contains. It may
also be one of those extra features where the director does a running commentary while the whole
film plays. I have recently ripped The Mummy which has such a commentary, it still all fits onto a
single CD! But to be fair I did compressed both the audio and video quite high. For best results when
doing long movies always use two CD's; hell you had to do this before DivX existed anyway, so stop
complaining =). If you are scratching your head thinking, 'but how do I get this audio track with
ac3dec or Total Recorder', please refer again to my Mpeg2Avi tutorial for full details ;).
Bingo! Now you will have at least two of the following:

•
Divx video with audio
•
DVD subtitles rip
•
Alternative audio track
To make sure the secondary audio track plays in synchronization with the original you must re-
multiplex it with the old movie's video sequence. To do this run Virtual Dub. Open the ORIGINAL Divx
file that already has audio and video by going to File > Open Video File. Select Video > Direct Stream
Copy
Now select Frame Rate > Change so video and audio durations match
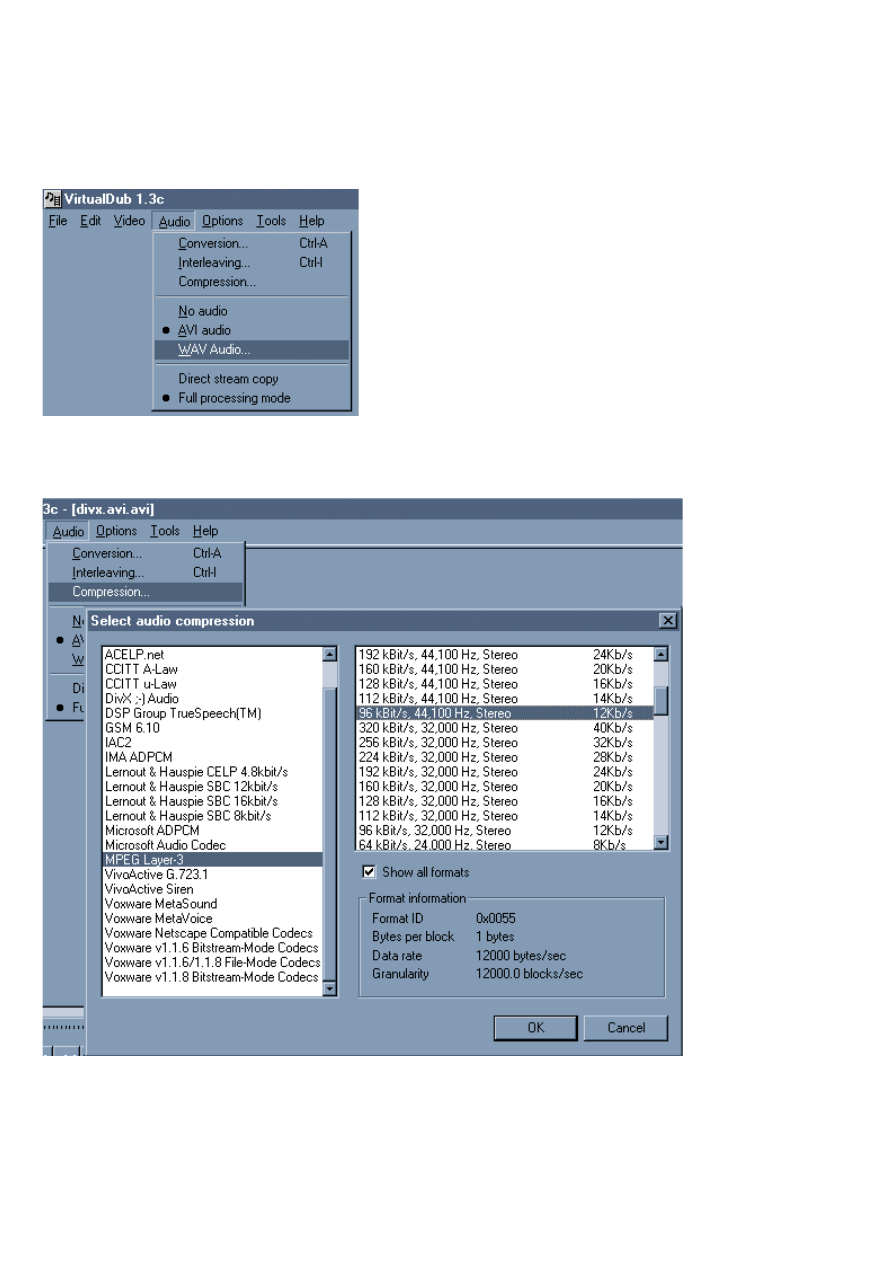
Go to 'Audio > Wav Audio...' And select the SECONDARY audio track you previously converted into
a wave file. You must also select Full processing mode here for audio only. If it says please wait ten
years you'll know you've used the wrong settings...lol ;).
Choose 'Audio > Compression...'. Then choose the Mpeg Layer-3 96 kbits stereo. If you need to save
space you can use a smaller mono bitrate such as 64kbits which is radio quality mp3.
Okay, Save the Avi.

Note: Please make sure you don't go over your original Divx movie otherwise you'll have to do it
again!
When it has finished processing you will end up with two films: your original Divx and the new one
with a different audio track. Check to see if the audio is in synchronization. If it isn't try the tips given
in the troubleshooting guide of my
until it works.
Now you should open in Virtual Dub your new Divx movie (with the second audio track) and choose
save Wav...
Note: Virtual Dub says save wave, but actually it will save whatever the file is (mp3, pcm, wav, vox
etc.,) but will call it something.wav. So your compressed mp3 file is unchanged except that it now has
a .wav extension. If this is a problem save it somewhere, open the Dos prompt, find the file and type
rename something.wav something.mp3. It doesn't matter what it is called though.
That's it! You now have a Divx Video with separate audio track. Repeat this process for every extra
audio track you use.
Step 2. Making Your Basic CD Work
The only Divx / VCD player that can support both subtitles, chapters and multiple audio tracks is
MicroDVD player! However, if you just want subtitles I prefer using Redz Divx player because it's
much easier. Either way we are going to make a CD that is fully compatible with both players, so you
will be able to use Redz Divx Player for subtitles OR Locutus' very stylish MicroDVD player for

everything else ;) please show both programmers your support for all their hard work =) ie. email
them!
Redz Divx Player
The only requirement of this player is that you name your subtitles file with a .sub extension and
rename the subtitles text file to the same name as the movie. See my subtitles tutorial for full details
on creating subtitles.
MicroDVD Player's INI Files
From now on everything here deals with MicroDVD player. MicroDVD FULLY supports the subtitles
that are made according to my subtitles guide. Make them exactly as I have explained there and then
continue reading.
To make MicroDVD play your extra audio tracks, subtitles and everything else, you must make a text
file with an .ini extension. MicroDVD will read this text file to know what to do with them. This .ini file
is similar to the .ifo file of a normal DVD. Locutus has been kind enough to create a program called
INI Editor which has some very nice features. But I find it less confusing to write it out as a text file
first and then use the editors advanced features later. Either way, once I show you my method you
can do it anyway you like.
Note: Don't use the INI Wizard yet, it is still buggy. I tried a few times to create a working INI file with
it but it just wouldn't add some very vital bits of information. The help file does point out that the
Wizard hasn't been tested properly so maybe it'll be more reliable in a future update.
Lets make an INI file! Much of the following is covered in greater detail in the instruction of MicroDVD
Player so I'll just go over the main points briefly. A typical INI file looks like the following list. This is
again the .ini from the film The Mummy and has only been set out to support the features I am using
in this tutorial. If you don't use any feature just don't add it to the text file. ALL MicroDVD text files
start with the title [Micro DVD Ini File] in square brackets. Notice also that that there are other
headings. [MAIN] deals with the CD opening info. [MOVIE] describes the movie location.
[LANGUAGES] describes where each secondary sound file is kept. [SUBTITLES] describes where
each subtitle file is kept. And [CHAPTERS] describes how the chapters are divided.
[Micro DVD Ini File]
[MAIN]
Title=The Mummy
ID=111
CD name Delay=1
[MOVIE]
Directory=.
AVIName=mummy.avi
[LANGUAGES]
Directory=. MultipleAudioAVI=0
Primary=ENG English
1=COM Commentary
File=comment.wav

[SUBTITLES]
Directory=.
Format=0
Lines=1
EstimateDisplayDuration=0
1=ENG English
File=mummy.sub
[CHAPTERS]
1=0 Chapter 1
2=9251 Chapter 2
3=16228 Chapter 3
4=31294 Chapter 4
5=39061 Chapter 5
6=49578 Chapter 6
7=58944 Chapter 7
8=66349 Chapter 8
9=72366 Chapter 9
10=77658 Chapter 10
11=96475 Chapter 11
12=106561 Chapter 12
13=118049 Chapter 13
14=121468 Chapter 14
15=130295 Chapter 15
16=140406 Chapter 16
17=148010 Chapter 17
18=157690 Chapter 18
19=168499 Chapter 19
Note: for full details of all additional features you can have in an .ini file please refer to the MicroDVD
help pages provided with the program ;)
Writing Your Own INI File
Open notepad or any text editor and lets write your .ini file. Start with the first section:
[MAIN]
Title=The Mummy
ID=111
Delay=1
Title= call this whatever you like, its not important. When you put your CD in this will be the
title of your film.
ID= any number you like. Each CD must have an separate ID number so that MicroDVD can
identify it.
Delay=1 Just use 1. This is how many seconds MicroDVD will wait to change chapters. A
second is good to give it time to play correctly.
Note: If you are using two or more CD's you must put an additional line called CDNumber= If
this is the first CD of the film put CDNumber=1. If it is the second CD of the film put =2 and so
on. Each separate CD must have its own INI file to help stop confusion.
[MOVIE]

Directory=.
AVIName=mummy.avi
Directory= this is the location of the movie .avi file on your CD. If you just bundle everything on the
CD put a full stop mark (.) as shown.
AVIName= tell it the location of the main film ie. something.avi. If it is inside a folder on the CD call it
AVIName=\foldername\something.avi.
[LANGUAGES]
Directory=.
MultipleAudioAVI=0
Primary=ENG English
1=COM Commentary
File=comment.wav
Directory= this is the location of the secondary audio track on your CD. If it is inside a folder
on the CD call it Directory=\foldername\something.wav.
MultipleAudioAVI=0 advanced function just leave it 0.
Primary= ENG English just keep this as English if your main .avi movie is in english its the default
language. If was German, for example you'd put GER German. It actually doesn't matter what you
put its just a name ;). The first three letters are the abbreviation for the whole word.
•
1=
• File=
1= and File= are connected. Each extra audio track is given a number and a name so '1=COM
Commentary' is the audio track with The Mummy Director's commentary. It doesn't matter what you
call it though. File= is the location of the file which I called comment.wav. If it was inside a folder on
the CD call it File=\foldername\comment.wav. Each language should be numbered with the file
location just under each number thusly:
•
1=COM Commentary
• File=comment.wav
• • 2=FRE French
• File=french.wav
• • 3=GER German
• File=german.wav
[SUBTITLES]
Directory=.
Format=0
Lines=1
EstimateDisplayDuration=0
1=ENG English
File=mummy.sub
Directory= Same as with other examples. It is the location of the folder that the subtitles are kept in.
If there is no folder simply put a full stop (.) as shown.
Format= Just keep it 0. MicroDVD supports three other kinds of subtitles SubMagic, SubRip and
SubViewer by putting in 1, 2, or 3 you can select the format.
Lines= How many lines will the subtitles take up? One line at the bottom, two or three? Just put the
amount here.

EstimateDisplayDuration=0 Keep this as 0 unless you have made your own subtitles which require
a set time (see MicroDVD instructions for details of this).
•
1=
•
File=
1= and File= is exactly like the Languages section the number is the language name and the file
directly below it is the location ie:
• 1=ENG English
• File=mummy.sub
• • 2=FRE French
• File=french.sub
• • 3=GER German
• File=german.sub
Note: if you are testing your subtitles they will only appear in full screen mode in MicroDVD. Also,
you cannot put the subtitle text files inside another folder if you want it to be compatible with Redz
DivX Player - keep it in the CD's main directory!
Okay, we are nearly finished ;) save your text file as "MDVD.INI" including quotation marks to force
the computer to save it as .ini rather than .ini.txt! This name is important as it is the one MicroDVD
looks for on the CD. If all has gone well this .ini will work on your new DivX or whatever CD. Lets test
it now! Make a new folder on your hard drive for all the files in your movie, I called mine 'mummy'.
Open MicroDVD player and press the configuration button (
1
). Up pops the following box. Select the
'Source' button at the top to bring up the directory selection. Select the 'Load from Directory' option
(
2
) and select the file MDVD.INI. Close the configuration box.
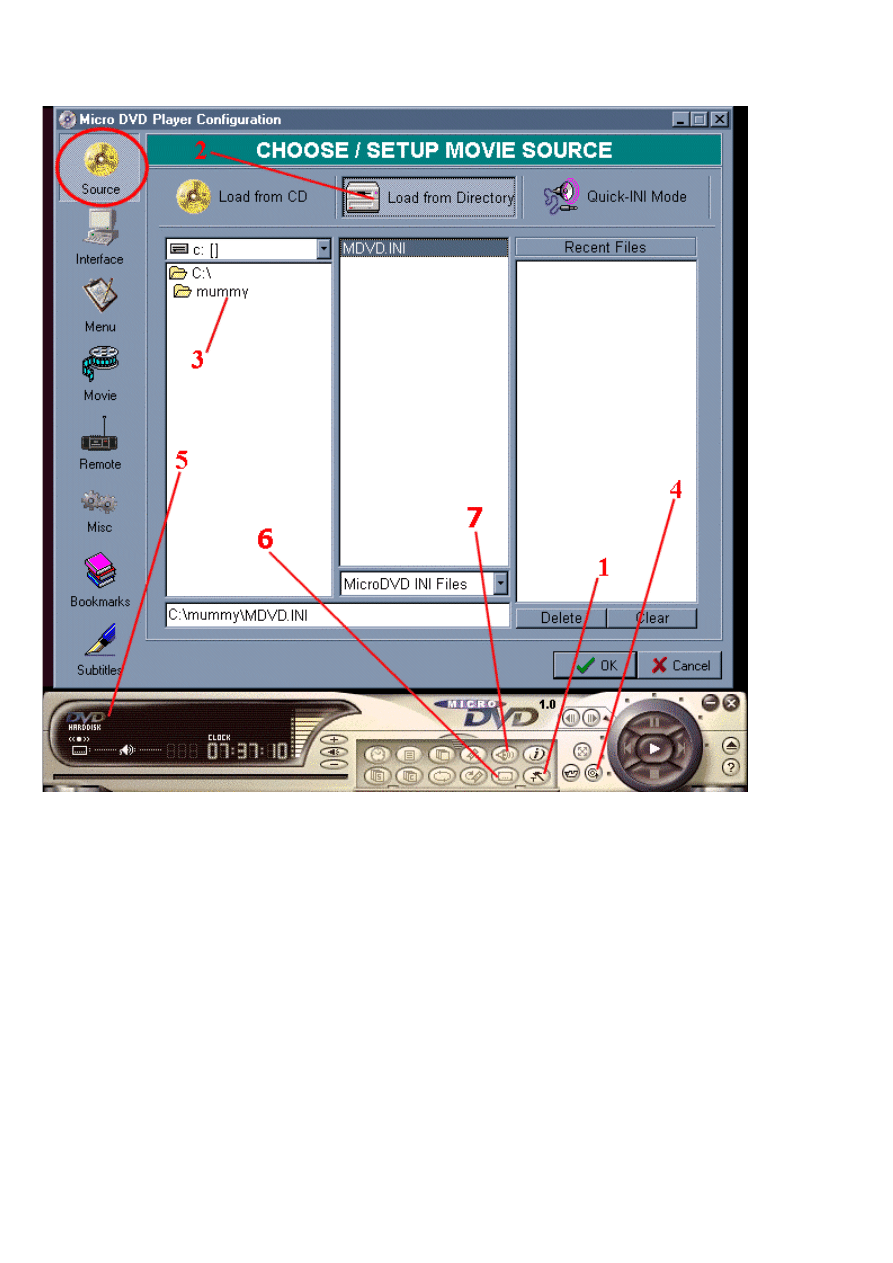
Now click the spiral button (
4
) until the DVD HardDisk icon appears in the far left display (
5
). Now
press the play button to preview your movie. Left click the mouse once so the MicroDVD player
control appears but the film remains in full screen mode. Then press the subtitles button (
6
) and
select your subtitles. Then press the alternate language to test that =). If all goes well you should be
smiling =), if not look over your notes again and check the MicroDVD instructions for a more detailed
description on the settings of your .ini file.
Congratulations! Your first working .ini file!
Getting the Chapters from a DVD Vob File
The chapters for a DVD film are held in the .ifo file on the CD. The main film of a DVD looks like this:
Vts_02_0.ifo
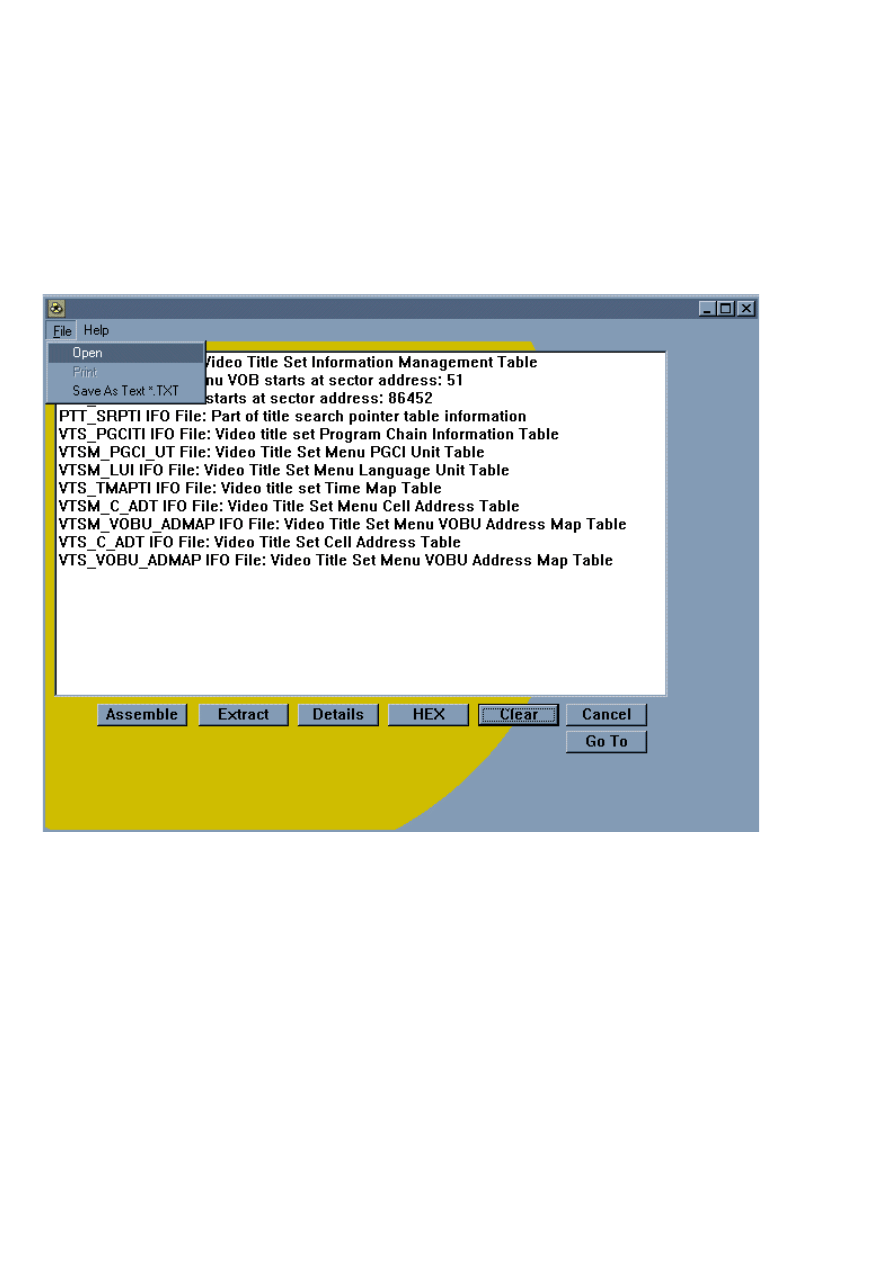
Vts_02_1.vob
Vts_02_2.vob
Vts_02_3.vob
Vts_02_4.vob
These have to be extracted and converted by Vobsnoopy and MicroDVD's INI editor. Run Vobsnoopy
and Open the first .ifo file of the movie list. There will be other .ifo files in the DVD but choose the one
that matches the .Vob files of the movie; it will look something like Vts_02_0.ifo.
Hit the extract button and only check the box that says 'Disassemble *.IFO file to *.INI File' and save
it somewhere.
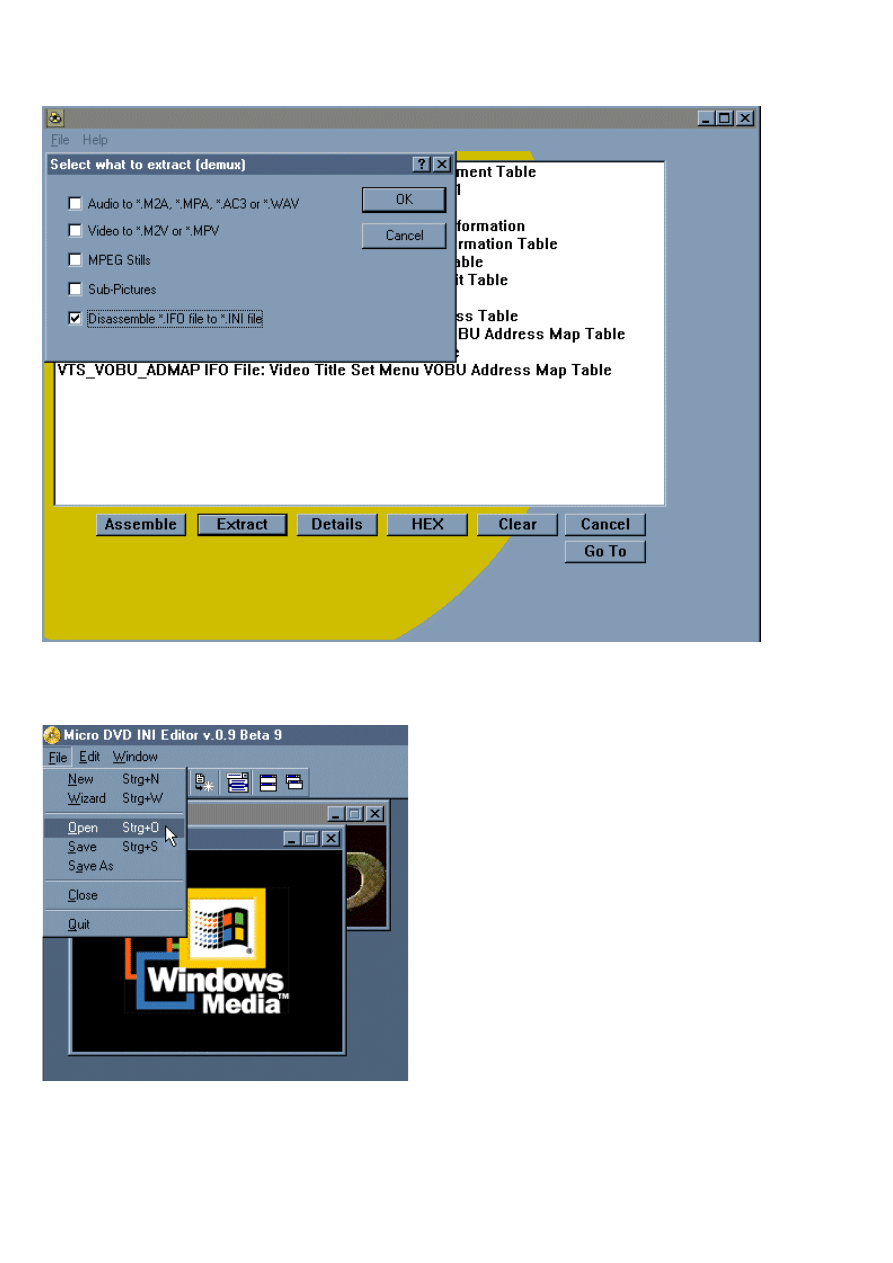
Now is the time to run the MicroDVD INI Editor. Open the .ini file that you previously made in
notepad.
Up pops this box. Don't worry, it is little more than a normal text editor. Everything you typed in
notepad could easily have been typed in this editor. Try clicking on the various tabs to see how your
file is broken up. Then click on the Chapters tab.
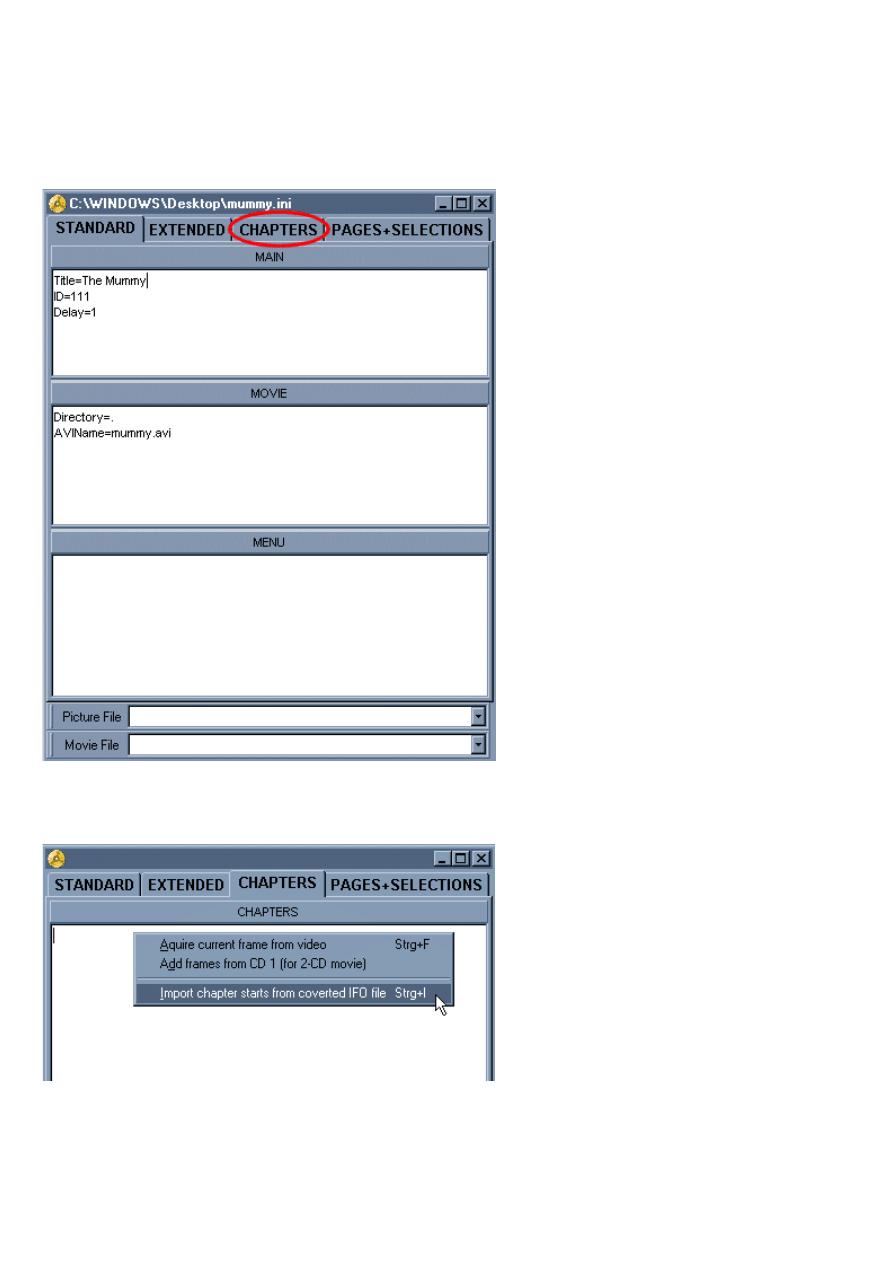
This section of the editor allows you to either create your own chapter positions or import them. We
are going to import the file we have just extracted with Vobsnoopy. Right-click the mouse in the
chapters window and select the option from 'Import chapter starts from IFO file'.
Choose the frames per second of your DivX, VCD or MiniDVD in the import box. This is usually
23.976 for a Divx .avi file or any .avi file, so use that. Press OK.
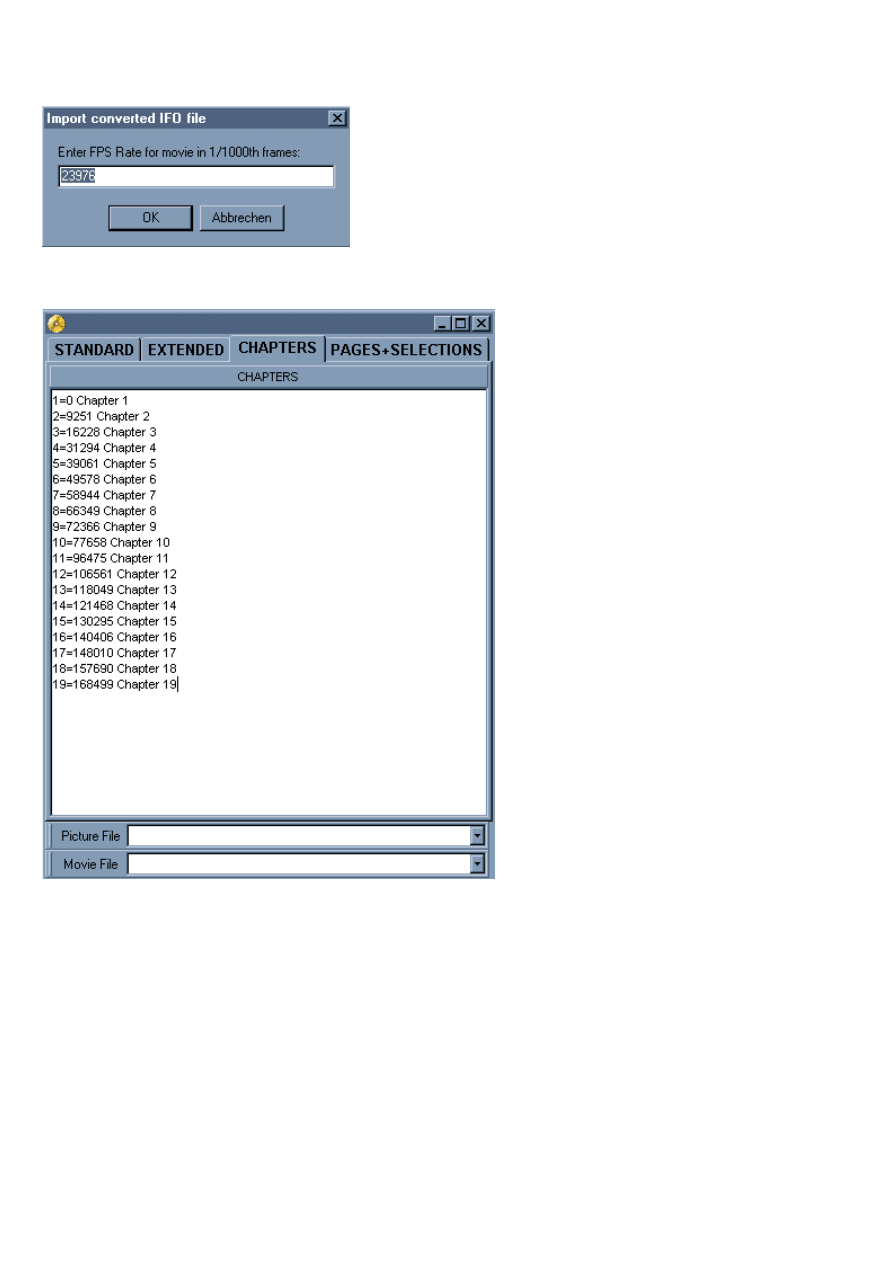
Up pops your chapter time codes =). You can rename them here if you wish so that it describes the
section of the film the chapter points.
When you are finished, go to File > Save. That's it! Open MicroDVD again and check that it jumps to
the chapters you have made and also so it lists them as designed.
That's all for this tutorial. Hopefully, the next one will describe a little more about creating menus and
the such like. As I said before, the MicroDVD's help file is very well written so I do not need to spend
too much time explaining each function in detail.
Wyszukiwarka
Podobne podstrony:
Konwersja RMVB do DIVX dokładny opis jak to zrobić
divx flaskmpeg kfid6hfqiawqi7cflbv2gbrpezh7uunx7o6qrjq KFID6HFQIAWQI7CFLBV2GBRPEZH7UUNX7O6QRJQ
divx 1 7eiymlwqb6scf7lv3ir2tk43svtnwzgbsaqjrti 7EIYMLWQB6SCF7LV3IR2TK43SVTNWZGBSAQJRTI
divx napisy 2 mfll56pnsr4wqxrhhxbngd
DivX XviD na DVD
Konwersja Filmów Z Płyt Dvd Do Formatu Divx (2)
divx software m376rf7dtxq4pzdrpttjwnmnd3vzj65h5k3hxzy M376RF7DTXQ4PZDRPTTJWNMND3VZJ65H5K3HXZY
divx napisy 1 tsptegb4wegymwvst5mjqcrnl6cekyxr432fira tsptegb4wegymwvst5mjqcrnl6cekyxr432fira TSPTE
divx faq ztxvewilbs4eugnodtcapsjcbwq2hm7ib6uepta ZTXVEWILBS4EUGNODTCAPSJCBWQ2HM7IB6UEPTA
divx 4 y7pvwsgyia3ugfccmsylpnugugvmb4hkxke3ypy Y7PVWSGYIA3UGFCCMSYLPNUGUGVMB4HKXKE3YPY
Konwersja DIVX do RMVB
divx 2 5RNMAP4KDC537SVXXFQ42KRJYXFJJBWPPQBPZOY
divx flask yftisc6lifmwvwbvnoucpojng
DivX,Xvid+napisy
divx to dvd
Divx 6 6 Pro SN(1)
How To Convert A Divx File To Dvd Mpeg2
Napisy do filmów DivX jednak legalne 2
więcej podobnych podstron