
Option nv, Gaston Geenslaan 14, 3001 Leuven - Belgium - Tel +32 16 317 411 - Fax +32 16
207 164
Quick start guide
GPS on GTM378 & GTM380

Quick start guide, GPS/A-GPS on GTM378 & GTM380
Author:
Option MIG
Version:
V01 – D2
Creation Date:
Aug 16, 2007
Page:
1 of 9
Option Confidential:
This document is Option Confidential - it may not be duplicated, neither distributed externally without prior and written
permission of Option nv.
ABOUT THIS DOCUMENT
Overview and Purpose
This document describes how to use the GTM378 and GTM380 modules as a GPS receiver.
Please note that this document is subject to change without notice.
Confidentiality
All data and information contained or disclosed by this document is confidential and property
of Option NV and all rights therein are expressly reserved. By accepting this document, the
recipient agrees that this information is held in confidence and in trust and will not be used,
copied, reproduced in whole or in part, nor its contents revealed in any manner to others
without prior and written permission of Option NV.
Version History
Date
Version
Author(s)
Revision(s)
Remarks
Oct 6, 2007
V01-D1
J. Baetens,
K. Jaksons,
P. Leyssens
B. Maho
F. Bilsen
Draft
Oct 12, 2007
V01-F1
Option MIG
First release

Quick start guide, GPS/A-GPS on GTM378 & GTM380
Author:
Option MIG
Version:
V01 – D2
Creation Date:
Aug 16, 2007
Page:
2 of 9
Option Confidential:
This document is Option Confidential - it may not be duplicated, neither distributed externally without prior and written
permission of Option nv.
TABLE OF CONTENTS
About this document
1
Overview and Purpose
1
Confidentiality
1
Version History
1
Table of contents
2
1
Overview & Prerequisites
3
2
Getting Started
3
2.1
Hardware setup
3
2.2
Connecting to the application interface
4
2.3
Activate GPS interface
5
2.4
Getting GPS information
7
3
REFERENCES
9
Quick start guide, GPS/A-GPS on GTM378 & GTM380
Author:
Option MIG
Version:
V01 – D2
Creation Date:
Aug 16, 2007
Page:
3 of 9
Option Confidential:
This document is Option Confidential - it may not be duplicated, neither distributed externally without prior and written
permission of Option nv.
1
OVERVIEW & PREREQUISITES
This document describes a step-by-step procedure to get a GPS fix using your Option
Globetrotter module. The explained procedure is valid for both the GTM380 and the GTM378
Globetrotter module.
Before starting, make sure that you have checked that the following conditions are fulfilled:
-
The Globetrotter module is configured and working as described in the Option Quick
Start Guide that came with your module [1].
-
Driver version 4.x.x.x is loaded on your system to communicate with the module.
-
On a GTM378 module, firmware 2.4.2 or higher needs to be loaded.
On a GTM380 module, firmware 2.8.1 or higher needs to be loaded.
-
You have a working GPS antenna that you can connect to the module.
For active GPS antenna’s, the power needs to be supplied externally.
-
Perform initial tests outside, in a clear area that has very good reception of the GPS
satellite signals.
2
GETTING STARTED
2.1
Hardware setup
Make sure your module is connected to your PC as described in the Option Quick Start Guide
that was delivered with the module [1].
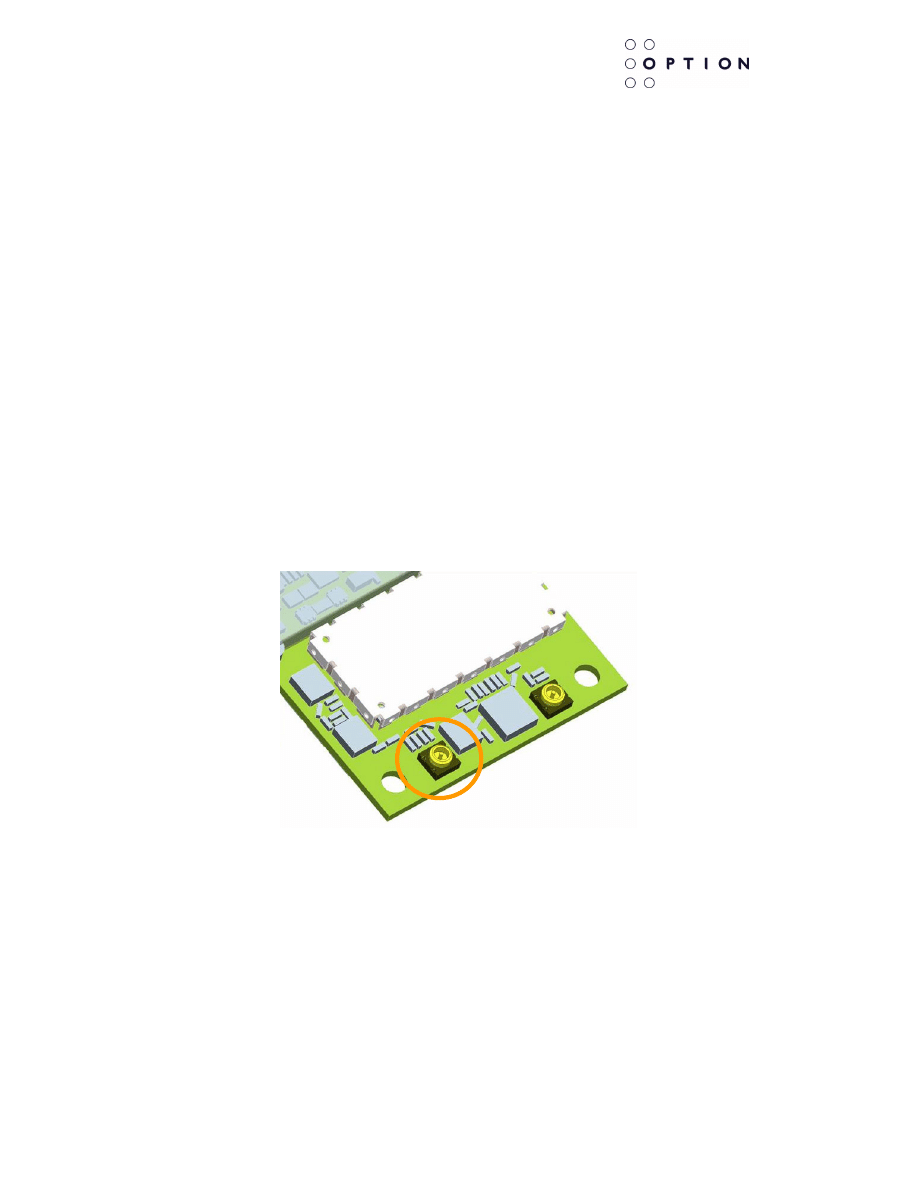
Connect a GPS antenna to the auxiliary antenna connector of the module, which is marked
by the letter “A” on the PCB (shown in the circle in Figure 2-1).
Figure 2-1: auxiliary antenna position
Quick start guide, GPS/A-GPS on GTM378 & GTM380
Author:
Option MIG
Version:
V01 – D2
Creation Date:
Aug 16, 2007
Page:
4 of 9
Option Confidential:
This document is Option Confidential - it may not be duplicated, neither distributed externally without prior and written
permission of Option nv.
2.2 Connecting to the application interface
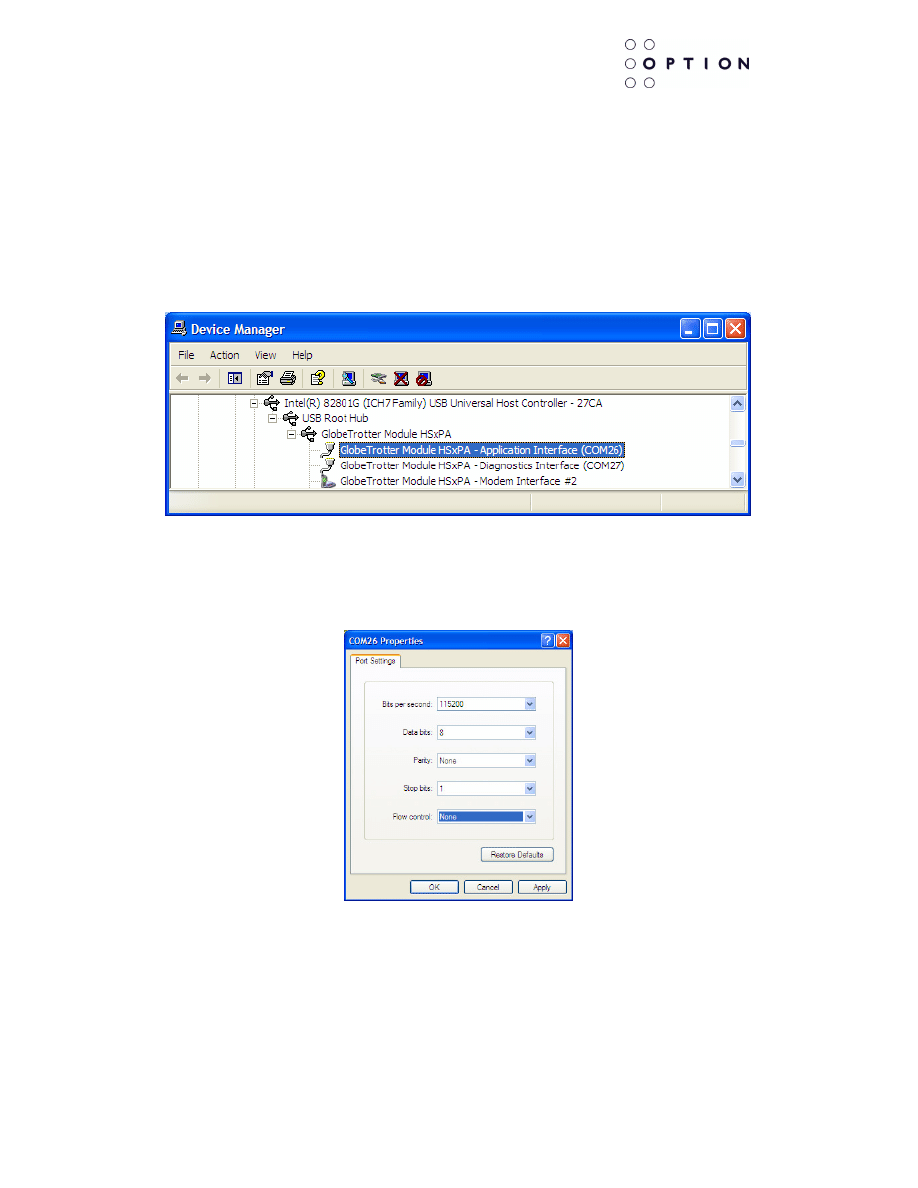
Open the Windows Device Manager and determine the COM port number for the module’s
Application interface.
When calling the properties of the Globetrotter Module HSxPA USB device, the loaded
drivers are displayed.
Verify that the loaded driver starts with 4. (i.e.: driver version: 4.0.0.18)
If a GPS interface is already shown in the Device Manager and does not appear to have any
problem, chapter 2.3 can be skipped. Continue from chapter 2.4.
Figure 2-2: Application interface of the Globetrotter module in Device Manager
Open a terminal program (like HyperTerminal) and connect to the Application interface using
following settings:
Figure 2-3: HyperTerminal settings
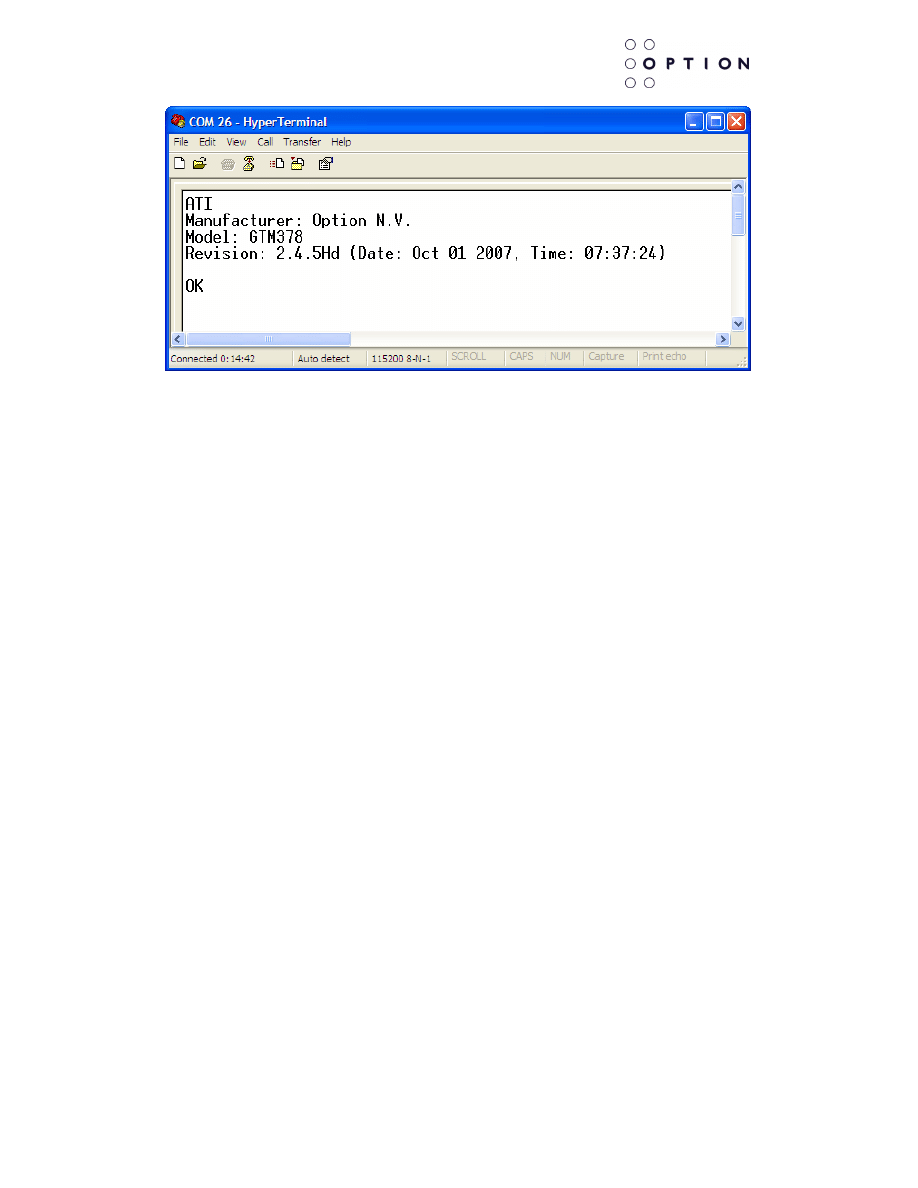
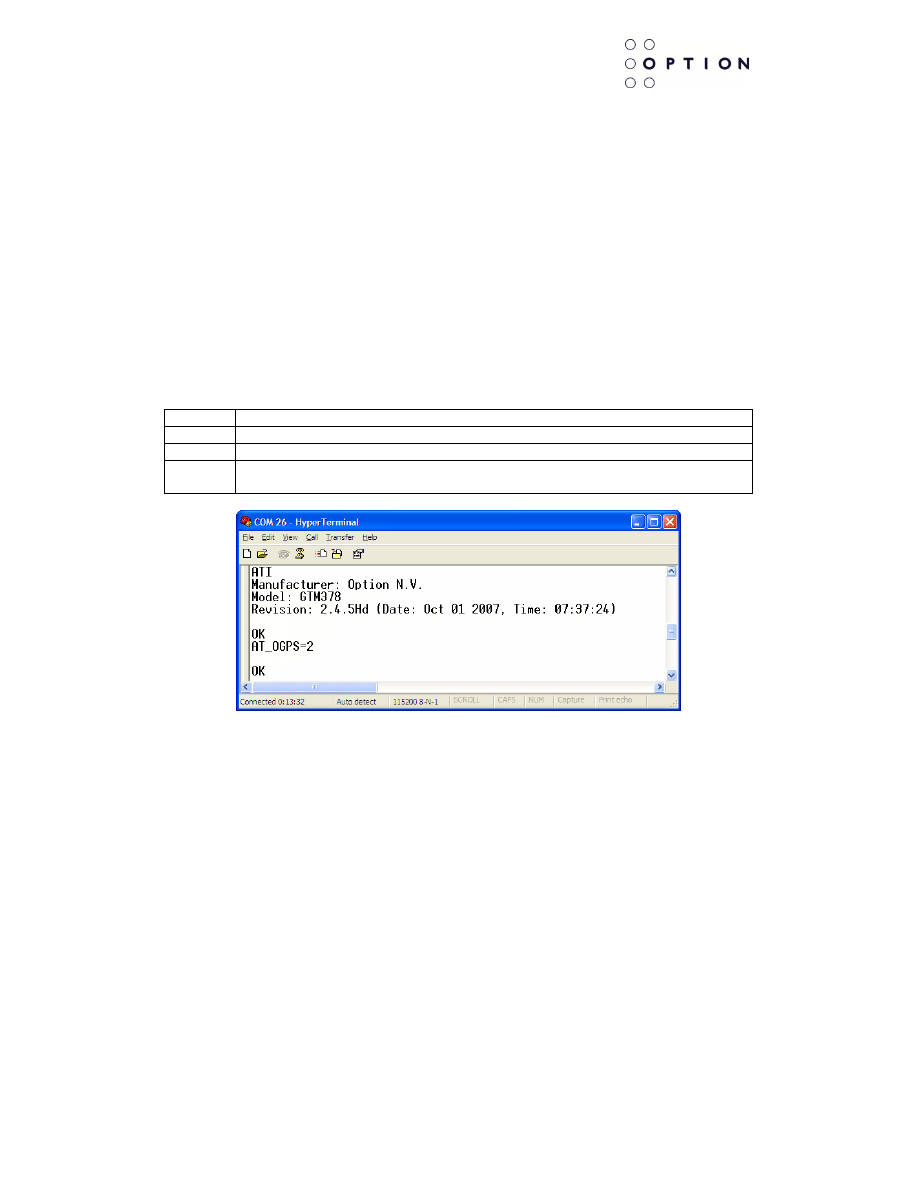
To verify the setup, you can type
ATI
in the HyperTerminal. The Globetrotter module will
reply with its identification string.
Quick start guide, GPS/A-GPS on GTM378 & GTM380
Author:
Option MIG
Version:
V01 – D2
Creation Date:
Aug 16, 2007
Page:
5 of 9
Option Confidential:
This document is Option Confidential - it may not be duplicated, neither distributed externally without prior and written
permission of Option nv.
Figure 2-4: Globetrotter identification string
Along with the model number, the firmware version is displayed.
Verify that the firmware version is correct for your model.
2.3 Activate GPS interface
The GPS interface can be turned ON and OFF through AT commands issued on the
application interface.
Issuing the AT commands is done through the HyperTerminal window that was set up in the
previous chapter.
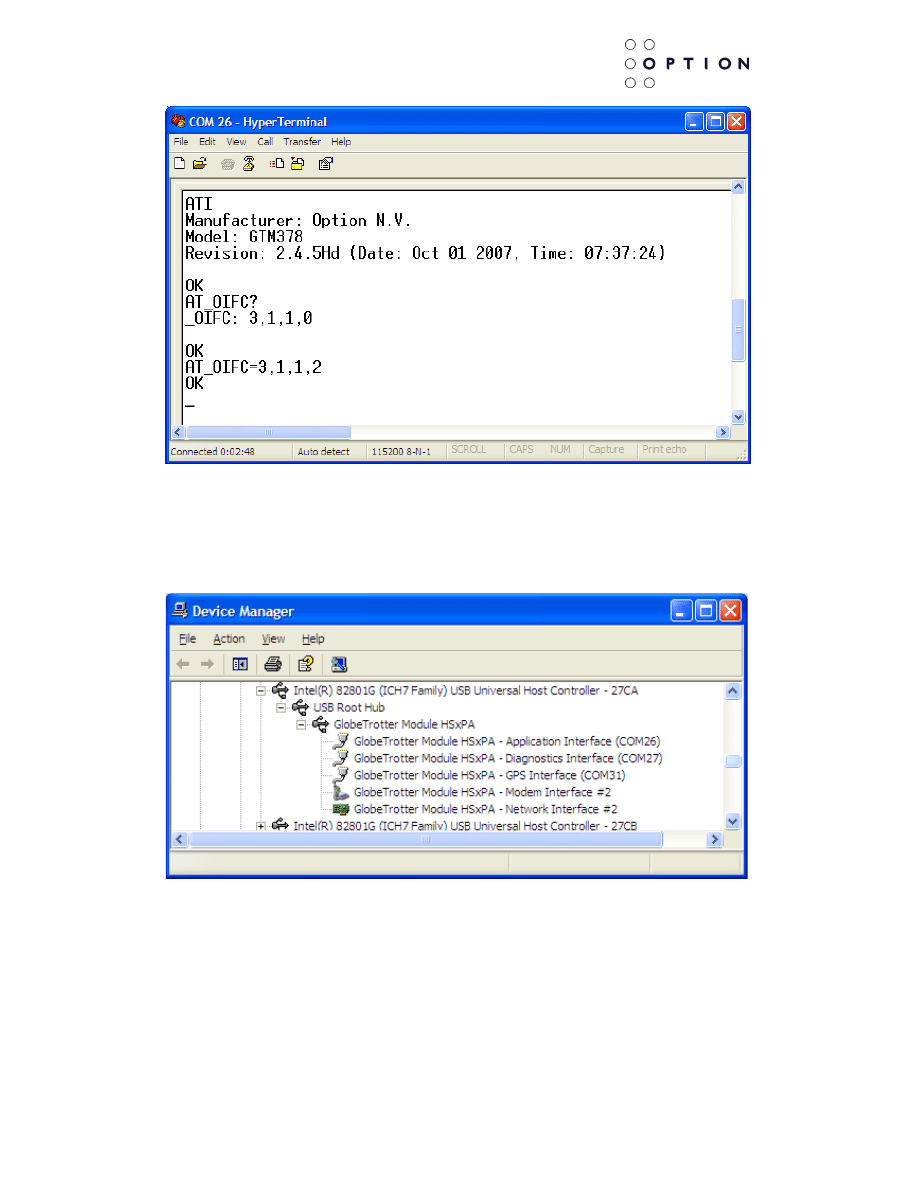
To activate the GPS interface, the AT_OIFC command is required.
This command also enables or disables other interface settings. To enable the GPS interface
only, it is required to first call the currently loaded configuration.
This is done by issuing:
AT_OIFC?
This AT command will return an unsolicited response: “_OIFC : w,x,y,z” (where w, x, y and z
are numbers representing the currently loaded interface states.
To enable the GPS interface, only the last number needs to be set. All other numbers must
be repeated unchanged!
Issue the following AT command:
AT_OIFC=w,x,y,0
to turn the GPS interface OFF
AT_OIFC=w,x,y,2
to turn the GPS interface ON
Quick start guide, GPS/A-GPS on GTM378 & GTM380
Author:
Option MIG
Version:
V01 – D2
Creation Date:
Aug 16, 2007
Page:
6 of 9
Option Confidential:
This document is Option Confidential - it may not be duplicated, neither distributed externally without prior and written
permission of Option nv.
The Globetrotter module needs to be rebooted for the GPS port to become available.
Unplug the power supply from the evaluation board.
After applying power back to the evaluation board, the GPS interface will become available in
the Windows Device Manager.
Figure 2-5: GPS interface becomes visible in Device Manager
Quick start guide, GPS/A-GPS on GTM378 & GTM380
Author:
Option MIG
Version:
V01 – D2
Creation Date:
Aug 16, 2007
Page:
7 of 9
Option Confidential:
This document is Option Confidential - it may not be duplicated, neither distributed externally without prior and written
permission of Option nv.
2.4 Getting GPS information
A serial port number has been assigned to the GPS interface.
Open a second terminal program (like Hyperterminal) and connect to the GPS interface
(COM 31 in the example) with the same setting as used to connect to the application
interface.
Through this serial port the GPS information will become available. No commands can be
sent through this interface!
To start a GPS Position Determination, the AT_OGPS command needs to be issued to the
application interface. (Through the HyperTerminal windows connected to COM26 in the
example)
In the application terminal, type:
AT_OGPS=<mode>
With <mode> being 0, 1 or 2.
<mode>
Mode
0
Turn GPS Position Determination Off
1
Turn GPS Position Determination On. It will turn off upon error or position fix.
2
Turn GPS Tracking on. This will automatically re-start the Position
Determination if it ends.
Figure 2-6: Setting GPS activity to tracking
When there is sufficient reception of the GPS signal, a NMEA data stream will appear in the
second HyperTerminal, connected to the GPS interface.
In the beginning, the Globetrotter module will continuously receive satellite data. The position
data will be empty at this time.
After a while, the module will get a position fix. The $GPGGA value will be filled.

Quick start guide, GPS/A-GPS on GTM378 & GTM380
Author:
Option MIG
Version:
V01 – D2
Creation Date:
Aug 16, 2007
Page:
8 of 9
Option Confidential:
This document is Option Confidential - it may not be duplicated, neither distributed externally without prior and written
permission of Option nv.
Figure 2-7: ‘empty’ NMEA data being exported to HyperTerminal
Figure 2-8: NMEA data with position fix
For more information about the NMEA codes, see the NMEA specifications [2].
2.5 Using the NMEA data
As example to illustrate the use of this NMEA data is in the form 2 online route plotter
websites are mentioned:
http://www.gpsvisualizer.com/map?form=google
This website gives you the possibility to upload a log file of your NMEA data. After uploading
your log, a map with your travelled route will be generated.
http://www.gonmad.co.uk/nmea.php
On this website, the raw NMEA data can be copied from the clipboard into a first frame. From
this first frame, the fix essential data will be extracted. Afterwards the map will be generated.

Quick start guide, GPS/A-GPS on GTM378 & GTM380
Author:
Option MIG
Version:
V01 – D2
Creation Date:
Aug 16, 2007
Page:
9 of 9
Option Confidential:
This document is Option Confidential - it may not be duplicated, neither distributed externally without prior and written
permission of Option nv.
REFERENCES
Ref
Document
[1]
GTM 351-378-380 Quick Start Guide
Option
[2]
NMEA 0183 specification
www.NMEA.org
Wyszukiwarka
Podobne podstrony:
Adafruit Ultimate GPS on the Raspberry Pi
GPS na GTM380 HSxPA w netbooku
Nokia Xpress on GPS shell PL
More on hypothesis testing
GPS
ZPSBN T 24 ON poprawiony
KIM ON JEST2
gps b ŕdy
Parzuchowski, Purek ON THE DYNAMIC
Foucault On Kant
GPS
G B Folland Lectures on Partial Differential Equations
free sap tutorial on goods reciept
5th Fábos Conference on Landscape and Greenway Planning 2016
ON CIĘ ZNA (fragm), WYCHOWANIE W CZAS WOJNY RELIGIJNEJ I KULTUROWEJ - MATERIAŁY, TEKSTY
Sprawozdanie techniczne GPS
2003 4 gps
więcej podobnych podstron