
1 - 4
Fundamentals UNIX 2.0—-Lab 12.6.3
Copyright
2002, Cisco Systems, Inc.
Fundamentals of UNIX
Lab 12.6.3 – CDE Archive Tools
(Estimated time: 20 min.)
Objectives:
• Become Familiar with CDE graphical backup, compression, and restore capabilities
• Access the Files subpanel Archive Option
• Archive a File with the Archive Option
• Archive a Folder with the Archive Option
• Restore an Archived File and Folder with File Manager
• Compress a file with the Files subpanel Compress Option
• Uncompress a File with File Manager
Background:
In this lab, the student will work with the Common Desktop Environment (CDE) Utilities to backup,
compress, and restore files and folders. The Files subpanel on the Front panel in conjunction with File
Manager can be used to archive, compress, and restore files creating the same results as using the
tar
,
compress
, and
uncompress
commands.
Tools / Preparation:
a) Before starting this lab, the student should review Chapter 12, Section 5 – GUI Backup Tools
b) The student will need the following:
1. A login user ID, for example user2 and a password assigned by the instructor.
2. A computer running the UNIX operating system with CDE.
3. Networked computers in classroom with the class file system installed.
4. Network printer available and print server running.
Notes:
2 - 4
Fundamentals UNIX 2.0—-Lab 12.6.3
Copyright
2002, Cisco Systems, Inc.
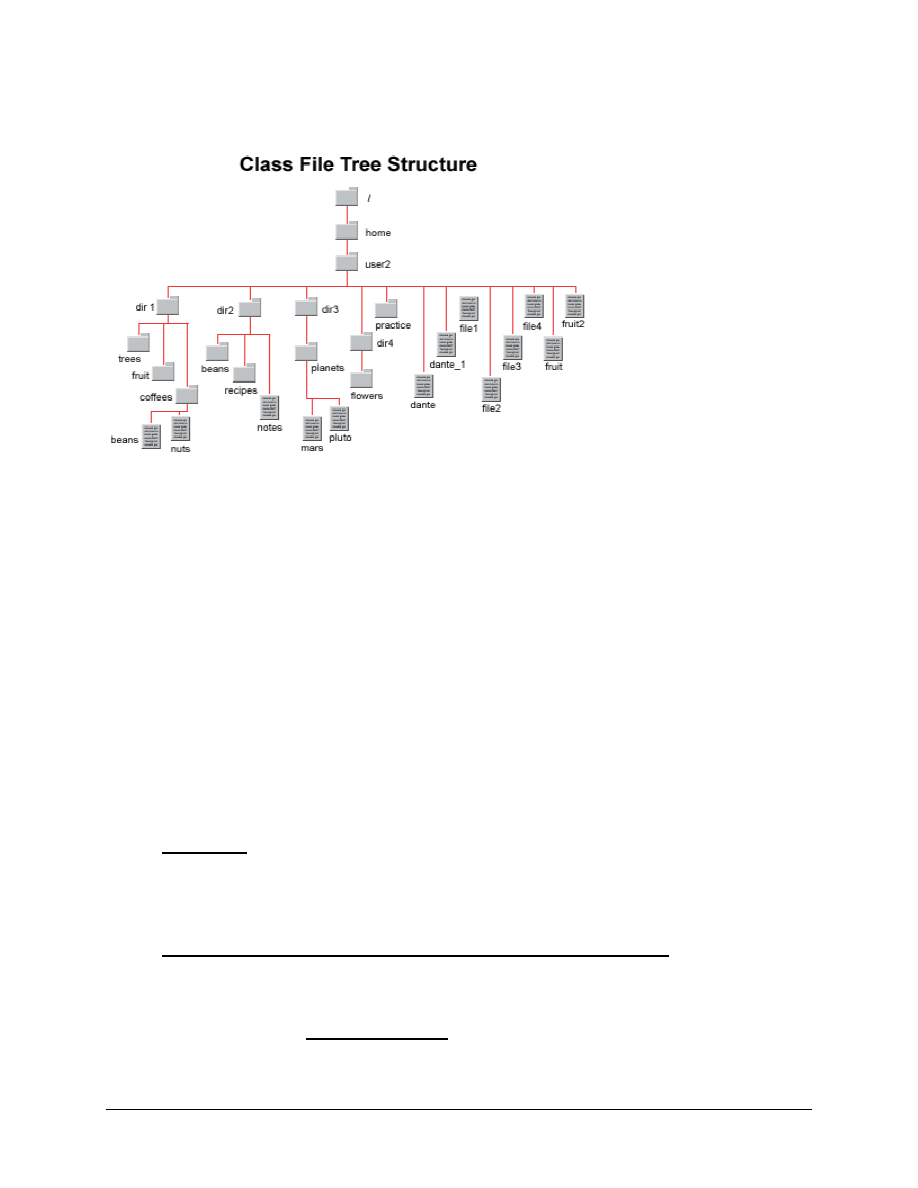
Use the diagram of the sample Class File System folder tree to assist with this lab.
Step 1. Log in to CDE
The student should login with the user name and password assigned by the instructor in the CDE entry
box.
Step 2. Access Files Subpanel Archive Option
Click on the Files subpanel from the CDE Front Panel and then select the Archive menu option. An
Archive window will open, to allow the student to enter the following information:
• Folder for archive: This is the folder where the archive (tar) file will be placed. The default is the
student’s home folder. For example, /home/userX.
• Name for Archive: The name the student wishes to give the archive file.
• File or folder to Archive: The name of a folder, file, or group of files to be combined into an
archive.
Step 3. Archive a File
a. Click on the Archive option from the Files subpanel above the file drawer icon. Leave the “Folder
for Archive” entry blank. What is the default folder where the archive will be placed?
b. Tab to “Name for Archive” and enter dante.tar. Then, tab to “File or Folder to Archive” and enter
dante.
c. Click OK to archive the dante file. What window was displayed when OK was clicked?
d. Close the Archive status window.
e. Open File Manager and check the student’s home folder for the new archive file. What is the icon
on the Archived file?

3 - 4
Fundamentals UNIX 2.0—-Lab 12.6.3
Copyright
2002, Cisco Systems, Inc.
Step 4. Archive a Folder
a. Click on Archive option from the Files subpanel. Leave the “Folder for Archive” entry blank.
What is the default folder where the archive will be placed?
b. Tab to “Name for Archive” and enter practice/dir2.tar. Where will this archive file be placed?
c. Tab to “File or Folder to Archive” and enter dir2.
d. Click OK to Archive the dir2 folder. What window was display when OK was clicked?
e. Close the Archive status window.
f.
Open File Manager and navigate to the practice folder? Is the archived folder there?
Step 5. Restore an Archived File and Folder
The student can restore an archive quickly using File Manager.
Note: If the original file exists in the folder where the Archive is restored, it will be overwritten by the
restored version.
a. Open File Manager and locate the tar file that was created previously from the dante file. The file
should be in the student’s home folder.
b. Select the dante archive file and click on the Selected menu. What option from the menu would
allow the student to extract the files from the tar file?
c. Select the Archive Unpack option from the menu. What was the response?
d. Navigate to the practice folder where the archive file for dir2 was placed.
e. Double click the archived dir2 file icon to see a table of contents of the tar file. Close the Archive
window. This is the same as using the t option with the
tar
command.
f.
Select the dir2 archive file and either use the Selected menu or right click the mouse and click on
the Archive Unpack option. Were the dir2 directory contents unpacked?
Step 6. Compress and Uncompress a File
The student can also compress and uncompress files with File Manager. The compressed file will be
renamed with a .Z extension. The compressed file will reside in the folder it was in before the compress.
The default is the home folder. The student should compress a filebefore ftp-ing or emailing the files to
another UNIX user or to save disk space if it is a file that is not used often.
a. Click on the Files subpanel from the CDE Front Panel and then select the Compress File menu
option. A Compress window will open to allow the student to enter the name of the File to
compress.
b. Enter the relative path to the beans file. What path was entered?
c. Open File Manager and navigate to the coffees folder. What is the compressed name of the
beans file?

4 - 4
Fundamentals UNIX 2.0—-Lab 12.6.3
Copyright
2002, Cisco Systems, Inc.
d. What is the icon for a compressed file?
e. Use the Selected menu or right click on the file to see its properties. Click on information. Can
the student tell what type of file it was?
f.
Close the Properties windows and right click on the compressed file icon again. Click on
Uncompress to restore the beans file to its original form.
g. Use the Selected menu or right click on the file to see its properties. Click on information. Can
the student tell what type of file it is?
h. Close the uncompress status window.
Step 7. Remove Files and Directories Created in this Lab
Remove any files and directories created in the student’s home folder during this lab.
Step 8. Logout
Exit the CDE File Manager by clicking the File menu and click Close. Close any terminal windows. Click
the EXIT icon on the front panel.
Wyszukiwarka
Podobne podstrony:
Lab12 Applications
lab12 1 7
lab12 5 1
LAB12
LAB12 Regulator cyfrowy
lab12 RapidPrototyping EN
Lab12 4 1
12 (2), Elektrotechnika AGH, Semestr II letni 2012-2013, Fizyka II - Laboratorium, laborki, laborki
Lab12 RapidPrototyping
Lab12
lab12
TECH INT lab12 2014, Studia - Politechnika Opolska, Semestr 6, Techniki Internetowe
LAB12 , Modu˙ sztywno˙ci
lab12 SWBlab12
lab12
lab12 4 3
Lab12 RapidPrototyping
Lab12 13spr, PWr, III semestr, MUD
LAB12, TARASIUK
więcej podobnych podstron