
Proprietary Statement
Copyright © 2006 Novell, Inc. All rights reserved.
No part of this publication may be reproduced, photocopied, stored
on a retrieval system, or transmitted without the express prior
consent of the publisher. This manual, and any portion thereof, may
not be copied without the express written permission of Novell, Inc.
Novell, Inc.
1800 South Novell Place
Provo, UT 84606-2399
Disclaimer
Novell, Inc. makes no representations or warranties with respect to
the contents or use of this manual, and specifically disclaims any
express or implied warranties of merchantability or fitness for any
particular purpose.
Further, Novell, Inc. reserves the right to revise this publication and
to make changes in its content at any time, without obligation to
notify any person or entity of such revisions or changes.
Further, Novell, Inc. makes no representations or warranties with
respect to any NetWare software, and specifically disclaims any
express or implied warranties of merchantability or fitness for any
particular purpose.
Further, Novell, Inc. reserves the right to make changes to any and
all parts of NetWare software at any time, without obligation to
notify any person or entity of such changes.
This Novell Training Manual is published solely to instruct students
in the use of Novell networking software. Although third-party
application software packages are used in Novell training courses,
this is for demonstration purposes only and shall not constitute an
endorsement of any of these software applications.
Further, Novell, Inc. does not represent itself as having any
particular expertise in these application software packages and any
use by students of the same shall be done at the students’ own risk.
Software Piracy
Throughout the world, unauthorized duplication of software is
subject to both criminal and civil penalties.
If you know of illegal copying of software, contact your local
Software Antipiracy Hotline.
For the Hotline number for your area, access Novell’s World Wide
Web page at http://www.novell.com and look for the piracy page
under “Programs.”
Or, contact Novell’s anti-piracy headquarters in the U.S. at 800-
PIRATES (747-2837) or 801-861-7101.
Trademarks
Novell, Inc. has attempted to supply trademark information about
company names, products, and services mentioned in this manual.
The following list of trademarks was derived from various sources.
Novell, Inc. Trademarks
Novell, the Novell logo, NetWare, BorderManager, ConsoleOne,
DirXML, GroupWise, iChain, ManageWise, NDPS, NDS, NetMail,
Novell Directory Services, Novell iFolder, Novell SecretStore,
Ximian, Ximian Evolution and ZENworks are registered
trademarks; CDE, Certified Directory Engineer and CNE are
registered service marks; eDirectory, Evolution, exteNd, exteNd
Composer, exteNd Directory, exteNd Workbench, Mono, NIMS,
NLM, NMAS, Novell Certificate Server, Novell Client, Novell
Cluster Services, Novell Distributed Print Services, Novell Internet
Messaging System, Novell Storage Services, Nsure, Nsure
Resources, Nterprise, Nterprise Branch Office, Red Carpet and Red
Carpet Enterprise are trademarks; and Certified Novell
Administrator, CNA, Certified Novell Engineer, Certified Novell
Instructor, CNI, Master CNE, Master CNI, MCNE, MCNI, Novell
Education Academic Partner, NEAP, Ngage, Novell Online
Training Provider, NOTP and Novell Technical Services are service
marks of Novell, Inc. in the United States and other countries. SUSE
is a registered trademark of SUSE Linux GmbH, a Novell company.
For more information on Novell trademarks, please visit
http://www.novell.com/company/legal/trademarks/tmlist.html.
Other Trademarks
Adaptec is a registered trademark of Adaptec, Inc. AMD is a
trademark of Advanced Micro Devices. AppleShare and AppleTalk
are registered trademarks of Apple Computer, Inc. ARCserv is a
registered trademark of Cheyenne Software, Inc. Btrieve is a
registered trademark of Pervasive Software, Inc. EtherTalk is a
registered trademark of Apple Computer, Inc. Java is a trademark or
registered trademark of Sun Microsystems, Inc. in the United States
and other countries. Linux is a registered trademark of Linus
Torvalds. LocalTalk is a registered trademark of Apple Computer,
Inc. Lotus Notes is a registered trademark of Lotus Development
Corporation. Macintosh is a registered trademark of Apple
Computer, Inc. Netscape Communicator is a trademark of Netscape
Communications Corporation. Netscape Navigator is a registered
trademark of Netscape Communications Corporation. Pentium is a
registered trademark of Intel Corporation. Solaris is a registered
trademark of Sun Microsystems, Inc. The Norton AntiVirus is a
trademark of Symantec Corporation. TokenTalk is a registered
trademark of Apple Computer, Inc. Tru64 is a trademark of Digital
Equipment Corp. UnitedLinux is a registered trademark of
UnitedLinux. UNIX is a registered trademark of the Open Group.
WebSphere is a trademark of International Business Machines
Corporation. Windows and Windows NT are registered trademarks
of Microsoft Corporation.
All other third-party trademarks are the property of their respective
owners.

Version 1
Copying all or part of this manual, or distributing such copies, is strictly prohibited.
1-1
To report suspected copying, please call 1-800-PIRATES.
Objective 1
Configure a DNS Server
The configuration of each DNS server type is slightly different. In
this objective the following is discussed:
■
Configure a Caching-Only DNS Server
■
Configure a Master Server for Your Domain
■
Configure One or More Slave Servers
Configure a Caching-Only DNS Server
A caching-only DNS server does not manage its own databases but
merely accepts queries and forwards them to other DNS servers.
The replies are saved in the cache.
The DNS server configuration is defined in the file /etc/named.conf.
You can use the example file that is installed with the DNS package
as a configuration file for a caching-only server.
The following example shows the beginning of a simple
configuration:
Lines beginning with a hash sign (“#”) are comments and will be
ignored.
#
# /etc/named.conf: Configuration of the name server (BIND9)
#
# Global options
#
options
{
#
# In which directory are the database files?
#
directory "/var/lib/named";
};

1-2
Copying all or part of this manual, or distributing such copies, is strictly prohibited.
Version 1
To report suspected copying, please call 1-800-PIRATES.
SUSE Linux Enterprise Server 10: Networking Services
The global options are defined in the
options
block at the beginning
of the file. The
directory
option specifies the directory where the
database files (or zone files) are located. Normally, this is
/var/lib/named/.
Using the
directory
option you can specify filenames for the
database files with a relative path (no absolute path required).
The global options are followed by the definition of the database
files for the domains managed by the DNS server. Several entries
are needed for basic DNS server functions such as those provided
by a caching-only server.
Three entries are needed for every DNS server:
■
The entry for root DNS servers (not needed for BIND 9 because
it has the list of root DNS servers compiled into the software).
■
The forward resolution for localhost
■
The reverse resolution for the network 127.0.0.0 (localhost)

Version 1
Copying all or part of this manual, or distributing such copies, is strictly prohibited.
1-3
To report suspected copying, please call 1-800-PIRATES.
The following are examples of these entries:
The zone entry for the root DNS servers contains a reference to a
file containing the addresses of the root DNS servers. This file
(root.hint) is generated in the directory /var/lib/named/ during the
installation of the package bind.
The two files for the resolution of localhost are also generated
during the installation. The structure of these files is explained later.
Starting each request for name resolution with queries to the root
servers can be quite slow. If these reqests are forwarded to a name
server with a lot of information in its cache (e.g., the name server of
your Internet service provider), the process will be much faster in
most cases.
## entry for root nameservers#
zone "." in {
type hint;
file "root.hint";
};
#
# forward resolution for localhost
#
zone "localhost" in {
type master;
file "localhost.zone";
};
#
# reverse resolution for localhost
#
zone "0.0.127.in-addr.arpa" in {
type master;
file "127.0.0.zone";
};

1-4
Copying all or part of this manual, or distributing such copies, is strictly prohibited.
Version 1
To report suspected copying, please call 1-800-PIRATES.
SUSE Linux Enterprise Server 10: Networking Services
You can define these DNS servers in the options block in the file
/etc/named.conf, as in the following:
You can enter up to three DNS server addresses. Queries that
cannot be resolved by the local DNS server are forwarded to one of
the specified DNS servers.
If these DNS servers cannot be reached, the queries are sent directly
to the root DNS servers.
Configure a Master Server for Your Domain
The following are the tasks you need to do to configure a master
DNS server for your domain:
■
Adapt the Main Server Configuration File
■
Create the Zone Files
■
Create Additional Resource Records
Adapt the Main Server Configuration File
You can adapt the configuration of the caching-only DNS server to
configure a DNS server containing its own information files.
options
{
directory "/var/lib/named";
forwarders {
10.0.0.254;
};
};

Version 1
Copying all or part of this manual, or distributing such copies, is strictly prohibited.
1-5
To report suspected copying, please call 1-800-PIRATES.
This configuration already contains the global entries for the
directory and the forwarders entries (which can be omitted) in the
options block. There are also some more options marked as
comment. The file also contains the mandatory entries for the root
servers and the resolution of localhost.
The global options are followed by definitions for the database files
(or zone files) for the domains this DNS server serves. At least 2
files are necessary for each domain:
■
A file for forward resolution (allocating an IP address to a
computer name)
■
A file for reverse resolution (allocating a computer name to an
IP address)
If several subnets belong to a domain, then one file for each of these
networks must be created for reverse resolution.
Each definition begins with the instruction
zone
(this is why the
database files are also known as zone files), followed by the name
of this zone.
For forward resolution, this is always the domain name. For reverse
resolution, the network prefix of the IP address must be given in
reverse order (10.0.0. becomes 0.0.10.) to which the suffix
in-addr.arpa is added (0.0.10.in-addr.arpa).
The zone name is always followed by an “in” for Internet. (DNS
servers can administer information on different name spaces, not
only that of the Internet. Other name spaces are practically never
used.)
The text in curly brackets defines the type of DNS server type (e.g.,
master) for this zone and the name of the zone file.

1-6
Copying all or part of this manual, or distributing such copies, is strictly prohibited.
Version 1
To report suspected copying, please call 1-800-PIRATES.
SUSE Linux Enterprise Server 10: Networking Services
The entries for a domain digitalairlines.com and a network
10.0.0.0/24 would look like this:
Create the Zone Files
The two files for the domain localhost and the file for the root DNS
servers are always included in the installation. You do not need to
change these files; however, you must create the files required for
the actual domain.
The subdirectory /var/lib/named/master/ is used for the database
files of a master server.
You need to know the following to manually create the zone files:
■
Structure of the Files
■
The File /var/lib/named/master/digitalairlines.com.zone
■
The File /var/lib/named/master/10.0.0.zone
■
The File /var/lib/named/master/localhost.zone
■
The File /var/lib/named/master/127.0.0.zone
#
# forward resolution for the domain digitalairlines.com
#
zone "digitalairlines.com" in {
type master;
file "master/digitalairlines.com.zone";
};
#
# reverse resolution for the network 10.0.0.0
#
zone "0.0.10.in-addr.arpa" in {
type master;
file "master/10.0.0.zone";
};

Version 1
Copying all or part of this manual, or distributing such copies, is strictly prohibited.
1-7
To report suspected copying, please call 1-800-PIRATES.
Structure of the Files
Each of the database files consists of a series of entries, or resource
records. The syntax of these records is always as follows:
reference [TTL] class type value
The following describes each part of a record:
■
reference.
The reference to which the record refers. This can be
a domain (or subdomain) or a standalone computer (name or IP
address).
■
TTL.
The Time To Live value for the record. If this is not
present, a default TTL value is used. This determines how long
other name servers store this information in their cache.
■
class.
The class of the record. For TCP/IP networks, this is
always IN (internet).
■
type.
The type of the record. The most important types are
listed in the table below.
■
value.
The value of the record. The value depends on the type
of record as listed in the following:
Table 1-1
Record Type
Meaning
Value
SOA
Start of Authority
(term for the
authority)
Parameters for the
domain
NS
Name server
Name or IP address of
one of the DNS servers
for this domain
MX
Mail exchanger
Name (or IP address)
and priority of a mail
server for this domain
A
Address
IP address of a computer
PTR
Pointer
Name of a computer

1-8
Copying all or part of this manual, or distributing such copies, is strictly prohibited.
Version 1
To report suspected copying, please call 1-800-PIRATES.
SUSE Linux Enterprise Server 10: Networking Services
x
Individual entries must always start in the first column with the reference. If
an entry does not start in the first column, the reference is taken from the
previous entry.
The File /var/lib/named/master/digitalairlines.com.zone
Unlike earlier versions of BIND, BIND 9 requires you to specify a
default TTL for all information at the beginning. This value is used
whenever the TTL has not been explicitly given for an entry.
You define the TTL with the following instruction:
x
In this file, the semicolon is used as a comment sign.
In this example, the TTL is given in seconds. It can be given in
other units as well, such as 2D for two days. Other units are M
(minutes), H (hours), and W (weeks).
CNAME
Canonical name
Alias name for a
computer
Table 1-1
(continued)
Record Type
Meaning
Value
;
; definition of a standard time to live, here: two days
;
$TTL 172800

Version 1
Copying all or part of this manual, or distributing such copies, is strictly prohibited.
1-9
To report suspected copying, please call 1-800-PIRATES.
This is followed by the definition of the SOA (Start of Authority)
entry, which specifies which DNS server has the authority for this
domain:
The domain to which this entry refers (in the example,
digitalairlines.com
) is listed first. The domain name must end with
a dot. If a name does not have a trailing dot, the name of the domain
is added, which would lead to an error here.
The name of the DNS server is listed after the SOA entry (in this
example,
da1.digitalairlines.com
with a dot at the end).
Alternatively, you could write da1, and the domain name
digitalairlines.com would be added after the name.
Next comes the email address of the person who is responsible for
the administration of the DNS server. The “@” usually used in
email addresses must be replaced by a dot (so the email address in
this example is hostmaster.digitalairlines.com). This is necessary
because “@” has a special meaning as an abbreviation.
It is advisable to use a generic email address here (e.g.,
hostmaster@digitalairlines.com) instead of an individual email
address.
The next entry is a serial number. Any number can be used, but
normally the date and a version number are used here. After any
change to the data in this file, the serial number has to be increased.
;
; SOA Entry
;
digitalairlines.com. IN SOA da1.digitalairlines.com.
hostmaster.digitalairlines.com. (
2004092601; serial number
1D
; refresh (one day)
2H
; retry (two hours)
1W
; expiry time (one week)
3H
; "negative" validity (three hours)
)

1-10
Copying all or part of this manual, or distributing such copies, is strictly prohibited.
Version 1
To report suspected copying, please call 1-800-PIRATES.
SUSE Linux Enterprise Server 10: Networking Services
Slave servers use this number to determine whether or not they need
to copy this zone file. If the serial number on the master server is
greater than that on the slave server, the file is copied.
The serial number is followed by time information (the first three
entries listed here are only important for slave servers):
■
The first entry causes a slave server to query a master server
after this length of time, to see if there is a new version of the
file (in the example, this is 1D or one day).
■
If the slave server cannot reach the master server, the next time
entry specifies at what intervals new attempts should be made
(in the example, this is 2H or two hours).
■
If the master server is not reached for a longer period of time,
the third time entry specifies when the slave server should
discard its information on this zone (in the example, this is 1W
or a week).
The basic idea here is that it is better not to pass on any
information than to pass on outdated information.
■
The fourth entry defines for how long negative responses from
the DNS server are valid. Each requesting server stores
responses in its cache, even if a computer name could not be
resolved (in the example, this is 3H or 3 hours).
These time definitions are followed by the name or IP address of the
computer that is acting as the DNS server for this domain. In all
cases, the master server must be entered here. If slave servers are
used, they should also be entered, as in the following:
The name of the domain can be omitted at this point. Then the name
from the previous entry (the SOA entry) is taken.
;
; entry for the name server
;
digitalairlines.com.
IN NS
da1.digitalairlines.com.
IN NS
da2.digitalairlines.com.

Version 1
Copying all or part of this manual, or distributing such copies, is strictly prohibited.
1-11
To report suspected copying, please call 1-800-PIRATES.
At the end of this file are the IP addresses that are allocated to
computer names. This is done with A (address) entries, as in the
following:
The File /var/lib/named/master/10.0.0.zone
The file for reverse resolution contains similar entries as the file for
forward resolution. At the beginning of the file there is the
definition of a default TTL and an SOA entry.
;
; Allocation of IP addresses to host names
;
da10
IN A
10.0.0.10
da12
IN A
10.0.0.12
da13
IN A
10.0.0.13
...
da1
IN A
10.0.0.254
da2
IN A
10.0.0.2

1-12
Copying all or part of this manual, or distributing such copies, is strictly prohibited.
Version 1
To report suspected copying, please call 1-800-PIRATES.
SUSE Linux Enterprise Server 10: Networking Services
In the SOA and NS entries, the IP address of the network is written
in reverse order:
At the end of this file are the host names that are allocated to
computer names, this time with the PTR (Pointer) entry, as in the
following:
; Database file for the domain digitalairlines.com:
; reverse resolution for the network 10.0.0.0
;
; Definition of a default TTL,here: two days
;
$TTL 172800
;
; SOA entry
;
0.0.10.in-addr.arpa. IN SOA da1.digitalairlines.com.
hostmaster.digitalairlines.com. (
2004092601; serial number
1D
; refresh (one day)
2H
; retry (two hours)
1W
; expiry time (one week)
3H
; "negative" validity(three hours)
)
;; Entry for the name server
;
IN NS
da1.digitalairlines.com.
IN NS
da2.digitalairlines.com.
;
; Allocation of host names to IP addresses
;
10
IN PTR
da10.digitalairlines.com.
12
IN PTR
da12.digitalairlines.com.
13
IN PTR
da13.digitalairlines.com.
14
IN PTR
da14.digitalairlines.com.
...
254
IN PTR
da1.digitalairlines.com.
2
IN PTR
da2.digitalairlines.com.

Version 1
Copying all or part of this manual, or distributing such copies, is strictly prohibited.
1-13
To report suspected copying, please call 1-800-PIRATES.
The following two files must exist for the local computer. These are
created automatically during installation and should not be
modified.
The File /var/lib/named/master/localhost.zone
The following is an example of the file
/var/lib/named/master/localhost.zone:
In this example, the “@” character is used as an abbreviation (for
this reason, it must be replaced by a dot in the email address in the
database files).
Using “@” instead of the domain name causes the file
/etc/named.conf to be read to see for which domain this file is
responsible.
In this case, it is localhost, which is also used for the name of the
DNS server (this is why “@” appears many times in the file).
$TTL 1W
@
IN SOA
@
root (
42
; serial (d. adams)
2D
; refresh
4H
; retry
6W
; expiry
1W )
; minimum
IN NS
@
IN A
127.0.0.1

1-14
Copying all or part of this manual, or distributing such copies, is strictly prohibited.
Version 1
To report suspected copying, please call 1-800-PIRATES.
SUSE Linux Enterprise Server 10: Networking Services
The File /var/lib/named/master/127.0.0.zone
In this file, the abbreviation “@” is also used. But here the computer
name must be given explicitly with localhost (remember the dot at
the end):
Create Additional Resource Records
Apart from the resource records already discussed (SOA, NS, A,
PTR), there are MX and CNAME resource records, which are used
to do the following:
■
Define Mail Servers for the Domain
■
Assign Aliases for Computers
Define Mail Servers for the Domain
To be able to use email addresses in the form
geeko@digitalairlines.com, the email server responsible for the
domain must be defined (the email cannot be sent directly to the
domain, but must be sent to a mail server).
$TTL 1W
@
IN SOA
localhost.
root.localhost. (
42
; serial (d. adams)
2D
; refresh
4H
; retry
6W
; expiry
1W )
; minimum
IN NS
localhost.
1
IN PTR
localhost.

Version 1
Copying all or part of this manual, or distributing such copies, is strictly prohibited.
1-15
To report suspected copying, please call 1-800-PIRATES.
To achieve this, an MX (Mail Exchange) entry must be made in the
database file for forward resolution, after the DNS server entry:
If an email is now sent to the address geeko@digitalairlines.com,
the computer sending the mail asks the DNS server which computer
is the mail server, and is sent the list of the MX entries in return.
Several mail servers can be given. On the basis of their priorities, it
is then decided to which computer the email is sent. The priority of
mail servers is defined by the number next to MX; the lower this
number, the higher the priority.
In this example the computer mail.digitalairlines.com has the
highest priority (it is, therefore, the primary mail server).
da1.digitalairlines.com and da5.digitalairlines.com both have the
same priority.
If the mail server with the highest priority cannot be reached, the
mail server with the second-highest priority is used. If several mail
servers have the same priority, then one of them is chosen at
random. An address entry must be made for each mail server.
digitalairlines.com.
IN MX
0 mail
IN MX
10 da1
IN MX
10 da5

1-16
Copying all or part of this manual, or distributing such copies, is strictly prohibited.
Version 1
To report suspected copying, please call 1-800-PIRATES.
SUSE Linux Enterprise Server 10: Networking Services
Assign Aliases for Computers
If you want a computer to be reached by more than one name (such
as addressing a computer as da30.digitalairlines.com and
www.digitalairlines.com), then corresponding aliases must be
given.
These are the CNAME (canonical name) entries in the database file
for forward resolution:
x
The names of the mail servers for the domain (MX entry) cannot be alias
names, since some mail servers cannot handle this correctly.
Configure One or More Slave Servers
To guarantee reliable operation, at least one more DNS server
besides the master server is required. This can take over part of the
load from the DNS master server. But it is especially important in
case the DNS master server is not available. This additional DNS
server is set up as a DNS slave server.
The essential difference between the two types is that a slave server
receives copies of the zone files from the master server.
Modifications to the zone files are only made on the master server.
As soon as a slave server is started, it connects to the master server
and receives a copy of the zone files from it. This is called a
zone
transfer
.
Comparison of data between the servers takes place automatically.
On the one hand, the slave server queries the master server at
regular intervals and checks, using the serial number of the zone
files, whether anything has changed.
da30
IN A
10.0.0.30
www
IN CNAME
da30

Version 1
Copying all or part of this manual, or distributing such copies, is strictly prohibited.
1-17
To report suspected copying, please call 1-800-PIRATES.
By default, the master server sends a message to all listed slave
servers (called
notify
) as soon as it has been restarted in order to
read in modified zone files.
In the configuration file /etc/named.conf for a slave server, there are
at least two entries that define it as a master server: the two zone
definitions for the loopback network (localhost).
There might also be a zone definition for the root DNS server. But a
zone definition is only necessary if the slave server will forward
requests to other DNS servers.
The definitions for zones for which it should copy data from the
master server look like the following:
The slave server gets data from the master server with the IP
address 10.0.0.254 and stores it in the directory
/var/lib/named/slave/. This directory is created when you install the
BIND package.
A similar configuration must be made for reverse resolution, as in
the following:
zone "digitalairlines.com" in {
type slave;
file "slave/digitalairlines.com.zone";
masters {
10.0.0.254;
};
};
zone "0.0.10.in-addr.arpa" in {
type slave;
file "slave/10.0.0.zone";
masters {
10.0.0.254;
};
};

1-18
Copying all or part of this manual, or distributing such copies, is strictly prohibited.
Version 1
To report suspected copying, please call 1-800-PIRATES.
SUSE Linux Enterprise Server 10: Networking Services
In the simplest configuration, the slave server gets information from
the master server at regular intervals. This can cause the slave
server to provide outdated information for a certain length of time.
This is why it is reasonable to instruct the master server to inform
the slave servers about modifications in the database files. The slave
servers then immediately carry out a zone transfer, which always
brings them up to date.
In order for the master server to be able to communicate with the
slave servers, it must know about them. By default, the master
server automatically informs its slave servers. This can also be
defined explicitely in the options section of the file /etc/named.conf,
as in the following:
Subsequently, the slave servers must be listed as DNS servers in the
database files (for the forward and reverse resolution):
This informs the slave server, da8.digitalairlines.com, about all
modifications.
options {
...
notify yes;
};
digitalairlines.com. IN
NS
da1.digitalairlines.com.
IN NS
da8.digitalairlines.com.

Version 1
Copying all or part of this manual, or distributing such copies, is strictly prohibited.
1-19
To report suspected copying, please call 1-800-PIRATES.
Objective 2
Activate LDAP Authentication
To activate authentication via LDAP you have to do the following:
■
Change the User Password
■
Activate pam_ldap
Change the User Password
If you use the LDAP directory for user authentication, you can
change the user’s password by using the
ldappasswd
command.
First you have to enter the new password for the user twice. Then
you have to enter the administrator’s password to fulfill the change.
The user can change his or her own password by:
da51:~ # ldappasswd -x -D
"cn=Administrator,dc=digitalairlines,dc=com" -W -S
"uid=geeko,ou=people,dc=digitalairlines,dc=com"
New password:
Re-enter new password:
Enter LDAP password:
Result: Success (0)
da51:~ #
da51:~ # ldappasswd -x -D
"uid=geeko,ou=people,dc=digitalairlines,dc=com" -W -S
"uid=geeko,ou=people,dc=digitalairlines,dc=com"
New password:
Re-enter new password:
Enter LDAP password:
Result: Success (0)
da51:~ #

1-20
Copying all or part of this manual, or distributing such copies, is strictly prohibited.
Version 1
To report suspected copying, please call 1-800-PIRATES.
SUSE Linux Enterprise Server 10: Networking Services
x
If you want to create a home directory automatically when the user logs in
the first time, add the following line to /etc/pam.d/sshd
session required pam_mkhomedir.so skel=/etc/skel/ umask=0022

Version 1
Copying all or part of this manual, or distributing such copies, is strictly prohibited.
1-21
To report suspected copying, please call 1-800-PIRATES.
If the user now searches for the new user’s LDAP entry he should
be prompted to enter his password and the crypted password should
be shown in the search results.
da51:~ # ldapsearch -x -D
"uid=geeko,ou=people,dc=digitalairlines,dc=com" -W
Enter LDAP Password:
# extended LDIF
#
# LDAPv3
# base <> with scope subtree
# filter: uid=geeko
# requesting: ALL
#
# geeko, people, digitalairlines.com
dn: uid=geeko,ou=people,dc=digitalairlines,dc=com
objectClass: posixAccount
objectClass: shadowAccount
objectClass: inetOrgPerson
uid: geeko
uidNumber: 1000
gidNumber: 100
cn: Geeko Chameleon
givenName: Geeko
sn: Chameleon
homeDirectory: /home/geeko
loginShell: /bin/bash
shadowMax: 99999
shadowWarning: 7
shadowInactive: -1
shadowMin: 0
shadowLastChange: 12609
userPassword::
e1NTSEF9TVJjWDlHQm8ydGxIUE1HWWFUT2lOQWZlNDkrUHA4OTU=
# search result
search: 2
result: 0 Success
# numResponses: 2
# numEntries: 1
da51:~ #

1-22
Copying all or part of this manual, or distributing such copies, is strictly prohibited.
Version 1
To report suspected copying, please call 1-800-PIRATES.
SUSE Linux Enterprise Server 10: Networking Services
Activate pam_ldap
To activate PAM and NSS, you have to add LDAP as a possible
source for authentication. You have to make sure the following lines
are in file /etc/nsswitch.conf:
If you configure the LDAP client with YaST the PAM module
pam_ldap.so is activated for all kinds of authentication. This is done
in the file /etc/security/pam_unix2.conf.
If you configure the LDAP client manually, you can activate the
LDAP authentication for selected services.
To do this, use the PAM module pam_ldap.so (included in the
package pam_ldap) is used. Add the module corresponding to the
service to the PAM configuration file in /etc/pam.d.
For example, if you want LDAP authentication for ssh, the file
/etc/pam.d/sshd must must look like this:
passwd: compat
group: compat
...
passwd_compat: ldap
group_compat: ldap
auth: use_ldap
account: use_ldap
password: use_ldap
session: none
#%PAM-1.0
auth include common-auth
auth required pam_nologin.so
account include common-account
password include common-password
session include common-session
# Enable the following line to get resmgr support for
# ssh sessions (see /usr/share/doc/packages/resmgr/README)
#session optional pam_resmgr.so fake_ttyname

Version 1
Copying all or part of this manual, or distributing such copies, is strictly prohibited.
1-23
To report suspected copying, please call 1-800-PIRATES.
Here the files common-auth, common-account, common-password
and common-session are included. These files can also be found in
/etc/pam.d/. The file /etc/pam.d/common-auth has -for example- the
following statements:
If a required module fails, the modules following the failed module
are tested anyway. But an error occurs at the end. If a sufficient
module fails, but another sufficient module matches, login is
allowed.
There are a couple of examples available in the directory
/usr/share/doc/packages/pam_ldap/pam.d/.
The advantage of using LDAP for all kinds of authentication (as
done by YaST) is that you can use standard tools like
passwd
or
chsh
.
auth required pam_env.so
auth required pam_unix2.so
kbailey@da51:~> passwd
Changing password for kbailey.
Enter login(LDAP) password:
New password:
Re-enter new password:
LDAP password information changed for geeko

1-24
Copying all or part of this manual, or distributing such copies, is strictly prohibited.
Version 1
To report suspected copying, please call 1-800-PIRATES.
SUSE Linux Enterprise Server 10: Networking Services
Exercise 1-1
Set up an LDAP User Database
In this exercise, you set up an LDAP user database.
You will find this exercise in the workbook.
(End of Exercise)

Version 1
Copying all or part of this manual, or distributing such copies, is strictly prohibited.
1-25
To report suspected copying, please call 1-800-PIRATES.
Objective 3
Troubleshoot the Network with Ethereal
and tcpdump
■
Use Ethereal
■
Use tcpdump
Use Ethereal
Ethereal is a network protocol analyzer. It allows you to examine
data from a live network or from a captured file on disk.
You can interactively browse the capture data, viewing summary
and detail information for each packet.
Ethereal has a powerful display filter language and the ability to
view a reconstructed stream of a TCP session.
To install Ethereal, select the ethereal package in the YaST software
installation module; then enter
ethereal
.
To use the features of the program, you need to be logged in as root.
In this objective, the following is covered:
■
Capture Traffic
■
The Ethereal Frontend
■
Filter Display
1-26
Copying all or part of this manual, or distributing such copies, is strictly prohibited.
Version 1
To report suspected copying, please call 1-800-PIRATES.
SUSE Linux Enterprise Server 10: Networking Services
Capture Traffic
If you start Ethereal, the dialog shows only a menu bar and a tool
bar at the top. To open a file containing a capture of network traffic,
select
File > Open
To capture actual network traffic, select
Capture > Options
.
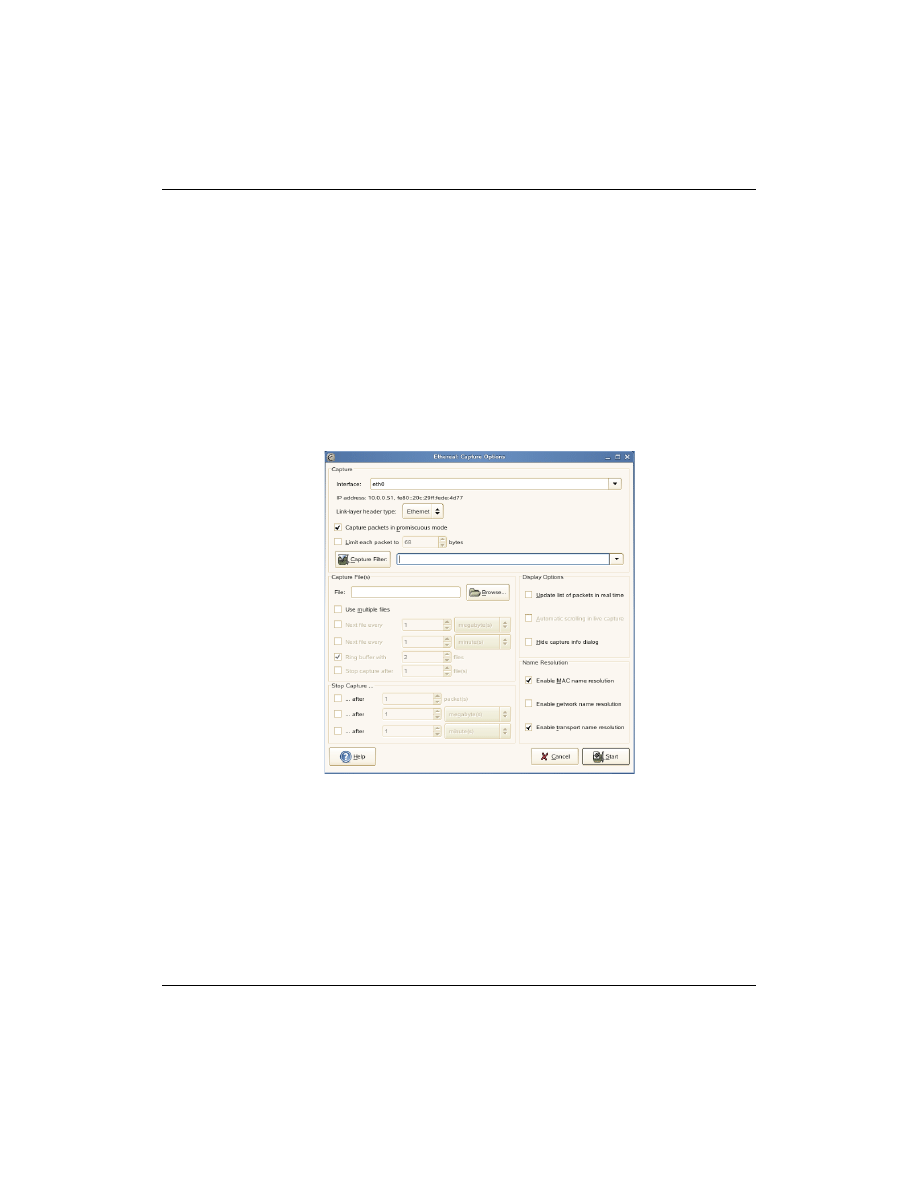
The following dialog appears:
Figure 1-1
From the
Interface
menu, you can select the interface (the traffic
you want to capture).
In
Capture Filter
, you can enter a filter rule.
Possible commands for the filter rule are
■
[
src
|
dst
]
host
host
. Allows you to filter a host IP address or
name.

Version 1
Copying all or part of this manual, or distributing such copies, is strictly prohibited.
1-27
To report suspected copying, please call 1-800-PIRATES.
If you add
src
or
dst
, you can specify that you are only
interested in source or destination addresses.
■
ether
[
src
|
dst
]
host
host
. Allows you to filter Ethernet host
addresses.
If you add
src
or
dst
, you can specify that you are only
interested in source or destination addresses.
■
gateway hos
t
host
. Allows you to filter packets that used the
host as a gateway (where the Ethernet source or destination was
host but neither the source nor destination IP address was host).
■
[
src
|
dst
]
net
net
[
mask
<
mask
>|
len
len
]. Allows you to filter
network numbers.
If you add
src
or
dst
, you can specify that you are only
interested in source or destination addresses.
In addition, you can specify either the netmask or the CIDR
(Classless InterDomain Routing) prefix for the network if it is
different from your own.
■
[
tcp
|
udp
] [
src
|
dst
]
port
port
. Allows you to filter TCP and
UDP port numbers.
You can optionally procede this parameter with the keywords
src
or
dst
and
tcp
or
udp
. These parameters allow you to
specify that you are only interested in source or destination
ports and TCP or UDP packets respectively.
The keywords
tcp
or
udp
must appear before
src
or
dst
.
■
less
|
greater
length
. Allows you to filter packets whose length
was less than or equal to the specified length, or greater than or
equal to the specified length, respectively.
■
ip
|
ether
proto
protocol
. Allows you to filter the specified
protocol at either the Ethernet layer or the IP layer.
■
ether
|
ip
broadcast
|
multicast
. Allows you to filter either
Ethernet or IP broadcasts or multicasts.
1-28
Copying all or part of this manual, or distributing such copies, is strictly prohibited.
Version 1
To report suspected copying, please call 1-800-PIRATES.
SUSE Linux Enterprise Server 10: Networking Services
■
expr
relop
expr
. Allows you to create complex filter
expressions that select bytes or ranges of bytes in packets.
You can combine these commands with
and
,
or
, or
not
. You can
also use brackets.
If you want to write the captured information into a file, use the
options in the Capture File(s) frame. You can split the captured
information into several files.
By default, you have to stop the capture process with a mouse click.
In the Stop Capture frame, you can choose to stop the capturing
after a number of packets has been captured, a level of used
memory, or after a certain time.
To start capturing select
Start
.
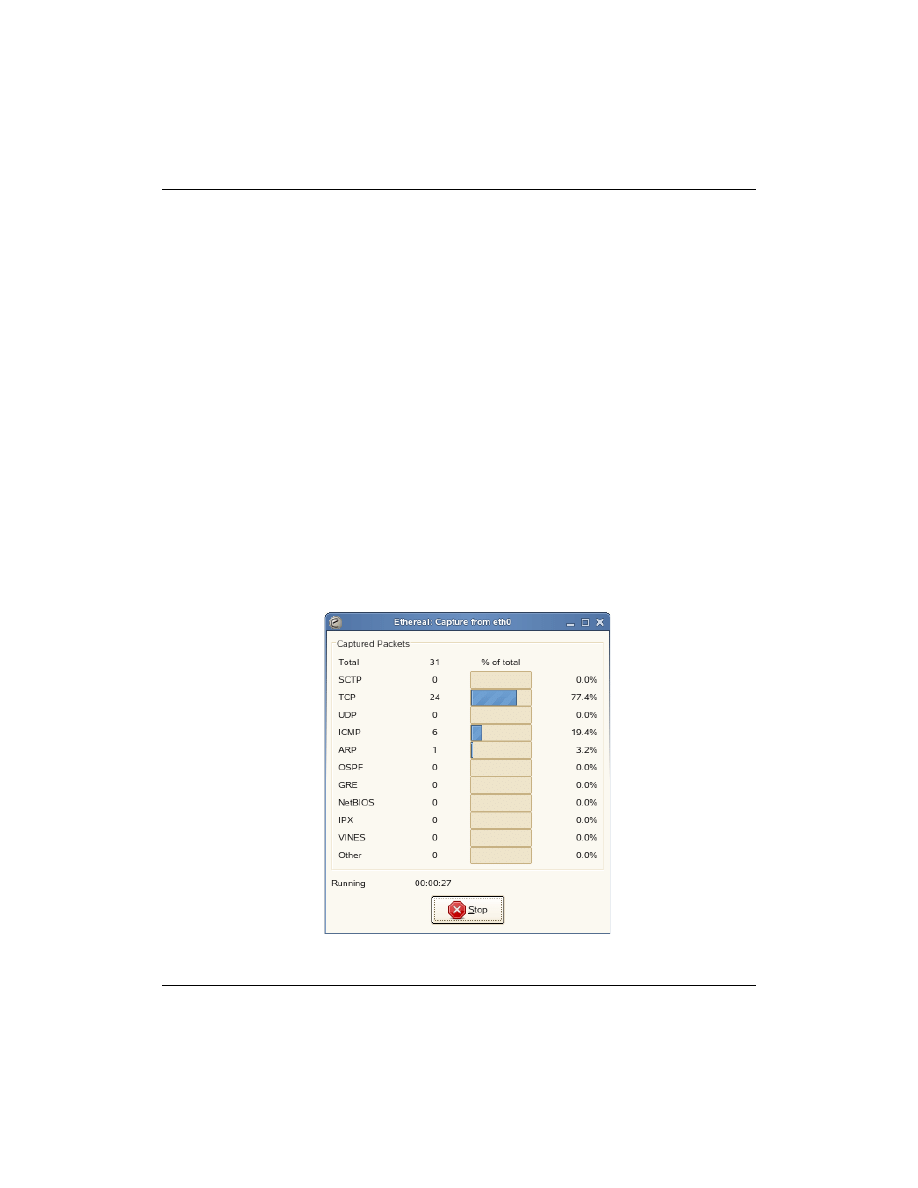
During the capture process, the following dialog shows how many
packets have been captured.
Figure 1-2

Version 1
Copying all or part of this manual, or distributing such copies, is strictly prohibited.
1-29
To report suspected copying, please call 1-800-PIRATES.
If you want to see the captured packets in real time, use the options
of the Display Options frame.
The Name Resolution options (in the bottom right corner) are also
useful. You can specify which names should be resolved.
After selecting
OK
, the capture begins.
To stop the capture process, select
Stop
.
The Ethereal Frontend
After capturing packages or opening a file with captured network
traffic, the Ethereal dialog shows three frames:
■
packet list
(top). This frame contains a table showing the
following information:
❑
No.
Number of the packet.
❑
Time
. Time when the packet is received.
❑
Source
. Sender of the packet.
❑
Destination
. Receiver of the packet.
❑
Protocol
. Used protocol.
❑
Info
. More information about the content of the packet.
■
packet details
(middle). Shows the content of the packet.
Select the triangle symbol to open a menu.
The structure of menus depends on the kind of protocol.
■
packet bytes
(bottom) The bytes of the packet written in
hexadecimal and ASCII characters.
1-30
Copying all or part of this manual, or distributing such copies, is strictly prohibited.
Version 1
To report suspected copying, please call 1-800-PIRATES.
SUSE Linux Enterprise Server 10: Networking Services
Below the packet bytes frame is a line for configuring the view
filter.
Figure 1-3
Filter Display
You can filter the displayed packets. You can enter a filter
expression in the text box next to the
Filter
button in the top line.
The expressions for display filters are different from the capture
filter expressions.
Possible expressions are:
■
eth.addr==08.00.08.15.ca.fe
. Display all traffic to and from the
Ethernet address 08.00.08.15.ca.fe.
■
ip.addr==192.168.0.10
. Display all traffic to and from the IP
address 192.168.0.10.
Version 1
Copying all or part of this manual, or distributing such copies, is strictly prohibited.
1-31
To report suspected copying, please call 1-800-PIRATES.
■
tcp.port==80
. Display all traffic to and from the TCP port 80
(HTTP) of all machines.
■
ip.addr==192.168.0.10 && tcp.port!=80
. Display all traffic to
and from 192.168.0.10 except HTTP.
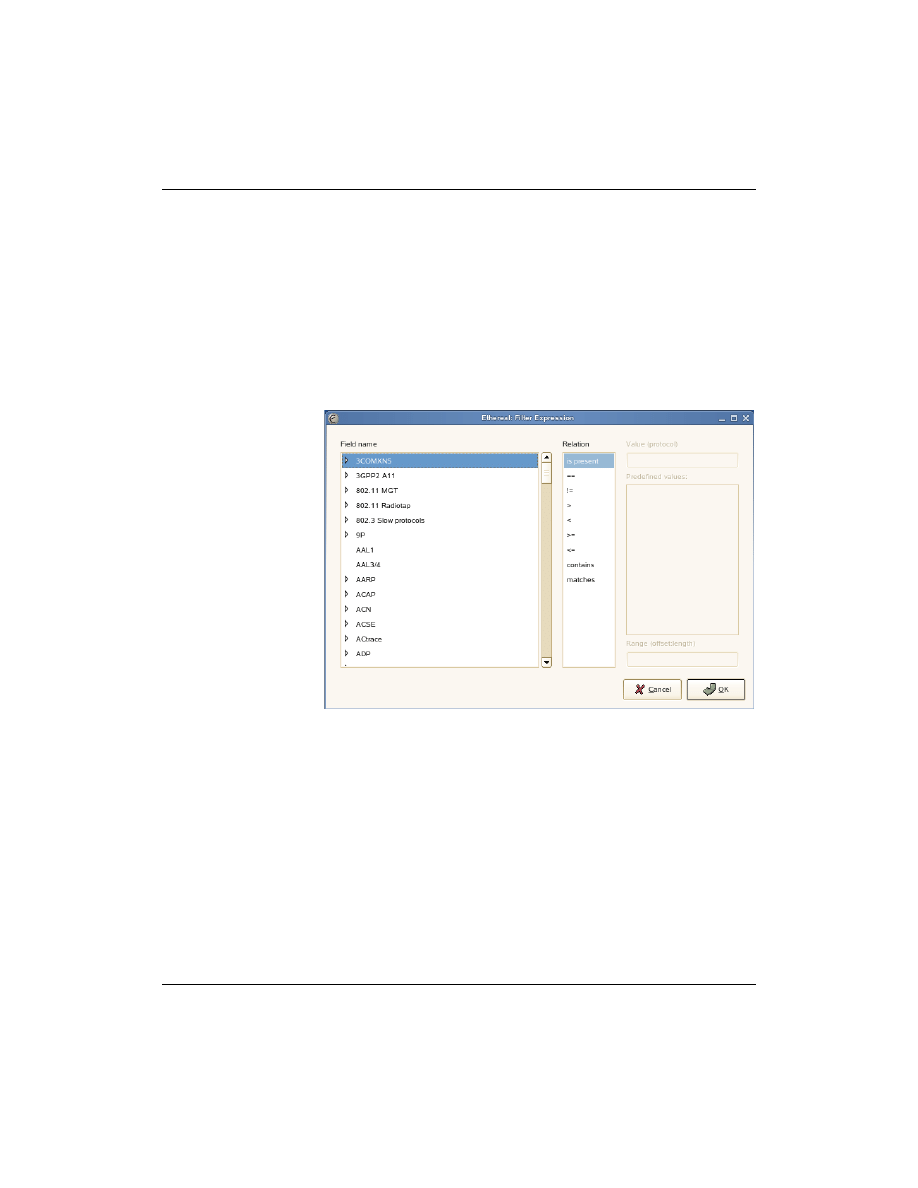
Ethereal provides a powerful tool to construct display filters. Select
Expressions
in the filter line.
Figure 1-4
In the left frame (labeled
Field name
), you can see a list of options
you can filter for. These fields are grouped for protocols or services.
In the middle frame, you can specify the relationship. The
relationship shown depend from the selected field.
Depending on the selected relationship, you can specify a value in
the text box
Value
in the top right column. The dialog shows what
kind of value is expected.

1-32
Copying all or part of this manual, or distributing such copies, is strictly prohibited.
Version 1
To report suspected copying, please call 1-800-PIRATES.
SUSE Linux Enterprise Server 10: Networking Services
If you select
View
>
Coloring Rules
, you can create a display filter
that colorizes the matches in a certain color.
x
When you want to see the traffic of a whole network session (e.g., a whole
telnet session), it is uncomfortable having to select each package from the
packet list. Instead, you can select a TCP packet in the session and choose
Analyze > Follow TCP Stream
.

Version 1
Copying all or part of this manual, or distributing such copies, is strictly prohibited.
1-33
To report suspected copying, please call 1-800-PIRATES.
Exercise 1-2
Use Ethereal
In this exercise, you use Ethereal and capture all traffic being sent to
and from da2.
You will find this exercise in the workbook.
(End of Exercise)

1-34
Copying all or part of this manual, or distributing such copies, is strictly prohibited.
Version 1
To report suspected copying, please call 1-800-PIRATES.
SUSE Linux Enterprise Server 10: Networking Services
Use tcpdump
This software can read all or certain packets going over the ethernet.
tcpdump is often used to save the network traffic in a file.
tcpdump is installed during the default installation of SUSE Linux
Enterprise Server 10.
The simplest way of using tcpdump is to enter just
tcpdump
.
To quit the capture, press
Ctrl + C
. A short summary is shown.
The most important options of tcpdump are
■
-c
number
. Exit after receiving
number
of packets.
■
-F
file
. Use
file
as input for the filter expression.
An additional expression given on the command line is ignored.
■
-i
interface
. Listen on
interface
.
■
-n
. Do not convert addresses (such as host addresses or port
numbers) to names.
■
-N
. Do not print the domain name qualification of host names.
■
-S
. Print absolute, rather than relative, TCP sequence numbers.
■
-w
file
. Write the raw packets to
file
rather than parsing and
printing them out.
da51:~ # tcpdump
tcpdump: verbose output suppressed, use -v or -vv for full protocol decode
listening on eth0, link-type EN10MB (Ethernet), capture size 96 bytes
16:52:50.488641 802.1d config 8000.00:80:2d:e2:9d:13.8013 root
8000.00:80:2d:e2:9d:13 pathcost 0 age 0 max 20 hello 2 fdelay 15
16:52:51.296790 (NOV-802.2) f4a33f8b.00:50:8b:d6:9b:8b.9001 >
00000000.ff:ff:ff:ff:ff:ff.9001: ipx-#9001 43
2 packets captured
2 packets received by filter
0 packets dropped by kernel
da51:~ #

Version 1
Copying all or part of this manual, or distributing such copies, is strictly prohibited.
1-35
To report suspected copying, please call 1-800-PIRATES.
You can also specify a filter expression. The most important filter
expressions are already described in the Ethereal section.
b
For more information, see the man page
man 1 tcpdump
.

1-36
Copying all or part of this manual, or distributing such copies, is strictly prohibited.
Version 1
To report suspected copying, please call 1-800-PIRATES.
SUSE Linux Enterprise Server 10: Networking Services
Exercise 1-3
Use tcpdump
In this exercise, you use tcpdump to capture 10 ICMP packages.
You will find this exercise in the workbook.
(End of Exercise)


www.suse.com
www.novell.com
Training
SERVICES
Wyszukiwarka
Podobne podstrony:
KET ket hb samples id 731595 Nieznany
Abolicja podatkowa id 50334 Nieznany (2)
4 LIDER MENEDZER id 37733 Nieznany (2)
katechezy MB id 233498 Nieznany
metro sciaga id 296943 Nieznany
perf id 354744 Nieznany
interbase id 92028 Nieznany
Mbaku id 289860 Nieznany
Probiotyki antybiotyki id 66316 Nieznany
miedziowanie cz 2 id 113259 Nieznany
LTC1729 id 273494 Nieznany
D11B7AOver0400 id 130434 Nieznany
analiza ryzyka bio id 61320 Nieznany
pedagogika ogolna id 353595 Nieznany
Misc3 id 302777 Nieznany
cw med 5 id 122239 Nieznany
D20031152Lj id 130579 Nieznany
więcej podobnych podstron