Lab 9.5.1 Configuring IP Blocking
Objectives
In this lab exercise you will complete the following tasks:
■
Configure your Sensor to perform IP blocking.
■
Create a string match signature with action IP blocking.
■
Trigger the string match signature.
■
View a list of blocked hosts.
■
Remove blocked hosts and networks.
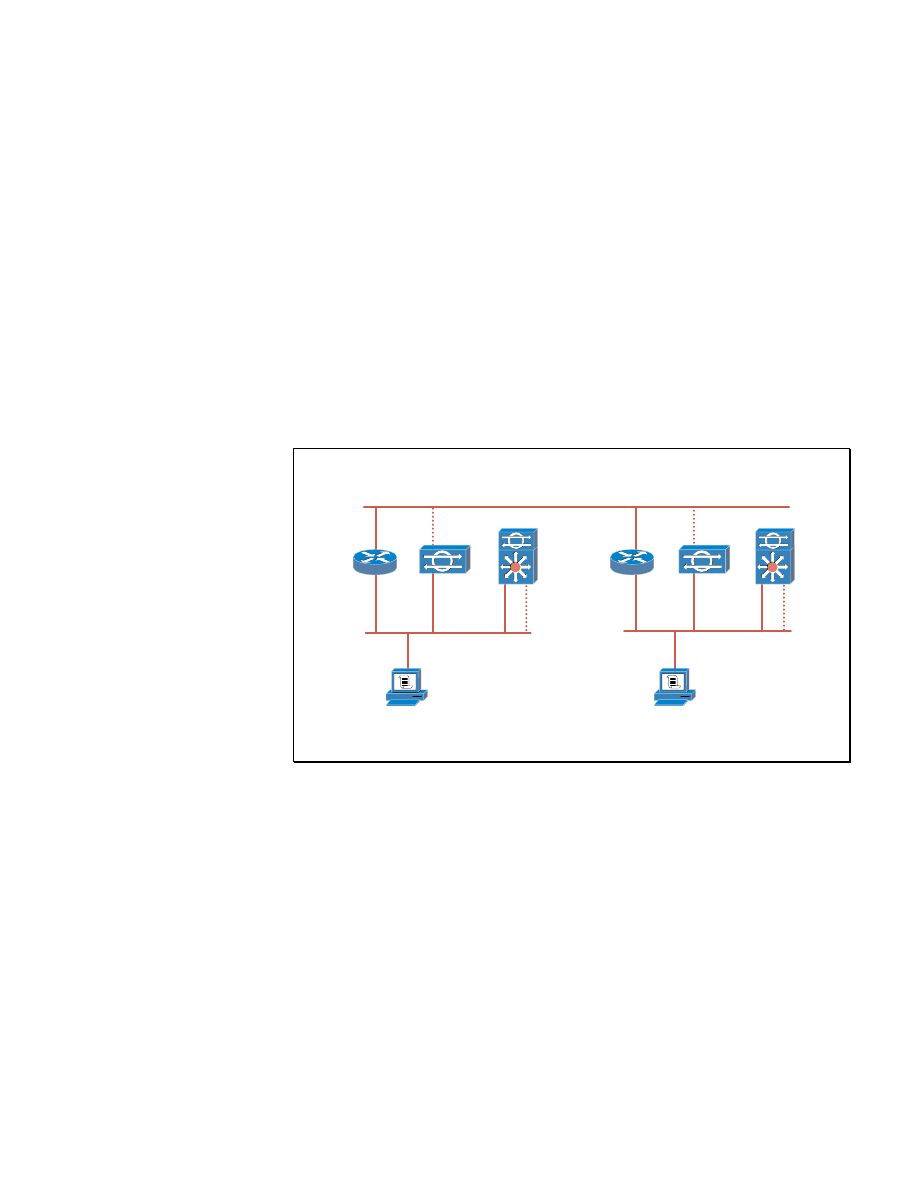
Visual Objective
This figure displays the information you will need to complete this lab exercise.
Pod P
Your Pod
Pod Q
Peer Pod
172.30.1.0/24
e0/1
rP
e0/0
.10P
.1
10.0.P.0 /24
CSPM
10.0.P.3
Host ID = 3, Org ID = P
Host Name = cspmP,
Org Name = podP
sensorP
.4
.6
idsmP
e0/1
rQ
e0/0
10.0.Q.0 /24
.1
.10Q
.4
.6
sensorQ
idsmQ
CSPM
10.0.Q.3
Host ID = 3, Org ID = Q
Host Name = cspmQ,
Org Name = podQ
A pair of students has been assigned to a pod. Each pod has a complete set of
equipment to complete the lab exercise.
Task 1—Configure the Sensor to Perform IP Blocking
Complete the following steps to configure a sensor to perform IP blocking:
Step 1
Select sensorP from the Network Topology Tree (NTT).
(where P = pod number)
Step 2
Select the Blocking tab in the Sensor view panel.
Step 3
Select the Blocking Devices tab within the Blocking tab.
Step 4
Click Add to open the Blocking Device Properties window and configure the
properties for IP blocking.
Step 5
Enter the following parameters in their respective fields:

9-2
Cisco Secure Intrusion Detection System 2.1—Lab 9.6.1
Copyright
2001, Cisco Systems, Inc.
Setting Value
Telnet IP Address
10.0.P.1 (where P = pod number)
Telnet Username
Leave blank
Telnet Password
cisco
Enable Password
cisco
Interface Name
Ethernet0/1
Interface Direction
Inbound
Note
Do not add a space between the interface name and the interface number.
Step 6
Click OK in the Blocking Device Properties window.
Step 7
Click OK in the Sensor view panel to accept your changes.
Step 8
Click Save on the top toolbar to save your changes.
Task 2—Create a String Match Signature with IP Blocking Response
Complete the following steps to create a string signature that when triggered will
respond with a block command:
Step 1
Select My Signatures from the Sensor Signatures folder.
Step 2
Select the Signatures tab in the Signatures view panel.
Step 3
Select the String Signatures tab within the Signatures tab.
Step 4
Click Add to create a string signature entry.
Step 5
Enter the following parameters in their respective fields:
Setting Value
String
blockP (where P = pod number)
Port
23 (Telnet)
Direction
Keep the default of To
Occurrences
Keep the default of 1
Severity
Keep the default of High
Enable
Keep the default of checked
Actions Select
Block only, and deselect TCP Reset
and IP Log
Comment
string match for block
Step 6
Click OK in the Signatures view panel to accept your changes.
Step 7
Click Update on the toolbar to save your changes and update the configuration
files.
Step 8
Click Continue in the Save Template window.
Step 9
Select sensorP from the NTT.
(where P = pod number)

Copyright
2001, Cisco Systems, Inc.
Cisco Secure Intrusion Detection System 2.1—Lab 9.6.1
9-3
Step 10
Select the Command tab in the Sensor view panel.
Step 11
Click the Approve Now button in the Command Approval section. Wait for the
configuration files to be downloaded to the Sensor.
Step 12
After you get an Upload completed message in the Status section, proceed to the
next task.
Task 3—Trigger the String Match Signature
Complete the following steps to trigger the string signature:
Step 1
From your own CSPM host, telnet to your peer’s router as assigned by the
instructor and log on with the password cisco.
Step 2
At the router prompt, enter the following:
r0> blockQ
(where Q = peer’s pod number)
Your peer’s Event Viewer displays the new alarm and your session is blocked.
Your session will hang and no input is allowed.
Note
The block may take a few seconds to occur.
Step 3
To get out of the hung connection, close your Telnet client.
Step 4
Attempt to telnet to your peer’s router to confirm the block was successful.
Task 4—Perform a manual block
Complete the following steps to perform a manual block on a network as assigned
by the instructor.
Step 1
Choose Actions>Block >Network from the Event Viewer menu. The Shunning
of Hosts window opens, showing the status of the block command.
Task 5—View a List of Blocked Hosts
Complete the following steps to view a list of block hosts:
Step 1
After your peer triggers your string match signature, go to your Event Viewer and
select the alarm that was triggered.
Step 2
Choose View>Block List from the Event Viewer menu. The Shun List window
opens.
Q 1) What are the IP addresses of the hosts or network address being blocked?
A)
Q 2) How much time is remaining before the block will be automatically removed for
each host or network?
A)
Step 3
Click OK to close the window.

9-4
Cisco Secure Intrusion Detection System 2.1—Lab 9.6.1
Copyright
2001, Cisco Systems, Inc.
Task 6—Remove the block
Complete the following steps to remove the block on all hosts.
Step 1
Choose Actions>Remove Block >All from the Event Viewer menu. The
Removing Shun of Hosts window opens.
Step 2
Click OK to close the window.
Wyszukiwarka
Podobne podstrony:
Lab9
lab9 2 6
Rafał Polak 12k2 lab9, Inżynieria Oprogramowania - Informatyka, Semestr III, Systemy Operacyjne, Spr
i2 lab9
LAB9, 1 STUDIA - Informatyka Politechnika Koszalińska, Labki, fizyka1, fiza, fizyka
lab9 procesory sygnalowe, LABORATORIUM
lab9, Przekazywanie parametrów, struktura programu
lab9, Przekazywanie parametrów, struktura programu
JP LAB9
lab9 wielomiany ortogonalne
lab9 wielomiany ortogonalne
LAB9, Porównanie struktur i własności wybranych materiałów ceramicznych
lab9 6 3 1
lab9 3 6
wyniki(2), Elektrotechnika AGH, Semestr II letni 2012-2013, Fizyka II - Laboratorium, laborki, labor
EAP Sprawozdanie Lab9, AGH, Semestr IV, Podstawy automatyki[Ornacki,Pakuła,Łukomski,Snamina], EAP Sp
TECH INT lab9 2014, Studia - Politechnika Opolska, Semestr 6, Techniki Internetowe
lab9 6 3 2
lab9 6
więcej podobnych podstron