FIRST PAGES
Chapter 7
7-1 (a) DE-Gerber, Eq. (7-10):
A
=
4[2
.2(600)]
2
+ 3[1.8(400)]
2
1
/
2
= 2920 lbf · in
B
=
4[2
.2(500)]
2
+ 3[1.8(300)]
2
1
/
2
= 2391 lbf · in
d
=
8(2)(2920)
π(30 000)
1 +
1
+
2(2391)(30 000)
2920(100 000)
2
1
/
2
1
/
3
= 1.016 in Ans.
(b) DE-elliptic, Eq. (7-12) can be shown to be
d
=
16n
π
A
2
S
2
e
+
B
2
S
2
y
1
/
3
=
16(2)
π
2920
30 000
2
+
2391
80 000
2
1
/
3
= 1.012 in Ans.
(c) DE-Soderberg, Eq. (7-14) can be shown to be
d
=
16n
π
A
S
e
+
B
S
y
1
/
3
=
16(2)
π
2920
30 000
+
2391
80 000
1
/
3
= 1.090 in Ans.
(d) DE-Goodman: Eq. (7-8) can be shown to be
d
=
16n
π
A
S
e
+
B
S
ut
1
/3
=
16(2)
π
2920
30 000
+
2391
100 000
1
/
3
= 1.073 in Ans.
Criterion
d (in)
Compared to DE-Gerber
DE-Gerber
1.016
DE-elliptic
1.012
0.4% lower
less conservative
DE-Soderberg
1.090
7.3% higher
more conservative
DE-Goodman
1.073
5.6% higher
more conservative
budynas_SM_ch07.qxd 11/30/2006 15:31 Page 178
FIRST PAGES
Chapter 7
179
7-2 This problem has to be done by successive trials, since S
e
is a function of shaft size. The
material is SAE 2340 for which S
ut
= 1226 MPa, S
y
= 1130 MPa, and H
B
≥ 368.
Eq. (6-19):
k
a
= 4.51(1226)
−
0
.
265
= 0.685
Trial #1: Choose d
r
= 22 mm
Eq. (6-20):
k
b
=
22
7
.62
−
0
.
107
= 0.893
Eq. (6-18):
S
e
= 0.685(0.893)(0.5)(1226) = 375 MPa
d
r
= d − 2r = 0.75D − 2D/20 = 0.65D
D
=
d
r
0
.65
=
22
0
.65
= 33.8 mm
r
=
D
20
=
33
.8
20
= 1.69 mm
Fig. A-15-14:
d
= d
r
+ 2r = 22 + 2(1.69) = 25.4 mm
d
d
r
=
25
.4
22
= 1.15
r
d
r
=
1
.69
22
= 0.077
K
t
= 1.9
Fig. A-15-15:
K
ts
= 1.5
Fig. 6-20:
r
= 1.69 mm, q = 0.90
Fig. 6-21:
r
= 1.69 mm, q
s
= 0.97
Eq. (6-32):
K
f
= 1 + 0.90(1.9 − 1) = 1.81
K
f s
= 1 + 0.97(1.5 − 1) = 1.49
We select the DE-ASME Elliptic failure criteria.
Eq. (7-12) with d as d
r
, and M
m
= T
a
= 0,
d
r
=
16(2
.5)
π
4
1
.81(70)(10
3
)
375
2
+ 3
1
.49(45)(10
3
)
1130
2
1
/
2
1
/
3
= 20.6 mm
budynas_SM_ch07.qxd 11/30/2006 15:31 Page 179
FIRST PAGES
180
Solutions Manual • Instructor’s Solution Manual to Accompany Mechanical Engineering Design
Trial #2: Choose d
r
= 20.6 mm
k
b
=
20
.6
7
.62
−
0
.
107
= 0.899
S
e
= 0.685(0.899)(0.5)(1226) = 377.5 MPa
D
=
d
r
0
.65
=
20
.6
0
.65
= 31.7 mm
r
=
D
20
=
31
.7
20
= 1.59 mm
Figs. A-15-14 and A-15-15:
d
= d
r
+ 2r = 20.6 + 2(1.59) = 23.8 mm
d
d
r
=
23
.8
20
.6
= 1.16
r
d
r
=
1
.59
20
.6
= 0.077
We are at the limit of readability of the figures so
K
t
= 1.9,
K
ts
= 1.5
q
= 0.9, q
s
= 0.97
∴
K
f
= 1.81
K
f s
= 1.49
Using Eq. (7-12) produces d
r
= 20.5 mm. Further iteration produces no change.
Decisions:
d
r
= 20.5 mm
D
=
20
.5
0
.65
= 31.5 mm, d = 0.75(31.5) = 23.6 mm
Use D
= 32 mm, d = 24 mm, r = 1.6 mm Ans.
7-3 F
cos 20°(d
/2) = T, F = 2T/(d cos 20°) = 2(3000)/(6 cos 20°) = 1064 lbf
M
C
= 1064(4) = 4257 lbf · in
For sharp fillet radii at the shoulders, from Table 7-1, K
t
= 2.7, and K
ts
= 2.2. Examining
Figs. 6-20 and 6-21, with S
ut
= 80 kpsi, conservatively estimate q = 0.8 and q
s
= 0.9. These
estimates can be checked once a specific fillet radius is determined.
Eq. (6-32):
K
f
= 1 + (0.8)(2.7 − 1) = 2.4
K
f s
= 1 + (0.9)(2.2 − 1) = 2.1
(a) Static analysis using fatigue stress concentration factors:
From Eq. (7-15) with M
= M
m
, T
= T
m
, and M
a
= T
a
= 0,
σ
max
=
32K
f
M
πd
3
2
+ 3
16K
f s
T
πd
3
2
1
/
2
budynas_SM_ch07.qxd 11/30/2006 15:31 Page 180
FIRST PAGES
Chapter 7
181
Eq. (7-16):
n
=
S
y
σ
max
=
S
y
32K
f
M
πd
3
2
+ 3
16K
f s
T
πd
3
2
1
/
2
Solving for d,
d
=
16n
π S
y
4( K
f
M)
2
+ 3(K
f s
T )
2
1
/
2
1
/
3
=
16(2
.5)
π(60 000)
4(2
.4)(4257)
2
+ 3(2.1)(3000)
2
1
/
2
1
/
3
= 1.700 in Ans.
(b)
k
a
= 2.70(80)
−
0
.
265
= 0.845
Assume d
= 2.00 in to estimate the size factor,
k
b
=
2
0
.3
−
0
.
107
= 0.816
S
e
= 0.845(0.816)(0.5)(80) = 27.6 kpsi
Selecting the DE-ASME Elliptic criteria, use Eq. (7-12) with M
m
= T
a
= 0.
d
=
16(2
.5)
π
4
2
.4(4257)
27 600
2
+ 3
2
.1(3000)
60 000
2
1
/
2
1
/
3
= 2.133 in
Revising k
b
results in d
= 2.138 in Ans.
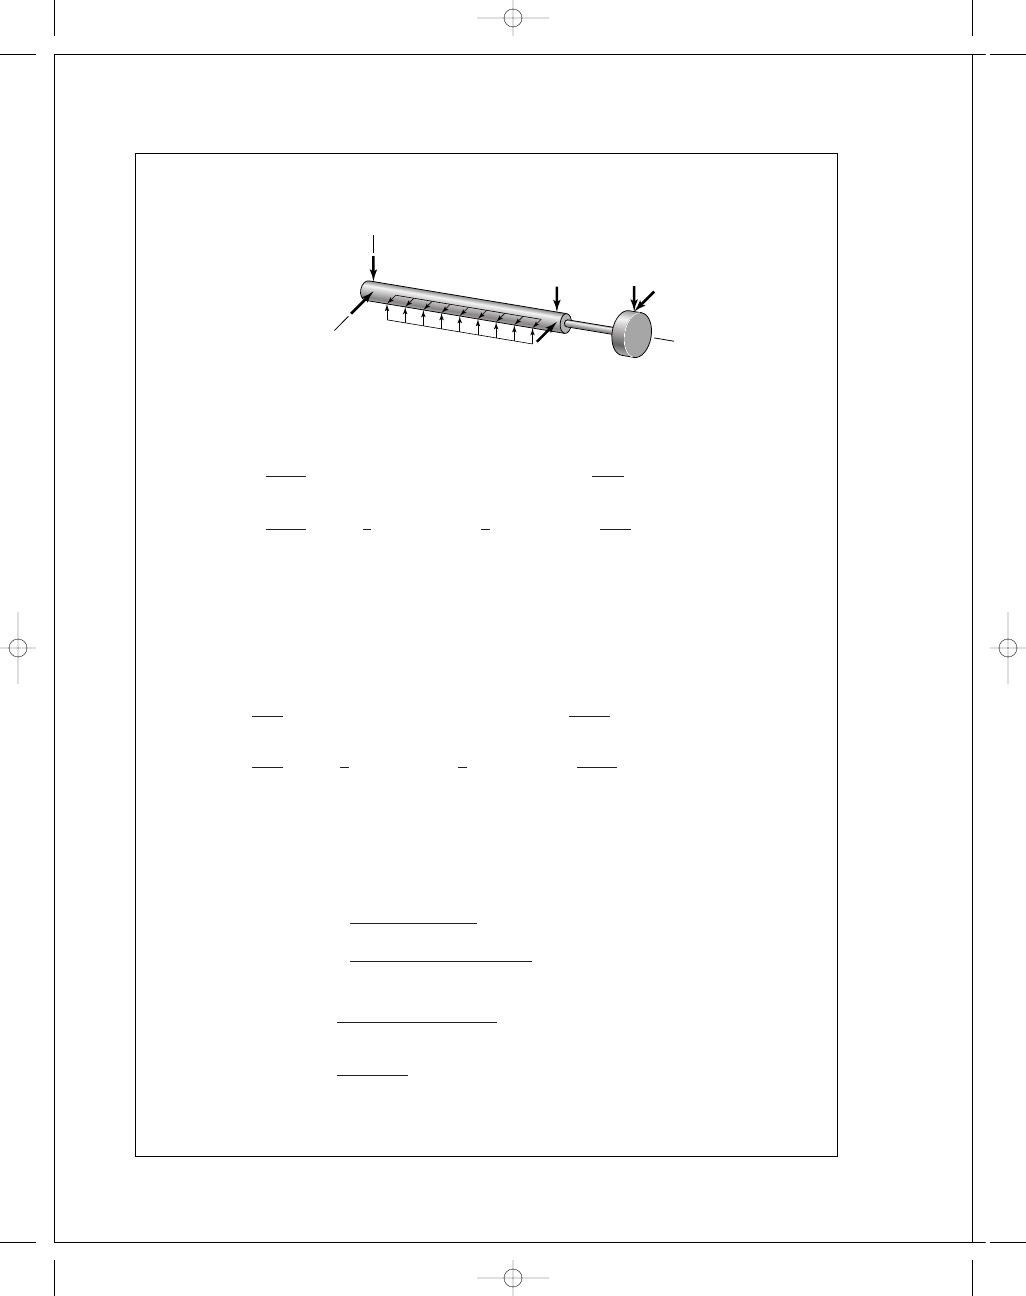
7-4 We have a design task of identifying bending moment and torsion diagrams which are pre-
liminary to an industrial roller shaft design.
F
y
C
= 30(8) = 240 lbf
F
z
C
= 0.4(240) = 96 lbf
T
= F
z
C
(2)
= 96(2) = 192 lbf · in
F
z
B
=
T
1
.5
=
192
1
.5
= 128 lbf
F
y
B
= F
z
B
tan 20°
= 128 tan 20° = 46.6 lbf
z
y
F
y
B
F
z
B
F
z
C
F
y
C
budynas_SM_ch07.qxd 11/30/2006 15:31 Page 181
FIRST PAGES
182
Solutions Manual • Instructor’s Solution Manual to Accompany Mechanical Engineering Design
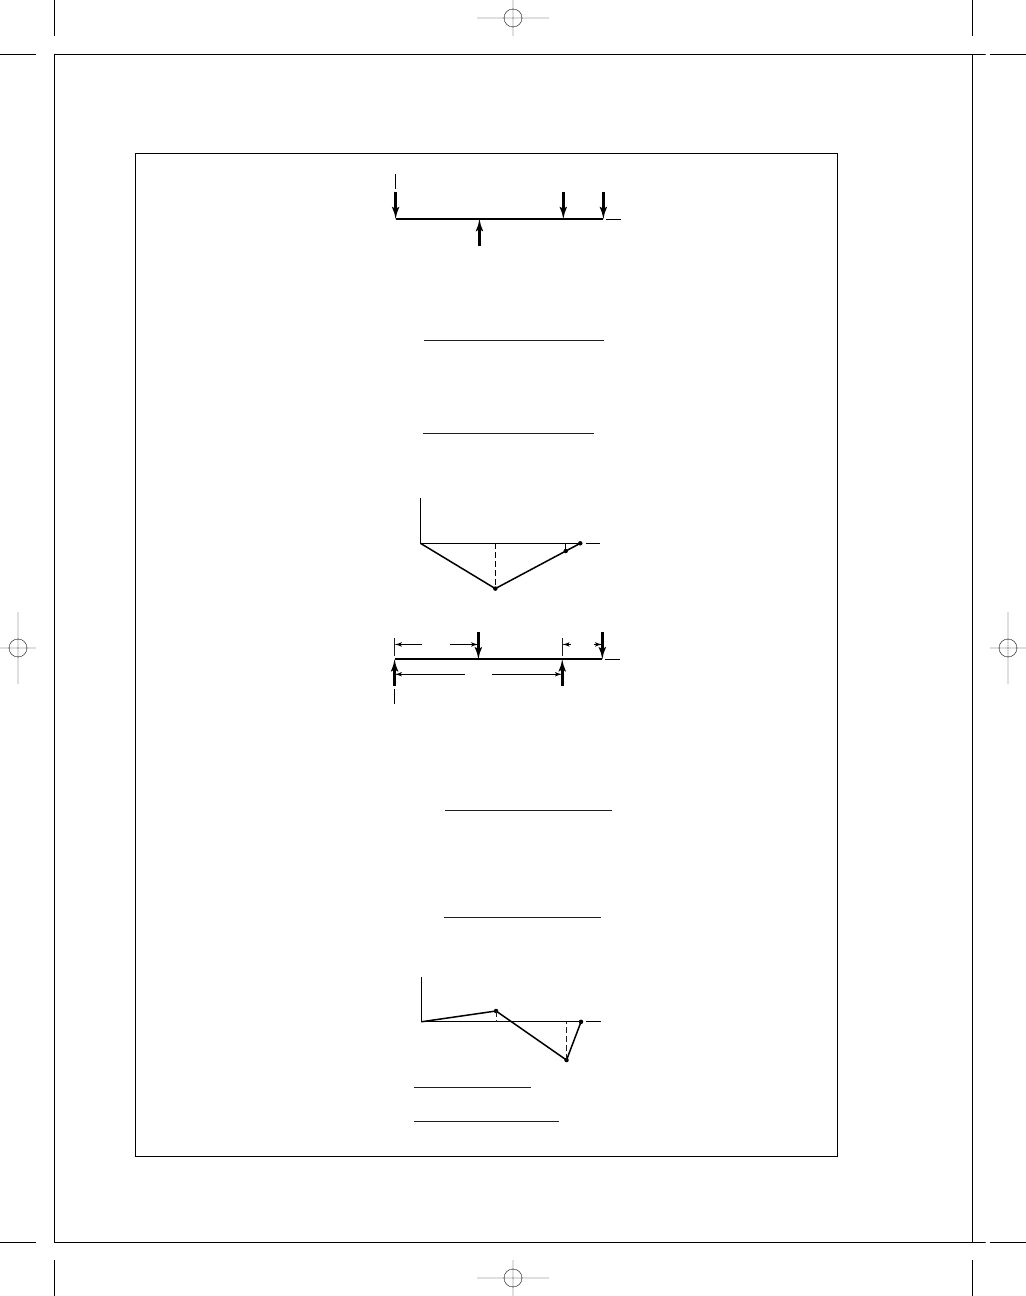
(a) xy-plane
M
O
= 240(5.75) − F
y
A
(11
.5) − 46.6(14.25) = 0
F
y
A
=
240(5
.75) − 46.6(14.25)
11
.5
= 62.3 lbf
M
A
= F
y
O
(11
.5) − 46.6(2.75) − 240(5.75) = 0
F
y
O
=
240(5
.75) + 46.6(2.75)
11
.5
= 131.1 lbf
Bending moment diagram
xz-plane
M
O
= 0
= 96(5.75) − F
z
A
(11
.5) + 128(14.25)
F
z
A
=
96(5
.75) + 128(14.25)
11
.5
= 206.6 lbf
M
A
= 0
= F
z
O
(11
.5) + 128(2.75) − 96(5.75)
F
z
O
=
96(5
.75) − 128(2.75)
11
.5
= 17.4 lbf
Bending moment diagram:
M
C
=
100
2
+ (−754)
2
= 761 lbf · in
M
A
=
(
−128)
2
+ (−352)
2
= 375 lbf · in
This approach over-estimates the bending moment at C, but not at A.
C
100
⫺352
A B
O
M
xz
(lbf
•
in)
x
11.5"
5.75"
C
A
F
z
A
F
z
O
B
z
2.75"
96
128
O
x
C
O
⫺754
⫺128
A B
M
xy
(lbf
•
in)
x
11.5"
5.75"
A
C
O
F
A
y
F
O
y
B
x
y
2.75"
240
46.6
budynas_SM_ch07.qxd 11/30/2006 15:31 Page 182
FIRST PAGES
Chapter 7
183
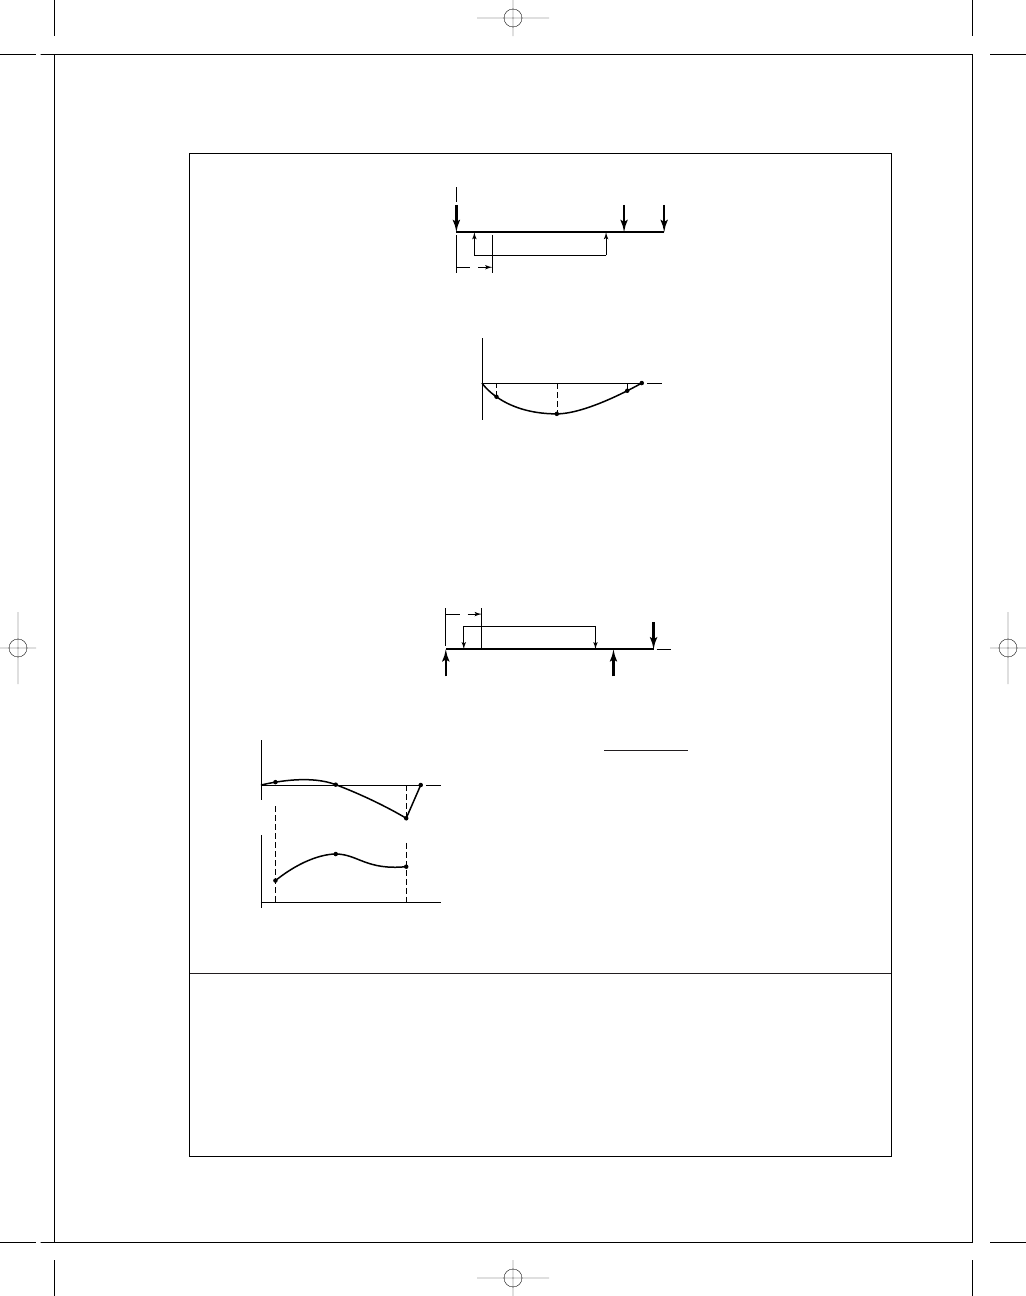
(b) xy-plane
M
x y
= −131.1x + 15x − 1.75
2
− 15x − 9.75
2
− 62.3x − 11.5
1
M
max
occurs at 6.12 in
M
max
= −516 lbf · in
M
C
= 131.1(5.75) − 15(5.75 − 1.75)
2
= 514
Reduced from 754 lbf
· in. The maximum occurs at x = 6.12 in rather than C, but it is
close enough.
xz-plane
M
x z
= 17.4x − 6x − 1.75
2
+ 6x − 9.75
2
+ 206.6x − 11.5
1
Let M
net
=
M
2
x y
+ M
2
x z
Plot M
net
(x)
1
.75 ≤ x ≤ 11.5 in
M
max
= 516 lbf · in
at x
= 6.25 in
Torque: In both cases the torque rises from 0 to 192 lbf
· in linearly across the roller and is
steady until the coupling keyway is encountered; then it falls linearly to 0 across the key.
Ans.
7-5 This is a design problem, which can have many acceptable designs. See the solution for
Problem 7-7 for an example of the design process.
C
4.1
516
231
⫺352
374
O
O
A B
M
net
(lbf
•
in)
x
1.75
30.5
M
xz
(lbf
•
in)
x
206.6
17.4
x
x
128
12 lbf/in
C
⫺514
⫺128
⫺229
A B
1.75
O
M
xy
(lbf
•
in)
x
x
62.3
131.1
30 lbf/in
46.6
y
budynas_SM_ch07.qxd 11/30/2006 15:31 Page 183
FIRST PAGES
184
Solutions Manual • Instructor’s Solution Manual to Accompany Mechanical Engineering Design
7-6 If students have access to finite element or beam analysis software, have them model the shaft
to check deflections. If not, solve a simpler version of shaft. The 1" diameter sections will not
affect the results much, so model the 1
"
diameter as 1
.25
"
. Also, ignore the step in AB.
From Prob. 18-10, integrate M
x y
and M
x z
xy plane, with d y
/dx = y
E I y
= −
131
.1
2
(x
2
)
+ 5x − 1.75
3
− 5x − 9.75
3
−
62
.3
2
x − 11.5
2
+ C
1
(1)
E I y
= −
131
.1
6
(x
3
)
+
5
4
x − 1.75
4
−
5
4
x − 9.75
4
−
62
.3
6
x − 11.5
3
+ C
1
x
+ C
2
y
= 0 at x = 0
⇒ C
2
= 0
y
= 0 at x = 11.5 ⇒ C
1
= 1908.4 lbf · in
3
From (1)
x
= 0:
E I y
= 1908.4
x
= 11.5: E I y
= −2153.1
xz plane (treating z
↑+)
E I z
=
17
.4
2
(x
2
)
− 2x − 1.75
3
+ 2x − 9.75
3
+
206
.6
2
x − 11.5
2
+ C
3
(2)
E I z
=
17
.4
6
(x
3
)
−
1
2
x − 1.75
4
+
1
2
x − 9.75
4
+
206
.6
6
x − 11.5
3
+ C
3
x
+ C
4
z
= 0 at x = 0
⇒ C
4
= 0
z
= 0 at x = 11.5 ⇒ C
3
= 8.975 lbf · in
3
From (2)
x
= 0:
E I z
= 8.975
x
= 11.5: E I z
= −683.5
At O:
E I
θ =
1908
.4
2
+ 8.975
2
= 1908.4 lbf · in
3
A:
E I
θ =
(−2153.1)
2
+ (−683.5)
2
= 2259 lbf · in
3
(dictates size)
θ =
2259
30(10
6
)(
π/64)(1.25
4
)
= 0.000 628 rad
n
=
0
.001
0
.000 628
= 1.59
A
z
x
y
O
C
B
budynas_SM_ch07.qxd 11/30/2006 15:31 Page 184
FIRST PAGES
Chapter 7
185
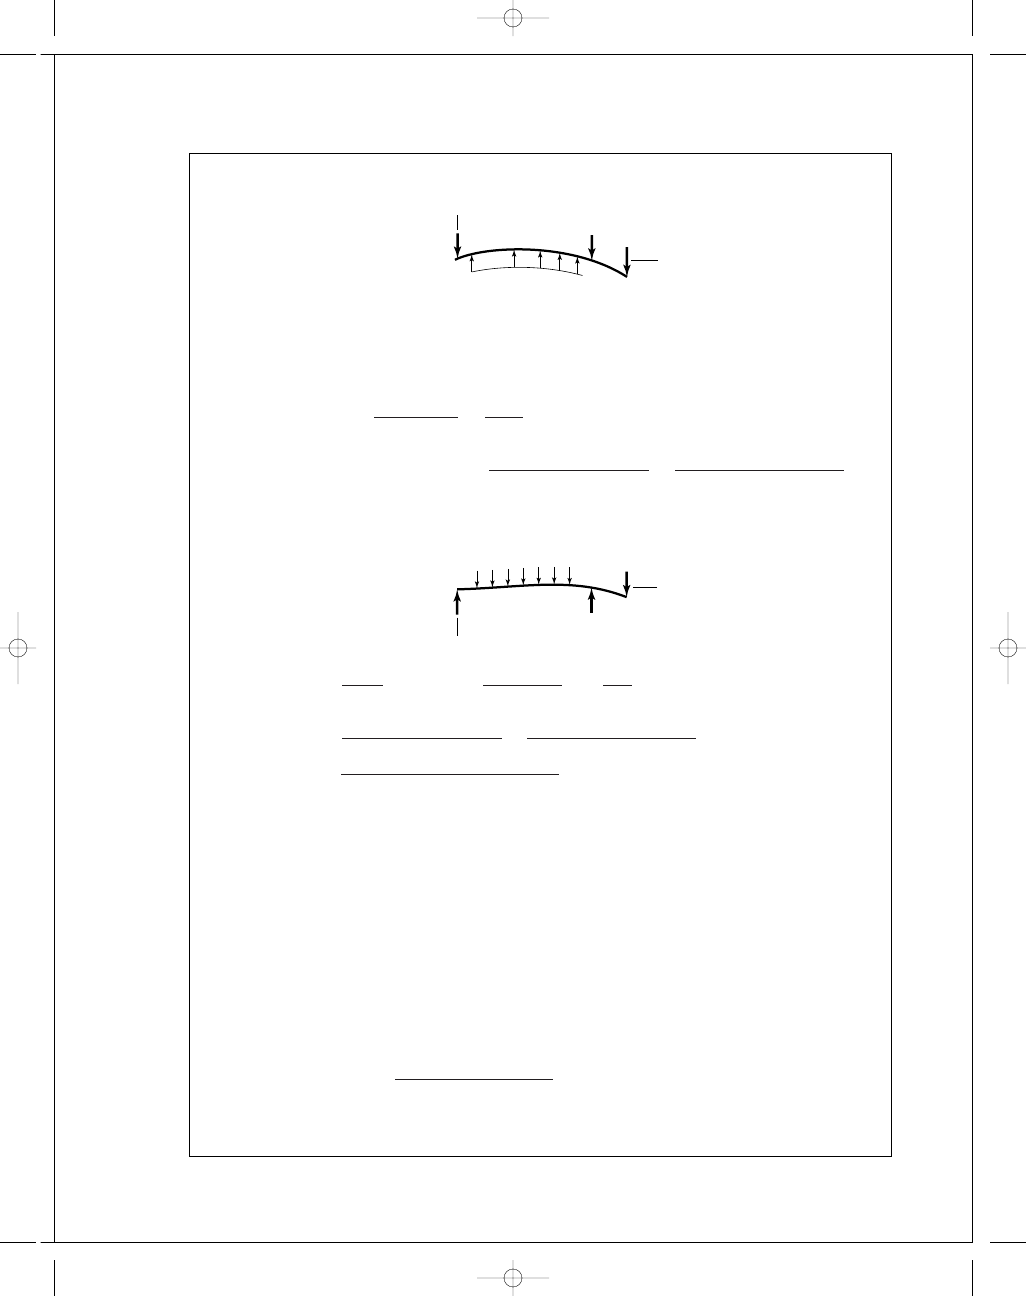
At gear mesh, B
xy plane
With I
= I
1
in section OCA,
y
A
= −2153.1/E I
1
Since y
B
/A
is a cantilever, from Table A-9-1, with I
= I
2
in section AB
y
B
/A
=
F x(x
− 2l)
2E I
2
=
46
.6
2E I
2
(2
.75)[2.75 − 2(2.75)] = −176.2/E I
2
∴
y
B
= y
A
+ y
B
/A
= −
2153
.1
30(10
6
)(
π/64)(1.25
4
)
−
176
.2
30(10
6
)(
π/64)(0.875
4
)
= −0.000 803 rad (magnitude greater than 0.0005 rad)
xz plane
z
A
= −
683
.5
E I
1
,
z
B
/A
= −
128(2
.75
2
)
2E I
2
= −
484
E I
2
z
B
= −
683
.5
30(10
6
)(
π/64)(1.25
4
)
−
484
30(10
6
)(
π/64)(0.875
4
)
= −0.000 751 rad
θ
B
=
(
−0.000 803)
2
+ (0.000 751)
2
= 0.001 10 rad
Crowned teeth must be used.
Finite element results:
Error in simplified model
θ
O
= 5.47(10
−
4
) rad
3.0%
θ
A
= 7.09(10
−
4
) rad
11.4%
θ
B
= 1.10(10
−
3
) rad
0.0%
The simplified model yielded reasonable results.
Strength
S
ut
= 72 kpsi, S
y
= 39.5 kpsi
At the shoulder at A, x
= 10.75 in. From Prob. 7-4,
M
x y
= −209.3 lbf · in, M
x z
= −293.0 lbf · in, T = 192 lbf · in
M
=
(
−209.3)
2
+ (−293)
2
= 360.0 lbf · in
S
e
= 0.5(72) = 36 kpsi
k
a
= 2.70(72)
−
0
.
265
= 0.869
z
A
B
x
128 lbf
C
O
x
y
A
B
C
O
46.6 lbf
budynas_SM_ch07.qxd 11/30/2006 15:31 Page 185
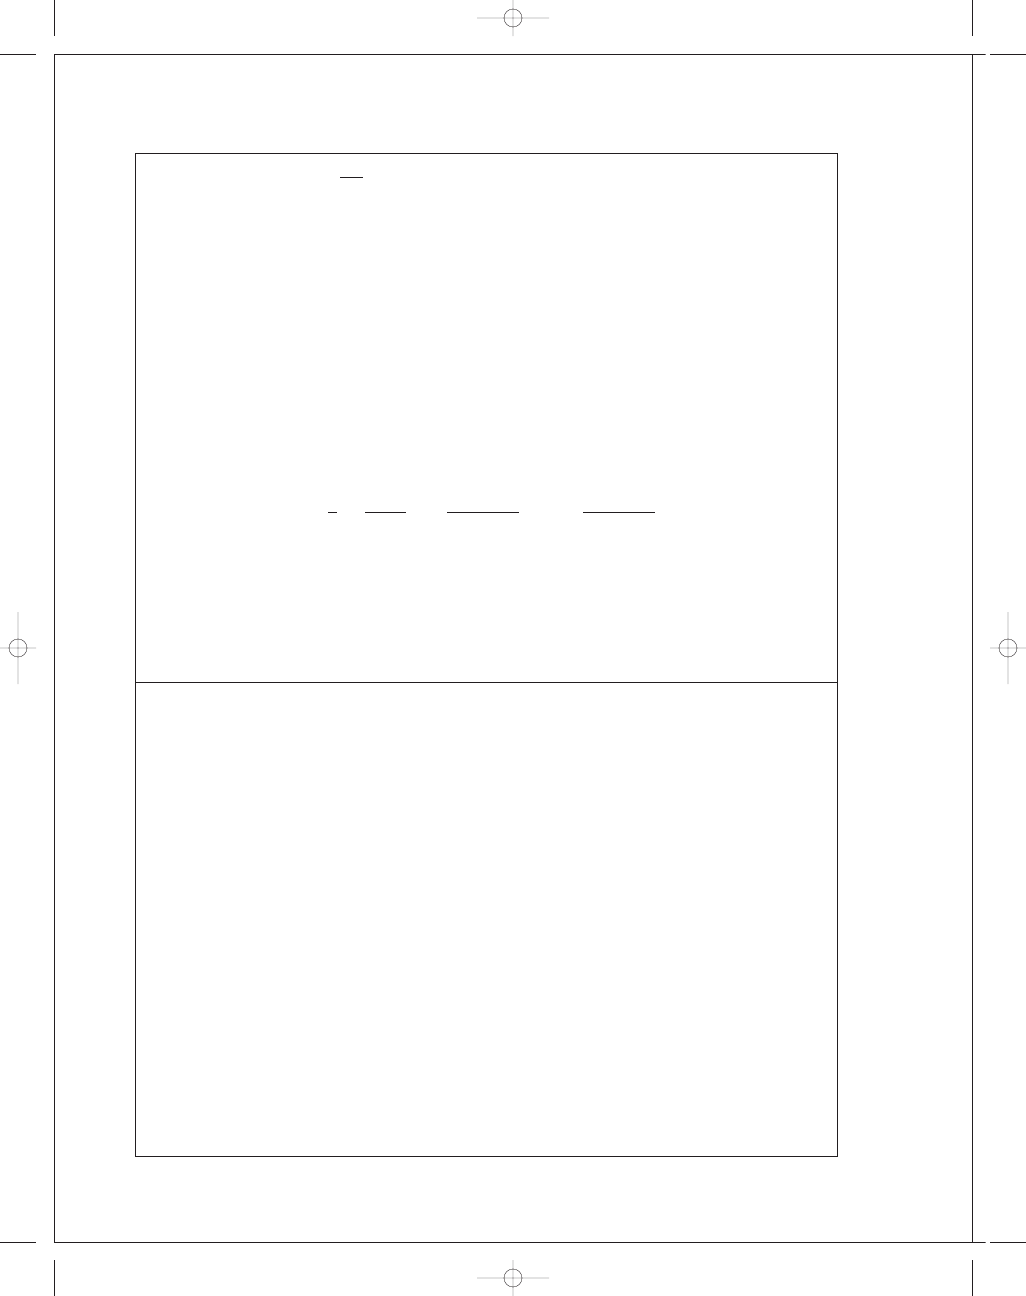
FIRST PAGES
186
Solutions Manual • Instructor’s Solution Manual to Accompany Mechanical Engineering Design
k
b
=
1
0
.3
−
0
.
107
= 0.879
k
c
= k
d
= k
e
= k
f
= 1
S
e
= 0.869(0.879)(36) = 27.5 kpsi
From Fig. A-15-8 with D
/d = 1.25 and r/d = 0.03, K
ts
= 1.8.
From Fig. A-15-9 with D
/d = 1.25 and r/d = 0.03, K
t
= 2.3
From Fig. 6-20 with r
= 0.03 in, q = 0.65.
From Fig. 6-21 with r
= 0.03 in, q
s
= 0.83
Eq. (6-31):
K
f
= 1 + 0.65(2.3 − 1) = 1.85
K
f s
= 1 + 0.83(1.8 − 1) = 1.66
Using DE-elliptic, Eq. (7-11) with M
m
= T
a
= 0,
1
n
=
16
π(1
3
)
4
1
.85(360)
27 500
2
+ 3
1
.66(192)
39 500
2
1
/
2
n
= 3.89
Perform a similar analysis at the profile keyway under the gear.
The main problem with the design is the undersized shaft overhang with excessive slope at
the gear. The use of crowned-teeth in the gears will eliminate this problem.
7-7 (a) One possible shaft layout is shown. Both bearings and the gear will be located against
shoulders. The gear and the motor will transmit the torque through keys. The bearings
can be lightly pressed onto the shaft. The left bearing will locate the shaft in the housing,
while the right bearing will float in the housing.
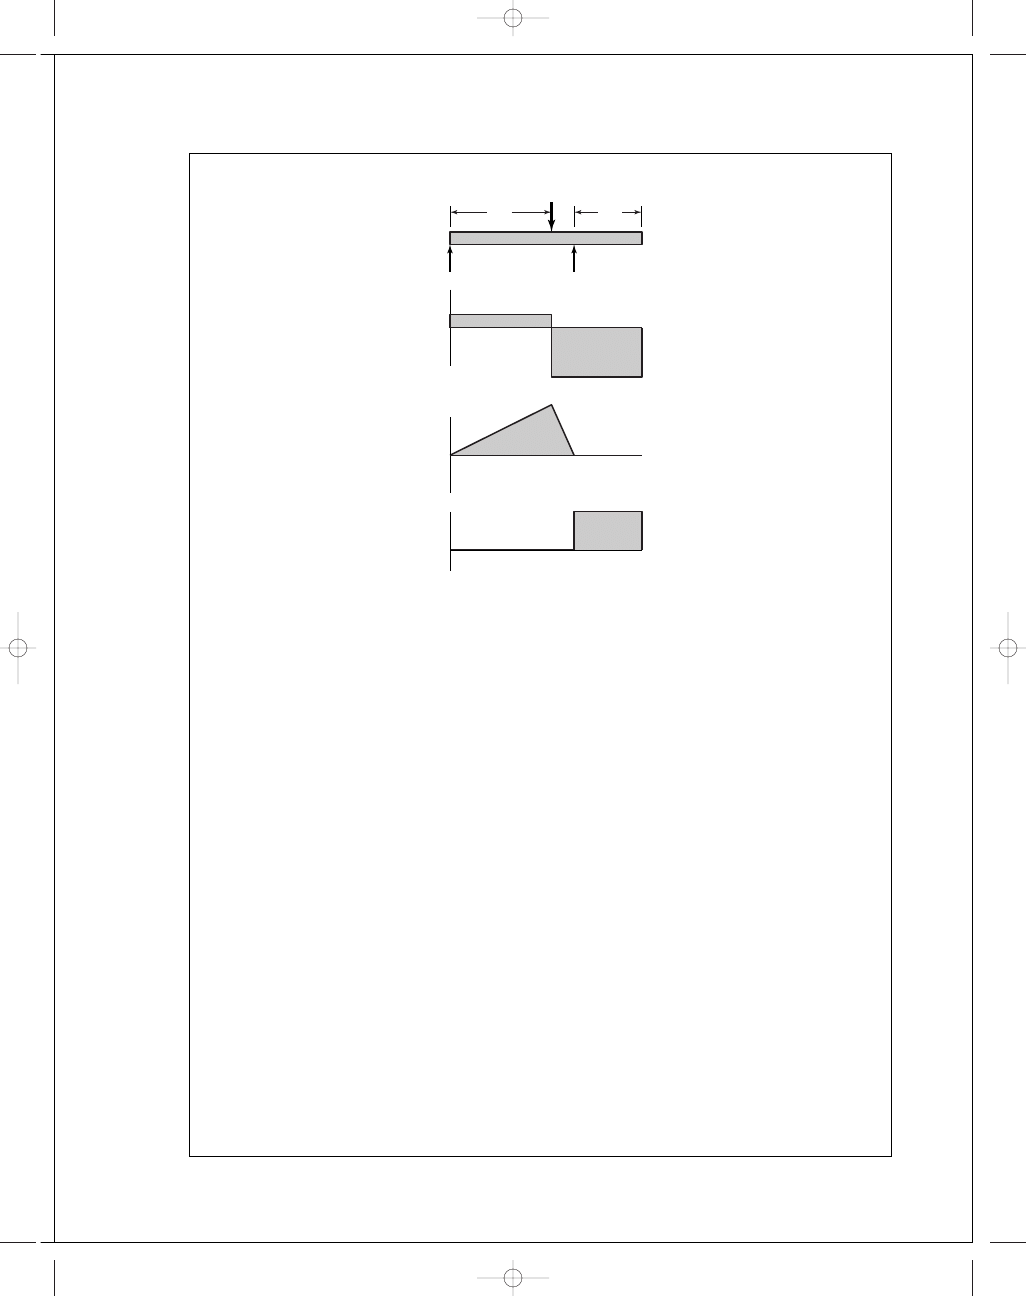
(b) From summing moments around the shaft axis, the tangential transmitted load through
the gear will be
W
t
= T/(d/2) = 2500/(4/2) = 1250 lbf
The radial component of gear force is related by the pressure angle.
W
r
= W
t
tan
φ = 1250 tan 20
◦
= 455 lbf
W
= [W
2
r
+ W
2
t
]
1
/
2
= (455
2
+ 1250
2
)
1
/
2
= 1330 lbf
Reactions R
A
and R
B
, and the load W are all in the same plane. From force and moment
balance,
R
A
= 1330(2/11) = 242 lbf
R
B
= 1330(9/11) = 1088 lbf
M
max
= R
A
(9)
= (242)(9) = 2178 lbf · in
budynas_SM_ch07.qxd 11/30/2006 17:09 Page 186
Chapter 7
187
Shear force, bending moment, and torque diagrams can now be obtained.
(c) Potential critical locations occur at each stress concentration (shoulders and keyways). To
be thorough, the stress at each potentially critical location should be evaluated. For now,
we will choose the most likely critical location, by observation of the loading situation,
to be in the keyway for the gear. At this point there is a large stress concentration, a large
bending moment, and the torque is present. The other locations either have small bend-
ing moments, or no torque. The stress concentration for the keyway is highest at the ends.
For simplicity, and to be conservative, we will use the maximum bending moment, even
though it will have dropped off a little at the end of the keyway.
(d) At the gear keyway, approximately 9 in from the left end of the shaft, the bending is com-
pletely reversed and the torque is steady.
M
a
= 2178 lbf · in
T
m
= 2500 lbf · in
M
m
= T
a
= 0
From Table 7-1, estimate stress concentrations for the end-milled keyseat to be
K
t
= 2.2 and K
ts
= 3.0. For the relatively low strength steel specified (AISI 1020
CD), estimate notch sensitivities of q
= 0.75 and q
s
= 0.9, obtained by observation of
Figs. 6-20 and 6-21. Assuming a typical radius at the bottom of the keyseat of
r
/d = 0.02 (p. 361), these estimates for notch sensitivity are good for up to about 3 in
shaft diameter.
Eq. (6-32):
K
f
= 1 + 0.75(2.2 − 1) = 1.9
K
f s
= 1 + 0.9(3.0 − 1) = 2.8
Eq. (6-19):
k
a
= 2.70(68)
−
0
.
265
= 0.883
For estimating k
b
, guess d
= 2 in.
k
b
= (2/0.3)
−
0
.
107
= 0.816
S
e
= (0.883)(0.816)(0.5)(68) = 24.5 kpsi
M
T
R
B
R
A
2500 lbf
•
in
2178 lbf
•
in
242 lbf
⫺1088 lbf
9 in
2 in
6 in
V
W
Ans.
budynas_SM_ch07.qxd 11/30/2006 19:04 Page 187
FIRST PAGES
188
Solutions Manual • Instructor’s Solution Manual to Accompany Mechanical Engineering Design
Selecting the DE-Goodman criteria for a conservative first design,
Eq. (7-8):
d
=
16n
π
4( K
f
M
a
)
2
1
/
2
S
e
+
3( K
f s
T
m
)
2
1
/
2
S
ut
1
/
3
d
=
16n
π
4(1
.9 · 2178)
2
1
/
2
24 500
+
3(2
.8 · 2500)
2
1
/
2
68 000
1
/
3
d
= 1.58 in Ans.
With this diameter, the estimates for notch sensitivity and size factor were conservative,
but close enough for a first iteration until deflections are checked.
Check for static failure.
Eq. (7-15):
σ
max
=
32K
f
M
a
πd
3
2
+ 3
16K
f s
T
m
πd
3
2
1
/
2
σ
max
=
32(1
.9)(2178)
π(1.58)
3
2
+ 3
16(2
.8)(2500)
π(1.58)
3
2
1
/
2
= 19.0 kpsi
n
y
= S
y
/σ
max
= 57/19.0 = 3.0 Ans.
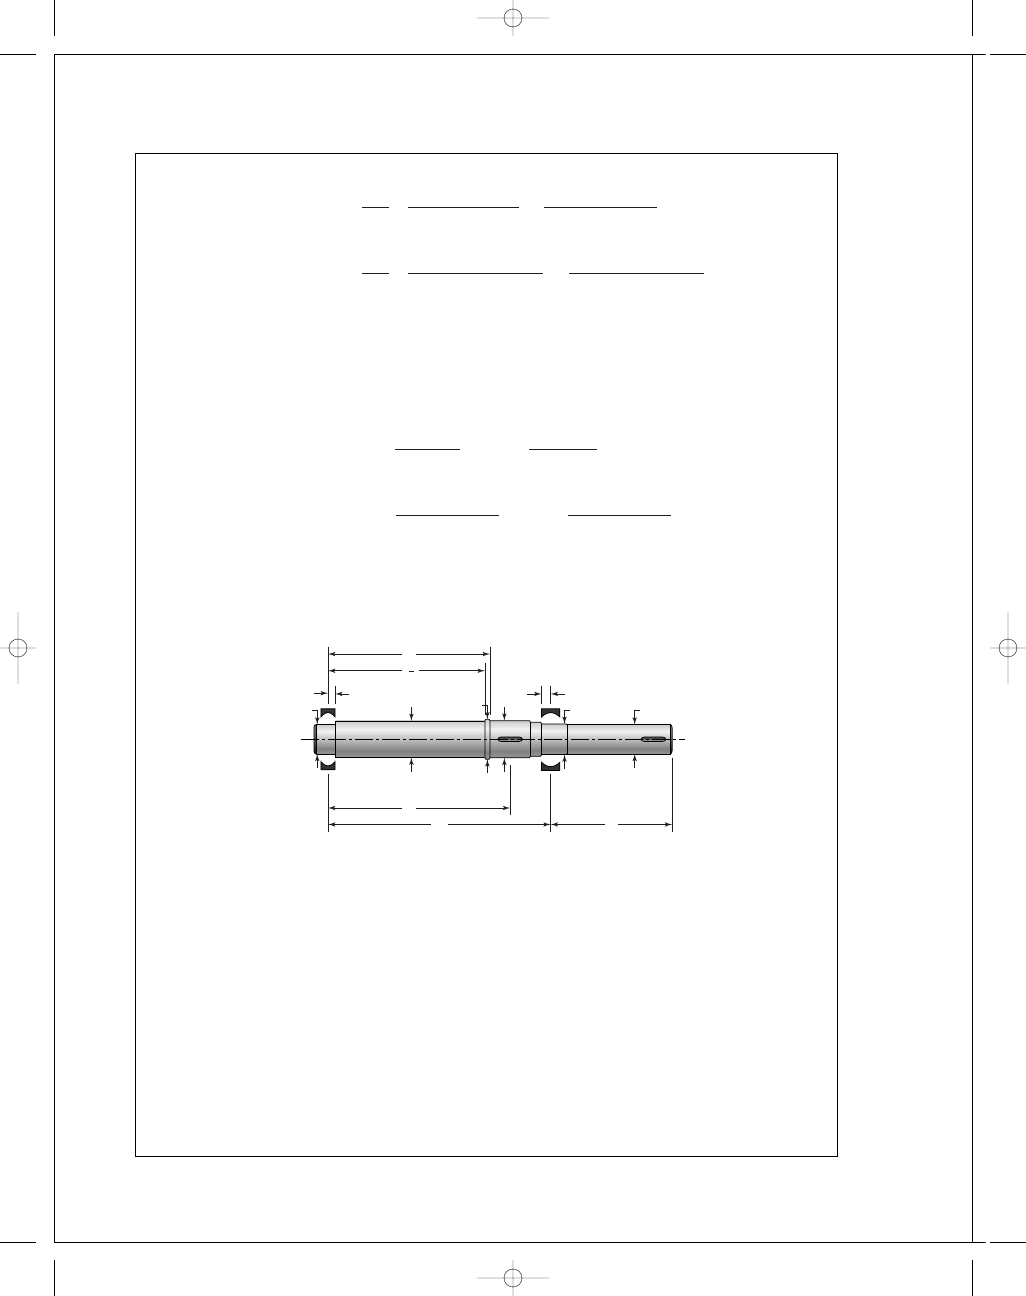
(e) Now estimate other diameters to provide typical shoulder supports for the gear and
bearings (p. 360). Also, estimate the gear and bearing widths.
(f) Entering this shaft geometry into beam analysis software (or Finite Element software),
the following deflections are determined:
Left bearing slope:
0.000532 rad
Right bearing slope:
−0.000850 rad
Gear slope:
−0.000545 rad
Right end of shaft slope:
−0.000850 rad
Gear deflection:
−0.00145 in
Right end of shaft deflection:
0.00510 in
Comparing these deflections to the recommendations in Table 7-2, everything is within
typical range except the gear slope is a little high for an uncrowned gear.
8
1.56
9
11
6
1.58
0.45
1.31
1.250
2.00
1.25
0.35
7
3
4
budynas_SM_ch07.qxd 11/30/2006 15:31 Page 188
FIRST PAGES
Chapter 7
189
(g) To use a non-crowned gear, the gear slope is recommended to be less than 0.0005 rad.
Since all other deflections are acceptable, we will target an increase in diameter only for
the long section between the left bearing and the gear. Increasing this diameter from the
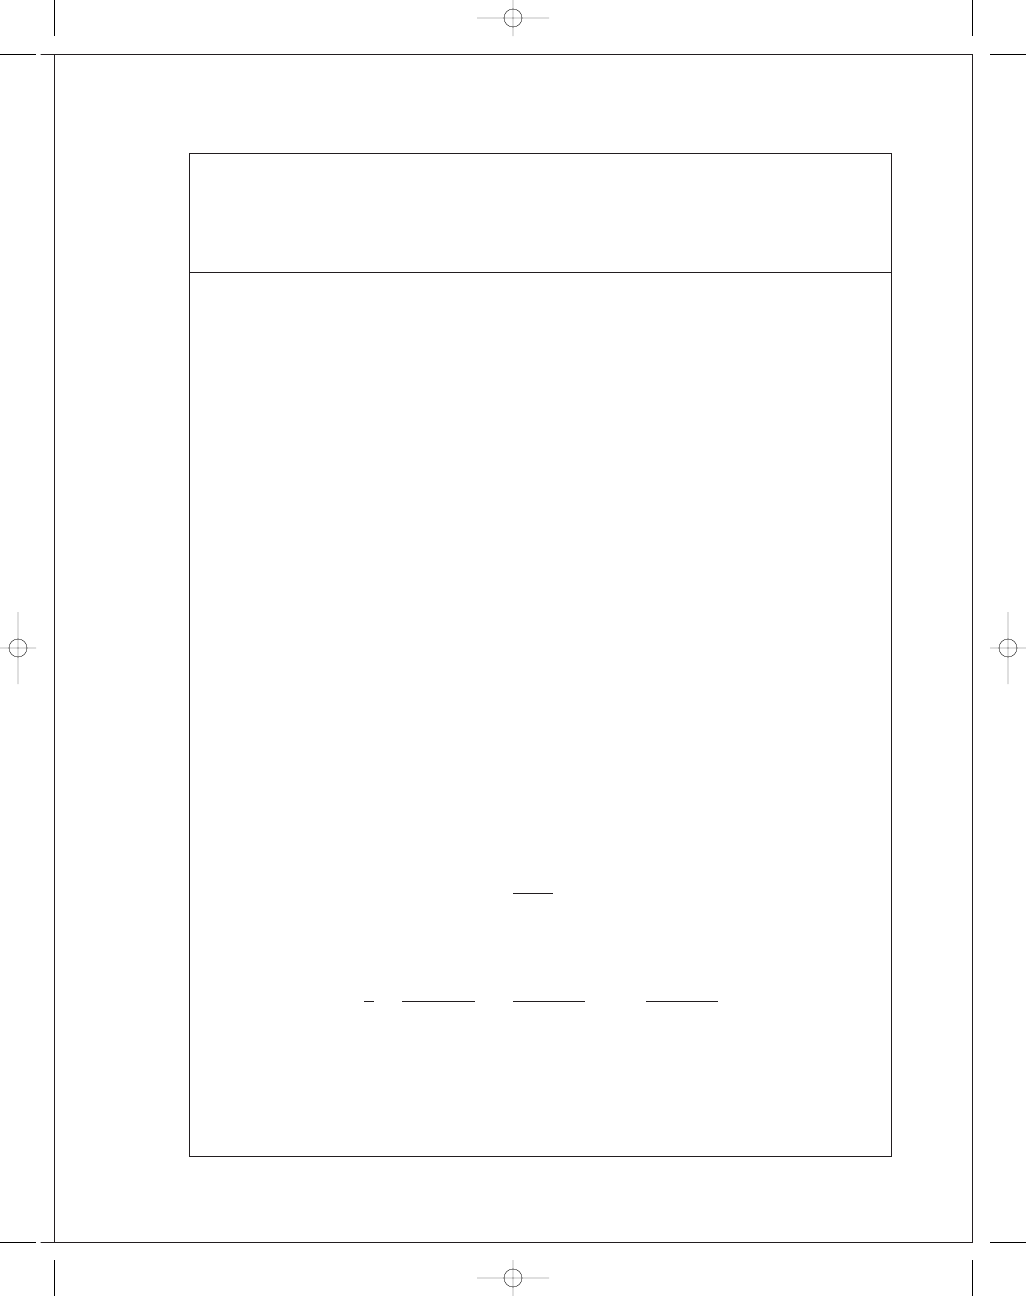
proposed 1.56 in to 1.75 in, produces a gear slope of –0.000401 rad. All other deflections
are improved as well.
7-8 (a) Use the distortion-energy elliptic failure locus. The torque and moment loadings on the
shaft are shown in the solution to Prob. 7-7.
Candidate critical locations for strength:
• Pinion seat keyway
• Right bearing shoulder
• Coupling keyway
Table A-20 for 1030 HR:
S
ut
= 68 kpsi, S
y
= 37.5 kpsi, H
B
= 137
Eq. (6-8):
S
e
= 0.5(68) = 34.0 kpsi
Eq. (6-19):
k
a
= 2.70(68)
−
0
.
265
= 0.883
k
c
= k
d
= k
e
= 1
Pinion seat keyway
See Table 7-1 for keyway stress concentration factors
K
t
= 2.2
K
ts
= 3.0
Profile keyway
For an end-mill profile keyway cutter of 0.010 in radius,
From Fig. 6-20:
q
= 0.50
From Fig. 6-21:
q
s
= 0.65
Eq. (6-32):
K
f s
= 1 + q
s
( K
ts
− 1)
= 1 + 0.65(3.0 − 1) = 2.3
K
f
= 1 + 0.50(2.2 − 1) = 1.6
Eq. (6-20):
k
b
=
1
.875
0
.30
−
0
.
107
= 0.822
Eq. (6-18):
S
e
= 0.883(0.822)(34.0) = 24.7 kpsi
Eq. (7-11):
1
n
=
16
π(1.875
3
)
4
1
.6(2178)
24 700
2
+ 3
2
.3(2500)
37 500
2
1
/
2
= 0.353, from which n = 2.83
budynas_SM_ch07.qxd 11/30/2006 15:31 Page 189
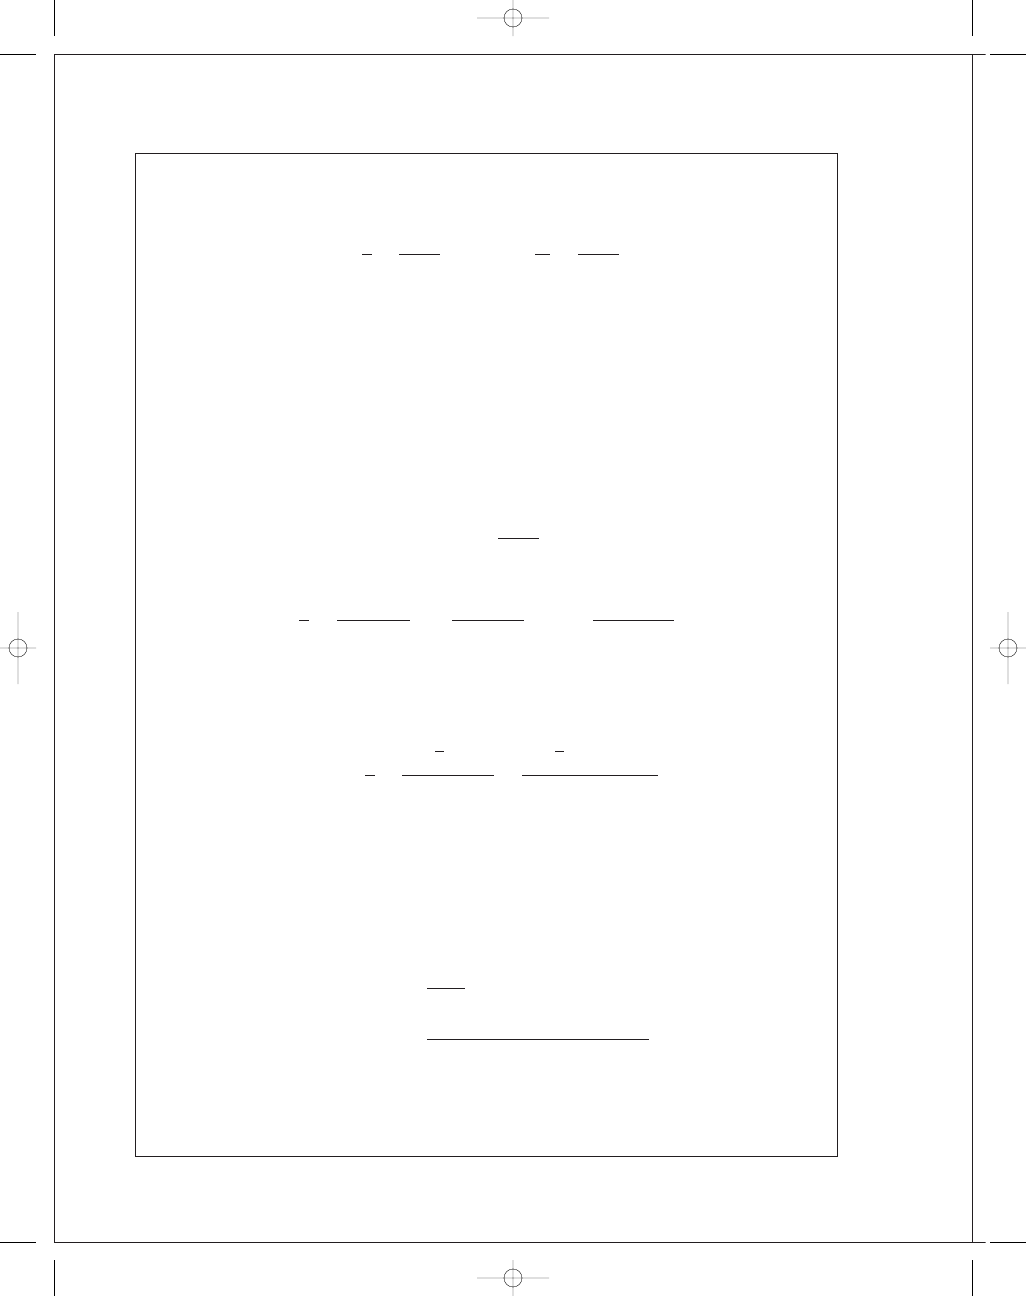
FIRST PAGES
190
Solutions Manual • Instructor’s Solution Manual to Accompany Mechanical Engineering Design
Right-hand bearing shoulder
The text does not give minimum and maximum shoulder diameters for 03-series bearings
(roller). Use D
= 1.75 in.
r
d
=
0
.030
1
.574
= 0.019,
D
d
=
1
.75
1
.574
= 1.11
From Fig. A-15-9,
K
t
= 2.4
From Fig. A-15-8,
K
ts
= 1.6
From Fig. 6-20,
q
= 0.65
From Fig. 6-21,
q
s
= 0.83
K
f
= 1 + 0.65(2.4 − 1) = 1.91
K
f s
= 1 + 0.83(1.6 − 1) = 1.50
M
= 2178
0
.453
2
= 493 lbf · in
Eq. (7-11):
1
n
=
16
π(1.574
3
)
4
1
.91(493)
24 700
2
+ 3
1
.50(2500)
37 500
2
1
/
2
= 0.247, from which n = 4.05
Overhanging coupling keyway
There is no bending moment, thus Eq. (7-11) reduces to:
1
n
=
16
√
3K
f s
T
m
πd
3
S
y
=
16
√
3(1
.50)(2500)
π(1.5
3
)(37 500)
= 0.261 from which n = 3.83
(b) One could take pains to model this shaft exactly, using say finite element software.
However, for the bearings and the gear, the shaft is basically of uniform diameter, 1.875 in.
The reductions in diameter at the bearings will change the results insignificantly. Use
E
= 30(10
6
) psi
.
To the left of the load:
θ
A B
=
Fb
6E I l
(3x
2
+ b
2
− l
2
)
=
1449(2)(3x
2
+ 2
2
− 11
2
)
6(30)(10
6
)(
π/64)(1.825
4
)(11)
= 2.4124(10
−
6
)(3x
2
− 117)
At x
= 0:
θ = −2.823(10
−
4
) rad
At x
= 9 in:
θ = 3.040(10
−
4
) rad
budynas_SM_ch07.qxd 11/30/2006 15:31 Page 190
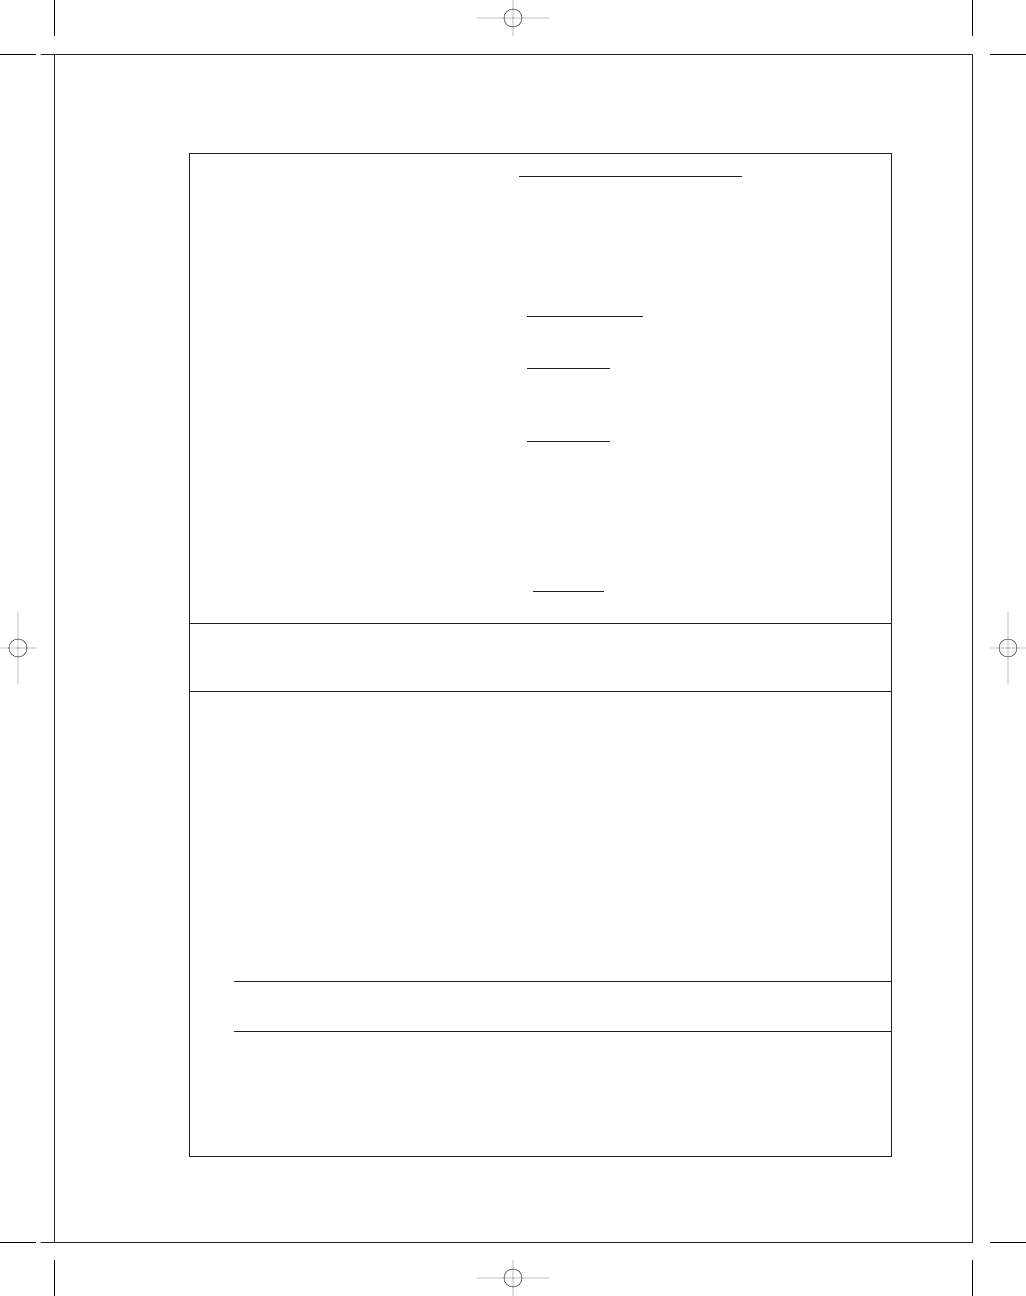
FIRST PAGES
Chapter 7
191
At x
= 11 in:
θ =
1449(9)(11
2
− 9
2
)
6(30)(10
6
)(
π/64)(1.875
4
)(11)
= 4.342(10
−
4
) rad
Obtain allowable slopes from Table 7-2.
Left bearing:
n
f s
=
Allowable slope
Actual slope
=
0
.001
0
.000 282 3
= 3.54
Right bearing:
n
f s
=
0
.0008
0
.000 434 2
= 1.84
Gear mesh slope:
Table 7-2 recommends a minimum relative slope of 0.0005 rad. While we don’t know the
slope on the next shaft, we know that it will need to have a larger diameter and be stiffer.
At the moment we can say
n
f s
<
0
.0005
0
.000 304
= 1.64
7-9
The solution to Problem 7-8 may be used as an example of the analysis process for a similar
situation.
7-10 If you have a finite element program available, it is highly recommended. Beam deflection
programs can be implemented but this is time consuming and the programs have narrow ap-
plications. Here we will demonstrate how the problem can be simplified and solved using
singularity functions.
Deflection: First we will ignore the steps near the bearings where the bending moments are
low. Thus let the 30 mm dia. be 35 mm. Secondly, the 55 mm dia. is very thin, 10 mm. The
full bending stresses will not develop at the outer fibers so full stiffness will not develop ei-
ther. Thus, ignore this step and let the diameter be 45 mm.
Statics: Left support: R
1
= 7(315 − 140)/315 = 3.889 kN
Right support: R
2
= 7(140)/315 = 3.111 kN
Determine the bending moment at each step.
x(mm)
0
40
100
140
210
275
315
M(N
· m)
0
155.56
388.89
544.44
326.67
124.44
0
I
35
= (π/64)(0.035
4
)
= 7.366(10
−
8
) m
4
, I
40
= 1.257(10
−
7
) m
4
, I
45
= 2.013(10
−
7
) m
4
budynas_SM_ch07.qxd 11/30/2006 15:31 Page 191
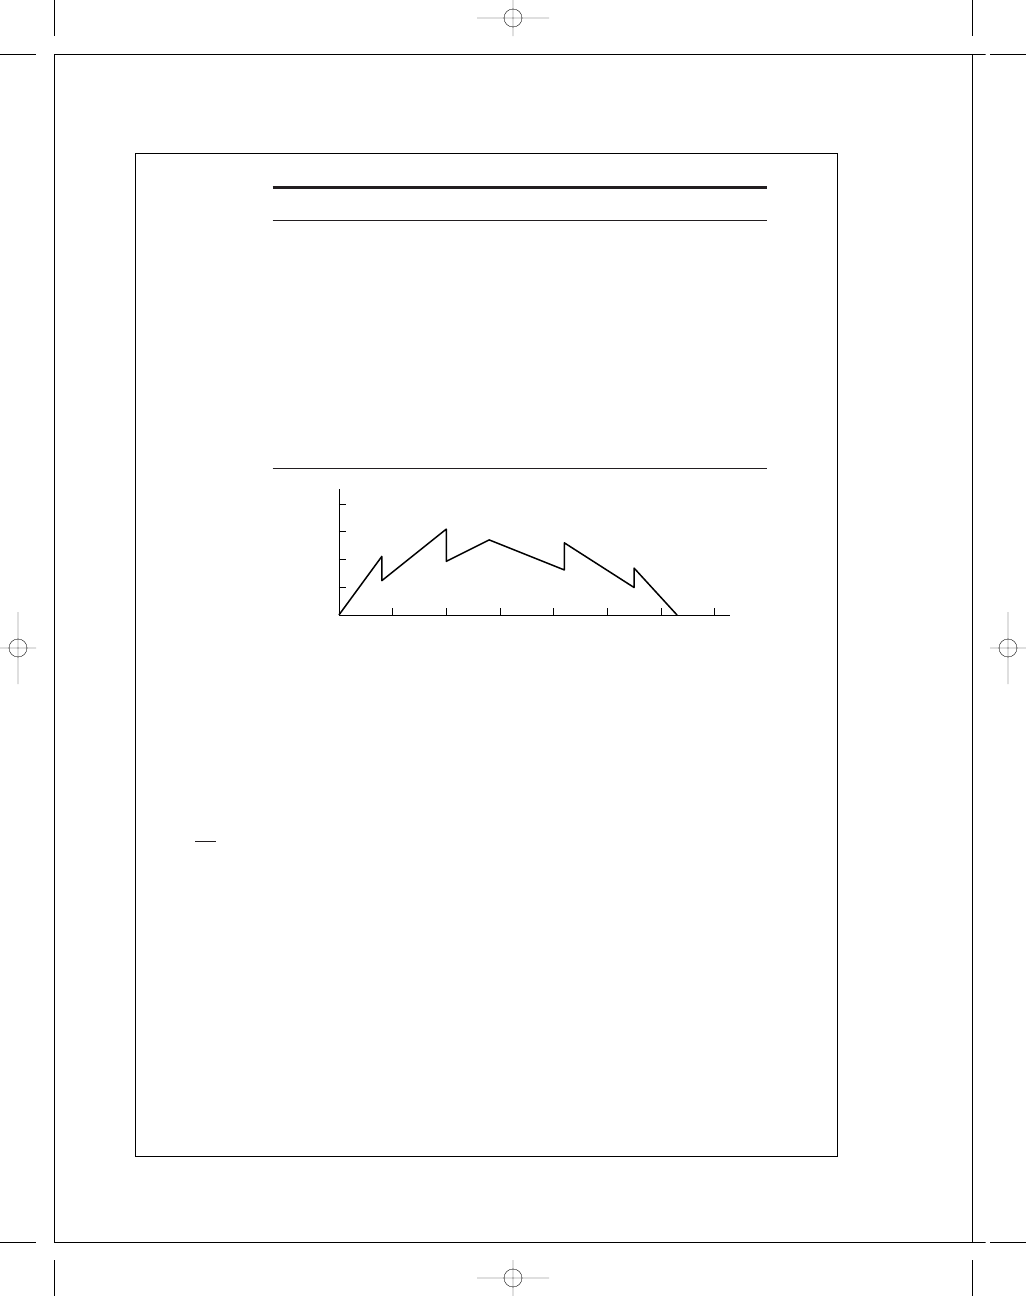
FIRST PAGES
192
Solutions Manual • Instructor’s Solution Manual to Accompany Mechanical Engineering Design
Plot M
/I as a function of x.
x
(m)
M
/I (10
9
N/m
3
)
Step
Slope
Slope
0
0
52.8
0.04
2.112
0.04
1.2375
−0.8745
30.942
−21.86
0.1
3.094
0.1
1.932
−1.162
19.325
−11.617
0.14
2.705
0.14
2.705
0
−15.457
−34.78
0.21
1.623
0.21
2.6
0.977
−24.769
−9.312
0.275
0.99
0.275
1.6894
0.6994
−42.235
−17.47
0.315
0
The steps and the change of slopes are evaluated in the table. From these, the function M
/I
can be generated:
M
/I =
52
.8x − 0.8745x − 0.04
0
− 21.86x − 0.04
1
− 1.162x − 0.1
0
− 11.617x − 0.1
1
− 34.78x − 0.14
1
+ 0.977x − 0.21
0
− 9.312x − 0.21
1
+ 0.6994x − 0.275
0
− 17.47x − 0.275
1
10
9
Integrate twice:
E
d y
d x
=
26
.4x
2
− 0.8745x − 0.04
1
− 10.93x − 0.04
2
− 1.162x − 0.1
1
− 5.81x − 0.1
2
− 17.39x − 0.14
2
+ 0.977x − 0.21
1
− 4.655x − 0.21
2
+ 0.6994x − 0.275
1
− 8.735x − 0.275
2
+ C
1
10
9
(1)
E y
=
8
.8x
3
− 0.4373x − 0.04
2
− 3.643x − 0.04
3
− 0.581x − 0.1
2
− 1.937x − 0.1
3
− 5.797x − 0.14
3
+ 0.4885x − 0.21
2
− 1.552x − 0.21
3
+ 0.3497x − 0.275
2
− 2.912x − 0.275
3
+ C
1
x
+ C
2
10
9
Boundary conditions: y
= 0 at x = 0 yields C
2
= 0;
y
= 0 at x = 0.315 m yields C
1
= −0.295 25 N/m
2
.
Equation (1) with C
1
= −0.295 25 provides the slopes at the bearings and gear. The fol-
lowing table gives the results in the second column. The third column gives the results from
a similar finite element model. The fourth column gives the result of a full model which
models the 35 and 55 mm diameter steps.
4
0
1
2
3
0
0.35
0.3
0.25
0.2
0.15
x (mm)
M
兾I
(10
9
N
兾m
3
)
0.1
0.05
budynas_SM_ch07.qxd 11/30/2006 15:31 Page 192

FIRST PAGES
Chapter 7
193
x
(mm)
θ (rad)
F.E. Model
Full F.E. Model
0
−0.001 4260
−0.001 4270
−0.0014160
140
−0.000 1466
−0.000 1467
−0.0001646
315
0.001 3120
0.001 3280
0.001 3150
The main discrepancy between the results is at the gear location (x
= 140 mm). The larger
value in the full model is caused by the stiffer 55 mm diameter step. As was stated earlier,
this step is not as stiff as modeling implicates, so the exact answer is somewhere between the
full model and the simplified model which in any event is a small value. As expected, mod-
eling the 30 mm dia. as 35 mm does not affect the results much.
It can be seen that the allowable slopes at the bearings are exceeded. Thus, either the load
has to be reduced or the shaft “beefed” up. If the allowable slope is 0.001 rad, then the max-
imum load should be F
max
= (0.001/0.001 46)7 = 4.79 kN. With a design factor this would
be reduced further.
To increase the stiffness of the shaft, increase the diameters by (0
.001 46/0.001)
1
/
4
=
1
.097, from Eq. (7-18). Form a table:
Old d, mm
20.00
30.00
35.00
40.00
45.00
55.00
New ideal d, mm
21.95
32.92
38.41
43.89
49.38
60.35
Rounded up d, mm
22.00
34.00
40.00
44.00
50.00
62.00
Repeating the full finite element model results in
x
= 0:
θ = −9.30 × 10
−
4
rad
x
= 140 mm: θ = −1.09 × 10
−
4
rad
x
= 315 mm: θ = 8.65 × 10
−
4
rad
Well within our goal. Have the students try a goal of 0.0005 rad at the bearings.
Strength: Due to stress concentrations and reduced shaft diameters, there are a number of
locations to look at. A table of nominal stresses is given below. Note that torsion is only to
the right of the 7 kN load. Using
σ = 32M/(πd
3
) and τ = 16T/(πd
3
),
x (mm)
0
15
40
100
110
140
210
275
300
330
σ (MPa)
0
22.0
37.0
61.9
47.8
60.9
52.0
39.6
17.6
0
τ (MPa)
0
0
0
0
0
6
8.5
12.7
20.2
68.1
σ
(MPa)
0
22.0
37.0
61.9
47.8
61.8
53.1
45.3
39.2
118.0
Table A-20 for AISI 1020 CD steel: S
ut
= 470 MPa, S
y
= 390 MPa
At x
= 210 mm:
k
a
= 4.51(470)
−
0
.
265
= 0.883, k
b
= (40/7.62)
−
0
.
107
= 0.837
S
e
= 0.883(0.837)(0.5)(470) = 174 MPa
D
/d = 45/40 = 1.125, r/d = 2/40 = 0.05.
From Figs. A-15-8 and A-15-9, K
t
= 1.9 and K
ts
= 1.32.
budynas_SM_ch07.qxd 11/30/2006 15:31 Page 193
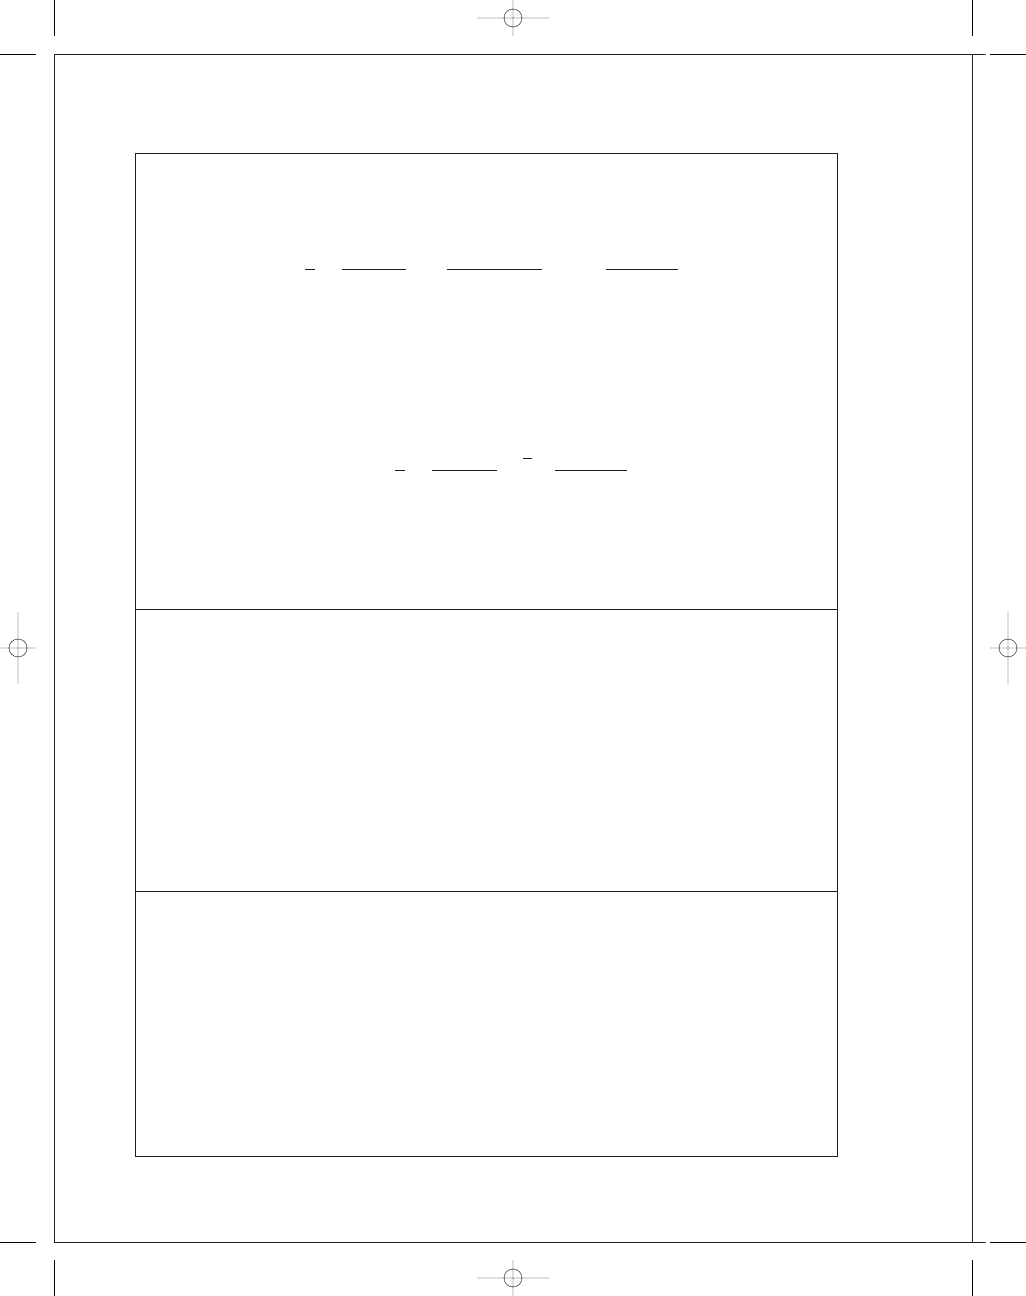
FIRST PAGES
194
Solutions Manual • Instructor’s Solution Manual to Accompany Mechanical Engineering Design
From Figs. 6-20 and 6-21, q
= 0.75 and q
s
= 0.92,
K
f
= 1 + 0.75(1.9 − 1) = 1.68, and K
f s
= 1 + 0.92(1.32 − 1) = 1.29.
From Eq. (7-11), with M
m
= T
a
= 0,
1
n
=
16
π(0.04)
3
4
1
.68(326.67)
174(10
6
)
2
+ 3
1
.29(107)
390(10
6
)
2
1
/
2
n
= 1.98
At x
= 330 mm: The von Mises stress is the highest but it comes from the steady torque
only.
D
/d = 30/20 = 1.5, r/d = 2/20 = 0.1 ⇒
K
ts
= 1.42,
q
s
= 0.92 ⇒
K
f s
= 1.39
1
n
=
16
π(0.02)
3
√
3
! 1.39(107)
390(10
6
)
n
= 2.38
Check the other locations.
If worse-case is at x
= 210 mm, the changes discussed for the slope criterion will im-
prove the strength issue.
7-11 and 7-12
With these design tasks each student will travel different paths and almost all
details will differ. The important points are
• The student gets a blank piece of paper, a statement of function, and some
constraints–explicit and implied. At this point in the course, this is a good experience.
• It is a good preparation for the capstone design course.
• The adequacy of their design must be demonstrated and possibly include a designer’s
notebook.
• Many of the fundaments of the course, based on this text and this course, are useful. The
student will find them useful and notice that he/she is doing it.
• Don’t let the students create a time sink for themselves. Tell them how far you want them
to go.
7-13
I used this task as a final exam when all of the students in the course had consistent test
scores going into the final examination; it was my expectation that they would not change
things much by taking the examination.
This problem is a learning experience. Following the task statement, the following guid-
ance was added.
• Take the first half hour, resisting the temptation of putting pencil to paper, and decide what
the problem really is.
• Take another twenty minutes to list several possible remedies.
• Pick one, and show your instructor how you would implement it.
budynas_SM_ch07.qxd 11/30/2006 15:31 Page 194
FIRST PAGES
Chapter 7
195
The students’ initial reaction is that he/she does not know much from the problem state-
ment. Then, slowly the realization sets in that they do know some important things that the
designer did not. They knew how it failed, where it failed, and that the design wasn’t good
enough; it was close, though.
Also, a fix at the bearing seat lead-in could transfer the problem to the shoulder fillet, and
the problem may not be solved.
To many students’ credit, they chose to keep the shaft geometry, and selected a new
material to realize about twice the Brinell hardness.
7-14 In Eq. (7-24) set
I
=
πd
4
64
,
A
=
πd
2
4
to obtain
ω =
π
l
2
d
4
g E
γ
(1)
or
d
=
4l
2
ω
π
2
"
γ
g E
(2)
(a) From Eq. (1) and Table A-5,
ω =
π
24
2
1
4
"
386(30)(10
6
)
0
.282
= 868 rad/s Ans.
(b) From Eq. (2),
d
=
4(24)
2
(2)(868)
π
2
0
.282
386(30)(10
6
)
= 2 in Ans.
(c) From Eq. (2),
l
ω =
π
2
4
d
l
g E
γ
Since d
/l is the same regardless of the scale.
l
ω = constant = 24(868) = 20 832
ω =
20 832
12
= 1736 rad/s Ans.
Thus the first critical speed doubles.
7-15 From Prob. 7-14,
ω = 868 rad/s
A
= 0.7854 in
2
,
I
= 0.04909 in
4
,
γ = 0.282 lbf/in
3
,
E
= 30(10
6
) psi,
w = Aγ l = 0.7854(0.282)(24) = 5.316 lbf
budynas_SM_ch07.qxd 11/30/2006 15:31 Page 195
FIRST PAGES
196
Solutions Manual • Instructor’s Solution Manual to Accompany Mechanical Engineering Design
One element:
Eq. (7-24)
δ
11
=
12(12)(24
2
− 12
2
− 12
2
)
6(30)(10
6
)(0
.049 09)(24)
= 1.956(10
−
4
) in/lbf
y
1
= w
1
δ
11
= 5.316(1.956)(10
−
4
)
= 1.0398(10
−
3
) in
y
2
1
= 1.0812(10
−
6
)
wy = 5.316(1.0398)(10
−
3
)
= 5.528(10
−
3
)
wy
2
= 5.316(1.0812)(10
−
6
)
= 5.748(10
−
6
)
ω
1
=
g
#
wy
#
wy
2
=
386
5
.528(10
−
3
)
5
.748(10
−
6
)
= 609 rad/s (30% low)
Two elements:
δ
11
= δ
22
=
18(6)(24
2
− 18
2
− 6
2
)
6(30)(10
6
)(0
.049 09)(24)
= 1.100(10
−
4
) in/lbf
δ
12
= δ
21
=
6(6)(24
2
− 6
2
− 6
2
)
6(30)(10
6
)(0
.049 09)(24)
= 8.556(10
−
5
) in/lbf
y
1
= w
1
δ
11
+ w
2
δ
12
= 2.658(1.100)(10
−
4
)
+ 2.658(8.556)(10
−
5
)
= 5.198(10
−
4
) in
= y
2
,
y
2
1
= y
2
2
= 2.702(10
−
7
) in
2
wy = 2(2.658)(5.198)(10
−
4
)
= 2.763(10
−
3
)
wy
2
= 2(2.658)(2.702)(10
−
7
)
= 1.436(10
−
6
)
ω
1
=
386
2
.763(10
−
3
)
1
.436(10
−
6
)
= 862 rad/s (0.7% low)
Three elements:
δ
11
= δ
33
=
20(4)(24
2
− 20
2
− 4
2
)
6(30)(10
6
)(0
.049 09)(24)
= 6.036(10
−
5
) in/lbf
δ
22
=
12(12)(24
2
− 12
2
− 12
2
)
6(30)(10
6
)(0
.049 09)(24)
= 1.956(10
−
4
) in/lbf
δ
12
= δ
32
=
12(4)(24
2
− 12
2
− 4
2
)
6(30)(10
6
)(0
.049 09)(24)
= 9.416(10
−
5
) in/lbf
δ
13
=
4(4)(24
2
− 4
2
− 4
2
)
6(30)(10
6
)(0
.049 09)(24)
= 4.104(10
−
5
) in/lbf
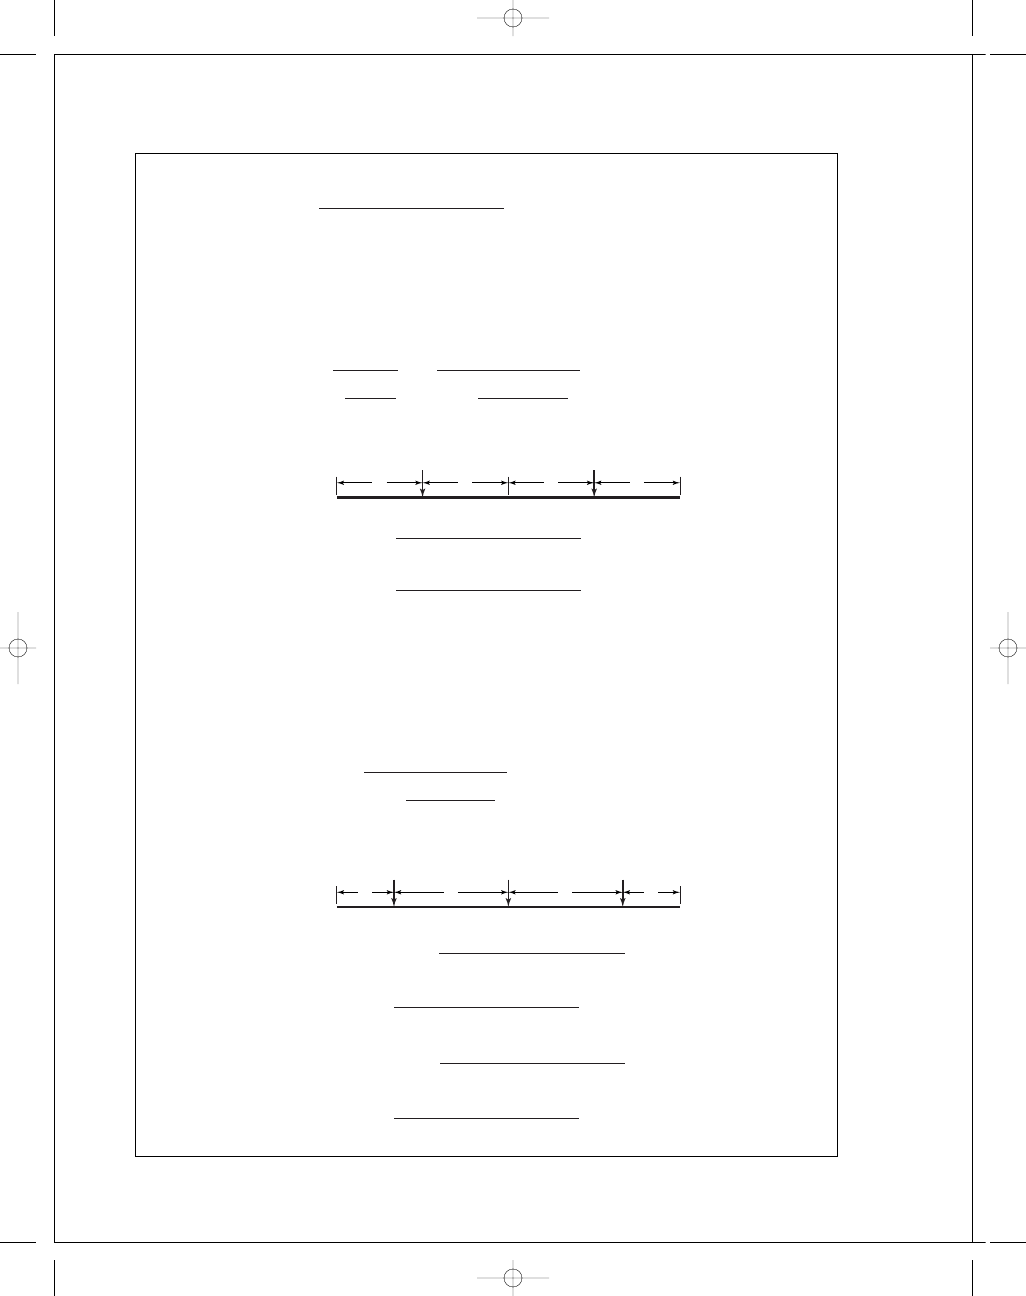
1.772 lbf
1.772 lbf
1.772 lbf
4"
4"
8"
8"
2.658 lbf
2.658 lbf
6"
6"
6"
6"
budynas_SM_ch07.qxd 11/30/2006 15:31 Page 196
FIRST PAGES
Chapter 7
197
y
1
= 1.772[6.036(10
−
5
)
+ 9.416(10
−
5
)
+ 4.104(10
−
5
)]
= 3.465(10
−
4
) in
y
2
= 1.772[9.416(10
−
5
)
+ 1.956(10
−
4
)
+ 9.416(10
−
5
)]
= 6.803(10
−
4
) in
y
3
= 1.772[4.104(10
−
5
)
+ 9.416(10
−
5
)
+ 6.036(10
−
5
)]
= 3.465(10
−
4
) in
wy = 2.433(10
−
3
),
wy
2
= 1.246(10
−
6
)
ω
1
=
386
2
.433(10
−
3
)
1
.246(10
−
6
)
= 868 rad/s
(same as in Prob. 7-14)
The point was to show that convergence is rapid using a static deflection beam equation.
The method works because:
• If a deflection curve is chosen which meets the boundary conditions of moment-free and
deflection-free ends, and in this problem, of symmetry, the strain energy is not very sensi-
tive to the equation used.
• Since the static bending equation is available, and meets the moment-free and deflection-
free ends, it works.
7-16 (a) For two bodies, Eq. (7-26) is
$$
$$
(m
1
δ
11
− 1/ω
2
)
m
2
δ
12
m
1
δ
21
(m
2
δ
22
− 1/ω
2
)
$$
$$ = 0
Expanding the determinant yields,
1
ω
2
2
− (m
1
δ
11
+ m
2
δ
22
)
1
ω
2
1
+ m
1
m
2
(
δ
11
δ
22
− δ
12
δ
21
)
= 0
(1)
Eq. (1) has two roots 1
/ω
2
1
and 1
/ω
2
2
. Thus
1
ω
2
−
1
ω
2
1
1
ω
2
−
1
ω
2
2
= 0
or,
1
ω
2
2
+
1
ω
2
1
+
1
ω
2
2
1
ω
2
+
1
ω
2
1
1
ω
2
2
= 0
(2)
Equate the third terms of Eqs. (1) and (2), which must be identical.
1
ω
2
1
1
ω
2
2
= m
1
m
2
(
δ
11
δ
22
− δ
12
δ
21
)
⇒
1
ω
2
2
= ω
2
1
m
1
m
2
(
δ
11
δ
22
− δ
12
δ
21
)
and it follows that
ω
2
=
1
ω
1
g
2
w
1
w
2
(
δ
11
δ
22
− δ
12
δ
21
)
Ans
.
(b) In Ex. 7-5, Part (b) the first critical speed of the two-disk shaft (
w
1
= 35 lbf,
w
2
= 55 lbf) is ω
1
= 124.7 rad/s. From part (a), using influence coefficients
ω
2
=
1
124
.7
386
2
35(55)[2
.061(3.534) − 2.234
2
](10
−
8
)
= 466 rad/s Ans.
budynas_SM_ch07.qxd 11/30/2006 15:31 Page 197
FIRST PAGES
198
Solutions Manual • Instructor’s Solution Manual to Accompany Mechanical Engineering Design
7-17 In Eq. (7-22) the term
I
/A appears. For a hollow unform diameter shaft,
"
I
A
=
π
d
4
o
− d
4
i
!
/64
π
d
2
o
− d
2
i
!
/4
=
1
16
d
2
o
+ d
2
i
!
d
2
o
− d
2
i
!
d
2
o
− d
2
i
=
1
4
d
2
o
+ d
2
i
This means that when a solid shaft is hollowed out, the critical speed increases beyond that
of the solid shaft. By how much?
1
4
d
2
o
+ d
2
i
1
4
d
2
o
=
1
+
d
i
d
o
2
The possible values of d
i
are 0
≤ d
i
≤ d
o
, so the range of critical speeds is
ω
s
√
1
+ 0 to about ω
s
√
1
+ 1
or from
ω
s
to
√
2
ω
s
.
Ans.
7-18 All steps will be modeled using singularity functions with a spreadsheet. Programming both
loads will enable the user to first set the left load to 1, the right load to 0 and calculate
δ
11
and
δ
21
. Then setting left load to 0 and the right to 1 to get δ
12
and
δ
22
. The spreadsheet shown
on the next page shows the
δ
11
and
δ
21
calculation. Table for M
/I vs x is easy to make. The
equation for M
/I is:
M
/I = D13x + C15x − 1
0
+ E15x − 1
1
+ E17x − 2
1
+ C19x − 9
0
+ E19x − 9
1
+ E21x − 14
1
+ C23x − 15
0
+ E23x − 15
1
Integrating twice gives the equation for E y
. Boundary conditions y = 0 at x = 0 and at
x
= 16 inches provide integration constants (C
2
= 0). Substitution back into the deflection
equation at x
= 2, 14 inches provides the δ’s. The results are: δ
11
− 2.917(10
−
7
),
δ
12
= δ
21
= 1.627(10
−
7
),
δ
22
= 2.231(10
−
7
)
. This can be verified by finite element analysis.
y
1
= 20(2.917)(10
−
7
)
+ 35(1.627)(10
−
7
)
= 1.153(10
−
5
)
y
2
= 20(1.627)(10
−
7
)
+ 35(2.231)(10
−
7
)
= 1.106(10
−
5
)
y
2
1
= 1.329(10
−
10
),
y
2
2
= 1.224(10
−
10
)
wy = 6.177(10
−
4
),
wy
2
= 6.942(10
−
9
)
Neglecting the shaft, Eq. (7-23) gives
ω
1
=
386
6
.177(10
−
4
)
6
.942(10
−
9
)
= 5860 rad/s or 55 970 rev/min Ans.
budynas_SM_ch07.qxd 11/30/2006 15:31 Page 198
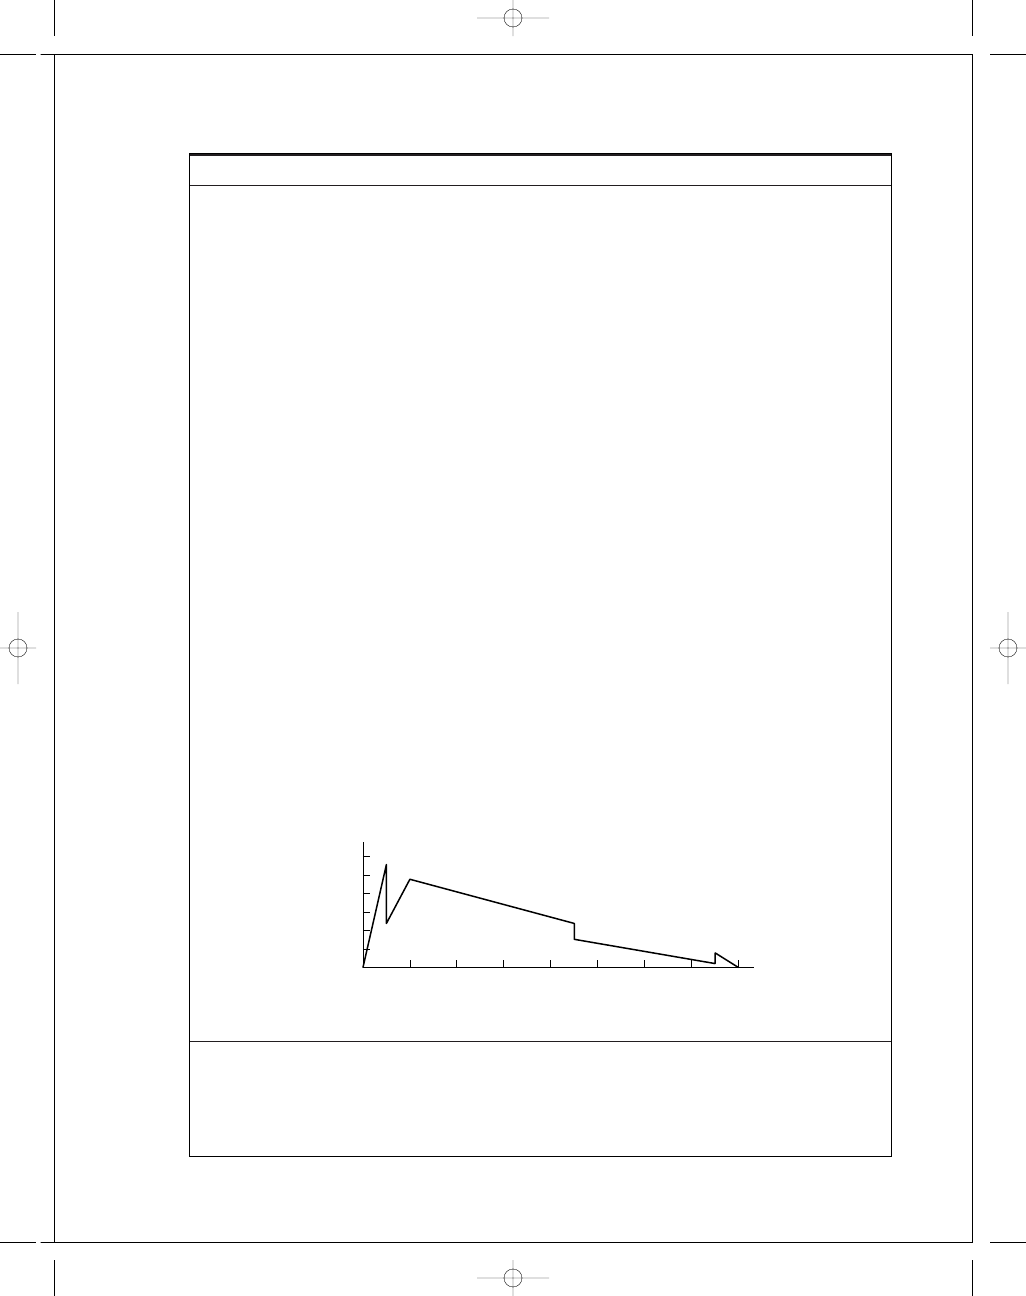
FIRST PAGES
Chapter 7
199
A
B
C
D
E
F
G
H
I
1
F
1
= 1
F
2
= 0
R
1
= 0.875 (left reaction)
2
3
x
M
I
1
= I
4
= 0.7854
4
0
0
I
2
= 1.833
5
1
0.875
I
3
= 2.861
6
2
1.75
7
9
0.875
8
14
0.25
9
15
0.125
10
16
0
11
12
x
M
/I
step
slope
slope
13
0
0
1.114 082
14
1
1.114 082
15
1
0.477 36
−0.636 722 477
0.477 36
−0.636 72
16
2
0.954 719
17
2
0.954 719
0
−0.068 19
−0.545 55
18
9
0.477 36
19
9
0.305 837
−0.171 522 4
−0.043 69
0.024 503
20
14
0.087 382
21
14
0.087 382
0
−0.043 69
0
22
15
0.043 691
23
15
0.159 155
0.115 463 554
−0.159 15
−0.115 46
24
16
0
25
26
C
1
= −4.906 001 093
27
28
29
δ
11
= 2.91701E-07
30
δ
21
= 1.6266E-07
Repeat for F
1
= 0 and F
2
= 1.
0.8
1
1.2
0
0.2
0.4
0.6
0
16
14
12
10
8
6
x (in)
M
(lbf
•
in)
4
2
budynas_SM_ch07.qxd 11/30/2006 15:31 Page 199
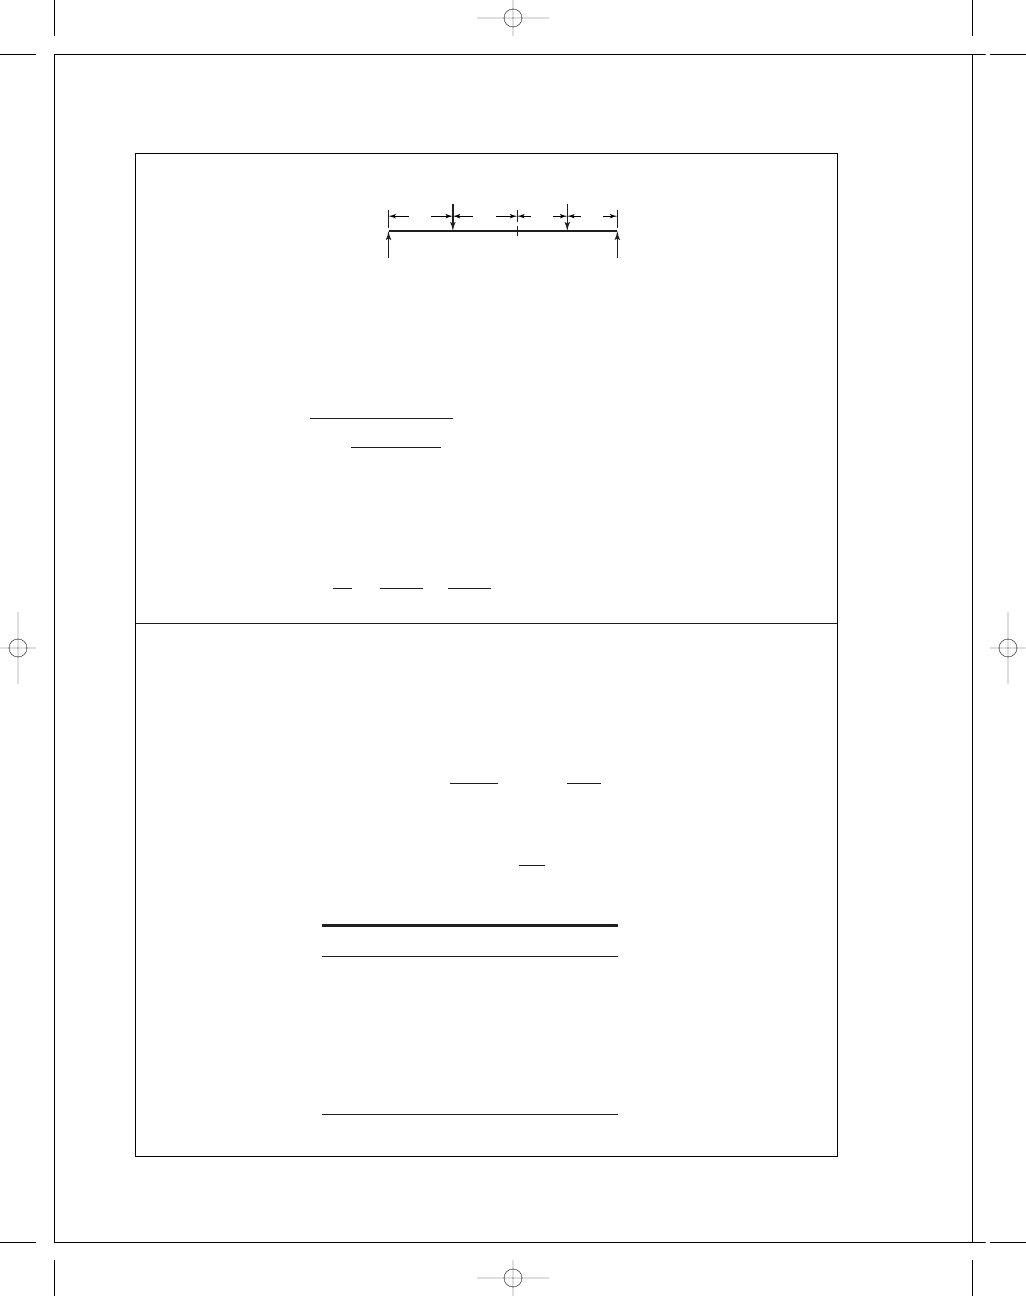
FIRST PAGES
200
Solutions Manual • Instructor’s Solution Manual to Accompany Mechanical Engineering Design
Modeling the shaft separately using 2 elements gives approximately
The spreadsheet can be easily modified to give
δ
11
= 9.605(10
−
7
),
δ
12
= δ
21
= 5.718(10
−
7
),
δ
22
= 5.472(10
−
7
)
y
1
= 1.716(10
−
5
),
y
2
= 1.249(10
−
5
),
y
2
1
= 2.946(10
−
10
),
y
2
2
= 1.561(10
−
10
),
wy = 3.316(10
−
4
),
wy
2
= 5.052(10
−
9
)
ω
1
=
386
3
.316(10
−
4
)
5
.052(10
−
9
)
= 5034 rad/s Ans.
A finite element model of the exact shaft gives
ω
1
= 5340 rad/s. The simple model is
5.7% low.
Combination
Using Dunkerley’s equation, Eq. (7-32):
1
ω
2
1
=
1
5860
2
+
1
5034
2
⇒ 3819 rad/s Ans.
7-19
We must not let the basis of the stress concentration factor, as presented, impose a view-
point on the designer. Table A-16 shows K
ts
as a decreasing monotonic as a function of
a
/D. All is not what it seems.
Let us change the basis for data presentation to the full section rather than the net section.
τ = K
ts
τ
0
= K
ts
τ
0
K
ts
=
32T
π AD
3
= K
ts
32T
π D
3
Therefore
K
ts
=
K
ts
A
Form a table:
(a
/D)
A
K
ts
K
ts
0.050
0.95
1.77
1.86
0.075
0.93
1.71
1.84
0.100
0.92
1.68
1.83
← minimum
0.125
0.89
1.64
1.84
0.150
0.87
1.62
1.86
0.175
0.85
1.60
1.88
0.200
0.83
1.58
1.90
R
1
R
2
11 lbf
11.32 lbf
4.5"
3.5"
9"
3.5"
4.5"
budynas_SM_ch07.qxd 11/30/2006 15:31 Page 200

FIRST PAGES
Chapter 7
201
K
ts
has the following attributes:
• It exhibits a minimum;
• It changes little over a wide range;
• Its minimum is a stationary point minimum at a
/D .= 0.100;
• Our knowledge of the minima location is
0
.075 ≤ (a/D) ≤ 0.125
We can form a design rule: in torsion, the pin diameter should be about 1
/10 of the shaft
diameter, for greatest shaft capacity. However, it is not catastrophic if one forgets the rule.
7-20 Choose 15 mm as basic size, D, d. Table 7-9: fit is designated as 15H7/h6. From
Table A-11, the tolerance grades are
D = 0.018 mm and d = 0.011 mm.
Hole: Eq. (7-36)
D
max
= D + D = 15 + 0.018 = 15.018 mm Ans.
D
min
= D = 15.000 mm Ans.
Shaft: From Table A-12, fundamental deviation
δ
F
= 0. From Eq. (2-39)
d
max
= d + δ
F
= 15.000 + 0 = 15.000 mm Ans.
d
min
= d + δ
R
− d = 15.000 + 0 − 0.011 = 14.989 mm Ans.
7-21 Choose 45 mm as basic size. Table 7-9 designates fit as 45H7/s6. From Table A-11, the
tolerance grades are
D = 0.025 mm and d = 0.016 mm
Hole: Eq. (7-36)
D
max
= D + D = 45.000 + 0.025 = 45.025 mm Ans.
D
min
= D = 45.000 mm Ans.
Shaft: From Table A-12, fundamental deviation
δ
F
= +0.043 mm. From Eq. (7-38)
d
min
= d + δ
F
= 45.000 + 0.043 = 45.043 mm Ans.
d
max
= d + δ
F
+ d = 45.000 + 0.043 + 0.016 = 45.059 mm Ans.
7-22 Choose 50 mm as basic size. From Table 7-9 fit is 50H7/g6. From Table A-11, the tolerance
grades are
D = 0.025 mm and d = 0.016 mm.
Hole:
D
max
= D + D = 50 + 0.025 = 50.025 mm Ans.
D
min
= D = 50.000 mm Ans.
Shaft: From Table A-12 fundamental deviation
= −0.009 mm
d
max
= d + δ
F
= 50.000 + (−0.009) = 49.991 mm Ans.
d
min
= d + δ
F
− d
= 50.000 + (−0.009) − 0.016
= 49.975 mm
budynas_SM_ch07.qxd 11/30/2006 15:31 Page 201
FIRST PAGES
202
Solutions Manual • Instructor’s Solution Manual to Accompany Mechanical Engineering Design
7-23 Choose the basic size as 1.000 in. From Table 7-9, for 1.0 in, the fit is H8/f7. From
Table A-13, the tolerance grades are
D = 0.0013 in and d = 0.0008 in.
Hole:
D
max
= D + (D)
hole
= 1.000 + 0.0013 = 1.0013 in Ans.
D
min
= D = 1.0000 in Ans.
Shaft: From Table A-14: Fundamental deviation
= −0.0008 in
d
max
= d + δ
F
= 1.0000 + (−0.0008) = 0.9992 in Ans.
d
min
= d + δ
F
− d = 1.0000 + (−0.0008) − 0.0008 = 0.9984 in Ans.
Alternatively,
d
min
= d
max
− d = 0.9992 − 0.0008 = 0.9984 in. Ans.
7-24 (a)
Basic size is D
= d = 1.5 in.
Table 7-9:
H7/s6 is specified for medium drive fit.
Table A-13:
Tolerance grades are
D = 0.001 in and d = 0.0006 in.
Table A-14:
Fundamental deviation is
δ
F
= 0.0017 in.
Eq. (7-36):
D
max
= D + D = 1.501 in Ans.
D
min
= D = 1.500 in Ans.
Eq. (7-37):
d
max
= d + δ
F
+ d = 1.5 + 0.0017 + 0.0006 = 1.5023 in Ans.
Eq. (7-38):
d
min
= d + δ
F
= 1.5 + 0.0017 + 1.5017 in Ans.
(b) Eq. (7-42):
δ
min
= d
min
− D
max
= 1.5017 − 1.501 = 0.0007 in
Eq. (7-43):
δ
max
= d
max
− D
min
= 1.5023 − 1.500 = 0.0023 in
Eq. (7-40):
p
max
=
E
δ
max
2d
3
(d
2
o
− d
2
)(d
2
− d
2
i
)
d
2
o
− d
2
i
=
(30)(10
6
)(0
.0023)
2(1
.5)
3
(2
.5
2
− 1.5
2
)(1
.5
2
− 0)
2
.5
2
− 0
= 14 720 psi Ans.
p
min
=
E
δ
min
2d
3
d
2
o
− d
2
!
d
2
− d
2
i
!
d
2
o
− d
2
i
=
(30)(10
6
)(0
.0007)
2(1
.5)
3
(2
.5
2
− 1.5
2
)(1
.5
2
− 0)
2
.5
2
− 0
= 4480 psi Ans.
(c) For the shaft:
Eq. (7-44):
σ
t,
shaft
= −p = −14 720 psi
Eq. (7-46):
σ
r,
shaft
= −p = −14 720 psi
Eq. (5-13):
σ
= (σ
2
1
− σ
1
σ
2
+ σ
2
2
)
1
/
2
= [(−14 720)
2
− (−14 720)(−14 720) + (−14 720)
2
]
1
/
2
= 14 720 psi
n
= S
y
/σ
= 57 000/14 720 = 3.9 Ans.
budynas_SM_ch07.qxd 11/30/2006 15:31 Page 202
FIRST PAGES
Chapter 7
203
For the hub:
Eq. (7-45):
σ
t,
hub
= p
d
2
o
+ d
2
d
2
o
− d
2
= (14 720)
2
.5
2
+ 1.5
2
2
.5
2
− 1.5
2
= 31 280 psi
Eq. (7-46):
σ
r,
hub
= −p = −14 720 psi
Eq. (5-13):
σ
= (σ
2
1
− σ
1
σ
2
+ σ
2
2
)
1
/
2
= [(31 280)
2
− (31 280)(−14 720) + (−14 720)
2
]
1
/
2
= 40 689 psi
n
= S
y
/σ
= 85 000/40 689 = 2.1 Ans.
(d)
Eq. (7-49)
T
= (π/2) f p
min
ld
2
= (π/2)(0.3)(4480)(2)(1.5)
2
= 9500 lbf · in Ans.
budynas_SM_ch07.qxd 11/30/2006 15:31 Page 203
Wyszukiwarka
Podobne podstrony:
budynas SM ch01
budynas SM ch15
budynas SM ch16
budynas SM ch14
budynas SM ch05
budynas SM ch12
budynas SM ch20
budynas SM ch09
budynas SM ch03
budynas SM ch10
budynas SM ch08
budynas SM ch11
budynas SM ch04
budynas SM ch13
budynas SM ch02
budynas SM ch17
budynas SM ch06
więcej podobnych podstron