1 - 44
CCNP: Implementing Secure Converged Wide-area Networks v5.0 - Lab 3-9
Copyright
© 2007, Cisco Systems, Inc
Lab 3.9 Configuring Easy VPN with SDM
Learning Objectives
• Configure EIGRP on a router
• Configure Easy VPN using SDM
• Install the Cisco VPN Client to a host
• Connect to the VPN using Cisco VPN client
• Verify VPN operation using SDM
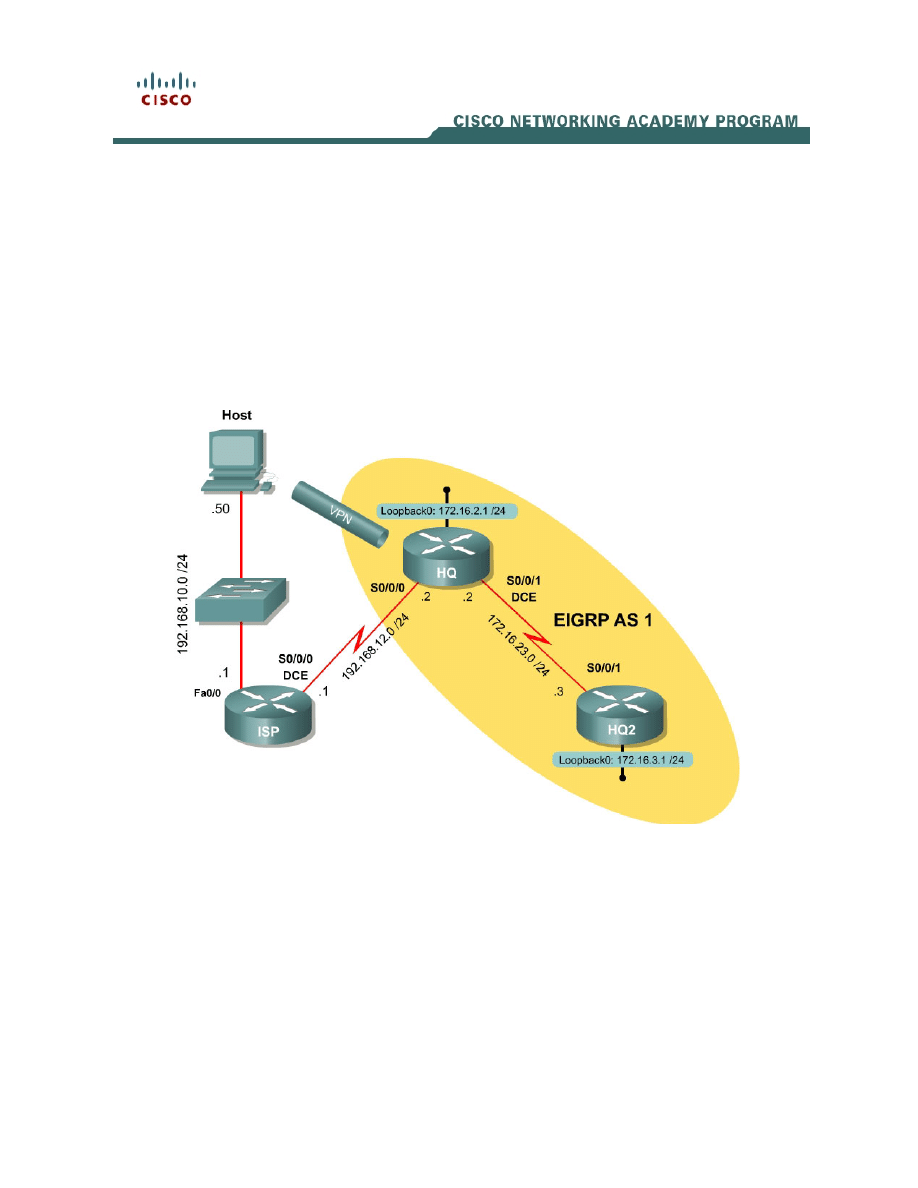
Topology Diagram
Scenario
In this lab, you will set up Easy VPN using SDM for the International Travel
Agency. The host will simulate an employee connecting from home over the
Internet. The router ISP will simulate an Internet router representing the Internet
connection for both the home user and the company headquarters.
Step 1: Configure Addressing
Configure the loopback interfaces with the addresses shown in the diagram.
Also configure the serial interfaces shown in the diagram. Set the clockrate on

the appropriate interfaces and issue the no shutdown command on all serial
connections. Verify that you have connectivity across the local subnet using the
ping command. Do not set up the tunnel interface.
ISP# configure terminal
ISP(config)# interface fastethernet0/0
ISP(config-if)# ip address 192.168.10.1 255.255.255.0
ISP(config-if)# no shutdown
ISP(config-if)# interface serial 0/0/0
ISP(config-if)# ip address 192.168.12.1 255.255.255.0
ISP(config-if)# clockrate 64000
ISP(config-if)# no shutdown
HQ# configure terminal
HQ(config)# interface loopback 0
HQ(config-if)# ip address 172.16.2.1 255.255.255.0
HQ(config-if)# interface serial0/0/0
HQ(config-if)# ip address 192.168.12.2 255.255.255.0
HQ(config-if)# no shutdown
HQ(config-if)# interface serial 0/0/1
HQ(config-if)# ip address 172.16.23.2 255.255.255.0
HQ(config-if)# clockrate 64000
HQ(config-if)# no shutdown
HQ2# configure terminal
HQ2(config)# interface loopback 0
HQ2(config-if)# ip address 172.16.3.1 255.255.255.0
HQ2(config-if)# interface serial 0/0/1
HQ2(config-if)# ip address 172.16.23.3 255.255.255.0
HQ2(config-if)# no shutdown
Step 2: Configure EIGRP AS 1
Configure EIGRP for AS1 on HQ and HQ2. Add the entire 172.16.0.0/16 major
network and disable automatic summarization. The router ISP will not
participate in this routing process.
HQ(config)# router eigrp 1
HQ(config-router)# no auto-summary
HQ(config-router)# network 172.16.0.0
HQ2(config)# router eigrp 1
HQ2(config-router)# no auto-summary
HQ2(config-router)# network 172.16.0.0
An EIGRP neighbor adjacency should form between HQ and HQ2. If not,
troubleshoot by checking your interface configuration, EIGRP configuration, and
physical connectivity.
Step 3: Configure a Static Default Route
Since the router ISP represents a connection to the Internet, send all traffic
whose destination network does not exist in the routing tables at company
headquarters out this connection via a default route. This route can be statically
created on HQ, but will need to be redistributed into EIGRP so HQ2 will learn
the route too.
2 - 44
CCNP: Implementing Secure Converged Wide-area Networks v5.0 - Lab 3-9
Copyright
© 2007, Cisco Systems, Inc

HQ(config)# ip route 0.0.0.0 0.0.0.0 192.168.12.1
HQ(config)# router eigrp 1
HQ(config-router)# redistribute static
For which types of routes is it unnecessary to assign a default/seed metric
when redistributing into EIGRP?
How else could you configure HQ to advertise the default route?
Step 4: Connect to HQ through SDM
Prepare HQ to allow connection and configuration via SDM as you did in Lab
3.1.
Configure the host to connect to HQ using SDM. Configure the host with the IP
address shown in the topology diagram, and ensure that its default gateway is
set to ISP so that traffic from the host to HQ will get routed properly. Remember
that you should only be able to connect to HQ’s outside interface (192.168.12.2)
using SDM because the interfaces inside the EIGRP domain are not reachable
from ISP and the PC. If you do not know how to configure the host IP address
and connect using SDM, refer to Lab 3.1.
3 - 44
CCNP: Implementing Secure Converged Wide-area Networks v5.0 - Lab 3-9
Copyright
© 2007, Cisco Systems, Inc

Figure 4-1: SDM Home Screen
Step 5: Configure Easy VPN Server through SDM
Once you are at the SDM home screen for HQ, click the Configure icon at the
top and choose VPN on the left side bar. Choose Easy VPN Server in the VPN
types list. Notice that there is a prerequisite task to configure AAA. Click Enable
AAA to allow SDM to fulfill this task for you.
4 - 44
CCNP: Implementing Secure Converged Wide-area Networks v5.0 - Lab 3-9
Copyright
© 2007, Cisco Systems, Inc
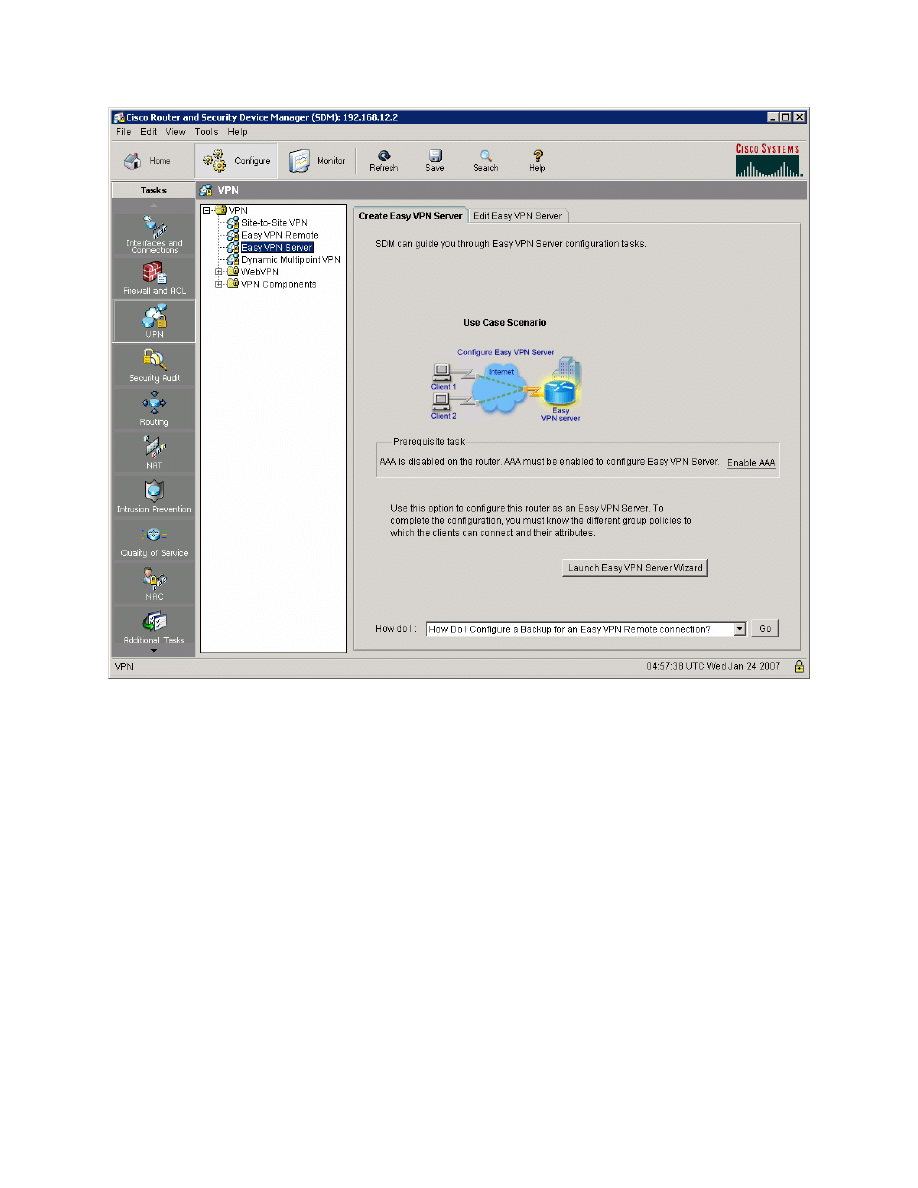
Figure 5-1: Create Easy VPN Server Tab
SDM gives you a warning about the changes it will make in addition to enabling
AAA (this is to prevent you from getting locked out of the router). When you
understand the implications of acknowledgement, click Yes to continue. Note
that now when accessing HQ you need to use a username/password pair
configured on the router. You already have configured one for use with SDM, so
you can reuse it.
5 - 44
CCNP: Implementing Secure Converged Wide-area Networks v5.0 - Lab 3-9
Copyright
© 2007, Cisco Systems, Inc
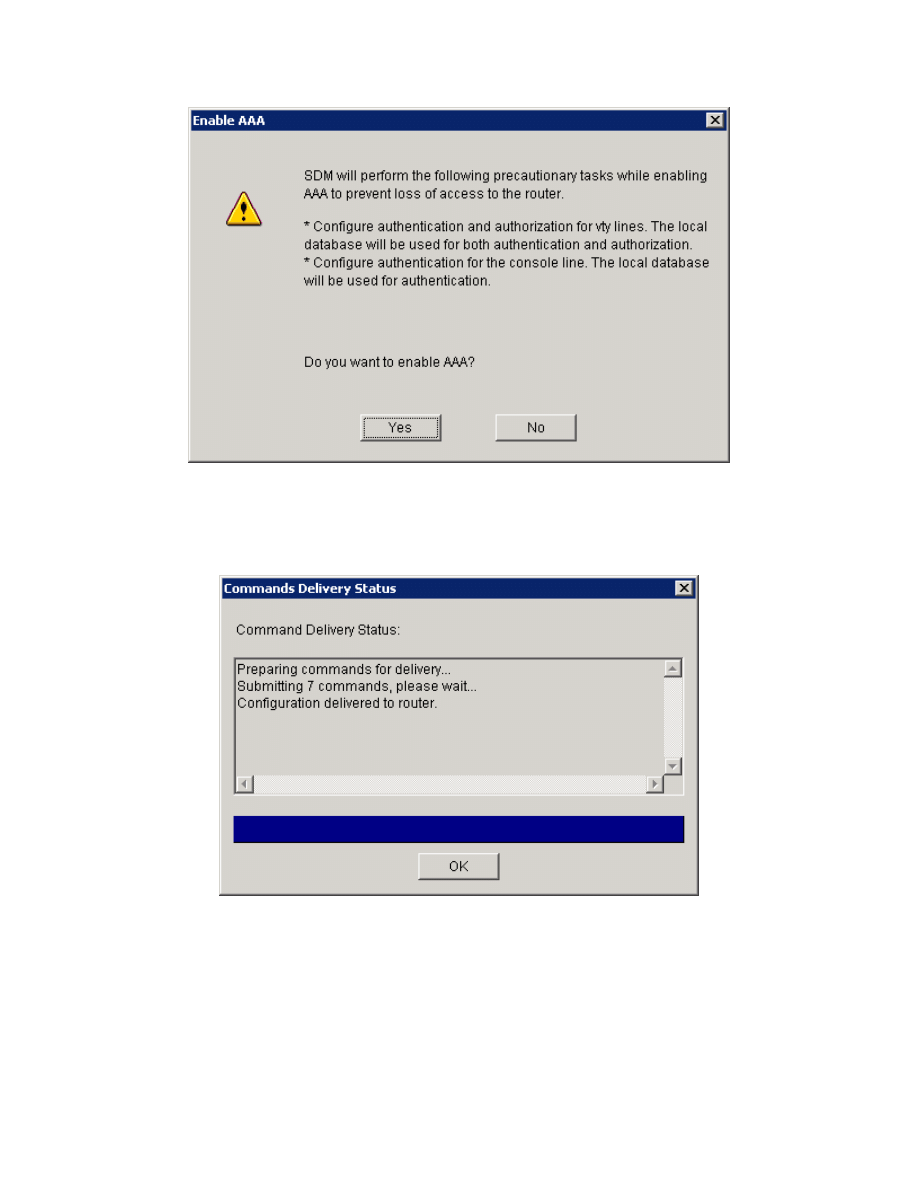
Figure 5-2: AAA Configuration Prompt
Click Yes and the SDM will deliver the AAA commands to the router. Click OK
when the delivery process is complete.
Figure 5-3: Command Delivery Progress Indicator
Once delivery is complete, SDM notifies you that enabling AAA was successful.
Click OK to continue.
6 - 44
CCNP: Implementing Secure Converged Wide-area Networks v5.0 - Lab 3-9
Copyright
© 2007, Cisco Systems, Inc
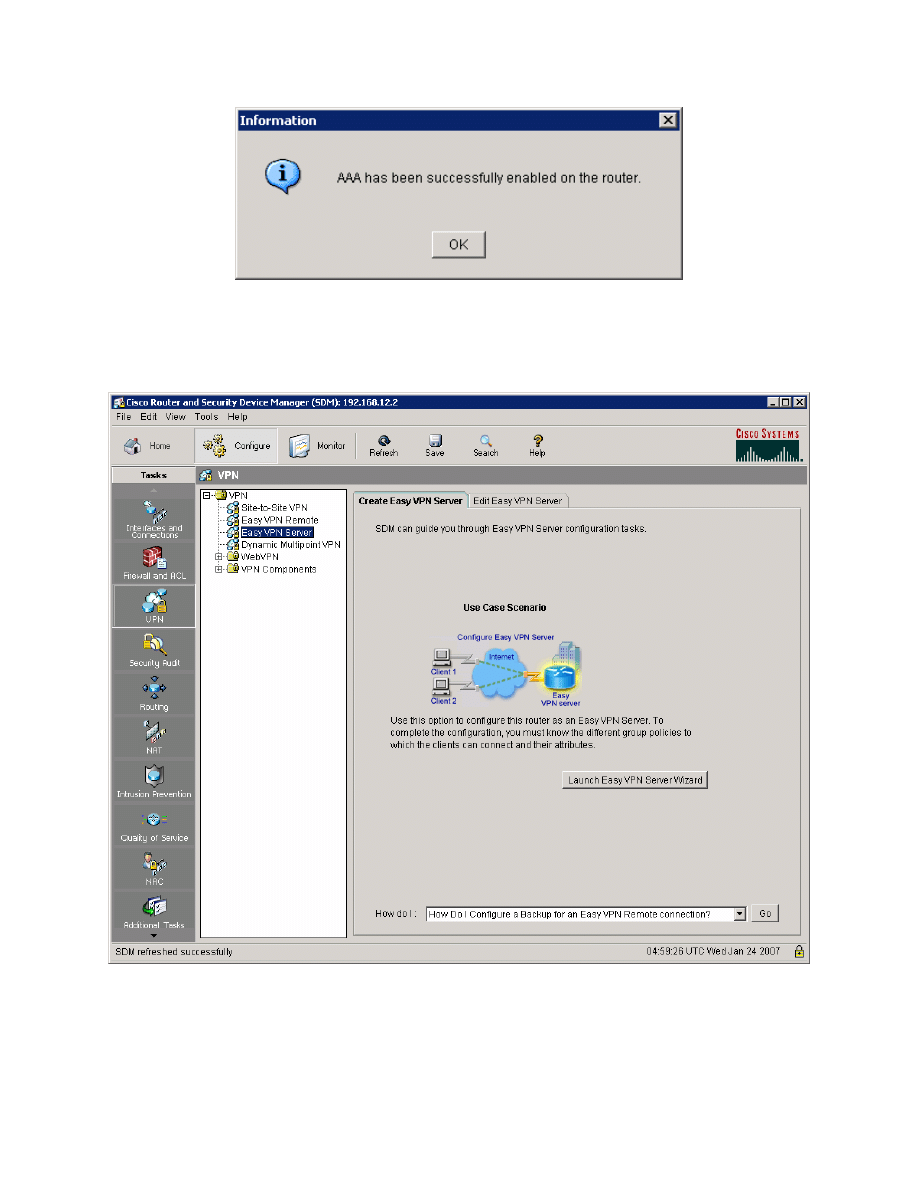
Figure 5-4: Successful AAA Configuration Report
Now that AAA is enabled, you can start the Easy VPN Server Wizard by clicking
the Launch Easy VPN Server Wizard button.
Figure 5-5: Create Easy VPN Server Tab
After reading the brief introduction to the wizard, click Next.
7 - 44
CCNP: Implementing Secure Converged Wide-area Networks v5.0 - Lab 3-9
Copyright
© 2007, Cisco Systems, Inc

Figure 5-6: Easy VPN Server Wizard
Choose to run the Easy VPN Server on the ISP-facing interface of HQ. Use pre-
shared keys as the authentication type since we will not be using a certificate
server. Click Next when you are finished.
8 - 44
CCNP: Implementing Secure Converged Wide-area Networks v5.0 - Lab 3-9
Copyright
© 2007, Cisco Systems, Inc
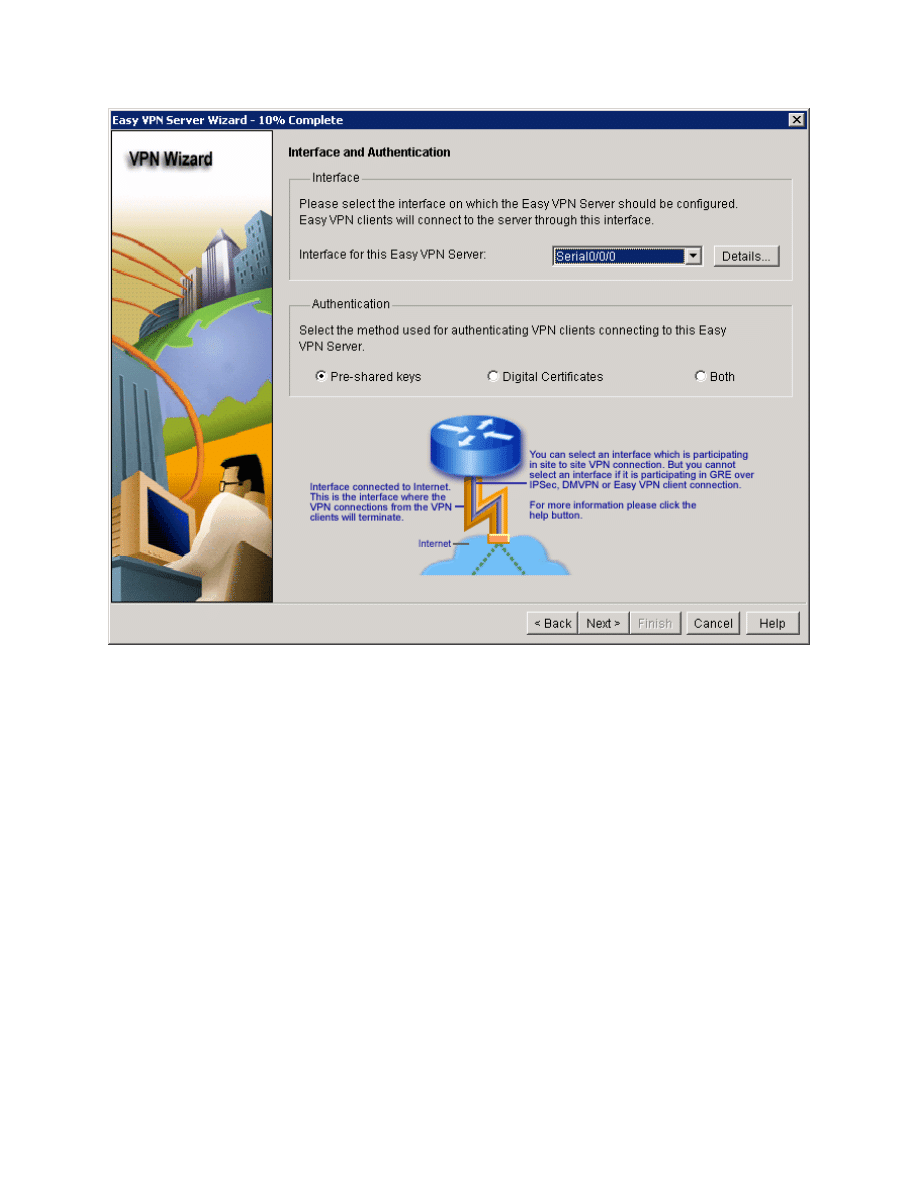
Figure 5-7: Interface and Authentication Options
Use the default SDM IKE proposal and click Next.
9 - 44
CCNP: Implementing Secure Converged Wide-area Networks v5.0 - Lab 3-9
Copyright
© 2007, Cisco Systems, Inc
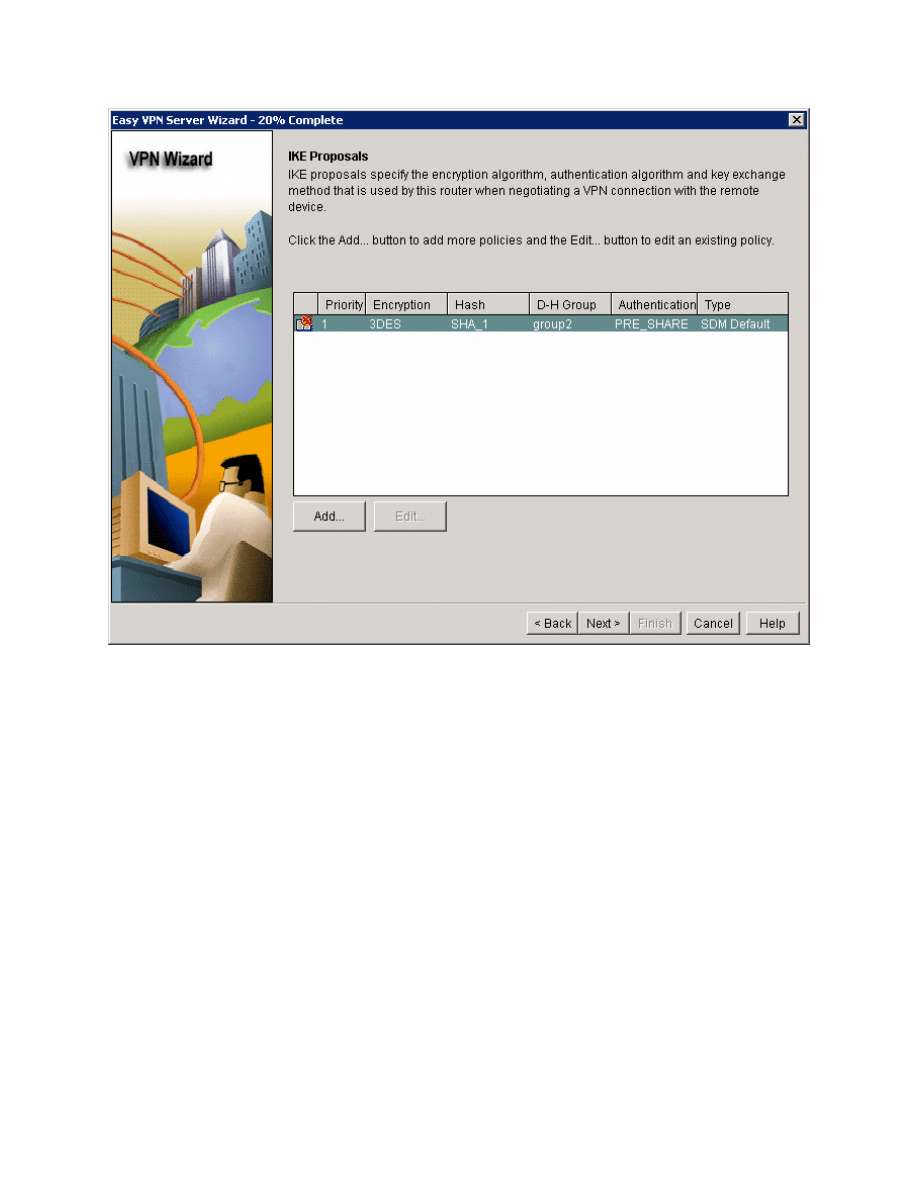
Figure 5-8: IKE Proposals List
Use the default SDM IPsec transform set and click Next.
10 - 44
CCNP: Implementing Secure Converged Wide-area Networks v5.0 - Lab 3-9
Copyright
© 2007, Cisco Systems, Inc
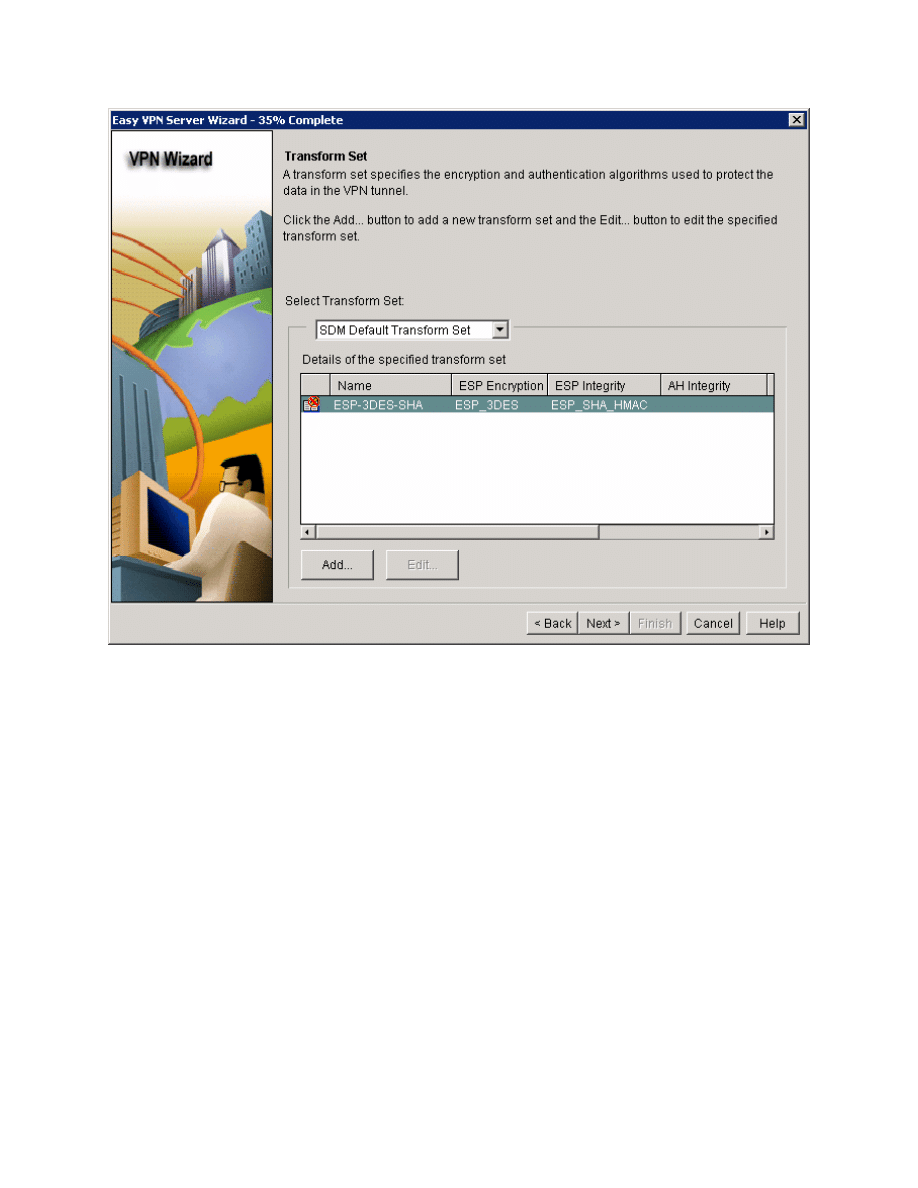
Figure 5-9: IPsec Transform Set List
Choose Local in Method List for Group Policy Lookup, and then click Next.
11 - 44
CCNP: Implementing Secure Converged Wide-area Networks v5.0 - Lab 3-9
Copyright
© 2007, Cisco Systems, Inc
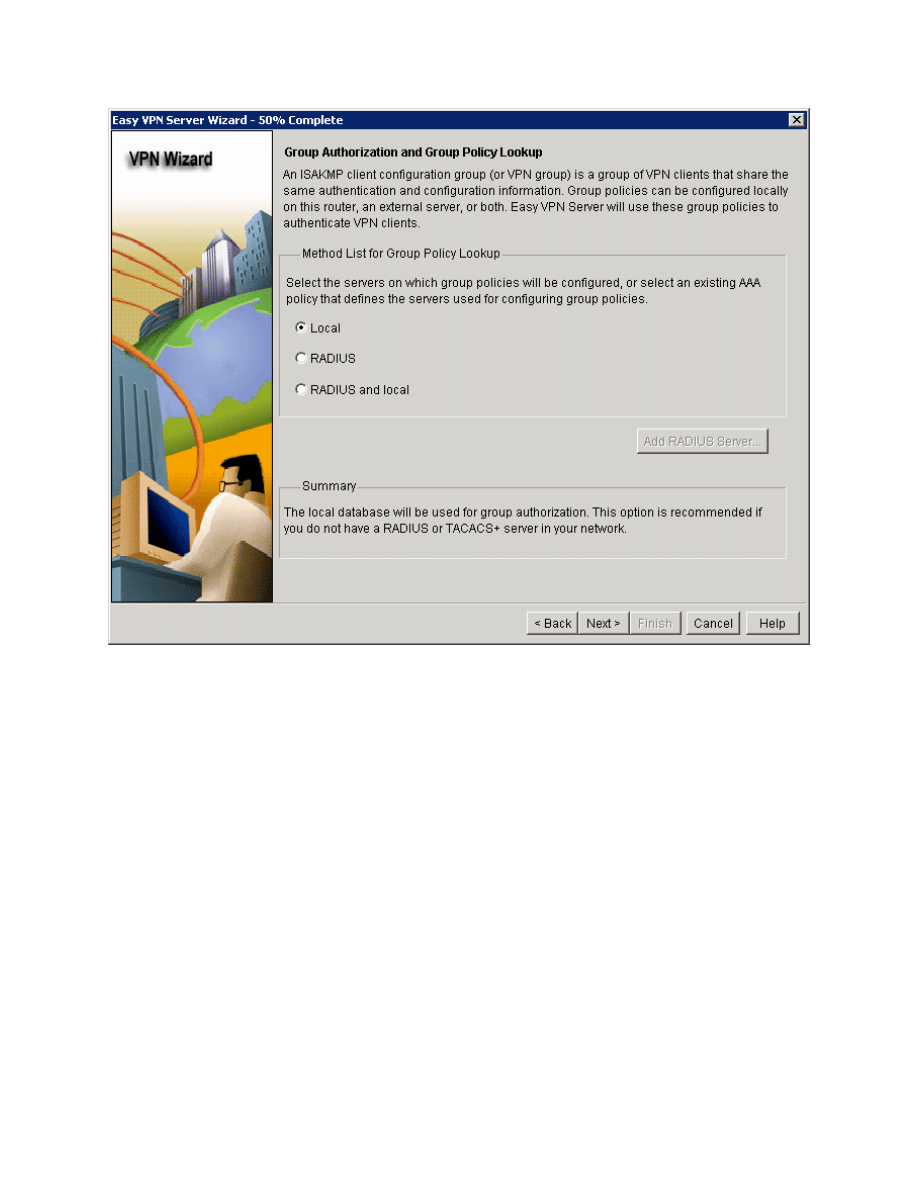
Figure 5-10: Authorization and Policy Options
Enable user authentication from a local database. Click Add User
Credentials... to add a username for VPN access.
12 - 44
CCNP: Implementing Secure Converged Wide-area Networks v5.0 - Lab 3-9
Copyright
© 2007, Cisco Systems, Inc
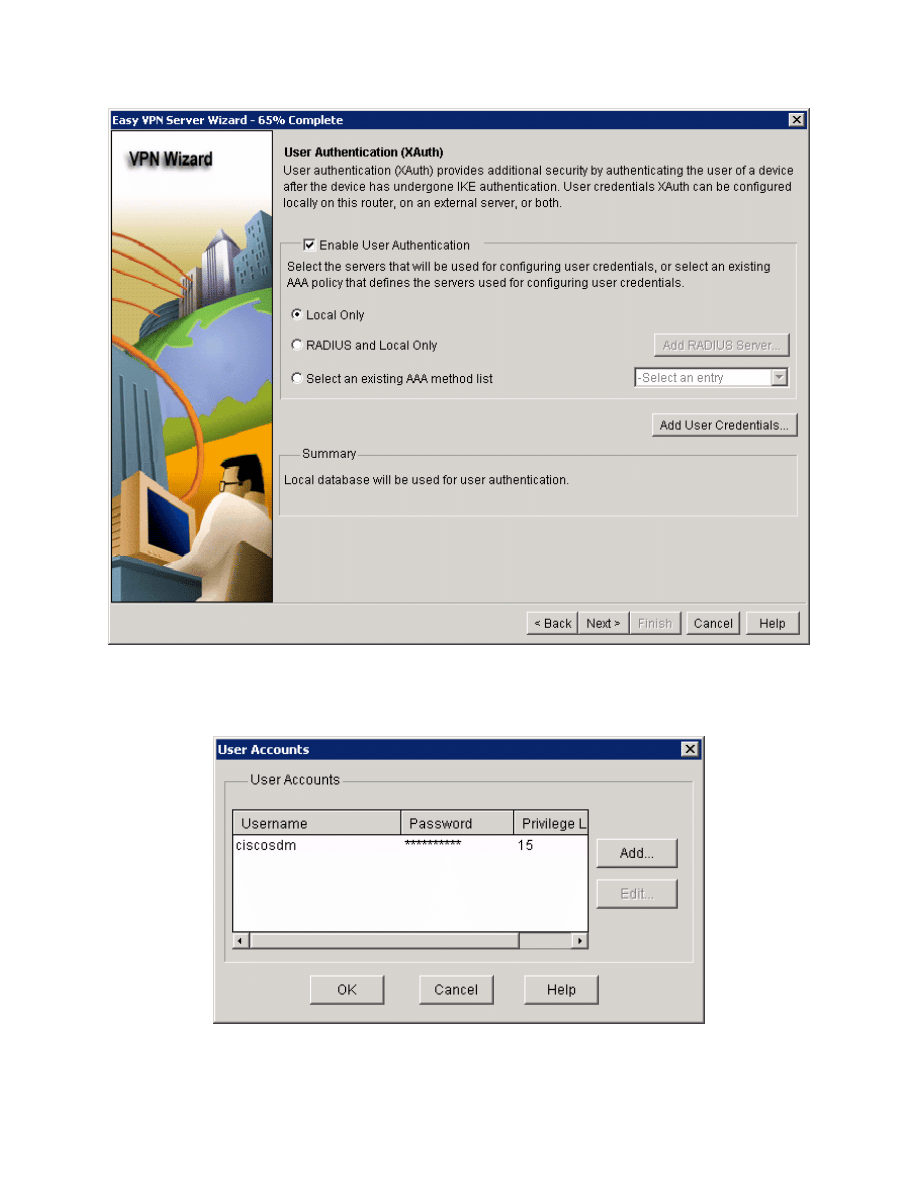
Figure 5-11: User Authentication Options
Click Add... to create a new user.
Figure 5-12: Local User Accounts
13 - 44
CCNP: Implementing Secure Converged Wide-area Networks v5.0 - Lab 3-9
Copyright
© 2007, Cisco Systems, Inc
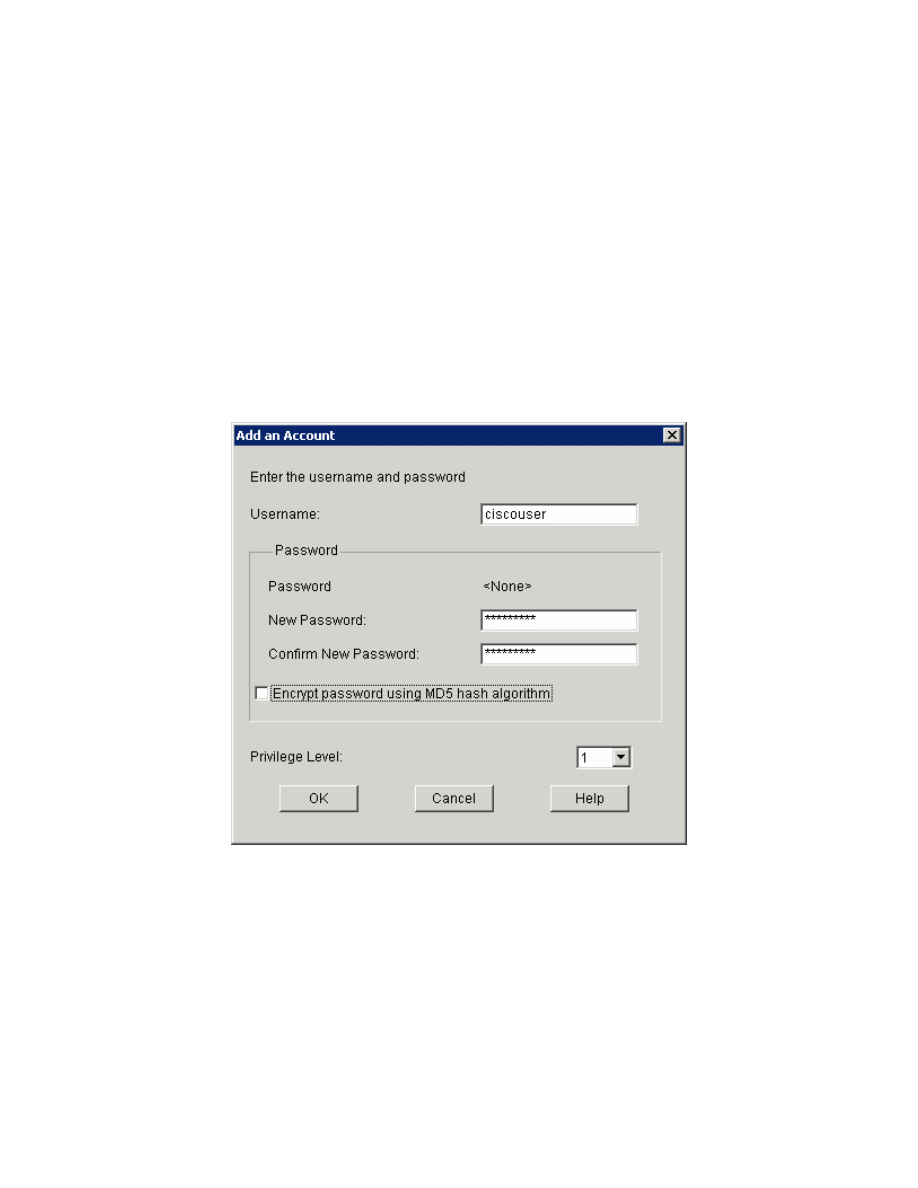
Create a username of “ciscouser” with a password of “ciscouser.” You can
leave this user at privilege level 1 since it is only going to be used for VPN
access. Encrypting this password is optional and not required.
If you clicked Encrypt password using MD5 hash algorithm, how would the
password be stored?
Click OK twice when you are done, and then click Next in the user
authentication window.
Figure 5-13: Add User Account Dialog
We will need to create a group for our Easy VPN clients. To do this, click
Add....
14 - 44
CCNP: Implementing Secure Converged Wide-area Networks v5.0 - Lab 3-9
Copyright
© 2007, Cisco Systems, Inc
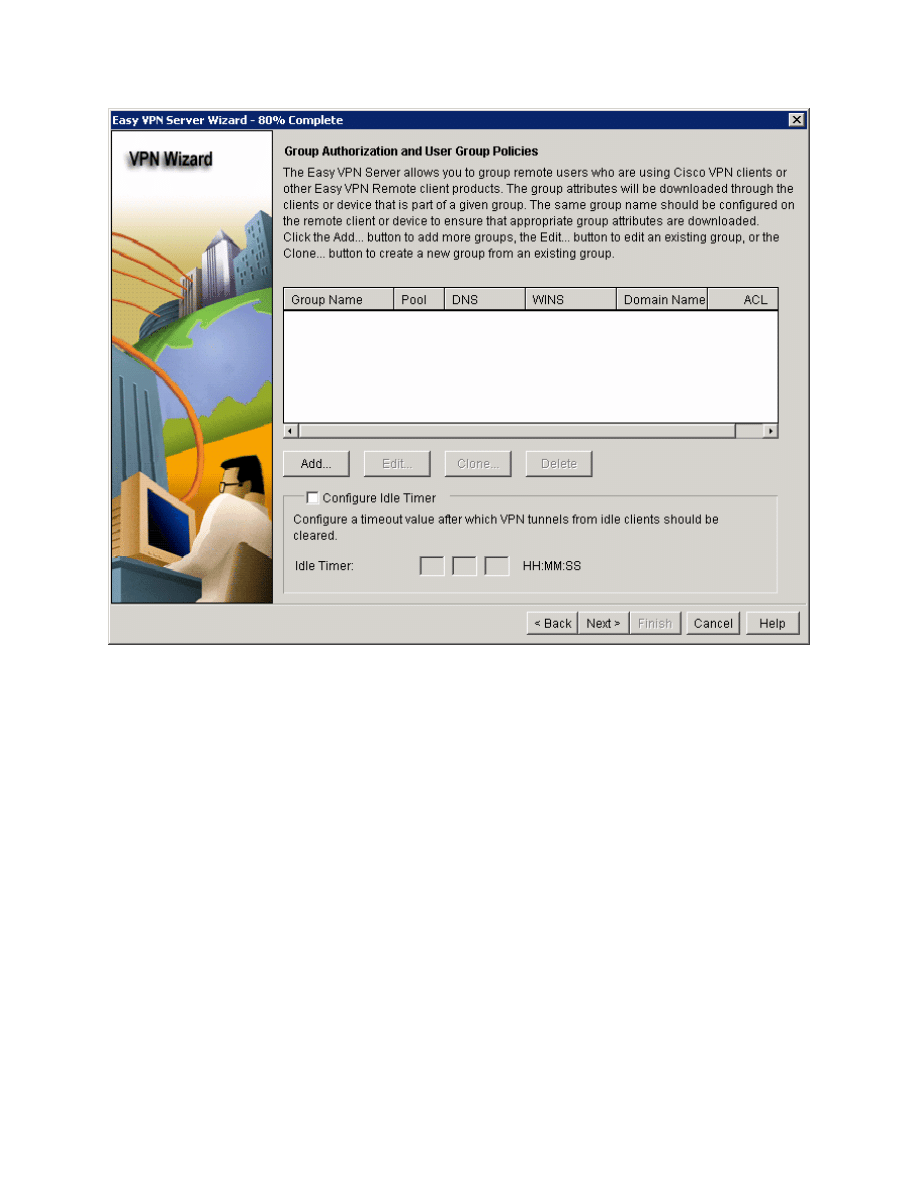
Figure 5-14: VPN Client Authorization Configuration
Make the group name and pre-shared key “ciscogroup.” Create an IP pool for
clients and use the range 172.16.2.100 – 172.16.2.200, with a subnet mask of
24 bits. Notice that this range falls under HQ’s loopback network. Click the Split
Tunneling tab after completing these fields.
Why would you want to use an IP network associated with a loopback interface
for your VPN pool?
How will HQ2 route traffic to the VPN clients?
15 - 44
CCNP: Implementing Secure Converged Wide-area Networks v5.0 - Lab 3-9
Copyright
© 2007, Cisco Systems, Inc

Figure 5-15: VPN Group Policy Configuration
Enable split tunneling to advertise the entire 172.16.0.0 network into the route
table of VPN clients. Click the Add... button and add the network with the
appropriate wildcard mask. When complete, click OK.
16 - 44
CCNP: Implementing Secure Converged Wide-area Networks v5.0 - Lab 3-9
Copyright
© 2007, Cisco Systems, Inc
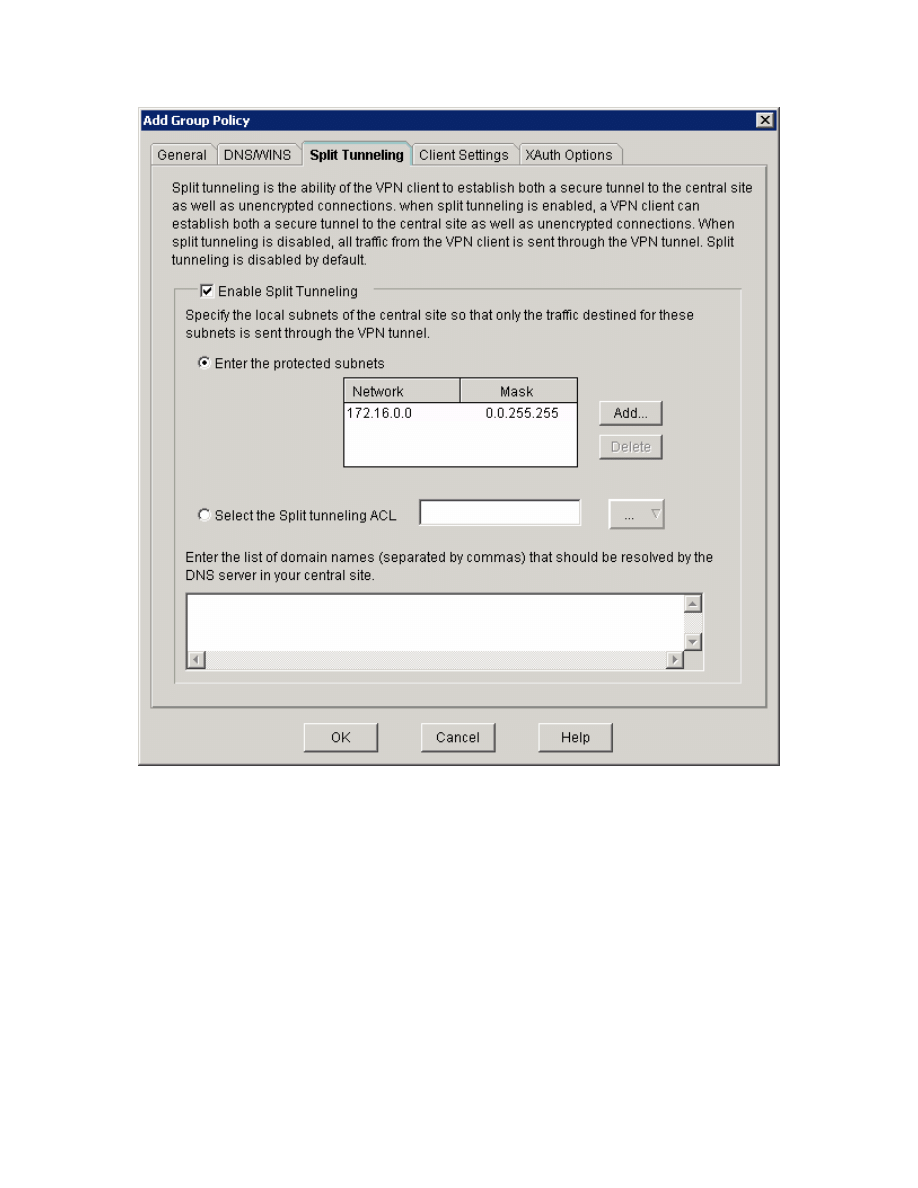
Figure 5-16: Split Tunneling Tab
You should see the new group information added. Configure an idle timer of 8
hours and click Next.
17 - 44
CCNP: Implementing Secure Converged Wide-area Networks v5.0 - Lab 3-9
Copyright
© 2007, Cisco Systems, Inc
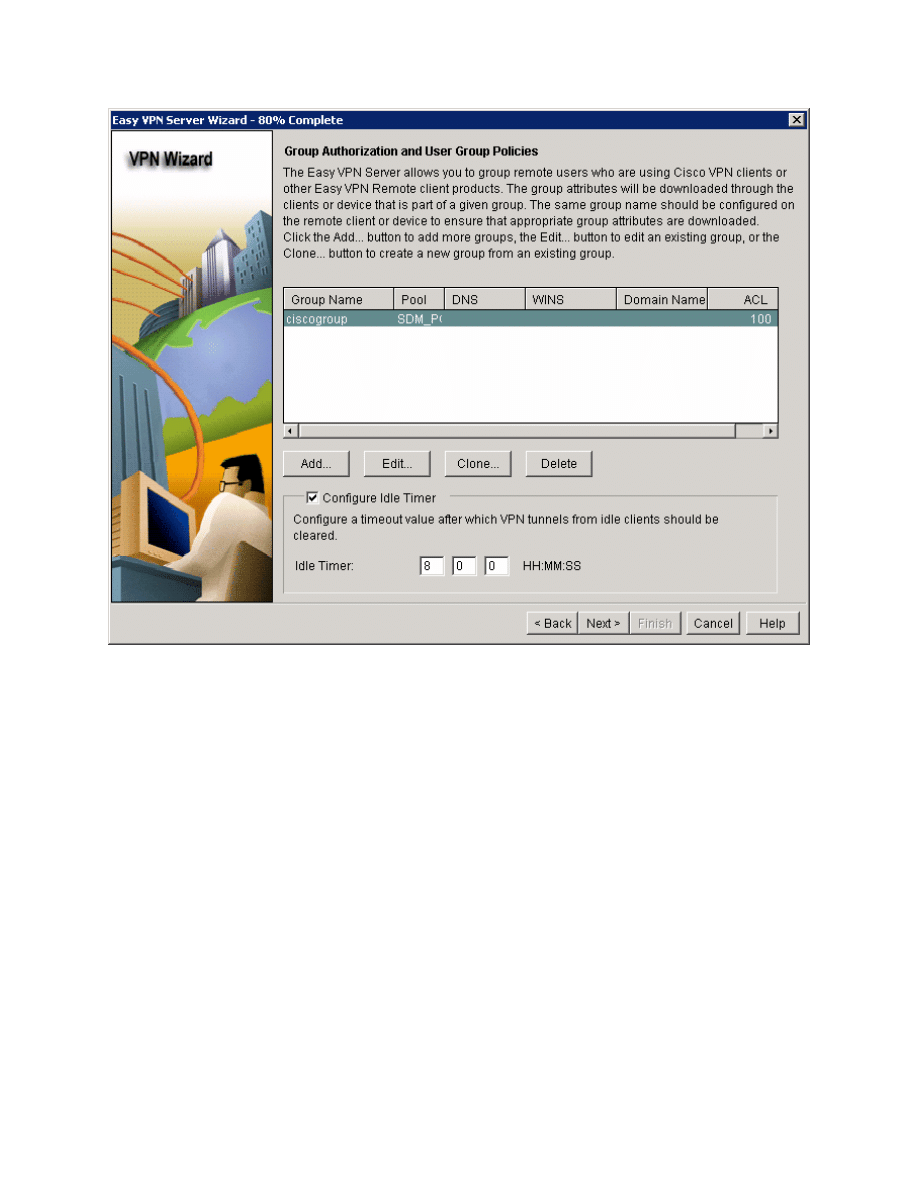
Figure 5-17: VPN Client Authorization Configuration with Changes Applied
Review what SDM will send to the router and click Finish.
18 - 44
CCNP: Implementing Secure Converged Wide-area Networks v5.0 - Lab 3-9
Copyright
© 2007, Cisco Systems, Inc
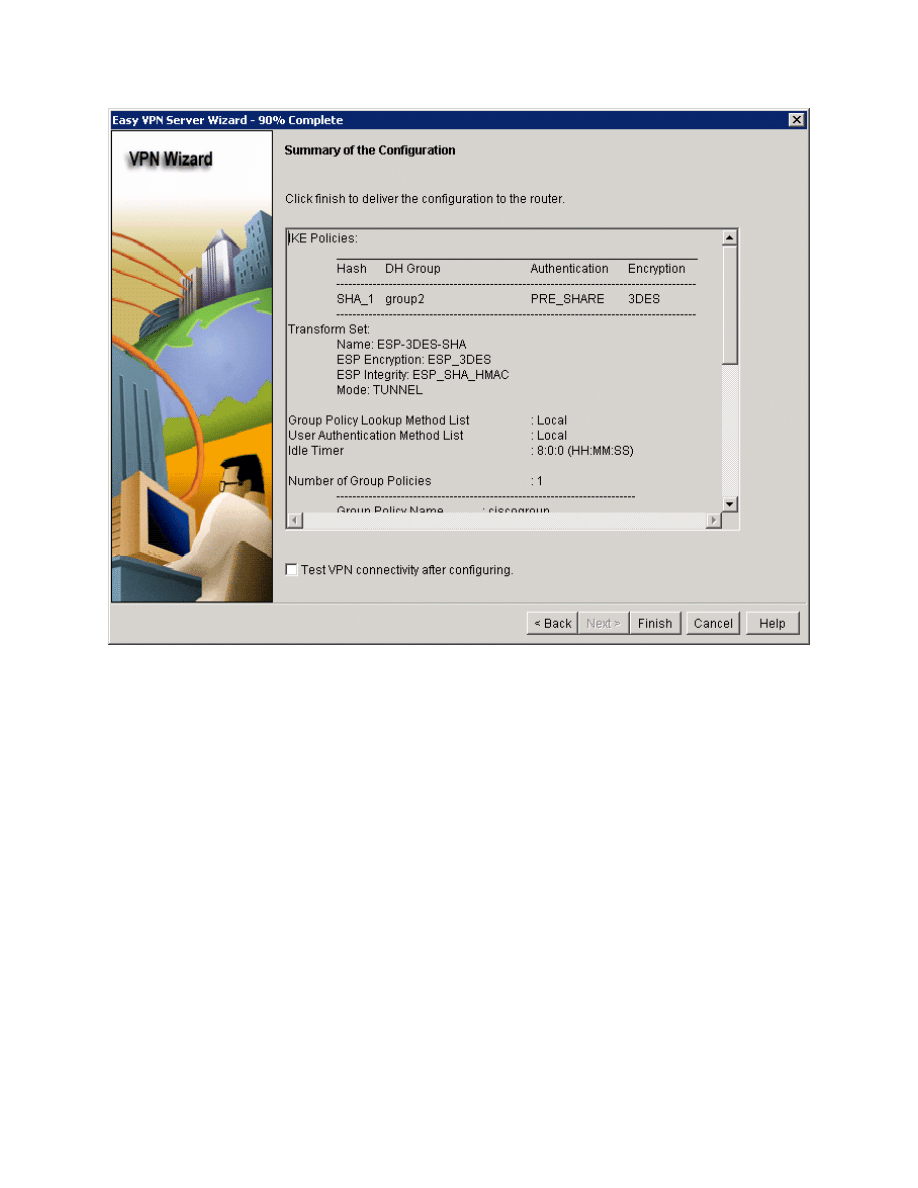
Figure 5-18: Summary of Easy VPN Configuration
Click Finish and SDM will deliver the configuration to the router. Click OK when
delivery is complete.
19 - 44
CCNP: Implementing Secure Converged Wide-area Networks v5.0 - Lab 3-9
Copyright
© 2007, Cisco Systems, Inc
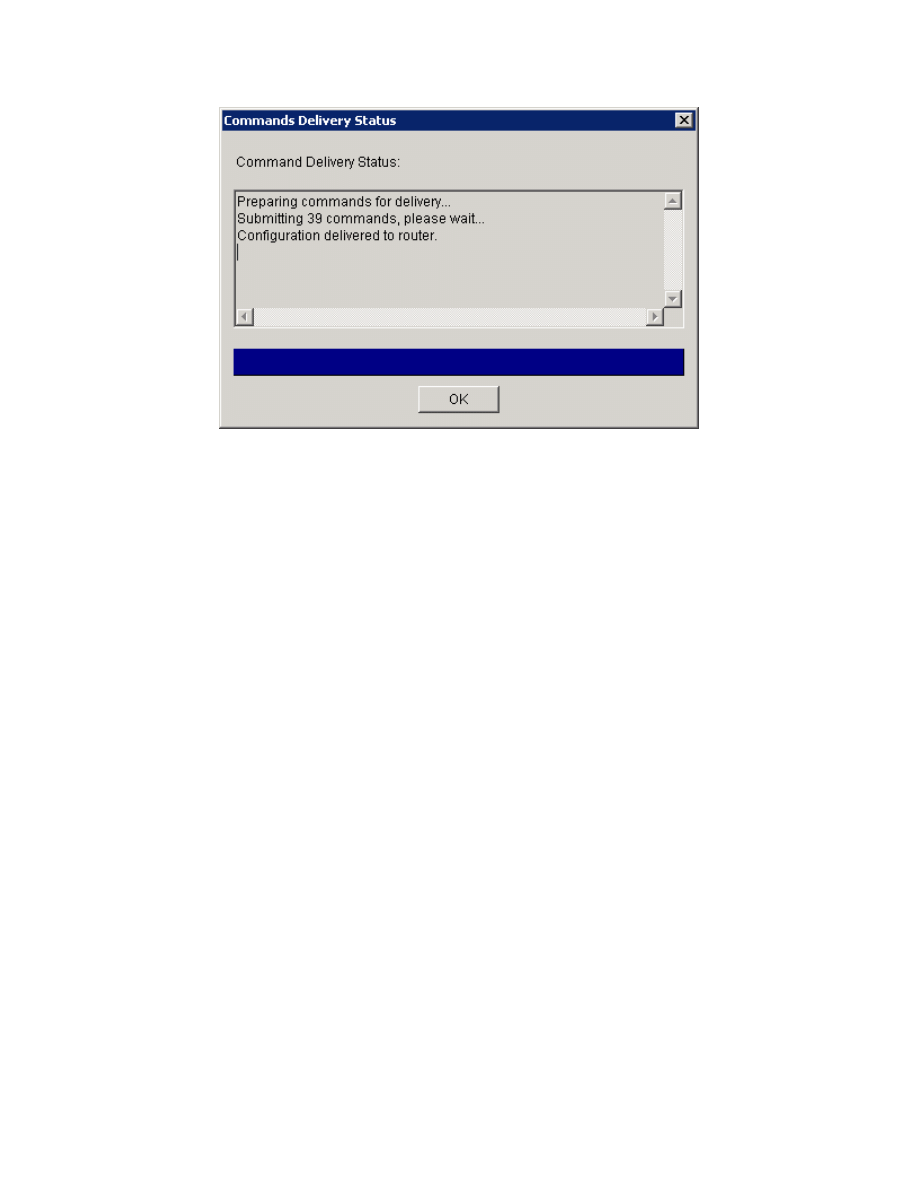
Figure 5-19: Command Delivery Progress Indicator
You have now successfully configured Easy VPN server.
Step 6: Install the Cisco VPN Client
Now that HQ has been set up as an Easy VPN Server, the host will change its
role from management host to a VPN client connecting across the Internet to
HQ. Before you can connect, you must install the Cisco VPN Client if you
haven’t already. If you have already installed the VPN Client, skip this step and
move on to Step 7.
To begin the installation, download the VPN Client from Cisco, and extract it to
a temporary directory. Run the setup.exe file in the temporary directory to start
installation. Click Next when the installer welcomes you.
20 - 44
CCNP: Implementing Secure Converged Wide-area Networks v5.0 - Lab 3-9
Copyright
© 2007, Cisco Systems, Inc

Figure 6-1: VPN Client Installation Wizard
Click Yes after reading the software license agreement.
21 - 44
CCNP: Implementing Secure Converged Wide-area Networks v5.0 - Lab 3-9
Copyright
© 2007, Cisco Systems, Inc
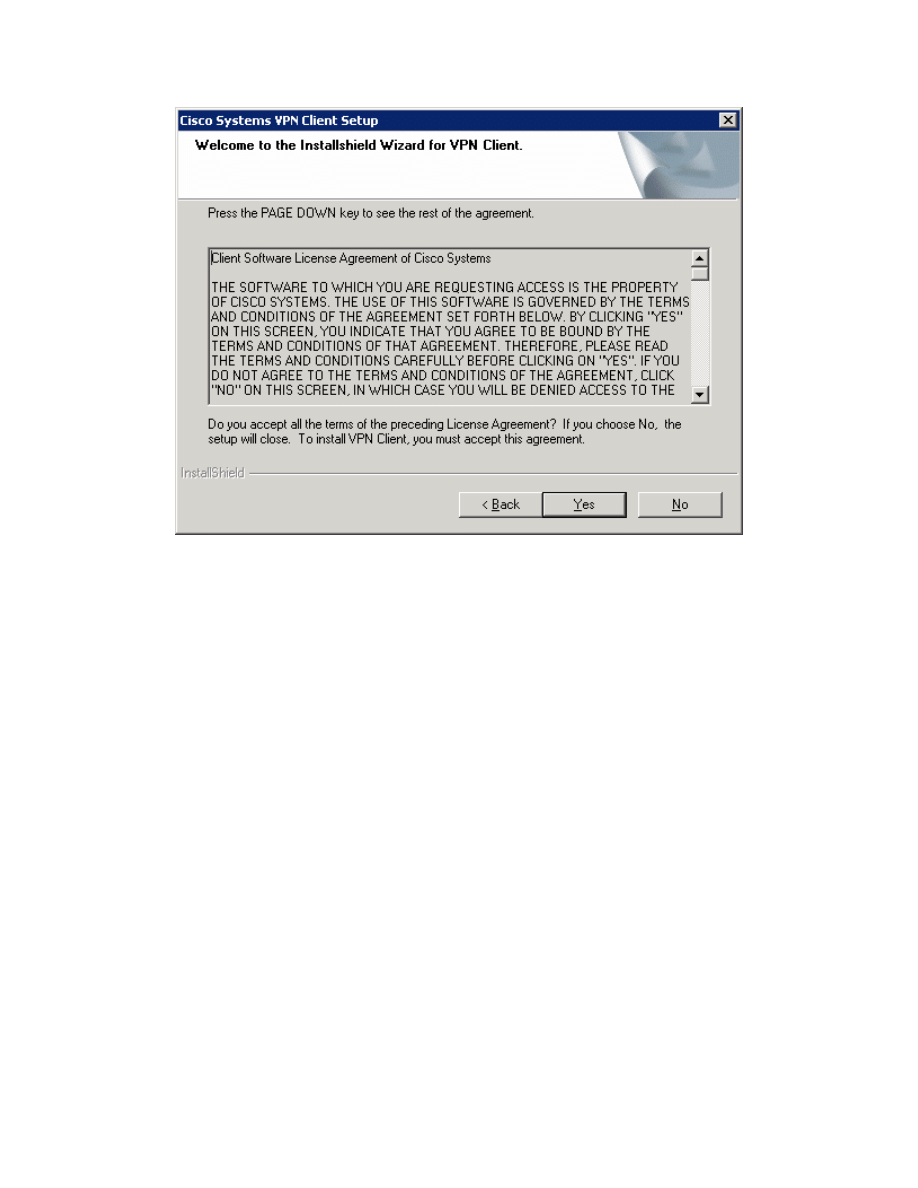
Figure 6-2: Cisco VPN Client License Agreement
Click Next to use the default installation.
22 - 44
CCNP: Implementing Secure Converged Wide-area Networks v5.0 - Lab 3-9
Copyright
© 2007, Cisco Systems, Inc
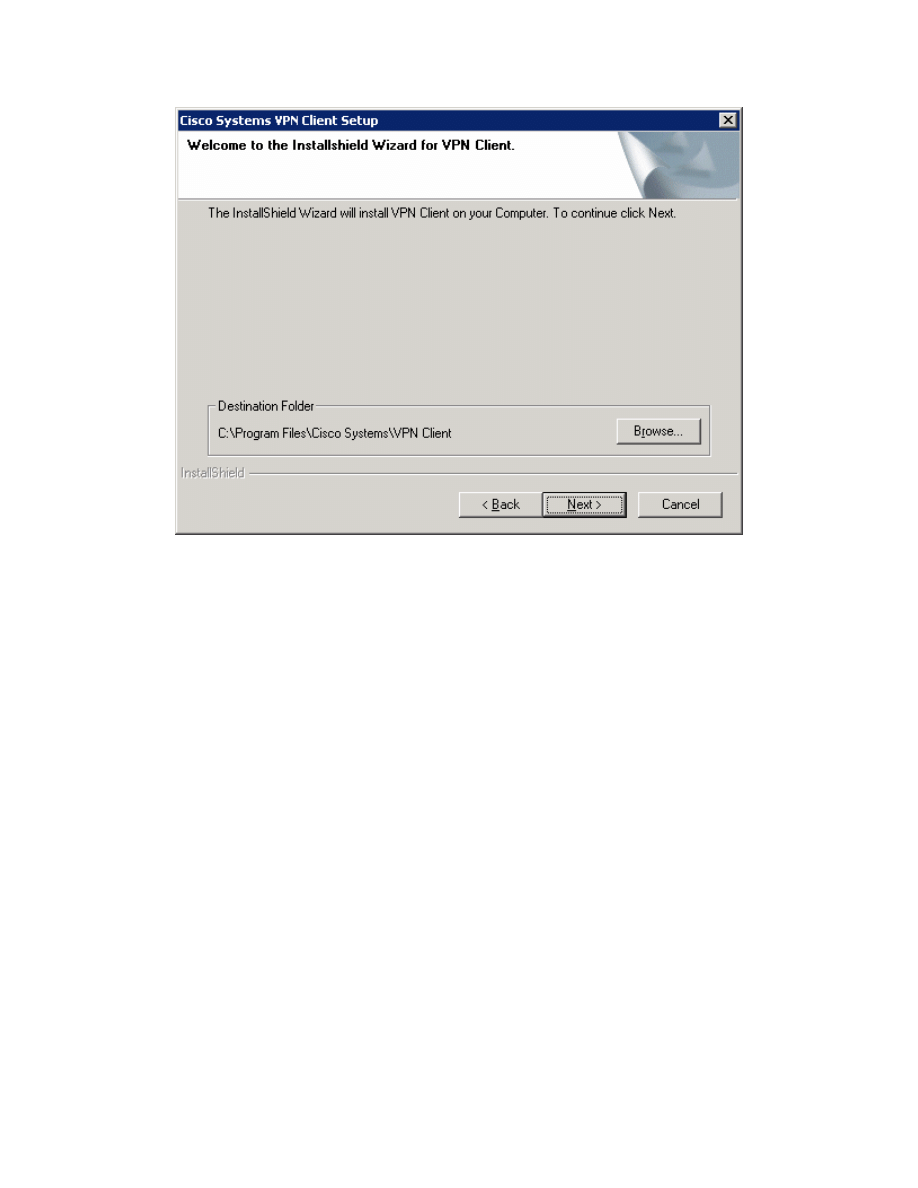
Figure 6-3: VPN Client Installation Location
Choose the default program group and click Next.
23 - 44
CCNP: Implementing Secure Converged Wide-area Networks v5.0 - Lab 3-9
Copyright
© 2007, Cisco Systems, Inc
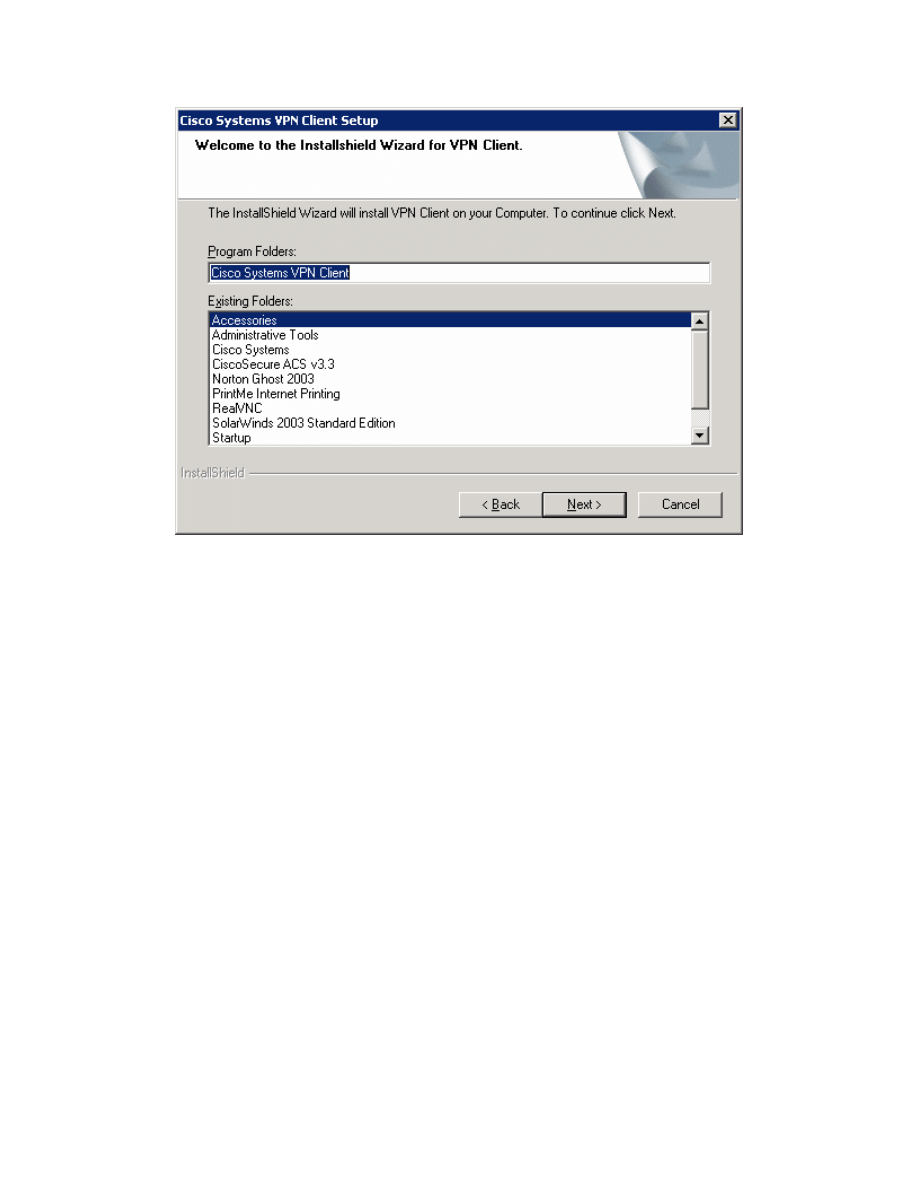
Figure 6-4: Start Menu Program Folder Selection
Allow the wizard to install all necessary files. At the end of the process, the
wizard will add the virtual network interfaces required for VPN use. This may
take some time.
24 - 44
CCNP: Implementing Secure Converged Wide-area Networks v5.0 - Lab 3-9
Copyright
© 2007, Cisco Systems, Inc
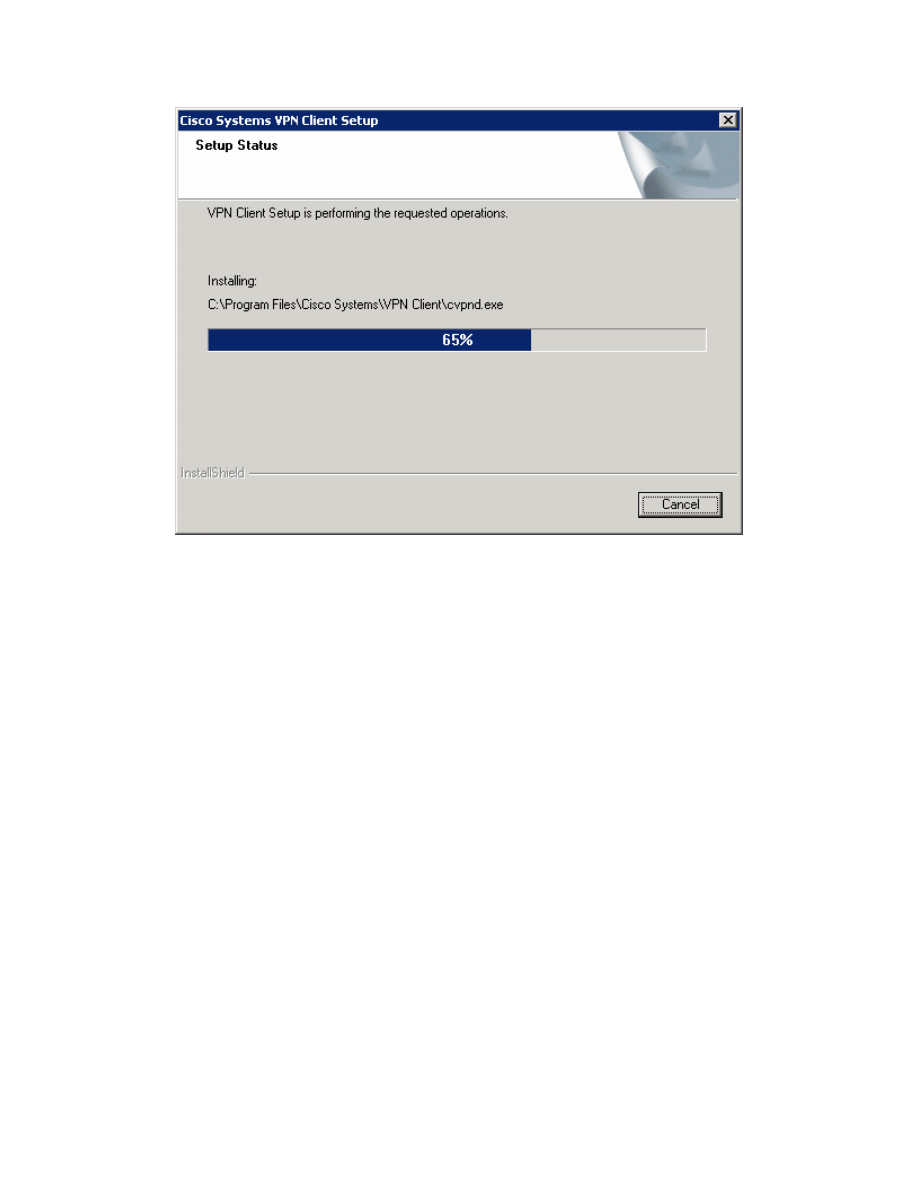
Figure 6-5: VPN Client Installation Progress Indicator
At the end of the installer, you will be required to restart. Click Finish to let your
computer restart.
25 - 44
CCNP: Implementing Secure Converged Wide-area Networks v5.0 - Lab 3-9
Copyright
© 2007, Cisco Systems, Inc

Figure 6-6: Final Installation Wizard Window
Step 7: Test Access from Client without VPN Connection
After restarting the host with the VPN client installed, open up a command
prompt. Click the Start button, choose Run... and type cmd, and then click OK.
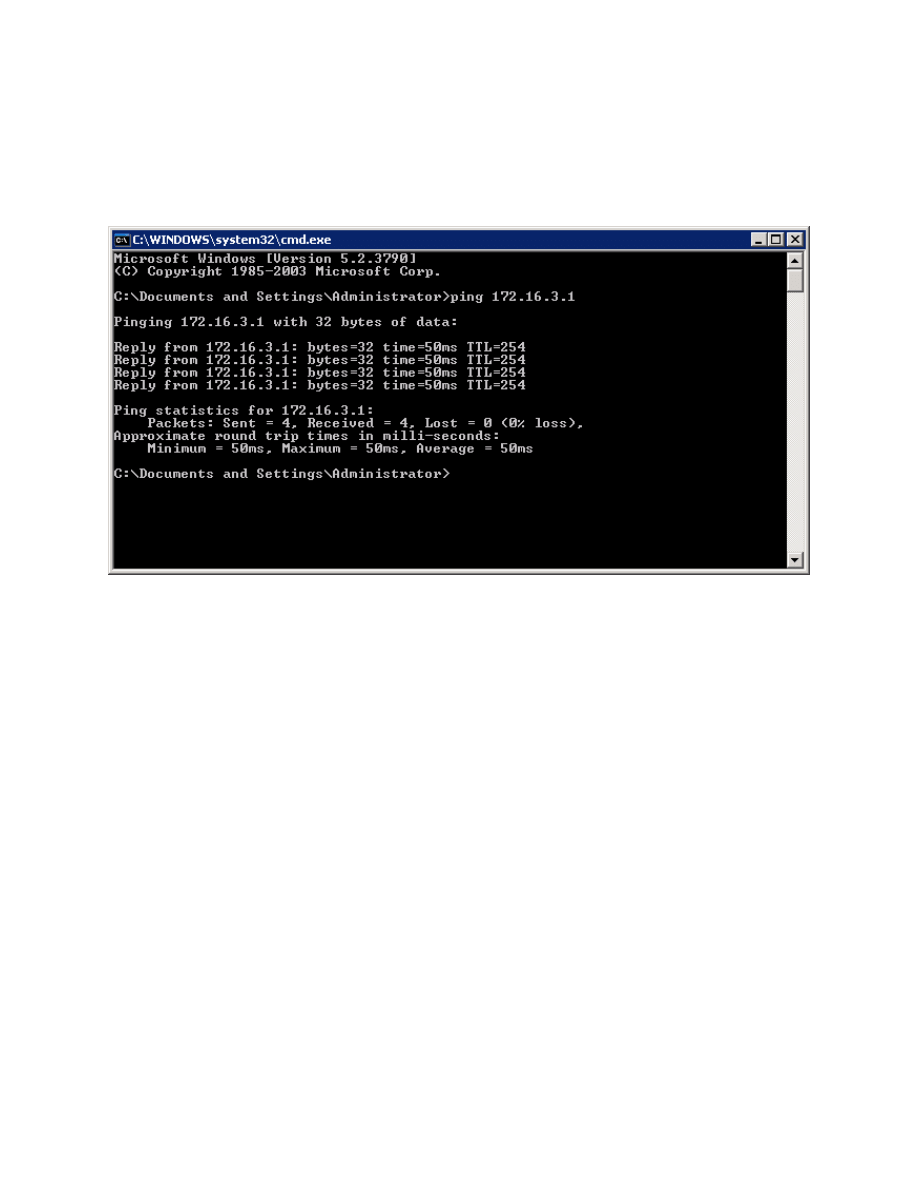
Try pinging HQ2’s loopback address. The pings should fail.
26 - 44
CCNP: Implementing Secure Converged Wide-area Networks v5.0 - Lab 3-9
Copyright
© 2007, Cisco Systems, Inc
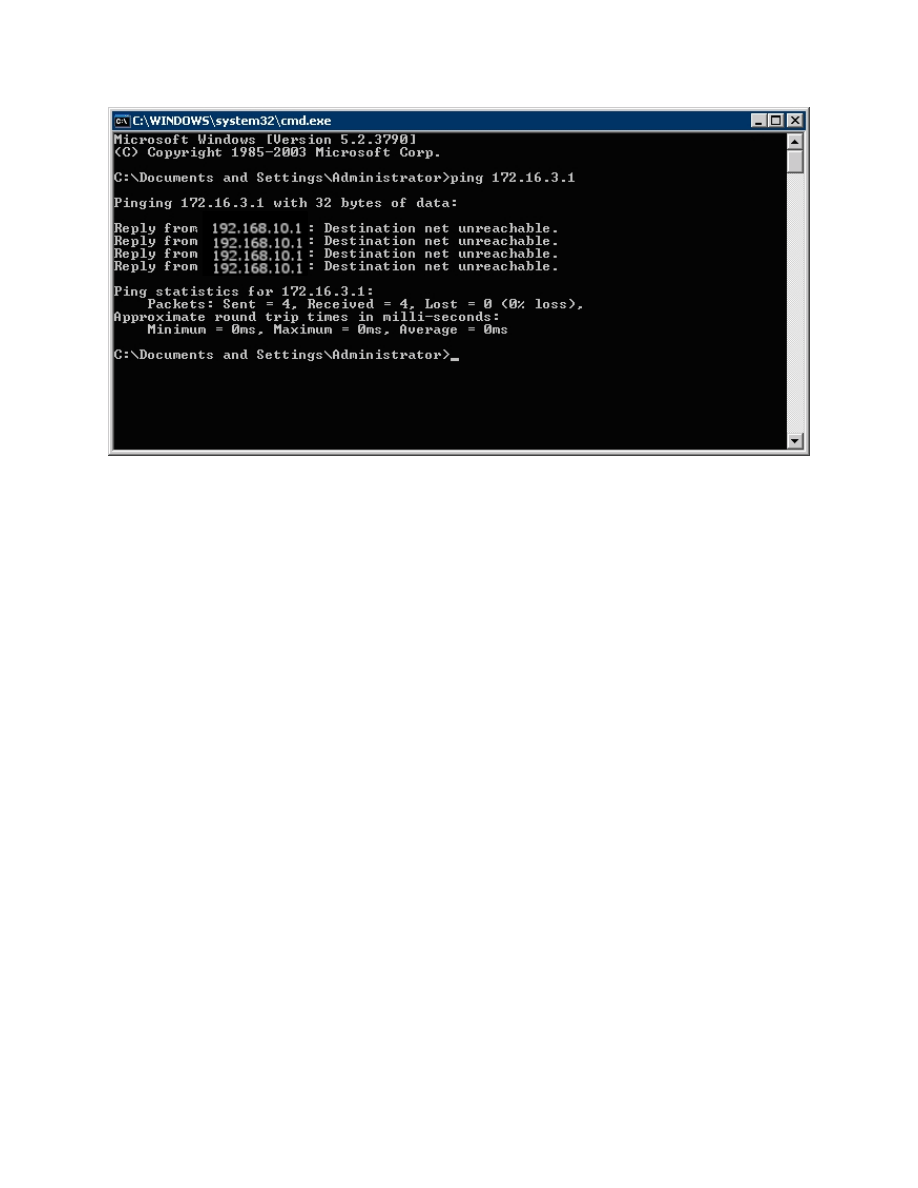
Figure 7-1: Unsuccessful Pings Without VPN
Step 8: Connect to the VPN
Start the Cisco VPN Client by clicking the Start button, and choosing Programs
> Cisco Systems VPN Client > VPN Client.
27 - 44
CCNP: Implementing Secure Converged Wide-area Networks v5.0 - Lab 3-9
Copyright
© 2007, Cisco Systems, Inc
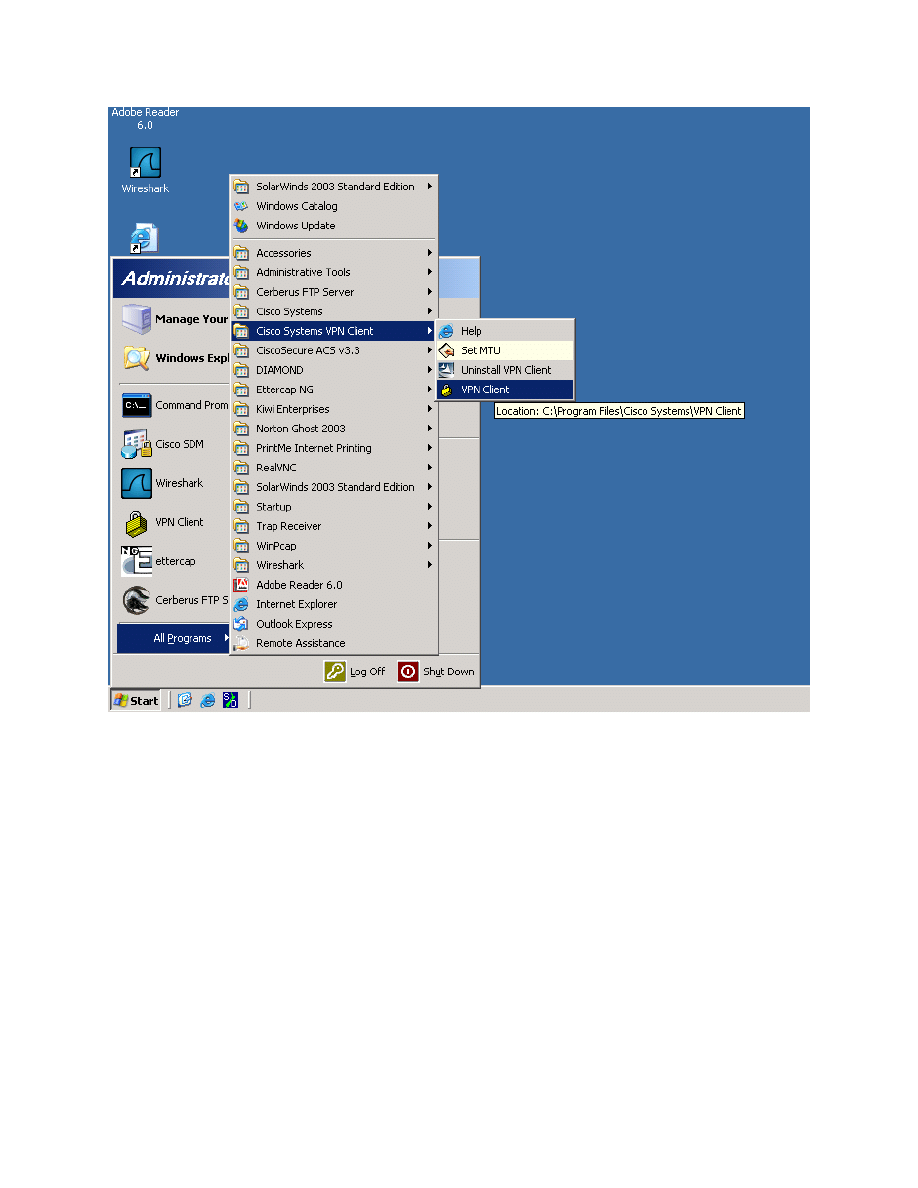
Figure 8-1: Launching the VPN Client
28 - 44
CCNP: Implementing Secure Converged Wide-area Networks v5.0 - Lab 3-9
Copyright
© 2007, Cisco Systems, Inc
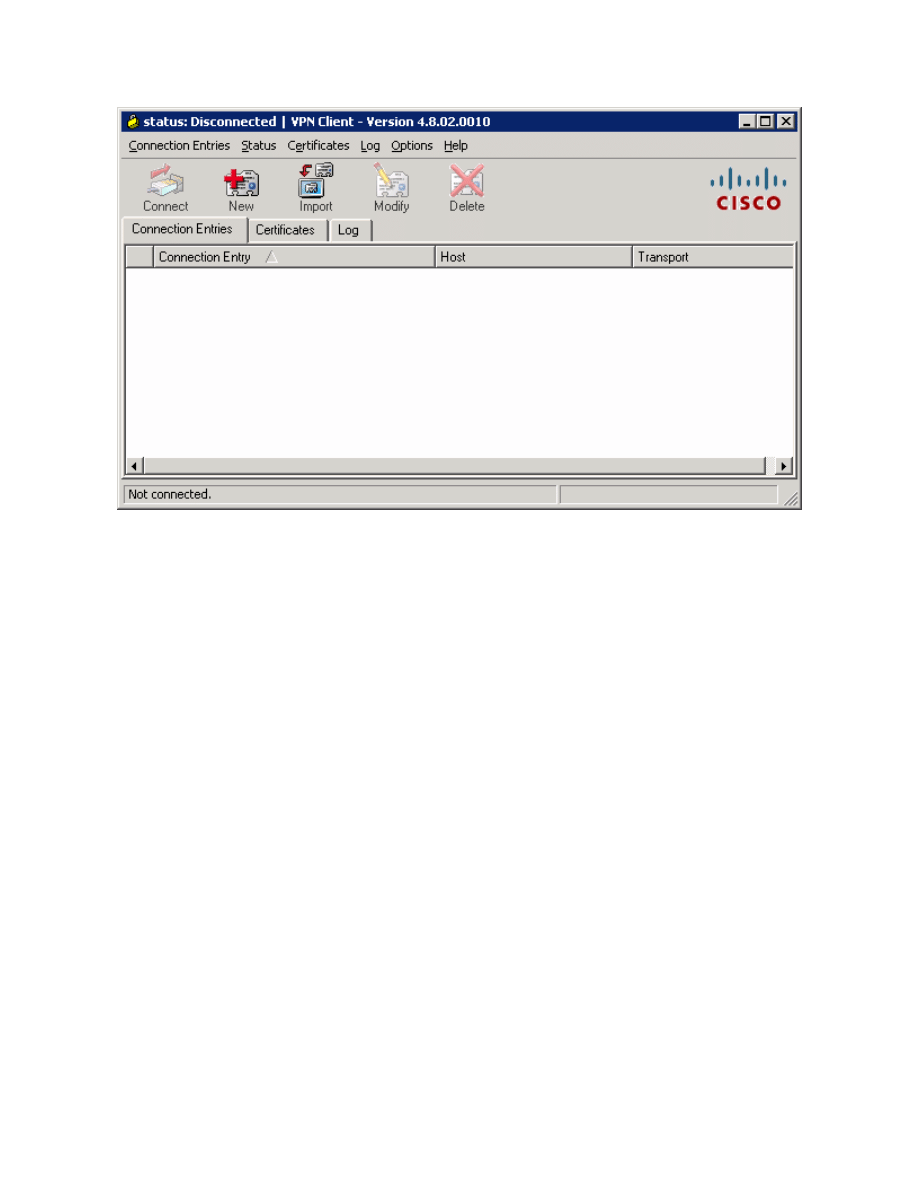
Figure 8-2: VPN Client Application
Once the VPN Client is open, you will need to create a new connection profile
to connect to HQ with. Click the New button. Create the new connection with
any name and description you want. For host, enter the IP of HQ’s Serial0/0/0
interface, 192.168.12.2. The host IP address represents the IP address of the
VPN server or concentrator to which you wish to connect. In this case, HQ is
running the Easy VPN Server and will function as such. Use the group name
and password previously configured in the Easy VPN wizard. Click Save when
you are done configuring.
29 - 44
CCNP: Implementing Secure Converged Wide-area Networks v5.0 - Lab 3-9
Copyright
© 2007, Cisco Systems, Inc
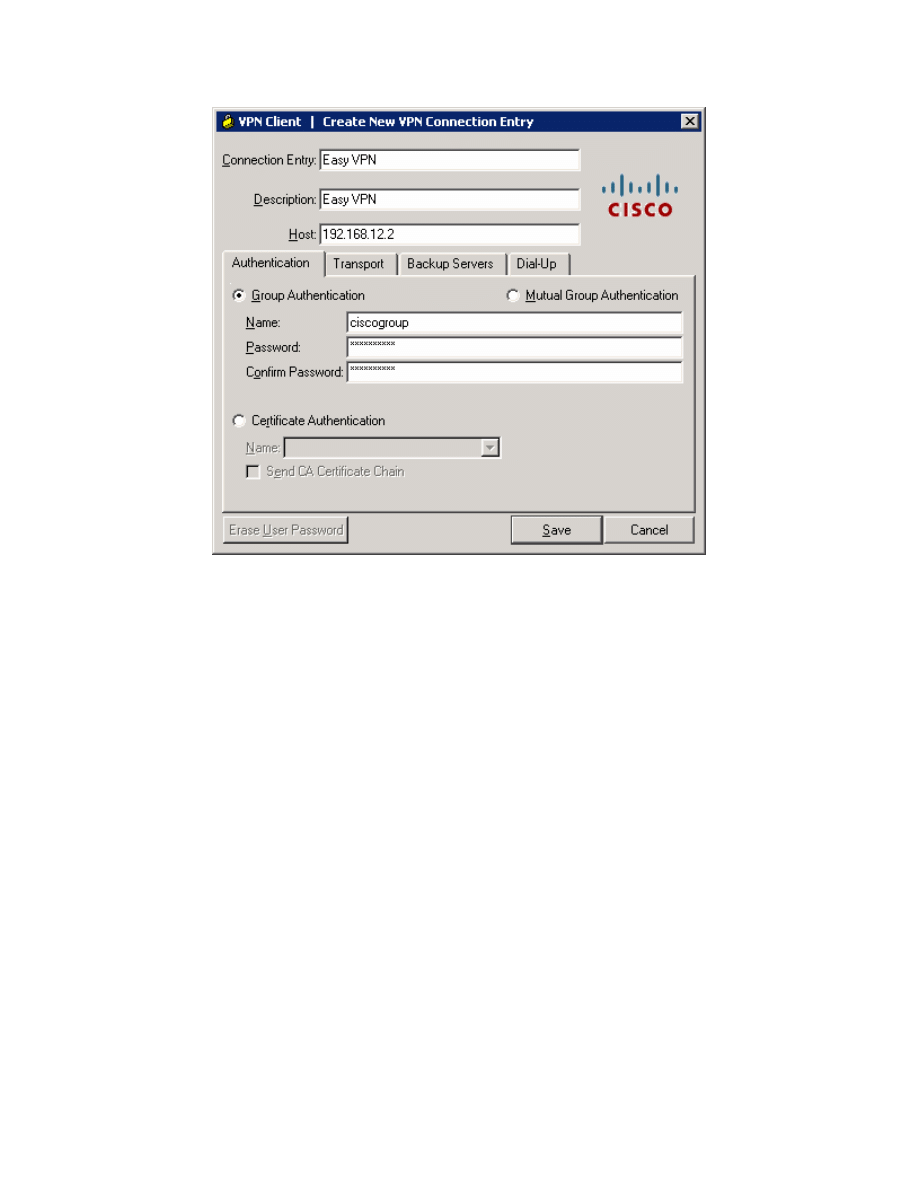
Figure 8-3: Create New VPN Connection Dialog
You should see your new profile appear in the profiles list. Before connecting,
click the Log tab so you can enable logging before attempting to connect.
Logging is not normally required but it is helpful in this lab to watch the VPN
client connect.
30 - 44
CCNP: Implementing Secure Converged Wide-area Networks v5.0 - Lab 3-9
Copyright
© 2007, Cisco Systems, Inc
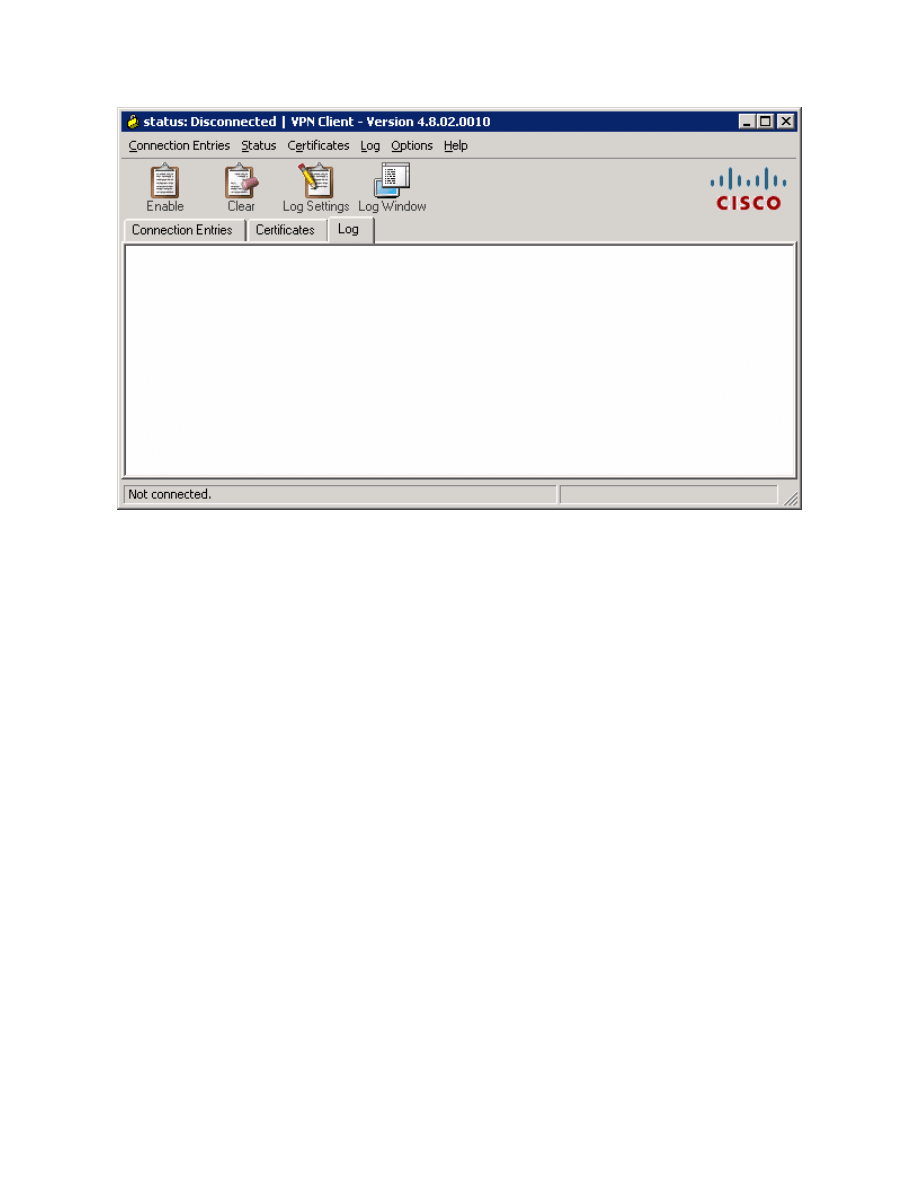
Figure 8-4: VPN Client Log Tab
Click Log Window to open up logging in a separate window.
31 - 44
CCNP: Implementing Secure Converged Wide-area Networks v5.0 - Lab 3-9
Copyright
© 2007, Cisco Systems, Inc
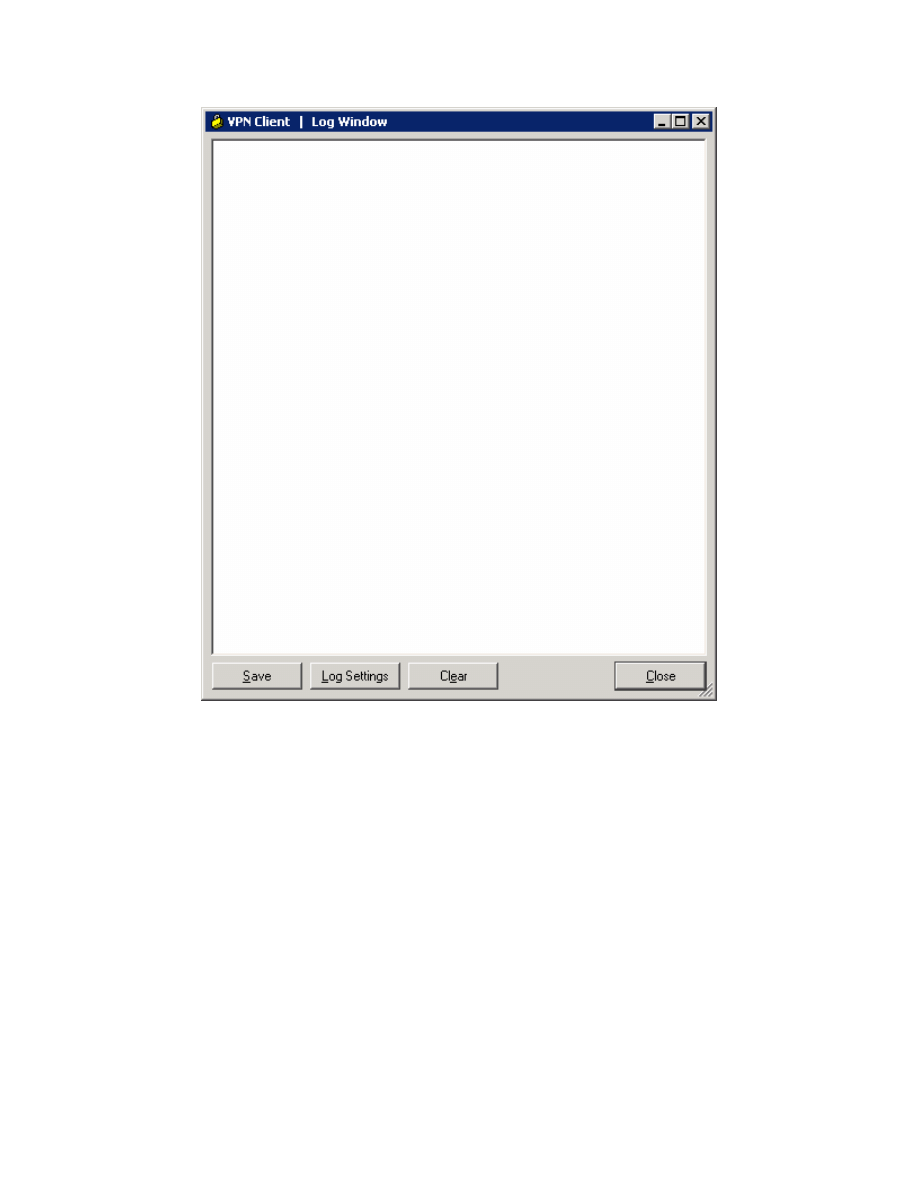
Figure 8-5: Log Window
While you have the log window open, go back to the main VPN client window
and click Log Settings. Change the logging settings for IKE and IPsec to 3 –
High. Click OK to apply these settings.
32 - 44
CCNP: Implementing Secure Converged Wide-area Networks v5.0 - Lab 3-9
Copyright
© 2007, Cisco Systems, Inc
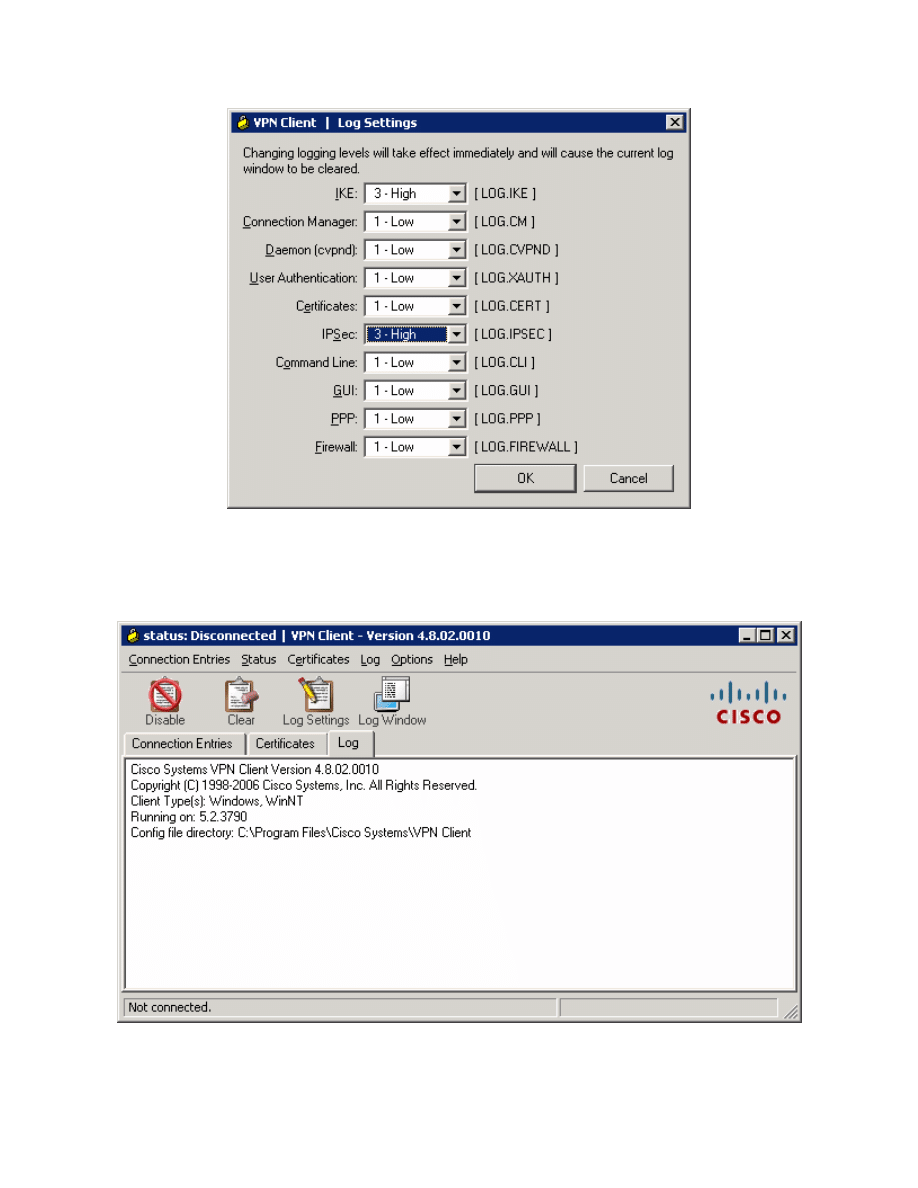
Figure 8-6: Logging Settings
Click Enable to enable logging. The Enable button should change to a Disable
button.
Figure 8-7: Log Tab with Logging Enabled
33 - 44
CCNP: Implementing Secure Converged Wide-area Networks v5.0 - Lab 3-9
Copyright
© 2007, Cisco Systems, Inc

Click the Connection Entries tab, and double-click the entry or click Connect
to connect to this profile.
Figure 8-8: VPN Client Connections Tab
While the VPN client tries to connect to the VPN, it will prompt you for a
username and password. Enter the user credentials you specified earlier during
the VPN client wizard.
Figure 8-9: User Authentication Prompt
When the VPN has successfully connected, you should see a locked padlock
icon in the system tray.
34 - 44
CCNP: Implementing Secure Converged Wide-area Networks v5.0 - Lab 3-9
Copyright
© 2007, Cisco Systems, Inc
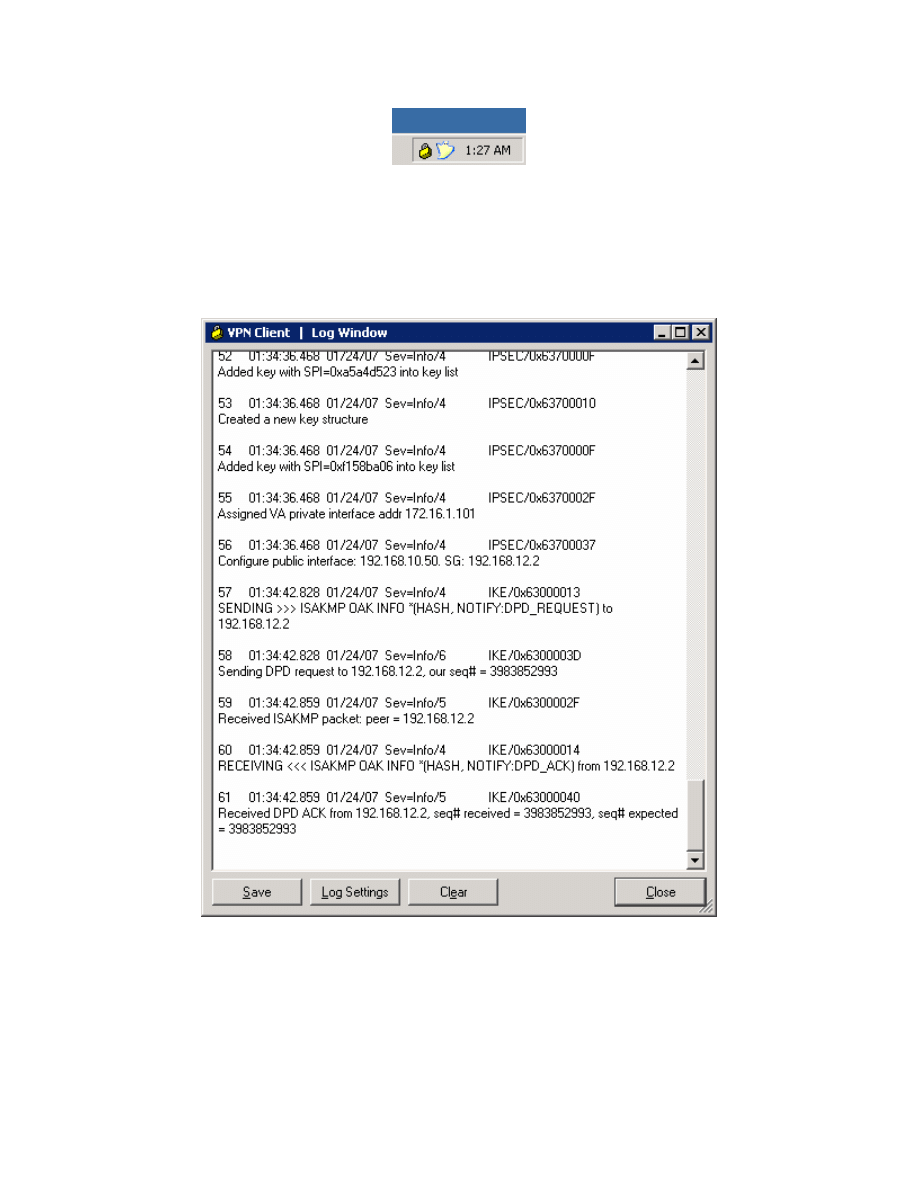
Figure 8-10: VPN Client System Tray Icon, Status: Connected
You can also see that your connection has populated the log window with
information. After reviewing the information here, click Close to close this
window. This logging functionality can be very useful when troubleshooting VPN
client problems.
Figure 8-11: Log Window, Populated with Connection Messages
To view VPN connection statistics, right-click the padlock icon in the system
tray and click Statistics....
35 - 44
CCNP: Implementing Secure Converged Wide-area Networks v5.0 - Lab 3-9
Copyright
© 2007, Cisco Systems, Inc
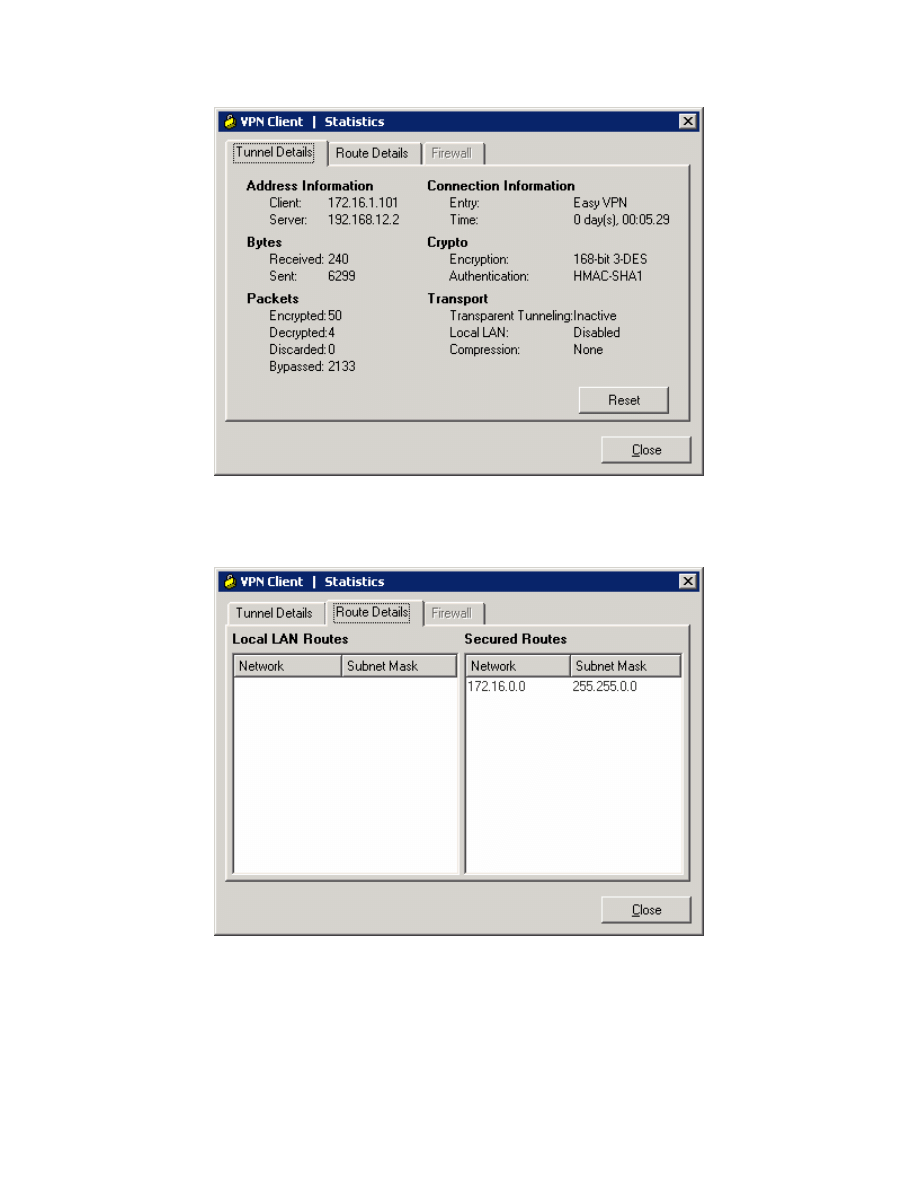
Figure 8-12: VPN Client Statistics
Click the Route Details tab to view routes sent out through split tunneling.
Figure 8-13: Route Details Tab
Close the Statistics window when done.
36 - 44
CCNP: Implementing Secure Converged Wide-area Networks v5.0 - Lab 3-9
Copyright
© 2007, Cisco Systems, Inc
Step 9: Test Network Access with VPN Connectivity
Now that the host has connected to the VPN, open up the command prompt
again (see earlier steps if you don’t remember) and ping HQ2’s loopback. This
time, it should be successful.
Figure 9-1: Successful Pings With VPN
Step 10: Verify Easy VPN Functionality with SDM
While connected through the VPN, open up SDM again on the host and
connect to HQ. This time you can connect to any interface on HQ, not just the
external one, because you are inside the VPN. Note on the home screen the
number of active VPN clients under the VPN section.
37 - 44
CCNP: Implementing Secure Converged Wide-area Networks v5.0 - Lab 3-9
Copyright
© 2007, Cisco Systems, Inc
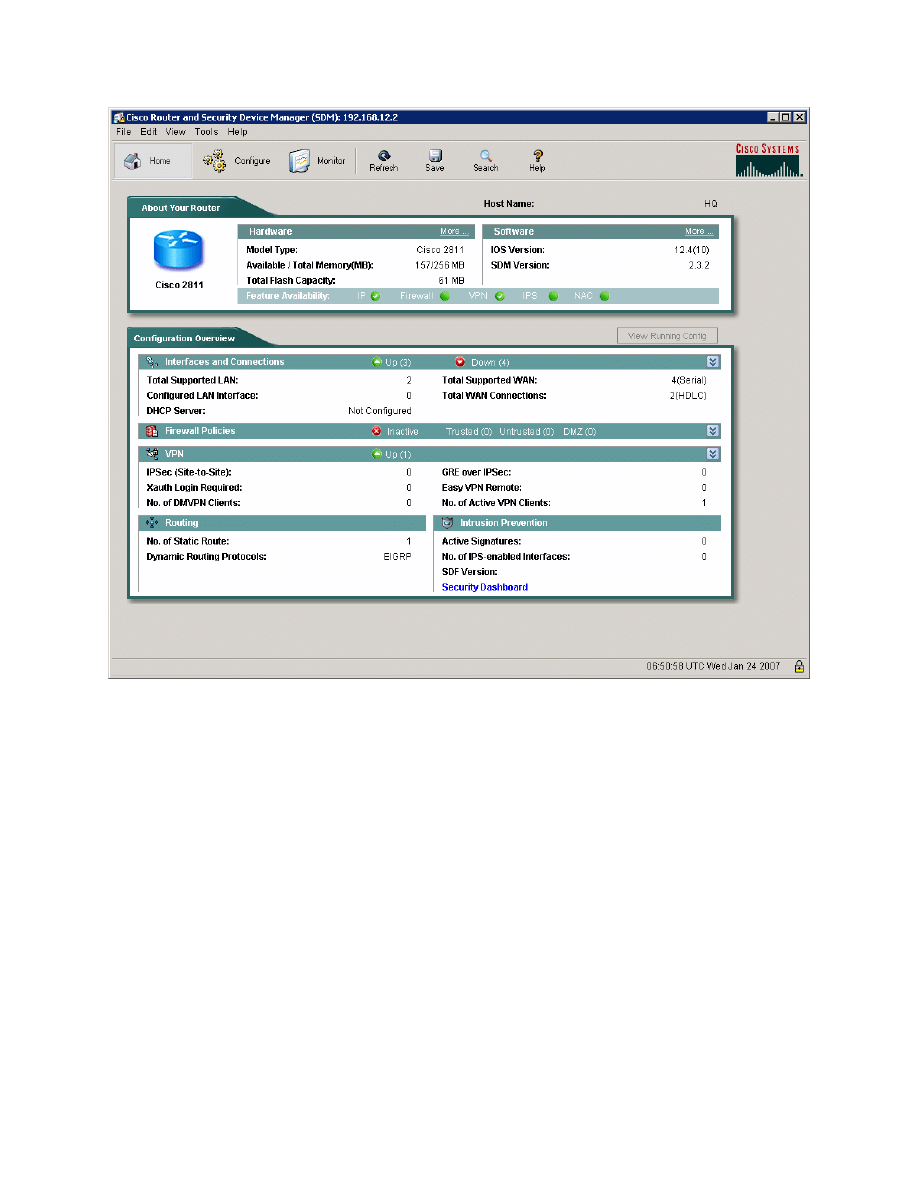
Figure 10-1: SDM Home Screen
Click the Configure icon, and then click VPN on the left side bar. Choose Easy
VPN Server from the VPN types. Click the Edit Easy VPN Server tab, and
then click the Test VPN Server button.
38 - 44
CCNP: Implementing Secure Converged Wide-area Networks v5.0 - Lab 3-9
Copyright
© 2007, Cisco Systems, Inc
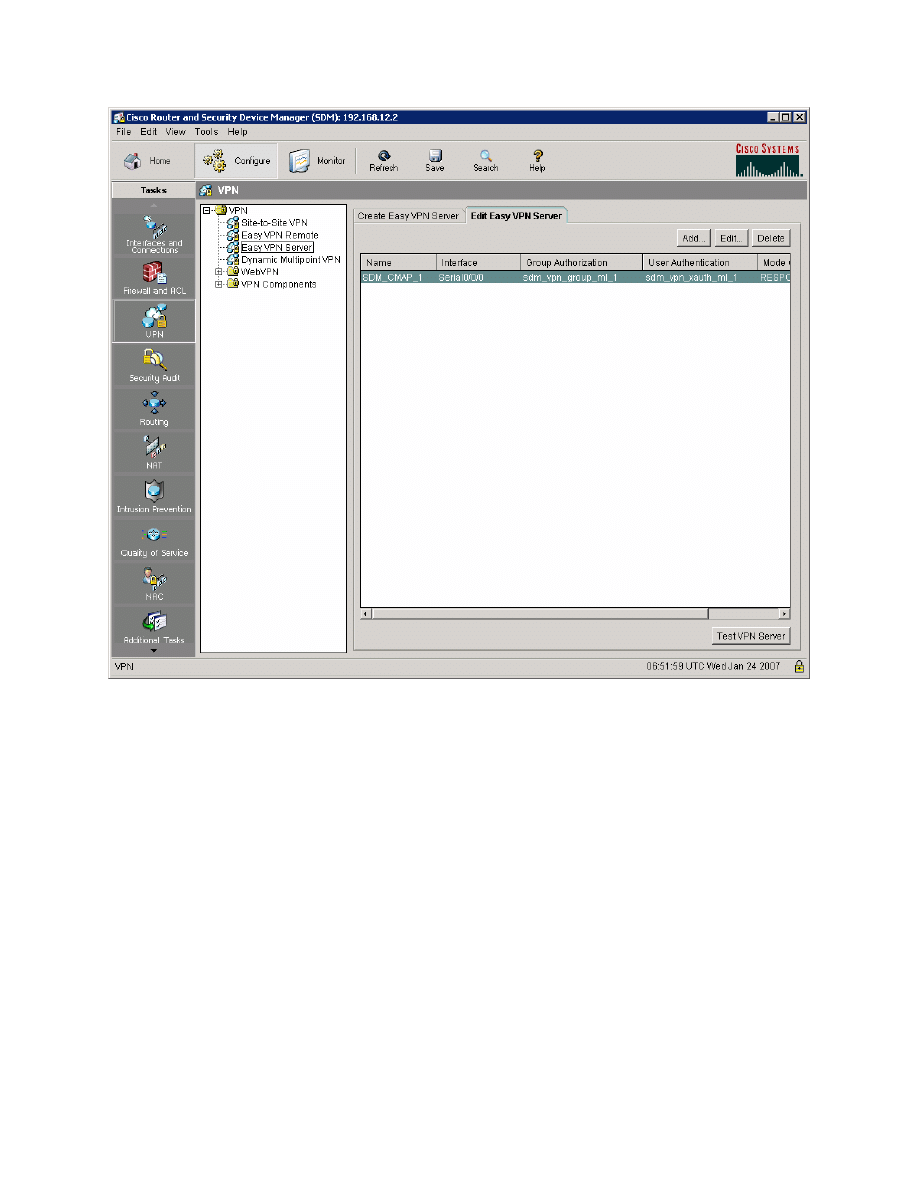
Figure 10-2: Edit Easy VPN Server Tab
Click Start.
39 - 44
CCNP: Implementing Secure Converged Wide-area Networks v5.0 - Lab 3-9
Copyright
© 2007, Cisco Systems, Inc
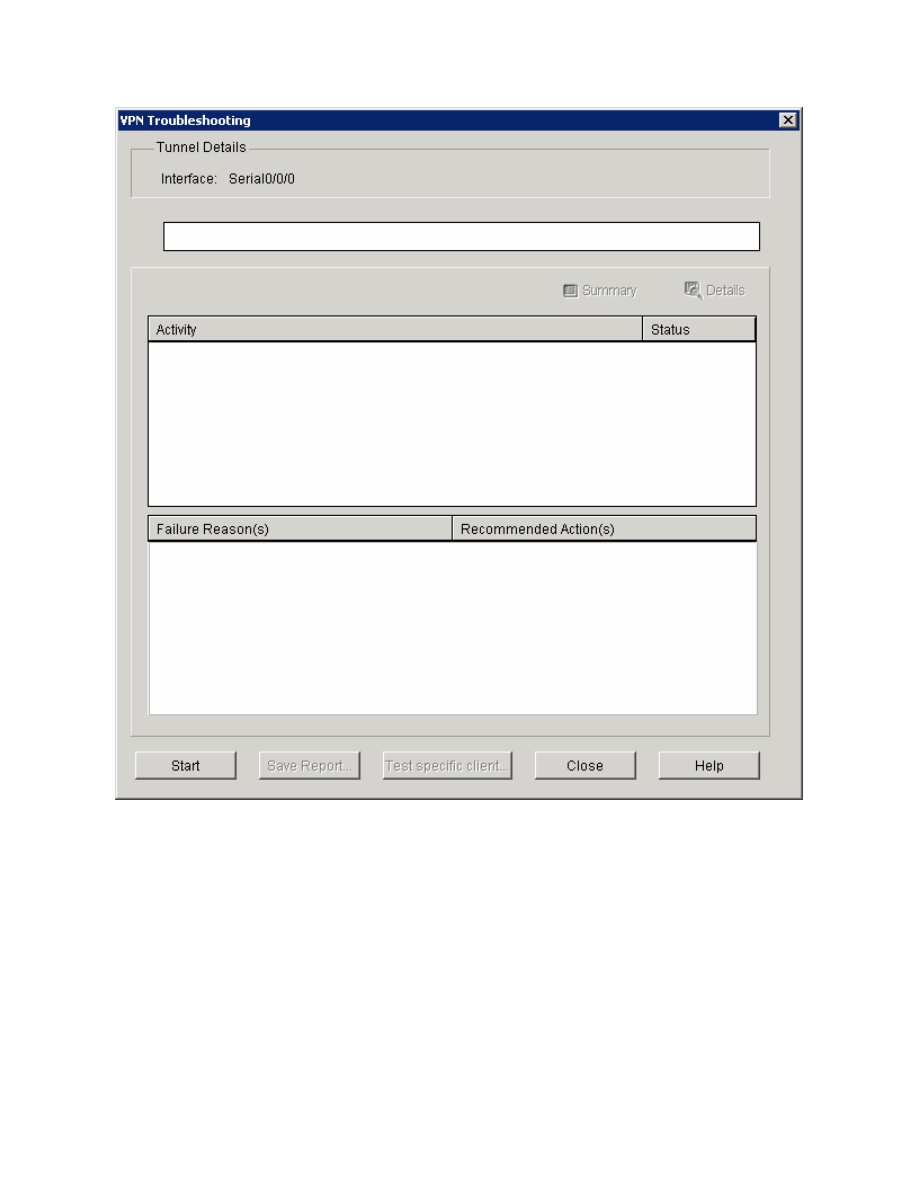
Figure 10-3: VPN Testing Window
The tests should be successful.
40 - 44
CCNP: Implementing Secure Converged Wide-area Networks v5.0 - Lab 3-9
Copyright
© 2007, Cisco Systems, Inc
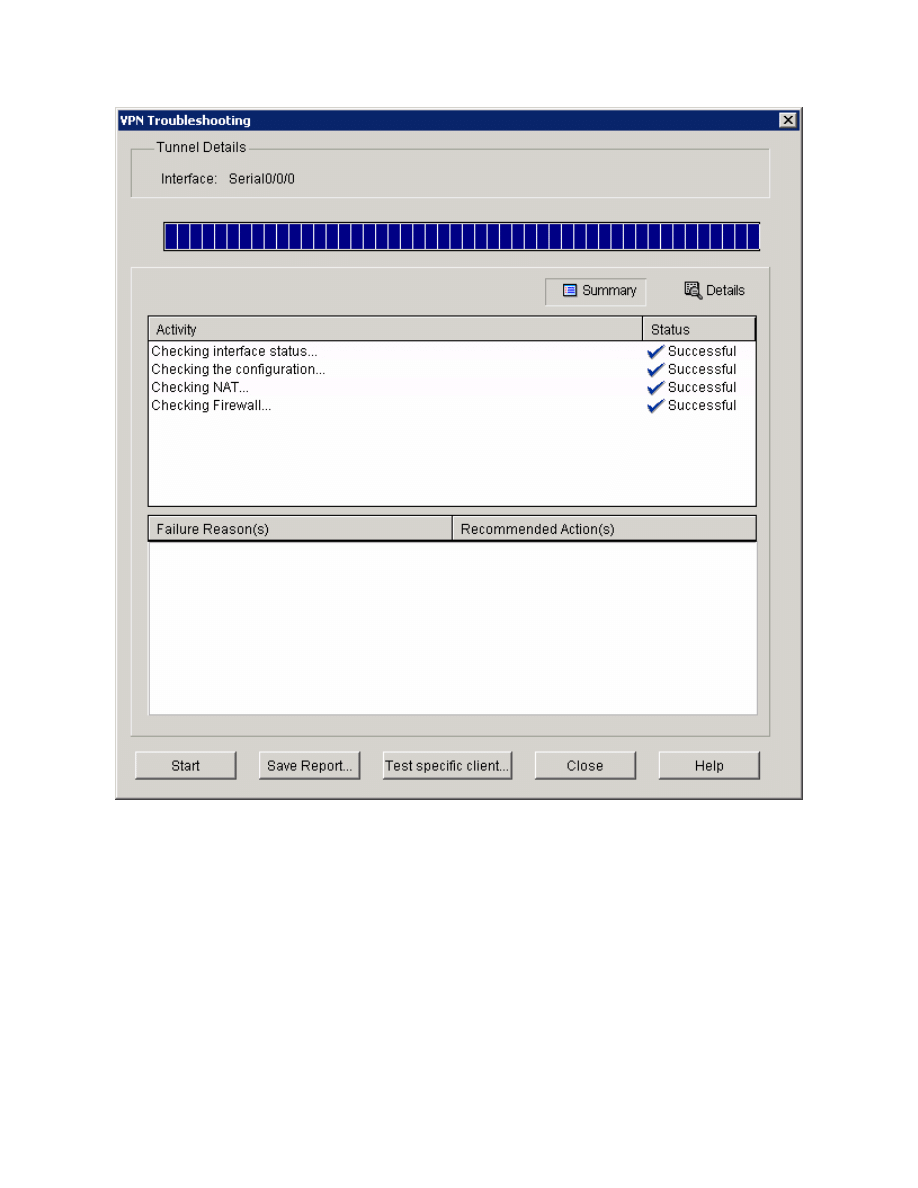
Figure 10-4: VPN Test In Progress
Click OK once the success message appears.
41 - 44
CCNP: Implementing Secure Converged Wide-area Networks v5.0 - Lab 3-9
Copyright
© 2007, Cisco Systems, Inc
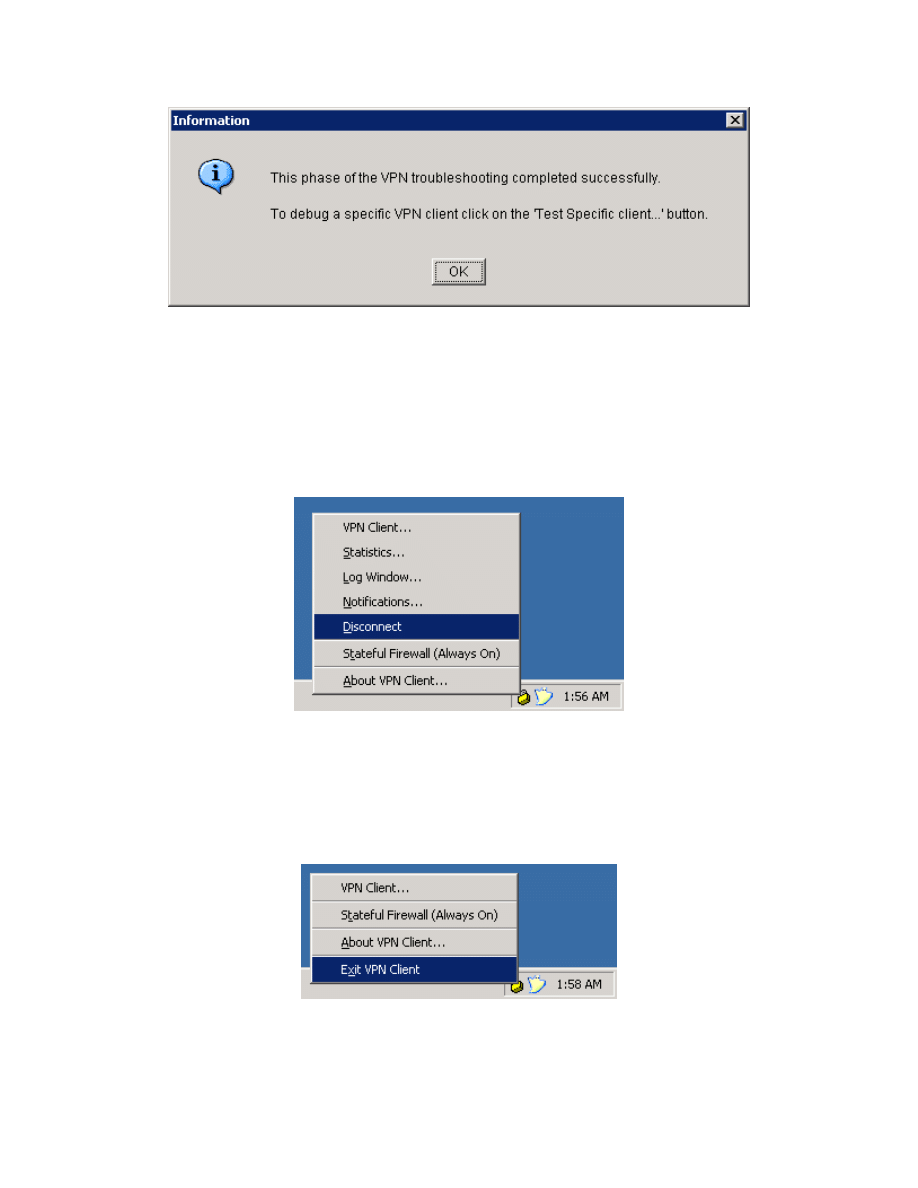
Figure 10-5: Successful VPN Test Status Window
Click Close when you are finished, and then close SDM.
Step 11: Disconnecting the VPN Client
Right-click the padlock icon in the system tray, and click Disconnect. The VPN
client will disconnnect.
Figure 11-1: Disconnecting from the VPN via the System Tray Icon
The padlock should first change to a padlock with an ‘X’ through it, indicating
that it is disconnecting. It will change to an unlocked icon, indicating no VPN
connection. Finally, right-click on the padlock and click Exit to quit the VPN
client.
Figure 11-2: Exiting the VPN Client via the System Tray Icon
42 - 44
CCNP: Implementing Secure Converged Wide-area Networks v5.0 - Lab 3-9
Copyright
© 2007, Cisco Systems, Inc

Final Configurations
ISP# show run
hostname ISP
!
interface FastEthernet0/0
ip address 192.168.10.1 255.255.255.0
no shutdown
!
interface Serial0/0/0
ip address 192.168.12.1 255.255.255.0
clock rate 64000
no shutdown
end
HQ# show run
hostname HQ
!
aaa new-model
!
aaa authentication login default local
aaa authentication login sdm_vpn_xauth_ml_1 local
aaa authorization exec default local
aaa authorization network sdm_vpn_group_ml_1 local
!
aaa session-id common
!
crypto pki trustpoint TP-self-signed-3043721146
enrollment selfsigned
subject-name cn=IOS-Self-Signed-Certificate-3043721146
revocation-check none
rsakeypair TP-self-signed-3043721146
!
crypto pki certificate chain TP-self-signed-3043721146
certificate self-signed 01
3082023A 308201A3 A0030201 02020101 300D0609 2A864886 F70D0101 04050030
31312F30 2D060355 04031326 494F532D 53656C66 2D536967 6E65642D 43657274
69666963 6174652D 33303433 37323131 3436301E 170D3037 30313234 30343437
32365A17 0D323030 31303130 30303030 305A3031 312F302D 06035504 03132649
4F532D53 656C662D 5369676E 65642D43 65727469 66696361 74652D33 30343337
32313134 3630819F 300D0609 2A864886 F70D0101 01050003 818D0030 81890281
8100ADBE 1C08ACA4 0AF3D3FF 11F49933 1AC172FE 3D3D40A6 3AB342FF B952D3E2
0F203935 83E9C1C0 E0B14B0B C44EF57E A9D7252E F8052060 8D194C9F 84BA3BE4
F004217A 09B4A9E7 EFBD0D8C BA420B55 6055B135 ED9A33E5 D4294415 BC453756
AB458059 4E6E23A4 159A87C1 E92F8AB3 E4C7BA5F 434C1BE0 9BF59A78 08961B55
F0DD0203 010001A3 62306030 0F060355 1D130101 FF040530 030101FF 300D0603
551D1104 06300482 02485130 1F060355 1D230418 30168014 5BCB0C4C C995CEA2
F7E9667E DC80525B BB481946 301D0603 551D0E04 1604145B CB0C4CC9 95CEA2F7
E9667EDC 80525BBB 48194630 0D06092A 864886F7 0D010104 05000381 81008FFA
728302E8 CA86686E 5394BA3A C8260F99 75CA12D4 3B86EAF2 EE3F9AB5 E5D18FEA
FC495B41 C716BEF5 82A0F21C 7D085C01 EEFE4302 BA666344 D0D51346 9BDB4AD0
94B91A93 FEB44001 E50D3BFF 9479456F D2658D25 8BE61405 2AA5229A 3AFF2096
ECDD7C61 3EB564C8 9608CA67 2A3CC3D6 B7A5B918 863E901E E2ABBD0D 279A
quit
username ciscosdm privilege 15 password 0 ciscosdm
username ciscouser password 0 ciscouser
!
crypto isakmp policy 1
encr 3des
authentication pre-share
group 2
!
crypto isakmp client configuration group ciscogroup
43 - 44
CCNP: Implementing Secure Converged Wide-area Networks v5.0 - Lab 3-9
Copyright
© 2007, Cisco Systems, Inc

key ciscogroup
pool SDM_POOL_1
acl 100
netmask 255.255.255.0
!
crypto ipsec transform-set ESP-3DES-SHA esp-3des esp-sha-hmac
!
crypto dynamic-map SDM_DYNMAP_1 1
set security-association idle-time 28800
set transform-set ESP-3DES-SHA
reverse-route
!
crypto map SDM_CMAP_1 client authentication list sdm_vpn_xauth_ml_1
crypto map SDM_CMAP_1 isakmp authorization list sdm_vpn_group_ml_1
crypto map SDM_CMAP_1 client configuration address respond
crypto map SDM_CMAP_1 65535 ipsec-isakmp dynamic SDM_DYNMAP_1
!
interface Loopback0
ip address 172.16.2.1 255.255.255.0
!
interface Serial0/0/0
ip address 192.168.12.2 255.255.255.0
crypto map SDM_CMAP_1
no shutdown
!
interface Serial0/0/1
ip address 172.16.23.2 255.255.255.0
clock rate 64000
no shutdown
!
router eigrp 1
redistribute static
network 172.16.0.0
no auto-summary
!
ip local pool SDM_POOL_1 172.16.1.100 172.16.1.200
ip route 0.0.0.0 0.0.0.0 192.168.12.1
!
ip http server
ip http authentication local
ip http secure-server
!
access-list 100 remark SDM_ACL Category=4
access-list 100 permit ip 172.16.0.0 0.0.255.255 any
!
line vty 0 4
transport input telnet ssh
end
HQ2# show run
hostname HQ2
!
interface Loopback0
ip address 172.16.3.1 255.255.255.0
!
interface Serial0/0/1
ip address 172.16.23.3 255.255.255.0
no shutdown
!
router eigrp 1
network 172.16.0.0
no auto-summary
end
44 - 44
CCNP: Implementing Secure Converged Wide-area Networks v5.0 - Lab 3-9
Copyright
© 2007, Cisco Systems, Inc
Wyszukiwarka
Podobne podstrony:
CCNP2 lab 4 1 en
CCNP2 lab 3 5 en
CCNP2 lab 5 5 en
CCNP2 lab 5 4 en
CCNP2 lab 3 6 en
CCNP2 lab 5 7 en
CCNP2 lab 3 4 en
CCNP2 lab 4 2 en
CCNP2 lab 5 8 en
CCNP2 lab 3 2 en
CCNP2 lab 5 1 en
CCNP2 lab 6 1 en
CCNP2 lab 6 3 en
CCNP2 lab 6 4 en
CCNP2 lab 5 2 en
CCNP2 lab 3 8 en
CCNP2 lab 6 2 en
CCNP2 lab 3 7 en
CCNP2 lab 5 3 en
więcej podobnych podstron