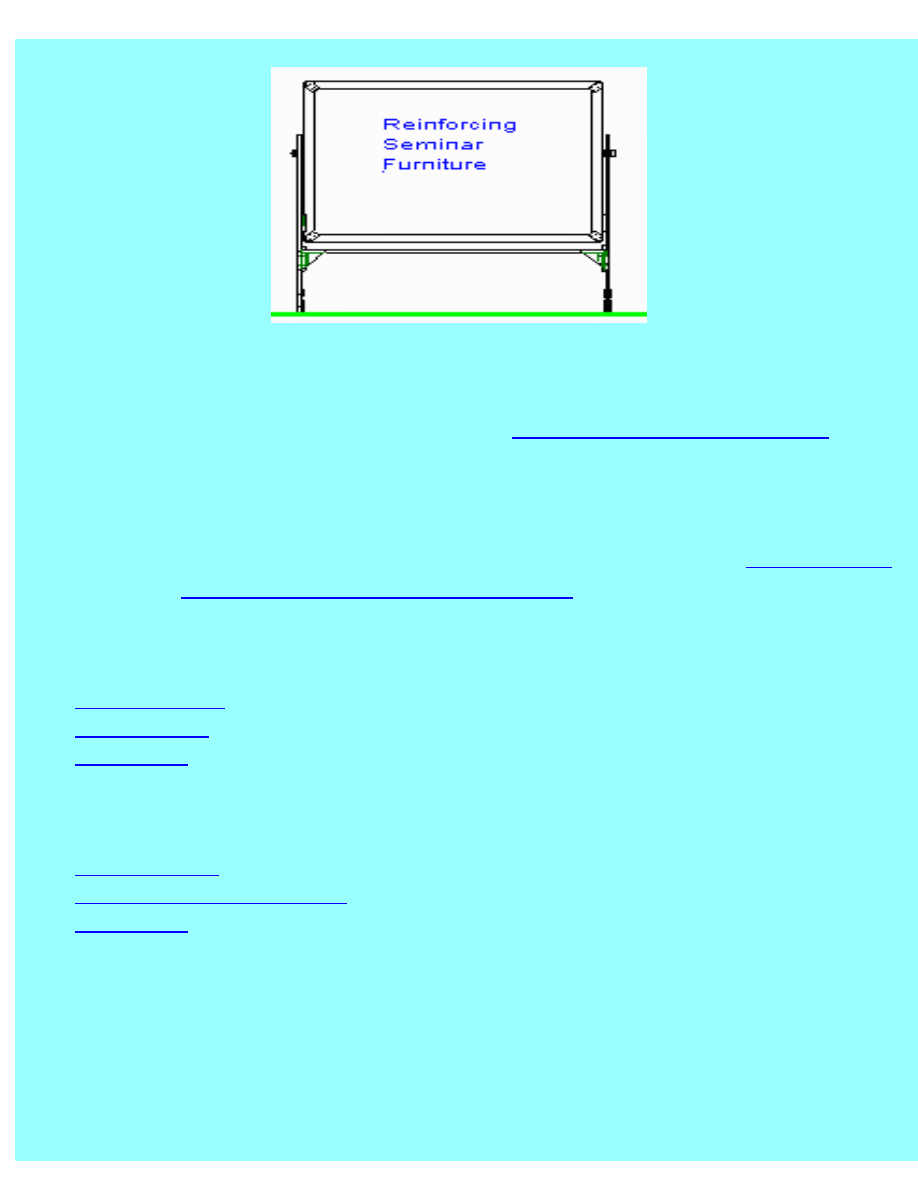
Woodware Designs -- Reinforcing Seminar Furniture
Reinforcing Seminar Furniture
We at Woodware Designs often help produce seminars for
Landmark Education Corporation
.
Landmark has a nice set of portable furniture for use in these seminars, but this furniture has to be
continually hauled between hotel meeting rooms. All this moving about is hard on it. This note is on
ways to reinforce portable furniture to make it much stronger and easier to transport.
If you would like to know more about our positive experiences with Landmark, please
.
Also check our our
Baltimore Landmark Community Calender
for upcoming events.
The pieces of furniture discussed below are:
1.
2.
3.
(Beyond Woodworking)
4.
5.
Batteries for the wireless mike
6.
http://www.charm.net/~jriley/seminar.html (1 of 15)12/03/2005 19:40:34
Woodware Designs -- Reinforcing Seminar Furniture
1.
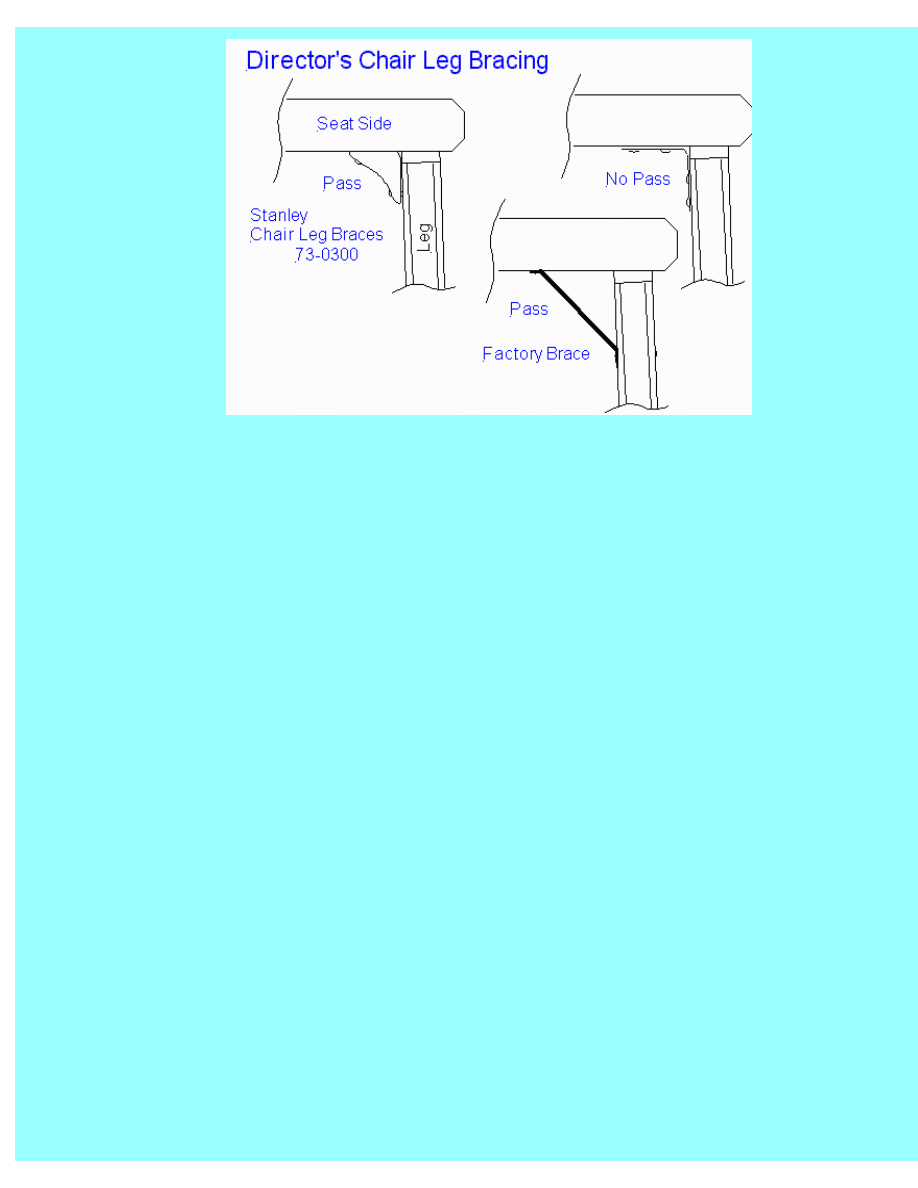
Directors Chairs
Tall directors chairs need diagonal bracing for their legs. Without bracing the legs can loosen and
break. Adding a few wood screws can also strengthen the arms and back. If the footrest or feet
are broken these are also easily repaired.
1.
Technical Information
A specific type of hardware is available for this task: Stanley 1-inch Chair Leg Braces (see
the sketch above). These are available at hardware stores for about $2.20 for a set of four.
No other type of hardware works as well, so accept no substitutes.
Some chairs already have diagonal braces as in the middle figure above, and require no
additional hardware. The small gap caused by the angle of the chair leg does not affect the
strength of the brace.
The materials required are:
1. Chair braces
2. 1 inch #6 flat head wood screws -- up to 12 per chair
3. Wood glue
4. Wood dowels -- as required
5. Replacement Feet -- as required
6. Sand paper
http://www.charm.net/~jriley/seminar.html (2 of 15)12/03/2005 19:40:34

Woodware Designs -- Reinforcing Seminar Furniture
The braces and feet can come from the local hardware store.
The tools required are:
1. awl
2. electric drill
3. drill bit for pilot hole for #8 screw
4. Screwmate Drill bit for #6 1-inch
5. Phillips screwdriver
The drill is for guide holes for the #8 screws that mount the braces. Gloves also help.
2.
Recommended Action:
First take an inventory to see how many braces and other parts, such as feet or
replacement backs and seats, are needed. Also check the pegs that support one end of the
foot rest, as these often need attention. If the joints are loose, you will need wood screws
to strengthen them. Make a list of the needed materials.
1.
Loose Joints
If a leg joint is loose, pull it apart, clean the peg with sand paper, and apply wood
glue. Push the peg hard back into the hole. Drill a screwmate hole from the inside
of the leg frame into the peg.
2.
Chair Braces
Turn the chair upside down and remove the seat and back. Hold the chair brace in
place, centered on the leg, and hard against it. Mark the screw hole centers with the
awl. Drill the guide holes. Install the screws. The installation of the braces takes
about 15 minutes per chair.
3.
Feet
Check to see if feet are missing. Some factory feet went into a 3/8 hole in the leg.
These holes must be filled with dowel before replacement feet can be installed.
4.
Foot Rest
If the peg that supports the footrest is damaged, replace it with as heavy a piece of
dowel as you can fit ( 1/2 inch or larger) and reinforce this with a screw. These
http://www.charm.net/~jriley/seminar.html (3 of 15)12/03/2005 19:40:34
Woodware Designs -- Reinforcing Seminar Furniture
dowels should be maple (very light in color) and not the weaker tropical hardwood
(more tan in color).
5.
Seat and Back
Washing the cloth seat and backs in warm water helps restore their appearance and
ironing makes them look even nicer.
Now vacuum up any wood dust and the repair work is complete. The chairs can be used
immediately. If there are a lot of chairs to repair, the people who assist tackle the task by
setting up a work party.
3.
Folding Tables
People inevitably will sit on the folding tables. Their tops are made from a material that
does not hold its screws very well. Fortunately these tables can be strengthened easily and
simply by gluing the metal frame to the top with general purpose construction adhesive.
1.
Technical Information
The table tops are made from Medium Density Particle board, which is
inexpensive, reasonably strong, and stable but does not provide a good grip on
screw threads. Sheet metal screws are used to attach the metal frames to the tops,
and the metal frames provide much of the table's strength. Over time, the screws
can strip out of the top. This lets gaps form between the tops and frames, thus
greatly weakening the table.
This problem is easily addressed by gluing the frames to the tops with general
http://www.charm.net/~jriley/seminar.html (4 of 15)12/03/2005 19:40:34

Woodware Designs -- Reinforcing Seminar Furniture
purpose construction adhesive. This material comes in tubes for a hand caulk gun
and costs about $2.00 a tube. It is normally used for jobs like mounting slats on
cinder block walls. It is available at any home fix-up store, one tube will reinforce
about three tables.
If the metal frames have an unwelded joint, these can also be reinforced with a
small mending plate and two bolts.
The materials required are:
1. General Purpose Construction Adhesive -- 1/3 10 oz. tube per table
2. #8 -- 5/8 inch pan head screws -- as required
3. toothpicks
4. Wood glue
5. 2 in. Minding Plate -- As required
6. #10 x 1/2 in. Round Head Bolt with nut -- 2 per plate
7. Soft Scrub Cleanser
8. 1 inch plastic feet -- as required
The tools required are:
1. Hand caulk gun
2. Standard screwdriver
3. Phillips screwdriver
4. Gloves
5. Power Drill
6. Small Bits
7. Pencils
8. Marker
9. Cleaning sponge
10. Plastic bucket
The following tools are most helpful
11. Long Phillips driver bit for drill
12. Whisk Broom
13. Paper towels
14. Plastic cup
2.
Recommended Action
Inspect your tables, count them, and determine if any are missing screws or feet.
Purchase one tube of adhesive for three tables and some extra screws. You may
also need some wood glue and toothpicks for stripped holes. Inspect the joints in
http://www.charm.net/~jriley/seminar.html (5 of 15)12/03/2005 19:40:34

Woodware Designs -- Reinforcing Seminar Furniture
the metal frame and buy a mending plate and two bolts for each unwelded joint.
Look at the legs and count missing plastic feet.
Allow 30 minutes per table for each two person team.
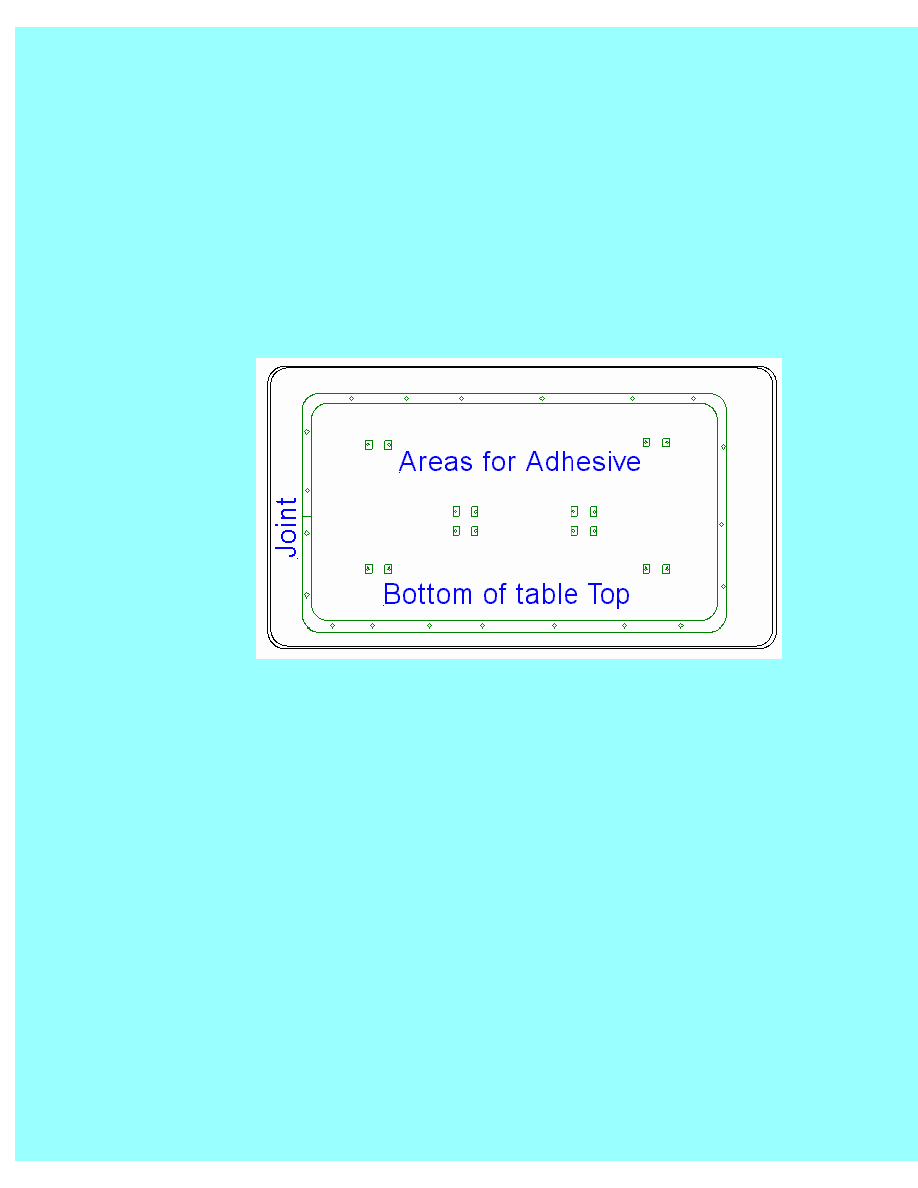
Place one table in the middle of a room and turn another up-side-down on top of it.
Take a pencil and draw lines around all the metal frame parts (see sketch above).
Make a small mark beside each screw. Inspect the screws to see if any are missing
or stripped out of the top. Also look for screw holes in the metal that have never
had screws in them and drill a pilot hole.
Remove all the screws from the metal frame and legs and place them in a plastic
cup. Brush away any sawdust. Stick wood glue and tooth picks into any stripped
screw holes. Lay down a 1/4 inch bead of adhesive between the pencil lines. Place
the metal frame back in place and reinstall the screws. Do not over-tighten the
screws. You will know you used the right amount of adhesive if a small amount
comes out from under the metal frame most of the way around. Be very careful in
placing the frame so that you do not get adhesive on the sides.
If the metal frame joint is not welded at the joint, center a 2 inch mending plate
over the joint and drill two screw holes. The plate should be inside the frame and
away from the the table top. Tighten the nuts well and place a small amount of
adhesive on the nuts to stake them. The bolts look best if you spray paint them dark
brown before installation.
You can repeat these steps with the brackets that hold on the legs. Be careful to put
the adhesive only on the area around the screws. You do not want very much of it
to get on the moving parts.
Mark the bottom of the table 'Glued'. Scrub the edge of the table with the cleanser
to remove white paint marks.
This glue takes about 24 hours to reach to full strength. The table will then hold up
much better to hauling and one person sitting on it is very unlikely to break it. Of
course, you still cannot jump up on top of it and jump up and down on it in
excitement.
http://www.charm.net/~jriley/seminar.html (6 of 15)12/03/2005 19:40:34
Woodware Designs -- Reinforcing Seminar Furniture
4.
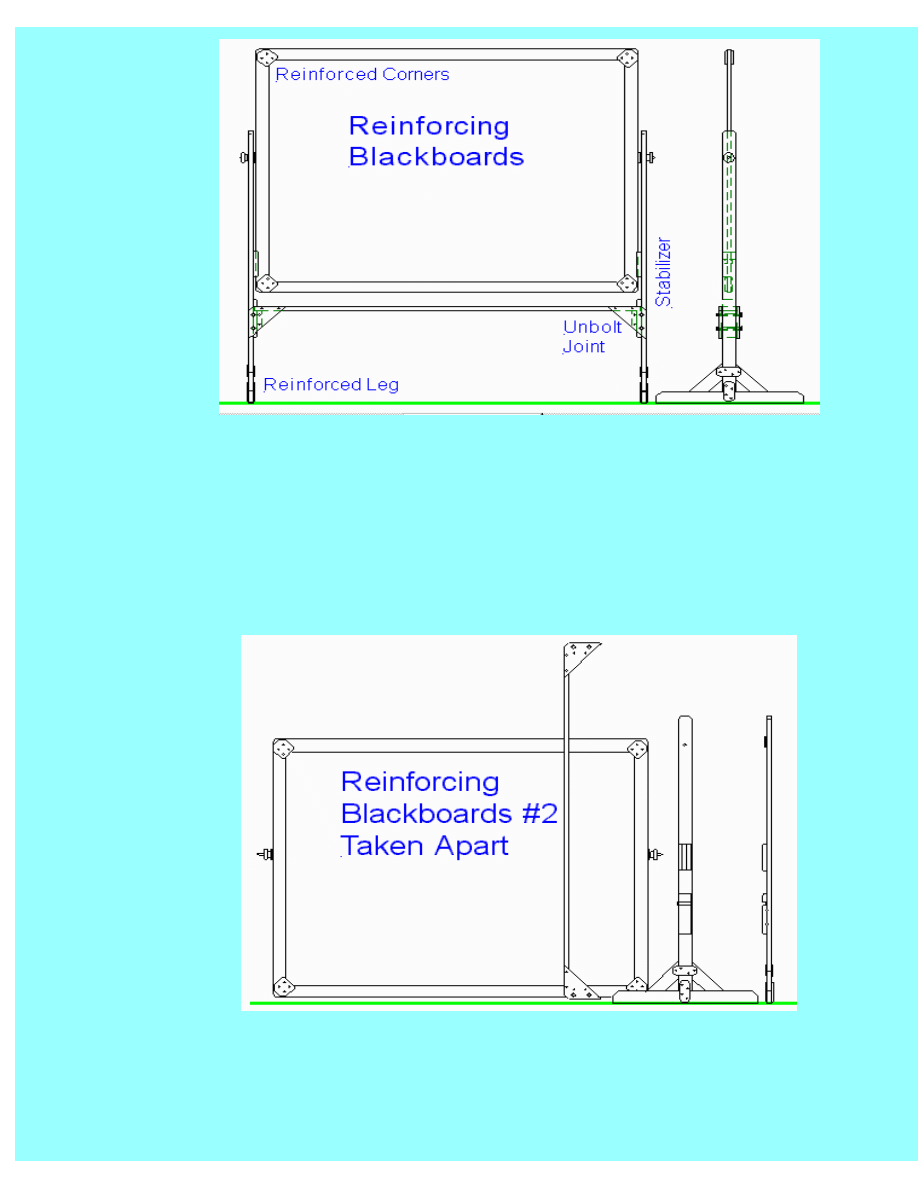
Blackboards
The blackboards we normally use are double sided and mounted in an oak frame. The
frame can be damaged in hauling. The board would be much easier to haul if they could
fit in a mini-van or station wagon. The actions below both reinforce the blackboard and
convert the frames so that they can be taken apart for transport.
1.
Technical Information:
You want the blackboards to look good but not so good as to distract from the
http://www.charm.net/~jriley/seminar.html (7 of 15)12/03/2005 19:40:34

Woodware Designs -- Reinforcing Seminar Furniture
speaker. You can do this with the following actions:
1. Clean board surface
2. Reinforce the corners of the blackboard
3. Reinforce the legs
4. Stabilizer the board
5. Modify the frame for easier transport
The materials required for two blackboards are:
1. Oak slats, 2 in. wide 1/4 inch thick -- 64 inches
2. Oak slats, 3 in. wide 1/4 inch thick -- 48 inches
3. Oak slats, 4 in. wide 1/4 inch thick -- 26 inches
4. Oak, 2.25 wide 3/4 inch thick -- 8 feet
5. Hardwood plywood, 1/4 inch thick -- 2 sq feet
6. 1 inch #8 flat head wood screws -- box of 100
7. Wood glue
8. 5/16 inch Wood dowel -- to fill holes
9. 3/16 inch by 4 inch, bolt -- 8
10. 3/16 inch flat washer -- 18
11. 3/16 inch wing nut -- 8
12. 3/8 inch wing nut -- as required
13. Wood filler
14. Sandpaper
15. Natural oak stain -- 1 pint
16. Polyurethane varnish -- 1 quart
These materials cost about $40.00 new for two blackboards. Some of the parts can
be made from scrap wood; wood flooring scrap worked well. Home Depot sells the
thin oak slats we used.
The tools required are:
1. Saw -- table, radial arm, or miter box and handsaw
2. Electric drill
3. Screwmate drill bit for #8 1 inch
4. 1/2 inch drill bit
5. Screwdriver
6. Wood chisel
This work is best done in a home workshop. If necessary, it can be done using a
handsaw and miter box anywhere.
http://www.charm.net/~jriley/seminar.html (8 of 15)12/03/2005 19:40:34

Woodware Designs -- Reinforcing Seminar Furniture
5.
Recommended Action:
The following actions:
1.
Blackboards
First clean the blackboard with a mild household cleaner to remove all the dust.
Inspect the surface to determine if new paint is needed. You can purchase special
paint for blackboard surfaces if it is needed. You will probably have to redraw the
guide lines on the surface with a permanent marker after cleaning.
Reinforce the four corners with pieces of thin hardwood on both sides as shown
above. They are cut to suggest the tabs that hold pictures in an old time picture
album. Screw and glue them on with the grain running diagonally across the joint.
Sand all edges and corners to remove any sharpness. Install the two pieces on each
corner of the blackboard with wood screws and glue. Fill the screw holes and sand
smooth.
Inspect the metal fittings that support the board. You may need to file the notches
new and sharp, deepen the screw countersinks, and replace missing screws,
damaged bolts, washers, and wing nuts.
2.
Legs
The wooden legs take major beating in transport. The sketches above show the
areas to reinforce with wooden plates. If the pieces of the feet are of uneven
http://www.charm.net/~jriley/seminar.html (9 of 15)12/03/2005 19:40:34

Woodware Designs -- Reinforcing Seminar Furniture
thickness, you may need to remove some material from the back of the plate with
the saw and chisel. Sand all edges smooth and install with wood screws and glue.
Place plates on both sides of the leg.
3.
Board Stabilizers
Two wooden stabilizers for the board are also shown to replace the unsightly taped
erasers often placed on the board frames. These are made from simple pieces of
scrap hardwood and are screwed to the frames without glue. The edge of the board
fits into the grove in the stabilizer. You may need to custom fit the depth of the
grove.
4.
Joints
The frame crosspiece comes held to the uprights with two lag bolts. These break
easily and cannot be taken out and put back vary many times. The sketch above
shows these joints converted so that they are held with two bolts and wing nuts.
Double up the the frame uprights with a piece of wood with a notch for the cross
piece and two bolt holes. Saw off the crosspiece and add the two end fittings.
These are made from a piece of the thin oak material glued to thin plywood. This
was done because the oak has a tendency to warp and the plywood does not match
the rest of the wood.
If you are very careful in measuring and drilling the bolt holes, you will be able to
place any crosspiece with any frame member. This is best done by making a
pattern out of heavy poster board or sheet metal.
Always place a flat washer between wood and a bolt or nut. For transport, the bolts
can be placed in the holes in the cross piece. Be sure to buy a few extra bolts,
washers, and wing nuts.
Beyond Woodworking
http://www.charm.net/~jriley/seminar.html (10 of 15)12/03/2005 19:40:34

Woodware Designs -- Reinforcing Seminar Furniture
6.
Repairing Stacking Chairs
We use a lot of simple metal and cloth stacking chairs. If in poor repair, these chairs are
uncomfortable, distracting to the user, and unsafe. The most common failures are:
1. Striped screws in the backs
2. Broken frames
3. Dirty seats
Go though all the chairs and tighten all the screws. Sort out the chairs with problems.
1.
Striped Screws in the Backs
The backs are held on by four long sheet metal screws that screw through the cloth
into the edge of the hidden back material. This material is either plywood or
medium density particle board and neither holds screws very well.
If the screws are just striped and the back material is not broken, you can often
repair it with glue and a toothpick. You to inject wood glue down the stripped hole.
This can be done with a glue bottle with a thin round point or a special tool. These
tools are sold through woodworking catalogs and are sometimes available at large
home repair stores. White or tan wood glue works just fine.
If a screw is stripped or missing, loosen the other screws in the back. Pull the back
away from the frame and inject the stripped screw hole with a modest amount of
glue. Stick a toothpick in the hole and brake it off at the surface. Then replace all
the screws but to not over-tighten them.
2.
Broken frames
Broken frames have to be welded or brazed back together. This requires someone
http://www.charm.net/~jriley/seminar.html (11 of 15)12/03/2005 19:40:34

Woodware Designs -- Reinforcing Seminar Furniture
with some metal working tools and skill. A simple brazing set will do the job well
enough and these start at about $60.00. This less than the cost of one new chair.
Start by removing the seats and back. Then strip the paint from the area with a wire
brush in an electric drill. File or grind away as much of the old weld as practical.
Weld or braze the broken joints. Wire brush the area clean and spray paint.
3.
Cleaning the Seats
Vacuuming will remove a lot of dust from the seats and freshen them up. Stains
can be attacked with a steam upholstery cleaner. These devices can be rented but
are becoming more common as a household appliance.
7.
Battery testing
Our wireless mikes use 9 volt batteries. We try to start each session with a fresh battery
and save the old one if it is not be quite used up. This results in our carrying around a
large number of questionable batteries and an occasional cut-out of the wireless mike.
This situation is greatly helped by using an inexpensive battery tester from Radio Shake
and discarding the weak batteries. The Micronta 22-032A battery tester is light weight and
rugged. It is often offered on sale at about $10.00.
By the way, there is a wonderful, hour and a half training film on the proper use of the
wireless mike. You can rent it at most Video stores. It is called Singing in the Rain.
http://www.charm.net/~jriley/seminar.html (12 of 15)12/03/2005 19:40:34
Woodware Designs -- Reinforcing Seminar Furniture
2.
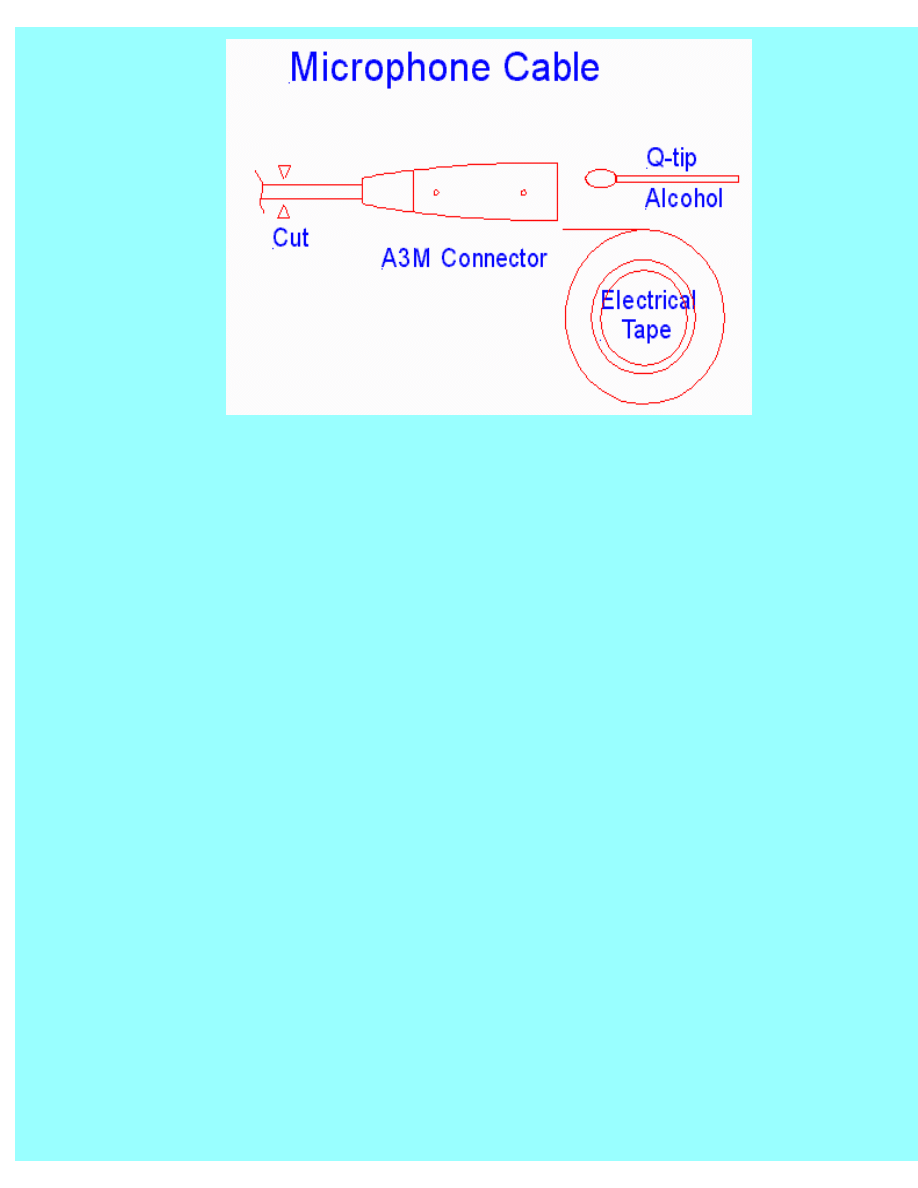
Repairing Microphone Cables
Microphone cable often break causing loss of sound or hum. Often the condition will come-and-
go when you wiggle the wire behind the connector. Swapping to a different cable may also clear
the problem and point out the bad cable. A person with experience soldering can repair these
cables at less cost than replacing them. A person with no soldering experience can often do some
good by cleaning the cables.
The most common cable failures are:
1. Broken or frayed wires inside the connector.
2. Worn or bent connector contacts.
3. Broken wires in the cable just behind the connector.
4. Broken wires at mechanically damaged points on the cable
1.
Types of Cables
There are two types of cables:
1. Shielded
2. Unshielded
And two types of connectors:
1. A3 Microphone & Audio Connector (three conductor)
2. 1/4 inch plug (tip, ring, and sleeve)
The shielded cables have a braid of fine wire just under the outer cover and are intended
for use from the microphone to the amplifier. The unshielded cables have only three wires
http://www.charm.net/~jriley/seminar.html (13 of 15)12/03/2005 19:40:34

Woodware Designs -- Reinforcing Seminar Furniture
and are intended for use from the amplifier to the speakers. Unshielded cables may pickup
hum if used from the microphone to the amplifier.
The three wire A3 connectors are far superior to the 1/4 inch plugs. If you have a mixed
system it is much better to replace all connectors with the A3 type. Adapters from one
type connector to the other are a major source of problems.
2.
Cleaning
A person without electronic experience can to a good job of cleaning the cables and
connectors. The best cleaning solution is a strong alcohol. Radio Shack sometimes has this
as non-residue electronic cleaner but it is very expensive in small spray cans. Professional
electronics technicians use 200 proof ethanol but this is hard to obtain. Two products you
can obtain are Denatured Alcohol from the home supply store (shellac thinner) and grain
alcohol (Everclear) from a liquor store. Russian technicians invariable use Vodka but then
they know a lot about Vodka.
Use these products in a well ventilated area and we advise the use of rubber gloves. The
alcohol is quite flamable and must be kept away from open flames. Do no smoke and do
not use around powered electronic equipment.
Remove all old tape and wipe down the cables with alcohol and paper towels. Rub hard to
remove old tape residue. Inspect for mechanical damage to the cables.
Wipe down the outside of the connectors with the alcohol and paper towels. Use 'Q' tips
inside the connectors. Cut the cotton head off some 'Q' tips and use the paper shaft with
alcohol inside the female connectors.
3.
Replacing Connectors
Replacing the connectors should be done by a person with soldering experience. If you
think that it is worthwhile for me to add a several pages here detailing soldering technique
please
me.
The A3 connectors are available from Radio Shack as 274-011 'A3F Microphone & Audio
Connector' (female, $4.40) and 274-010 'A3M Microphone & Audio Connector' (male,
$4.20). These connectors are commonly available at all electronics parts stores.
Cut off the old connector and about six inches of cable as the wires sometimes break just
where they come out of the connector. Take one connector apart to get the wire color
scheme you should use for the new connectors. Save all the screws and metal parts.
http://www.charm.net/~jriley/seminar.html (14 of 15)12/03/2005 19:40:34

Woodware Designs -- Reinforcing Seminar Furniture
There are three pins and a connection to the outer shell. I always connect the #1 pin
(ground) to the outer shell pin. Some commercially made cables do not have this
connection. I am sure this practice reduces hum. This may require you to add a short piece
of wire.
Use the old connectors to get the color scheme for the replacements as the color of the
cable wires varies. Use small strips of electrical tape or shrink tubing on the signal joints
for insulation.
4.
Taping the Connectors
Wrapping the outside of the connectors with electrical tape helps reduce mechanical
damage, makes the connectors less eye-catching, and shows which cables you have
rebuilt. Use good electrical tape as is lays much better than the cheap stuff; 3M makes all
the best tapes.
There is a trick to getting the tape to lay flat on odd shapes like the connector body. You
control the angle the tape is laying on by intentionally stretching only one side of the tape.
Lay down an inch or so of tape, look to see if it is going the way you want and then stretch
one side only until it is pointing just right. It takes some practice to learn to do this without
wrinkling the tape.
You can also obtain a role of colored table from Radio Shack or the home supply store to
use to make the shielded cables. Simple lay down a band of color a few inches down the
cable from the connector. This will tell you which cables to use for the microphones.
3.
Closing
Thanks for visiting Woodware Designs. Be sure to check out our many plans for low-stress
computer furniture before you leave. Please drop us
on ideas you have for supporting
seminar production.
Woodware Designs jriley@charm.net
http://www.charm.net/~jriley/seminar.html (15 of 15)12/03/2005 19:40:34
Document Outline
Wyszukiwarka
Podobne podstrony:
Higiena seminaria, Kosmetologia 9 Higiena psychiczna
Seminarium IIIR do kopiowania
Prezentacja na seminarium
SEMINARIUM IMMUNOLOGIA Prezentacja
Seminarium3 Inne zaburzenia genetyczne
3 Seminarium Patofizjologia chorób rozrostowych
Seminarium 6 Immunologia transplantacyjna farmacja 2
Biochemia z biofizyką Seminarium 2
seminarium2 2
JP Seminarium 9 wersja dla studentów
Seminarium 3
Prezentacja seminarium chłodnictwo
Vrok WL Seminarium 1 wrodzone wady serca materialy 2
V rok seminariumt ppt
więcej podobnych podstron