
Experimental investigation of transverse vibration-assisted orthogonal
cutting of AL-2024
Ahmed Syed Adnan
1
, Sathyan Subbiah
n
School of Mechanical & Aerospace Engineering, Division of Manufacturing Engineering, Nanyang Technological University, 50 Nanyang Avenue, Singapore 639798, Singapore
a r t i c l e
i n f o
Article history:
Received 4 September 2009
Received in revised form
28 October 2009
Accepted 8 November 2009
Available online 14 November 2009
Keywords:
Ultrasonic vibration-assisted machining
Ductile fracture
Cutting edge sawing action
a b s t r a c t
In the conventional use of vibration-assisted machining the vibratory motion is applied to the tool
either linearly along the direction of the cutting velocity or elliptically in the plane containing the
cutting velocity and surface normal. In contrast to this, this study investigates vibrations that are
applied along the cutting edge and perpendicular to the cutting velocity. Such a vibratory motion is
expected to provide a small sawing action that will enhance the ductile fracture occurring ahead of the
cutting tool as the chip separates from the bulk work material. This enhancement in fracture will then
contribute to reducing the chip thickness and cutting forces. Also, the sawing action reduces the imprint
left behind by the cutting tool leading to a better surface finish. To confirm these predictions orthogonal
cutting with the assistance of transverse vibrations applied to the cutting tool are performed on Al-2024
tubes using a carbide cutting tool. Experiments are performed at different conditions of cutting speeds,
feeds and amplitudes of vibration at a fixed vibration frequency of 40 kHz. Cutting forces, chip
thickness, and surface finishes are measured and compared with similar cutting conditions without
application of vibration. In general, a reduction in cutting forces and feed forces is observed when
transverse vibrations are applied. Chip thickness is also reduced and surface finish is improved upon
application of vibration. Some explanations are offered to support these results.
&
2009 Elsevier Ltd. All rights reserved.
1. Introduction
The machining process involves material removal in the form
of chips. The chips are removed by a complex process of
deformation and fracture immediately ahead of the cutting tool
edge. In machining brittle materials, such as wood, glass, and
silicon, there is little or no deformation of the removed chip, while
fracture occurs readily and can often be visually seen. In
machining ductile materials, the deformation of the chip is higher
as fracture does not occur readily and is accompanied by large
plastic deformation due to the higher toughness of these
materials.
In brittle materials, factors that suppress the formation of
fracture while machining tend to increase the ease of formation of
the chips. Based on this idea, different researchers report the
successful use of hydrostatic pressure
or large tool edge radii
to machine brittle materials such as silicon. Both these factors
suppress the growth of cracks close to the cutting edge leading to
a controlled fracture and continuous chip formation resulting in
smoother surfaces (
While numerous efforts have been reported in this area of
machining brittle materials by controlling fracture, not many
efforts are made to enhance fracture formation in ductile
materials. Owing to the higher fracture toughness of these
materials, fracture does not occur readily. Hence, factors that
promote fracture to occur while machining will ease chip
formation leading to a better machined surface finish, lower
sub-surface deformation, lower cutting forces, and thinner chips.
The idea of fracture occurring during chip formation in machin-
ing of ductile materials has been a controversial issue since fracture
cannot often be seen visually similar to that occurring during
machining of brittle materials. Fracture mechanics researchers such
as Atkins
and some machining researchers such as Astakhov
have advocated the incorporation of fracture parameters in classical
machining models that completely ignore the energy going into
surface formation. More recently, visual evidence of the presence of
ductile fracture at the junction of the chip and surface of the
material being machined in two ductile materials, OFHC copper and
Al-2024 has been shown
With sufficient evidence that fracture indeed plays a role in
chip formation even in machining of ductile materials, the
question to be asked is: what are the different methods to
enhance the formation of this fracture to ease the formation of
chips? Literature presents one way to reduce strain to fracture by
altering machining conditions
. Some alternate possible
ARTICLE IN PRESS
Contents lists available at
journal homepage:
www.elsevier.com/locate/ijmactool
International Journal of Machine Tools & Manufacture
0890-6955/$ - see front matter & 2009 Elsevier Ltd. All rights reserved.
doi:10.1016/j.ijmachtools.2009.11.004
n
Corresponding author. Tel.: + 65 6790 4861; fax: + 65 6790 4062.
E-mail address: sathyans@ntu.edu.sg (S. Subbiah).
1
M.Sc. Dissertation student; currently employed in Pakistan.
International Journal of Machine Tools & Manufacture 50 (2010) 294–302
ARTICLE IN PRESS
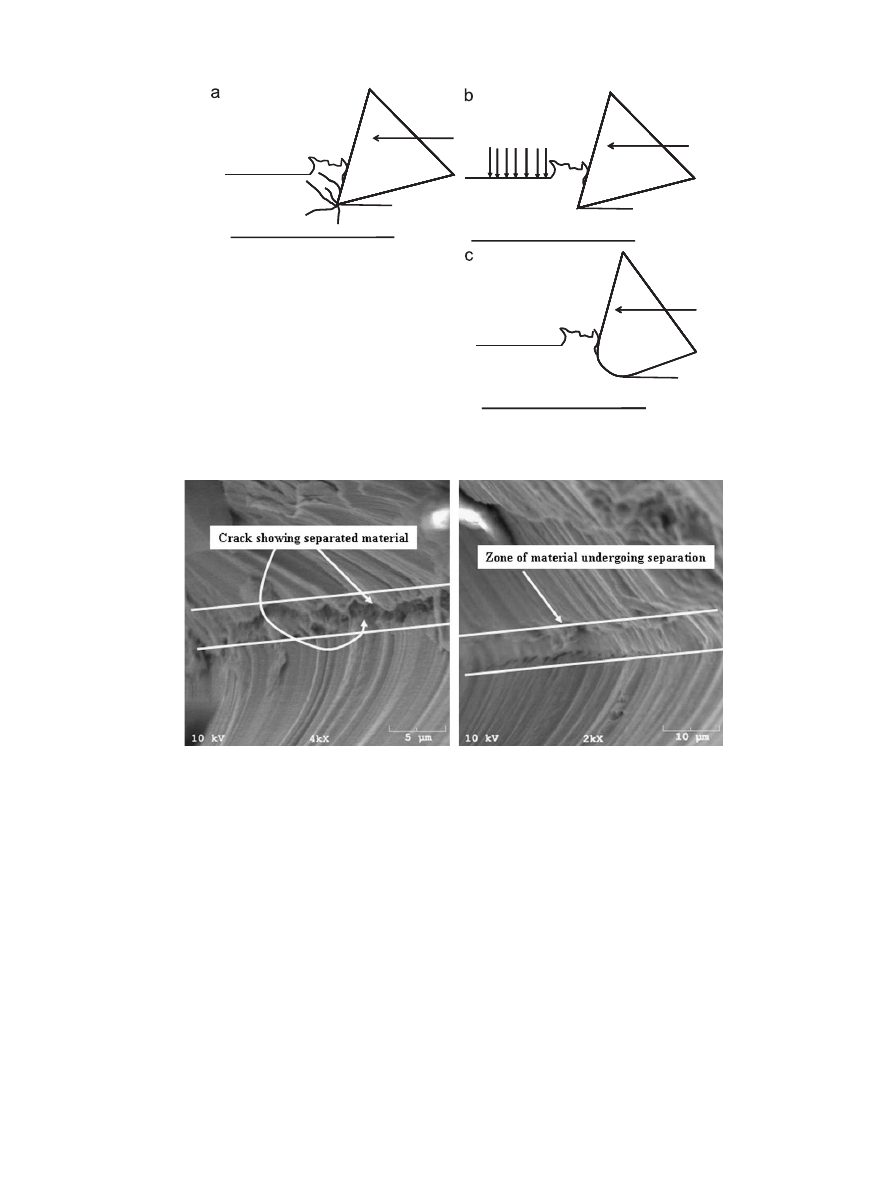
scenarios that don’t depend on altering machining conditions are
shown in
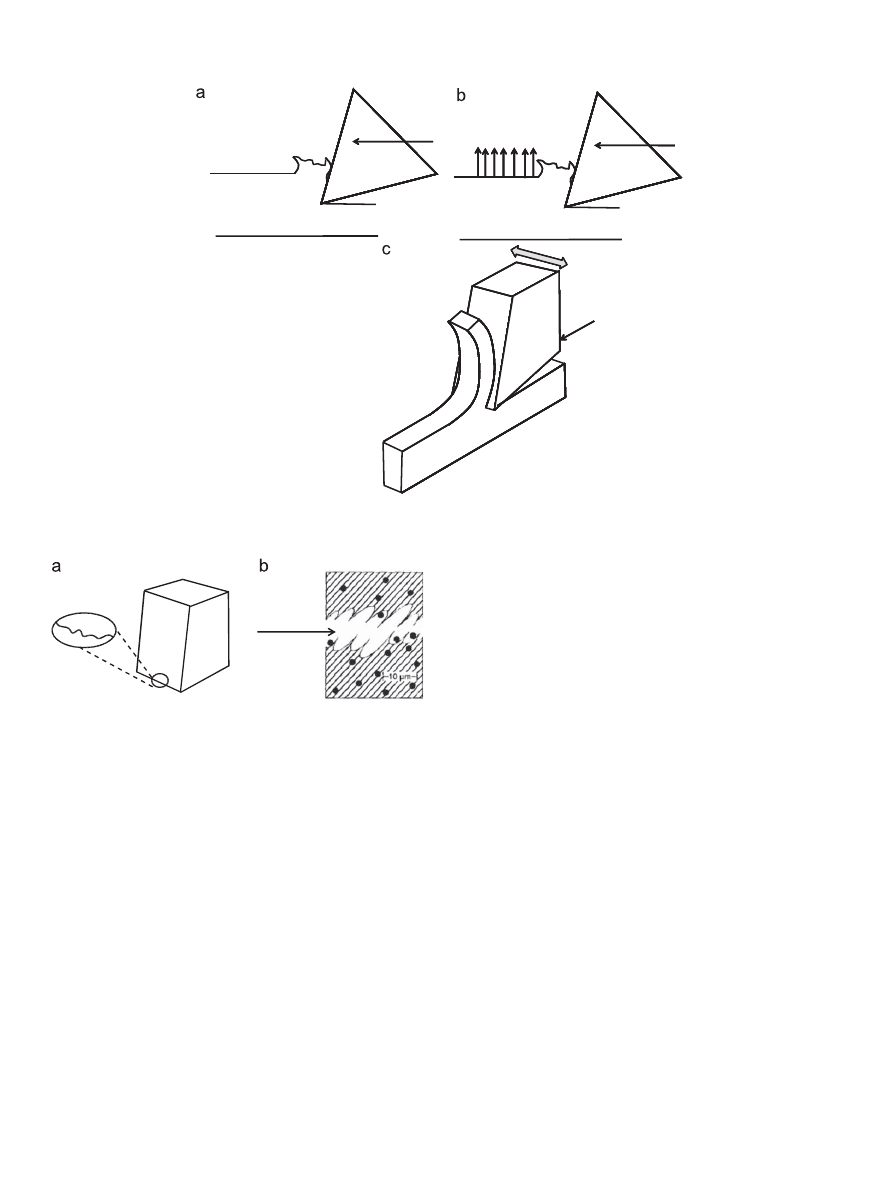
Two cases that will enhance the fracture formation are shown
in
. One of them involves inducing hydrostatic tension in
the direction normal to the surface that is being cut. Because of
the direction of the tension fracture will easily propagate in the
horizontal direction and this enhances chip separation while
machining. The second case, involves applying a vibratory sawing
action to the cutting tool along its edge. This sawing action
enhances chip separation ahead of the cutting tool edge.
The application of hydrostatic tension normal to the surface is
difficult to achieve in practice, while the vibratory sawing action
can be practically tested for its efficacy. This is the subject of this
paper. Such vibratory cutting motion applied along a cutting edge
has some precedence; it has been applied in the food industry, for
example, where blades (knives) are designed to ultrasonically
resonate along their length direction to enable cutting of food
materials such as cheese, chocolate, etc.
. There are also some
reports that such vibrations are used to cut composite sheets,
although a literature publication reporting this has not been
found by the authors. In addition to the food industry, vibratory
motion along the cutting edge direction has also been applied in
microtomy to prepare biological specimens for microscopic
observation
. In this work, Studer and Gnaegi report that
application of small ultrasonic vibrations, applied along the edge
of a 451 diamond knife, reduces the compression induced in the
ultrathin sections needed for microscopy.
Such proven applications of vibratory motion along the cutting
edge give further credence to this current investigation of
applying vibratory motion to cutting tools used in conventional
machining of metals and other materials. A clarification is needed
on the application of this type of vibratory motion since
application of vibratory motion to conventional cutting is not
new. In conventional use of vibration-assisted machining
, the
vibratory motion is applied to the tool either linearly along the
cutting speed direction or elliptically
in the plane containing
the cutting velocity and the normal to the surface. This method is
referred to commonly as vibration-assisted machining (VAM) or
ultrasonically assisted cutting. Brehl and Dow
have recently
published a comprehensive review of this technique. This is in
contrast to this study; here vibrations are applied along the
cutting
edge
and
perpendicular
to
the
cutting
velocity.
V
V
Apply
Uncontrolled
hydrostatic
fracture
pressure
V
Brittle Material
Large edge
radius
Fig. 1. Scenario for brittle materials: they undergo uncontrolled fracture on machining; application of hydrostatic pressure or use of large nose radius induces compressive
stresses to suppress crack growth.
Fig. 2. Experimental evidence of ductile tearing occurring ahead of the cutting tool edge in Al-2024-T3
A.S. Adnan, S. Subbiah / International Journal of Machine Tools & Manufacture 50 (2010) 294–302
295
ARTICLE IN PRESS
As explained before, such a vibratory motion is expected to
provide a small sawing action that enhances the ductile fracture
occurring ahead of the cutting tool as the chip separates from the
bulk work material. The sawing action is expected to come from
the imperfections in the cutting tool edge of most cutting tools
(
). This enhancement in fracture then helps in reducing the
chip thickness and cutting forces. Also, the sawing action reduces
the imprint left behind by the imperfect cutting tool edge leading
to better surface finish. This process can be called transverse
vibration-assisted machining (TVAM) to add to the list of
acronyms in this area.
This paper reports results from an orthogonal cutting experi-
ment with the application of transverse vibrations to the cutting
tool with Al-2024 tubes as work material and tungsten carbide as
the cutting tool material. Experiments are performed at several
combinations of cutting speeds, feeds, and amplitudes of vibration,
whereas the frequency of vibration is kept fixed at 40 kHz (
).
Cutting forces, chip thickness, and surface finishes are
measured and compared with similar cutting conditions without
application of vibration. A reduction in cutting forces and feed
forces in some cases is observed when transverse vibrations are
applied. Chip thickness is also reduced and surface finish is
improved upon application of vibration. Some explanations are
offered to support the observations.
2. Experimental method and materials
2.1. Work and tool materials
The work material is chosen as Al-2024T3, a structural aero-
space alloy. The work material is shaped like a tube (44.4 mm
outer diameter and 1.3 mm thickness) to enable orthogonal
cutting. The properties of this alloy, namely, strength and failure
models are readily available in literature
. The alloy is ductile
and suitable for this testing. The tool material used is an uncoated
tungsten carbide material used by many cutting tool manufac-
turers. Specifically the insert is a triangular insert manufactured
by Sandvik Coromant. One of the straight sides of the triangle is
used for the cutting. The cutting tool is designed for machining
aluminum alloys and hence has a high positive rake angle and a
polished rake face.
2.2. Experimental setup
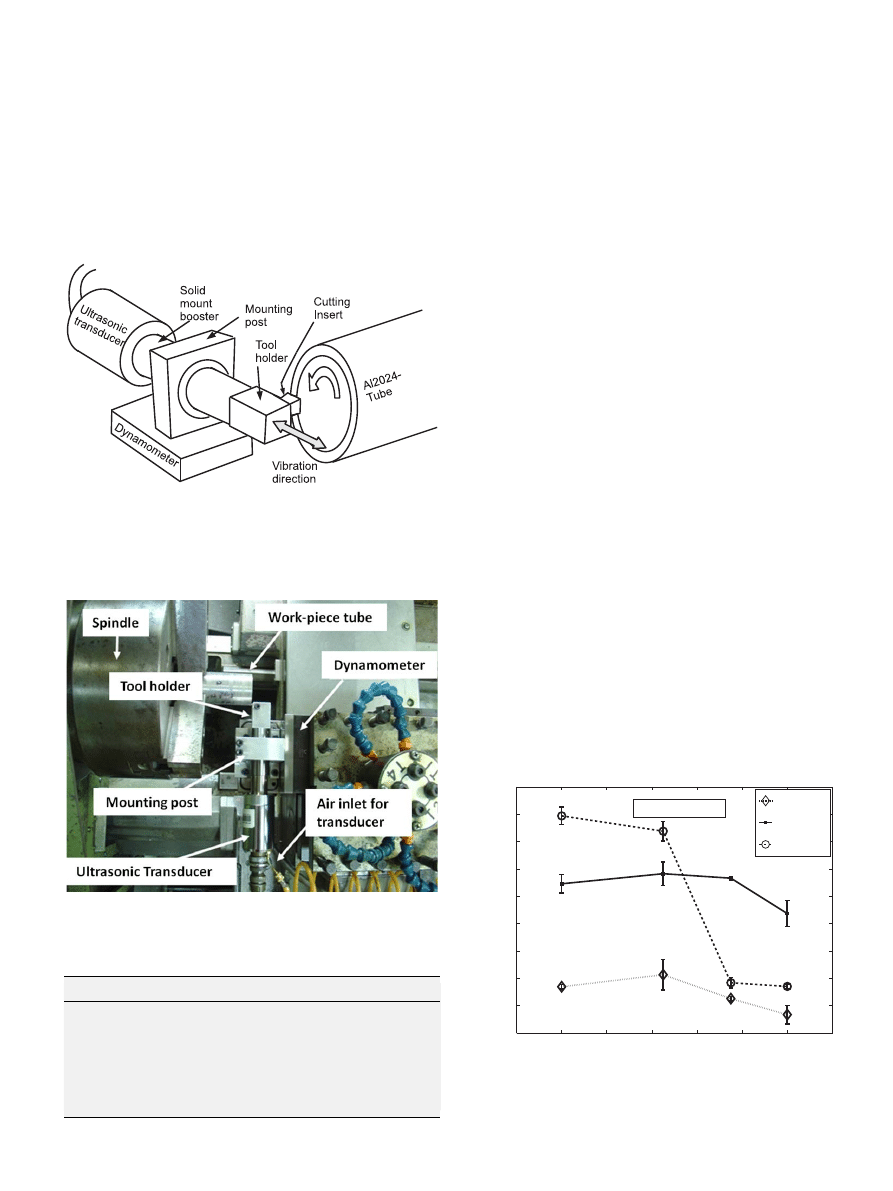
A schematic of the experimental setup is shown in
and
the actual setup is shown in
. The ultrasonic transducer is
model 4TR by Branson ultrasonics. It is capable of vibrating at
40 kHz with maximum amplitude of 10
m
m. The amplitude can be
varied using a control unit from a minimum of 45–100%. Since the
unit is a calibrated one, neither the amplitude nor the frequency
of vibration was independently verified. The solid mount booster
is made of Titanium and is designed to provide lower transverse
deflection to the tool holder, compared to standard boosters. The
booster is of the 1:1 type, meaning that the amplitude of vibration
V
V
Fracture does
Apply
not occur
hydrostatic
readily
tension
Vibration/Sawing
action of tool
Ductile Material
V
Tool
Tool
Chip
Work
Fig. 3. Scenario for ductile materials: Fracture does not occur readily during machining; application of hydrostatic tension or use of vibratory sawing action, as explored in
this paper, will induce fracture and ease chip formation.
Sawing
action
here
Shear dimples
Fig. 4. (a) Conventional cutting tools and even high-precision diamond tools have
some waviness and roughness along their cutting edges that can be used to
provide a sawing action and (b) the sawing action will improve the ductile tearing
process.
A.S. Adnan, S. Subbiah / International Journal of Machine Tools & Manufacture 50 (2010) 294–302
296
ARTICLE IN PRESS
is faithfully transmitted from the transducer to the tool holder
without any magnification or reduction.
2.3. Machine and machining conditions
The experiments were conducted on a computer numerically
controlled (CNC) lathe (Okuma LS30-N). The experimental
conditions are summarized in
. All experiments were
conducted without using flood coolant or misting. Orthogonal
tube cutting was performed by plunging the tool axially into the
tube. Spindle speeds of 150 and 300 rpm and feed rate (same as
depth-of-cut or uncut chip thickness) was varied from 50 to
150
m
m. The amplitude of vibration was varied as zero (no
vibration), 45% (4.5
m
m), 75% (7.5
m
m), and 100% (10
m
m). All
experiments and measurements were repeated three times.
2.4. Measurement systems used
The cutting and thrust forces were measured using a Kistler
9121 three-axis force dynamometer designed to be mounted on
the turret of a CNC lathe. The dynamometer was used along with a
Kistler 5011 charge amplifier. The dynamometer has a resonant
frequency of only 1 kHz. Hence, it is not possible to obtain
frequency data from the force measurements; the ultrasonic
transducer vibrates at 40 kHz. Thus, only average cutting and
thrust forces are obtained and reported. A DEWE-3010 Dewtron
portable data acquisition system was used to collect the data from
the dynamometer. The chip thickness was measured using a
Mitutoyo micrometer. Mean chip thicknesses were measured
three times and at three different locations. Surface finish
measurements (parameter Ra is measured along the direction of
cutting velocity) were made using a surface profiler (Talyscan,
with a mechanical probe). Some of the chips and work surfaces
were also observed in a JEOL scanning electron microscope (SEM).
3. Results
3.1. Variation in cutting and thrust forces with variation in vibration
amplitude
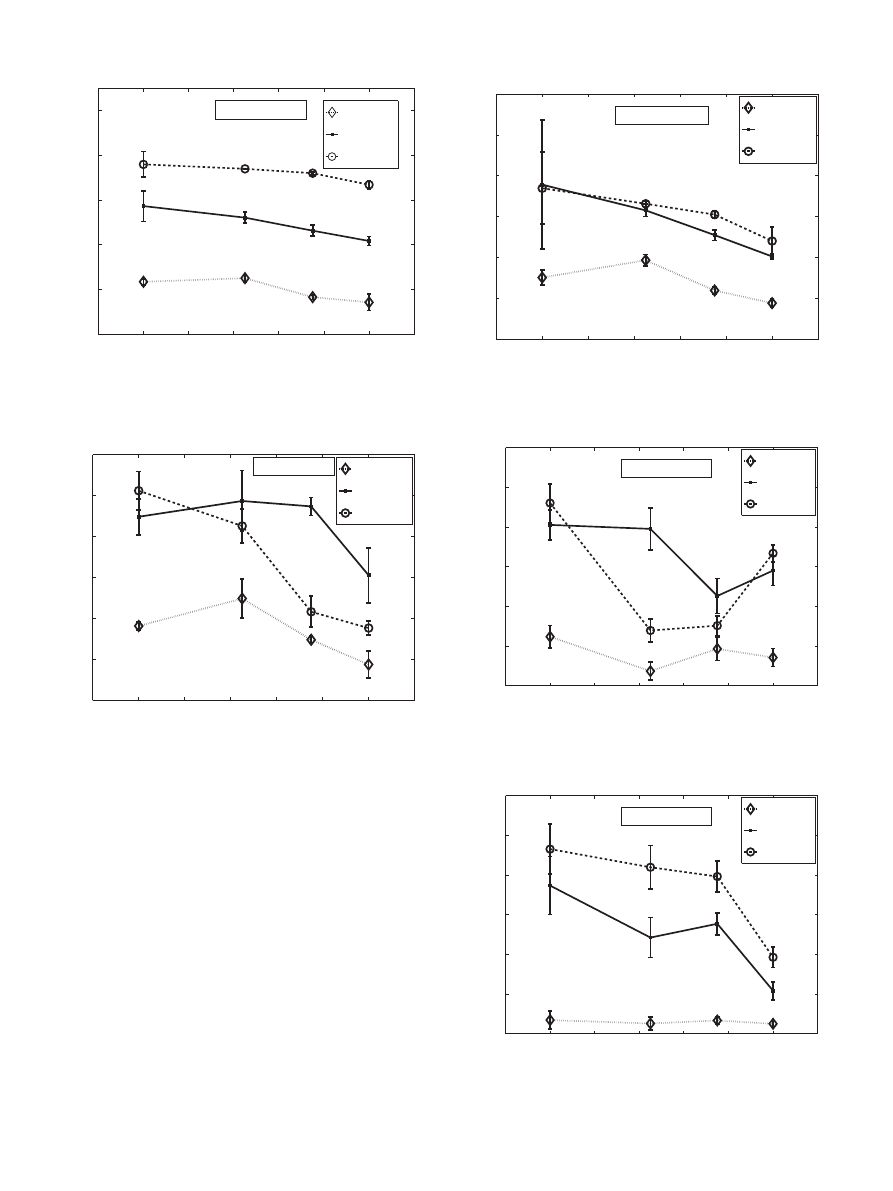
A plot of cutting forces as a function of the amplitude of
vibration is shown in
and
for spindle speeds of 150 and
300 rpm, respectively. At 150 rpm there is an initial increase
and then decrease in the cutting force at two feed rates of 50 and
75
m
m/rev
while
at
0.1 mm/rev
the
cutting
forces
drop
dramatically in a continuously decreasing trend. The reduction
in cutting force from no vibration to highest vibration amplitude
ranges from 10% to 48%. At 300 rpm all feed rates shows a
decreasing trend in the cutting force as the amplitude of vibration
Fig. 5. Experimental setup; the cutting insert is mounted on a tool holder; the tool
holder is affixed to a solid mount booster (1:1) connected to an ultrasonic
transducer. The solid mount booster is held at its nodal point on a mounting post.
The post is in-turn mounted on a dynamometer. The dynamometer is attached to
the turret of the lathe (not shown). The vibration direction is also indicated as is
the rotational direction of the tubular work material.
Fig. 6. Photograph of the experimental setup.
Table 1
Experimental conditions.
Cutting tool material
Carbide (Sandvik Coromant)
Work material
Al-2024 aluminum alloy
Rake angle
121
Clearance angle
101
Uncut chip thickness, t
o
50, 75, 100
m
m/rev
Spindle speed, S
150, 300 rpm
Vibration amplitude
0%, 45%, 75%, 100%
Vibration frequency
40 kHz
Work dimensions
Tube, OD = 44.4 mm, ID =41.8 mm
−20
0
20
40
60
80
100
120
50
60
70
80
90
100
110
120
130
140
Vibration Amplitude (%)
Cutting force (N)
t
o
= 50
µm
t
o
= 75
µm
t
o
= 100
µm
S = 150 RPM
Fig. 7. Plot of cutting force versus amplitude of vibration at S =150 rpm for various
uncut chip thicknesses. The plots show the average vale along with an error bar of
one standard deviation.
A.S. Adnan, S. Subbiah / International Journal of Machine Tools & Manufacture 50 (2010) 294–302
297
ARTICLE IN PRESS
is increased. The largest reduction seen is 16% at the smallest feed
rate of 50
m
m/rev.
The thrust forces also displayed an overall decreasing trend
with vibration amplitude at both the spindle speeds (
). Variation in thrust forces as the vibration amplitude was
changed did show an initial increase and then a decrease at some
of the feed rates. The drop in thrust forces from no vibration to
highest vibration amplitude was higher than the cutting forces
and ranged from 55% at 150 rpm to 37% at 300 rpm. The larger
error bars are noticeable in the thrust forces indicating that thrust
force trends have to be interpreted with caution.
The measured force profiles showed that steady state cutting
was reached and no unusual patterns were noticed with the
application of vibration. The spindle frequency was noticed in the
variation of the force profile with time and other frequencies were
naturally filtered by the dynamometer due to its lower natural
frequency as indicated earlier.
The forces along the third direction (i.e. along the cutting edge,
called radial force) were observed to have a small but non-zero
−20
0
20
40
60
80
100
120
40
60
80
100
120
140
Vibration Amplitude (%)
Cutting force (N)
t
o
= 50
µm
t
o
= 75
µm
t
o
= 100
µm
S = 300 RPM
Fig. 8. Plot of cutting force versus amplitude of vibration at S = 300 rpm for various
uncut chip thicknesses. The plots show the average value along with an error bar
of one standard deviation.
−20
0
20
40
60
80
100
120
10
20
30
40
50
60
70
Vibration Amplitude (%)
Thrust force (N)
t
o
= 50
µm
t
o
= 75
µm
t
o
= 100
µm
S = 150 RPM
Fig. 9. Plot of thrust force versus amplitude of vibration at S =150 rpm for various
uncut chip thicknesses. The plots show the average value along with an error bar
of one standard deviation.
−20
0
20
40
60
80
100
120
10
20
30
40
50
60
70
Vibration Amplitude (%)
Thrust force (N)
t
o
= 500
µm
t
o
= 75
µm
t
o
= 100
µm
S = 300 RPM
Fig. 10. Plot of thrust force versus amplitude of vibration at S = 300 rpm for various
uncut chip thicknesses. The plots show the average value along with an error bar
of one standard deviation.
−20
0
20
40
60
80
100
120
0.1
0.12
0.14
0.16
0.18
0.2
0.22
Vibration Amplitude (%)
Mean Chip thickness (mm)
t
o
= 50
µm
t
o
= 75
µm
t
o
= 100
µm
S = 150 RPM
Fig. 11. Plot of mean chip thickness versus amplitude of vibration at S= 150 rpm
for various uncut chip thicknesses. The plots show the average value along with an
error bar of one standard deviation.
−20
0
20
40
60
80
100
120
0.1
0.12
0.14
0.16
0.18
0.2
0.22
Vibration Amplitude (%)
Mean Chip thickness (mm)
t
o
= 50
µm
t
o
= 75
µm
t
o
= 100
µm
S = 300 RPM
Fig. 12. Plot of mean chip thickness versus amplitude of vibration at S =300 rpm
for various uncut chip thicknesses. The plots show the average value along with an
error bar of one standard deviation.
A.S. Adnan, S. Subbiah / International Journal of Machine Tools & Manufacture 50 (2010) 294–302
298
ARTICLE IN PRESS
mean value. This represents the sawing action force. A typical
force profile of this third component (not shown), that was similar
in all the cutting experiments, showed a mean radial force of
around 1–2.5 Newton with a variation on either side of this mean
of about 2 N. This force being along the applied direction of
vibration and since the frequency response of the dynamometer is
much less than the applied vibration frequency of 40 kHz, it is not
clear how reliable this measured force is. Also, the inertial force
due to the vibrating insert mass could be substantial enough to
disturb this measurement.
3.2. Variation in mean chip thickness, chip surface and shape with
amplitude of vibration
The variation in mean chip thickness as a function of vibration
amplitude for various feed rates at a spindle speed of 150 and
300 rpm are shown in
, respectively. At 150 rpm all
feed rates show an initial larger decrease in mean chip thickness
(by as much as 33%) as the amplitude of vibration is increased up
to 75% and then seen to increase (overall 13% decrease) up to
100%. Maximum reduction, of 33%, is seen at the highest feed rate
of 100
m
m/rev. At 300 rpm, a more or less uniform decreasing
trend in chip thickness is noticed as the vibration amplitude is
increased. Negligible change (
o5%) is seen at the lower feed rate.
At 75
m
m/rev an overall drop of as high as 30% is observed.
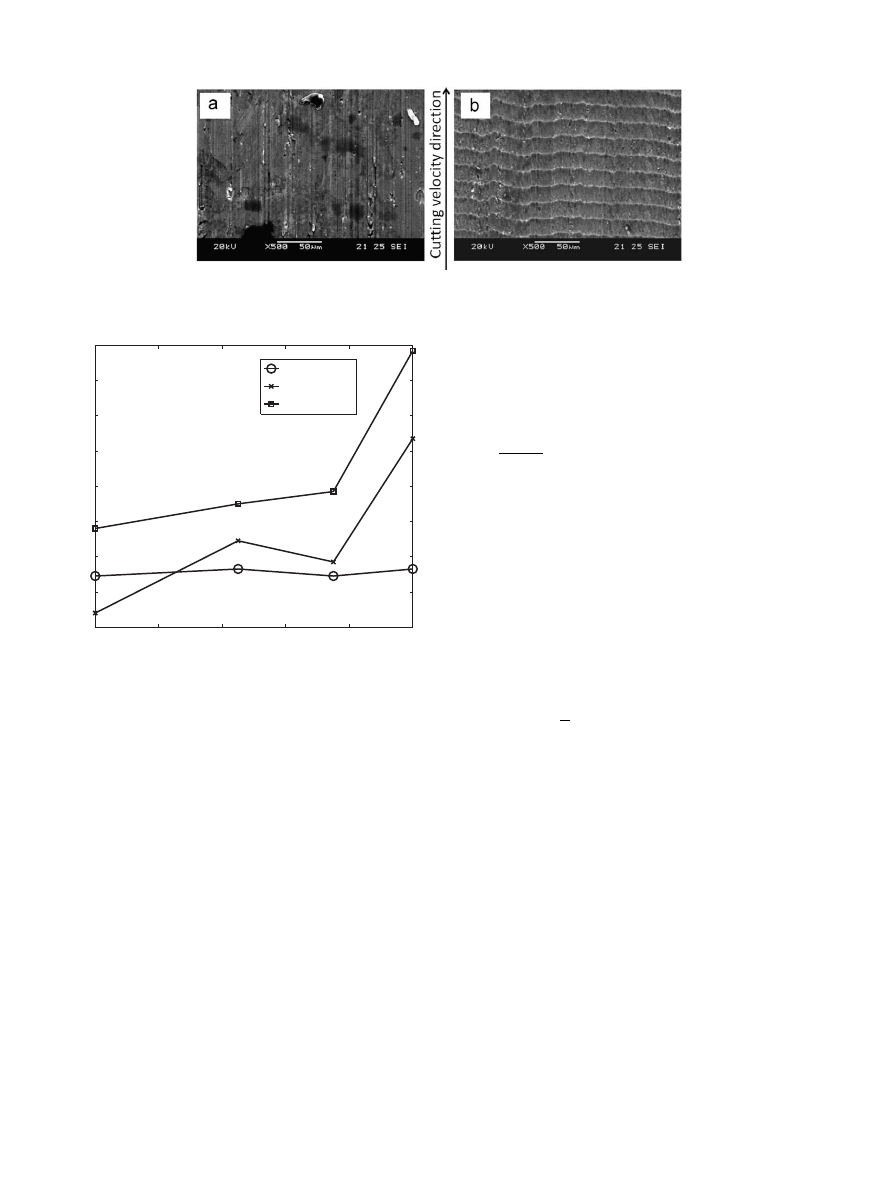
Observations on the back side of the chip at higher magnifica-
tions show that without vibration the surface looks rough and
rumpled, while with the application of the vibration the central
region of the chip is smoother (
). At a feed rate of 0.05 mm/
rev, the chips were seen to be curled and continuous for all
cutting conditions i.e. with or without vibration amplitudes. At
higher feed rates (for example, feed rate of 0.75 and 0.1 mm/rev),
the chips were seen to be discontinuous when the amplitude of
vibration was zero, but, became continuous when vibration
amplitude was increased.
3.3. Variation in surface finish with amplitude of vibration
The variation in surface roughness (parameter Ra) with
vibration amplitude at various feed rates is shown in
for
a spindle speed of S =150 rpm. The surface roughness is measured
along the cutting velocity direction. The surface roughness
reduces (by as much as 76%) as the vibration amplitude is
increased to 45% with no significant further reduction (4–9%) at
higher amplitude of vibrations. In fact, at some feed rates there is
an increase (as high as 22%) in surface roughness. An overall
reduction in roughness of as high as 55% is seen at 0.1 mm/rev.
Similar trends were seen at the spindle speed of 300 rpm
A comparison of the surface finish with and without vibration
is shown in
. While the surface of the work material
produced without any vibration shows directional grooves/marks
along the cutting velocity direction, the surface produced with
vibration shows small grooves running along the transverse
direction. This was observed at all conditions with the application
of vibration.
4. Discussion
In the introduction section of this paper an argument was
presented that application of transverse vibration provides a
sawing action thus enhancing ductile fracture to occur immedi-
ately ahead of the cutting edge leading to easier chip formation.
The ease of chip formation means that the cutting force and
perhaps also the thrust forces should reduce. This trend has
Fig. 13. Back side of chip at a feed of 0.1 mm/rev and spindle speed of 300 rpm: (a) with vibration 45% amplitude and (b) without any vibration.
−20
0
20
40
60
80
100
120
0
0.5
1
1.5
2
2.5
Vibration Amplitude (%)
Surface roughness (R
a
),
µ
m
t
o
= 50
µm
t
o
= 75
µm
t
o
= 100
µm
S = 150 RPM
Fig. 14. Plot of surface roughness (Ra) versus amplitude of vibration at S =150 rpm
for various uncut chip thicknesses. The plots show the average value along with an
error bar of one standard deviation. Trends similar to these were also observed at
S= 300 rpm.
A.S. Adnan, S. Subbiah / International Journal of Machine Tools & Manufacture 50 (2010) 294–302
299
ARTICLE IN PRESS
indeed been observed in our experiments. The trend of decreasing
cutting force with increase in amplitude can be explained by the
reasoning that with larger amplitude of vibration the sawing
action is improved since a longer portion of the cutting edge now
contacts the work contributing to the ease of fracture formation.
The decrease in thrust force follows naturally from the ease of
chip formation. The decrease in forces with increasing amplitude
could also be due to increase peak velocity of vibration as the
amplitude increases for a given frequency of vibration. The
‘‘sawing’’ action is enhanced because of this.
The ease of chip formation also means that the chip thickness
should reduce upon application of vibration. When there is more
effort needed to ‘‘pull’’ the chip out of the base work material the
chip tends to undergo larger plastic deformation and this
increases the chip thickness. When the chip is easily separated,
the chip tends to deform less and hence, the chip thickness will be
lower; in the extreme case, the uncut chip thickness is same as
the chip thickness and the chip is peeled away gently. This
tendency to ease the chip formation can also be checked by
calculating the shear angle in the primary zone.
The amount of shear deformation undergone in the primary
shear zone is proportional to the area of the shear plane. The area
of shear plane is reflected in the shear angle. To calculate the
shear angle, a classic Merchant’s analysis
of machining is
assumed. Even though this classic model has been modified many
times
, the model’s simplicity serves the purpose of a good
first approximation of machining analysis to verify trends. This
model has been used for this purpose recently
. Using this
model one can calculate the shear angle,
j
, using the chip
thickness values and the fixed rake angle,
a
, as
tan
j
¼
r cos
a
1-r sin
a
;
ð
1Þ
where r is the cutting ratio (ratio of uncut chip thickness, t
o
the
mean chip thickness, t
c
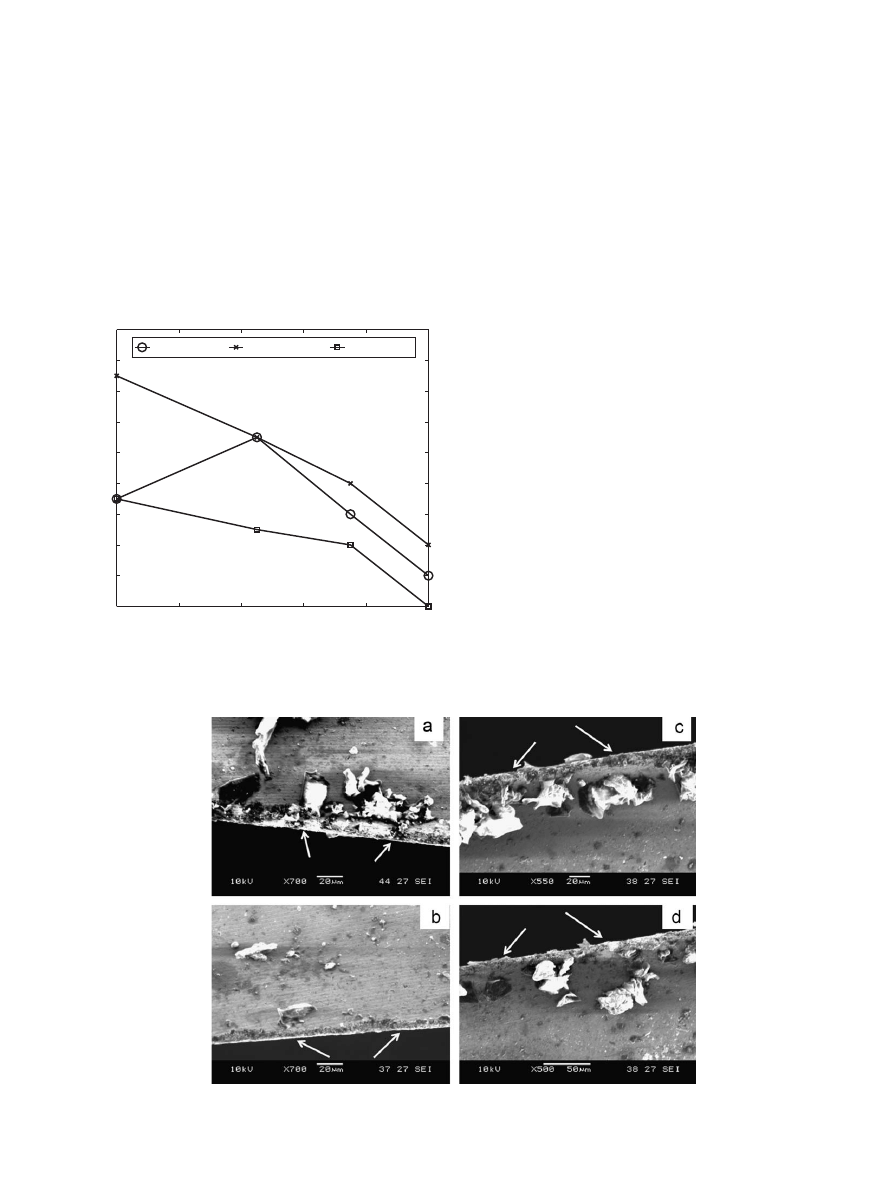
). A plot of the shear angles with increasing
vibration amplitude is shown in
at the spindle speed of
150 rpm. In general, the shear angle is seen to increase as the
vibration amplitude is increased. Similar trends are seen at the
spindle speed of 300 rpm. An increased shear angle means smaller
shear plane length and hence area. This confirms the view that
with application of vibration the effort to remove the chip has
indeed reduced (
Merchant’s analysis can also be used to estimate the coefficient
of friction between the chip and the rake face. With the chip
sliding on a transversely oscillating rake face and one can expect
the coefficient of friction to decrease because of reduced adhesion
and sticking effects. The friction coefficient,
m
, can be estimated as
m
¼
tan
a
þ
tan
-1
F
t
F
c
ð
2Þ
where F
c
is the cutting force and F
t
the thrust force.
The variation of coefficient of friction with increase in
vibration amplitude is plotted in
. As argued above, the
coefficient of friction is seen to decrease as the vibration
amplitude is increased.
When the tool is not subject to vibratory motion, the formation
of groove marks along the cutting velocity direction can be
explained as the marks left behind by the rough cutting edge.
Even high-precision cutting tools such as that made out of single
crystal diamond tools have a certain roughness and waviness on
their edges that the manufacturers try to control tightly; they are
there nonetheless. These leave their trace as the grooving marks
on the surface. Upon application of vibration such grooving
marks along the cutting velocity direction are no longer seen. The
marks now appear along the transverse direction, the direction
along which the ultrasonic vibration is applied. These transverse
marks are less deep and produce a better surface finish. These
marks can be caused by undesired vibration of the tool in the
thrust direction (normal to the work surface). There is scope to
reduce this vibration and further improve the surface finish, by
optimizing the design of the tool and vibration setup.
The sawing action of the cutting tool very much depends on
the cutting edge condition. The condition of the cutting edge
varies from insert to another and is a parameter that is not easily
Fig. 15. High-magnification micrographs of the work surface at a speed of 150 rpm and feed rate of 0.15 mm/rev: (a) no vibration and (b) with vibration, amplitude of 45%.
The horizontal direction is the tranverse direction and the vertical direction is the cutting velocity direction.
0
20
40
60
80
100
24
26
28
30
32
34
36
38
40
Vibration amplitude (%)
Shear angle (degrees)
0.05 mm/rev
0.075 mm/rev
0.1 mm/rev
S = 150 RPM
Fig. 16. Variation in shear angle (calculated using Merchant’s analysis) as the
vibration amplitude is increased, at a spindle speed of S = 150 rpm. Similar trend is
observed at S= 300 rpm.
A.S. Adnan, S. Subbiah / International Journal of Machine Tools & Manufacture 50 (2010) 294–302
300
ARTICLE IN PRESS
controllable. It is noted here that not all experiments were run
with the same insert. A fresh insert was used for each condition of
machining. Each insert does not necessarily have the same edge
condition. Hence, the reported trends in this paper are seen over
and above the variations in cutting edges. This is proof that these
trends and results do not depend on a particular edge condition.
To better confirm this, scanning electron microscope (SEM)
micrographs of the edge condition of several different inserts of
the type used in our experiment are presented in
. As evident
from this figure, the cutting edges are different, there is no particular
pattern in the edges that can favor one experimental condition over
the other, and the variation in edge conditions is random.
5. Conclusion
The effect of applying transverse vibration (i.e. transverse to
the cutting velocity but along the cutting edge) to the cutting tool
in the orthogonal cutting of Al-2024 has been studied. The main
conclusions are:
the cutting forces show an overall decreasing trend as the
vibration amplitude is increased,
similar decreasing trend is observed in the thrust force also,
a small non-zero force in the direction along the cutting edge
has been observed; this represents the sawing force,
the chip thickness shows a decreasing trend at both the
tested speeds and all feeds except at the lowest feed rate of
50
m
m/rev where no significant change was observed,
the chips tend to be more continuous with the application of
vibration,
the surface finish is seen to decrease as the vibration
amplitude is increased,
the work surface produced with application of vibration shows
grooves along the vibration direction while the work surface
produced without any vibration shows grooves along the
cutting velocity direction; the latter is due to the irregular
nature of the cutting tool edge. The application of vibration
removes this edge effect, while producing its own marks that
were probably created because of undesired vibration in the
thrust direction, and
application of the classical Merchant’s analysis to the mea-
sured force data and chip thickness reveals that the shear angle
decreases and the coefficient of friction decrease with the
application of vibration.
This preliminary investigation of the idea of applying trans-
verse vibration has established that this process provides some
advantages. Further investigation is necessary to assess the
impact of cutting tool edge condition, effect of rake angle and
effect of the process on various materials. The investigation will
be continued along these directions.
Fig. 18. SEM images of four different cutting edges (marked by indicating arrows) of the different inserts used in the experiments. It is evident that there is no pattern seen
in the edges itself, that they are all not the same, and the variation in edges condition is random.
0
20
40
60
80
100
0.52
0.54
0.56
0.58
0.6
0.62
0.64
0.66
0.68
0.7
Vibration amplitude (%)
Coefficient of friction
0.05 mm/rev
0.075 mm/rev
0.1 mm/rev
S = 300 RPM
Fig. 17. Variation of coefficient of friction (calculated using Merchant’s analysis)
with change in vibration amplitude at a spindle speed of S= 300 rpm.
A.S. Adnan, S. Subbiah / International Journal of Machine Tools & Manufacture 50 (2010) 294–302
301

ARTICLE IN PRESS
Acknowledgments
We thank Mr. Koh Wing Leong and Mr. Wong Cher Kong
(Mack) of the CNC workshop at the School of Mechanical and
Aerospace Engineering, Nanyang Technological University (NTU)
for their assistance in fabricating the various fixtures and in
assisting with the experiments. The authors also acknowledge the
use of the equipment from the Precision Engineering and
Nanotechnology (PEN) Centre and Metrology Laboratory at NTU.
References
[1] M. Yoshino, K. Kawade, E. Higashi, Two dimensional machining test of hard-
brittle materials under high hydrostatic pressure, Journal of the Japan Society
of Precision Engineering 73 (11) (2007) 1251–1255.
[2] M.B. Cai, et al., Crack initiation in relation to the tool edge radius and cutting
conditions in nanoscale cutting of silicon, International Journal of Machine
Tools and Manufacture 47 (3–4) (2007) 562–569.
[3] A.G. Atkins, Modelling metal cutting using modern ductile fracture
mechanics, International Journal of Mechanical Sciences 45 (2003) 373–396.
[4] V.P. Astakhov, A treatise on material characterization in the metal cutting
process, Part 2: cutting as the fracture of workpiece material, Journal of
Materials Processing Technology 96 (1999) 34–41.
[5] S. Subbiah, S.N. Melkote, Evidence of ductile tearing ahead of the cutting tool
and modeling the energy consumed in material separation in micro-cutting,
ASME Journal of Engineering Materials and Technology 129 (2) (2007)
321–331.
[6] V.P. Astakhov, in: Metal Cutting Mechanics, CRC Press, 1999.
[7] M. Lucas, et al., Design and characterisation of ultrasonic cutting tools, CIRP
Annals—Manufacturing Technology 50 (1) (2001) 149–152.
[8] M. Lucas, et al., A finite element model for ultrasonic cutting, Ultrasonics 44
(2006) e503–e509.
[9] D. Studer, H. Gnargi, Minimal compression of ultrathin sections with the use
of an oscillating diamond knife, Journal of Microscopy 97 (2000) 94–100.
[10] T. Moriwaki, E. Shamoto, Ultraprecision diamond turning of stainless steel by
applying ultrasonic vibration, Annals of CIRP 40 (1) (1991) 559–562.
[11] T. Moriwaki, E. Shamoto, Ultrasonic elliptical vibration cutting, Annals of CIRP
44 (1) (1995) 31–34.
[12] D.E. Brehl, T.A. Dow, Review of vibration-assisted machining, Precision
Engineering 32 (2008) 153–172.
[13] D.R. Lesuer, Experimental Investigations of Material Models for Ti–6AL–4V
Titanium and 2024-T3 Aluminum, US Department of Transportation Federal
Aviation Administration, 2000.
[14] M.E. Merchant, Mechanical of the metal cutting process. I. Orthogonal cutting
and a Type 2 chip, Journal of Applied Physics 16 (5) (1945) 267–275.
[15] V.P. Astakhov, On the inadequacy of the single-shear plane model of
chip formation, International Journal of Mechanical Sciences 47 (11) (2005)
1649–1672.
[16] C.K. Ng, et al., Experimental study of micro- and nano-scale cutting of
aluminum 7075-T6, International Journal of Machine Tools and Manufacture
46 (9) (2006) 929–936.
A.S. Adnan, S. Subbiah / International Journal of Machine Tools & Manufacture 50 (2010) 294–302
302
Document Outline
- Experimental investigation of transverse vibration-assisted orthogonal cutting of AL-2024
Wyszukiwarka
Podobne podstrony:
Torsion Experimental Investigation of New Long range Actions Nachalov & Sokolov p11
34 453 476 Creep of HSS Part I Experimental Investigations
34 453 476 Creep of HSS Part I Experimental Investigations
Experimental investigation on micromilling of oxygen free, high conductivity copper using tungste
a probalilistic investigation of c f slope stability
Endoscopic investigation of the Nieznany
13 161 172 Investigation of Soldiering Reaction in Magnesium High Pressure Die Casting Dies
8 95 111 Investigation of Friction and Wear Mechanism of Hot Forging Steels
Investigation of Barite Sag in Weighted Drilling Fluids in Highly Deviated Wells
Investigation Of Economic Crimes Attention Of Dr J P Mutonyi
Investigation of bioactive compounds
Investigations of White Layer Formation During Machining of Powder Metallurgical Ni Based ME 16 S
3 T Proton MRS Investigation of Glutamate and Glutamine in Adolescents at High Genetic Risk for Schi
Experimental study of drying kinetics by forced convection of aromatic plants
Ebsco Bialosky Manipulation of pain catastrophizing An experimental study of healthy participants
ABC Investigation of liver correct
Ebsco Bialosky Manipulation of pain catastrophizing An experimental study of healthy participants
więcej podobnych podstron