58
SS J^PtWOCC B • 8EADED AMULET PURSES
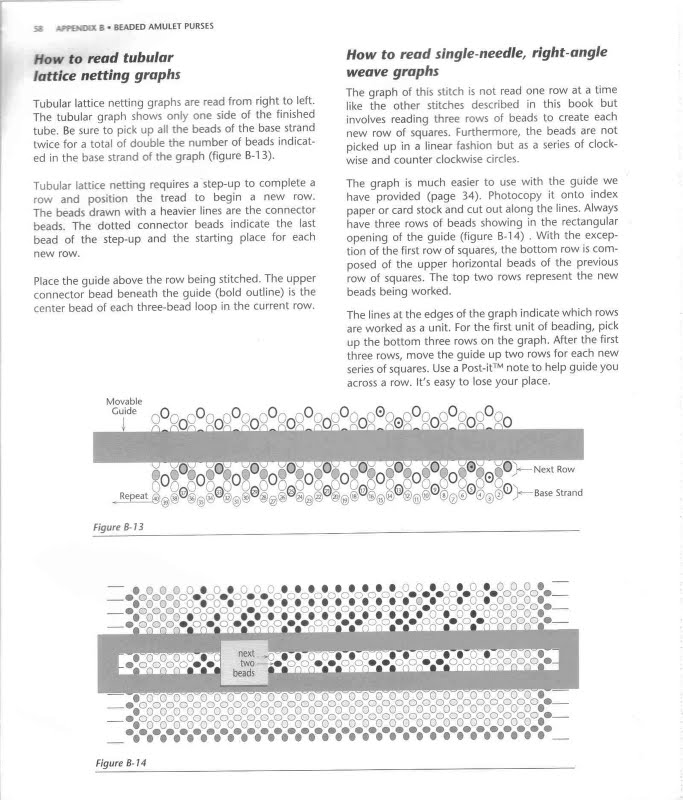
How to read tu bul ar lattice netting graphs
Tubular lattice netting graphs are read from right to left. The tubular graph shows only one side of the finished tubę. Be surę to pick up all the beads of the base strand lwice for a total of double the number of beads indicat-ed in the base strand of the graph (figurę B-l 3).
Tubular lattice netting requires a step-up to complete a row and position the tread to begin a new row. The beads drawn with a heavier lines are the connector beads. The dotted connector beads indicate the last bead of the step-up and the starting place for each new row.
Place the guide above the row being stitched. The upper connector bead beneath the guide (bold outline) is the center bead of each three-bead loop in the current row.
How to read single-needle, right angle weave graphs
The graph of this stitch is not read one row at a limę like the other stitches described in this book but involves reading three rows of beads to create each new row of squares. Furthermore, the beads are not picked up in a linear fashion but as a series of clock-wise and counter clockwise cirdes.
The graph is much easier to use with the guide we have provided (page 34). Photocopy it onto index paper or card stock and cut out along the lines. Always have three rows of beads showing in the rectangular opening of the guide (figurę B-14) . With the excep-tion of the first row of squares, the bottom row is com-posed of the upper horizontal beads of the previous row of squares. The top two rows represent the new beads being worked.
The lines at the edges of the graph indicate which rows are svorked as a unit. For the first unit of beading, pick up the bottom three rows on the graph. After the first three rows, move the guide up two rows for each new series of squares. Use a Post-it™ notę to help guide you across a row. It's easy to lose your place.
Movablr
Guide
0 O >0^^ O .0.0.0. On-nO

Ncxt Row
Figurę B13
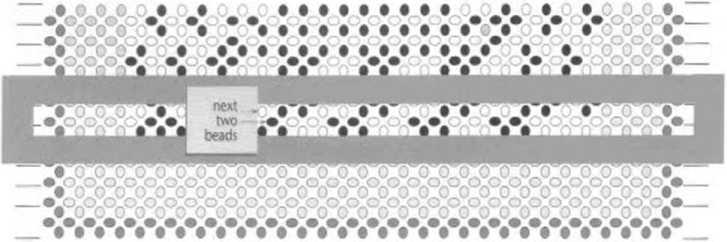
Figurę B■ 14
Wyszukiwarka
Podobne podstrony:
IS rRO)£CT THREE • BEADED AMULET PURSES To apply edge bcading to the ribbon. After the ribbon is sti
14 PROIECT TWO • BEAOEO AMULET PURSES To make the triangular flap. After completing the last row of
22 PROJECT FOUR • BEADED AMULET PURSES To make the branched fringe. Begin a new thread and exit one
A • 8EADED AMULET PURSES A • 8EADED AMULET PURSES sq^3re and the right vertical bead of the new squa
BEADED AMULET PURSES • PROIECT THREE 17 Sections to be read before beginning: • Tu
BEADED AMULET PURSES • PROJECT SIX 31 Sections to read before beginning: •
BIADED AMULET PURSES • PROIECT SEVEN J7 Sections to read before beginning: • Tubul
BEADED AMULET PURSES • PROJECT TWO 1J Sectlons to read before beginning: •
BEADED AMULET PURSES • BEADING SUPPLIES 5How To Use This Book After choosing a project, first read t
BEADED AMULET PURSES • PROJECT ONE 9 BEADED AMULET PURSES • PROJECT ONE 9 Sections to be read before
więcej podobnych podstron