17
BEADED AMULET PURSES • PROIECT THREE 17
Sections to be read before beginning:
• Tubular Lattice Netting (page 47)
• Fringe (page 51)
• Threads, KnotS and Bead Graphs (page 52)
• To begin tubular lattice netting (page 54)
• How to read tubular lattice netting graphs (page 58)
b.
Materials used:
• Size llc seed beads:
• Transparent orange
• Transparent light green
• Transparent sapphire
• Fringes include:
• Czech molded glass beads
• Oval Italian millefiori beads
• Guatemalan clay parrot
• Size 6° transparent light green seed beads for strap
• Half a yard of three-quarter inch light green ribbon
This project is a flattened tubę with the bottom stitcheri together.
To create the body of the purse. String 80 seed beads and tie into a circle. Allow a one-quarter inch space between the last bead and the knot. Place the circle over a support. See Lightweight Supports for Beading (page 7).
Take the needle and thread through the first bead. Pick up three seed beads and pass through bead five of the circle of beads (figurę 1). Thread on three morę beads and pass the needle through the fourth bead to the left of the last bead worked, bead nine (figurę 1). Continue adding new beads in groups of three and connecting at each fourth bead of the base strand until you reach the end of the circle.

Figurę 7
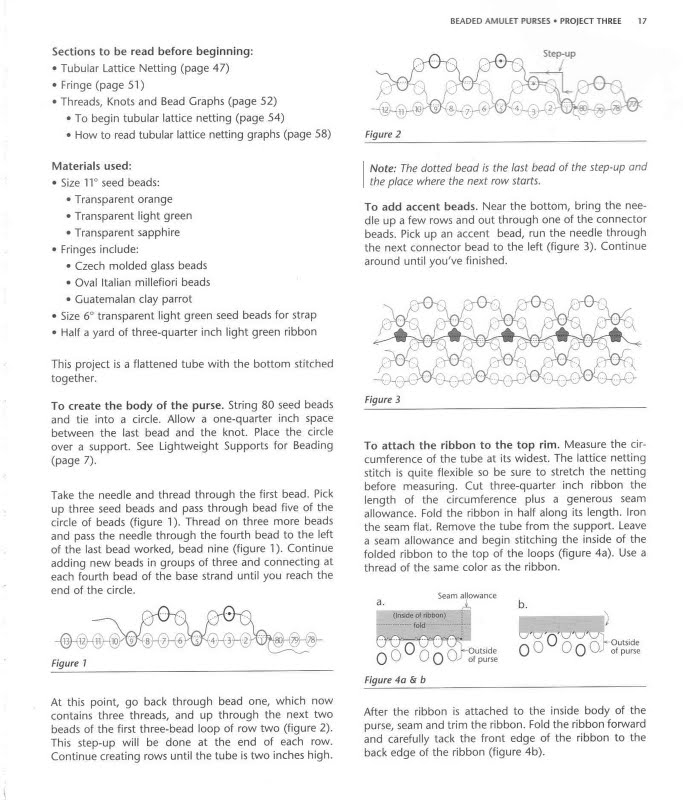
At this point, go back through bead one, which now contains three threads, and up through the next two beads of the first three-bead loop of row two (figurę 2). This step-up will be done at the end of each row. Continue creating rows until the tubę is two inches high.
Notę: The dotted bead is the last l>ead of the step-up and the place where the next row starts.
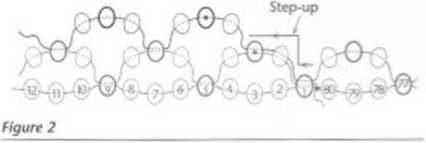
To add accent beads. Near the bottom, bring the needle up a few rows and out through one of the connector beads. Pick up an accent bead, run the needle through the next connector bead to the left (figurę 3). Continue around until you've finished.

Figurę 3
To attach the ribbon to the top rim. Measure the cir-cumference of the tubę at its widest. The lattice netting stitch is quite flexible so be surę to stretch the netting before measuring. Cut three-quarler inch ribbon the length of the circumference plus a generous seam allowance. Fold the ribbon in half along its length. Iron the seam fiat. Remove the tubę from the support. Leave a seam allowance and begin stitching the inside of the folded ribbon to the top of the loops (figurę 4a). Use a thread of the same color as the ribbon.
S«am allowance
3- _____ -i
(Insce ot noeon)
fołd
oo°ooo^2t™ 00 ooorase
Figurę 4a & b
After the ribbon is attached to the inside body of the purse, seam and trim the ribbon. Fold the ribbon forward and carefully tack the front edge of the ribbon to the back edge of the ribbon (figurę 4b).
Wyszukiwarka
Podobne podstrony:
BEADED AMULET PURSES • PROJECT FOUR 21 Sections to bo read before beginning: • Tub
BfcADŁO AMULET PURSCS • PRO
BEADED AMULET PURSES • PROJECT SIX 31 Sections to read before beginning: •
BIADED AMULET PURSES • PROIECT SEVEN J7 Sections to read before beginning: • Tubul
BEADED AMULET PURSES • PROJECT ONE 9 BEADED AMULET PURSES • PROJECT ONE 9 Sections to be read before
BEADED AMULET PURSES • PROIECT SEVEN i ) Figurę 4 To make the triangular points at the top of the pu
BEADED AMULET PURSES • PROJECT TWO 1J Sectlons to read before beginning: •
IS rRO)£CT THREE • BEADED AMULET PURSES To apply edge bcading to the ribbon. After the ribbon is sti
BEADED AMULET PURSES • PROJECT ONE 11 To make the strap. Think oł the strap as a necklace. Choose th
16 PROfECT THREE • BEADED AMULET PURSES 16 PROfECT THREE • BEADED AMULET PURSESProject ThreeRain For
więcej podobnych podstron