25
BfcADŁO AMULET PURSCS • PRO|ECT FIVE 25
Sections to be read before beginning:
• Threads, Knots and Bcad Graphs (page 52)
• To begin loomed bead weaving (page 53)
• How to read loomed bead weaving graphs (page 57)
Materials used:
• Miyuki delica beads:
• DB-34 round gold
• DB-41 silver-lined elear
• DB-36 cut silver
• DB-34 cut gold
• Smali crystal drop
• Two 4mm gold-filled beads
• Loom of your choice
This purse is loomed as one hour glass shaped piece. The warps are then pulled up to close the bottom.
Notę: This project is not for beginners and presumes you are already familiar with loomed bead weaving.
The heart-shape bottom of this purse is unusual for a loomed bag. The purse is loomed in one piece and then the warp threads are pulled up through the work to close most of the purse and create the rounded bottom. Therefore, the smali hourglass graph represents the shape of the finished loomwork (page 29). Graph one depicts the front of the purse, graph two depicts the back and graph three the flap.
To begin. Attach 34 warp threads at least eighteen inch-es long to your loom. The finished loomwork is 5i/2 inch-es long, plus you will need at least six inches on both ends to be able to weave the warps into the body of the loomwork.
To weave the bag. Aboul three inches down from the center of the loom, tie the weft thread around the sev-enth warp thread from the left, leaving a four-inch taił.
Work Tip: While looming, be surę not to pierce ony of the warp threads because to complete this purse, you musi be able to puli the warps up after weoving the beads. To ensure that the needle crosses above the warp threads, push the beads up between the warps until the silver glint of the needle is deariy visible as it crosses above the warp threads.
String on 21 round gold delicas and take the needle and thread under the center warp threads. Push the beads up between the warp threads and bring the needle up through the sixth space from the right. Pass through the beads from right to left. There should be six gaps between the warp threads on both sides of the loomed beads.
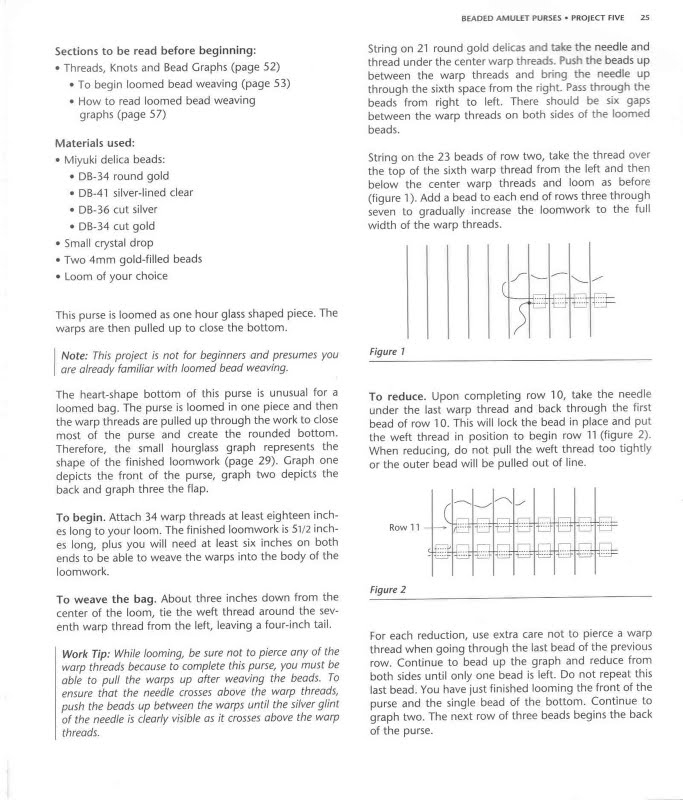
String on the 23 beads of row two, take the thread over the top of the sixth warp thread from the left and then below the center warp threads and loom as before (figurę 1). Add a bead to each end of rows three through seven to gradually inerease the loomwork to the fuli width of the warp threads.

Figurę 1
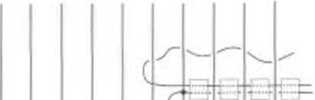
To reduce. Upon completing row 10, take the needle under the last warp thread and back through the first bead of row 10. This will lock the bead in place and put the weft thread in position to begin row 11 (figurę 2). When reducing, do not puli the weft thread too tightly or the outer bead will be pulled out of linę.
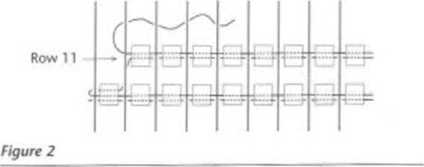
For each reduction, use extra care not to pierce a warp thread when going through the last bead of the previous row. Continue to bead up the graph and reduce from both sides until only one bead is left. Do not repeal this last bead. You have just finished looming the front of the purse and the single bead of the bottom. Continue to graph two. The next row of three beads begins the back of the purse.
Wyszukiwarka
Podobne podstrony:
BEADED AMULET PURSES • PROIECT THREE 17 Sections to be read before beginning: • Tu
BEADED AMULET PURSES • PROJECT ONE 9 BEADED AMULET PURSES • PROJECT ONE 9 Sections to be read before
BEADED AMULET PURSES • PROJECT FOUR 21 Sections to bo read before beginning: • Tub
26 PRO)ECT FIVE • 8EA0E0 AMULET PURSES Be surę to puli the warp threads close to the woven beads as
BEADED AMULET PURSES • PROJECT SIX 31 Sections to read before beginning: •
BIADED AMULET PURSES • PROIECT SEVEN J7 Sections to read before beginning: • Tubul
BEADED AMULET PURSES • PROJECT TWO 1J Sectlons to read before beginning: •
A6E7736W003 (2) BROKEN FILAMENT TAPE SECTION TO BE REPAIRED A6E7?J£f.VOOJ
20 PRO
Project tree Siemens - C:UsefsAUSYS03lDocumentsVAutomationProject Green ManProject Green Man Pro
C- MEISOF T Senes GX WorksZ (Untltled Pro
więcej podobnych podstron