31

BEADED AMULET PURSES • PROJECT SIX 31
Sections to read before beginning:
• Single-needle, Right-angle Weave (pagc 48)
• Decreasing at the sides (page 51)
• Threads, Knots and Bead Graphs (page 52)
• To begin single-needle, right-angle weave (page 55)
• How to read single-needle, right-angle weave graphs (page 58)
Materials used:
• Si/e 11° Czech seed beads:
• Opaque medium red
• Transparent dark red
• Opaque medium orange-yellow
• Transparent orange-yellow of a different tonę than the opaque orange-yellow
• Size 12* transparent yellow three-cut seed beads
• Size 5° or 6° opaque red seed beads
• Two large opaque red oval glass beads
• Four 4mm and four 8mm transparent dark red
glass rondels
This purse is formed by sewing a triangle to a square.
Notę: We highly recommend moking jamples ii you have not done this technięue before. It takes time to become familiar with the threading path of this stitch and to be obie to read the graph. This project will reąuire patience the first time.
Notę: Bolh the red and yellow seed beads of this project are several tones of each color hue, which then lends rich-ness and visual interest. Mix the groups of color randomly, don't worry aboul creating a pattern wilhin the yellow or red areas of the design. However, do be careful not to have too many beads of an individual color together, especially the opoques, because those groupings would detract from the graphic design of the finished purse.
Work Tip: If you need to back-track and redo a square, loosen the square and puli the thread back through the beads and then puli the needle back through the bead.
To begin. Start in the lower left comer of the graph one on page 34, string four seed beads and then pass the needle back through beads number one through four again to make a circle. Tie a knot.
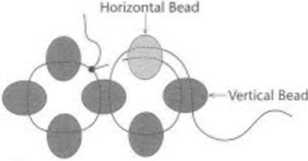
Pick up the three beads of the next square. Take the needle up through the right vertical bead of the first group of four. Pass back through the upper horizontal bead and down through the right vertical bead of the new square (figurę 1).

Figurę 1. Verticol and hori/onta! rełer to the direction of the hole in relohon to the aiready woven beads.
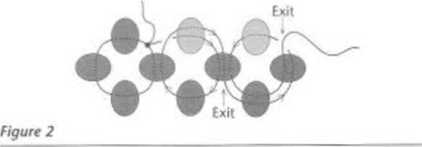
To begin the third square, pick up three beads. Take the needle down through the right vertical bead of the pre-vious square, across through the lower horizontal bead and up through the right vertical bead (figurę 2).

The squares will alternate between a counter clock-wise and clock-wise threading path. Think in terms of tuming corners, every time you come through a bead — tum a corner. Never take the thread across an open space to another bead. By continually turning corners, the beads are pulled into the characteristic right-angle weave pattern. Periodically look at the interstices of the bead squares to make surę the threading path is correct (figurę 3).
Wyszukiwarka
Podobne podstrony:
BEADED AMULET PURSES • PROJECT TWO 1J Sectlons to read before beginning: •
BIADED AMULET PURSES • PROIECT SEVEN J7 Sections to read before beginning: • Tubul
BEADED AMULET PURSES • PROJECT FOUR 21 Sections to bo read before beginning: • Tub
BEADED AMULET PURSES • PROJECT SIX 33 To add the fringes to the edges. Add two-bead fringes between
BEADED AMULET PURSES • PROIECT THREE 17 Sections to be read before beginning: • Tu
BEADED AMULET PURSES • PROJECT ONE 9 BEADED AMULET PURSES • PROJECT ONE 9 Sections to be read before
BEADED AMULET PURSES • PROJECT ONE 11 To make the strap. Think oł the strap as a necklace. Choose th
BEADED AMULET PURSES • PROJECT FIVE 27 To create the fringe. Take the thread out through the top out
więcej podobnych podstron