essentÊrving°82

ESSENTIAL W o O D C A R VIXG T E C H N1Q U E S

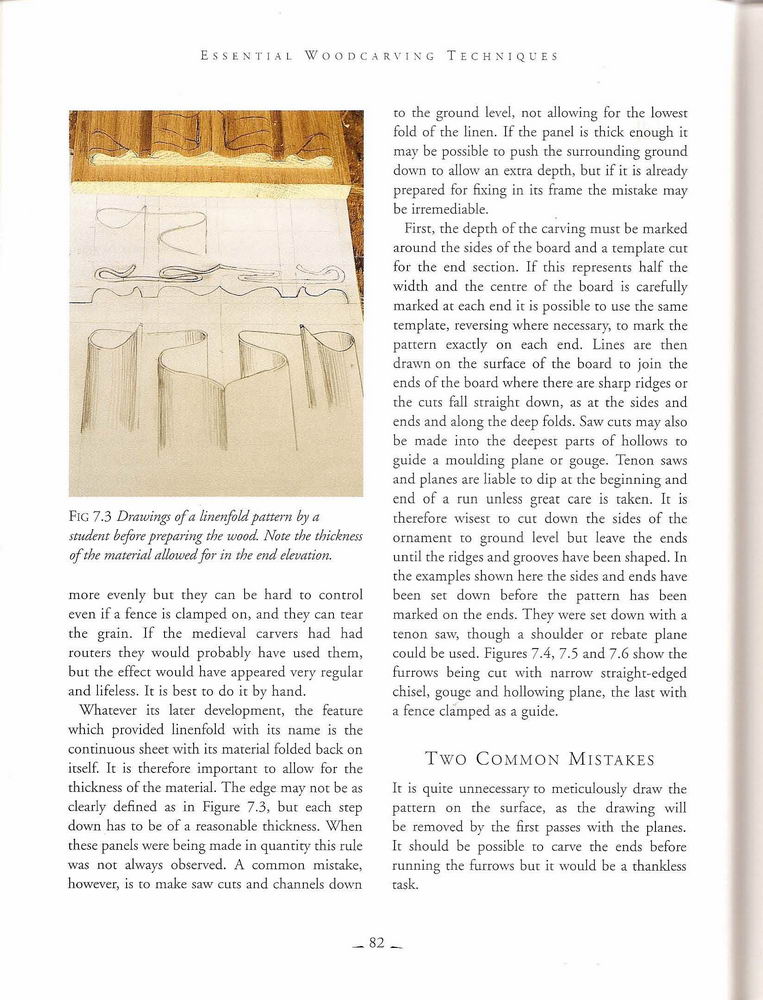
Fig 7.3 Drawings ofa linenfoldpatiem by a student before preparing the woocL Notę tbe thickness of the materiał aliowedfor in the end elemtion.
morÄ™ evenly but they can be hard to control even if a fence is clamped on, and they can rear the grain. If the medieval carvers had had routcrs they would probably havc uscd them, but the cffect would have appeared verv regular and lifeless. It is besc to do it by hand.
Whatever its later development, the feature which provided linenfold with its name is the continuous sheet with its materiał folded back on itself. It is therefore important to allow for the thickness of the materiał. The edge may not be as clearly defined as in Figurę 7.3, bur each step down has to be of a reasonable thickness. When these pancls wcrc being inade in quantity this rulc was not always obscrvcd. A common mistake, howcver, is to make saw cuts and channels down to the ground leveł, not allowing for the lowest fold of the linen. If the panel is thick enough it may be possible to push the surrounding ground down to allow an extra depth, but if it is already prepared for fixing in its frame the mistake may be irremediable.
First, the depth of the carving must be marked around the sides of the board and a template cut for the end section. If this represents half the width and the centre of the board is carefully marked at cach end it is possible to use the same template, reversing where necessary, to mark the pattcrn cxactly on each end. Lines arc rhcn drawn on the surface of the board to join the ends of the board where there are sharp ridges or the cuts fali straight down, as at the sides and ends and along the decp folds. Saw cuts may also be madÄ™ into the decpcst parts of hollows to guide a moulding piane or gouge. Tenon saws and planes are liable to dip at the bcginning and end of a run unless great care is takcn. It is therefore wisest to cut down the sides of the ornament to ground lcvcl but leave the ends until the ridges and grooves have been shaped. In the examples shown here the sides and ends have been set down before the pattern has been marked on the ends. They werc set down with a tenon saw, though a shoulder or rebate piane could be used. Figures 7.4, 7.5 and 7.6 show the furrows being cut with narrow straight-edged chisel, gouge and hollowing piane, the last with a fence clamped as a guide.
Two Common Mistakes
It is quite unnecessary to meticulously draw the pattern on the surface, as the drawing will be removed by the first passes with the planes. It should be possible to carve the ends before running the furrows but it would be a thankless task.
-82 _
Wyszukiwarka
Podobne podstrony:
essent?rving?52 Essential Woodcarying Techniques Fig 14.3 Mov mg water. Fig 14.4 Drawings devełoping
essent?rving?14 pp Essential Woodcarvixg Techniques W Fig 1.17 Ttoo grounders. Very narrow old Engli
essent?rving?22 ESSENTIAL W O O D C A R VIN G T E C H N IQ U E S Fig 1.36 It is possible to use the
essent?rving?31 S K L K C T lG AND B l Y I N G Sl l T A B I E W O O D Fig 2.7 The tiuisted bark on t
essent?rving?42 Essential Voodcarving Techkiques Fig 2.24 Vaulter carued in cauilpa by Dick Oniatis.
essent?rving?47 First C i t s: Chip C a r v i n c, Fig 3.3 The depth of the stab cut. exercise. Cut
essent?rving?66 Essen ti al Woodcarvixg Techniques Fig 5.1 Oak leafstudies by a student (Howard Spie
essent?rving?70 Essential Woodcaryinc Techntiques Fig 5.11 The top surface of the leaffinished, with
essent?rving?77 C A R VI X G T RADITIONAL F O L 1 A G E Fig 6.8 Rococo frame showing leafedges to un
essent?rving?84 Essential Woodcarving Techniques Fig 7.7 This is how a piece of card would look if f
essent?rving?85 Linenfoi. D pcrspcctive is Iost as the bortom edge is a mirror image of rhe lop. If
essent?rving?98 Essential Woodcarving Techniques Fig 9.1 Various lines. The one on the left Incks in
essent?rving?99 C A R V 1 N C IN THE R O U X D CON VEYING A SENSE OF DEPTH If you are drawing with a
essent?rving?24 E S ii E Nil A L W O O O C A R V l N O, T E C H X I Q L F. S Fig 11.14 The left sic
essent?rving?29 C A R v I N O. Tl-IF. H l* M A N F I C, f R F. Fig 12.5 Finished małe figurę. (Notę
essent?rving?46 ESSF. NTIAL W O O D C A R v I N G T E C H N 1 Q U E S Fig 13.17 Top view afer first
essent?rving?47 S T Y L I /. I N C the FigurÄ™ Fig 13.18 Right side showing deoelopment of the fonns,
essent?rving?48 Essential W o o d c aR v
essent?rving?64 ESSENTIAL W o O D C AR v1N G T E C H NIQ U E S Fig 15.7 Alphabet drawn by Janct Monk
więcej podobnych podstron