
8.2.6c
8.2.6c Using Fills and
Strokes (Illustrator)
1-2
Fundamentals of Web Design 1.2—-Lab 8.2.6c
Copyright
2002, Adobe Systems, Inc.
8.2.6c Using Fills and Strokes (Illustrator)
Filling with color
Painting objects with colors, gradients, or patterns is done using a combination
of palettes and tools—including the Color palette, the Swatches palette, the
Gradient palette, the Stroke palette, and the paint buttons in the toolbox, which
let you select and change an object’s paint and line attributes.
You’ll begin by filling an object with color. Filling an object paints the area
enclosed by the path.
When you reset the defaults, the Color palette and Swatches palette appear
automatically on-screen when starting Adobe Illustrator.
1. Choose File > Open, and open the star.ai file in the End folder, located
inside the 8_2_6/c folder.
2. Choose File > Save As, name the file Hats.ai, and select the 8_2_6/c folder.
Leave the Format option set to Adobe Illustrator® Document, and click Save.
In the Illustrator Native Format Options dialog box, select Illustrator 10
Compatibility and click OK.
3. Click the Swatches tab to bring the palette to the front of its group. (If the
Color and Swatches palettes aren’t visible, display them by choosing
Window > Color and Window > Swatches.)
4. Click the close box or choose Window > Layers to close the Layers palette.
You won’t need this palette for this lesson.
5. Choose View > Hide Bounding Box. The bounding box is useful for moving
and resizing objects. You won’t need this option for this lesson.
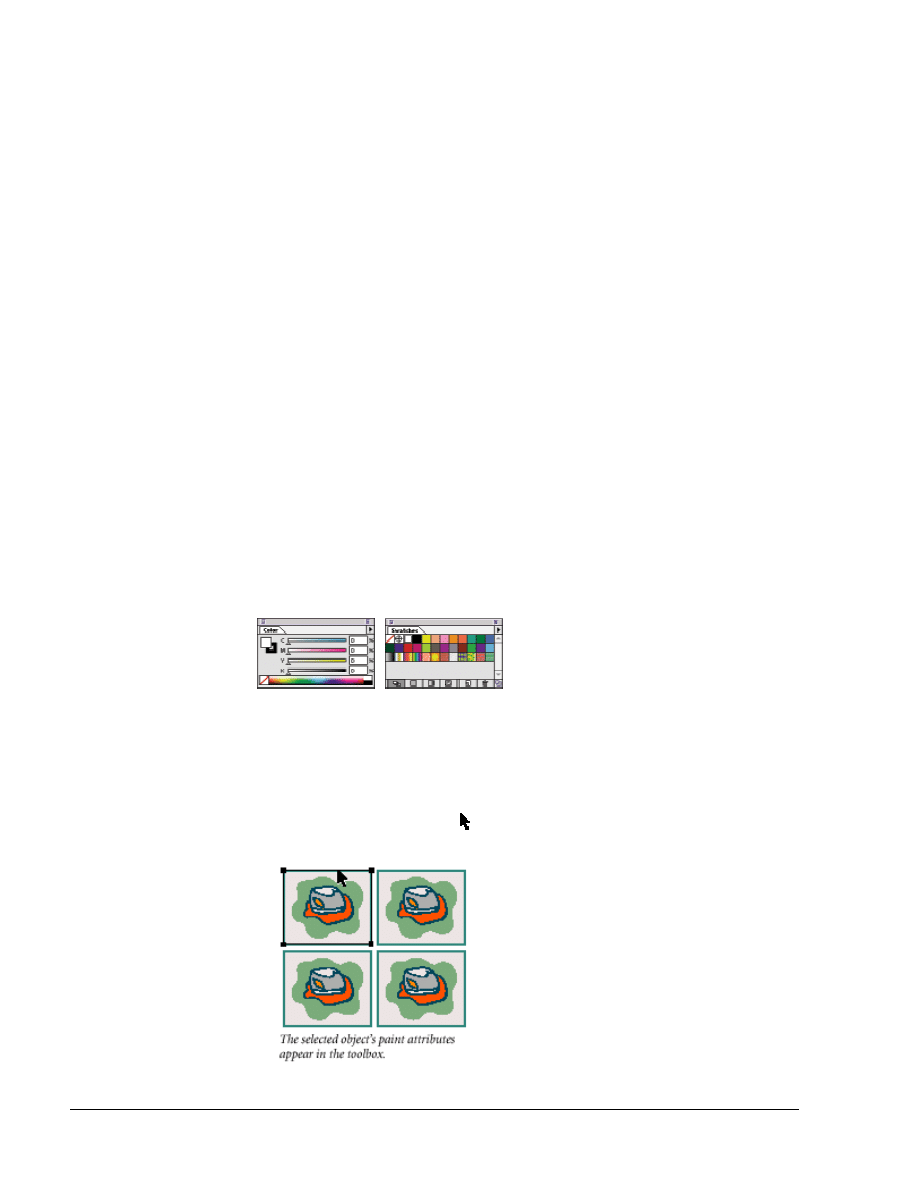
6. Select the selection tool (
) in the toolbox, and then click the rectangular
border around the top left block in the artwork to select the object.
Copyright
2002, Adobe Systems, Inc.
Fundamentals of Web Design 1.2—Lab 8.2.6c
1-3
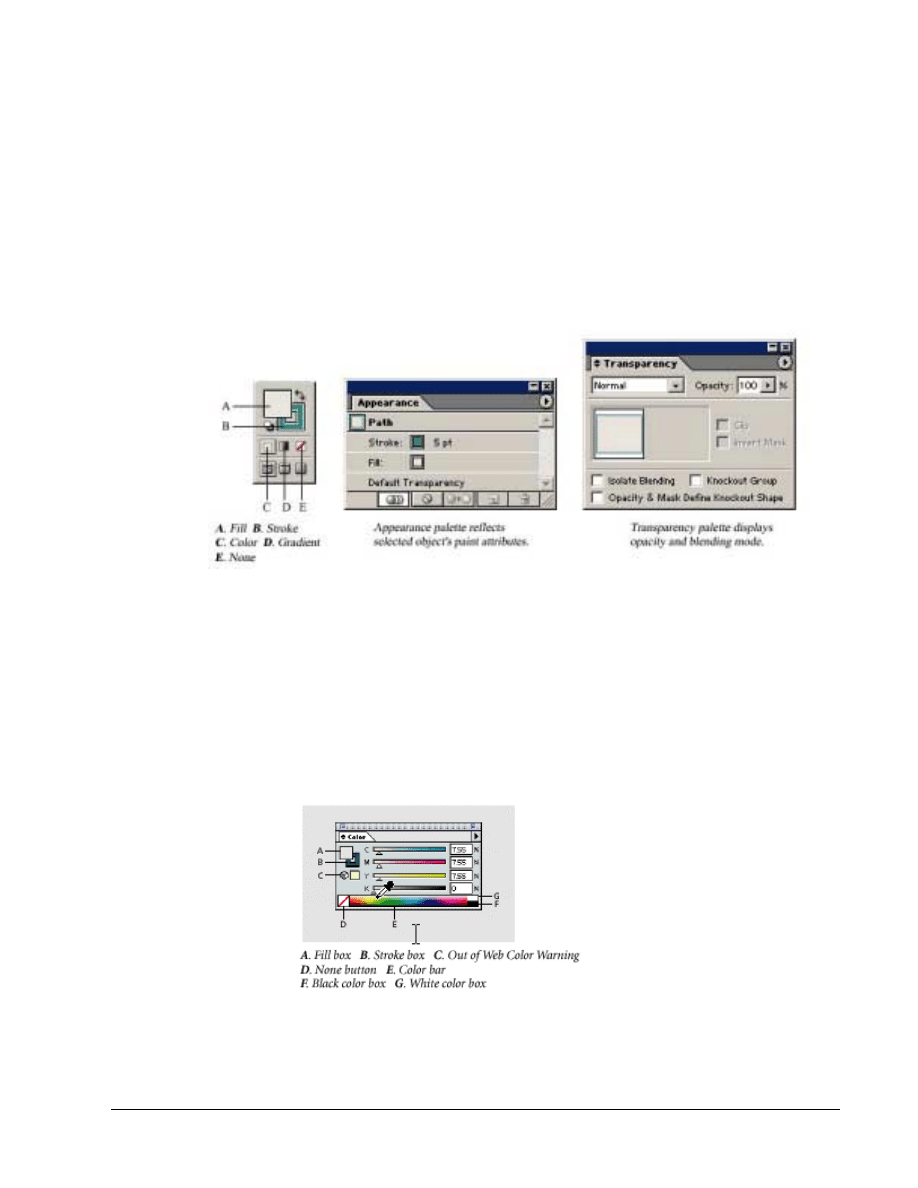
In the toolbox, notice that the Fill box appears in the foreground, indicating that
it is selected. (This is the default.) The box has a fill of a warm gray color. The
Color button appears depressed, indicating that it is selected. In the background
behind the Fill box, the Stroke box has a turquoise outline, indicating that the
rectangle is outlined in turquoise. When the Stroke box or Fill box is in the
background, its color is not the current selection.
The fill and stroke attributes of the selected object also appear in the Appearance
palette. Appearance attributes can be edited, deleted, saved as styles, and applied
to other objects, layers, and groups. You’ll use this palette later in this lesson.
The Color palette displays the current color for the fill and stroke as well, and its
CMYK sliders show the color’s percentage of cyan, magenta, yellow, and black.
At the bottom of the Color palette is the color bar. Now you’ll use it to select a
fill color of yellow.
7. In the Color palette, position the eyedropper pointer over the color bar. Hold
down the mouse button and drag the eyedropper across the colors. As you
drag, the color updates in the Fill boxes in the toolbox, Color palette, and
Appearance palette.
The color bar lets you quickly pick a fill or stroke color from a spectrum of
colors and select colors visually. You can also choose white or black by clicking
the white color box or black color box on the right end of the color bar.
1-4
Fundamentals of Web Design 1.2—-Lab 8.2.6c
Copyright
2002, Adobe Systems, Inc.
8. Now click a yellow color in the color bar to select the color. You can adjust
the color by dragging the CMYK sliders in the Color palette. (We selected a
yellow color with these values: C = 3.53%, M = 4.31%, Y = 48.63%, and K =
0%.) The color is updated in the Fill boxes in the toolbox and the Color
palette, and in the artwork.
The paint attributes you choose are applied to all new objects you create until
you change the attributes again. Depending on the last paint attribute applied,
either the Fill box or the Stroke box appears selected and front most in the
toolbox.
Stroking with color
Next, you’ll outline the squiggly area around the bottom left hat. Painting just
the outline of an object is called stroking.
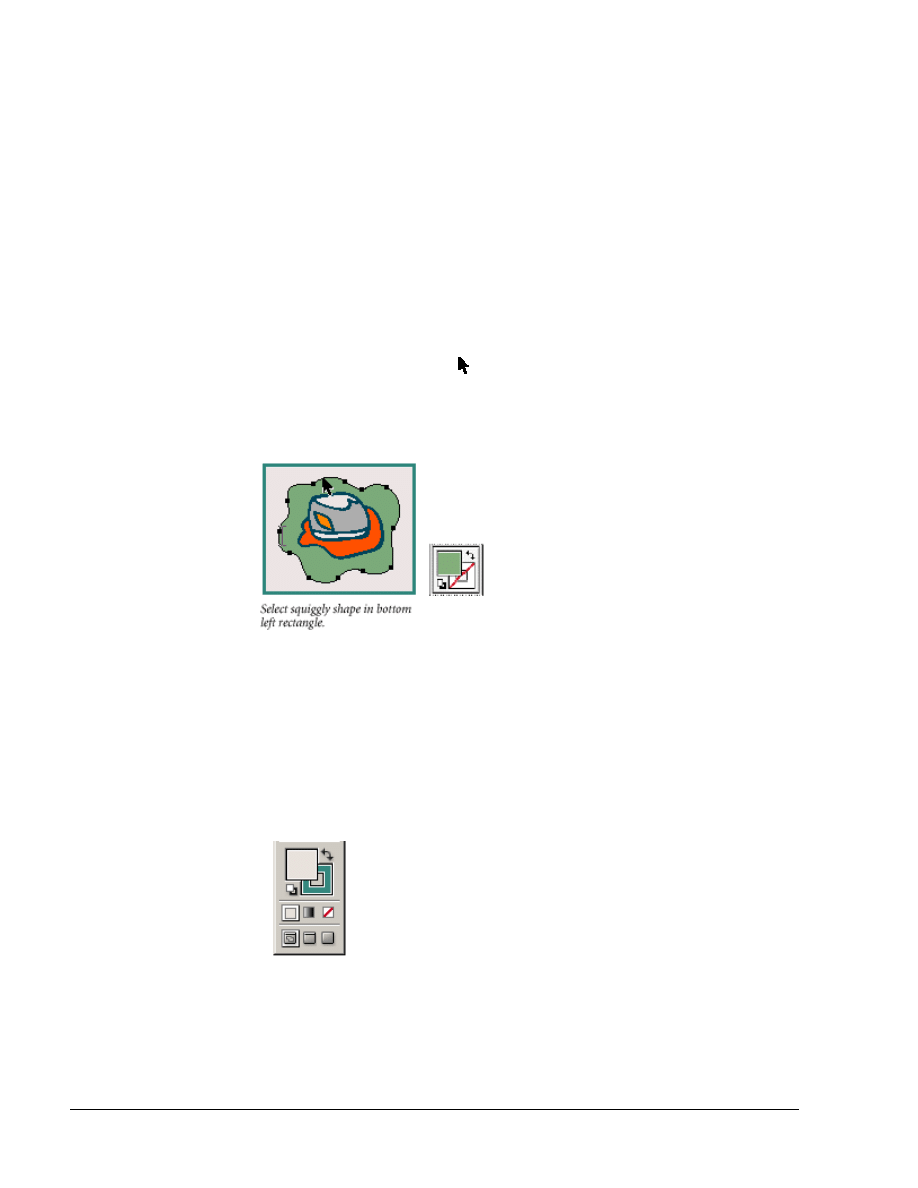
1. Using the selection tool (
), click the squiggly shape around the hat in the
bottom left rectangle to select it.
The Fill box in the toolbox displays a pale green color. The Stroke box in the
background has a red slash, indicating the squiggly shape’s stroke is unpainted (a
stroke of “None”).
You’ll start by swapping the fill color with the stroke color.
2. Click the Swap Fill and Stroke button to reverse the colors of the selected
object’s fill and stroke.
The Fill box now has no fill (a fill of “None”) and the Stroke box has a pale
green color. (The color will become apparent in the next step.) With a fill of
None, you can see through to the fill underneath—in this case, the gray color of
the rectangle’s fill.
Copyright
2002, Adobe Systems, Inc.
Fundamentals of Web Design 1.2—Lab 8.2.6c
1-5
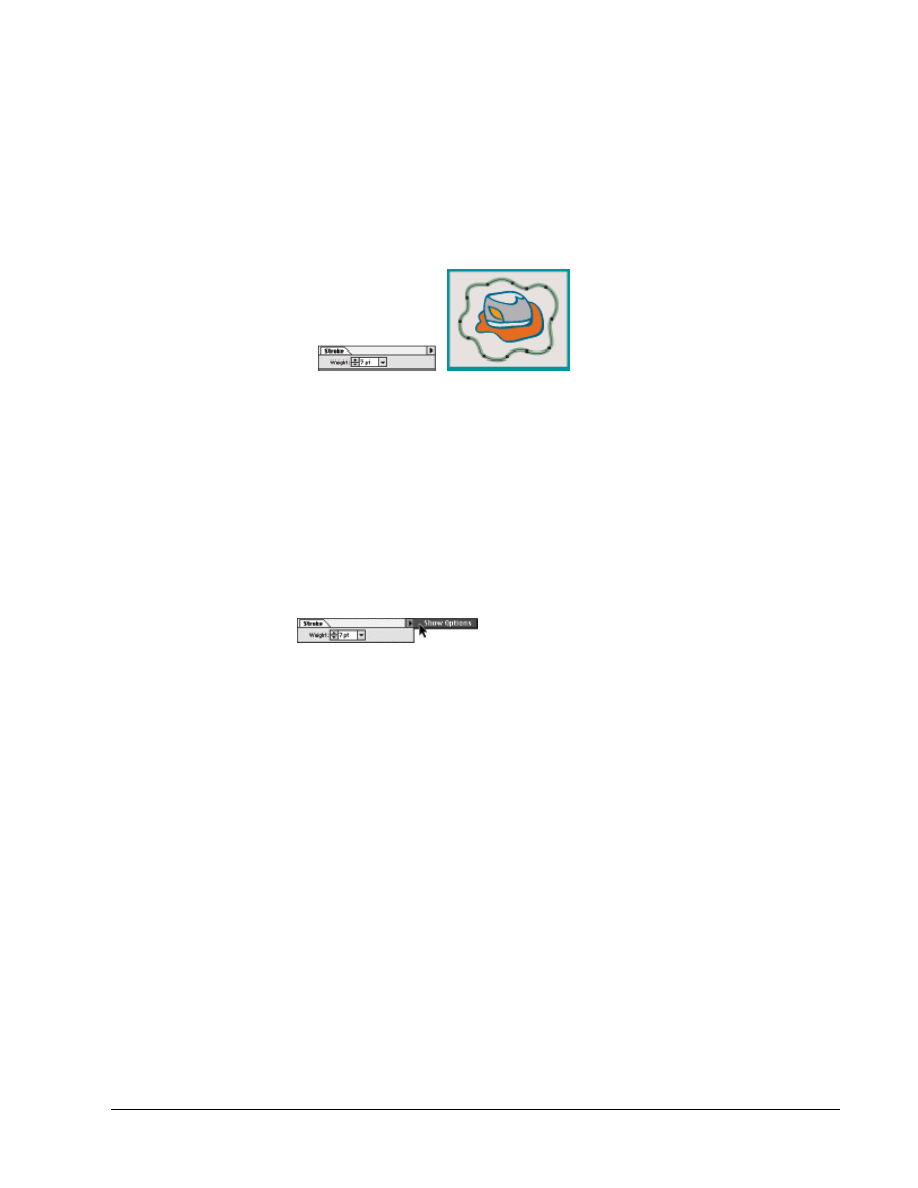
Now you’ll change the weight of the line that you just stroked using the Stroke
palette. Stroke weight is the thickness of a line. In the Stroke palette (beneath the
Transparency palette), the line has a weight of 1 point.
3. Click the Stroke tab to bring the palette to the front of its group. Then type 7
in the Weight text box and press Enter or Return to change the stroke weight
to 7 points. The squiggly line now stands out.
Next you’ll use the Stroke palette’s options to change the line from solid to
dashed.
4. First, drag the Swatches palette by its tab to move the palette down and away
from the Stroke palette.
5. In the Stroke palette, hold down the mouse button on the triangle in the
upper right corner of the palette and choose Show Options from the palette
menu. (You use this same technique for choosing options from other palette
menus.)
You use the Stroke palette options to specify how to cap the ends, join the
corners, and make lines dashed or dotted.
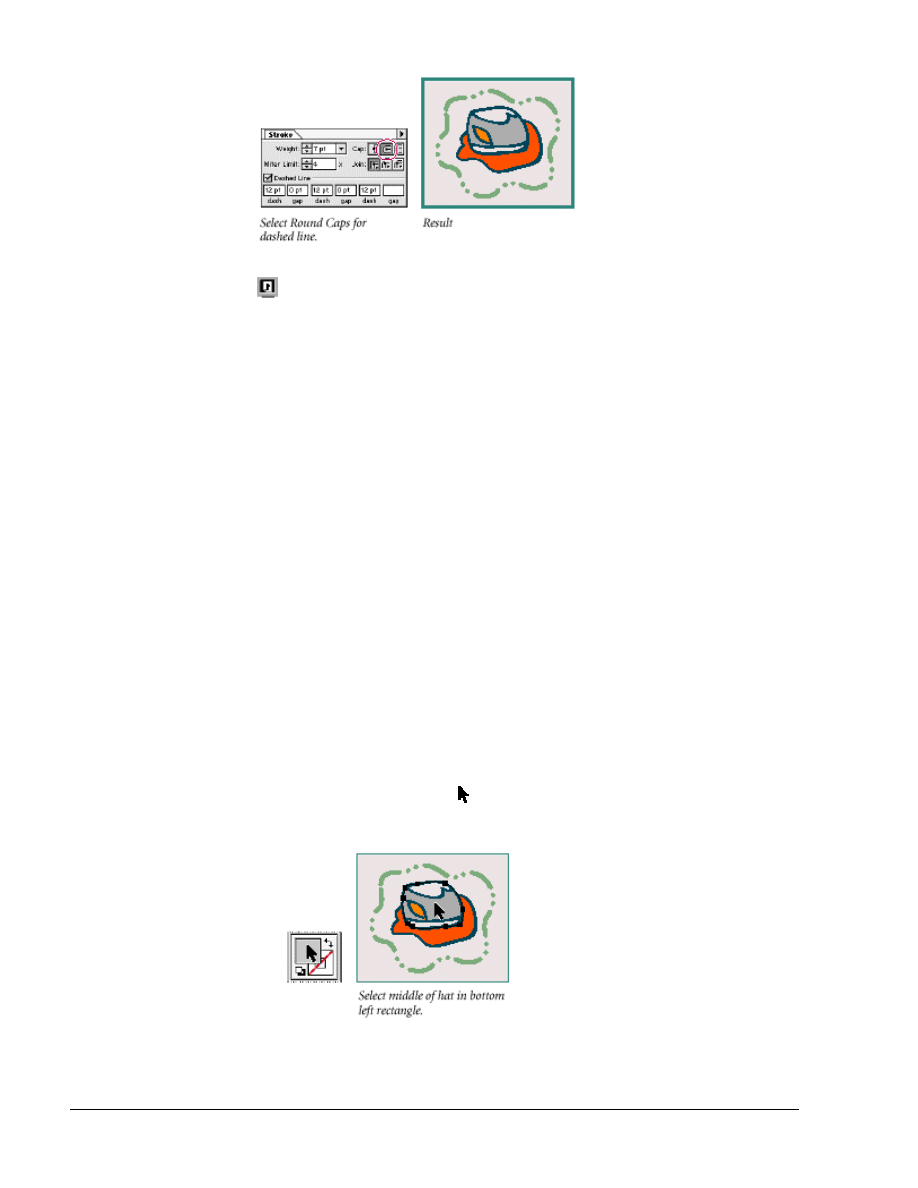
6. In the Stroke palette, select the Dashed Line option. The Dash and Gap text
boxes become active.
To create a dashed or dotted line, you specify the length of the dash (or dot) and
then the gap, or spacing, between the dashes. You can create a dashed or dotted
line with as few as two values or as many as six values. The more values you
enter, the more complex the pattern.
7. Type the following values in the Dash and Gap text boxes, pressing Tab to
advance to the next text box: 12, 0, 12, 0, 12. Leave the last Gap box empty.
Press Enter or Return to apply the change.
Now you’ll select a cap for the lines to create a dotted-line effect.
8. In the Cap options area of the Stroke palette, click the Round Cap button
(the middle button). Click away from the artwork to deselect it and see the
result.
1-6
Fundamentals of Web Design 1.2—-Lab 8.2.6c
Copyright
2002, Adobe Systems, Inc.
For examples of other effects you can create, and information on stroking
lines, see “Using the Stroke palette” in online Help or Chapter 6 in the Adobe
Illustrator User Guide.
You can select objects by a common paint attribute (such as their stroke color or
weight) and change them all at once.
9. Select the border of one of the rectangles, and click the Stroke box in the
toolbox to select the rectangle’s stroke.
10. Choose Select > Same > Stroke Weight to select the strokes of all the objects
that have the same stroke weight in the artwork (in this case, all of the
rectangles).
11. In the Stroke palette, type 2 in the Weight text box and press Enter or Return
to globally change the stroke weight to 2 points.
12. Click away from the artwork to deselect it, and choose File > Save.
Building a custom palette
Now you’ll learn how to create your own custom palettes by mixing colors,
naming them, and saving them in the Swatches palette.
Mixing your own color
You’ll start to create a custom palette by mixing a color using the CMYK sliders
in the Color palette. First you’ll mix a fill color.
1. In the toolbox, click the Fill box to make it active.
2. Using the selection tool (
), click the middle of the hat in the bottom left
rectangle to select it.
Copyright
2002, Adobe Systems, Inc.
Fundamentals of Web Design 1.2—Lab 8.2.6c
1-7
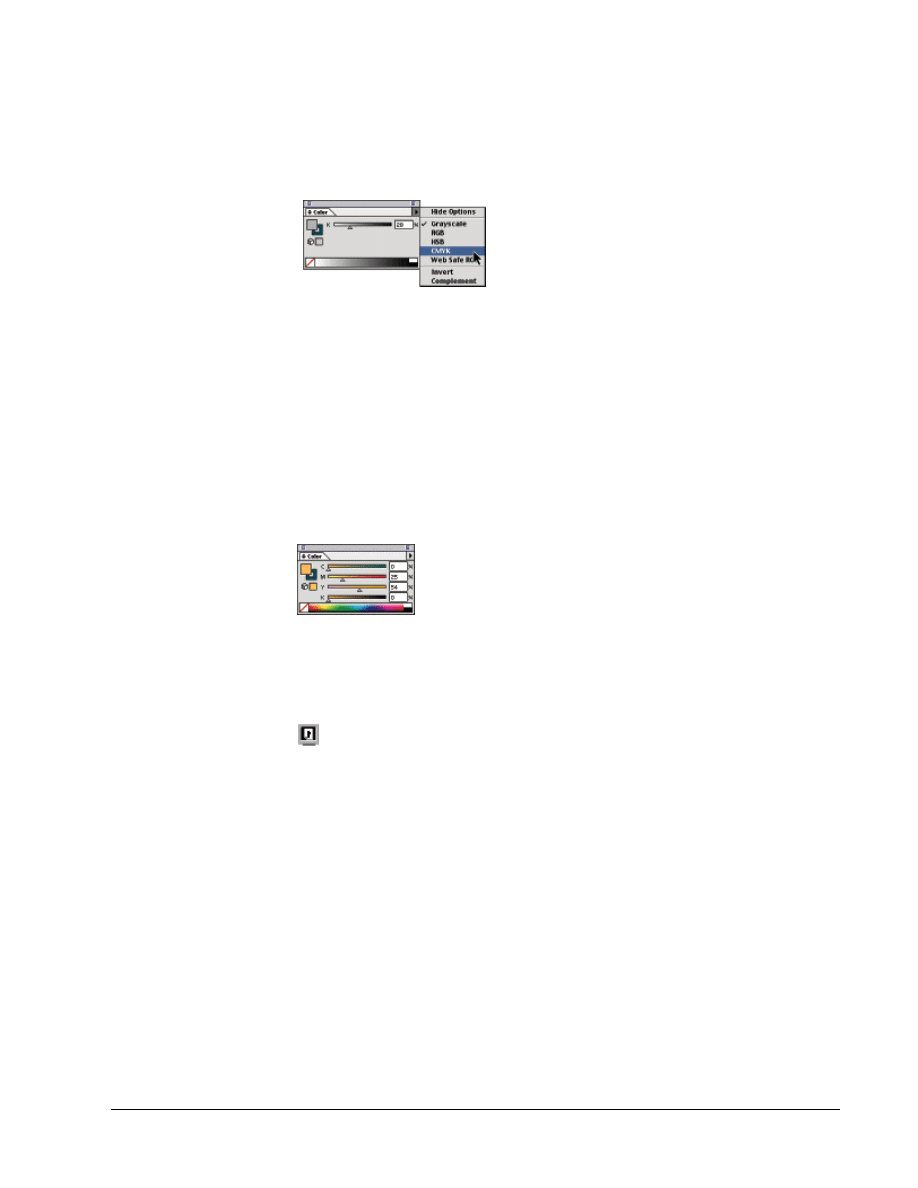
In the Color palette, notice that the hat color is grayscale—that is, a percentage
of black— and only a K (black) slider shows a value. The color bar changes to
display a scale ramp from white to black.
Now you’ll change the color model to CMYK so that you can mix colors.
3. In the Color palette, choose CMYK from the palette menu.
The Color palette lets you edit and mix colors—either colors that you create or
colors that you have selected from the Swatches palette, from an object, or from
a color library. In this case, you’re choosing colors using the CMYK color
model.
Now you’ll select an orange color for the middle of the hat.
4. In the Color palette, drag the CMYK sliders to select a light orange color or
type values in the % text boxes and press Enter or Return to apply the
changes. (We specified 0% cyan, 25% magenta, 54% yellow, and 0% black.)
You can use the different color models in conjunction with the Color palette
sliders to select a color precisely by its different color values. However, if you
mix color models (such as CMYK and RGB) in the same file, Illustrator will
convert the colors to whatever mode the file is saved in.
For information on the color models that Illustrator uses, see “Color Modes
and Models” in online Help or Chapter 6 in the Adobe Illustrator User Guide.
5. Click away from the artwork to deselect it, and choose File > Save.
Saving colors
The Swatches palette stores the colors, gradients, and patterns that have been
preloaded into Adobe Illustrator, as well as those you have created and saved for
reuse. New colors added to the Swatches palette are saved with the current file.
Opening a new artwork file displays the default set of swatches that comes with
the Adobe Illustrator program.
You’ll add the light orange color you just mixed to the Swatches palette so it
will be stored with this artwork file. You can select a color to add from either the
Fill or Stroke boxes in the toolbox, or from the Color palette. Even though you
deselected the artwork, the light orange color is still the current color in the Fill
box in the toolbox and in the Color palette.
1. Drag the orange color from the Fill box and drop it in the Swatches palette.
It appears in the first empty spot in the palette.

1-8
Fundamentals of Web Design 1.2—-Lab 8.2.6c
Copyright
2002, Adobe Systems, Inc.
As you drag a color into the Swatches palette, an outline appears around the
palette, indicating that it is active and that you are about to drop the color.
Now you’ll add another color to the Swatches palette.
2. Using the selection tool (
), select the top left rectangle that you painted
with a yellow fill.
3. Make sure that the Fill box is selected in the toolbox, and then click the New
Swatch button at the bottom of the Swatches palette to store the color.
You can make your own custom set of swatches for the file by deleting swatches
from the Swatches palette that you don’t use.
4. Click away from the artwork to deselect it, and then click the black swatch
(C=0, M=0, Y=0, K=100) in the Swatches palette to select it. Click the
Delete Swatch button at the bottom of the Swatches palette, and then click
Yes in the warning dialog box to delete the swatch.
If you want to add a color back into the Swatches palette, you can drag the color
directly from the Color palette or from the Fill or Stroke boxes in the toolbox.
You can also restore the default set of colors to your artwork.
5. Choose Window > Swatch Libraries > Default_CMYK to retrieve the
default set of swatches for CMYK files. (These swatches may look different
from the swatches in your Swatches palette.)
6. In the Default palette, select the black color swatch you deleted in step 4,
and then choose Add to Swatches from the palette menu to copy the selected
swatch back to your customized Swatches palette. The color appears as the
last color in the bottom row of the Swatches palette.
You can add swatches from any color library palette to the Swatches palette.
7. Click the close box of the Default palette to close it, and choose File > Save.
Naming a color
You can name colors and refer to that name as you paint. All colors—whether
process colors or spot colors—can be named while still retaining all of the
characteristics of the color mode (for example, RGB, Web Safe RGB, HSB, or
Grayscale modes).
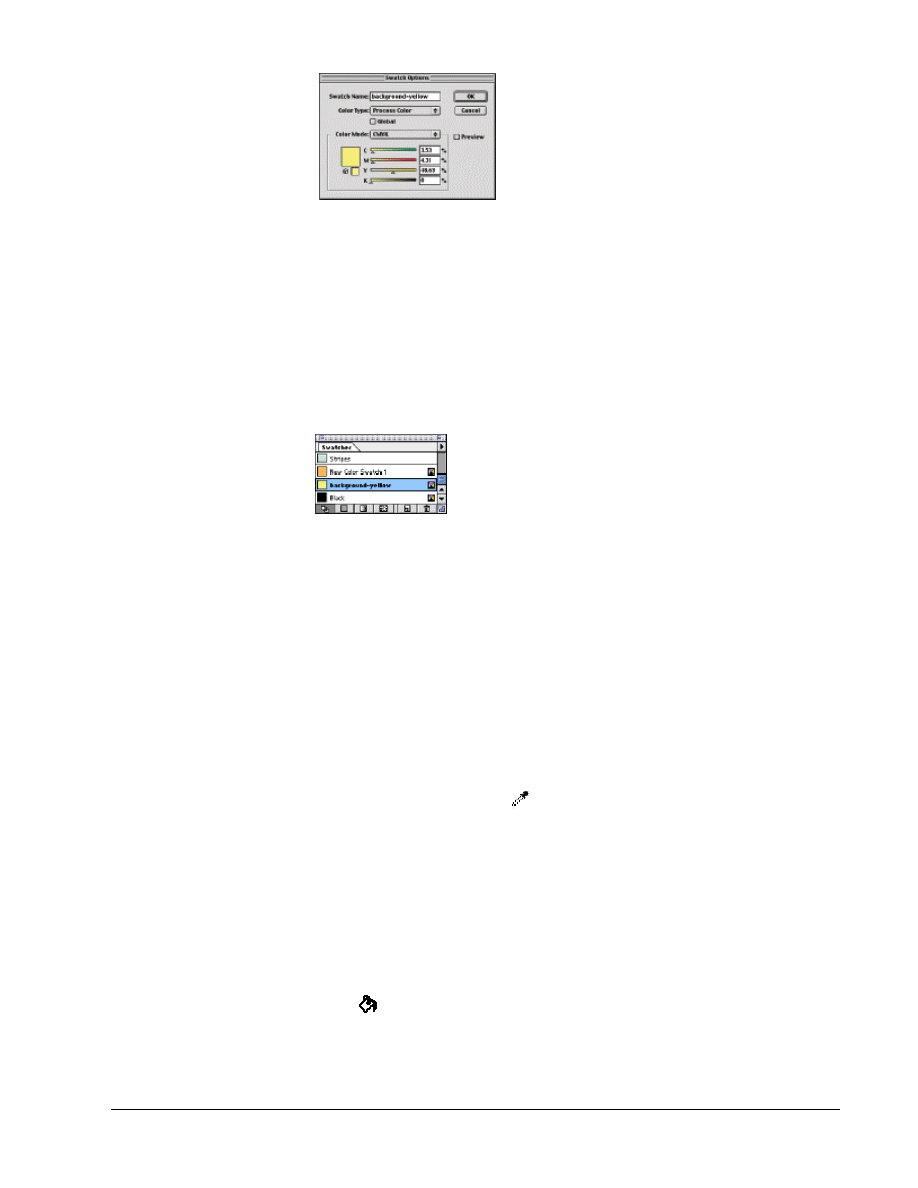
1. Double-click the yellow swatch you saved in the Swatches palette, or select
it and choose Swatch Options from the Swatches palette menu.
2. In the Swatch Options dialog box, name the color (for example,
“background-yellow”) and click OK.
Copyright
2002, Adobe Systems, Inc.
Fundamentals of Web Design 1.2—Lab 8.2.6c
1-9
The Swatches palette lets you name, store, and select three types of colors:
individual and global process colors (these include grayscale and CMYK, RGB,
Web Safe RGB, and HSB color models), and global spot colors. Spot colors are
special premixed colors used instead of, or in addition to, process color inks;
they require their own separations and their own plates on press.
Now you’ll change the display of the Swatches palette so that you can locate the
color by its name.
3. Choose List View from the Swatches palette menu to display the swatches
by name and see the swatch you just named.
You can change how swatches are displayed in the palette—as large or small
swatches, or by name. When you display swatches by name, the Swatches palette
also displays icons indicating the color model and color type (individual process
color, global process color, or global spot color).
Copying paint attributes
Adobe Illustrator lets you copy paint attributes of objects (such as their fill and
stroke color) in various ways and apply the attributes to other objects.
You’ll use the eyedropper tool to copy colors from your artwork into the Color
palette. Also called sampling, copying colors lets you replicate paint attributes
even when you don’t know their exact values.
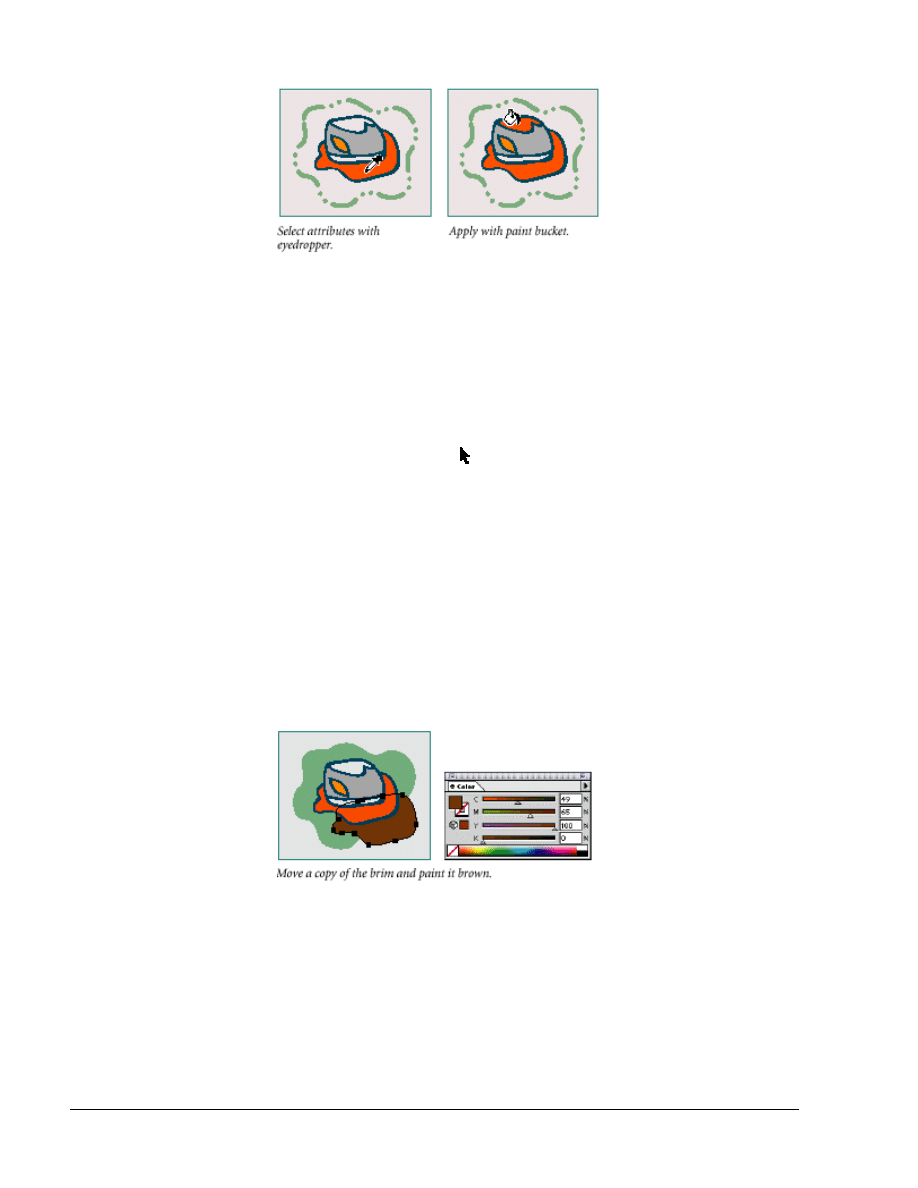
1. Select the eyedropper tool (
) in the toolbox.
2. In the bottom left rectangle, click the orange brim of the hat to sample its
color. This action picks up the fill and stroke attributes of the hat brim and
displays them in the Color palette.
By default, the eyedropper tool affects all paint attributes of an object. However,
you can restrict which attributes are affected (by double-clicking the eyedropper
tool and selecting options in the dialog box).
3. To quickly apply the current paint attributes to the top of the hat, hold down
Alt (Windows) or Option (Mac OS) to temporarily select the paint bucket
tool (
), and then click inside the top of the hat to apply the paint.
1-10
Fundamentals of Web Design 1.2—-Lab 8.2.6c
Copyright
2002, Adobe Systems, Inc.
Copying appearance attributes
Adobe Illustrator lets you copy appearance attributes that include both the fill
and the stroke of an object as well as its transparency and effects.
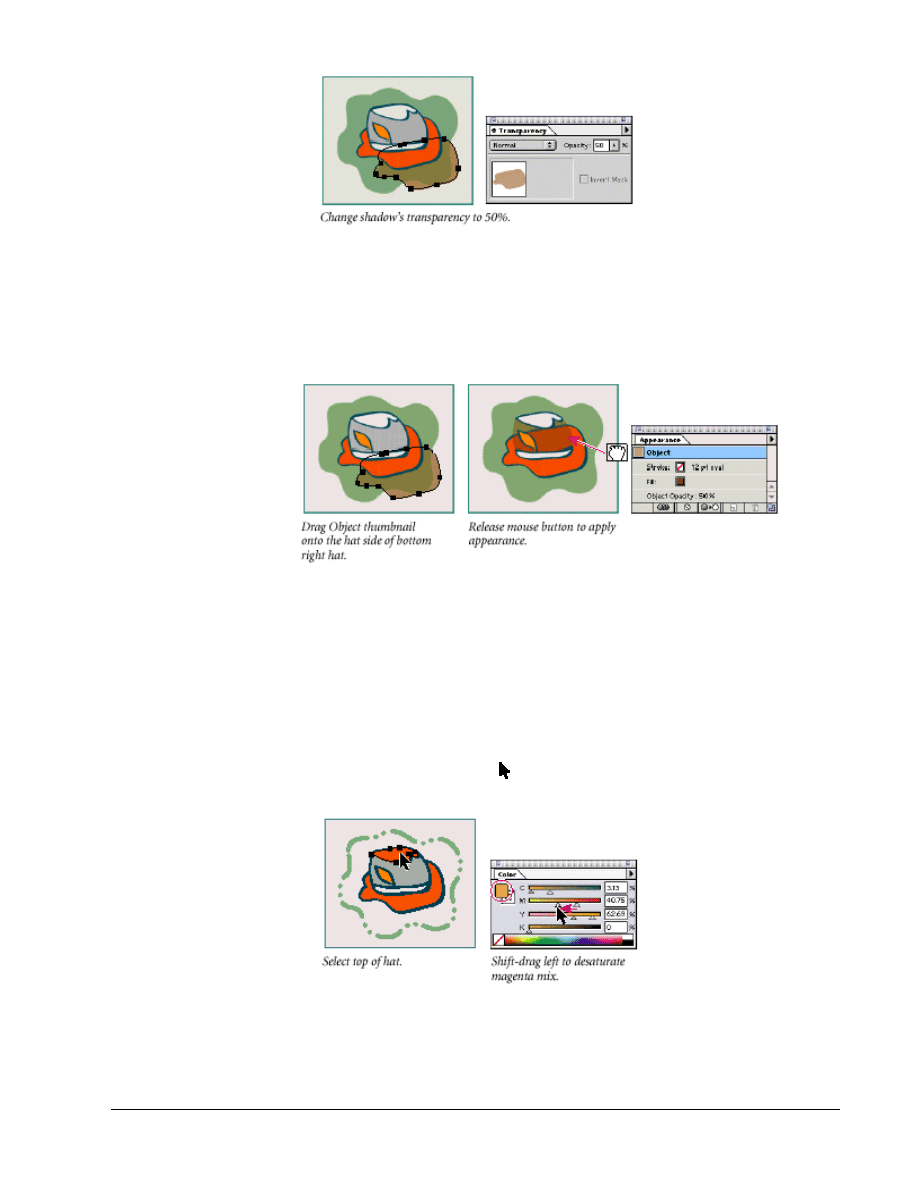
You’ll create a drop shadow shape and change its transparency. Then you’ll
apply the shadow’s appearance to another shape using the Appearance palette.
You can save and name appearance attributes using the Styles palette.
1. Select the selection tool (
) in the toolbox, and click the hat brim in the
upper right rectangle.
2. Hold down Alt (Windows) or Option (Mac OS) and drag the brim slightly
down and to the right. Release the mouse button to leave a copy of the hat
brim. This copy will become a drop shadow.
3. Choose Object > Arrange > Send Backward to move the shadow shape
underneath the hat brim. You should still be able to see both the shadow
shape and the hat brim.
4. With the object still selected, use the Color palette to change its stroke to
None.
5. Change the fill to a medium brown. (We specified 49% cyan, 65% magenta,
100% yellow, and 0% black.)
6. Click the Transparency tab to bring the palette to the front of its group. Then
choose Show Options from the palette menu to expand the palette.
7. With the shadow shape still selected, in the Transparency palette type 50 in
the Opacity percentage box or use the slider, and press Return or Enter to
change the opacity of the shape to 50%.
Copyright
2002, Adobe Systems, Inc.
Fundamentals of Web Design 1.2—Lab 8.2.6c
1-11
8. In the Appearance palette, click the Object thumbnail to select it. Drag the
Object thumbnail from the Appearance palette until the pointer is over the
bottom right hat side.
Release the mouse button to apply the appearance to the hat side. Notice that the
hat side is now a transparent brown.
9. Click away from the artwork to deselect it, and choose File > Save.
For more information on using the Appearance and Style palettes, see that topic
in online Help or Chapter 10 of the Adobe Illustrator User Guide.
Saturating colors
Next, you’ll adjust the saturation of the new color you added to the hat’s top by
changing the percentage of black in the color.
1. Using the selection tool (
), click the top of the hat in the bottom left
rectangle to select it. Make sure that the Fill box in the toolbox is selected.
2. In the Color palette, hold down Shift and drag the M slider to the left to
desaturate the color. Notice that as you Shift-drag, the sliders move in
tandem, and the intensity of the color changes. Adjusting the saturation lets

1-12
Fundamentals of Web Design 1.2—-Lab 8.2.6c
Copyright
2002, Adobe Systems, Inc.
you change the strength of a color without affecting the hue. (However, if you
drag a slider that is set to 0%, you will change the hue or color rather than the
saturation.)
3. Click away from the artwork, and choose File > Save.
Document Outline
Wyszukiwarka
Podobne podstrony:
6c
6C
6c PhC W2
5Analiza-6C, Materiały z Uniwersytetu Szczecińskiego i PS (ZUT)
deon, 1c 2b 3b 4d 5a 6c 7d 8a 9b 10d 11b 12a 13b 14d 15c 16 b 17b 18d 19c 20b 21d 22d 23a 24a 25a 26
6c Klimatyzacja
Ćwiczenie 6C, R
bioch biol 6c
Materiałoznawstwo i Techniki Wytwarzania, Sprawozdanie 6C
ŚrodkiTransportu Dalekiego wykład 6c
Ćwiczenie 6C R
6C.Koniczyna krwistoczerwona, Koniczyna krwistoczerwona (inkarnatka) (Trifolum incarnatum L
6c. Teoria grup odniesienia, Ćwiczenia - dr K
CZĘŚĆ 6C WSTĘP DO SZCZEGÓLNEJ TEORII WZGLĘDNOŚCI
Catapillar kop 301 6C 301 8C mini
Statystyka wykład 6C
Materiałoznawstwo i Techniki Wytwarzania Sprawozdanie 6C
6c
6c
więcej podobnych podstron