
Volkswagen Corrado 1990 - 1994
Fuel Systems Supercharger Exhaust Engine Electrical
Supercharger (Page GR-21)
G-charger
boost pressure
component layout
damage, repairing
Safety precautions
chart
Volkswagen Corrado 1990 - 1994
Fuel Systems Supercharger Exhaust Engine Electrical
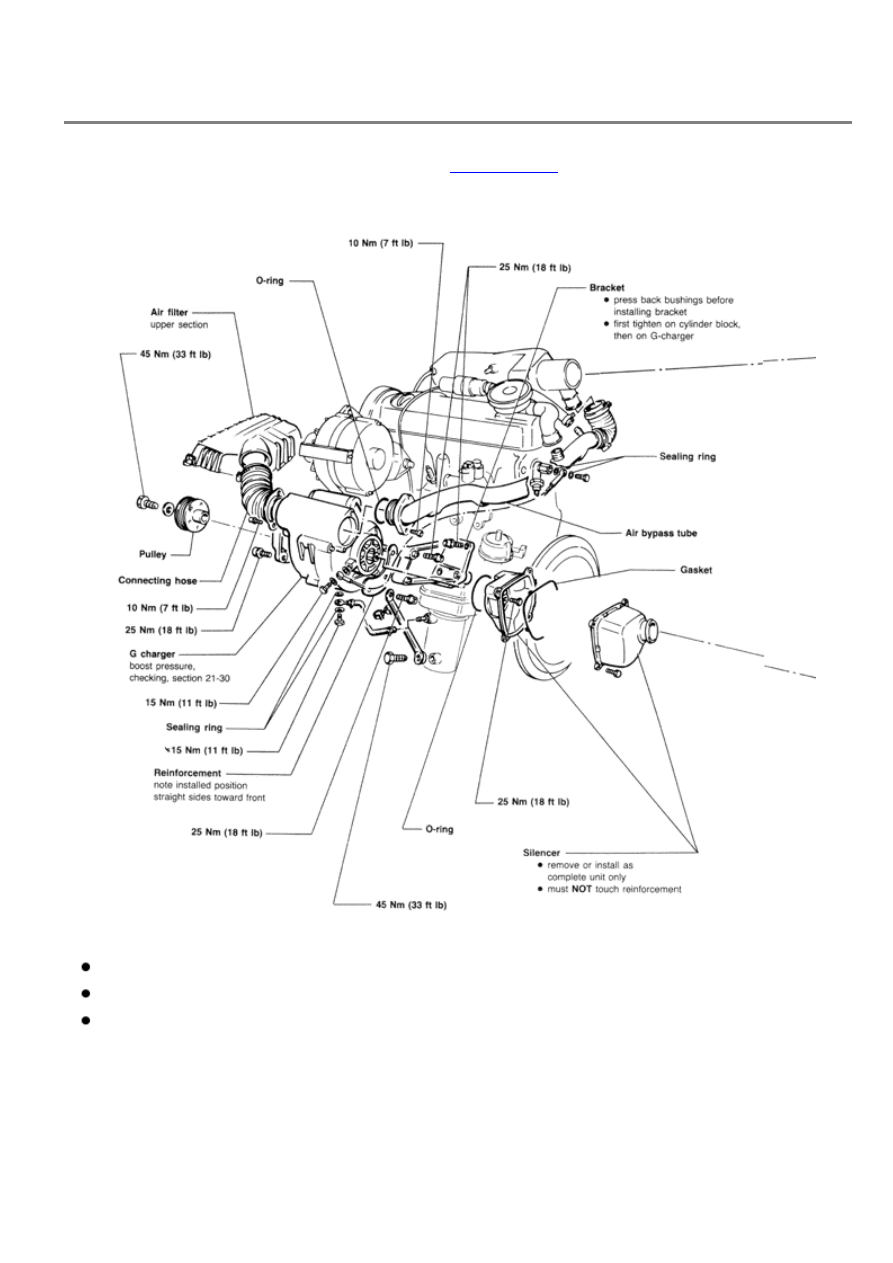
Supercharger (Page 21-10-1)
Before starting repairs, see Safety Precautions,
section 21-20
.
Notes
secure ALL hose connections with clamps
replace ALL seals and sealing rings
air system must be sealed
Volkswagen Corrado 1990 - 1994
Fuel Systems Supercharger Exhaust Engine Electrical
Supercharger (Page 21-10-2)

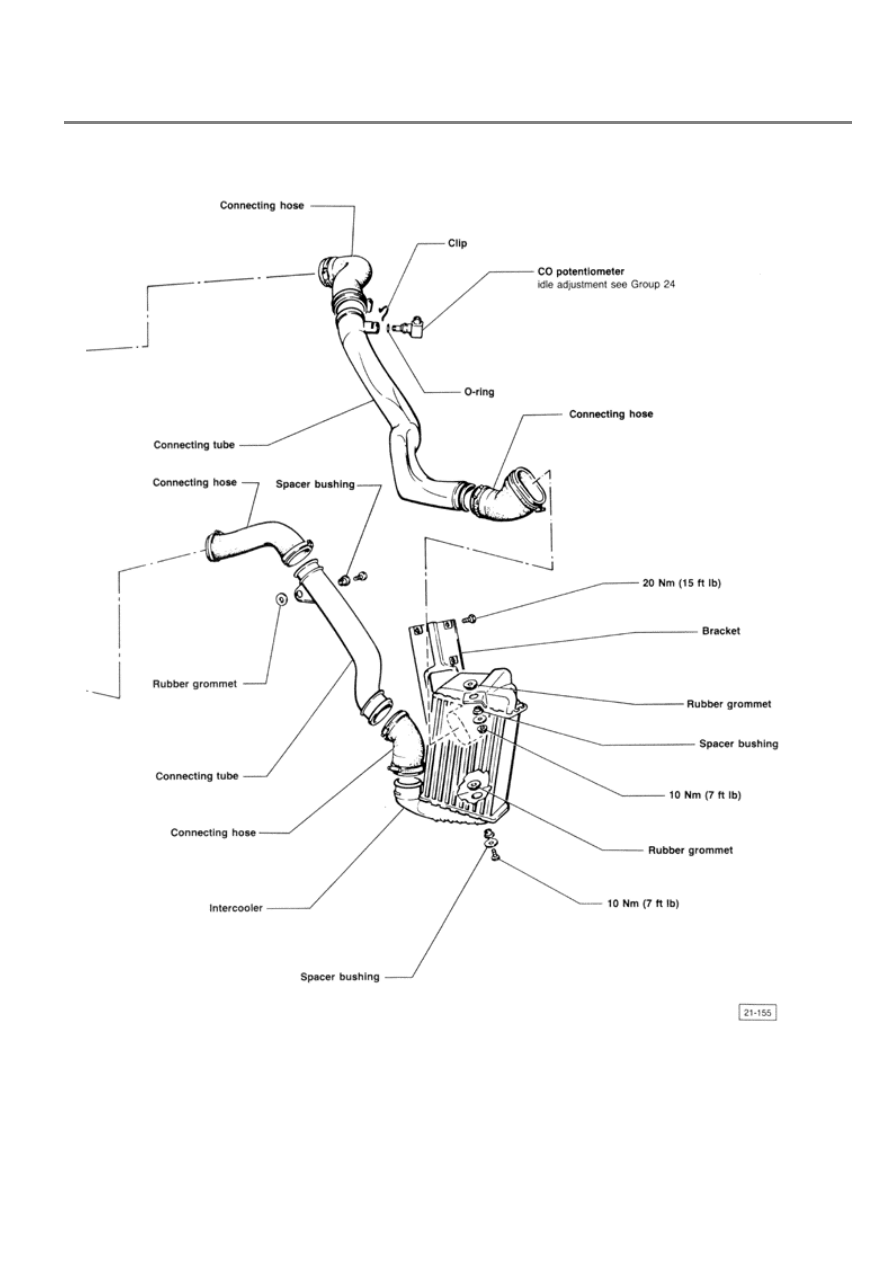
Volkswagen Corrado 1990 - 1994
Fuel Systems Supercharger Exhaust Engine Electrical
Supercharger (Page 21-20-1)
Safety Precautions
Rules of Cleanliness
When working on fuel system, always follow precautions on cleanliness below:
thoroughly clean all unions and area near connections before disconnecting
place removed parts on a clean surface and cover over. Use paper or plastic sheet.
Do NOT use fluffy cloths.
components which have been opened or disassembled must be covered or sealed
carefully if repair cannot be carried out immediately
only install clean components
only unpack replacement parts immediately before they are installed
do NOT use parts that have been stored loose (for instance, in toolboxes)
when fuel system is open, do NOT work with compressed air if this can be avoided
or move car unless absolutely necessary
System Precautions
CAUTION!
When working on vehicles with Digifant fuel/ ignition system, observe the following
precautions to prevent personal injury and/or damage to the ignition system:
connect/disconnect ignition system wires (including high tension wires and
test instrument wires) only when the ignition is switched OFF
do NOT crank engine before high tension wire of ignition distributor (terminal
4) is connected to ground with jumper wire
do NOT use battery booster longer than 1 minute or exceed 16.5 Volts with
booster
do NOT wash engine unless the ignition is switched OFF
disconnect battery completely when arc or spot welding
do NOT connect condenser to terminal 1
do NOT substitute rotor of ignition distributor or radio noise suppressor with
one of different type
when installing suppressor, use only 1000 Ohms for high tension wires and
5000 Ohms for spark plug connectors
do NOT allow terminal 1 of coil to contact ground. Possible destruction of the
control unit could result
Volkswagen Corrado 1990 - 1994
Fuel Systems Supercharger Exhaust Engine Electrical
Supercharger (Page 21-30-1)
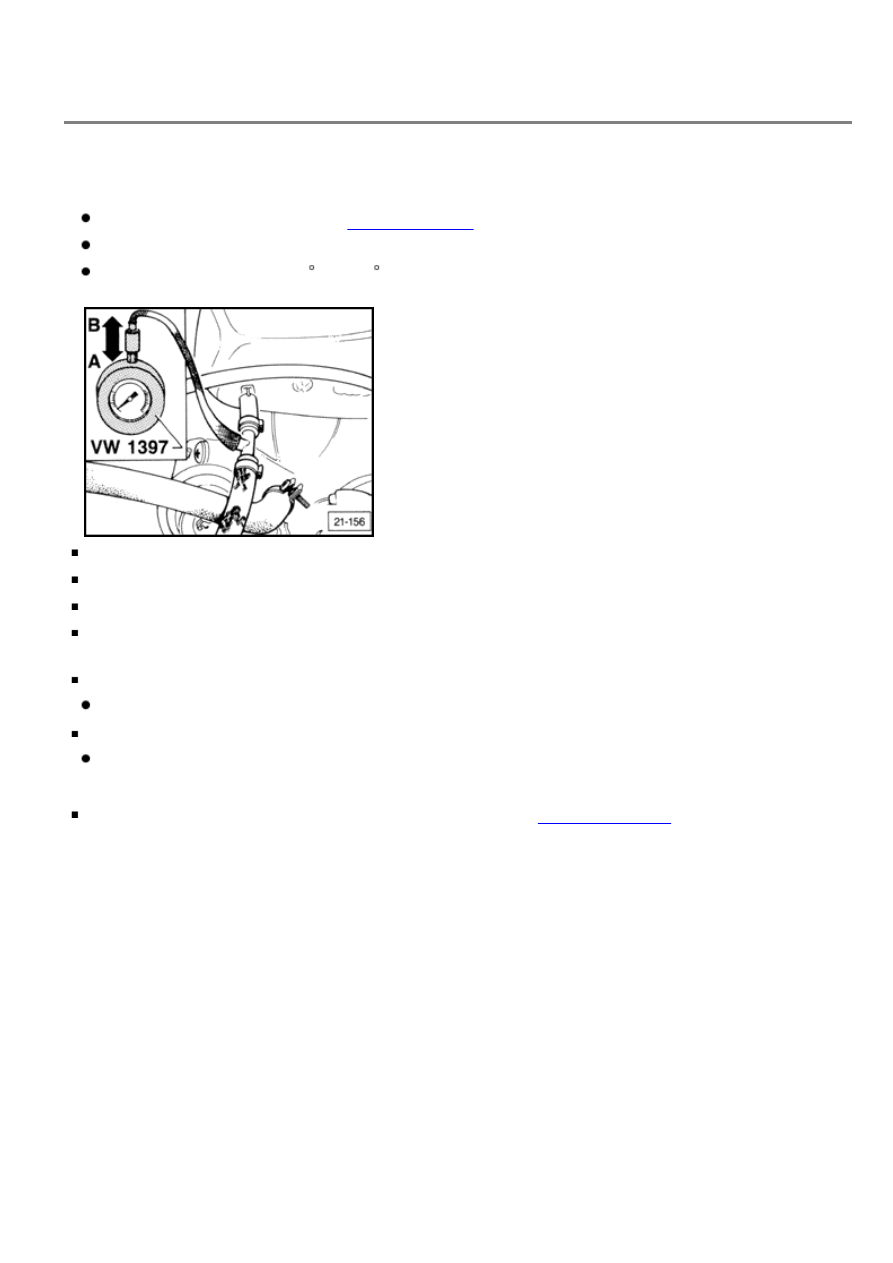
Boost pressure, checking
Check these first
idle setting OK (checking, see
repair Group 24
)
knock sensor OK (checking, see repair Group 28)
engine oil temperature 80 C (176 F) minimum
connect pressure gage VW 1397 to pressure regulator using T adaptor
open pressure gage check valve to position A
start engine and run at idle
remove harness connectors from CO potentiometer and temperature sensor (in front
flange on cylinder head, color code blue)
accelerate to full throttle
engine speed must increase periodically and then drop (surges)
observe pressure gage
boost pressure must reach 0.6 bar (8.7 psi) at high engine speed
If NO
check air system for leakage, check bypass setting, see
Repair Group 24
and/or
replace G-charger

Volkswagen Corrado 1990 - 1994
Fuel Systems Supercharger Exhaust Engine Electrical
Supercharger (Page 21-40-1)
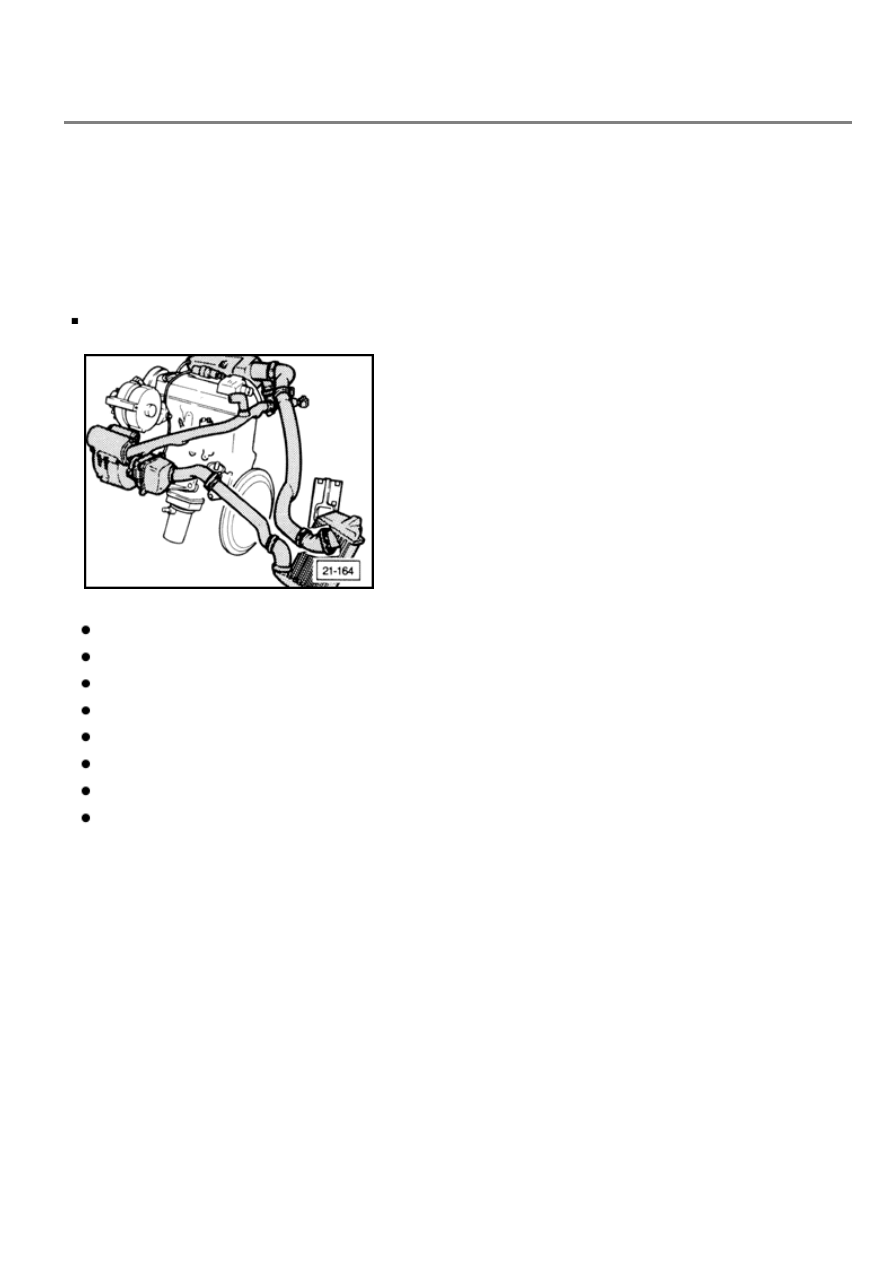
G-charger damage, repairing
CAUTION!
Strictly observe Rules of Cleanliness when working on or assembling components in the
G-charger system.
If the G-charger is damaged by foreign material entering the inlet air system, perform the following
steps BEFORE replacing the G-charger
thoroughly clean air filter housing
replace air filter element
replace intercooler
replace silencer
clean G-charger connecting hoses, if cleaning not possible, replace
replace seals and sealing rings
replace air bypass tube
check for filter screen in air bypass tube
If no filter screen
repair is complete
If filter screen installed
check air bypass tube for foreign material
If present
thoroughly clean intake manifold (inside)
remove cylinder head, see
Repair Group 15
for additional information on this topic
carefully inspect cylinder head for obvious damage and stress induced damage
resulting from foreign material, repair or replace as necessary
inspect piston and cylinder walls for foreign material damage, repair or replace as
necessary
Volkswagen Corrado 1990 - 1994
Fuel Systems Supercharger Exhaust Engine Electrical
Supercharger (Page 21-50-1)
Boost pressure system, leak checking
Notes
By using leak tester tool VAG 1687, Test A will completely check the inlet air system for leakage.
The following tests are performed with the engine not running.
Test A
If there is still leakage after performing Test A
perform Test B
Test A leak-checks the following:
G-charger including silencer
connecting hoses between silencer and intercooler
connecting hoses between intercooler (with CO potentiometer G 74) and by-pass
by-pass tube between G-charger and by-pass
connecting hose to carbon canister shut-off valve
throttle
intake manifold
fuel injector sealing at seat

Volkswagen Corrado 1990 - 1994
Fuel Systems Supercharger Exhaust Engine Electrical
Supercharger (Page 21-50-2)
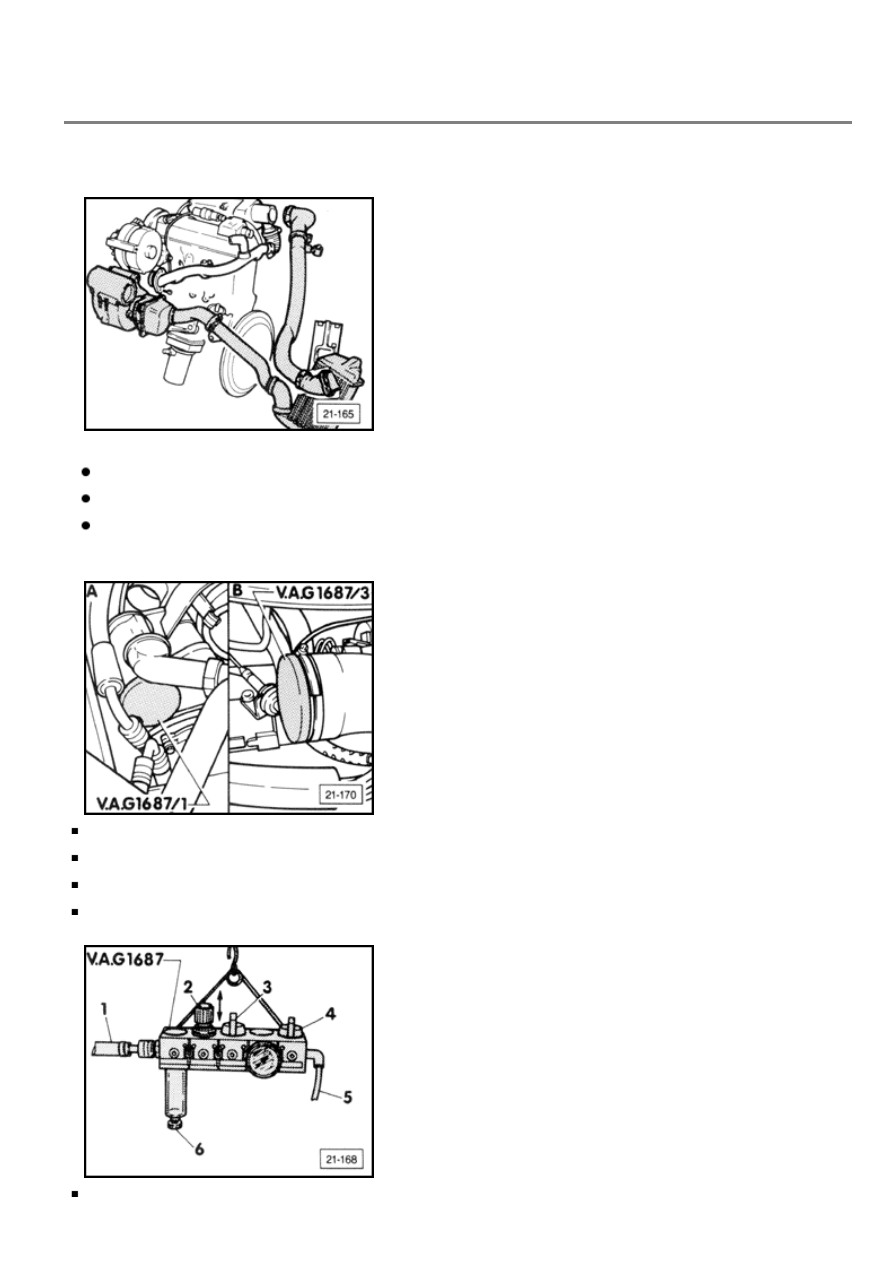
remove camshaft drive belt cover from above engine
A: position crankshaft at TDC for cylinder 1 .
B: camshaft cover marking must be between dots on cam gear.
note position of camshaft gear dots
turn back camshaft gear approx. 3 teeth by turning crankshaft counterclockwise
remove crankcase ventilation hose from pressure regulator valve and seal off using
adaptor VAG 1687/4
tighten hose to adaptor using two hose clamps 1
remove intake air hose flange from G-charger
install adaptor VAG 1687/2
Volkswagen Corrado 1990 - 1994
Fuel Systems Supercharger Exhaust Engine Electrical
Supercharger (Page 21-50-3)
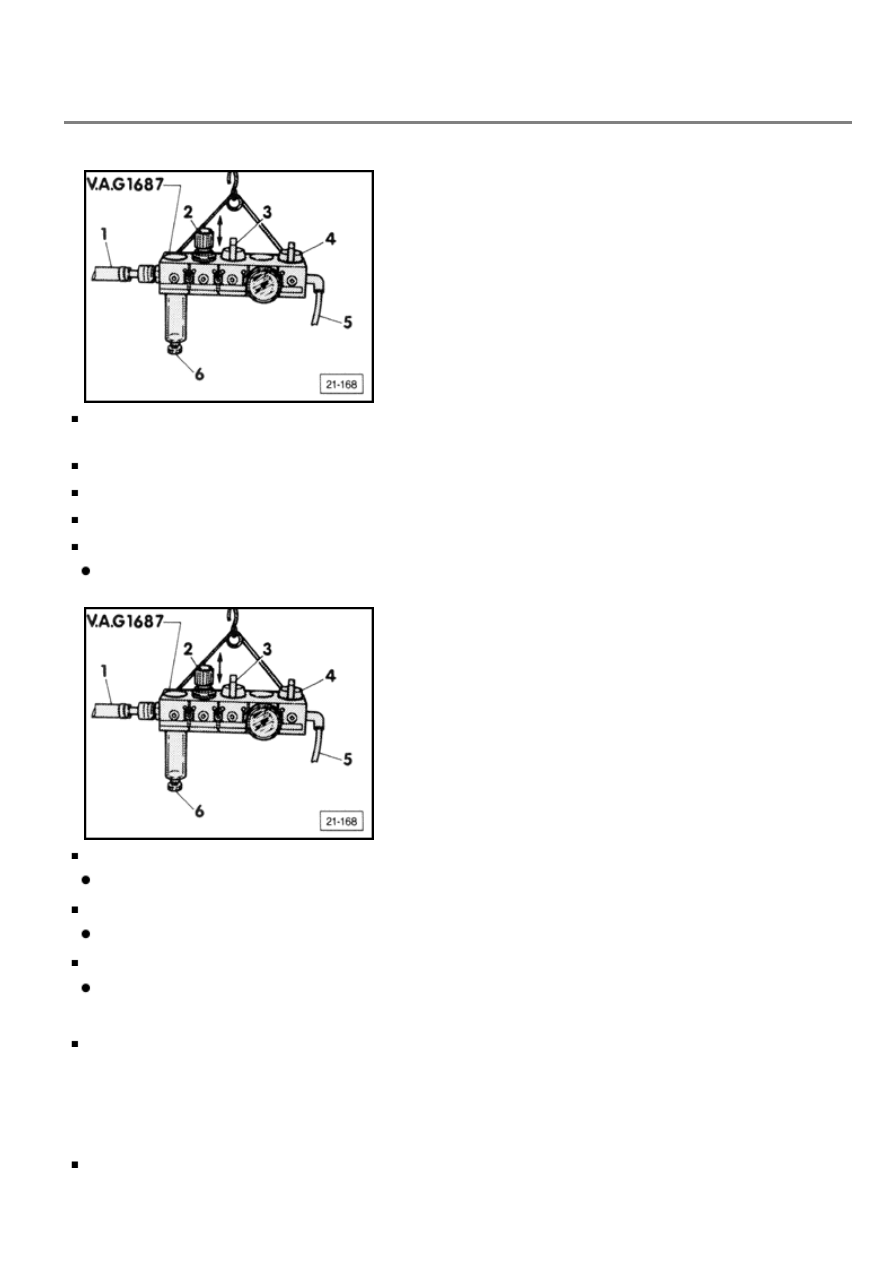
close valves 2, 3, 4 on VAG 1687 leak tester, drain viewing glass if necessary using
drain screw 6
connect shop air 1 to VAG 1687 leak tester
connect pressure hose 5 to tester using adaptor VAG 1687/2
open valve 3
adjust pressure on valve 2 to 0.9 bar
cap pushed upwards
open valve 4 until the boost pressure circuit (air path) is pressurized
regulate using valve 2 until 0.9 bar pressure is obtained
close valve 3 and observe pressure drop
pressure build-up must not exceed 0.9 bar
observe pressure after 30 seconds
pressure must not be less than 0.3 bar
If YES
determine source of leak by listening, feeling or by applying a commercial leak
detector spray
Notes
A slight air leak near the top toothed gear of the G-charger does not affect boost pressure. This
area is not connected to the boost system when the engine is running.
release the applied pressure before removing the adaptor by removing the coupling
from adaptor VAG 1687/2
Volkswagen Corrado 1990 - 1994
Fuel Systems Supercharger Exhaust Engine Electrical
Supercharger (Page 21-50-4)
Test B
Test B leak-checks the following:
G-charger with silencer
connecting hoses between silencer and intercooler
connecting hoses between intercooler (with CO potentiometer G 74) and throttle
body
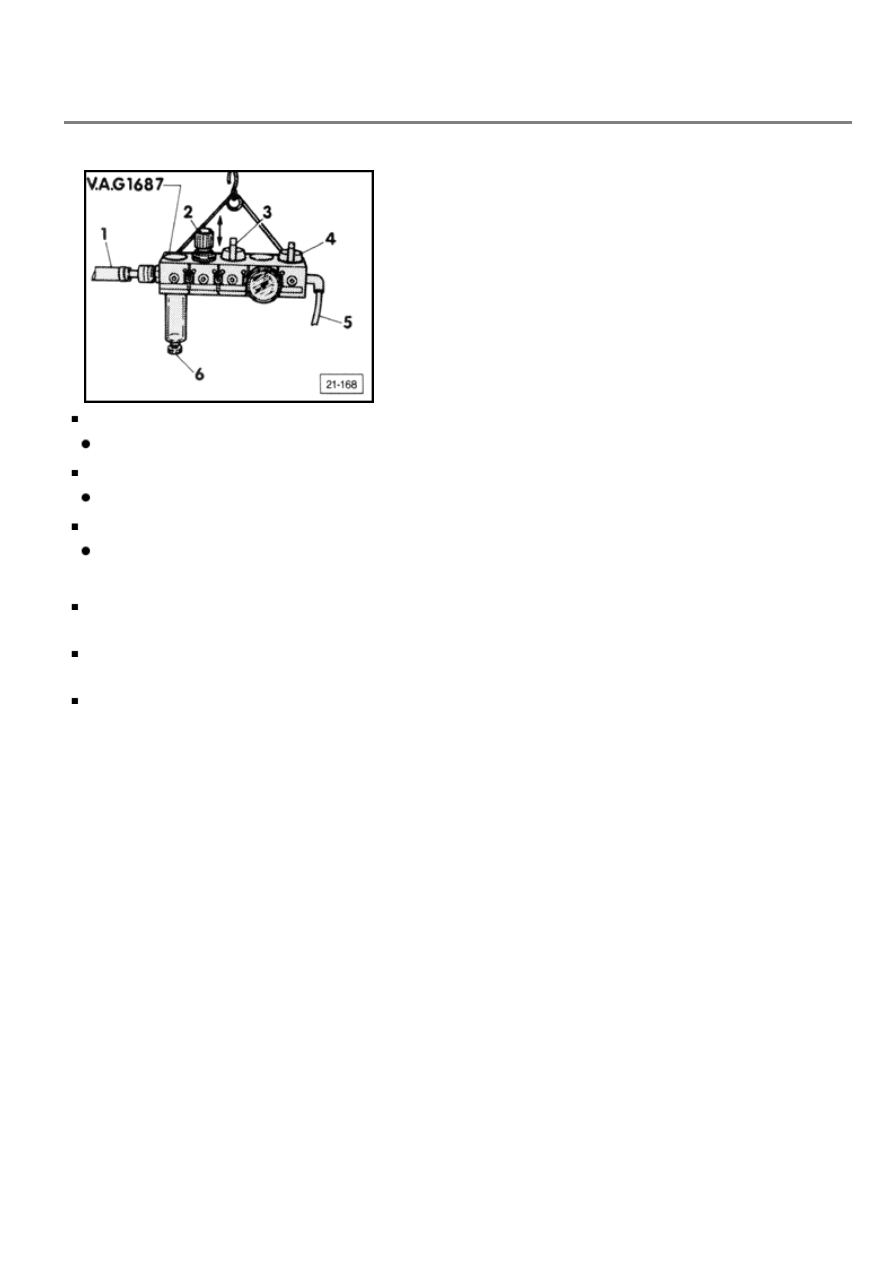
A : disconnect by-pass tube at G-charger and install adaptor VAG 1687/1
B : disconnect intercooler hose from throttle body
plug off hose opening using adaptor VAG 1687/3
tighten hose to adaptor using hose clamp
close valves 2, 3 , and 4 on leak tester VAG 1687

connect air pressure hose 5 to adaptor VAG 1687/2
open valve 3
adjust pressure on valve 2 to 0.9 bar
with cap pushed upwards
Volkswagen Corrado 1990 - 1994
Fuel Systems Supercharger Exhaust Engine Electrical
Supercharger (Page 21-50-5)
open valve 4 until the boost pressure circuit (air path) is pressurized
regulate using valve 2 until 0.9 bar pressure is obtained
close valve 3 and observe pressure drop
pressure build-up must not exceed 0.9 bar
observe pressure after 40 seconds
pressure must not be less than 0.3 bar
If YES
determine source of leak by listening, feeling or by applying a commercial leak
detector spray
release the applied pressure before removing the adaptor by removing the coupling
from adaptor VAG 1687/2
perform Test A to check for leakage
Document Outline
Wyszukiwarka
Podobne podstrony:
PG cw3
Matematyka PG PP kl2 MPZ sprawdzian 04A instrukcja
PG 1
8 pg
PG 9
4 PG
Materialy budowlane pytania 2008, PG Budownictwo, Semestr III, Materiały budowlane, egzaminy itp, In
geosyntetyki char.wlk.porów, PG Budownictwo, sem. 7 BWM, Geosyntetyki w Budownictwie, Laboratorium
Temat3, Mechanika i Budowa Maszyn PG, semestr 2, Materiałoznawstwo II, laborki
TwarKwasZasad, PG, rok2, sem III, sprawka z chemii
05.Grupy społeczne, 12.PRACA W SZKOLE, ZSG NR 4 2008-2009, PG NR 5
Polymer Processing With Supercritical Fluids V Goodship, E Ogur (Rapra, 2004) Ww
pg 2 2010
Matematyka PG PP kl2 MPZ sprawdzian 04B arkusz
02 01 11 01 01 18 Pol Gdańska, PG, Kolo1 z rozw
Cuberbiller, Skutki małpiego procesu (PG 2008)
pg 2005 09 18
okladka II PG
PG plan2015
więcej podobnych podstron