
7-Step Project Mapping with MindManager
®
White Paper
July 2003
Mindjet LLC
125 E. Sir Francis Drake Blvd
Fourth Floor
Larkspur, CA 93949 USA
415.925.3120
Copyright Mindjet LLC 2003 All Rights Reserved. All Registered Trademarks, Trademarks and Service Marks are the property of
their respective owners and are acknowledged.

7-Step Project Mapping with MindManager
1
Table of Contents
Executive Summary 2
Purpose, Purpose, Purpose 3
The Keys to Successful Project Mapping
Creativity, Discipline, Consistency 4
Seeing information in context 5
Step 1: Establish your Visual Vocabulary
Establishing identity with colors and styles 6
Identifying key items with Branch Codes 7
Prioritizing tasks 8
Showing task dependencies with Relationships 9
Creating associations with Resources and Categories 11
Using a Template map for consistency and speed 11
Step 2: Brainstorm your Project
Quick capture of project information 12
Who, What, When, Why, How 12
Step 3: Establish your Main Goals
Managing information 13
Objectives and activities 14
Moving from brainstorming to project planning 14
Step 4: Implement your Visual Vocabulary
Viewing Tasks 16
Inserting codes, colors 16
Step 5: Develop the Detail of your Project Plan 17
Step 6: Create a Workable Project Plan 18
Step 7: Deploy your Project Map
Managing small projects 20
Communicating small projects 21
Managing larger projects 21
Communicating larger projects 22
MindManager and the Project Lifecycle 22
Complementing other Project Management Tools 23
For More Information 24

7-Step Project Mapping with MindManager
2
Executive Summary
This paper describes a 7-Step Project Mapping Technique for users of Mindjet's MindManager 2002
Business or Enterprise Edition software
. The technique is designed for MindManager users working
either alone or in groups on small- to medium-sized projects. The paper will demonstrate how to develop
a MindManager map that represents a workable project plan that can be deployed in a variety of ways,
including export to project scheduling tools or continued use within MindManager.
MindManager is not a tool for continuing to do what you have done in the past. Used well, the
software actually changes the way you think about and communicate the complex relationships that exist
in a project. MindManager's unique contribution to project management is in giving project teams the
ability to:
• Quickly capture and organize team and stakeholder input. MindManager’s strength as a note-
taking tool is particularly useful at the early stages of project planning. Initial activities such as
interviewing stakeholders, gathering user requirements, determining project scope and capturing
insights and ideas from previous projects is accomplished quickly and easily using the map interface.
• Literally see how a project fits together. A picture is worth a thousand words because our minds
are able to derive a great deal of information from relatively few visual cues. MindManager enables
users to build project maps that employ a host of such cues to convey complex information quickly
and clearly.
• Toggle between overview and details. MindManager captures information in a series of cascading
visual “branches.” By selectively opening and closing branches, users can either helicopter up to a
30,000 foot view of a project, or quickly zoom in on details. The Power Select and Power Filter
features further enable users to quickly create customized views of project information.
• Immediately access all supporting project information. The ability of MindManager users to
insert links to any and all background or supporting information means that valuable project
1
NOTE: This is a generalized approach that does not rely on a specific project methodology. If your organization uses a formalized
methodology, you can integrate the appropriate steps of your proprietary process into this technique at any point. This paper
assumes that the reader is reasonably familiar with MindManager software, and does not include detailed instructions. Users will
save time by familiarizing themselves with MindManager's Dynamic Legend and Power Select features. For detailed instructions,
please consult the MindManager HELP menu. The techniques described here apply to MindManager 2002 Business or Enterprise
edition
s. Other editions of MindManager 2002 do not have all the features necessary for interactive project planning and
integration with other software.

7-Step Project Mapping with MindManager
3
information is easy to locate. This includes documents, emails and email addresses, applications,
audio/video/graphics files and Web sites. Key information that might otherwise become lost or difficult
to locate in pure scheduling applications is captured by MindManager in an intuitive, easily navigated
visual structure.
• Communicate effectively with all stakeholders. For those not immersed in the world of project
management, Gantt charts and complex project management tables can be confusing. MindManager
presents project information in a readily understood format that speeds understanding and builds
consensus among stakeholders. It also enables project teams to quickly export all project content to
dedicated project management tools including Microsoft
®
Project, as well as to Microsoft Word,
Outlook
®
and PowerPoint
®
, and to HTML to build project web sites.
Users often find that they derive the greatest benefit from MindManager during early stage project
planning, when team members and stakeholders need to be flexible, inclusive and imaginative in their
thinking. Once the project is shaped and initiated, MindManager then helps project teams keep track of
project details, manage change and build concise but complete documentation. It enables project teams
to keep stakeholders informed and on track with the project—without requiring the team to create
additional documentation. And finally, it creates a very concise, complete and clear repository of all
project-related information that can be easily accessed in the course of preparing for future projects.
Visit
http://www.mindjet.com/us/guided_tour/success.php
for more information on how MindManager
improves project planning and management.
Purpose, Purpose and Purpose!
Real estate agents frequently always say that the three most important attributes of a piece of property
are “Location. Location. Location.” Similarly, the three most important things to remember about
MindManager maps are “Purpose. Purpose. Purpose.” To achieve longer-term benefits, your maps must
be built with a particular goal in mind. The usefulness of the maps is determined by you and your team’s
ability to stay focused on the goal at hand.
Purpose means knowing not just what you want to accomplish, but who will use this map, when, and why.
It doesn't matter whether the purpose is large or small, so long as there is one. Some examples of
purpose include maps designed to:
• Brainstorm ideas and do initial thinking
• Define scope and goals as part of early project planning

7-Step Project Mapping with MindManager
4
• Communicate and explain project elements to stakeholders
• Explain to participants what their part in the project will be and how their work will tie into the greater
whole
• Prepare the basic project schedule and/or task lists for export to another tool (e.g. Microsoft
®
Project)
• Serve as a concise progress report, to be updated as the project proceeds
The Keys to Successful Project Mapping
Creativity, Discipline, Consistency
Successfully achieving the purpose you have established requires creativity, discipline and consistency.
Some believe that discipline and consistency don't belong in the same place as brainstorming and
creativity. Creativity, however, is just one part of a bigger process that leads to results—and results are
the goal of all project management. The best projects start with creative thinking, and then move forward
into communication, decision-making and action, culminating in a desired result. MindManager eliminates
the "boundaries" between these stages.
For experienced MindManager users, the same map that the team uses at the very start of a project to
capture initial brainstorming and planning can evolve into a disciplined project plan, simply through a
process of refinement. Once the project is completed, the map will provide a very detailed account of how
the project was designed and implemented. It can contain everything from initial ideas to changes along
the project trajectory (including who was responsible for changes and when and why the changes were
made). Furthermore, the maps can contain links to everything from purchase orders, legal documents,
key emails and screen shots to a team member’s idea or insight, graphics, images, spread sheets and
Web sites. When it comes time to initiate a similar project, there is no need to struggle to remember who
did what when, or to relocate key documents. All related information is attached to a particular branch of a
particular map. In this way, the maps help create consistency moving forward by providing a clear and
complete artefact of the project that went before.
Unlike more restrictive tools that require users to fit projects into predefined structures such as databases,
MindManager maps are flexible, adaptable repositories of related information. At any point, users can
decide how they want to visualize project information to fulfil the expectations of the project itself, project
stakeholders, senior management, internal departments and outside entities. The key, as with all

7-Step Project Mapping with MindManager
5
documentation, is to create and use the maps in a consistent, logical fashion. By doing so, you can
ensure that project information will be readily understandable to others—even if they did not help map out
the project in the first place.
Seeing information in context
In MindManager, pieces of information are never isolated: The map interface creates a structure that puts
each piece of information into clear visual relationship with another piece of information. Looking at a
visual image of how pieces of information are related makes it easier to understand where something
belongs, why it belongs there, and what else it relates to. This makes it easy to identify two key issues
that are hardly ever clarified: assumptions and implications. Assumptions and implications are frequently
the sources of trouble down the line in projects: The earlier you catch them, the better your chances of
success.
A MindManager project map is a rich mixture of different types of information, text-based data such as
actions, ideas, information and issues—and visual cues. These two information types are structured so
that it is clear how each element contributes to some over-riding action. Project information can be quickly
viewed from many perspectives. For example, you may want to look at:
• What tasks each particular person has been assigned
• Which tasks are undone or most urgent
• What issues are undecided
• Which areas are the most risky
A properly built map can quickly isolate and reveal these components of the basic action plan. Rather
than having to maintain separate, isolated documents or lists corresponding to each of these information
sets, MindManager users can house all project information in one map or set of nested maps.
Step 1: Establish your Visual Vocabulary
Step 1 lays the foundation for how you will adapt MindManager’s “visual vocabulary” of colors, icons,
symbols and other graphic elements. The idea is to build a visual vocabulary that will meet the specific
needs of your project or organization. Creation of this vocabulary also lays the groundwork for the
subsequent use of MindManager’s more advanced features.
7-Step Project Mapping with MindManager
6
The primary goal of using these graphic elements is not to create an attractive map (although viewers do
tend to respond better to such a map). More than four decades of scientific research into the human brain
has shown that visual cues maximize the brain’s ability to understand and retain information—as well as
to create and capture new information such as ideas and insights. Despite the fact that science has
known for years how to create the most effective communication environment, most project teams in
particular, and business professionals in general, use primarily text-based tools that fail to take full
advantage of our ability to understand visual representations of information.
As such, it is usually a good idea to keep maps small at first, introducing graphics slowly and restricting
the use of color and images to the absolute minimum required to convey essential information. It is also
important to use these graphic elements consistently so that others can quickly learn them. As a project
manager, your goal is to establish authority and clarity. Maps that are too large and have too many
graphics can overwhelm some audiences with too much information.
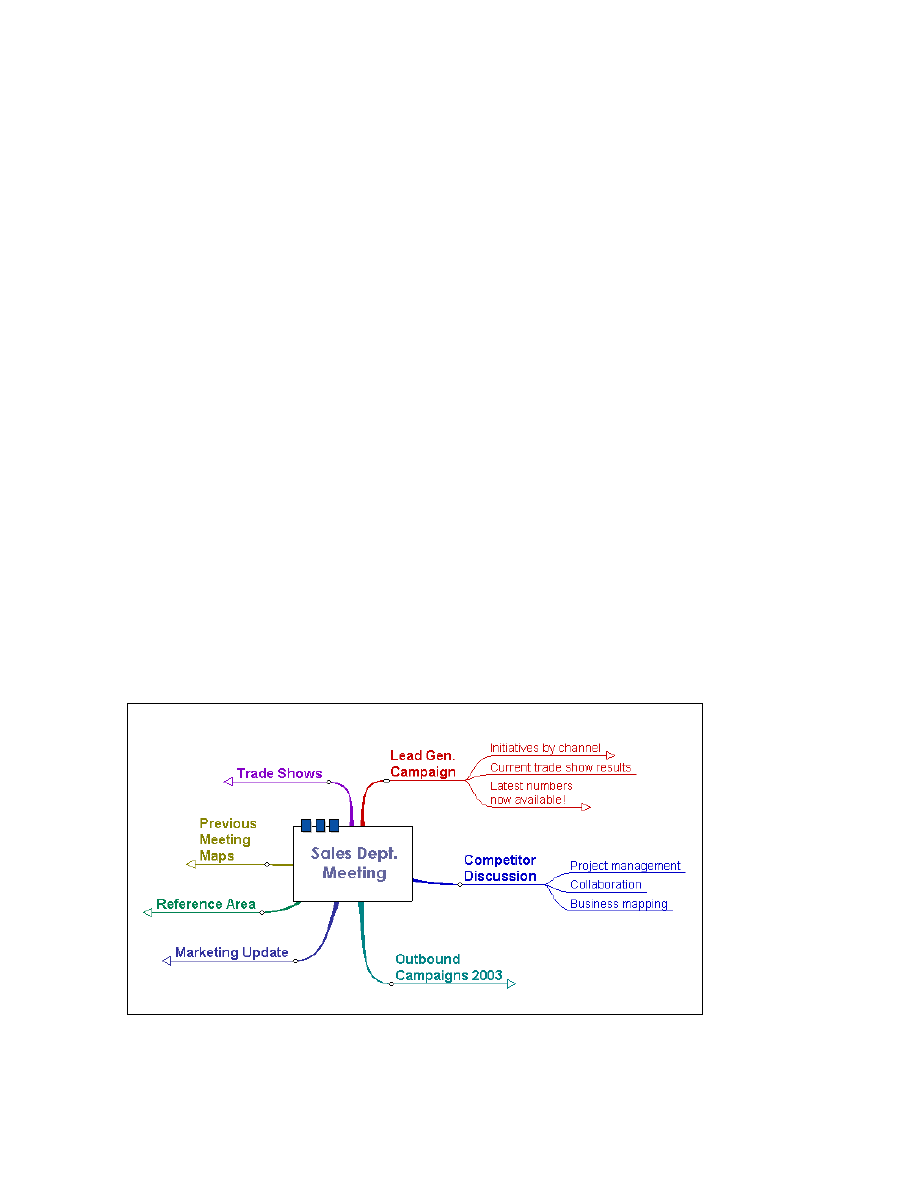
Establishing identity with colors and styles
When creating a map, use color, fonts, a custom map title or floating symbols to reinforce your
organizational, departmental or project identity. Using a wide variety of visual cues may be appealing. But
think carefully about what this additional visual information conveys (or obscures) before launching into a
complex scheme. Use color sparingly for best effect.
Figure 1: Create a color scheme for your map.
Copyright 2003 Mindjet LLC
7-Step Project Mapping with MindManager
7
For example, you could use color to indicate that the certain tasks have been assigned to a particular
person. The map (or linked maps) can then be searched later for that color to reveal all the tasks
assigned to that person. Note that using branch color to show who is doing a task is a good idea when
only one person is responsible. This color scheme will break down if you need to show that two people
are working together on the same task.
Remember that for consistency you should use color to indicate only one dimension of your project
information. A scheme such as "Red means the QA department and Blue means completion this month"
will only cause confusion. You may find it useful to use a slightly brighter branch color than the default
black. Rich colors make the map more visually interesting and will stand out better when you use Power
Select later on to generate unique views of map information.
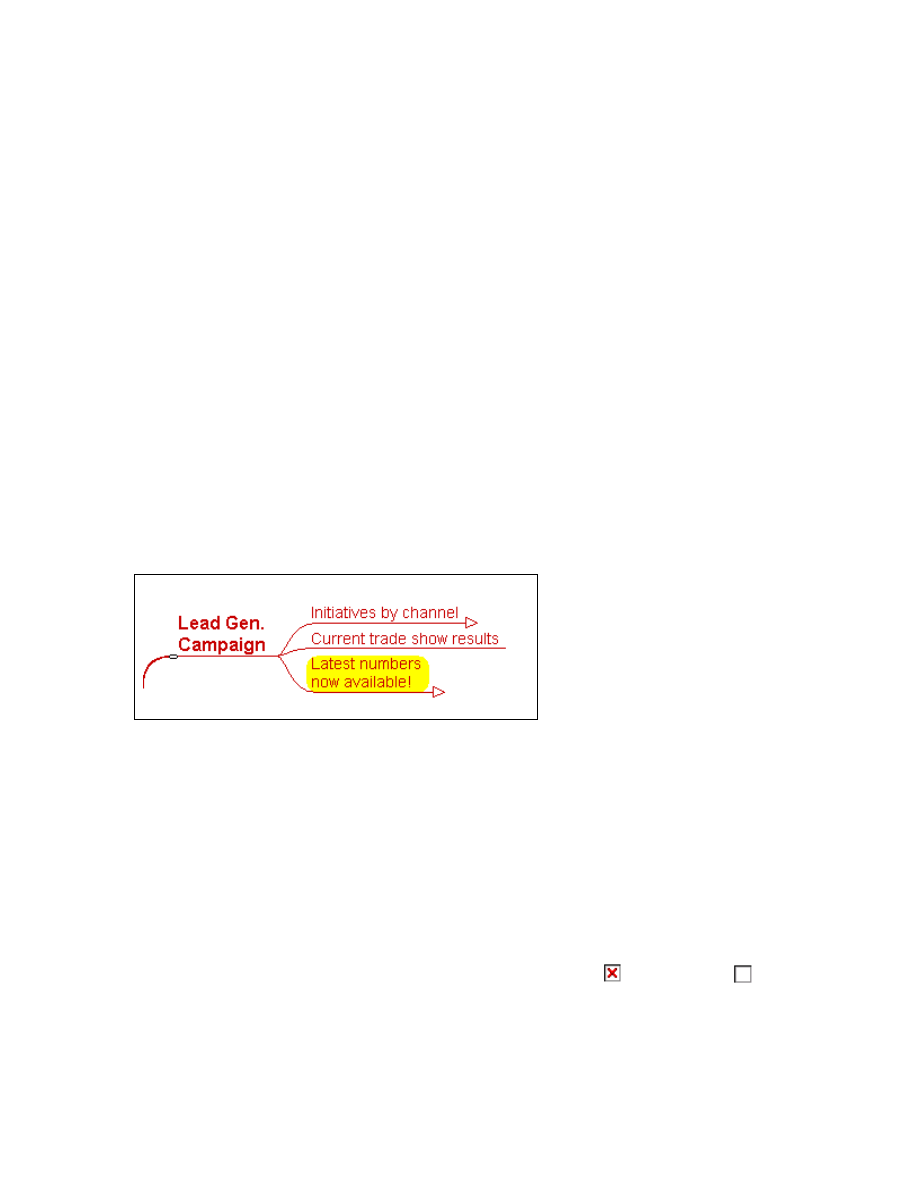
Highlighting can be used for transient attributes. Use it, for example, when you want to mark items that
are important for a particular meeting, or to indicate things that have been added since the last review
and need to be checked.
Figure 2: Using Highlights
Copyright 2003 Mindjet LLC
Identifying key items with Branch Codes
Items in your map can also be tagged with any of a number of "Branch Codes”, accessed in the “Codes”
toolbar. More than one code can be used on the same branch. For example, a particular item may be a
Task, and it also may be a Risk. In those situations when, for instance, you want to find all tasks that are
risks, attach both codes to the branch.
The only branch codes that MindManager "understands" are the Done (
) and Not Done (
) icons,
which are generally used with tasks. Branches marked with these codes are automatically recognized as
tasks in MindManager import and export processes, such as when a map is exported to Microsoft Project.
The rest of the codes are free for users to define and can be customized by going to VIEW->
7-Step Project Mapping with MindManager
8
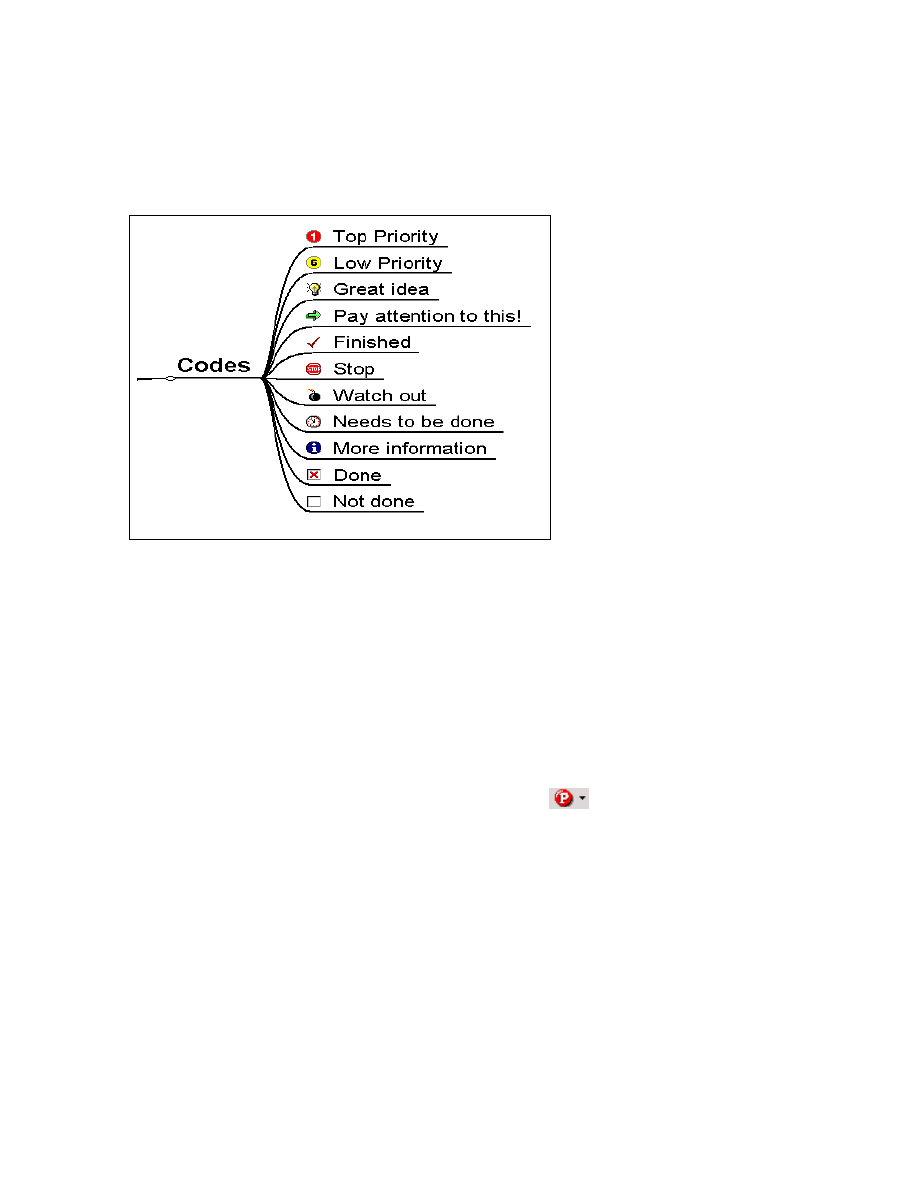
TASKPANE-> DYNAMIC LEGEND. Unused codes can also be removed at this point. It is often helpful to
insert a legend, such as the following image, somewhere in the map to remind users of the visual
vocabulary you have created.
Figure 3: Define your Branch Codes
Copyright 2003 Mindjet LLC
The Insert -> Legend command in the main menu will insert the legend for the currently used codes,
colors and highlights. You can remove the code legend later when everyone has grown accustomed to
the graphics, or when you are ready to export the rest of the map to other software.
Prioritizing Tasks
MindManager has built-in priority codes (found in the top menu
) that can be used to show the
relative priority of Tasks. But before labelling everything in your map with a Priority Level, it is best to
decide what "Priority" actually means.
Given that the project will be mainly scheduled by other constraints (such as deadline dates and task
dependencies), priorities are only needed for smaller-scale decision making within these constraints.
Suppose, for example, that one member of the project team has two tasks to complete by the same
deadline, either of which could be done first. In this case, a priority level could be used to signify which
task needs to be done first after considering factors not coded into the constraints. If the consequences of
completing Task A late are worse than being late with Task B, then Task A has "higher priority" on the
small scale, but not necessarily across the whole project.
7-Step Project Mapping with MindManager
9
This means that on a project-wide basis you do not normally need to consider Priority as an absolute
indicator. However, most people looking at a project plan might assume that something with Priority 1
means "most important throughout the whole project," requiring immediate attention. This is partly a
matter of educating users. But it is better to minimize this effect by using lower priority levels (4 or below)
to indicate small-scale prioritization and not distract users with Priority Level 1 where the plan represents
the real order of work.
Global project priorities (1, 2 or 3) are best used for two purposes:
• Before there is a real structure to your project plan, when you want to highlight issues that need to be
resolved before a workable plan can be implemented. Once the dependencies in the project plan start
to take shape, there is a decreasing need for project-wide priority settings.
• To communicate short-term exceptional conditions requiring attention to get the project back on track
again, where the normal task sequence might need to be short-circuited.
Figure 4: Priority Codes
Copyright 2003 Mindjet LLC
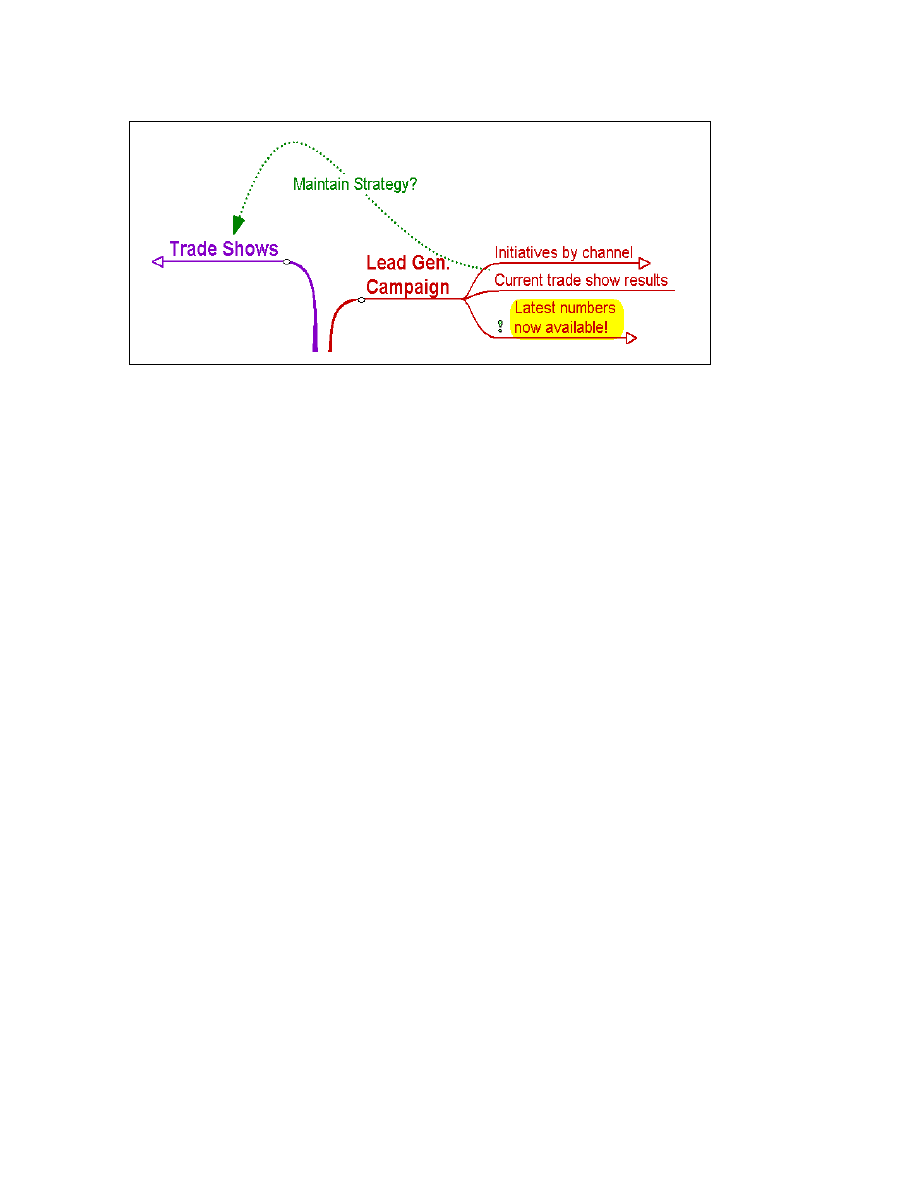
Showing task dependencies with Relationships
Relationships in MindManager maps are an effective way to indicate task precedence. In almost any
project, there will be some things that must be done before others can start. For example, before
choosing which trade shows to attend in the coming year, it might be wise to review results of current
trade show activities. Relationships in the map can show task dependencies: MindManager's export to
MPX for integration with other project management and scheduling software takes advantage of this.
(The MPX interface is a separate download, available from the Solution Xchange on
7-Step Project Mapping with MindManager
10
Figure 5: Adding Branch Relationships
Copyright 2003 Mindjet LLC
By convention, an arrow pointing from Task A to Task B says "Task A must finish before Task B can
start." There are other possibilities, described in more detail in the documentation for the MPX export, but
this basic relationship works in most cases.
The use of Relationships means that tasks can be organized in a different structure than the order in
which they must be completed. The task takes its Relationship with it when moved.
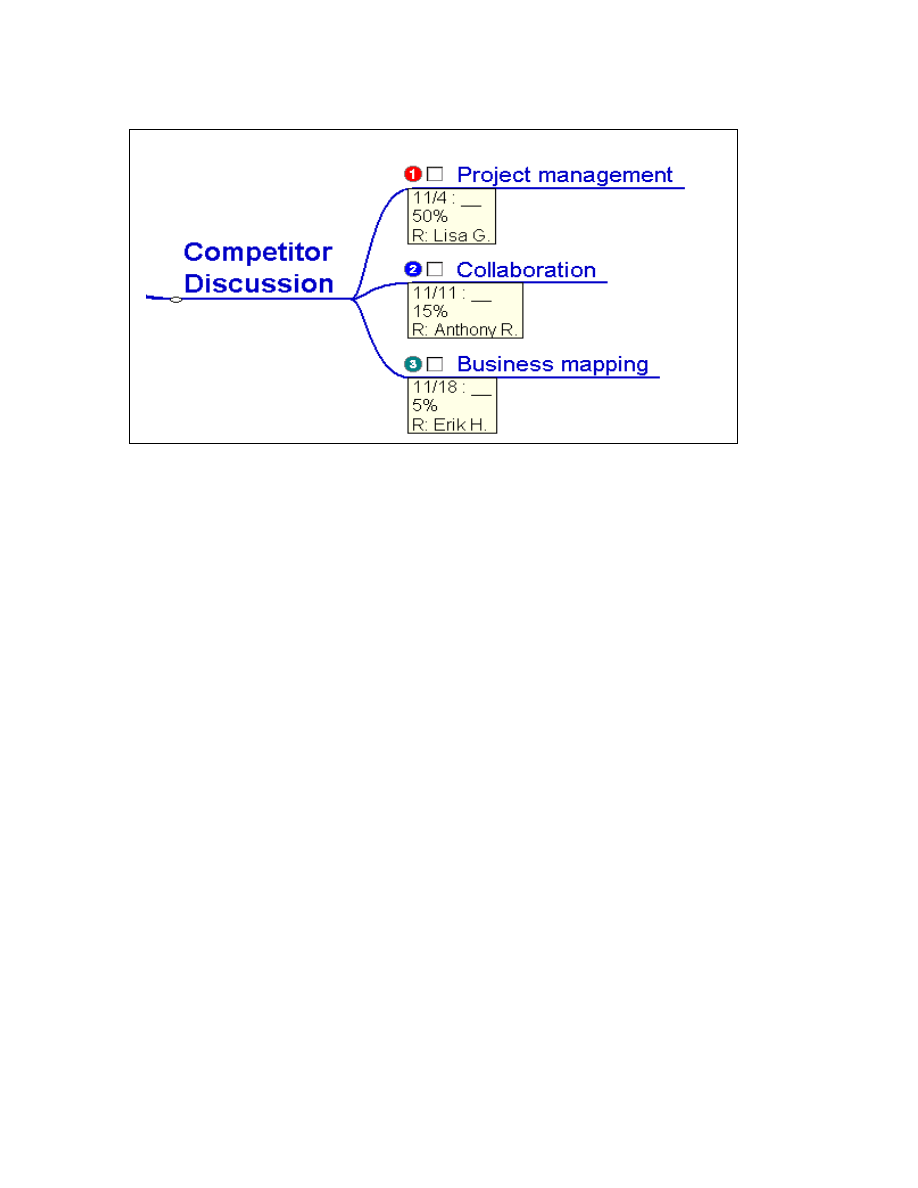
Creating associations with Resources and Categories
Use the Resources field to identify who is responsible for actions in your project map. Use the Categories
field to identify aspects of the project information that are of particular relevance to groups of
stakeholders. Resources can be customized by going to VIEW-> SELECT TASK PANES-> TASK
PLANNING.
7-Step Project Mapping with MindManager
11
Figure 6: Defining Resources and Categories
Copyright 2003 Mindjet LLC
Using a Template map for consistency and speed
Now that you have begun to define the look and feel of your map, this a good time to set up a template
that you can use for other projects as well.
• Use the Dynamic Legend task pane to give names to the Branch Codes, Highlights, Colors and
Priority Levels that you use in your map.
• Set up the color and width of the default Relationship style in FORMAT-> MAP -> STANDARDS. You
will probably find it most convenient to set the default Arrow Style to point from task predecessor to
successor, which is the third option for the arrow style.
TIP: Use a fairly light color and narrow line for Relationships so that they do not obscure branches
they cross.
• Save this map as a new Template for project mapping applications. Ideally, you will be able to make
this template available to everyone with whom you work on projects so that you will all use the same
visual vocabulary for future project maps.

7-Step Project Mapping with MindManager
12
Step 2: Brainstorm your Project
Step 2 is often where many people will start and finish their use of mapping for projects. As you will see
in the steps that follow, MindManager has great value beginning with brainstorming, continuing
on through project planning and extending all the way into closure.
Quick capture of project information
Starting with the Project Map Template you just created in Step 1, collect as much information as you can
about your project. At this stage it doesn't matter how organized the information is. The immediate goal is
to capture the information into the map, where it can later be organized.
Begin by working with colleagues and others who understand the project and are comfortable with
working in a visual environment. Be aware that brainstorming with project sponsors or customers
depends very much on your relationship with them. Seeing a great deal of unstructured thinking laid bare
can be an unsettling experience for some. It may be more appropriate to collect the information remotely,
organize your map into a logical structure and then perhaps even export it to Microsoft Word or Project
before showing it to them. (We won't cover the facilitation of brainstorming here. If you are unfamiliar with
the basic rules of brainstorming, you would be well served to research this process separately.)
Who, What, When, Why, How
To begin the brainstorming process, capture at least some of the following kinds of information in your
map:
• Who: roles, stakeholders, customers, users, team members, contributors, gatekeepers, sources of
veto and influence
• What: objectives, questions, issues and decisions, tasks, deliverables, risks, quality, measurements,
the unknown
• When: deadlines, phases, milestones, dependencies
• Why: strategies, underlying needs and purposes, indirect stakeholders
• How: skills and knowledge, information, people, resources, equipment, materials, handing changes,
communicating, measuring
These are just a few of the triggers that may be important to your project. You might find it useful to
create a library of these trigger words as you go to help with your next project. If you get stuck and can't
come up with this information, you might try to reverse the process and brainstorm what you don't know
7-Step Project Mapping with MindManager
13
about your project. Either way, in order to avoid the “Ready, Fire, Aim” syndrome, you need to allow time
for this brainstorming process before continuing on to the planning stage.
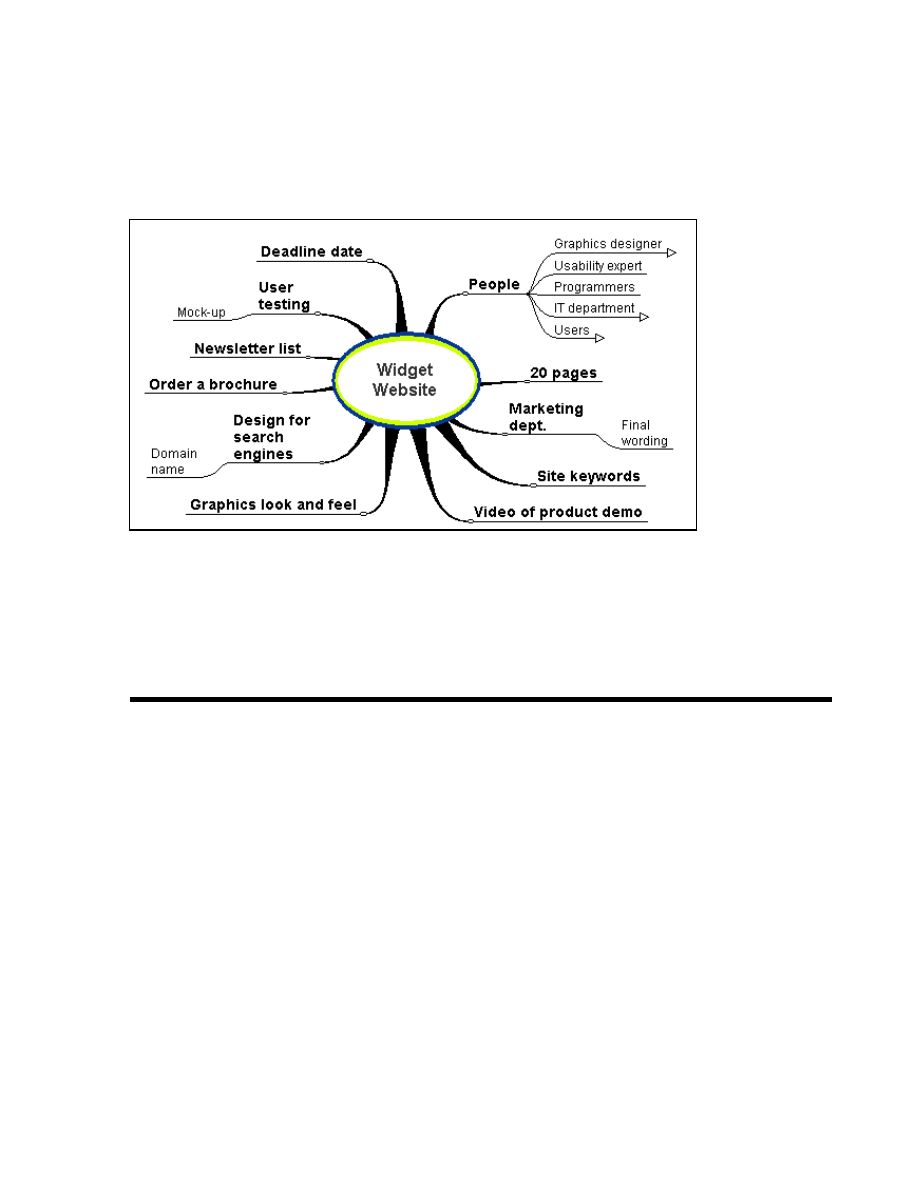
Figure 7: Initial brainstorm map - put anything anywhere to begin with.
Copyright 2003 Mindjet LLC
Step 3: Establish your Main Goals
In Step 3, we start to develop our brainstorm into more of a project plan.
Managing information
For smaller projects, there will be one map for the project plan. If your project consists of a number of
small sub-projects, you can keep them all in one map by initially assigning a branch of the main map to
each sub-project. If your project is very complex, you may decide to break it up into a number of sub-
projects, with a map for each. Large amounts of project information can be managed by creating links
from a master project map to all sub-project maps. MindManager will handle either scenario.
MindManager project maps can contain much more than just tasks. In fact, this is the key advantage of
using MindManager to capture project information. Additional notes, hyperlinks and information can be
integrated into the plan—but kept distinct from the tasks themselves. This is one of the primary
differences between MindManager and project scheduling software. With most other tools there is
often no way to capture other project information such as team members’ ideas and insights,

7-Step Project Mapping with MindManager
14
explanations behind decision to alter the plan in mid-stream, links to relevant documents, emails,
etc. With MindManager, it is as simple as adding a branch, text note and/or hyperlink.
MindManager represents project information as a visual hierarchy of inter-dependent tasks, resources,
and other data that enables the user to easily see where everything belongs and how each unit of
information is connected to the greater whole. In other views, such as Gantt charts, you can see when
something must be done and what precedes it or succeeds it. But it is less clear which part of the project
it contributes towards and what else is closely related.
Objectives and activities
You may have your own preference for the structure of your map. In this paper, however, we choose one
primary structure for project maps in MindManager: Contribution towards objective. We view the Map
Title as the ultimate objective (not merely the title) of the project, and regard all sub-branches as feeding
towards that objective. Thus the main organizing principle of the map is activity.
This means that, in general, most branch titles should be written as objectives, unless they are clearly
supporting information. Staying focused on activities and results enables you to review all project
information and activities in terms of the contribution to the overall project goal. It is also helpful when
constructing task lists in MindManager that are intended to serve later as the basis for a formal Work
Breakdown Structure. A focus on activity also provides a sound basis for compatibility with other project
management software. An action-oriented structure represents achievement and allows the project status
to be represented in the map. For example, as the project progresses, percent-complete values and
dates for each action can be updated to show the latest status.
A second, slightly subliminal effect (albeit a benign one) of keeping the map focused on action also
occurs: Repeated exposure to objectives helps you and your team stay focused on the project goals. The
ability to keep the team focused is often a missed opportunity at project kick-off, when team identity and
sense of ownership often get focused on an arbitrary project name rather than on a clear goal. The more
you can refer to the project in terms of outcome, the faster you will notice if you are getting off
track.
Moving from brainstorming to project planning
To restructure your brainstorm map into the skeleton for your project plan, do the following:
• Once your key project objective is agreed, make this the title of your map (e.g. "Widget Web Live by
June 1st").
• Identify the Resources (people or equipment) that your project uses. You will need these shortly.
7-Step Project Mapping with MindManager
15
• Identify the roles (or "viewpoints") on your project. These may include stakeholders, visitors, senior
management, team members, suppliers, project support staff, users or anyone else who is connected
with your project. We will distribute these later on.
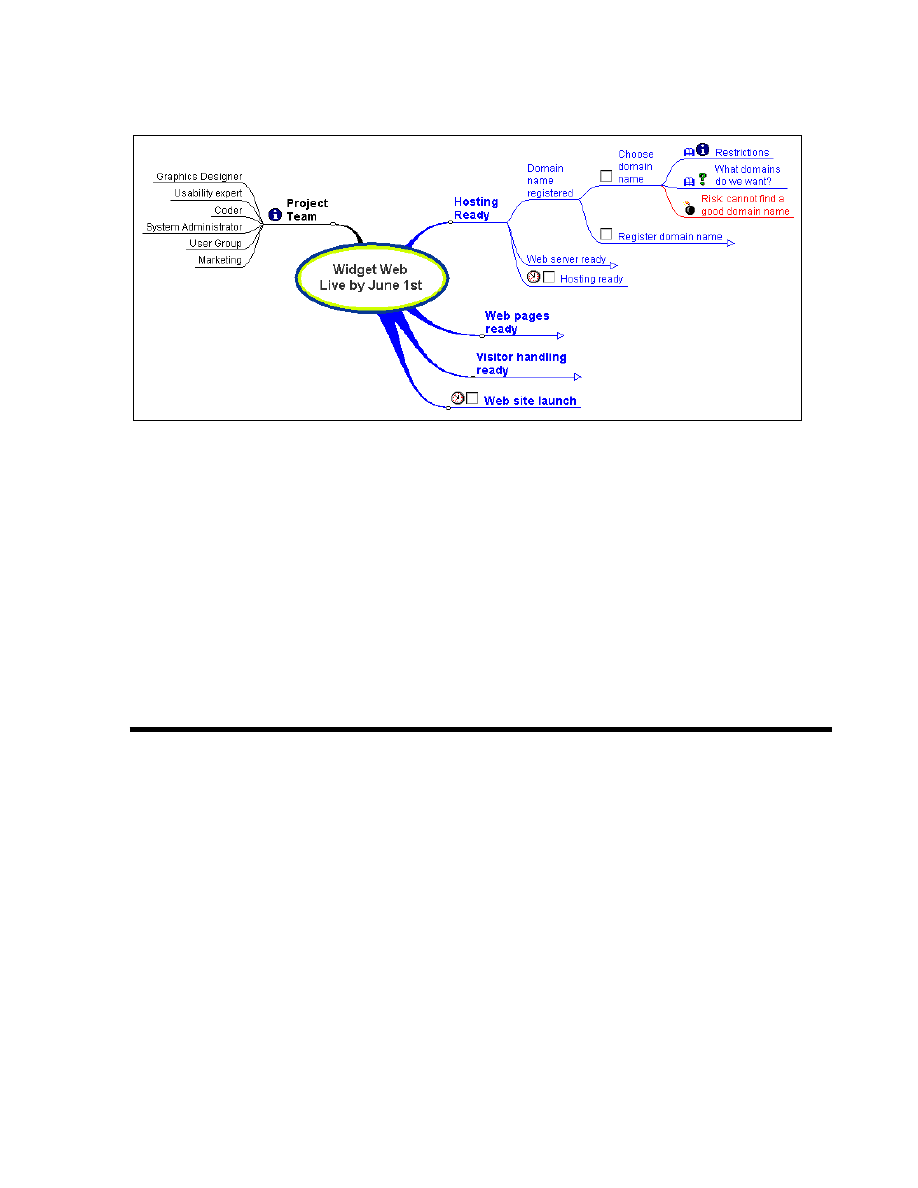
• Identify the key goals that must be in place for the objective to be realized. In our example, for a web
site to be online, we basically need a web server, pages with content in them, and visitors. These can
be our three primary goals and are stated as such.
• Reorganize the information you collected when you were brainstorming in Step 2 by moving all of
these ideas to one of these primary goals. If anything is left over, review your primary goals and
decide if new branches are necessary.
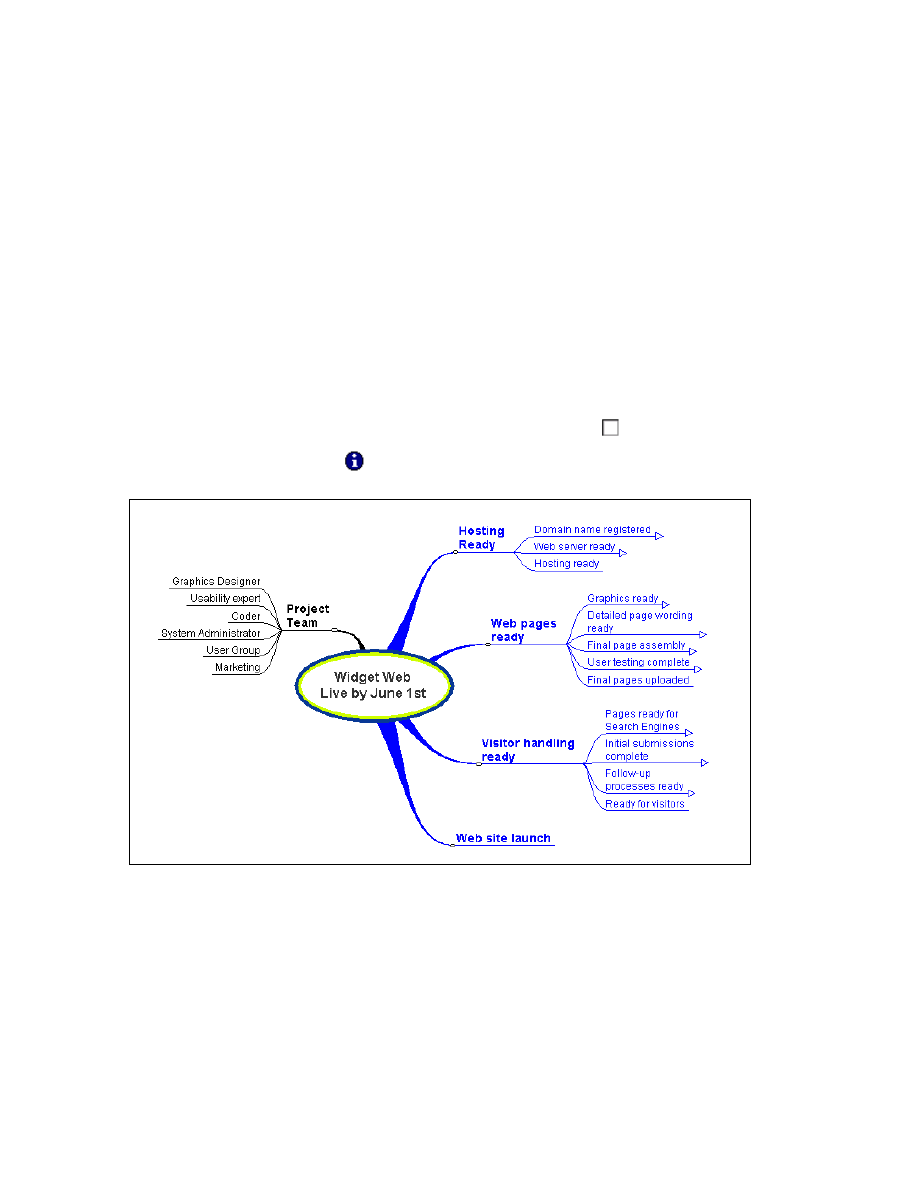
• Go through the map and initially mark up Tasks or Information. Attach information to the Task to
which it relates. Mark the Tasks with the "Not Done" Branch Code (
) and Information with the
"Information" Branch Code (
).
Figure 8: Deciding on the Main Goals of your Project
Copyright 2003 Mindjet LLC
As you work through this restructuring, either alone or preferably in a group, you will identify activities that
have been overlooked, are duplicated or are unnecessary. As you move, add or delete items in your map,
consider the implications of what you are doing. How does that piece of information contribute to the goal
as stated on the map? Does the project goal depend on it to be completed?

7-Step Project Mapping with MindManager
16
If you are working on a sub-project of a larger initiative, don't worry at this stage about any activities that
contribute towards more than one goal. We will deal with this later by using Relationships to indicate task
predecessors and successors.
Step 4: Implement your Visual Vocabulary
In Step 4, we implement the more detailed visual vocabulary that you created in Step 1.
Viewing tasks
Display all the Tasks in your map by using the Power Select task pane to show only Tasks. (VIEW->
SELECT TASK PANES-> POWER SELECT) If you have used the "Not Done" icons to mark tasks, then
set up the Power Select as follows:
Action = "Filter (Hide Unselected)", Selection = "Match Any", Task = "Any"
This will show just the tasks in your map. With all the Tasks displayed, use the arrow at the top of the
Task Pane to go to the Task Planning task pane and review the data for each Task:
• In the Resources box, enter the name of the person responsible for the task. MindManager does not
have centralized resource management, so you need to be consistent with the names.
• In the Categories box, enter the names / roles of those who will be interested in the information on
this branch.
Inserting codes, colors
Return to the Power Select task pane and click Reveal All to show all branches again. Apply the codes or
colors for the other mark-ups you have defined, such as
• Risks
• Deliverables
• Confidential
information
• Items requiring immediate attention
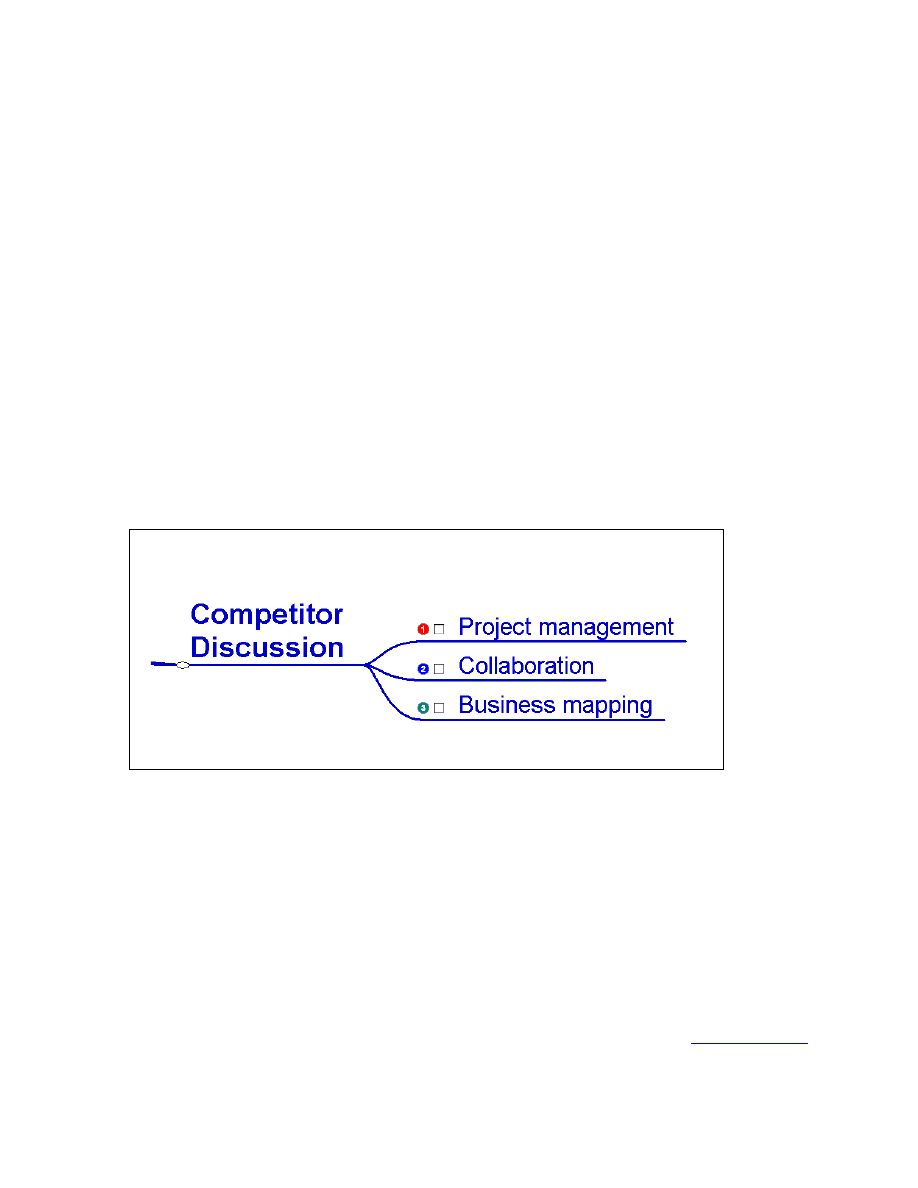
7-Step Project Mapping with MindManager
17
Figure 9: Marking key items in your map
Copyright 2003 Mindjet LLC
From now on, when you add any new branches to your map, try to add appropriate cues from your visual
vocabulary as the branch is created. This will save time later and enable you to use MindManager's
Power Select feature at any time to examine a particular aspect of your project.
We now have the basics of our project plan in place. In Step 5, we will further refine the plan.
Step 5: Develop the Detail of your Plan
Step 5 is where your visual vocabulary starts to pay dividends. Use Power Select to quickly group items in
your map, and then to review and develop the following:
• Check through all Project Deliverables. How will you measure their quality and accept them?
• Check through all Risks associated with tasks. How will each eventuality be addressed? What
extra actions might be needed early to reduce the possibility of things going wrong? Can you design
in some safety-net actions that will increase survivability in the event of risks materialising later?
• Review all the Open Issues. What are the effects of leaving them open? When will decisions need
to be taken, to avoid delays? Consider upgrading them to Actions. If a deferred decision is needed,
then they can be scheduled into the project. You should be aiming to either resolve open issues
relating to your project plan now, or design the decision into the project as a later action—perhaps
after some other information has been gathered or the results of earlier work known.
7-Step Project Mapping with MindManager
18
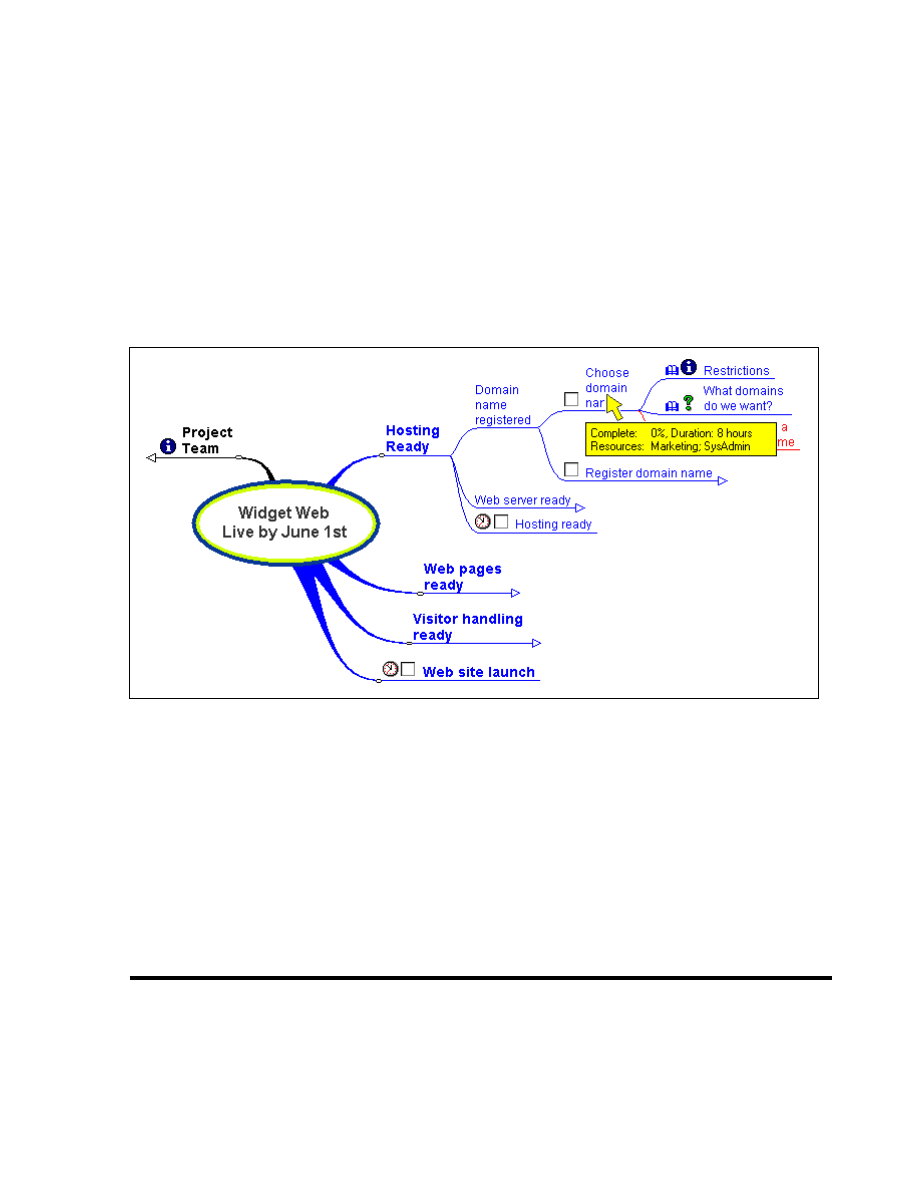
• Review all the Tasks and Milestones again, and set Durations on Tasks. Check to make sure
that each task has at least one Resource allocated to it. Look at the positions of Tasks and
Milestones in your map. If you intend to export the map to a scheduling package such as Microsoft®
Project, then any branch that is a Task should not have child branches that are also Tasks. This is
because any branch that has another task associated with it cannot itself have Duration and other
task attributes. These attributes are typically calculated from the child tasks by other scheduling tools.
Rearrange the Task branches so that they are either at the tips of the tree, or only carry non-task
child branches, such as information or risks.
Figure 10: Adding task planning information
Copyright 2003 Mindjet LLC
Your map now contains a good description of all the activities and associated information. Rather than
being presented as a linear list, buried in hidden folders or located in separate documents, all project
information is presented in clear, easy-to-understand context. Through the use of Power Select and
Power Filter features, information can be displayed in user-defined custom views. Now we need to turn
the map into a sequential plan.
Step 6: Create a Workable Project Plan
In Step 6, we "wire up" the tasks in your project to create a workable project plan. We do this by including
information that will help project-scheduling software convert the map into an optimized sequence of
activities. This is done with a combination of deadline dates and task dependencies.

7-Step Project Mapping with MindManager
19
Using Power Select, review all the tasks and milestones in your plan:
• Assign deadline dates only to those tasks and milestones that really need them. If you plan to
export to an external project-scheduling package, set as few deadline dates as possible. The
scheduling software will give you the most flexibility if you give it least number of constraints. If your
project is small and you will continue to manage it in MindManager, then you will effectively be
scheduling by hand, so include the appropriate date information.
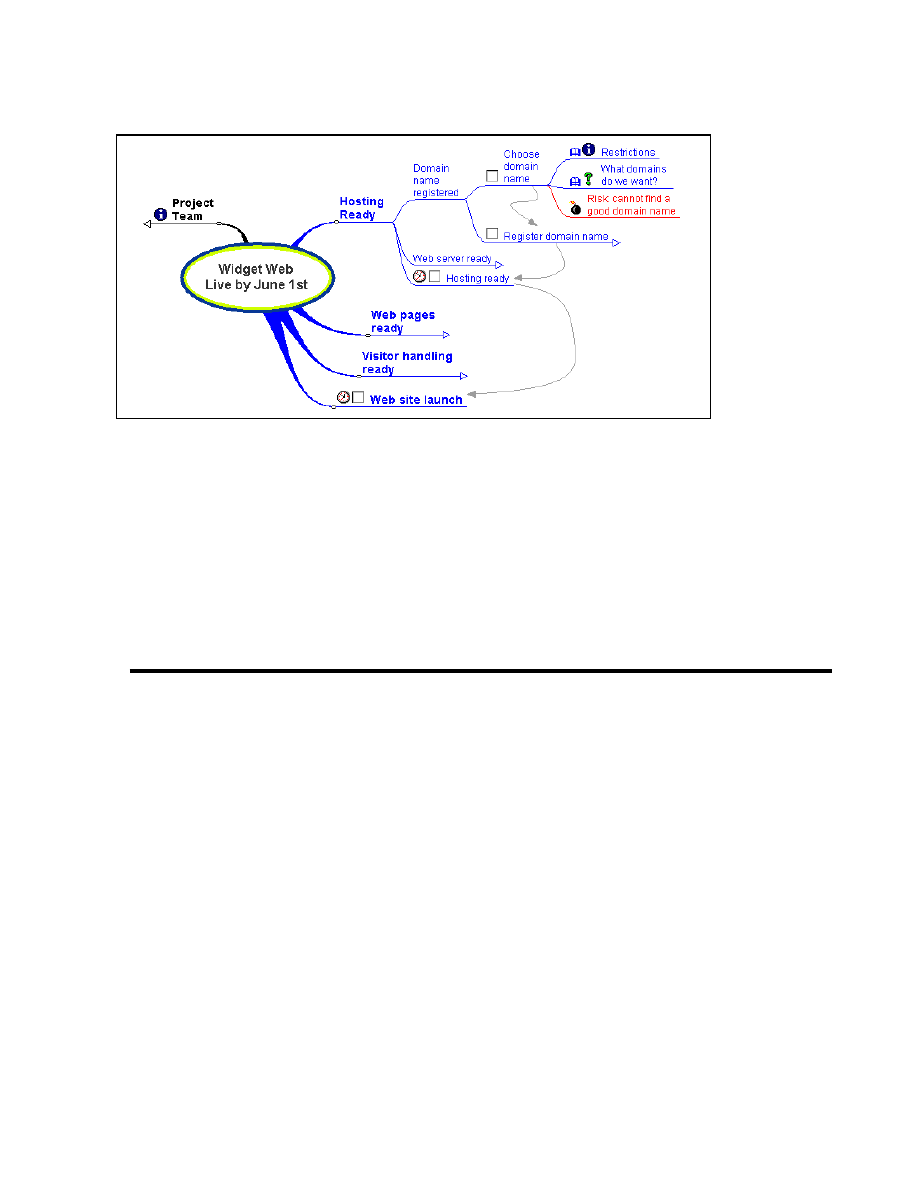
• Determine how the tasks rely upon each other. Where a task cannot meaningfully start until a
previous one is complete, draw a Branch Relationships
pointing from the task predecessor to the
task, i.e. from a task to others that depend on it (its successors). A Task may have multiple
successors or predecessors. Also try to ensure that there is only one task without any successors.
This will be the final outcome of your project. If you will be using scheduling software to level the
project, you don't need to worry about serializing tasks that are allocated to the same resource. The
scheduling software will normally take care of this for you.
If you intend to export your plan to another project-scheduling package, try to avoid creating
dependencies involving Task Summaries, or non-task branches. While these may make sense to you,
project scheduling packages may find them ambiguous. Generally you should restrict your use of
Relationships in a project map to interdependencies between tasks. Using them for other
purposes may be confusing.
TIP: Complex project maps with a lot of Relationships can become both confusing and intimidating. You
can hide Relationships in a map with the View -> Show/Hide command. Remember that reducing the
Level of Detail on a branch (collapsing a branch) will also temporarily hide Relationships that lead to or
connect sub-branches not in view. You can work productively with very complex maps through effective
use of MindManager's features (and those new to mapping who look over your shoulder will be less
confused!).
Advanced users can find more information about coding other types of task dependency (e.g. Finish to
Finish) in the MPX Import/Export utility documentation. (Available at
http://www.mindjet.com/partners/partner_solutionxchange.shtml
7-Step Project Mapping with MindManager
20
Figure 11: Connecting up dependent relationships
Copyright 2003 Mindjet LLC
You how have a highly developed MindManager project map (the above image shows only a subset of all
available branches) showing the scope of your project, its tasks and task network, and associated
information. This is a powerful and usable representation of your project plan which can be deployed in a
variety of ways discussed in Step 7.
Step 7: Deploy your Project Map
Now that you have mapped out your project and developed it into a plan, what next?
Managing small projects
If your project is not very complex and uses limited resources, it may be practical for you to continue
managing and tracking it in MindManager alone. Your primary tool is the Power Select feature, which will
help you view:
• Tasks that are starting, in progress or completed. Sort by date ranges (you must provide detailed
dates for this)
• Tasks assigned to specific Resources
• Branches assigned to specific Categories
• Branches matching selected visual vocabulary criteria, for example all Deliverables or Risks.

7-Step Project Mapping with MindManager
21
You may find it useful to extract Task Lists and their current status using the Task to CSV Exporter
available from the Solution Xchange (
http://www.mindjet.com/partners/partner_solutionxchange.shtml
This will provide a convenient printout of project tasks together with their associated data (start dates,
duration and so on).
TIP: You can also obtain a task report with via MindManager’s Microsoft
®
Word export. In addition to
outline-formatting options, the export provides options for task planning attributes. Filter your map to show
just the tasks and check the required Task Planning information in the Word export to create a convenient
project task report.
Communicating small projects
If your map is relatively simple, you can choose the appropriate information you want to view by using
Power Select first, then exporting:
• To
Microsoft
®
Project or as an .MPX file
• To Microsoft Word to create a report or outline
• To Microsoft PowerPoint
®
to create a presentation,
• As HTML to create a fully functional web site
• To an image file or clipboard (useful if you want to email a “picture” of the project)
You can also use MindManager’s built-in Presentation mode to communicate your project or selected
areas of it to the stakeholders. As discussed above, when presenting project details as a map, you may
also find it helpful to hide Relationships to keep the maps as simple as possible (unless of course you are
discussing and assigning task interrelationships with your team).
Managing larger projects
If your project is more complex, you may choose to move to dedicated project-scheduling software to
manage tasks, analyze the data, or develop the schedule in such a way as to be able to level it against
other constraints (such as resources and calendars). In this case, you can export your project map to a
variety of destinations:
• To
Microsoft
®
Project, using MindManager's built-in synchronization, which will schedule and balance
your project, allows you to set baselines and create resource schedules.
• To other project management solutions using the MPX import/export tool available from the Mindjet
Solution Xchange. Supported applications at the time of writing include FastTrack Schedule 8 from
AEC Software, Milestones Professional from Kidasa Software, Microsoft
®
Project 98, 2000 and 2002,

7-Step Project Mapping with MindManager
22
Project KickStart from Experience in Software Inc., PERT Chart Expert and WBS Chart Pro from
Critical Tools™, Pertmaster Professional from Pertmaster Ltd, PS8™ from Sciforma Corp, PS-Team
from Delcam Ltd, P3 and SureTrak from Primavera
®
Systems, and Microsoft
®
Visio. Other project
management software that can import MPX version 4.0 files may also be compatible.
• To Microsoft Excel or other spreadsheets, using the Task to CSV Exporter available in the Solution
Xchange. This will produce a table of tasks from your project map that can be opened with a
spreadsheet package. This will enable you to keep numerical track of tasks, such as adding cost
information or analyzing resource loads.
• As tasks into Microsoft Outlook
®
, using MindManager's built-in synchronization. This can be useful
where you are able to share and transfer tasks using Exchange.
To export to another package, use Power Select to first filter all the Tasks in your project. Most of
the above mentioned software will only be interested in the Task data and will not import the other
information included in your map.
Communicating larger projects
If your project is complex, presenting the full project map to the senior management team may provide so
much detail as to be overwhelming. MindManager has many features that help you focus your
presentation on what is important to each particular audience. The key MindManager features that will
help you create this custom view include:
• The
View -> Show/Hide command
• The
Power Select task pane
• The
View -> Level of Detail command (or Ctrl+D keyboard shortcut)
If you implemented project Roles using the categories field, this step will be easy. To create a
presentation for select project sponsors, you simply open the Power Select, choose appropriate sponsor
names under Categories, and apply the filter. The resulting view will include only that project information
relevant to their needs.
MindManager and the Project Lifecycle
Project planning is never finished until the project stops. Invariably across the life of any project, there are
constant changes, updates and new decisions to be made. MindManager’s intuitive flexibility and capacity

7-Step Project Mapping with MindManager
23
to capture a multiplicity of project related information, from ideas and insights to key documents, data and
images make it a very useful way to manage projects from inception to completion.
Even once the project is complete, MindManager continues to play an important role. At project close,
your maps will provide a very effective way for you and your team to review successes and failures, and
to capture project debrief information that will help the next time.
The map (or series of linked maps related to that project) will create an extremely useful archive of all
project-related activities—with all documents, all reasons for change (as well as who
suggested/authorized changes, and when and why), all pertinent background information available. If it
becomes necessary to go back and review that project, all the information can be easily located. Having
said that…
Complimenting other Project Management Tools
As you have now seen, MindManager has many strengths and much to offer Project Managers. But in
some cases it complements rather than replaces fully-featured project scheduling tools. There are several
important techniques in project scheduling that MindManager does not address:
• Critical path analysis
• Project and resource calendars (e.g. taking into account holidays)
• Schedule
calculation
and resource levelling
• Risk
analysis
• Baseline
management
These and other features are best handled by dedicated tools. MindManager is compatible with the
leading project management solutions for Microsoft
®
Windows
®
, and can export its project maps directly
to them. If your project is large or complex, you can use MindManager to create and communicate the
project plan, and then export the plan to another package for detailed scheduling and tracking.
If your project is fairly small and simple (for example, if you do not need a Gantt chart view), it can be
practical to use MindManager alone to both plan the project and keep track of tasks. MindManager's
Power Select feature allows you to view selected project information, making it easy to update and
present information to others. The Word export gives you a handy Task Status report.

7-Step Project Mapping with MindManager
24
When you consider whether and how to integrate MindManager into your current project management
process; remember that one of the best things you can do to run a successful project is to think before
you act. The more front-end planning you and your team do to define project stakeholders, goal, scope,
definitions of success, and potential risk, the better off you will be. Once the project is under way, success
will be enhanced by your ability to manage both the big picture and all the details, and to concisely
communicate project status to all interested parties. MindManager provides an excellent way to
accomplish all of these key project activities.
For More Information
To find out more about project management solutions using MindManager, visit the Mindjet Solution
Xchange at
http://www.mindjet.com/partners/partner_solutionxchange.shtml
. The Xchange is part of the
Mindjet Partner Program and features downloads and resources for MindManager users and support for
developers.
The Mindjet web site at
has case studies to help you understand how to apply mapping
to your work, along with useful reviews, articles and white papers. Mindjet.com is a great place to refer
friends and colleagues interested in understanding how to add MindManager to their project management
tool set.
Wyszukiwarka
Podobne podstrony:
Productivity 101 Mapping Your Mind
005009 Nast, Jamie Learning to Learn With Mind Maps 25C2 25AE & Memory HeadMan by Tony Buzan
Tony Buzan Taking Notes With Mind Maps
Serge Charbonneau Software Project Management A Mapping Between Rup And The Pmbok
automating with step 7 in lad and fbd simatic (1)
Project Management Six Sigma (Summary)
Agile Project Managemnet
ZPT 02 Project management processes V2 odblokowany
Business 10 Minute Guide to Project Management
Lumiste Betweenness plane geometry and its relationship with convex linear and projective plane geo
2003 formatchain and network management gilda project
BYT 2006 Communication in Project Management
PROJECT MANAGEMENT 2008 NEW
project-management-jako-rozwojowa-koncepcja-wykorzystywana-w-innowacyjnosci, Chrzest966, MAP
Project Manager, Chrzest966, MAP
Fundamentals of Project Management 4th ed J Heagney (AMACOM, 2012)
1 Project Management Basics
PROJECT MANAGEMENT
więcej podobnych podstron