
1
U-859/U-860 Mechanical Disc Brake Assembly Instruction
Notice!
1. Unique disc brakes have been designed for bicycle use only!! The use on any other kind of
vehicles will not be warranted by Unique. Improper installation could cause severe or fatal
injuries.
2. A qualified technician with the proper tools should perform the installation of the disc brake
components.
Mounting the Rotor to the Hub
Tools Required
Screwdrivers: Torx T25 driver
Steps:
1. Clean the disc and the hub-mounting surface with alcohol.
2. Place the rotor on the mounting surface of the hub, and make sure the arrow on the rotor are
pointing in the same direction of rotation in which the wheel moves forward.
3. Fasten M5*P0.8*10 rotor screws with Torx T25 driver in sequence pictured, torque to
6-8Nm.(53.11-70.81 in. lbs)
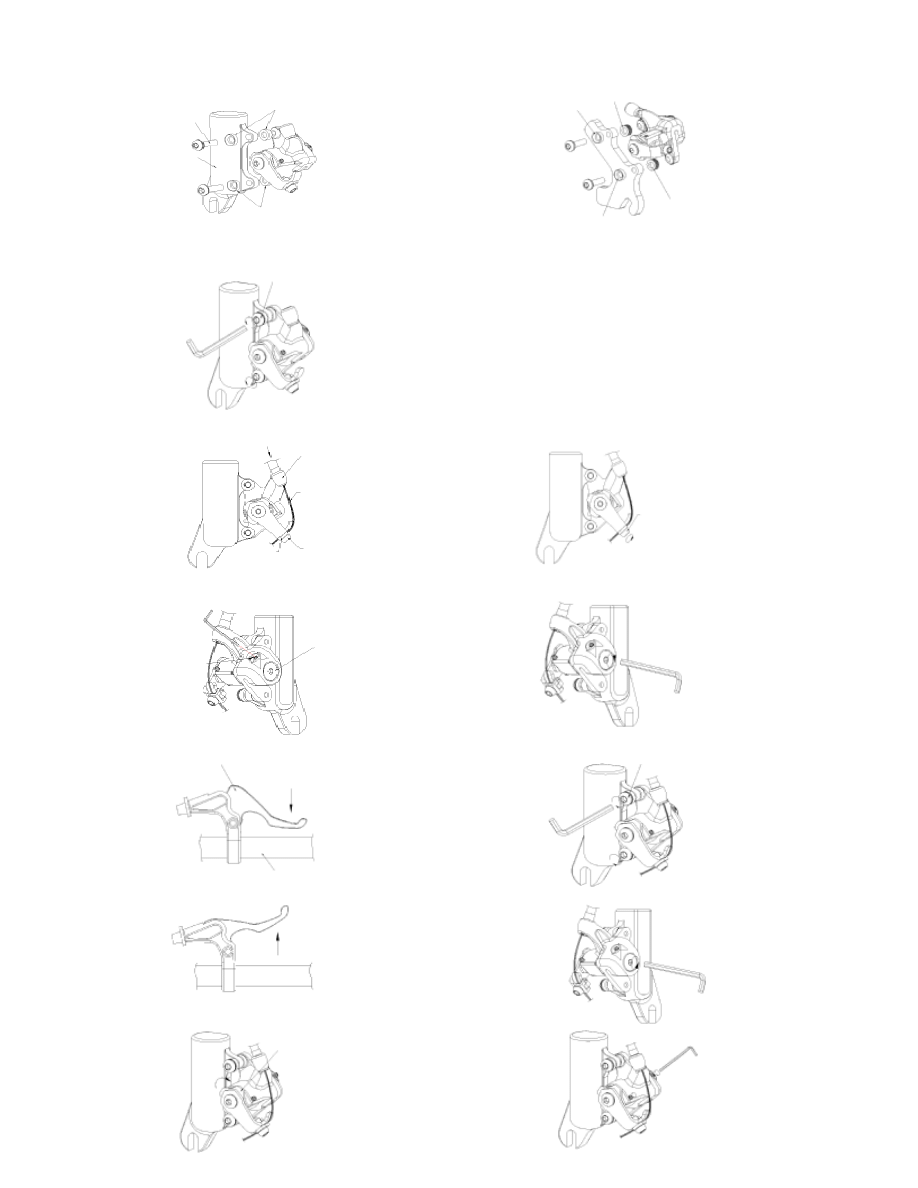
Mounting the Brake to the Frame or Fork
Tools Required
Allen driver: 5mm, 2mm
Steps:
1. Mounting the Caliper
Lock the caliper to the fork using M6*P1*21 caliper fixed screws (2pcs) with round concave
washers (4pcs). (Picture 1)
Note: Using M6*P1*21 caliper fixed screws (2pcs) with round concave washers (2pcs) and
round concave washers with UCP finish (2pcs) if mounting the caliper directly to the frame.
1.1 Turn the M6*P1*21 caliper fixed screws counter clockwise 1/6 of a turn. They are now semi
tight so that the angle of the caliper can be micro adjusted later when the pads and rotor are
fully adjusted. (Picture 1.1)
2. Mounting the Cable
Install the cable wire through its housing (housing will bottom out on the cable), pulling the
cable wire through the cable anchor screw and washer. (Picture 2)
2.1 Pull the cable wire tight and tighten the cable anchor screw to 6-8 Nm of
torque.(53.11-70.81 in. lbs) (Picture 2.1)
3. Brake Pad Adjustment
Loosen the M4 set screw (which is used to fix the pad adjuster) with 2mm Allen driver. Using
a 5mm Allen driver turn the pad adjuster clockwise until the pad touches the rotor. (Picture 3)
Note: If spin the wheel, be sure there is sound of pads and rotor rubbing each other but the
wheel can spin freely without any difficulty.
3.1 Squeeze and hold the brake lever making the pads clamp the rotor tightly. While holding the
lever, torque the caliper fixed screws to 8-10 Nm.(70.81-88.51 in. lbs) (Picture 3.1)
3.2 Release the brake lever. Turn the pad adjuster counter clockwise 1/3 of a turn.(to make the
inner pad be about parallel to the rotor and have a 0.3mm gap) (Picture 3.2)
3.3 Spin the wheel and squeeze the brake lever, if it feel too loose while squeezing (the wheel
cannot be stopped until squeezing the brake lever almost to its limit), it means the gap
between rotor and pad is too big and the outer adjusting knob (silver) should be turn
clockwise until the gap is about 0.3mm. (Picture 3.3)
Note: The outer pad is the pad away from the wheel.
4. Spin the wheel, if there is noise or drag, should re-loosen the caliper fixed screws and adjust
the position of caliper and pads again, if there is not and can spin freely, that means the
installment is correct.
5. Tighten the two M4 set screws on the brake to complete the installment. (Severe or fatal
injuries could be caused if neglect to tighten the M4 set screws) (Picture 5)
2
housing
cable wire
cable anchor screw
washer
Pull the cable wire tight and
tighten the cable anchor screw
pad adjuster
Loosen the
M4 set screw
2mm
5mm
outer adjusting knob
2mm
handlebar
Squeeze and hold
the brake lever
brake lever
Release the
brake lever
caliper fixed screw
5mm
5mm
1/3turn
5mm
round
cancave
washer
round
cancave
washer
round cancave
washer
with UCP finish
round cancave
washer
with UCP finish
Install the cable wire
1. Front Rear
(Using the caliper at front wheel should match 160mm rotor, if at rear should match 140mm rotor)
1.1
2. 2.1
3.
3.1
3.2
3.3 5.
caliper fixed
for
round
cancave
washer
round
cancave
washer
caliper fixed
5mm
Turn the screws counter clockwise 1/6 of a turn as they
are under the state of locking. Fully tighten once the
pads and rotor are fully adjusted.
Wyszukiwarka
Podobne podstrony:
SAF HOLLAND Instructions for Use Universal Disc Brake To
(7 1)861 862 Disc brake
12 brake system
Popular Mechanics Calming A Pulsating Brake Pedal
electric brake service tool ebs301
859
PARKING BRAKE
12.1. Dz.U.98.130.859, Lotniska cywilne
DIY Brake
Popular Mechanics Servicing Front Brake Calipers
859
Montaż i regulacja hamulców V- brake
860
860 Pale
UMD Disc
Dz U 11 144 859
DISC types
59 847 859 Crack Resistance of Hardened Steels Against Thermal Shock
M 860
więcej podobnych podstron