SIP
Fast Track Guide
Ensure that your MP-11x is supplied with the following items:
9
AC power cord
9
Four anti-slide rubber feet for desktop mounting
You’ll also need the following (not supplied):
9
RJ-11 telephone cable
9
RJ-45 Ethernet crossover & straight-through cable
9
Internet connection
9
VoIP provider
9
PSTN telephone provider
9
PC running a Web browser
2. Physical Description
1. Before Installing
MP-11x Series
AudioCodes CPE & Access Gateway Products
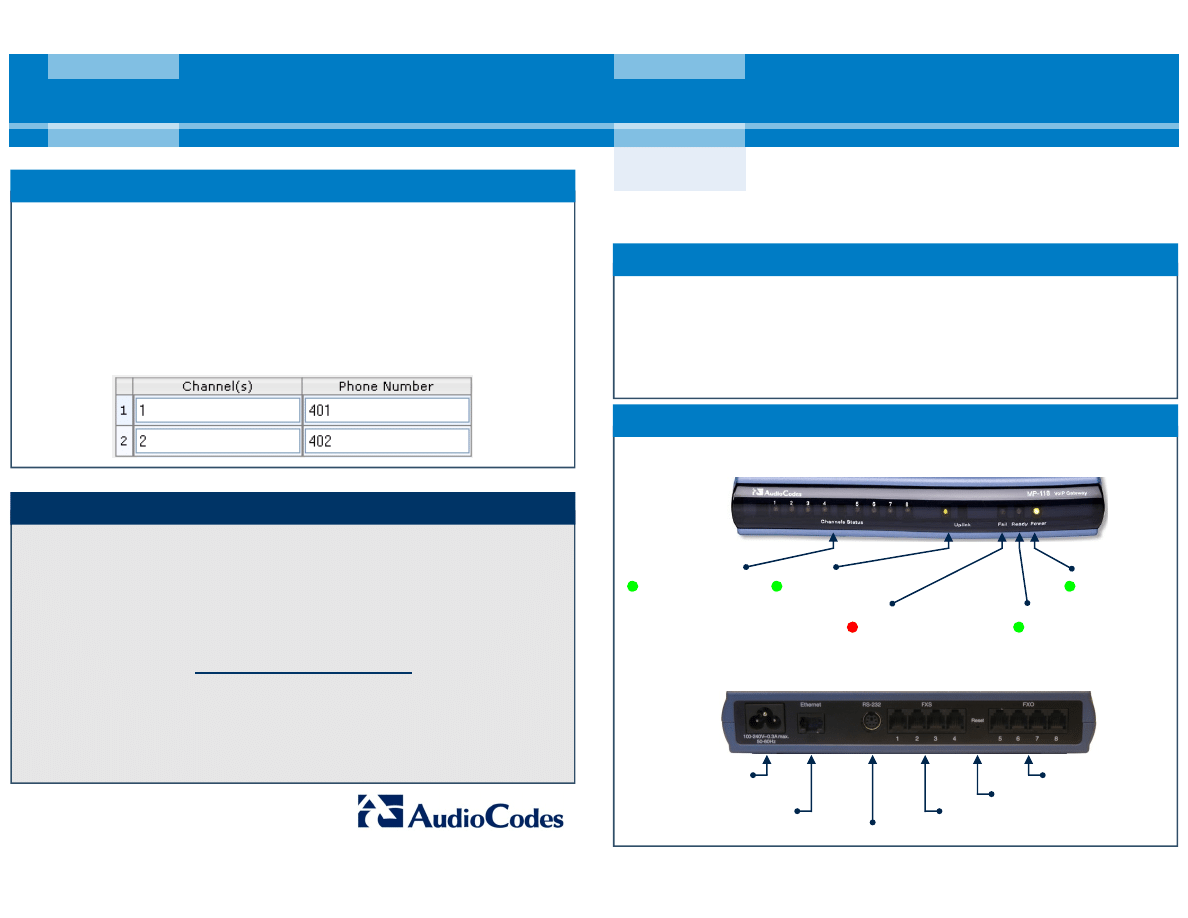
The MP-11x front panel provides operating status LEDs, as shown below:
The MP-11x rear panel provides ports, as shown below:
1.
Open the ‘Endpoint Phone Number Table’ page (Configuration tab > VoIP menu
> GW and IP to IP > Hunt Group > Endpoint Phone Number).
2.
In the ‘Channel(s)’ column, enter the port number of the port that you want to enable,
as labeled on the rear panel.
3.
In the ‘Phone Number’ column, enter the port’s phone number (e.g. 401), which is
typically provided by your VoIP provider, and then click Submit.
The MP-11x ports are enabled by assigning them a phone number.
)
To enable MP-11x ports:
Notice
This Fast Track Guide describes the quick setup for AudioCodes MediaPack MP-11x
series Voice-over-IP (VoIP) SIP media gateways.
Information contained in this document is believed to be accurate and reliable at the time
of printing. However, due to ongoing product improvements and revisions, AudioCodes
cannot guarantee accuracy of printed material after the Date Published nor can it accept
responsibility for errors or omissions. Updates to this document and other documents as
well as software updates for the MP-11x gateway can be viewed by registered customers
on AudioCodes’ Web site at
www.audiocodes.com/downloads
.
© Copyright 2010 AudioCodes Ltd. All rights reserved.
This document is subject to change without notice.
Date Published: December-16-2010
6. Enabling the Voice Ports (Channels)
AudioCodes CPE & Access Gateway Products
AC Power Socket
RJ-45 10/100BaseTX
Ethernet Port
RS-232 6-Pin Mini-DIN Female (PS/2) Port
RJ-11 FXS Ports
Reset Button
RJ-11 FXO Ports
Channel Status
On: Off-Hook
Slow Flash: Ringing
Fast Flash: Malfunction
Off: On-Hook
Uplink
On: Ethernet Up
Off: No Link
Fail
On: Failure/Initialization
Off: Normal
Ready
On: Operational
Off: Loading SW / Failure
Power
On: Power On
Off: No Power
Document #: LTRT-52906
)
To change the MP-11x IP address:
1.
Disconnect MP-11x from the network and reconnect the Ethernet port directly to a
PC’s LAN port using an Ethernet crossover cable.
2.
Change your PC’s IP address and subnet mask to correspond with the MP-11x
factory default IP address and subnet mask.
3.
Open your Web browser and browse to http://10.1.10.10 (i.e., the MP-11x default IP
address); the MP-11x Web interface's login 'Enter Network Password’ page appears.
4.
Log in using the default, case-sensitive user name (“Admin”) and password
(“Admin”), and then click OK. You are now logged in to the MP-11x Web interface.
5.
Open the ‘IP Settings’ page (Configuration tab > VoIP menu > Network > IP
Settings), and then change the IP addresses to correspond with your network IP
scheme. Click Submit and then “burn” your settings to flash in the ‘Maintenance
Actions’ page; your Web browser disconnects from the MP-11x Web interface.
6.
Disconnect MP-11x from your PC and reconnect it to the network. Restore your PC’s
IP address and subnet mask to their original settings. Restart your PC and re-access
the MP-11x Web interface with its newly assigned IP address.
5. Configuring Basic SIP Parameters
Configure MP-11x with basic SIP parameters using the Web interface:
)
To configure basic SIP parameters:
1.
In the ‘Coders Table’ page (Configuration tab > VoIP menu > Coders And Profiles >
Coders), select coders used by MP-11x that best suit your VoIP network and are
supported by your VoIP provider.
2.
In the ‘Proxy & Registration’ page (Configuration
tab > VoIP menu > SIP Definitions > Proxy &
Registration), set the ‘Use Default Proxy’ field
to “Yes” and the ‘Enable Registration’ field
to “Enable”.
3.
Click the Proxy Set Table button, and then
enter the IP address or domain name of the
Proxy server provided by your VoIP provider.
3. Installing the MP-11x
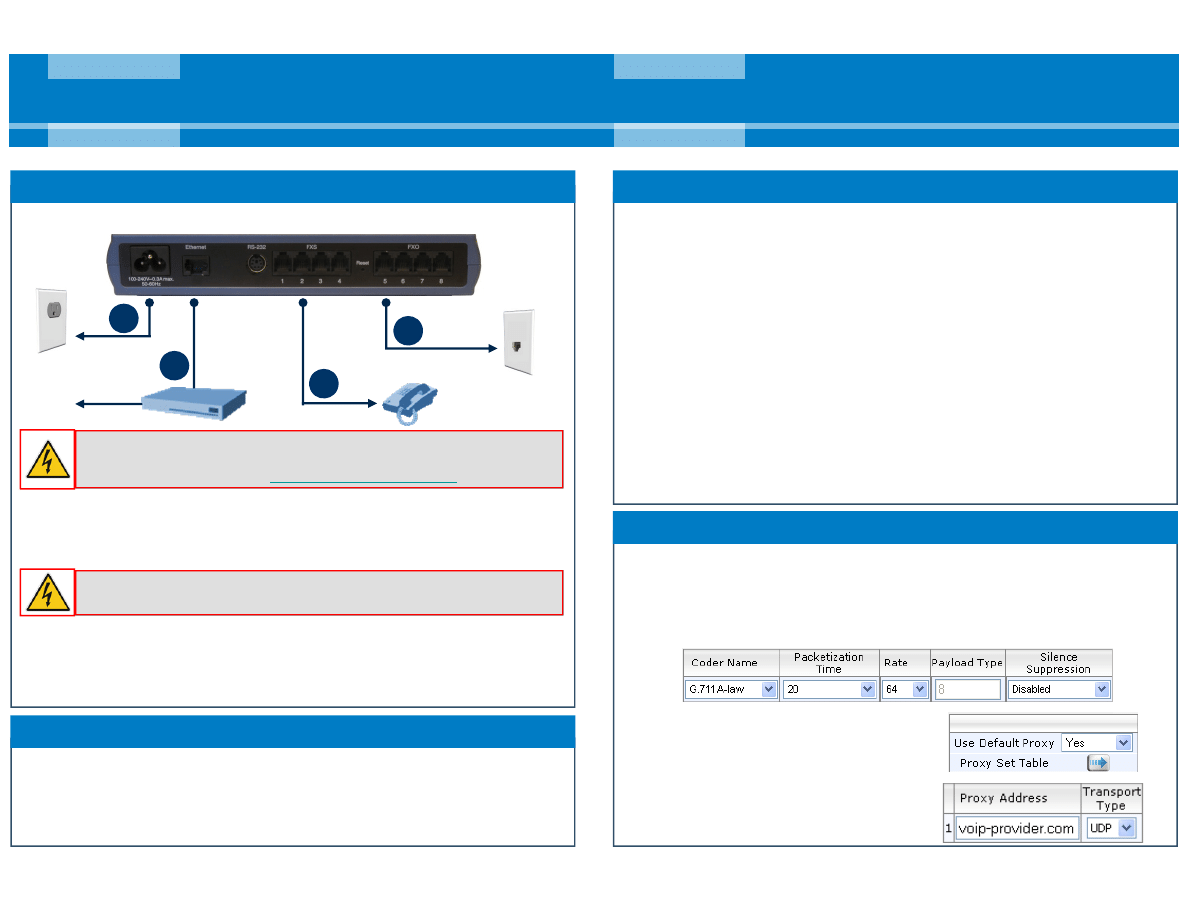
The cabling of the MP-11x is shown in the figure below:
1.
Connect MP-11x Ethernet port (labeled Ethernet) to your LAN switch, using the RJ-45
Ethernet cable connector.
2.
Connect the MP-11x FXS port(s) to a telephone/fax/modem, using an RJ-11 cable.
3.
Connect the MP-11x FXO port(s) to a PBX or the PSTN, using an RJ-11 cable.
4.
Connect MP-11x to a standard AC wall outlet using the AC power cord; the Ready and
Power LEDs are lit green and the Fail LED red (turns off after MP-11x completes
initialization ~ 1 min). The Uplink LED flashes green, indicating an Ethernet link.
5.
Attach four anti-slide, rubber feet (supplied) to the underside of MP-11x and place it on
a desktop. (For wall and 19-inch rack mounting, refer to the Installation Manual.)
Warning:
Connect FXS ports only to analog telephones/ PBX trunk lines, and
FXO ports only to CO/PBX lines; otherwise, damage to MP-11x can occur.
4. Assigning an IP Address
Your MP-11x is shipped with the following default IP address settings:
9
FXS-only and combined FXS/FXO devices: 10.1.10.10
9
FXO-only devices: 10.1.10.11
9
Subnet: 255.255.0.0
9
Default Gateway: 0.0.0.0
Power
110/220V
4
Phone
PBX/PSTN
1
2
3
4. Assigning an IP Address (Cont.)
AudioCodes CPE & Access Gateway Products
AudioCodes CPE & Access Gateway Products
Warning:
Ensure that you connect MP-11x to an electrical socket outlet that
provides protective earthing (grounding). Prior to connecting power, refer to
the Regulatory Information at
www.audiocodes.com/library
.
Switch
LAN
WAN
Wyszukiwarka
Podobne podstrony:
LTRT 59806 MP 11x & MP 124 SIP Fast Track Guide
LTRT 52911 MP 11x SIP Quick Guide
LTRT 59815 MP 11x and MP 124 SIP Installation Manual Ver 6 6
Fast Track 5 Slow Ride
iec cetral office on the fast track process 2007
Fast Track 4 The Chase
143030393X {72191ACF} Fast Track to Sun Certified Java Programmer (SCJP) 5 0 Upgrade Exam [Tong 2006
Fast Track 3 Hot Finish
Fast Track 1 Flat Out Sexy
Fast Track 2 Hard and Fast
MP W 06N
MP W 04N
Fotogrametria i SIP cwiczenia 3
R 4 2b mp
MP W 07N dodatek
R 4 1 mp
więcej podobnych podstron