
R
R
D
D
M
M
+
+
R
R
e
e
m
m
o
o
t
t
e
e
d
d
e
e
s
s
k
k
t
t
o
o
p
p
f
f
o
o
r
r
M
M
o
o
b
b
i
i
l
l
e
e
s
s
F
F
o
o
r
r
B
B
l
l
a
a
c
c
k
k
B
B
e
e
r
r
r
r
y
y
R
R
I
I
M
M
d
d
e
e
v
v
i
i
c
c
e
e
s
s
Copyright © 2006, SHAPE Services
www.shapeservices.com

Introduction
RDM+ (Remote Desktop for Mobiles) is a communication tool that gives you the unique
ability to connect to your desktop computer through the mobile phone and interact with it
remotely. With Remote Desktop for Mobiles you can not only observe the remote desktop on
the screen of your BlackBerry device but perform different usual keyboard and mouse
commands using instead phone's joystick or buttons.
While using RDM+ you are able to send and receive mail, browse the Internet, edit files
copying, cutting, pasting documents from one folder to another and to do hundreds regular
things that you usually do sitting at your computer at home or in the office. The naturally and
transparent interface, simple navigation and the list of commonly used options compensate to
the full inconveniences of mobiles. On top of all this is the strong encryption algorithm that
guarantees the highest level of data transfer protection.
Main features of application
Compatibility with Windows 98/ME/NT4.0/2000/XP/2003;
Support of various connection types: Direct Internet connection, BES and BIS
connections;
Both TCP/IP and HTTP protocols are supported;
File manager feature for convenient management of files on remote computer without
accessing to desktop.
Possibility to execute any console command (like ping, netstat, ipconfig) on your computer
very quickly getting a result to your mobile phone. For that you don't need to access
desktop of your computer. Additional history feature lets you to find and to re-send stored
commands.
Time saving built-in option letting you to reboot or shutdown computer remotely, control
running applications and system services by one operation not being connected in remote
screen mode.
Address book for saving computer numbers and logins for several desktops. In addition
you can specify the description of desktop that will help you to find needed computer in a
large list;
Advanced security option for assignment of a password at client startup. Address book is
encrypted with this main password;
Direct input mode – you can use the keyboard of your device for direct text input in
remote desktop applications.
Full-screen view and zooming modes. In full-screen mode you can see the remote desktop
on the entire screen of your device. Zoomed mode lets you to enlarge desktop and to
scroll it to review all fragments in details;
Setup options for choosing the default desktop pallet of connected desktop.
Copyright © 2006, SHAPE Services
www.shapeservices.com
System Requirements
Supported devices:
8100, 6700, 7100, 7200, 7500, 7700, 8700, 6510/7510/7520
OS Requirements:
Version 4.0 and higher. 4.1 OS is more recommended.
Network requirements for client module:
Application supports either direct Internet access through TCP/IP or connection through BES
server. For more efficient work the first above mentioned connection type is more preferable.
BIS connection is also supported.
Application connects to RDM Online Service through TCP port 6100.
Requirements for server part of software:
The server part of software (RDM+ Local Service) will work on any Windows-based PC with
minimal requirements to hardware resources. The server will work on Microsoft Windows 98 /
NT 4.0 / 2000 / XP / 2003 or higher. Some internal control commands will work only starting
from Windows 2000 / XP and higher. Most of internal commands use WMI (Windows
Management Instrumentation) functions for operating. We recommend installation of all latest
OS service packs and updates for correct work of the internal commands.
Security:
Remote Desktop for Mobiles works in encrypted mode where all data, screen images, mouse
movement and keys are encrypted by 3DES (Triple DES) algorithm with 128 bits key. The 3DES
key is generated by randomly each time at opening a session. This provides the most secure
remote access solution. Server on remote computer has a logging feature where all connections
are written to the log file.
Advanced security option lets you to assign main password at startup of the client. Without this
password no one can access to your client address book. Address book is encrypted by main
password.
Copyright © 2006, SHAPE Services
www.shapeservices.com
1. Overview
RDM+ software is ideal remote access solution for those who wants to have a remote access
to the home or office computer but can't open a direct access to the computer for some reason.
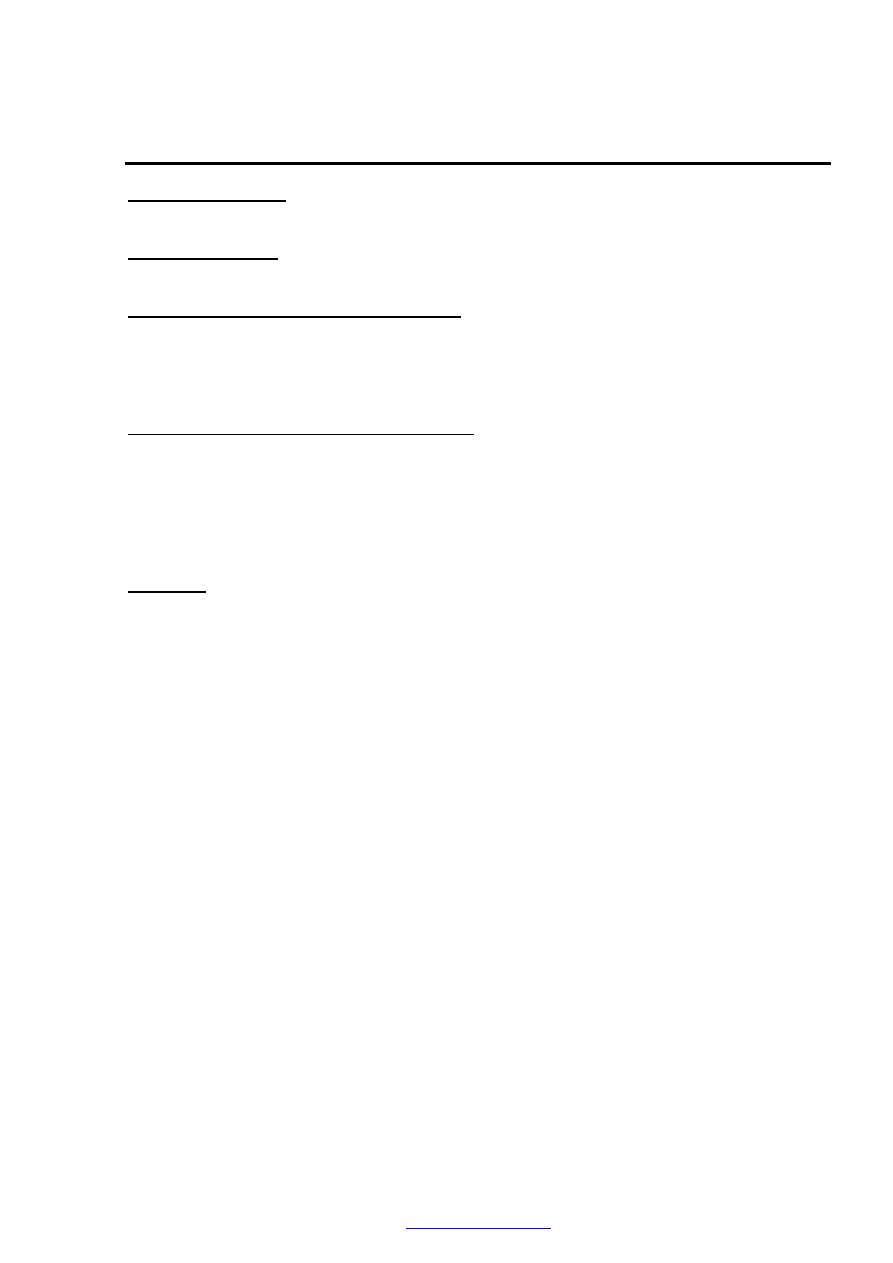
In other words RDM+ is a hosted service made up of three components.
First of them is special middleware (local service) is installed on the computer you want to have
access to, e.g. to your home or office PC that has always-on internet access. This computer
registers and authenticates itself in RDM Online Service (second component). Local service
initiates communication with server issuing HTTP requests (as usual Web browser) to check for
new connections. Mobile client, the last constituent in this chain, is installed on your BlackBerry.
RDM Online Service provides the most secure access to remote computer. There is no need to
allow direct access to computer from Internet, punch holes through corporate firewall or make
any special router settings. It works with both dynamic and static IP addresses, network and
port address translation and firewalls that block incoming sessions.
RDM+ is launched on BlackBerry. After connection to selected address RDM+ will send
encrypted request to the communication server. The RDM communication server is a
matchmaker - it listens to connection requests and mapping them to registered computers.
When a match occurs, the server opens session between client and remote computer and
allows the client to access the remote computer.
2. Server
part
RDM+ software consists of Server part (Local service) for remote computer and Client
module for your BlackBerry device. To work with your computer from your BlackBerry device,
you should install both these components.
The Server part of RDM+ software contains two main applications. It is the Local service
which waits for client connections and serves current connections and RDM+ Control Panel
which is intended for control of the local service. Only control panel has visual user interface.
At installation of RDM+ on your computer the system service calling RDM+ Local Service will
be installed and started automatically.
You can find it in "My Computer" - "Manage" - "Services and Applications" - "Services". This
service will started under "Local system" account by default and with enabled option "Interact
with desktop". The Local service must have a local system rights for properly work.
2.1. Installation
You should install the server part of RDM+ on all computers to which you‘re going to use for
remote access. Run the installation executable file “rdmplus_blackberry.exe” and follow
instruction of installation wizard to completely install the product.
Copyright © 2006, SHAPE Services
www.shapeservices.com
You can download this file from our site:
http://www.shapeservices.com/en/products/details.php?product=rdm&platform=bb
Note: For correct work of the local service, you should install this software with the account having
administrator privileges on the local computer. All previous versions should be removed before
installation.
Run the file on your PC and follow all required steps.
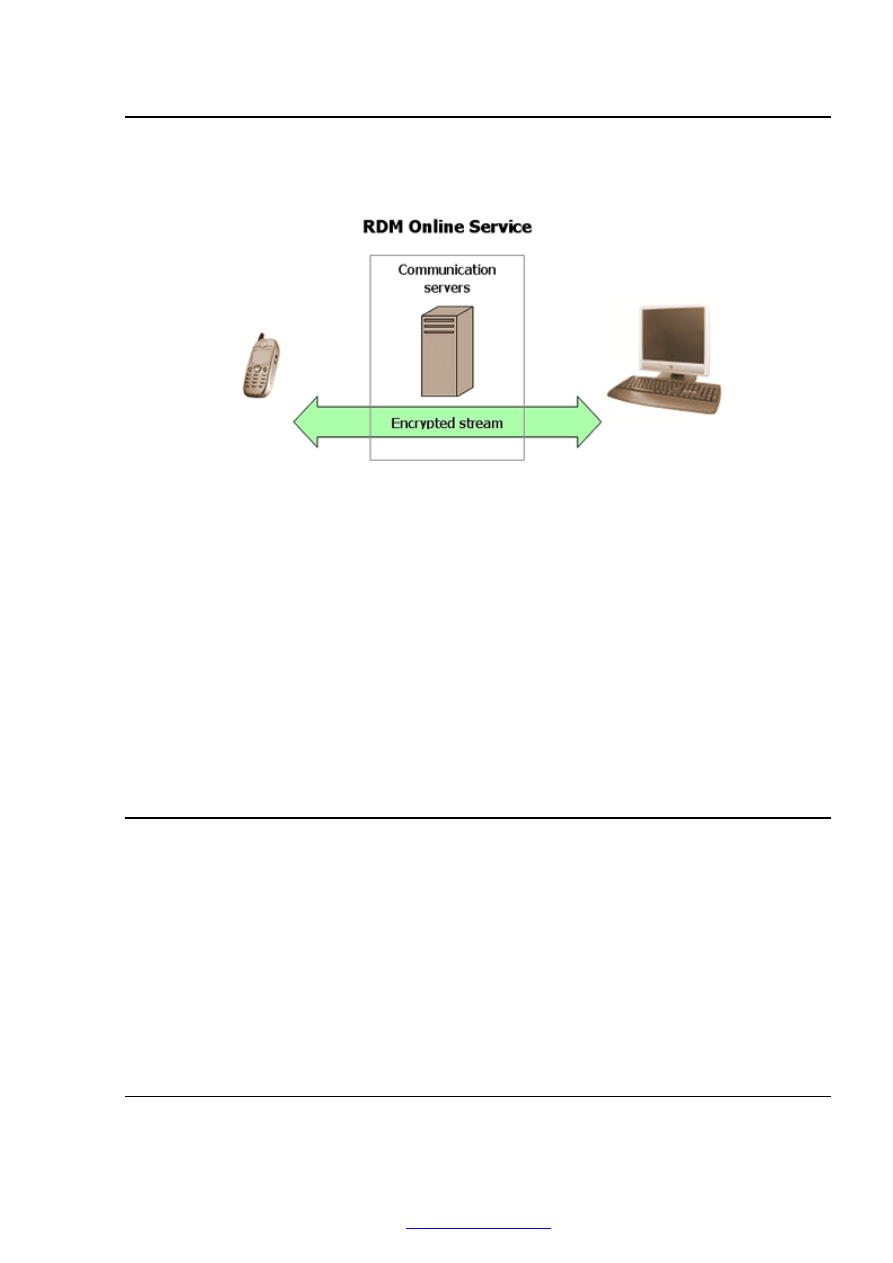
At the final stage of installation you will be prompted to fill out the form to register your
computer in RDM Online service. Please enter all necessary information and press ‘OK’ button to
finish the installation. If you are registering your computer for the first time, you should just
denote your name and valid e-mail address.
Note: Please specify existing e-mail address in registration form exactly. You will receive automatic
notification about registration to this email address. You should confirm or cancel your registration in
"RDM Online Service", by choosing one of web links in this email. Without confirmation you can't be
connecting to the service in future.
If you’re already registered in RDM Online Service and remember the CIC (Computer
Identification Code) given you at registration, please check the corresponding checkbox and
enter your Computer Identification Code.
Your computer’s code assigned after registration in RDM Service can be discovered if clicking on
the icon of RDM+ in system tray and choosing in pop-up menu ‘Details’ item.
After the installation is finished ‘Remote Desktop for Mobiles’ item will be created in the
Windows start-up menu. ‘Control Panel’, ‘Help’ and ‘Uninstall’ shortcuts can be discovered
if choosing ‘Start’/ ‘Programs’ from the menu.
The icon of RDM+ control panel is also appeared on your taskbar. Local service is running right
after successful installation. After clicking on the icon in system tray a pop-up menu is
displayed. The information about your computer number can be discovered if you select the
menu item ‘About’.
Important! To be able to connect with your computer, you need to create a new account in
RDM+ Control Panel and to denote afterwards the same account in address book of the mobile
phone client. You can get more detailed information on this point at
.
Copyright © 2006, SHAPE Services
www.shapeservices.com
2.2. Display driver
RDM+ can use the video hook driver for fast and efficient notification of screen changes. The
driver uses a mirroring technology for the Windows OS family. It makes a mirror of the video
buffer memory inside local service memory. Using this technology eliminates use of the CPU for
intensive screen blitting, resulting in a big speed boost and very low CPU load.
The video hook driver will be installed and used with RDM+ software by default. But you can
disable this driver through RDM+ Control Panel or uninstall it at all. Without video hook driver
RDM+ will be capturing the screenshots in usual way for Windows OS using standard blitting
function.
You can completely uninstall the video hook driver without uninstalling RDM+ software. For
that, open the directory in which RDM+ software has been installed (the default installation
directory is "\Program Files\RDM+\" on a system disk) and run file "uninstall_driver.exe".
Note: After uninstalling the driver, you should reboot your computer to complete uninstalling process.
3. Control Panel Application
All control and settings parameters for the server part are performed through RDM+ Control
Panel application. The Control panel can be called up if clicking to the icon of RDM+ Control
panel on the task bar. You can use RDM+ Control Panel for checking the state of the local
service, control of current client’s connections, managing of accounts, setting parameters for
online service and setting the local service options.
Note: RDM+ Control Panel is the separate application. It is intended only for control of the local service.
All connections from the clients and connection to the online service is implemented in the local service.
You can stop the control panel, but the local service will continue work.
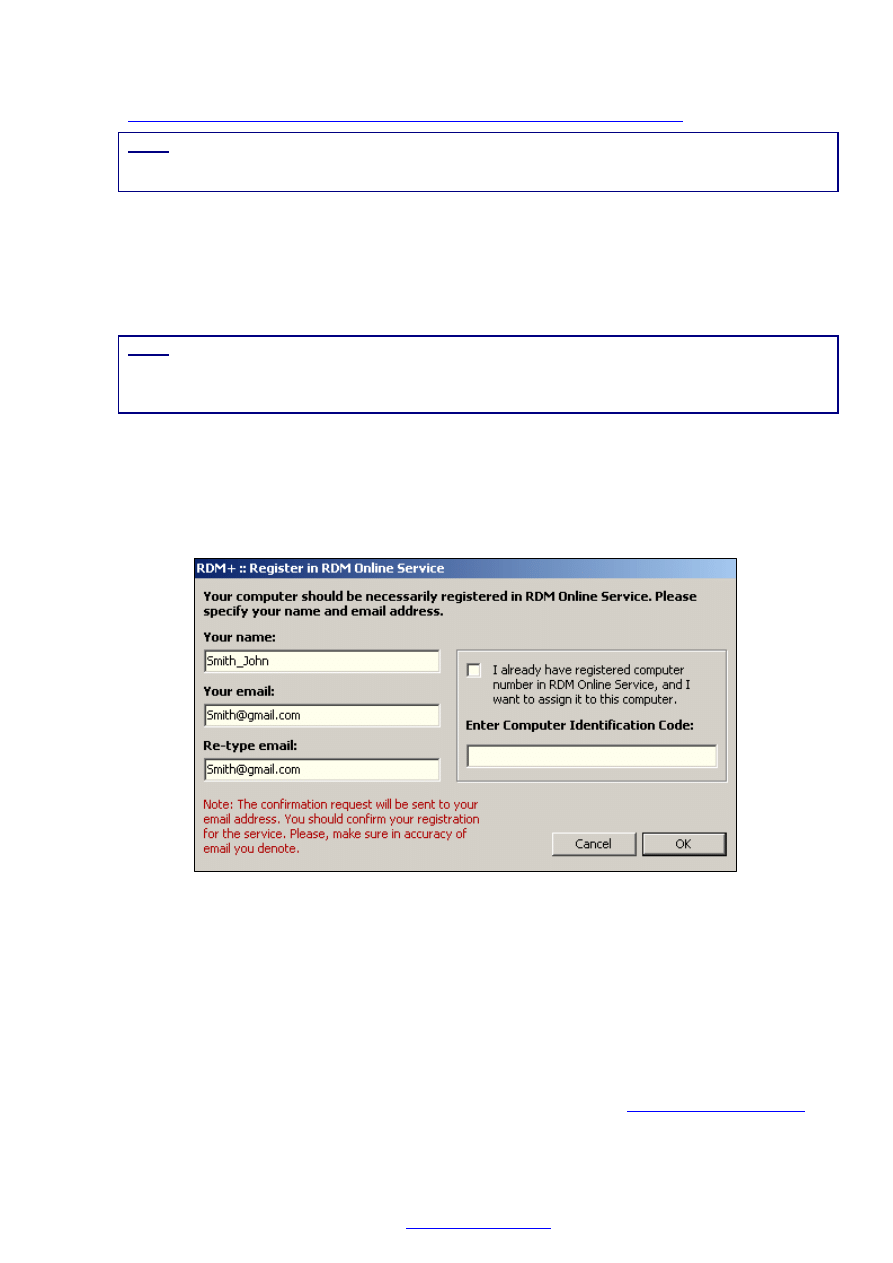
3.1. Settings
To make any Local service settings through RDM+ Control Panel, click on menu item
‘Settings’. After changing any settings, you should save it and restart the local service.
Copyright © 2006, SHAPE Services
www.shapeservices.com
Following local service settings are available in given section:
Connect to online service at startup
If this checkbox is marked with a flag RDM local service will connect to online service
automatically at start up. By default this option is marked.
RDM online server address
The address of RDM online server can be specified in this string. Usually the address is already
denoted by default and you should not make any changes.
If in your local network the proxy server is used, you should specify the proxy settings before
connecting to RDM Online Service. For that, click the button "Proxy" and enter all required
information. Details about proxy settings, you can get to know from your network
administrator.
Save local service logs & Last log files
This option enables or disables storing of all local service operations in log files. In ‘Storing last
log files’ option you can define the quantity of log files which will be stored. Each new log file
will be created daily. Old log files will be automatically deleted to set free space for new logs.
Disable video hook driver
The video hook driver will be installed and used with Remote Desktop for Mobiles software by
default. You can disable the work of this driver or uninstall this driver at all if any problems
occur with its work. Without video hook driver RDM service will capture screenshots in usual
way for Windows OS (uses BitBlit function).
Starting Control Panel at system startup
When this option is enabled, an RDM+ Control Panel application will be starting at every system
startup and user logon. Control Panel application will be starting minimized and its icon will be
placed in system tray.
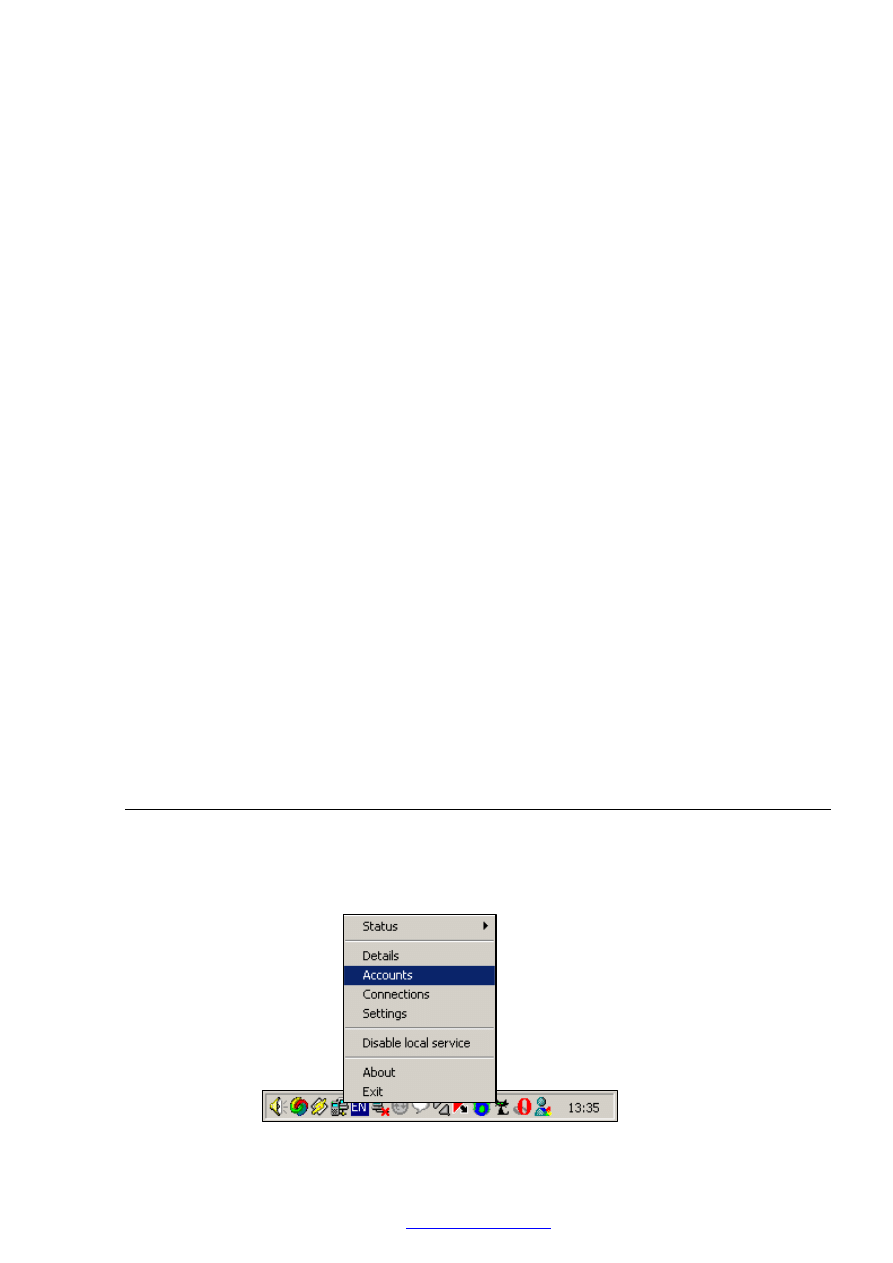
3.2. Account creation
To be able to connect with your computer, you need to create a new account in RDM+ Control
Panel and to denote afterwards the same account in address book of the BlackBerry client. In
order to create new account, click on icon of RDM+ Control panel on your task bar and select
‘Accounts’ from menu:
An account section of control panel will open. Push ‘Add’ button and enter the required
information into appeared form.
Copyright © 2006, SHAPE Services
www.shapeservices.com
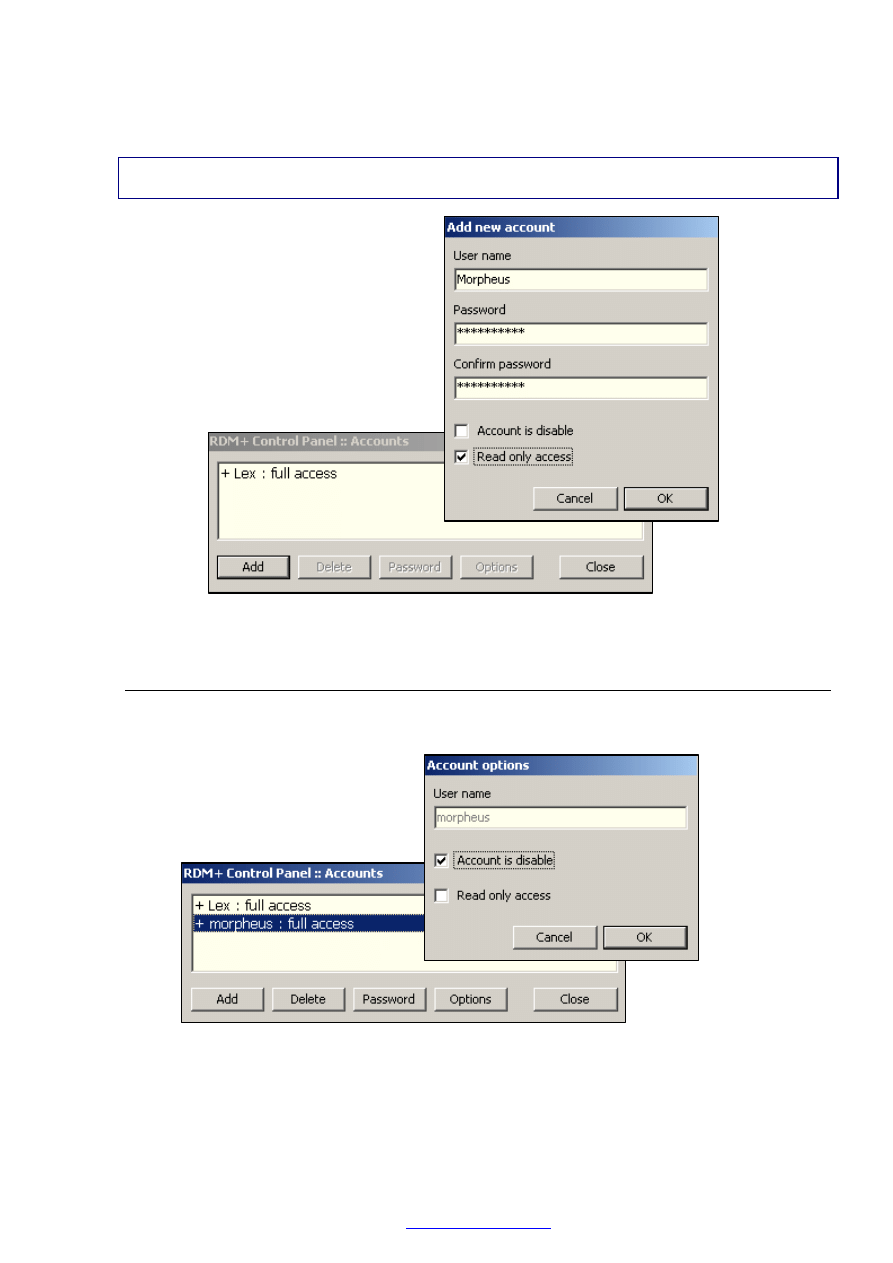
In the dialog window, you should enter a new user name and password. The user name must
be unique! The password will be masked by asterisks at entering and you should enter the
same password twice for confirmation.
Note: The user name is case-insensitive. But the password is case-sensitive! In the address book of the
client module you should enter the password exactly as it was specified in control panel.
In the address book of the client module you can add one of existing accounts which were
added before in the RDM+ Control Panel.
3.3. Account options
To change options of existing account open the page ‘Accounts’ in RDM+ Control Panel, select
an account and click the button ‘Options’.
Following options are available for existing accounts:
Account is disabled
If marking the checkbox with this option the selected user account will remain in accounts list
and all its settings will be stored, but the user won’t be able to connect with remote computer
using this account.
Copyright © 2006, SHAPE Services
www.shapeservices.com
Read only access
If you mark ‘Read only access’ option you won’t be able to make changes or control anything
on remote desktop, only view of desktop is allowed. Any commands from the client will be
ignored. Mouse and keyboard control are disabled.
3.4. Active connections
You can discover how many clients are simultaneously connected to your computer choosing
from Control panel application ‘Connections’ menu item. You can send a message to the
connected client or disconnect it choosing the corresponding button in Connections window.
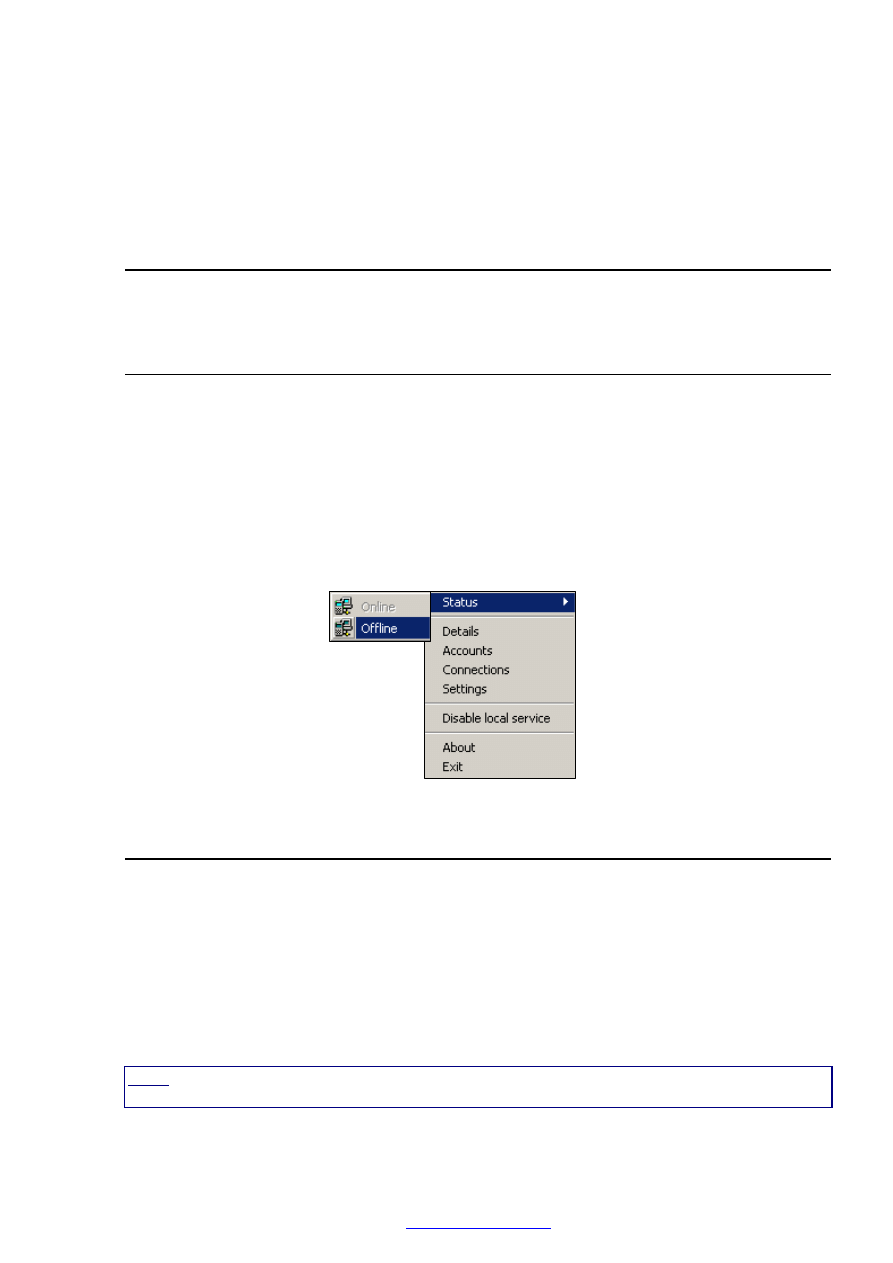
3.5. Local service status and connection
Local service is running right after successful installation. You can disable it choosing in control
panel ‘Disable local service’ menu item. In this case online service won’t be running at
computer start.
You can also change the status of Local service to Offline if your current status is online. That’s
you will be disconnected from RDM Online service. The icon of the Local service in system tray
will change.
The status can be set in Status menu section of the Control panel application:
4.
Client module
Installation from Desktop Manager
The client module is included into installation file of a server part. The default installation
directory is "C:\Program Files\RDM+\". The file for your device is in subdirectory "Client". Follow
next steps to install the application on your BlackBerry:
1.
Plug BlackBerry device into connected cradle.
2.
Run BlackBerry Desktop Manager on your PC, chose Application Loader, browse into
folder with file (E.g. C:\Program Files\RDM+\ Client and select the *.alx file and start the
file uploading.
Note: You should have BlackBerry Desktop v 4.1 with service pack 1, which can be downloaded from
RIM website.
5.
The icon of RDM+ application appears on your device.
6.
Select the icon and run the application
Copyright © 2006, SHAPE Services
www.shapeservices.com
Direct OTA downloading
You can freely download RDM+ via your BlackBerry's WAP browser. The WAP download
location is: wap.shapeservices.com
1.
Run ‘Browser’ from the BlackBerry menu.
2.
Press the Trackwheel, choose ‘Go To…’ from menu, type in wap.shapeservices.com and
select OK button.
3.
SHAPE's page with different products will be displayed. Scroll down to highlight ‘RDM+’
and select ‘Get Link’ from menu.
4.
A new window appears. Highlight ‘Download free trial version’ and select ‘Get Link’
from menu. You will pass to another window.
5. Choose
‘Download’ button.
6.
Wait until the downloading process is terminated.
7.
Reboot your device. The installation is finished.
5. Auto
configuration
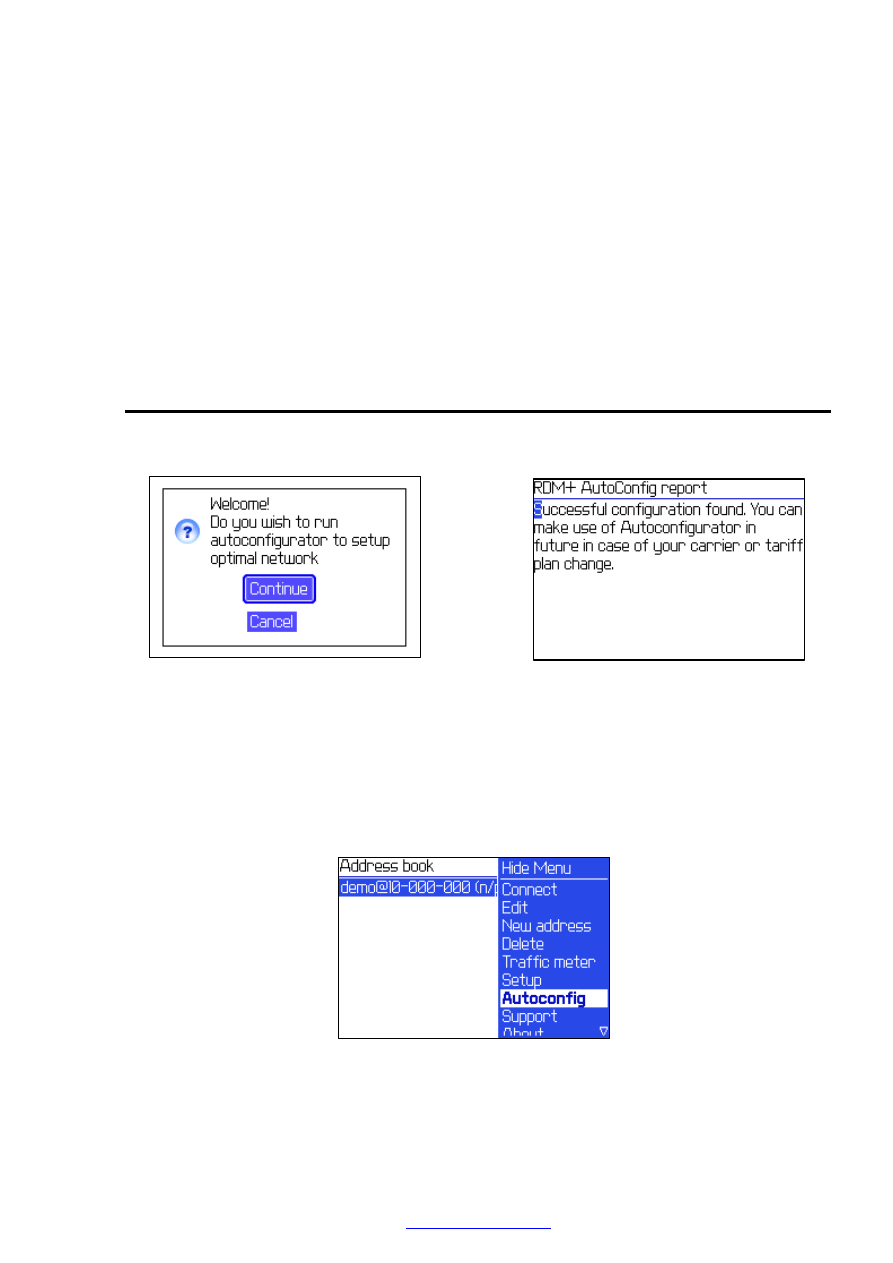
At first launch of the program you will be offered to run Auto configurator to setup optimal
network settings for proper work of connection in RDM+ application.
In case of unsuccessful test of Auto configurator, you’re proposed to configure your connection
settings manually. Depending on the connection error discovered by configurator, you will be
given some hints on how to resolve this connection problem. Please, read the given information
thoroughly and perform advised actions. Then you can repeat the test with Autoconfigurator.
Also you are able to send the log file by mail directly to Support Team. You can do this,
choosing the menu item ‘Send log to support’.
You can run Autoconfigurator afterwards in case of carrier change or changing your data plan.
Choose Autoconfigurator option from menu of Address book window
Copyright © 2006, SHAPE Services
www.shapeservices.com
6. Connection
settings
You are recommended to start Auto configurator at first launch of RDM+. Nevertheless you can
set connection parameters manually if the test was finished unsuccessfully or if you are sure in
your settings.
The application supports both HTTP and TCP/IP connection types. TCP/IP connection is more
preferable if your carrier supports it and your have the proper tariff plan for using this
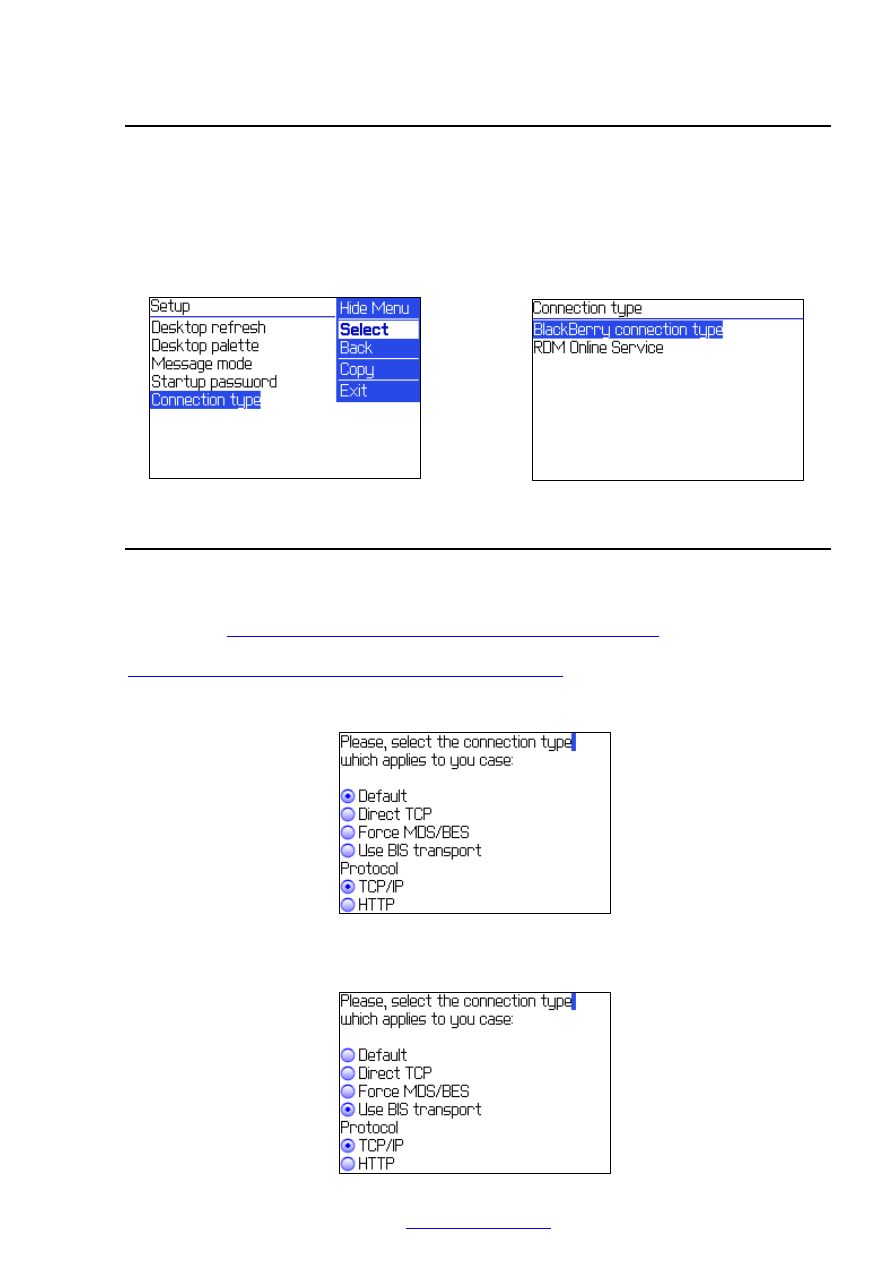
connection type. You can setup your connection settings in ‘Setup’/’Connection type’/
BlackBerry connection type’ section.
Here are connection options recommended for different categories of users:
6.1. Standalone users
Connection via TCP/IP protocol is recommended by its fast speed and stability. Most likely
TCP/IP is already enabled on your device and you should not perform any additional operations
and can freely connect with your settings. In case of connection problems, please, check your
TCP/IP here:
http://www.shapeservices.com/en/faq/sections/bb_tcp.php
or contact your mobile
carrier. You can also find more useful information if follow this address:
http://www.blackberryforums.com/showthread.php?t=2185
In this case TCP/IP protocol should be selected in connection settings section. The ‘Default’
connection type should be remained unchanged or ‘Direct TCP’ should be set.
‘Use BIS transport’ option is recommended to activate if you carrier supports using of BIS-B
transport for third-party applications. If unsure, please, contact your carrier.
This option can work either with HTTP or with TCP/IP connection type.
Copyright © 2006, SHAPE Services
www.shapeservices.com
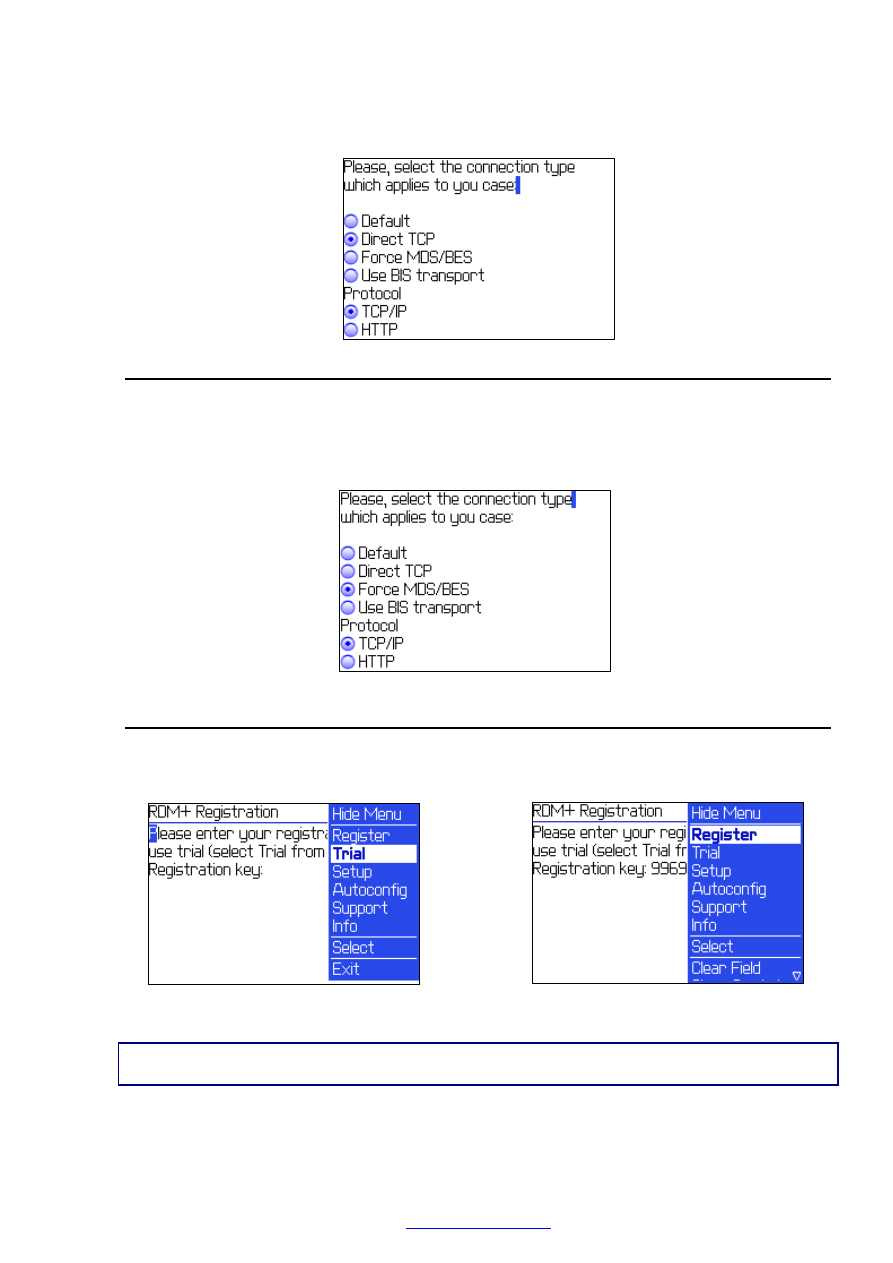
If you have no Service book entries on your device, you can try to select ‘Direct TCP’ option.
This option can work either with HTTP or with TCP/IP connection type.
6.2. BlackBerry Enterprise Server users
If your organization operates a BlackBerry Enterprise Server usually you don’t have to set any
parameters, leaving the ‘Default’ connection type. Just if you have any connection problems
you can choose ‘Force MDS/BES’ option. In most usual cases checking of this option is not
obligatory. TCP/IP protocol should be selected.
7. Registration and trial
At first launch of RDM+ for BlackBerry RIM after choosing proper connection type you will
be asked to insert the registration key, which you have received with the purchase of the
program.
If you want to use RDM+ in trial mode, choose ‘Trial’ from the menu.
Note: There is no difference between trial and commercial version in work and design. You may use the
trial version for full 7 days.
If you want to register RDM+ insert the registration key in the corresponding field and press
the ‘Register’ button. If you have inserted the right registration key, the program will register
Copyright © 2006, SHAPE Services
www.shapeservices.com
and there will be no need to insert the license code once more. If the registration key is wrong,
the program will show the corresponding message and will not be registered.
If you delete the program and then install it once more, or reinstall the program to another
mobile device, your registration key will not be valid any more.
If you have changed your mobile device for a new one, please contact
to reset your registration key in this case.
8. Address
book
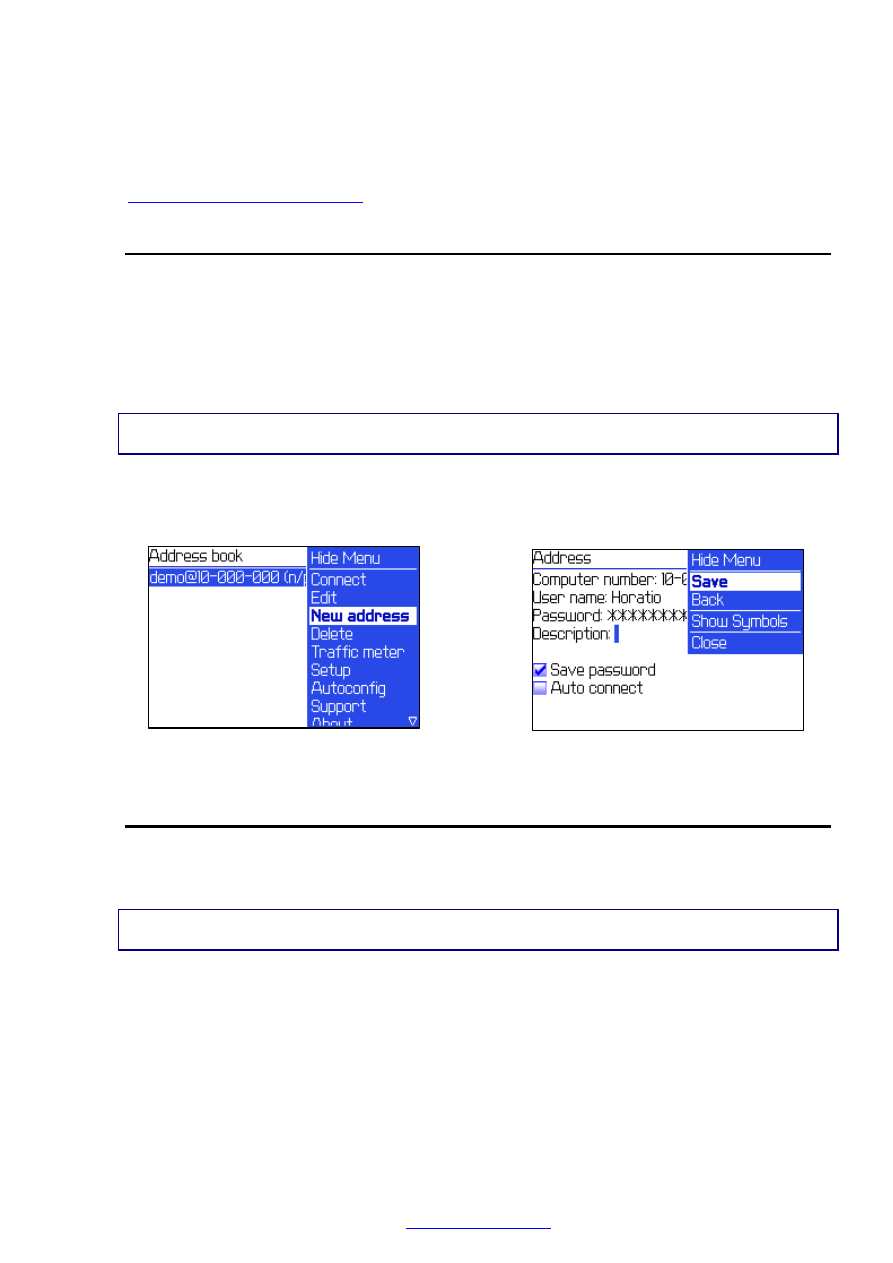
At RDM+ launch the window with address book opens. The address book contains the list of
computers which you used to connect to.
At first start the address book is empty. You should select the menu item ‘New address’ to
add a new record into address book.
In the new record dialog you should enter the number of computer which you received at
registration of RDM+ service while installing the server part. Then you need to enter your
account (user name and password) which you created in RDM+ control panel.
Note: BlackBerry device makes the first symbol in the fields in upper-case. Be careful, because the
password will be masked by asterisks you can make a mistake at entering the password on the client.
In ‘Description’ field you can specify a short description text for computer with this number,
which will help you to find a certain computer in large list of records. If the description field
remains unfilled only the computer number and user name will be displayed.
Please, save your record choosing ‘Save’ from the menu.
9. Test
connection
You can test the work of the Remote Desktop for Mobiles application connecting to our test
server. You will make sure that the client can work on your mobile device and will see a simple
demonstration of the client abilities.
Note: At the first start of the client on BlackBerry we recommend to choose a direct access through
TCP/IP without use the BES server.
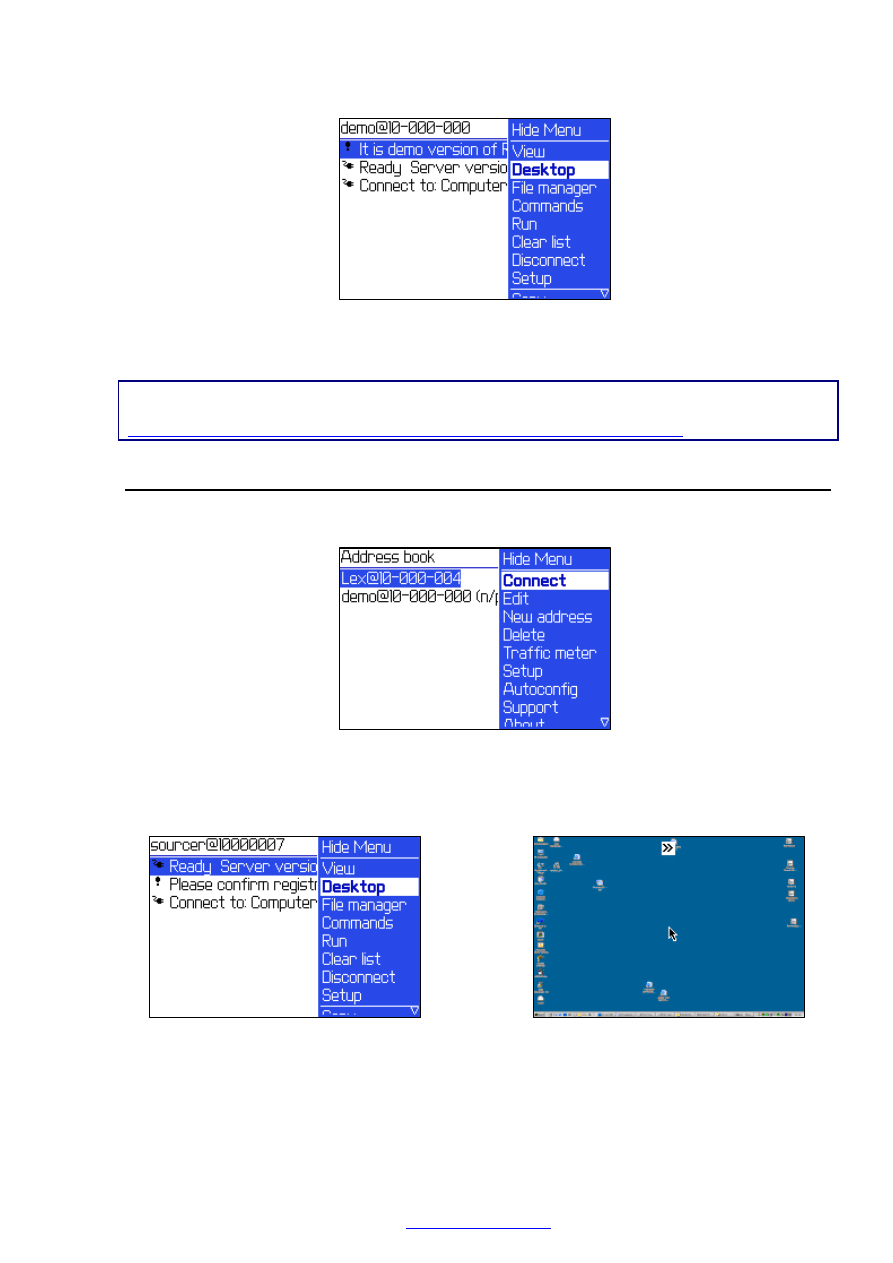
The test server entry is already added into the client address book by default. If not, you can
add the computer number "10-000-000" to address book of the client and specify the user
name as "demo". No password is required.
Choose the menu item ‘Connect’ for connection to the test server.
After successful connection, the client will display the notification message about connection to
the test server. After closing it, you will see the general list of messages. In this list the
messages about connection process, messages from the server and error messages are
displayed. Select ‘Desktop’ menu item to pass to desktop view mode. You can also discover
the text of error message if select the menu item ‘View’.
Copyright © 2006, SHAPE Services
www.shapeservices.com
The test server works in demo mode. It only shows the work with the remote desktop and
displays several examples of to execute management commands. The complete list of
management commands, mouse and keyboard controls is disabled.
Note: The test server works with the latest version of the client. The latest version for various mobile
devices can be downloaded from our site:
http://www.shapeservices.com/en/products/details.php?product=rdm&platform=bb
10. Connecting & Management
You can freely connect to any saved address choosing the menu item ‘Connect’.
In case of successful connection to the selected remote desktop you will see a notification
message informing you about server readiness to start your work with computer. Select
‘Desktop’ from menu to pass to desktop view mode.
In case of unsuccessful connection you can view the error message choosing the menu item
‘View’.
Copyright © 2006, SHAPE Services
www.shapeservices.com
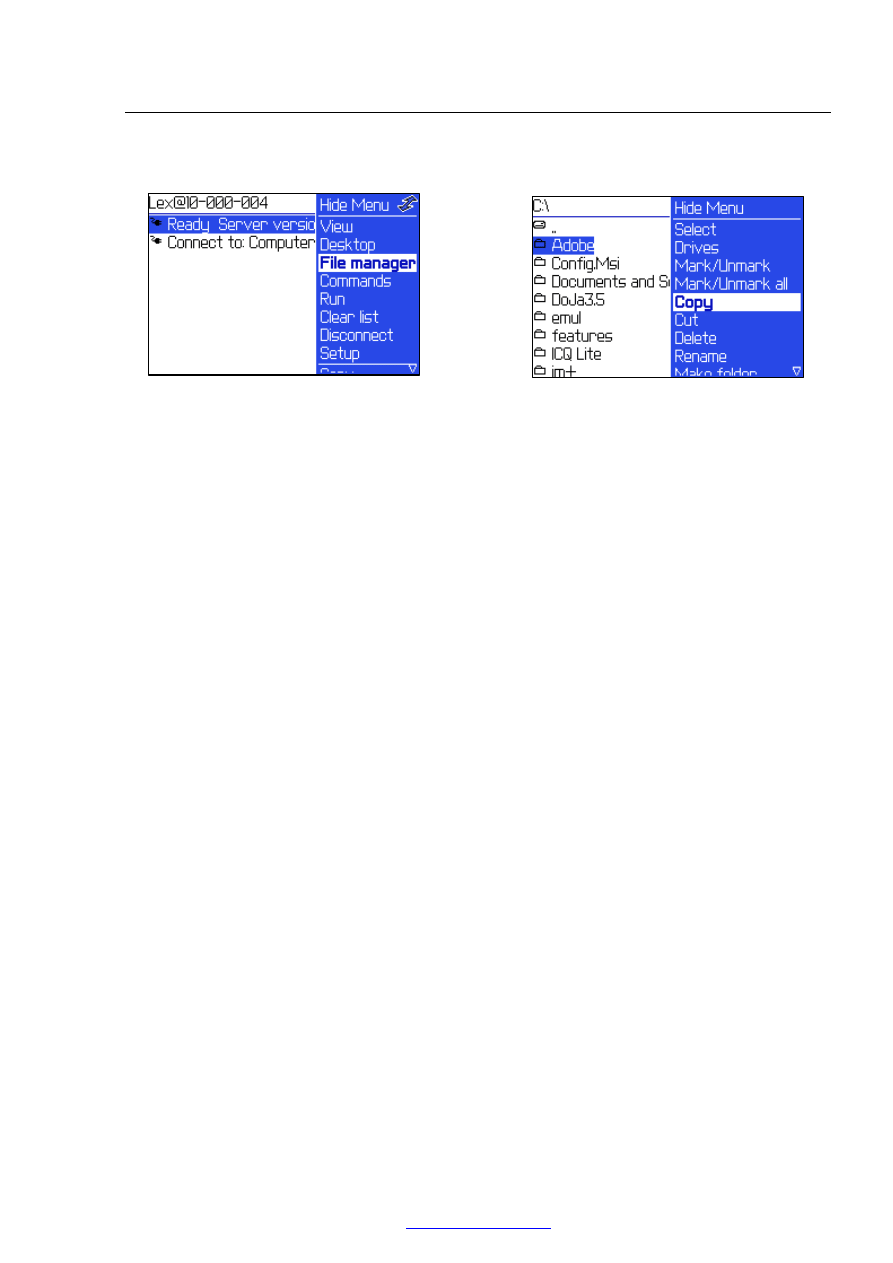
10.1. File manager
When you got connected to remote computer, a set of various actions can be performed on
computer without viewing the desktop using File Manager feature.
You can manage files on your computer or mobile phone using built-in ‘File manager’ feature.
You can perform following actions with files and folders on remote desktop using named below
File manager menu items:
Mark/Unmark
Marking/unmarking of the selected file or folder for a common group;
Mark/Unmark all
Marking/unmarking of all files and subfolders in selected folder for a common group;
Copy
Copying of the selected file or folder (or marked group of files and folders) to specified
destination folder;
Cut
Cutting and moving of the selected file or folder (or marked group of files and folders) to
specified destination folder;
Delete
Deleting of the selected file or folder (or marked group of files and folders);
Rename
Renaming of the current file or folder;
Make folder
Making a new folder;
View/Edit
Viewing the current text file. In a viewing mode simple line editor is available;
Open
Opening selected file on remote computer. The result of operation depends on file type. (E.g.:
executable files will be running; documents will be opening in editor, etc.). In addition you can
specify optional command line parameters which will be passed with opening file;
Info
Viewing of detailed information about current file or folder;
Refresh
Refreshing of contents in selected folder;
Copyright © 2006, SHAPE Services
www.shapeservices.com
Back
Returning to general list of messages;
For copying, moving and deleting operations you can use either single file or folder or marked
group of files and folders.
For operation with single file or folder, move selection bar to it and select an appropriate item
from menu. For operations with group of files or folders first mark required files and/or folders,
select a corresponding menu item and specify a destination folder in appeared dialog.
10.2. Executing external commands
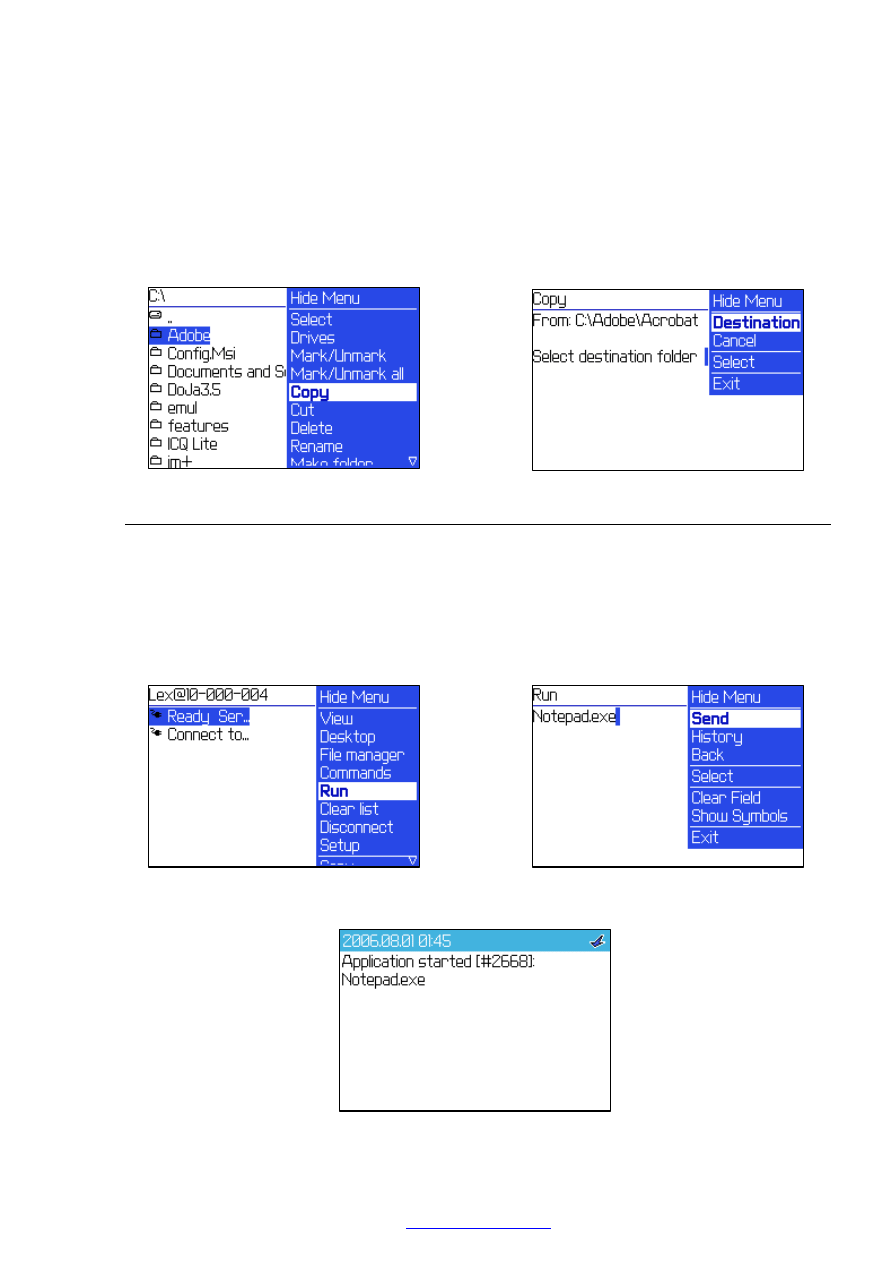
To start a GUI of application or a console command, use a special command ‘Run’.
At execution of an external console command
(like ping, netstat, ipconfig)
the local service
waits for completion of a command and returns a result of execution (stream from standard
output) as the answer. But if a command is not completed after timeout interval (by default 3
min) it will be terminated.
At starting of applications GUI the local service won't be waiting until the execution of
command is complete but shows a notification about application start.
As an answer this command returns a message: Application started…
Copyright © 2006, SHAPE Services
www.shapeservices.com
11. Remote desktop control
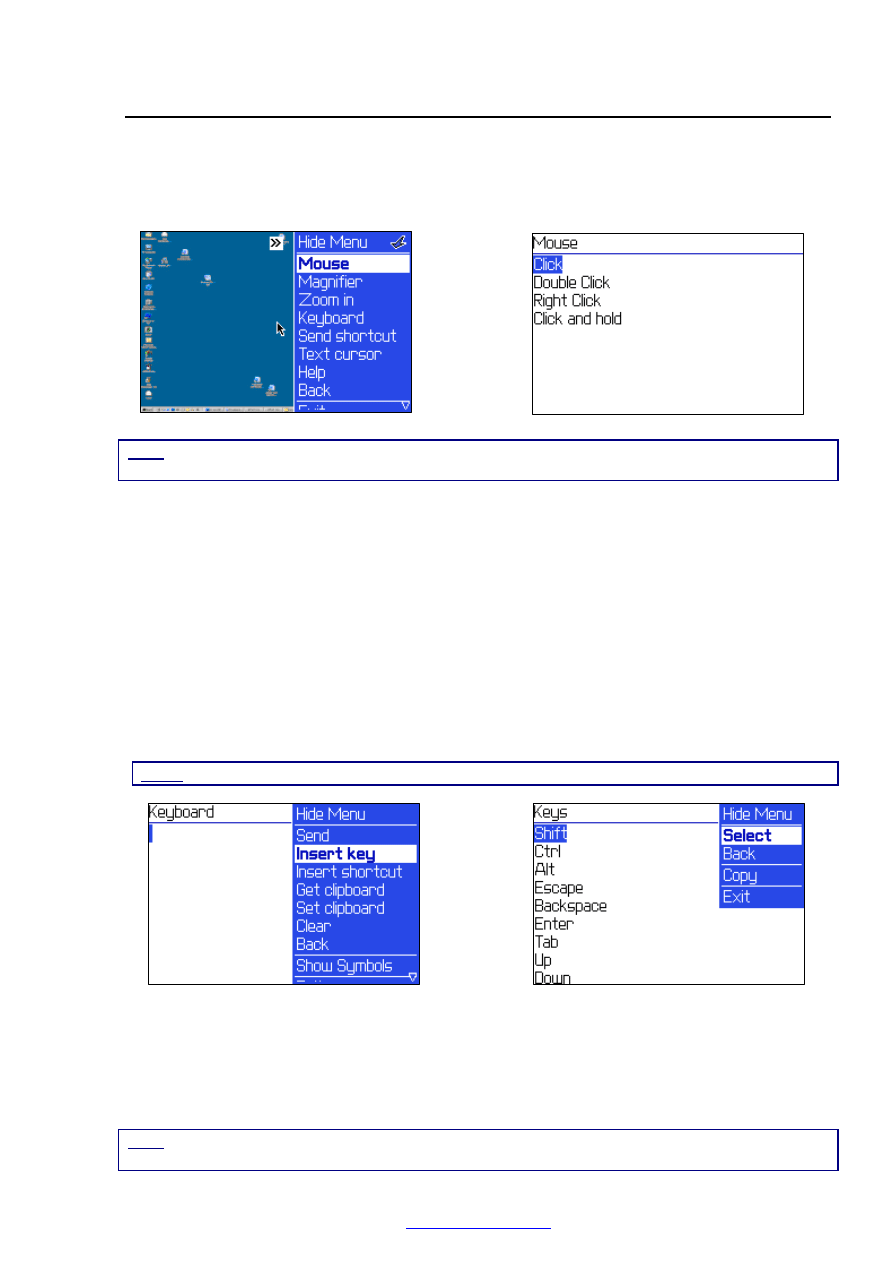
You can control the remote desktop by using both onscreen menu and desktop mode hotkeys.
Following options are available in main menu:
Mouse - This menu item is used to perform left, right, and double clicks of Mouse.
Note: To move cursor vertically up/down a screen you should roll thumb-operated Trackwheel. To move
cursor horizontally, hold Alt and roll Trackwheel. For 8100 device trackball should be used.
Magnifier – If choose this option the magnifier frame will appear on the screen. Using
this frame you can mark in a selected fragment of the desktop and then enlarge it
choosing Zoom in item from menu. In magnified mode ‘Full desktop’ item is available.
Zoom in– Given menu item serves to enlarge the view of current desktop. Zoom in item
is available if desktop size is larger then the device’s screen.
Scroll mode- In ‘Zoom in’ mode you can scroll your desktop without mouse cursor
choosing this menu item.
Keyboard - You can enter the text that will be transferred to remote host just like you
enter it from a keyboard. Along with the plain text, you can also insert control keys and
shortcuts (E.g. Alt+ F4).
Note: In order to transfer # symbol, you should enter it twice (##).
Send shortcut –You can select a shortcut to send it to remote host, like entering it from
keyboard.
Text cursor – This menu item works in programs with text editors and lists. Choosing
this item you’re able to move over your texts and highlighted list items with a text cursor
instead of mouse cursor.
Note: To move cursor vertically up/down a screen you should roll thumb-operated Trackwheel. To move
cursor horizontally, hold Alt and roll Trackwheel. For 8100 device trackball should be used.
Copyright © 2006, SHAPE Services
www.shapeservices.com
Disconnect – You will be disconnected from the host, choosing this menu item.
Help – A short description of desktop mode control keys is available under this menu
option.
12. Hotkeys Usage
Double pressing the SYM button will call up the menu with control keys.
You can select the control key or a combination of control keys and send them to desktop of
the computer.
Following hotkeys are available in program:
[SYM] + [SYM] - Control Keys menu.
[SYM] + [1] - Left mouse click. *
[SYM] + [2] - Double click. *
[SYM] + [3] - Right click. *
[SYM] + [6] - Left click and hold. *
* If not in cursor mode a key can be pressed to switch to cursor mode.
[SYM] + [4] - Selecting and sending keyboard shortcut from list.
[SYM] + [7] - Turning on text cursor mode
[SYM] + [5] - Magnifier mode: x1, x2, x3.
[SYM] + [8] - Zoom in.
[SYM] + [9] - Full desktop mode.
[SYM] + [0] - Selecting and sending keys sequence (entering text string).
[SYM] + [*] - Turning on scroll mode.
[SYM] + [#] - Tab key
[SYM] + [L] - Refreshing a desktop or fragment selected by magnifier.
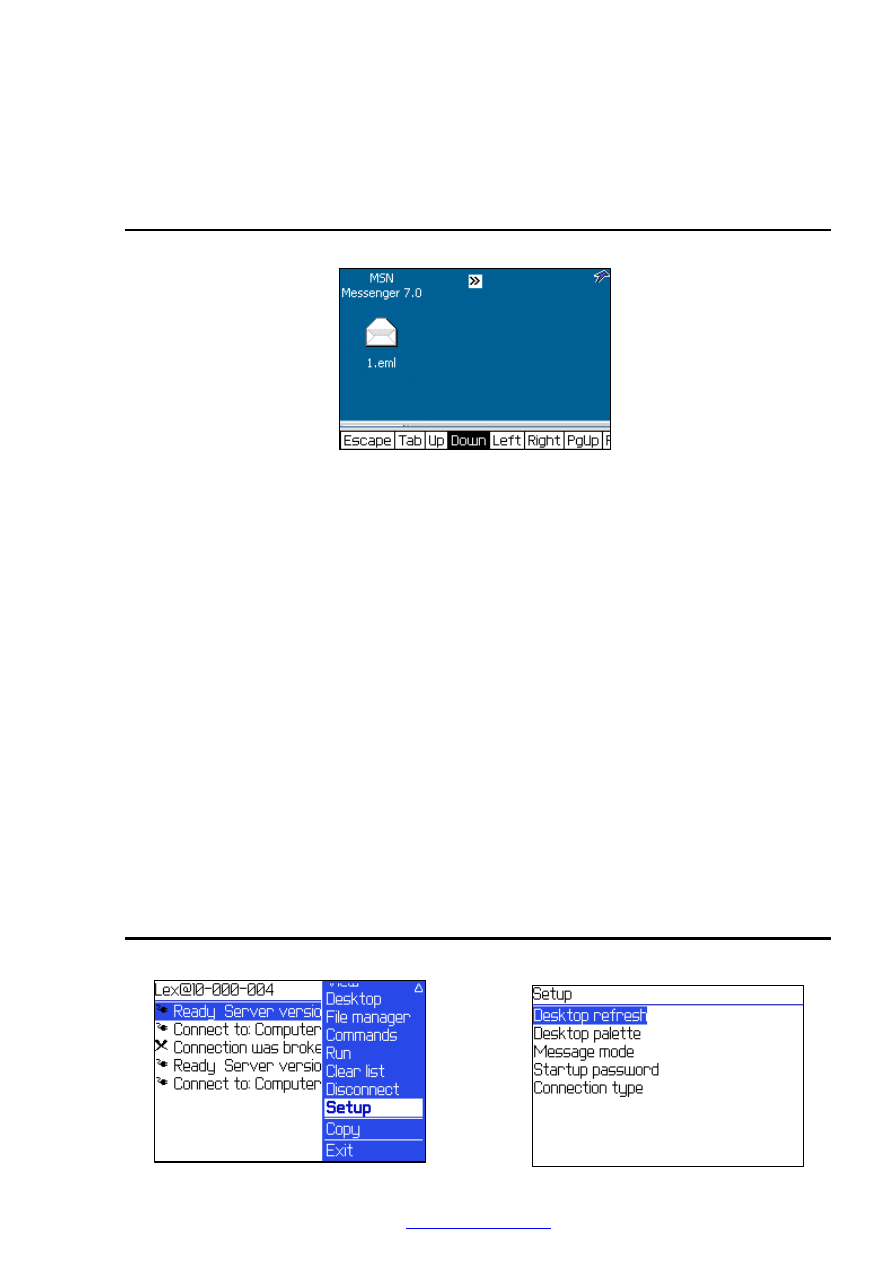
13. Setup menu
You can change settings of application in ‘Setup’ menu.
Copyright © 2006, SHAPE Services
www.shapeservices.com
There are following subsections in Setup menu:
Desktop refresh
You can change the remote desktop refresh rate. Refresh rate is specified in milliseconds, the
possible value is from 100 to 9999. Increasing this value you can reduce data traffic, but the
time interval between changes of remote desktop will be increasing. By default desktop refresh
is 1000 msec.
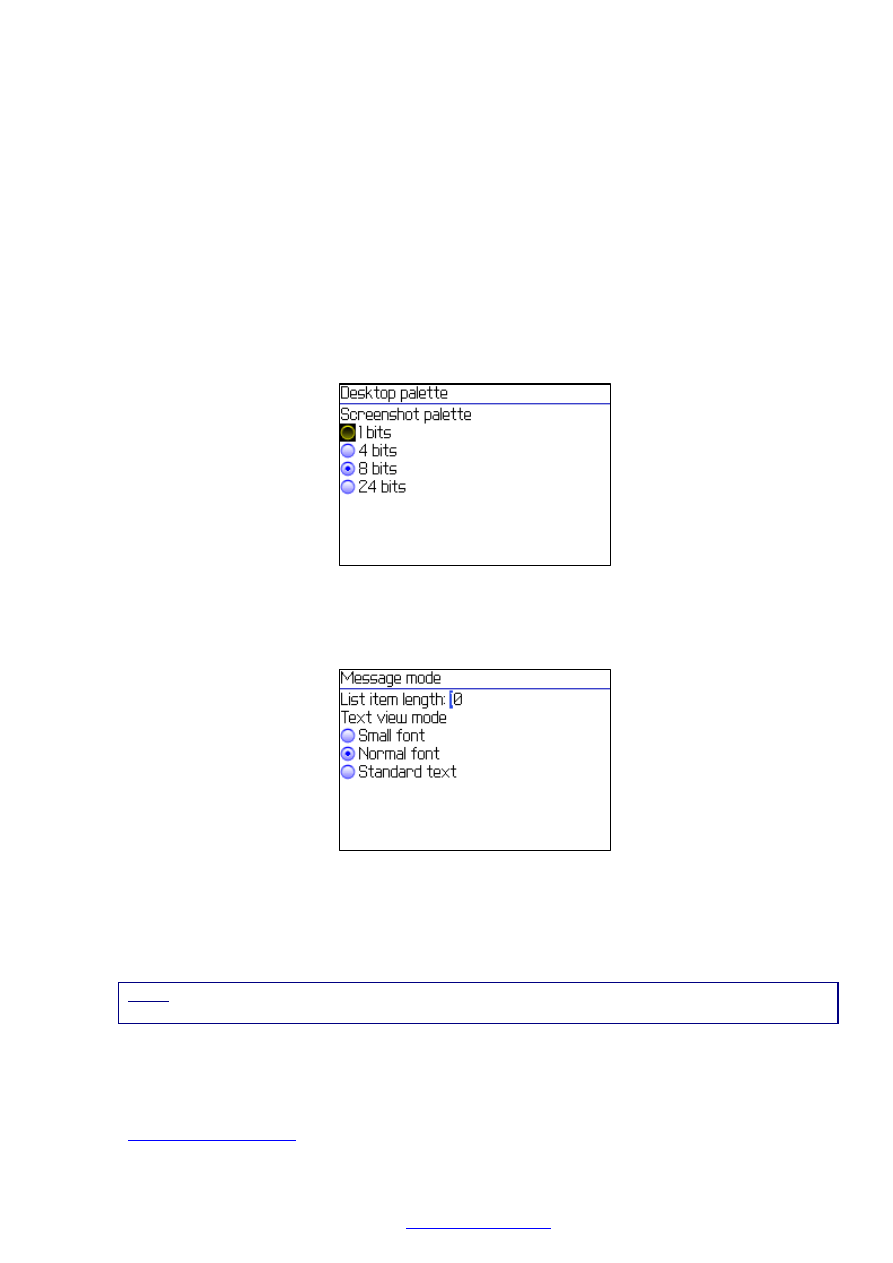
Desktop palette
This item defines color palette used at transferring a picture of remote desktop. By default 8
bits palette (256 colors) is used. Decreasing the palette value you can reduce the data traffic
and make faster refresh of the desktop, but a picture of screen will be degraded. For best
quality pictures with fast 3G connection, you can try to use a 24 bits palette (true color).
Message mode
In this section you can set the number of symbols in lines of the lists in information windows
and font size of text displaying.
Startup password
You’re able to set a password which will be asked at program start. Your address book will be
encrypted with this password, so nobody could access the program and use your address book.
This option is very useful in case of device loss as it prevents publishing of your confidential
data.
Note: Please keep in mind your password. If you forget it you will only be able to reinstall the application
and your address book will be unavailable.
Connection type
You can select an adoptable connection type at BlackBerry connection section.
‘Direct TCP/IP’, ‘BES/MDS’, ‘Use BIS transport’ options can be selected. TCP/IP and
HTTP protocols are supported in application. You can get more detailed information in
section.
There is a possibility to change the address of RDM Online service at corresponding section.
Copyright © 2006, SHAPE Services
www.shapeservices.com
Note: If changing connection type you have to restart application.
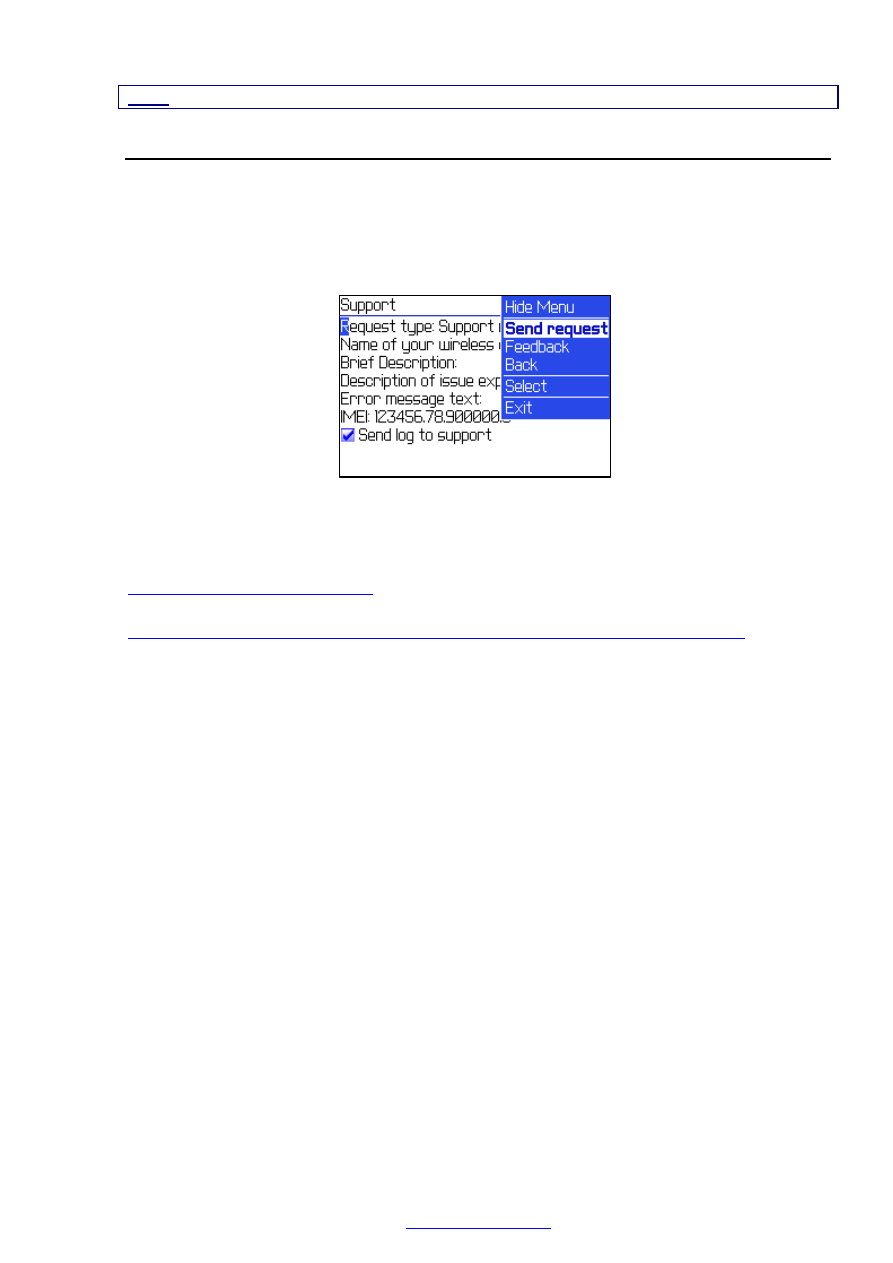
14. Support
If you faced with any problems while using the application you’re able to send a request to
support team right from the application. Just choose ‘Support’ item from menu, enter the
required information into support request form and select from menu ‘Send request’.
Together with your request a log file will be sent to support if the appropriate checkbox is
marked.
SHAPE Services provides online information to help your troubleshooting problems. You can
download software updates and submit your problems online.
Looking for update or trial installation? See Download Page:
If you need further assistance after reading this manual, please fill out our Support form:
http://www.shapeservices.com/en/support/support.php?form=rdm_bb&platform=bb
Alternatively, you can send us an email at
Our Support Team will answer your email within two business days.
We will be glad to answer all your questions.
Copyright © 2006, SHAPE Services
www.shapeservices.com
Document Outline
- RDM+
- Remote desktop for Mobiles
- For BlackBerry RIM devices
- Introduction
- OS Requirements:
- Version 4.0 and higher. 4.1 OS is more recommended.
- At first launch of the program you will be offered to run Au
- In case of unsuccessful test of Auto configurator, you’re pr
- You can run Autoconfigurator afterwards in case of carrier c
- 6. Connection settings
- 7. Registration and trial
Wyszukiwarka
Podobne podstrony:
Parallels Desktop for Mac Quick Start Guide
Windows Server 2012 R2 Remote Desktop Services Licensing Datasheet
Hunt for the Skinwalker Science Confronts the Unexplained at a Remote Ranch in Utah by Colm Kellehe
63230 500 221A1 Remote Display Kit for PM800 Meters
Virtual Desktop Infrastructure A Deployment Guide for Education
2D desktop acceralation and video haraware decodoe for cubieboard4 linaro desktop
Design Requirements For Medium Sized Wind Turbines For Remote And Hybrid Power Systems
Figures for chapter 5
Figures for chapter 12
GbpUsd analysis for July 06 Part 1
Figures for chapter 6
The American Society for the Prevention of Cruelty
AME Stds for NATO Seminar
Herbs for Sports Performance, Energy and Recovery Guide to Optimal Sports Nutrition
Japanese for busy people I (ch26 end)
Biomass Fired Superheater for more Efficient Electr Generation From WasteIncinerationPlants025bm 422
Microactuator for Precise Head Positioning
NLP for Beginners An Idiot Proof Guide to Neuro Linguistic Programming
więcej podobnych podstron