file:///H|/Modellismo/AFV%20Interiors/[armor]%20-%20AFV%20Interiors/afvinteriors.hobbyvista.com/daimler/daimler.html
British Daimler Scout Car, Revised
February 3, 2002
Picture 1:
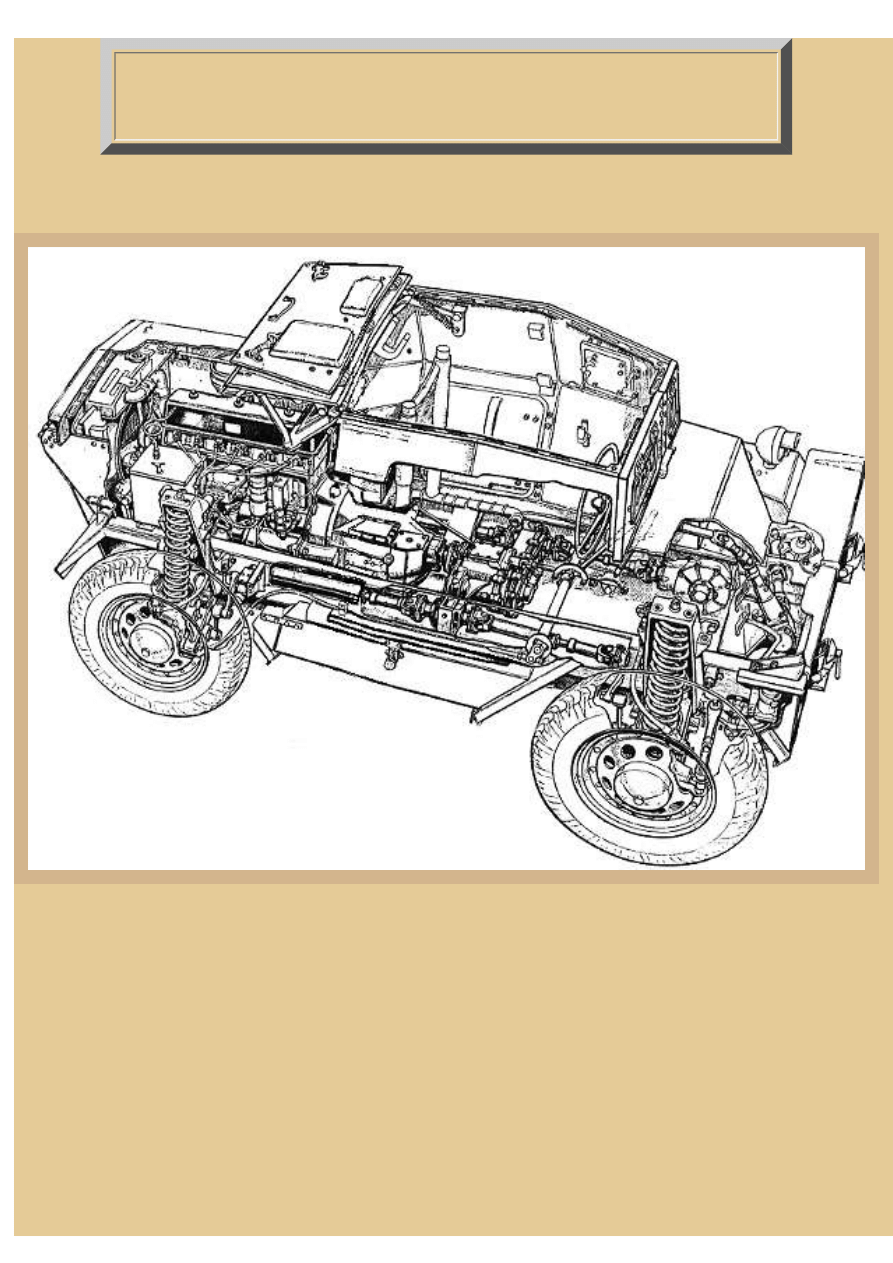
I suppose this is one of my favorite British scout cars and I am happy to introduce you to this little gem in this
web page. The Daimler Scout Car was designed back in 1938 by B.S.A. as a two-seat, light armored vehicle
with good cross-country ability. It was a rear-engined little sportster, usually armed with a Bren MG, and
powered by a Daimler 55bhp 6-cylinder gasoline car engine. The Scout has a relatively low center of gravity
as well as a high ground clearance and the bottom of the chassis is flat and relatively smooth so minor
obstructions can be skated over and will not hang-up the chassis. The 2.5liter engine is coupled with a five-
speed fluid flywheel transmission, both mounted at the rear. The engine is coupled to a transfer case near the
driver where twin propeller shafts within the frame channels bring the drive forward and rearward to bevel
reduction gears coupled by Tracta-jointed shafts to the hubs of the four wheels. The wheels have very large
springs and are designed with large deflection independent suspensions, again enabling the car to tackle
rough terrain with relative ease.
file:///H|/Modellismo/AFV%20Interiors/[armor]%20-%20AFV...eriors/afvinteriors.hobbyvista.com/daimler/daimler.html (1 di 6)06/02/2007 19.49.25
file:///H|/Modellismo/AFV%20Interiors/[armor]%20-%20AFV%20Interiors/afvinteriors.hobbyvista.com/daimler/daimler.html
Picture 2:
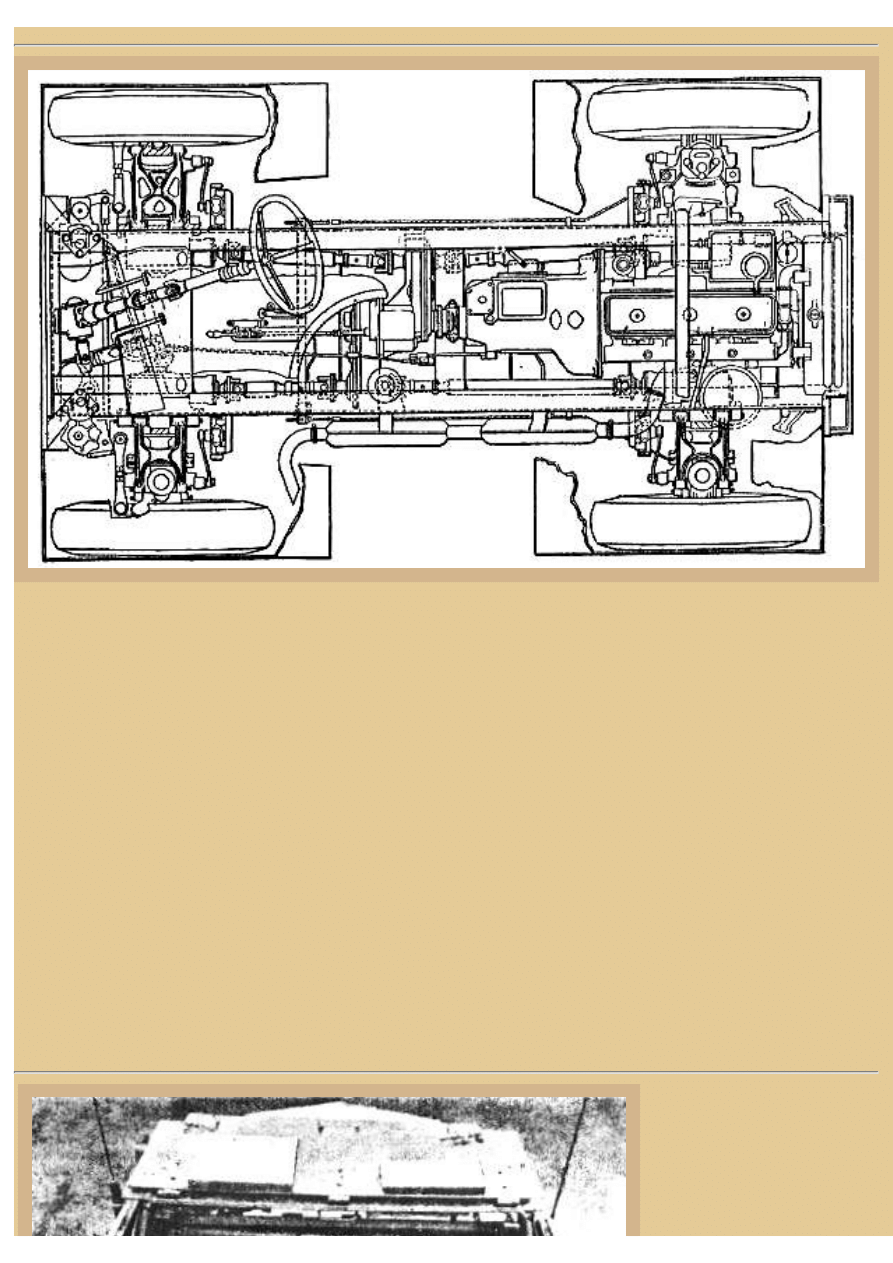
In this drawing you get a feel for the wide track and short wheel base of the chassis. The rear of the vehicle is
to our right and the engine and transmission are at the rear of the vehicle. Notice how there are four
individual drive shafts, one going to each wheel from the power transfer box. The second interesting design
feature is the canted steering wheel arrangement. This is accomplished to allow the right seated driver easier
views to the rear of the AFV when driving in reverse.
The Daimler fluid flywheel transmission consists of a hydraulic coupling along with an epicyclic gearbox in
which the various gear ratios are brought together by contracting bands upon appropriate drums. The Wilson
epicyclic gearbox has a top gear clutch with a compact multi-plate design where engagement is secured
without need for heavy pedal pressure. To engage the clutch, a rotary movement is imparted to a thrust ring
which has a number of special grooves cut on its outer circumference. There are also corresponding grooves
in the clutch housing and a row of steel balls between the grooves enables the rotary movement to be
converted into an endwise movement, therefore engaging the clutch.
Drive from the epicyclic gearbox passes through a flexible coupling to the transfer gearbox you see near the
driver's seat location. The transfer box provides a reverse gear, neutral, differential gear, and transference of
single central drive from the gearbox into the twin drives, one running to each of the bevel drive gears at the
wheels.
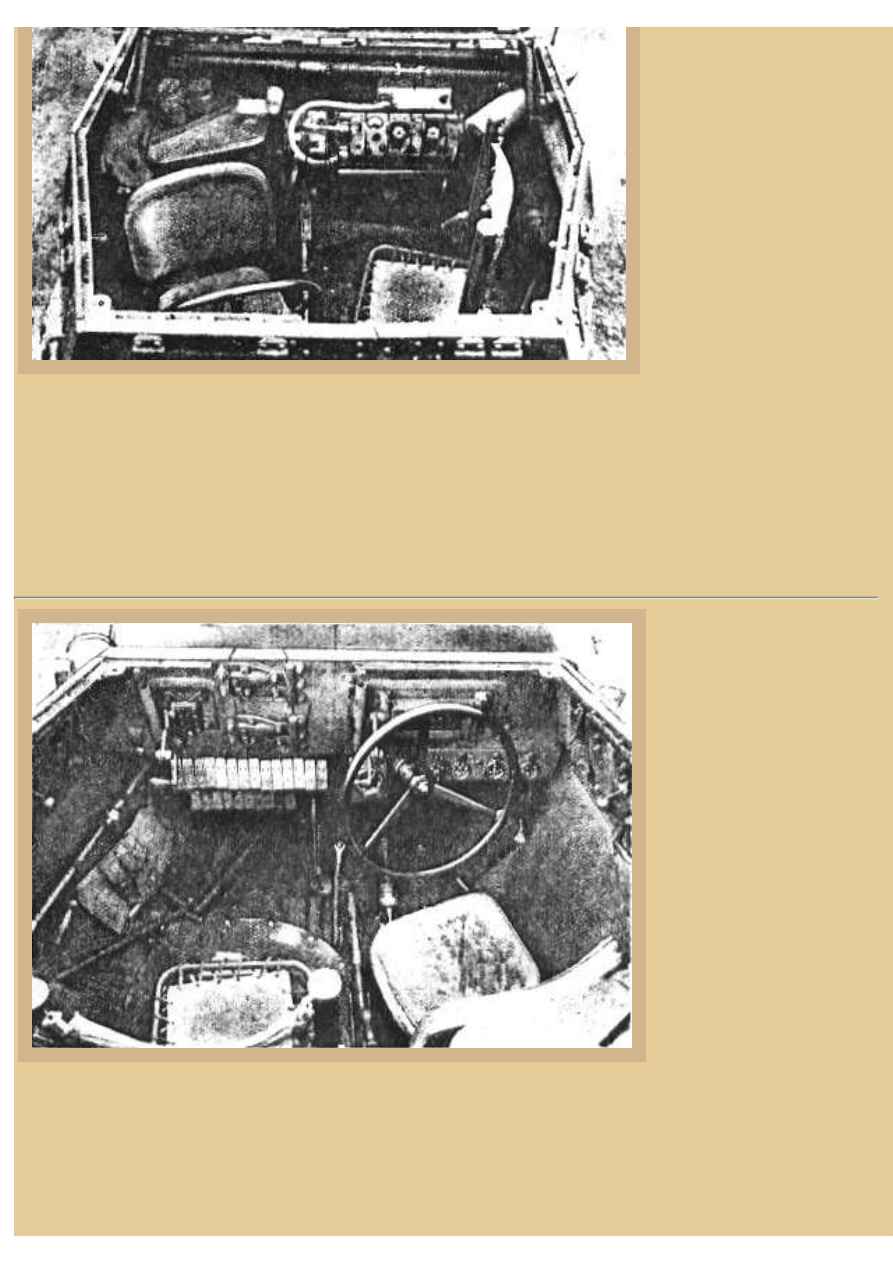
Picture 3:
This photo shows the open
topped vehicle from the
front, complete with the
slightly angled driver's seat
file:///H|/Modellismo/AFV%20Interiors/[armor]%20-%20AFV...eriors/afvinteriors.hobbyvista.com/daimler/daimler.html (2 di 6)06/02/2007 19.49.25
file:///H|/Modellismo/AFV%20Interiors/[armor]%20-%20AFV%20Interiors/afvinteriors.hobbyvista.com/daimler/daimler.html
on the right of the AFV (our
left) and the passenger's seat,
now turned sideways,
mounted in front of a radio
set (WT19). Back behind the
driver is the 18 gallons
(British) gas tank. The
octagon shaped body around
the driving compartment was
armored, but the rear engine
compartment had thinner
armor in order to reduce
weight.
Since the engine is at the
rear, the cooling system is designed slightly differently from other armored cars of this period. The top
armored plate over the engine compartment has a lip that overlaps the sides and therefore does not quite
touch the side armor plates of the engine compartment. This air space allows air to be drawn in by a six-
bladed fan, which is mounted in tandem with the water pump and is twin V-belt driven. This cooling air is
then forced backwards through the radiator behind and then out through louvers in the rear armor plate. The
same twin belts also drive the generator (dynamo) that supplies power for the vehicle lights and other
electrical components.
Picture 4:
This photo shows the
driver's compartment from
the rear. Although slightly
grainy, you can still make
out some details here
including a bit of the front
visors and the slot for the
Bren gun. Once again, the
driver's seat was angled so
he would have an easier
view over his left shoulder
through the rear flap while
driving in reverse. The roof
of this particular Scout
model is of the folding type,
a characteristic of the Mk.Ia
through Mk.II vehicles (the
Mk.I had a sliding roof).
The Mk.III vehicles had no
roof panels at all, just a canvas top that could be used in inclement weather. You can see that there are head
pads on the folded roof panels (brown padded leather), which were a real necessity with such a low, head-
banging roof plate.
Daimler Scout cars were used anywhere British and Commonwealth soldiers fought in W.W.II, usually in
tank units or armored car regiments, although other types of units also utilized them in great numbers.
file:///H|/Modellismo/AFV%20Interiors/[armor]%20-%20AFV...eriors/afvinteriors.hobbyvista.com/daimler/daimler.html (3 di 6)06/02/2007 19.49.25
file:///H|/Modellismo/AFV%20Interiors/[armor]%20-%20AFV%20Interiors/afvinteriors.hobbyvista.com/daimler/daimler.html
"Dingo" was the name most often used for scout cars, although the name actually belonged to the early Alvis
produced scout car.
Although they are difficult to see in this drawing, if you look closely you will see the "operating pedal" on the
left, next to the brake pedal, and to the right is the accelerator pedal. Close to the right hand, below the
instrument panel, is the pre-selector control lever with its five speed markings. On the left of the driver is the
hand brake lever and then beyond it is yet another lever; this lever provides control over forward and reverse
gears, as well as providing a disconnect neutral. To start the Scout Car, you switch on the power and then
press the starter button. Once the engine starts and warms up, you pre-select first gear, push the operating
pedal down, and then let it rise again. This sets the gear and you can then accelerate the engine gently to
begin moving off. You can then change up to second gear my pre-selecting it first then pressing the operating
pedal, then third, and so on, each time using the preselector in the same manner. Although engine noise is
relatively quiet, the interior is still quite noisy, due mainly to the transfer case next to your seat. The Scout
Car is easy to steer, and once you get used to the gear noise, it really is quite fun to drive.
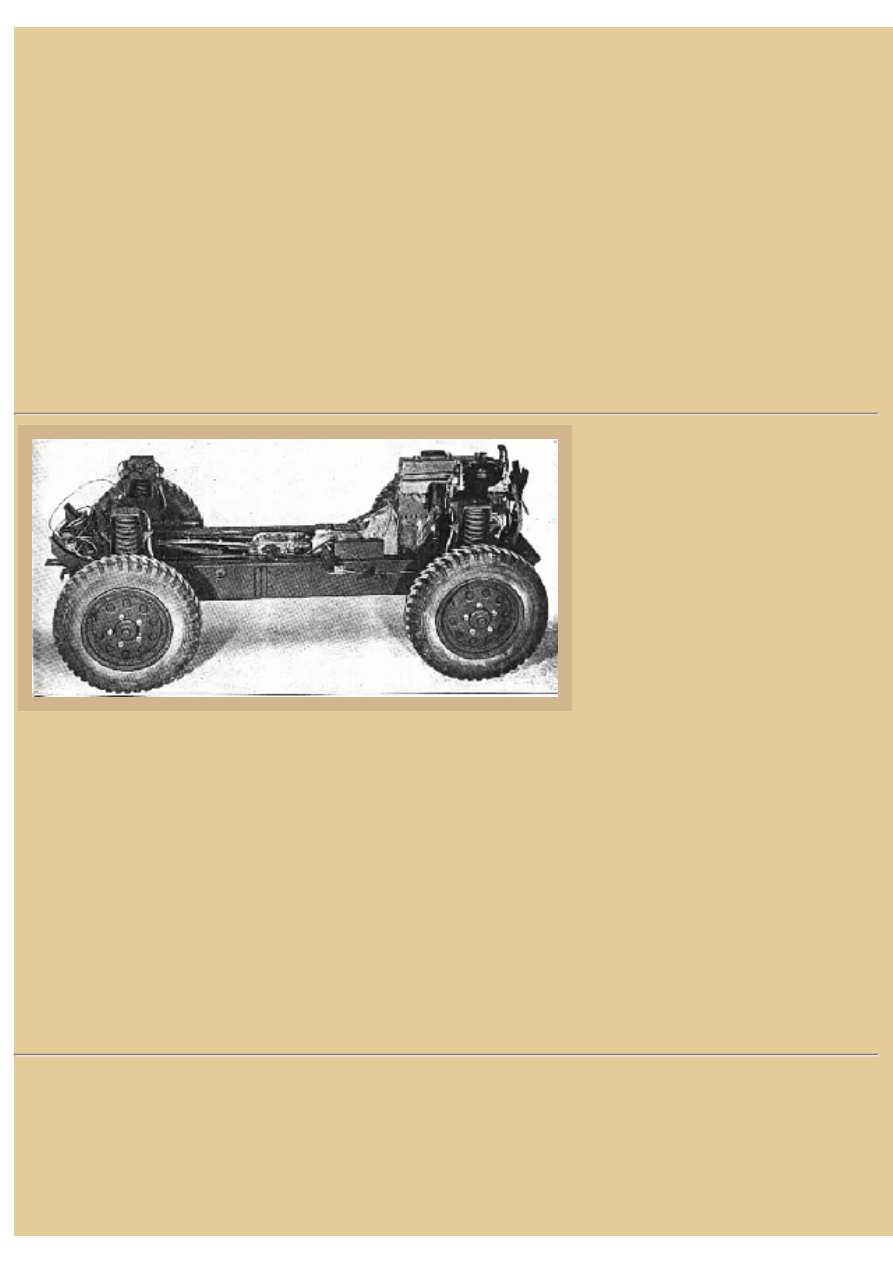
Picture 5:
This is a fine photo of the chassis of
the Daimler Scout Car, showing the
rear-engined configuration. As we
mentioned earlier, the suspension was
interesting and unique in that the
drive from the engine went directly to
the transfer box where a drive shaft
then left for each of the four wheels.
The flexible arrangement, along with
the prominent independent coil
springs, allowed each of the wheels to
be lifted high while the other three
remained on the ground. The earlier Marks also had provision for four-wheel steering, although this was
eliminated in later marks as it tended to make the vehicle a bit skittish when handled by a poorly trained
driver. All Marks had four-wheel drive.
One of the special design features of the Daimler Scout Car is the three stage Solex carburetor with a non-
mechanical acceleration pump. The carb maintains a constant fuel level at all angles by having the main jet
assembly concentric with the float. A large air cleaner of the oil bath-type is fitted on the left side of the
engine compartment, as well as a Ki-gass atomizer for easy starting in cold climates. The engine lubrication
system is also a bit different, using the dry-sump type. The engine oil is contained in a separate 2gal tank on
the right side of the engine compartment and is fed to a pressure pump, which then forces the oil through a
large Vokes filter prior to delivery to the engine bearings. As the oil collects in the sump, it is drawn up by a
large capacity scavenger pump and returned back to the oil tank again.
file:///H|/Modellismo/AFV%20Interiors/[armor]%20-%20AFV...eriors/afvinteriors.hobbyvista.com/daimler/daimler.html (4 di 6)06/02/2007 19.49.25
file:///H|/Modellismo/AFV%20Interiors/[armor]%20-%20AFV%20Interiors/afvinteriors.hobbyvista.com/daimler/daimler.html
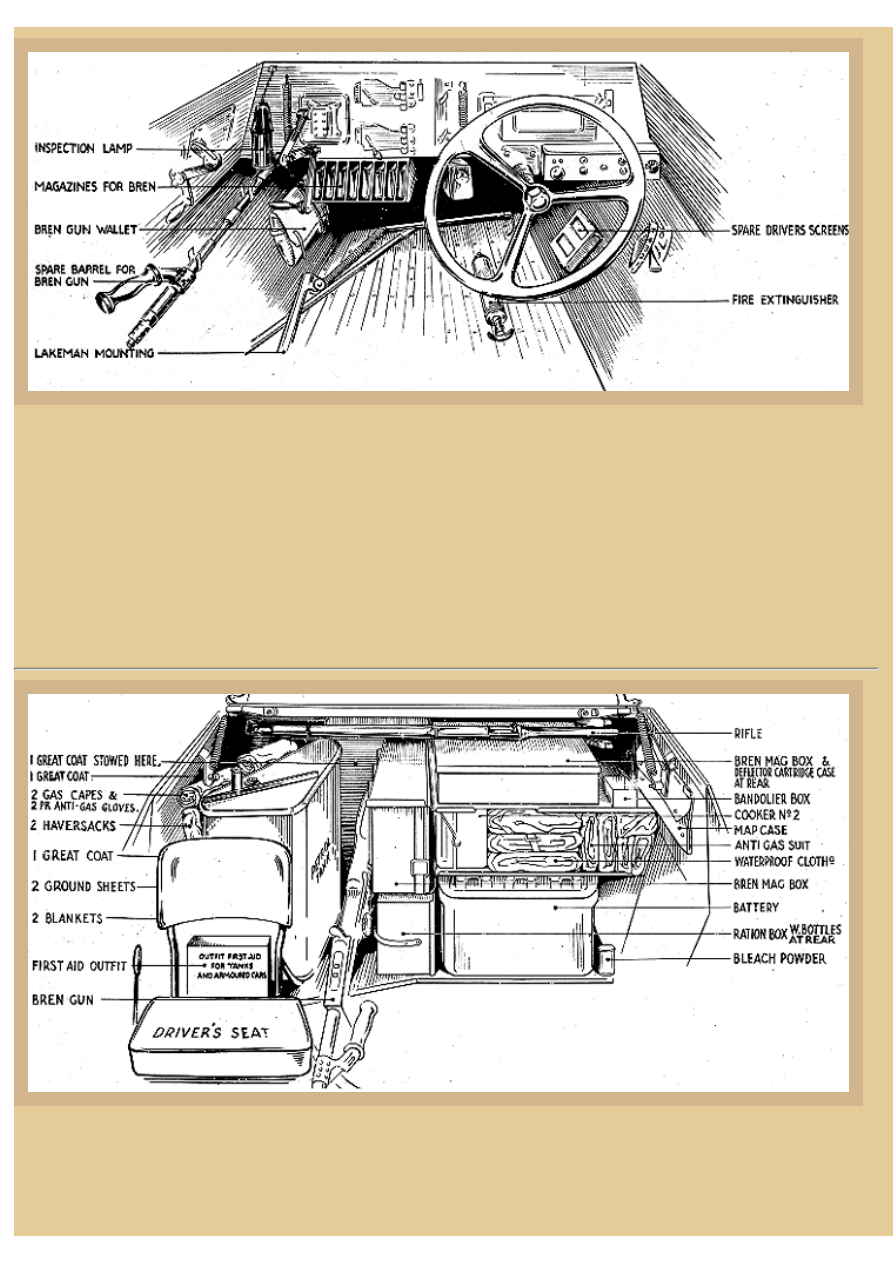
Picture 6:
This is a drawing from the Operator's Manual of the Car, Scout, Mk.Ia, the drawing showing components that
are also typical for the other Mk.I versions of the Scout as well as the Mk.II. The gearshift is on the far right
wall (5-speed preselector type gearbox), a small instrument panel is under the dash on the right, and
magazines for the Bren are mounted under the front panel on the left. Hinged handles controlled the view
flaps and a spare barrel for the MG was typically mounted on the left wall. The armor on the driving
compartment walls was only 30mm thick and the interiors of these vehicles were generally painted the same
color as the exterior paint. Due to the light armor, this was not a vehicle to be caught inside during any
serious shooting, but the Scout was extremely well suited for its intended reconnaissance and liaison role.
Picture 7:
This is the view looking back into the rear of the compartment, again illustrating the Mk.I series. The 18gal
petrol tank is directly behind the driver, and pictured to the right are stowage racks and items identified for
this mark. Most stowage drawings of the Scout show a radio mounted in this position, and most recon
file:///H|/Modellismo/AFV%20Interiors/[armor]%20-%20AFV...eriors/afvinteriors.hobbyvista.com/daimler/daimler.html (5 di 6)06/02/2007 19.49.25
file:///H|/Modellismo/AFV%20Interiors/[armor]%20-%20AFV%20Interiors/afvinteriors.hobbyvista.com/daimler/daimler.html
vehicles probably had radios mounted here. The Daimler Scout Car was fast and nimble, cruising up to
55mph on roads with a range of around 200mi. By the end of the production run, over 6,600 had been made.
Over the years it has been rumored that Rommel made his escape westward after the fighting of Second
Alamein in a captured Daimler Scout Car.
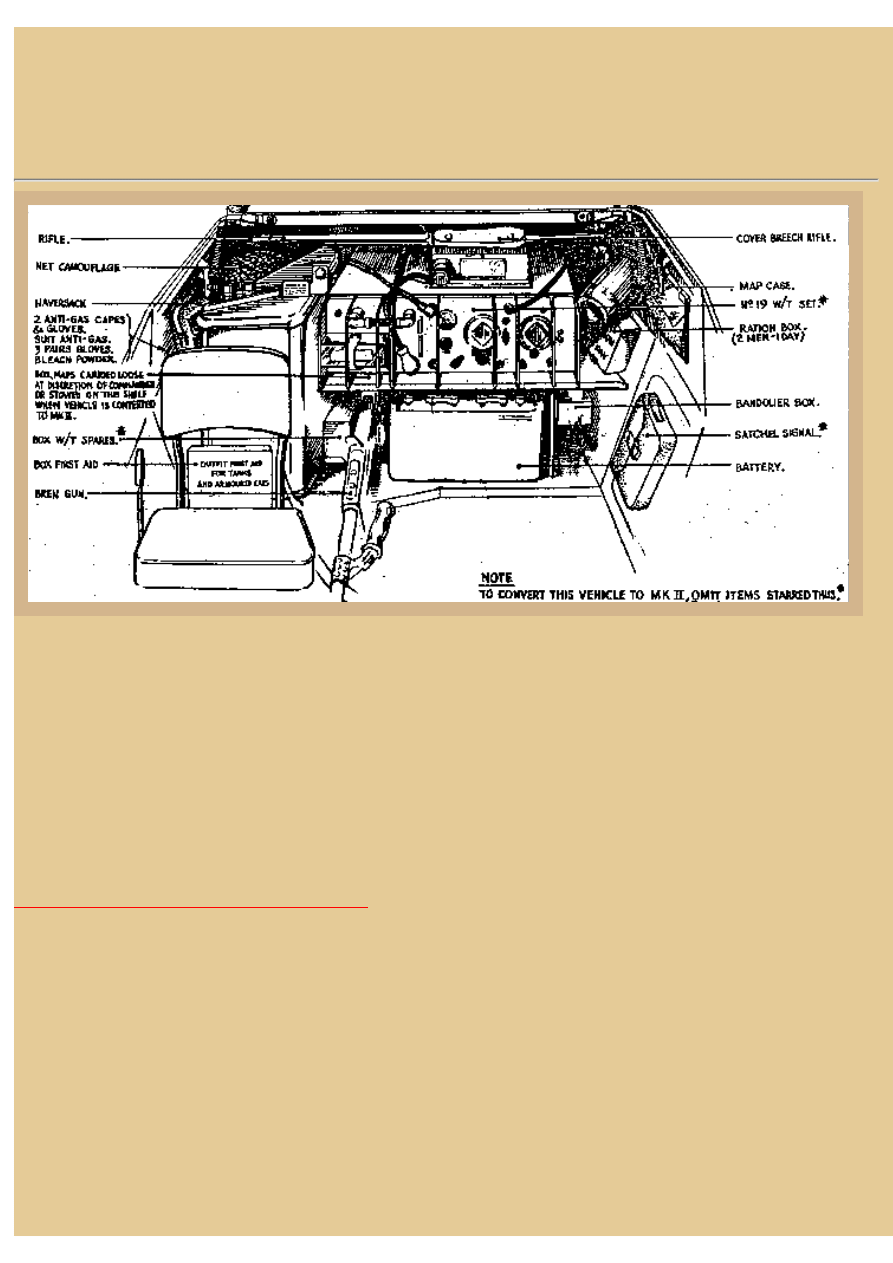
Picture 8:
Here's the same general view, but from the storage drawing for the Mk.II W/T version. The radio is the
common WT19 set and horizontally mounted above it is storage for a rifle. The vehicle battery sets under the
radio shelf, along with small boxes for W/T parts on the left and MG rounds on the right. Otherwise, the rest
of the stowage is similar to the vehicle we saw above.
That is all we have on the Daimler Scout Car for now. The images you see in this web page were contributed
by Ron Bell, Glen Goens, and Brock Taplin, and additional editorial help was provided by Danny Bosma. My
thanks to all these gentlemen for their support of AFV INTERIORS Web Magazine. If you have additional
information about the interior of this vehicle, please do not hesitate to contact me.
BACK TO AFV INTERIORS HOME PAGE
(c) 2002, 2003 AFV INTERIORS Web Magazine
file:///H|/Modellismo/AFV%20Interiors/[armor]%20-%20AFV...eriors/afvinteriors.hobbyvista.com/daimler/daimler.html (6 di 6)06/02/2007 19.49.25
Document Outline
Wyszukiwarka
Podobne podstrony:
AFV Interiors Water Buffalo
Afv Interiors Isu 152
AFV Interiors CV 33 35
AFV Interiors German AFV Radio Equipment In WWII
AFV Interiors M1A2 Abrams
AFV Interiors British Medium Tank Mk I & Mk II
AFV Interiors Czech Light Tank, LT vz 38, Pz Kpfw 38(t)
AFV Interiors Leopard 2
AFV Interiors Otter
AFV Interiors B1 bis
Afv Interiors Mk V
AFV Interiors Marder III
AFV Interiors M113 Toa
AFV Interiors Fahrpanzer
AFV Interiors Semovente Da 75 18
AFV Interiors LVT
AFV Interiors IS 2
AFV Interiors Flakpanzer 38t
więcej podobnych podstron