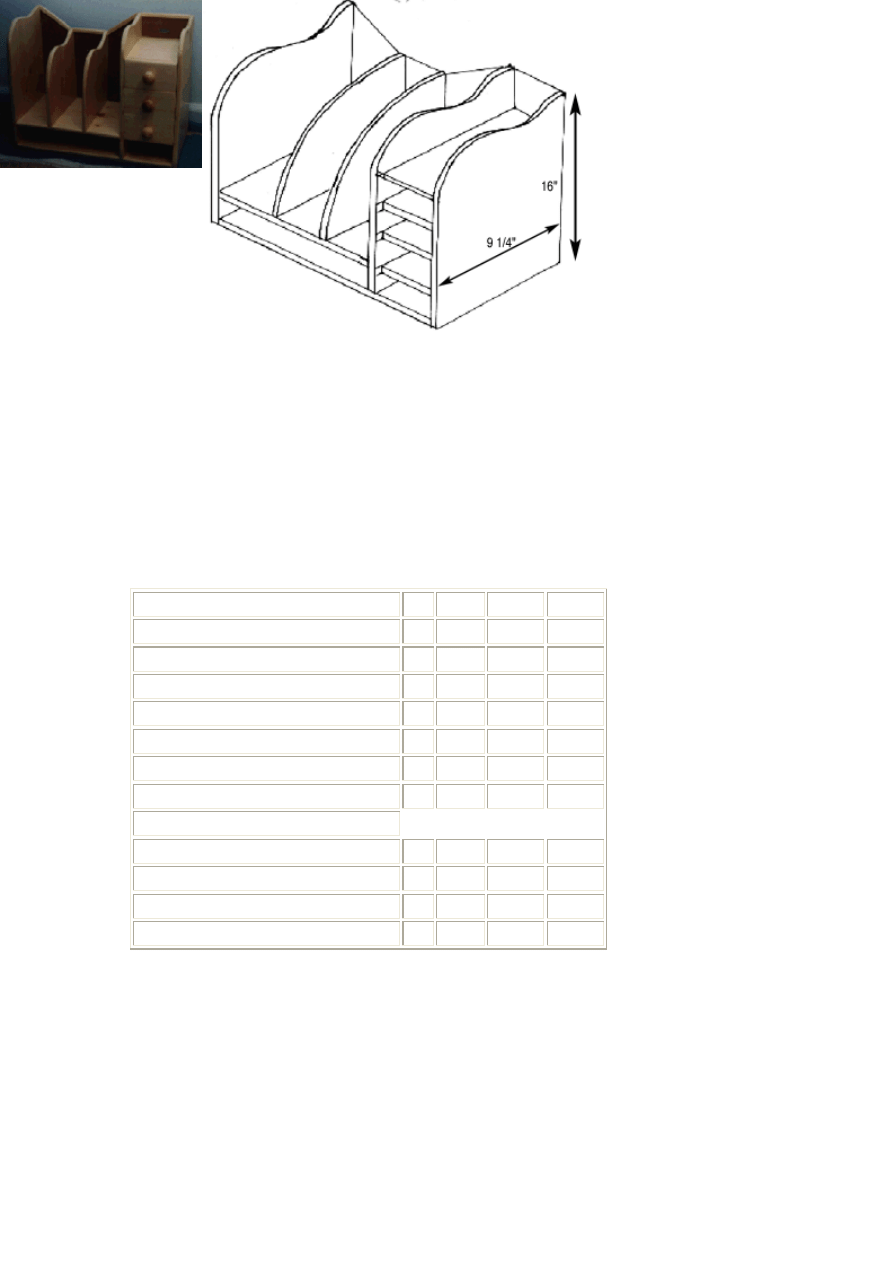
Desk
Organizer
Computers seem to
create
more paper than they
save
these days, as anyone
with a
small computer desk
can
attest to. The battle
against
clutter is easily lost,
makin
it very difficult to find
anything that you need quickly. With this goal in mind (especially in my wife's mind)
I finally built a desk organizer and designed it to have small drawers for hiding the
more junky items, such as floppy disks, staples and so on. The organizer also had to
accommodate the modem and a SyQuest drive, hence the open shelves above and
below the drawers.
g
Construction
Tools Required: Jigsaw, sander, router
Wood List (Pine):
Description Qty Depth Width
Length
Sides
3
1/2" 9 1/4" 16"
Partitions 2
1/2"
9"
9
3/4"
Cross member
1
1/2" 9"
13"
Base
1
1/2" 9 1/4" 19"
Drawer bases:
3
1/2" 6"
8 1/4"
Back 1 (hardboard):
1
1/8" 15 1/2" 12 3/4"
Back 2 (hardboard):
1
1/8" 15 1/2" 6"
Drawers: (quantities for one drawer)
Sides:
2
1/2" 2 1/2" 8 1/4"
Back:
1
1/2" 2 1/2" 4 1/2"
Front:
1
1/2" 3 1/2" 5 3/4"
Base (hardboard):
1
1/8" 5"
8"
Cut the three side pieces to shape, matching the top curve on each one. Note that the
"middle" side piece should be 1/2" shorter than the other two as it sits on top of the
base piece, whereas the end two side pieces reach all the way to the bottom (butted up
against the side of the base piece). Take one side piece and the "middle" side piece
and cut the slots for the drawer bases. These slots should be 1/2" wide (and 1/8"
deep), starting from 2 1/2", 5 3/4", 8 7/8" and 11 7/8" from the bottom of the middle
side piece (and therefore, 3", 6 1/4", 9 3/8" and 12 3/8" from the bottom of the end
side piece) -- see diagram. Then, cut a slot 1/8" from the back of each shelf (1/8" wide

and deep) that will take the hardboard back (number 2). Note: for the middle side, this
slot must be cut into both sides as it connects into both back one and two.
Once these slots have bee cut, glue the drawer bases into the 1/2" wide slots, ensuring
that they are perpendicular to the sides, and also glue in back two.
Next, take the cross member piece and cut two slots, evenly spaced, from front to
back. These should be 1/2" wide and 1/8" deep and are used to fasten the two
partitions into place. Then cut the two partitions to shape (any shape will do as long as
they match each other) and then glue into the 1/2" wide slots.
Then, take the final side piece and cut a slot 1/2" wide, and 1/8" deep that starts 3"
from the bottom of the piece. At this time, also cut a slot (again, 1/2" wide and 1/8"
deep) that is 2 1/2" from the bottom of the middle side piece. These slots are used to
fasten in the cross member piece. Then, cut a 1/8" wide, 1/8" deep slot along the back
of the side piece, that will allow the back to fasten in.
Once all slots have been made, fasten the side and the drawer unit to the base (using
glue and small nails). At the same time, slot in the cross member piece (including the
two partitions that should be attached to it). Then, cut the back piece to a suitable
shape, so that it dips down to meet the two partitions (see photo and diagram). There
is no exact science to this, just cut the back into whatever shape looks good. Once cut,
glue the back into the slots in the side pieces, and attach to the partitions by the use of
small nails from behind.
Finally, fill in the small gaps in front of the drawer bases by gluing small pieces of
wood into these slots. The main unit is now complete and can now be sanded down to
a smooth finish.
Drawer Construction
The drawers are very primitive, using no joints. Instead, simply glue and nail the sides
to the front and back, and then fill the holes. The one exception to this is the drawer
base which should be slotted in, using a 1/8" wide, 1/8" deep slot, as used elsewhere
in this project.
When attaching the front of the drawer, the easiest way is to slide the incomplete
drawer unit into its designated space, and then nail the front on, thus ensuring that the
front is a neat match against the sides, top and bottom of the space. Note that the
drawer front should overhang the drawer bases above and below it, so that there is
very little space between each drawer front.
Document Outline
Wyszukiwarka
Podobne podstrony:
desk organizer polka na biurko
desk organizer2 biurko
9 Ch organiczna WĘGLOWODANY
organizacja i metodyka pracy sluzby bhp
Jedność budowy organizmów żywych1
Organizacja kąpieliska
Losy leków w organizmie
Zachowania w organizacji
Socjologia wyklad 12 Organizacja i zarzadzanie
Caritas Diecezji Kieleckiej organizacje ppt
4 6 Organizacja geodezji w Polsce ppt
organiz
Zasady organizowania stanowisk pracy
sroda teoria organizacji i zarzadzania
W 2 Prawno organiz pp97
więcej podobnych podstron