HORNS
CONTENTS
page
page
GENERAL INFORMATION
. . . . . . . . . . . . . . . . . . 1
HORN REPLACEMENT
. . . . . . . . . . . . . . . . . . . . 3
HORN SWITCH REPLACEMENT
. . . . . . . . . . . . . 2
HORNS SOUND CONTINUOUSLY
. . . . . . . . . . . . 2
HORNS WILL NOT SOUND . . . . . . . . . . . . . . . . . 1
RELAY REPLACEMENT
. . . . . . . . . . . . . . . . . . . . 3
GENERAL INFORMATION
WARNING: ON VEHICLES EQUIPPED WITH AN AIR
BAG, SEE GROUP 8M - RESTRAINT SYSTEMS FOR
STEERING WHEEL REMOVAL PROCEDURES.
The horn circuit consists of a horn switch, horn
relay and horns. The relay plugs into the relay center
located under the glove box.
Battery voltage is applied to the horn relay at all
times through fuse #13, located in the fuse block. The
fuse block is located in the passenger end of the
instrument panel.
When the horn switch is depressed, the horn relay
is grounded, pulling the contact closed and providing
battery voltage to the horns.
The horn is also activated by the security alarm
system. When the alarm is triggered, the security
alarm module grounds the horn relay for a specified
cycle time. Refer to Group 8Q - Theft Security Sys-
tem.
HORNS WILL NOT SOUND
Refer to Group 8W - Wiring Diagrams for a com-
plete circuit diagram.
If the horn functions properly except for the
security alarm system, refer Group 8Q - Theft
Security System.
HORN RELAY
• Inspect 20 amp fuse, #13, located in the Fuse block.
Replace fuse as required.
• Depress Horn Switch. The relay contacts should
click. If ok, go to HORNS. If not, go to next step.
• Remove relay (BLACK) from the relay center lo-
cated under the glove box (Fig. 5). There should be
battery voltage at cavity 1. If not, repair open in
circuit to relay.
• Depress horn switch. Measure resistance between
relay cavity 2 and ground. The meter should read
zero ohms. If not, repair open to horn switch ground.
• Measure resistance between relay cavity 4 and
ground. The meter should read almost zero ohms
(horn resistance) If OK, replace relay. If not, repair
open in circuit between relay and horn.
HORN
• Measure the resistance between the horn connector
pin B (black) and chassis ground. The meter should
read zero ohms. If not, repair open to ground.
• Disconnect horn connector. Depress Horn Switch.
There should be battery voltage at the horn connector
pin A (dark green). If OK, replace horn assembly. If
not, repair open to relay.
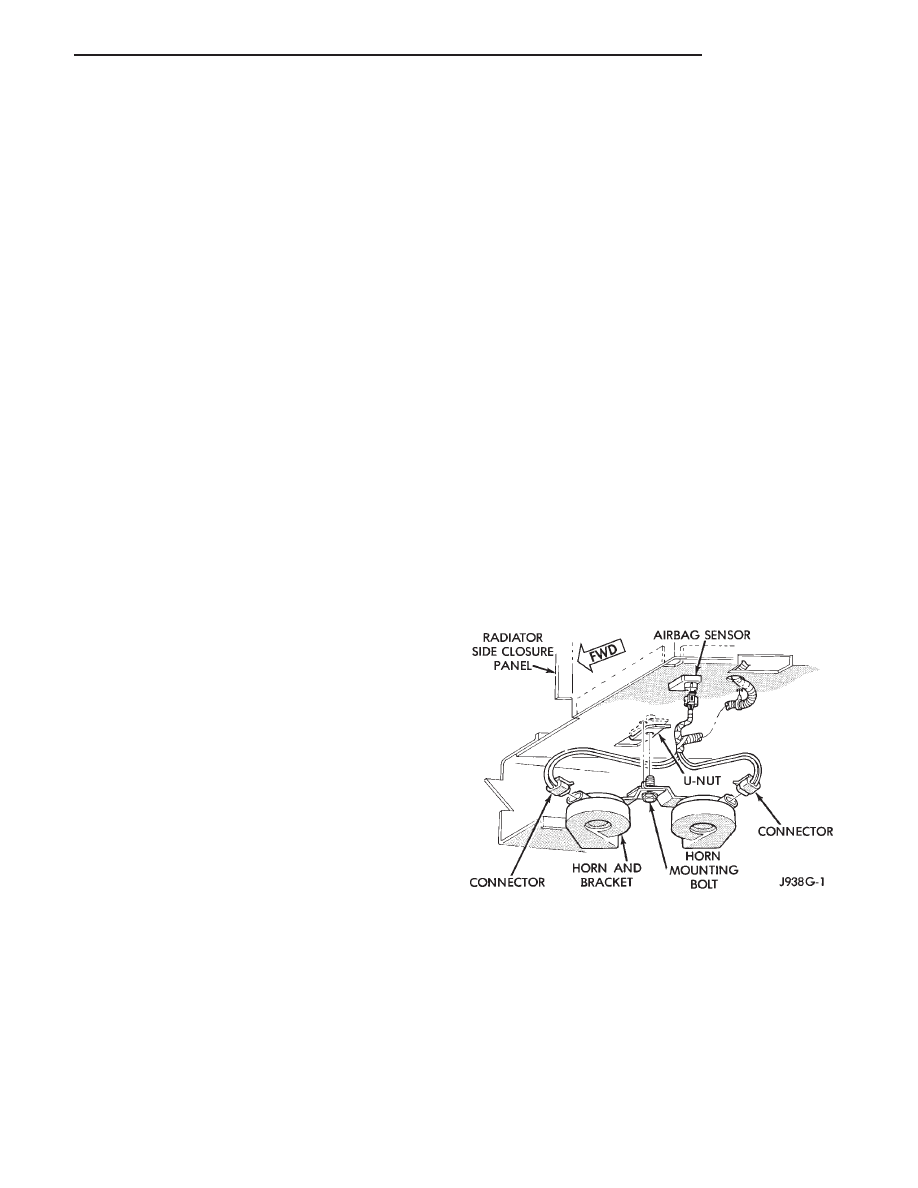
Fig. 1 Horn Removal/Installation
Z
HORNS
8G - 1
HORNS SOUND CONTINUOUSLY
CAUTION: Continuous sounding of horns may
cause relay to fail.
(1) Unplug the horn relay from the relay center
underneath the glove box (Fig. 5). Plug in a known
good relay. If the horns stop blowing, the relay is
defective and must be replaced. Should the horns still
sound, replace original relay and proceed as follows:
(a) Connect one lead of test lamp to relay termi-
nal 1 (battery) on the relay bank.
(b) Connect the other lead to relay terminal 2
(switch) on the relay bank. Should the lamp illumi-
nate, either the wire from the horn switch is
shorted to ground or the horn switch is defective.
Continue to next step.
WARNING: BEFORE BEGINNING ANY AIR BAG SYS-
TEM COMPONENT REMOVAL OR INSTALLATION,
REMOVE AND ISOLATE THE NEGATIVE (-) CABLE
FROM THE BATTERY. THIS IS THE ONLY SURE WAY
TO DISABLE THE AIR BAG SYSTEM. FAILURE TO
DO THIS COULD RESULT IN ACCIDENTAL AIR BAG
DEPLOYMENT AND POSSIBLE INJURY.
(2) Disconnect and isolate the battery negative
cable.
(3) Remove 4 retaining nuts from back of steering
wheel. Remove air bag module (Fig. 2).
(4) Disconnect wire from rear of air bag module.
(5) Place air bag module on a clean level surface
with pad facing upward.
(6) Pry out 2 trim cover buttons on back of steering
wheel to access retaining screws for the horn switch.
(7) Remove 2 screws and disconnect horn wires
located in the lower portion of steering wheel.
(8) Repeat the previous test and if the test lamp
still illuminates, wire is shorted and should be re-
paired. If test lamp does not illuminate, horn switch
is defective and must be replaced.
HORN SWITCH REPLACEMENT
WARNING: BEFORE BEGINNING ANY AIR BAG SYS-
TEM COMPONENT REMOVAL OR INSTALLATION,
REMOVE AND ISOLATE THE NEGATIVE (-) CABLE
FROM THE BATTERY. THIS IS THE ONLY SURE WAY
TO DISABLE THE AIR BAG SYSTEM. FAILURE TO
DO THIS COULD RESULT IN ACCIDENTAL AIR BAG
DEPLOYMENT AND POSSIBLE INJURY.
(1) Disconnect and isolate the battery negative
cable.
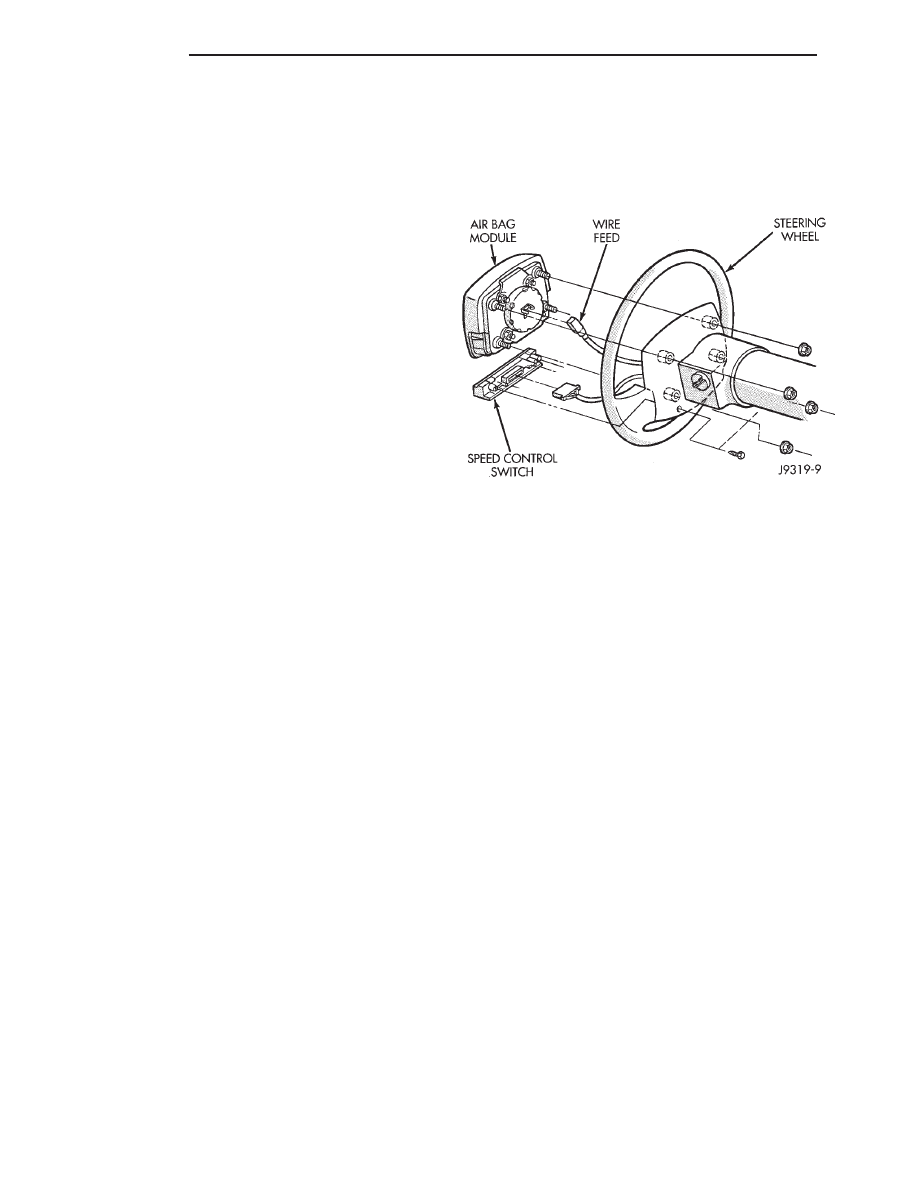
(2) Remove 4 retaining nuts from back of steering
wheel. Remove air bag module.
(3) Disconnect wire from rear of air bag module.
(4) Place air bag module on a clean level surface
with pad facing upward.
(5) Pry out 2 trim cover buttons on back of steering
wheel to access retaining screws for the horn switch.
(6) Remove 2 screws and disconnect horn wires
located in the lower portion of steering wheel. Push
wires through the access holes and remove horn
switch.
(7) To install, reverse the previous procedures. Use
caution not to pinch wires.
Fig. 2 Horn Switch Removal/Installation
8G - 2
HORNS
Z
HORN REPLACEMENT
(1) Raise and support the vehicle.
(2) Remove the splash shield from passenger side of
vehicle.
(3) Disconnect wire harness connector from the
horn (Fig. 3).
(4) Remove horn mounting bolt and horns. Horn
and bracket are removed as an assembly.
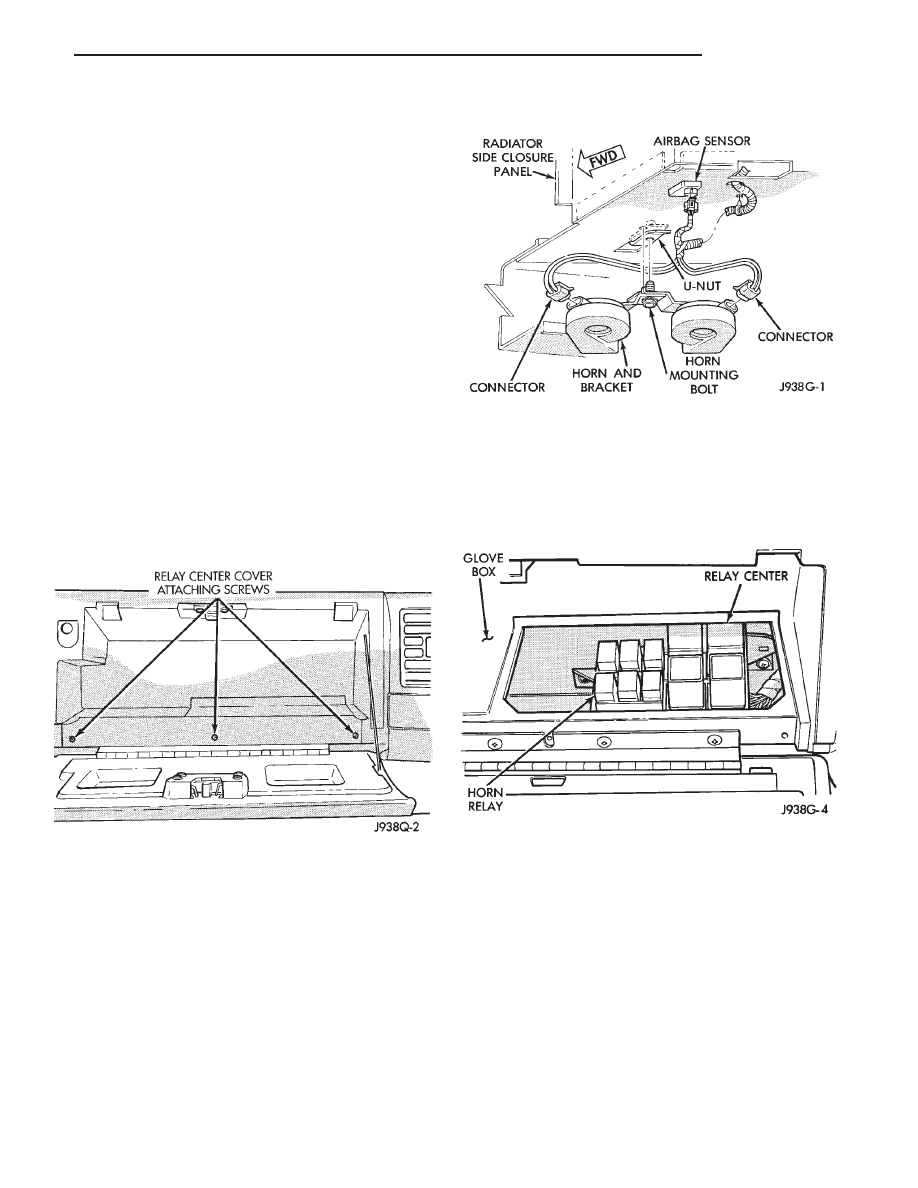
RELAY REPLACEMENT
(1) Open glove box and remove 3 screws holding
relay center cover (Fig. 4).
(2) Remove horn relay (Fig. 5)
Fig. 3 Horn Removal/Installation
Fig. 4 Relay Center Cover
Fig. 5 Horn Relay
Z
HORNS
8G - 3

Document Outline
Wyszukiwarka
Podobne podstrony:
93ZJ Secc 11 Exhaust System and Intake Manifold
93ZJ Secc 8J Turn Signals and Hazard Warning Flashes
93ZJ Secc 8F Audio Systems
93ZJ Secc 8R Power Seats
93ZJ Secc 16 Propeller Shafts
93ZJ Secc 6 Clutch
93ZJ Secc 8L Lamps
93ZJ Secc 8B Battery Starter Motor Generator Service
93ZJ Secc 8A Electrical Systems
93ZJ Secc 8M Restraint Systems
93ZJ Secc 22 Wheels and Tires
93ZJ Secc 25 Emission Control Systems
93ZJ Secc 0 Lubrication and Maintenance
93ZJ Secc 8Q Vehicle Theft Security System
93ZJ Secc 8T Power Mirrors
93ZJ Secc 8K Windshield Wiper and Washer Systems
93ZJ Secc 8C Overhead Console
93ZJ Secc 8U Chime Buzzer Warning Systems
93ZJ Secc 8S Power Windows
więcej podobnych podstron