49
BŁADEO AMULET PURSES • APPENDIX A 49

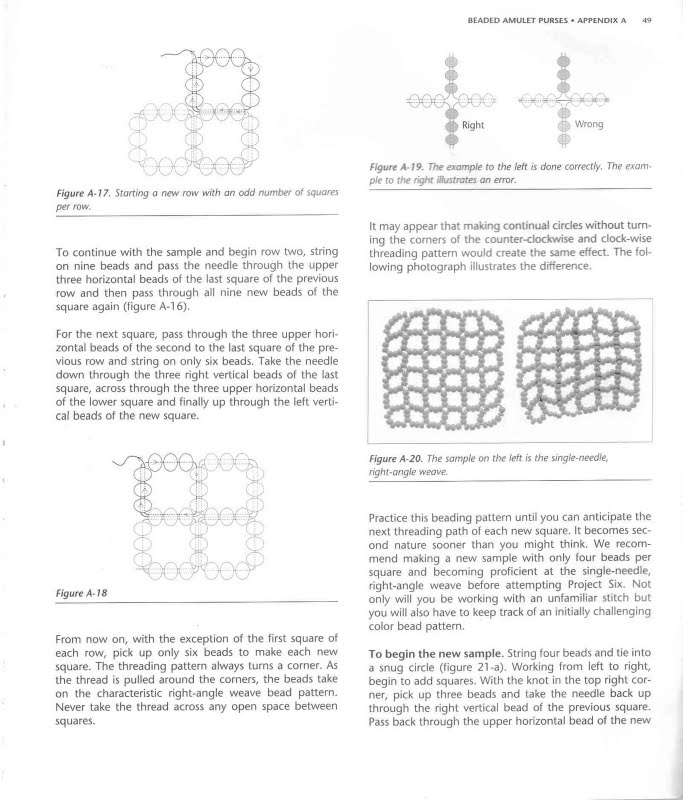
Figurę A■ 17. Starting a nev/ row with an odd number of squares per row.
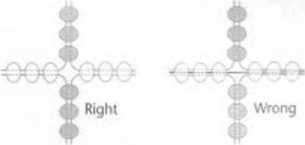
Figurę A-19. The example to the lett is done correaty. The exam-ple to the right Oustrates on error.
To continue with the sample and begin row two, string on nine beads and pass the needle through the upper three horizontal beads of the last square of the previous row and then pass through all nine new beads of the square again (figurę A-l 6).
For the next square, pass through the three upper horizontal beads of the second to the last square of the pre-vious row and string on only six beads. Take the needle down through the three right vertical beads of the last square, across through the three upper horizontal beads of the lower square and finally up through the left verli-cal beads of the new square.
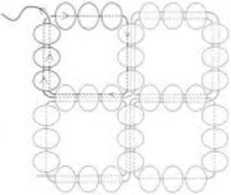
Figurę A-i 8
From now on, with the exception of the first square of each row, pick up only six beads to make each new square. The threading pattem always lurns a corner. As the thread is pulled around the corners, the beads take on the characteristic right-angle weave bead pattern. Never take the thread across any open space between sguares.
It may appear that making continual cirdes without turn-ing the corners of the counter-clockwise and dock-wise threading pattern would create the same effect. The fol-lowing photograph illustrates the difference.
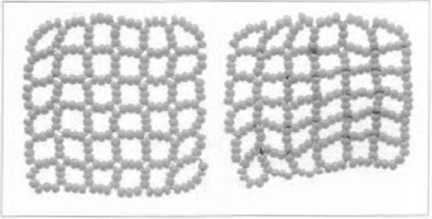
Figurę A-20. The sample on the left is the single-needie, right-angle weave.
Practice this beading pattern until you can anticipale the next threading path ol each new sguare. It becomes second naturę sooner than you might think. We recom-mend making a new sample with only four beads per square and becoming proficient at the single-needie, right-angle weave before attempting Project Six. Not only will you be working with an unfamiliar stitch but you will also have to keep track of an initially challenging color bead pattern.
To begin the new sample. String four beads and tie into a snug cirde (figurę 21-a). Working from left to right, begin to add squares. With the knot in the top right corner, pick up three beads and take the needle back up through the right vertical bead of the previous square. Pass back through the upper horizontal bead of the new
Wyszukiwarka
Podobne podstrony:
BEADED AMULET PURSES • APPENDIX A 45 BEADED AMULET PURSES • APPENDIX A 45 Figurę A-8 Figurę A-6a &am
BEADED AMULET PURSES • APPENDIX A 43Appendix ABeading Technigues Figurę A-la&b. The thread gaps
BEADED AMULET PURSES • PROIECT SEVEN i ) Figurę 4 To make the triangular points at the top of the pu
Z2 POOSCT sa ■ SEADED AMULET PURSES Right Wrong Figurę 3 Continue beading row one
Z2 POOSCT sa ■ SEADED AMULET PURSES Right Wrong Figurę 3 Continue beading row one
Bf ADI.D AMULET PURSES • APPENDIX A SISingle-needle,Right-angle WeaveDecreasing at the sides Used in
BEADED AMULET PURSES • APPENDIX Et SSTo begin single-needle, right-angle weave Tie the base strand i
BEADED AMULET PURSES • APPENDIX B 57How to read even-count tubular peyote graphs The tubular peyote
BEADED AMULET PURSES • PROIECT THREE 17 Sections to be read before beginning: • Tu
10 PROJECT ONE • BEADED AMULET PURSES Figurę 4 To outline the hearts at the top rim. Begin a new thr
więcej podobnych podstron