
Installing RNS-E SAT NAV for Audi A4
As one of the major options on the A4 you can get a DVD Satellite Navigation System call the
RNS-E. With the help of eBay these sat nav systems are now available to by at a rough cost
of £650 plus the cost of all the other parts that are required.
This document shows a step by step install of the RNS-E into an A4 for that has been fitted
with a single DIN stereo.
Tips and Tricks
As there are a lot of bolts than need removing during this install, use a supply of small coin
bags to keep the bolts for each area together and label the bags accordingly.
Install difficulty
(the
more the harder the install)
www.audiretrofit.co.uk
Page 1 of 27
04/02/2006
Installing RNS-E SAT NAV for Audi A4
Parts Required
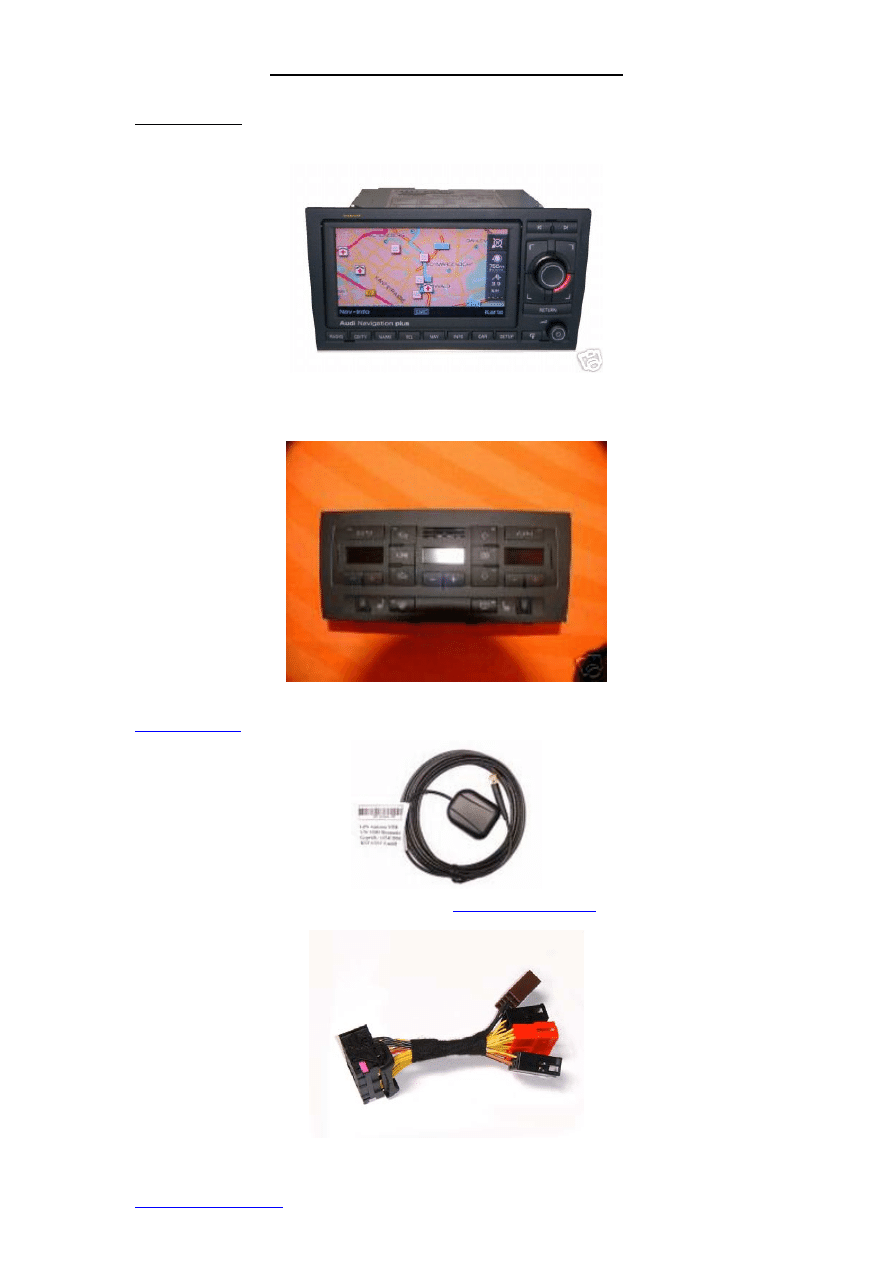
1 x RNS-E Unit - Part Number:
8E0 035 192 C or 8E0 035 192 D (EUROPEAN VERSION)
1 x Double DIN style climate control unit (make sure the one you buy has all the same
switches that your current unit has i.e. heated seats etc..) This item can be ordered from Audi
at a high cost or bought off ebay.
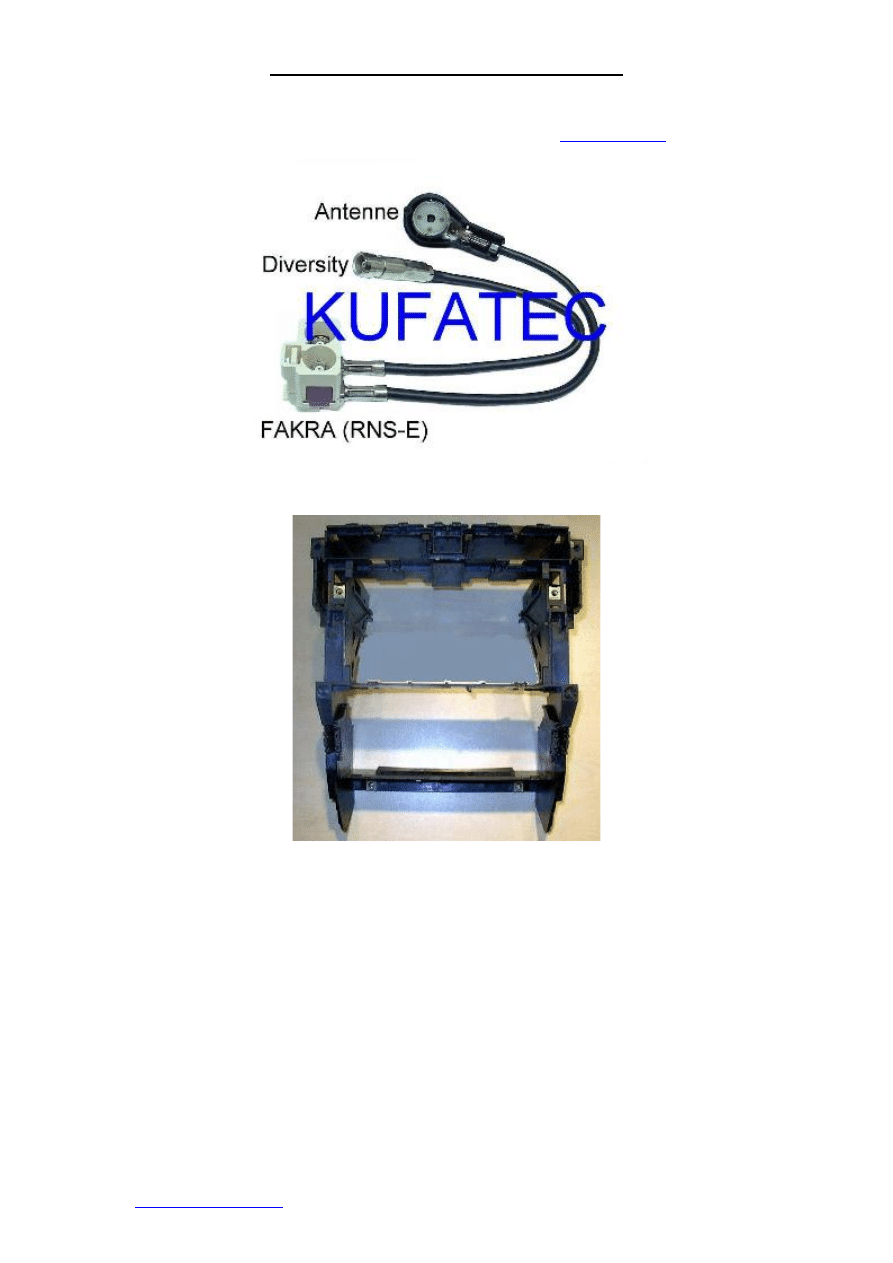
1 x GPS Antenna - with either an SMB or FAKRA connector. Can be purchased from ebay or
1 x RNS-E Adapter – Part Number 33350 from
www.audiretrofit.co.uk
Page 2 of 27
04/02/2006
Installing RNS-E SAT NAV for Audi A4
1 x RNS-E Antenna Adapter - Can be purchased from ebay or
1 x Double DIN Dash Housing – Available from Audi Parts department or eBay.
1 x RNS-E Western Europe DVD (Try and buy the latest version that is out as this will also
update your RNS-E Firmware to the latest version)
www.audiretrofit.co.uk
Page 3 of 27
04/02/2006
Installing RNS-E SAT NAV for Audi A4
Tools Required
4 x Radio Removal (These can be purchased off ebay or from Halfords etc..)
1 x Hacksaw with Fine Blade (Suitable for cutting plastic)
1 x Screwdriver Set which has hex style bits
1 x Socket Wrench with Extension Arm
1 x 8mm Socket
1 x 13mm Socket
1 x Small flat head screwdriver
1 x Stanley Knife with a sharp blade
1 x Ruler
1 x Wire Cutters
10 x Cable Ties
www.audiretrofit.co.uk
Page 4 of 27
04/02/2006
Installing RNS-E SAT NAV for Audi A4
Part 1: Removing and installing “chorus” and “concert” radios
a) Switch off all electrical equipment.
b) Remove ignition key.
c) Prior to removing the radio check that you have the anti-theft code and have removed
any Tapes/CD’s from it.
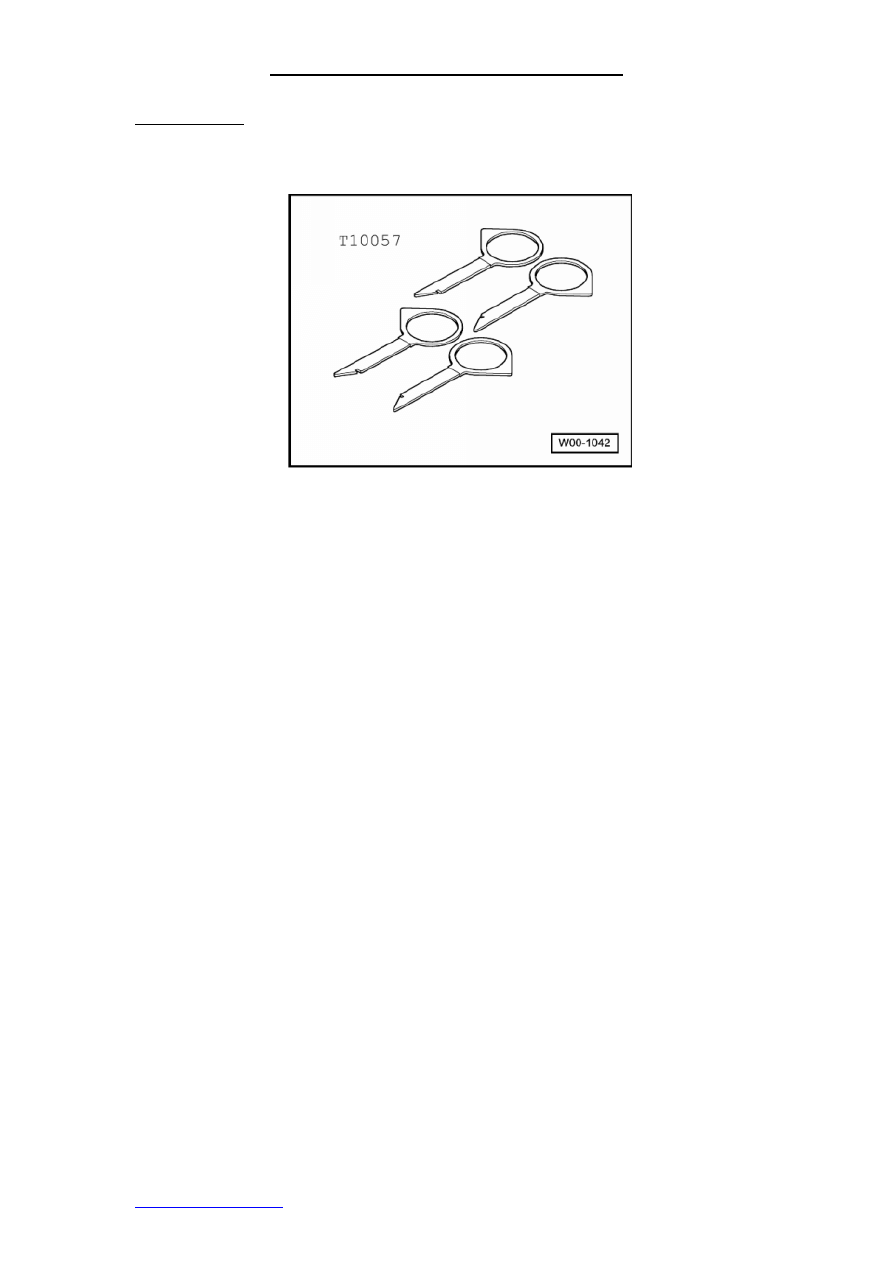
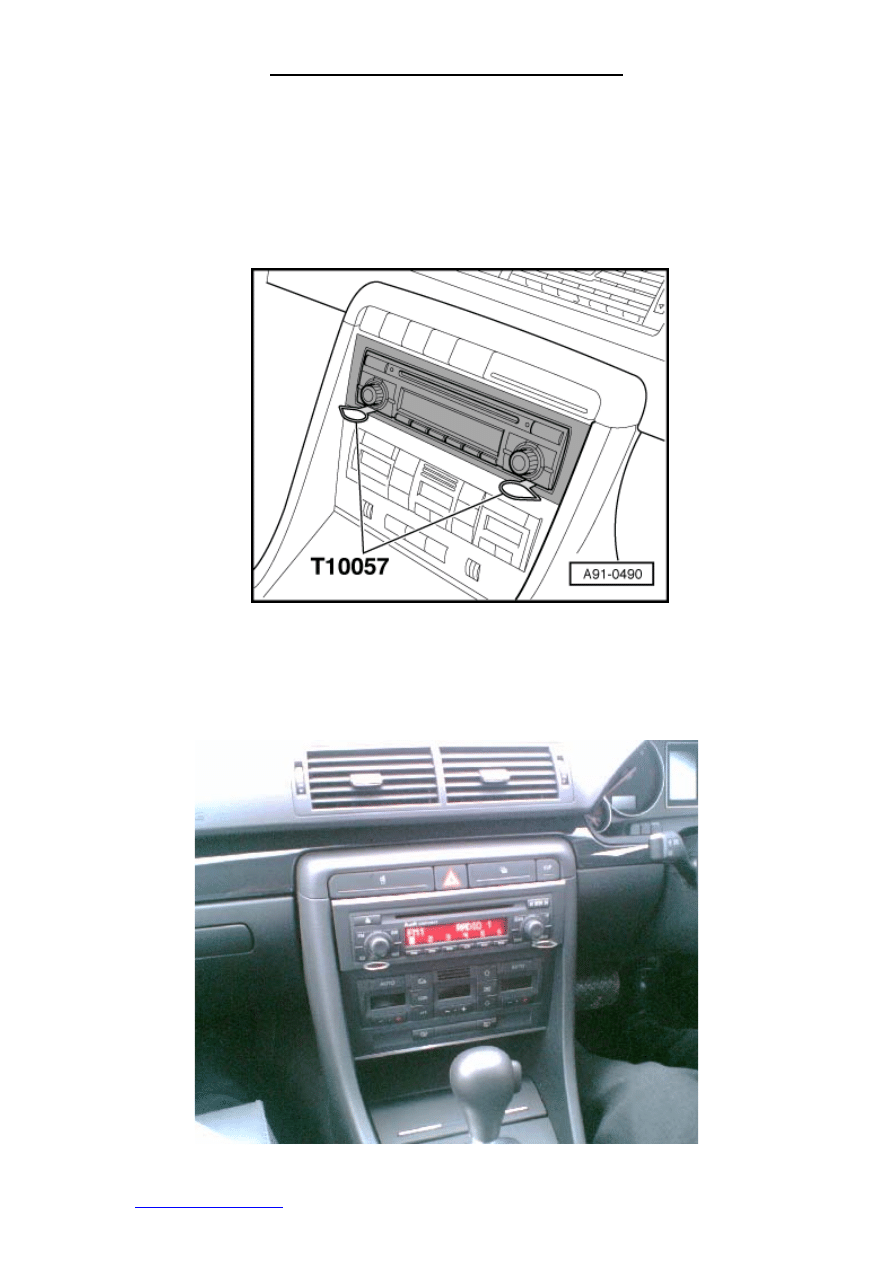
d) Insert radio release tool -T10057- into release slots as illustrated until they engage.
Pointed ends of grips must face outwards.
e) Grasp hold of grips on radio release tool -T10057- and pull radio out of dash panel.
f) Release and unplug connectors at the back of the stereo unit.
g) Press the tabs on the sides of the radio and pull out release tools.
www.audiretrofit.co.uk
Page 5 of 27
04/02/2006
Installing RNS-E SAT NAV for Audi A4
Stage 2: Removing plastic trim and switches from the centre of the dash
a) Unclip upper switch module trim by hand or with a small flat head screwdriver which
has had the end wrapped with electrical tape (this will stop the dash/trim from getting
scratched) -1-
b) Detach trim for switch module.
c) Carefully remove the hazard warning switch by hand.
d) Unplug electrical the connectors off the switch (The connector is colour coded so
there is no need to make a note of where it goes).
www.audiretrofit.co.uk
Page 6 of 27
04/02/2006
Installing RNS-E SAT NAV for Audi A4
Stage 3: Remove right and left dash panel covers
a) Open the driver’s door.
b) Use small flat head screwdriver which has had the end wrapped with electrical tape
(this will stop the dash/trim from getting scratched) to remove the side panel cover.
c) Open the front passenger’s door and repeat the process (b) on this side as well.
www.audiretrofit.co.uk
Page 7 of 27
04/02/2006
Installing RNS-E SAT NAV for Audi A4
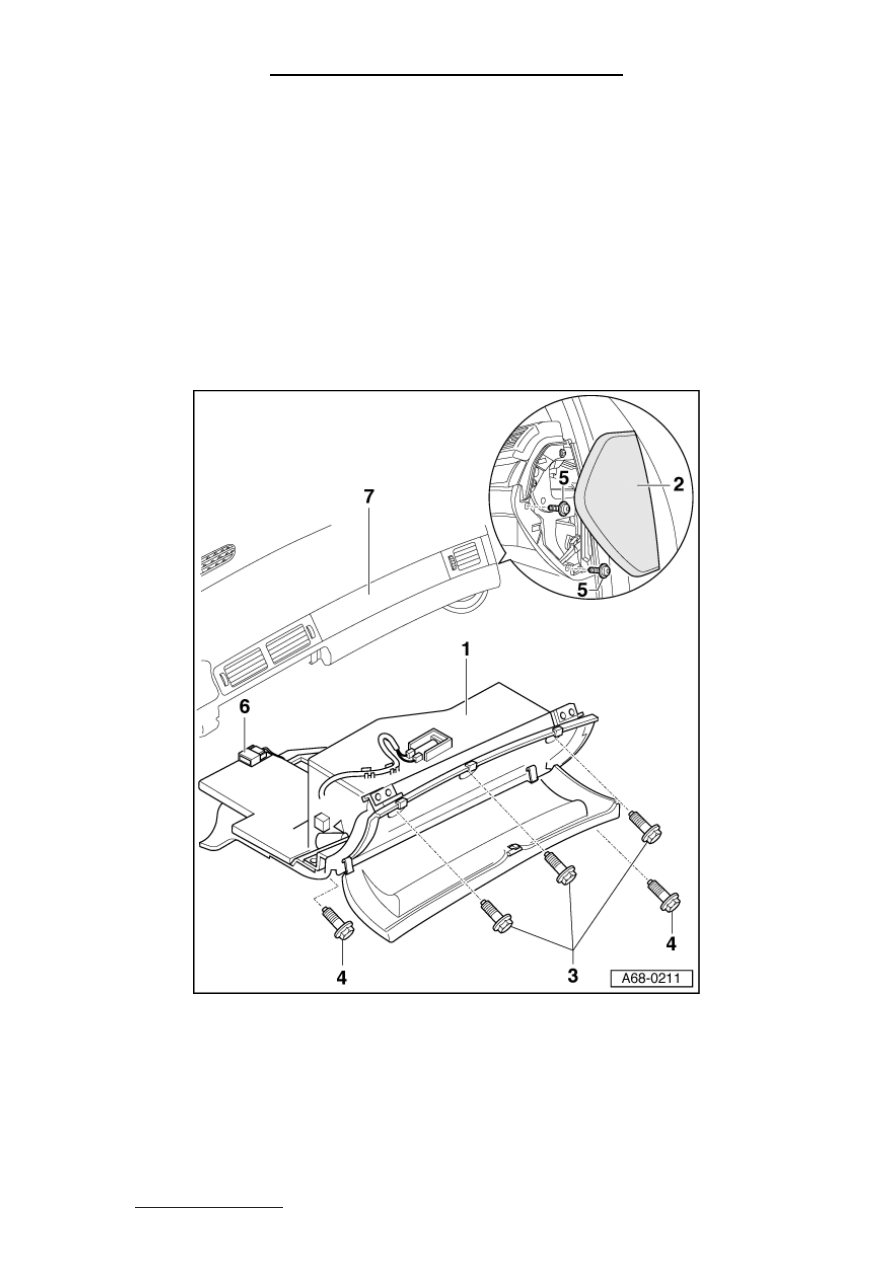
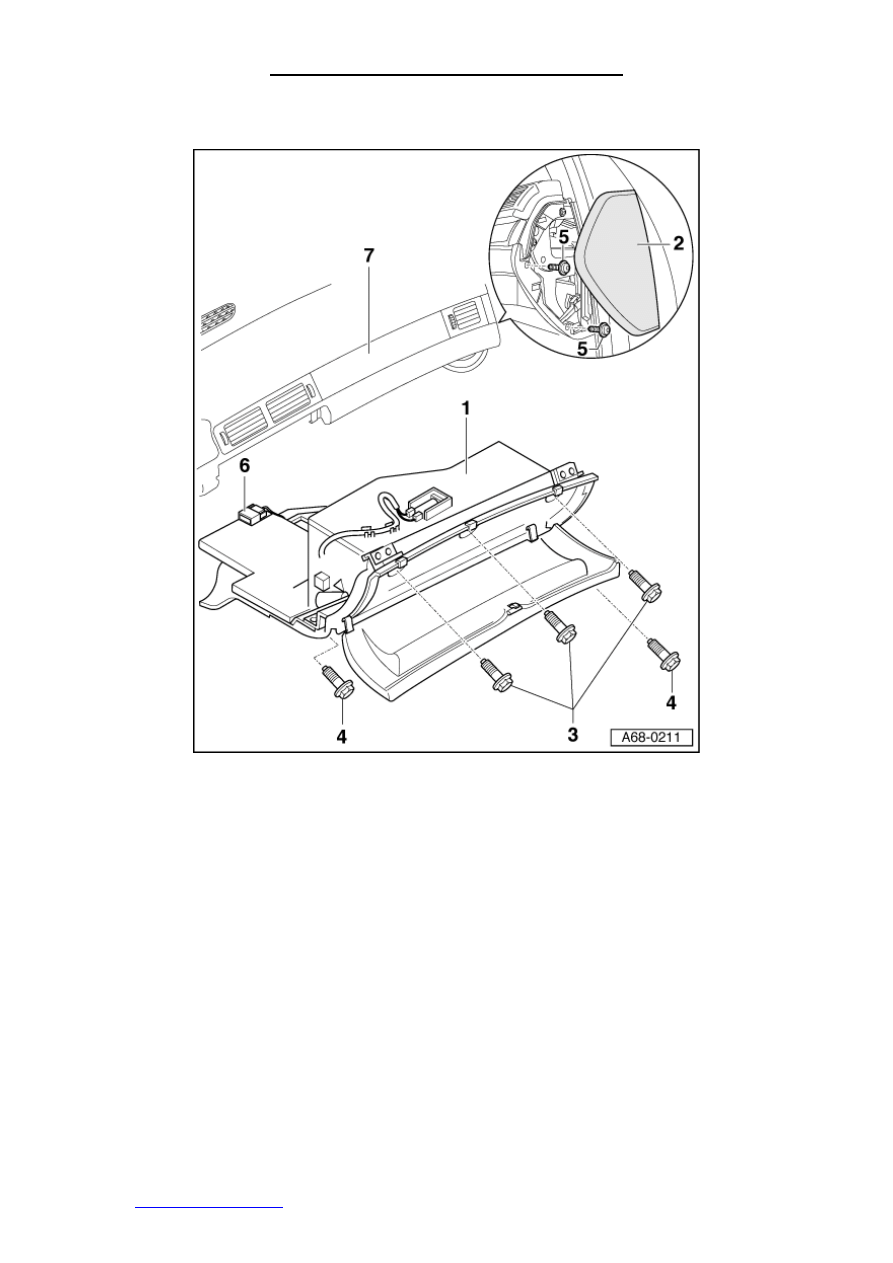
Stage 4: Remove the Glovebox
WARNING!!
If you car has an airbag deactivation switch in the glove box complete the following
task prior to completing this stage.
TASK: Switch the airbag deactivation switch in the glove box to the off position, then switch
the ignition around to the until the airbag off light is displayed on the dash, then switch the
ignition off and remove the key.
REASON: Completing this will cause the car to acknowledge that you have manually
switched off the airbag. If you don’t complete this and then disconnect the glovebox you may
need to take the car to your dealer to reset the airbag light.
a) So not to scratch the glovebox make sure the floor mat is clean or covered with a
towel.
b) If you have a CD changer in the glovebox remove this with the stereo removal keys
and unplug the connector at the back.
c) Remove the 3 bolts -3- in recesses at top of glove compartment -1- with an 8mm
socket.
www.audiretrofit.co.uk
Page 8 of 27
04/02/2006
Installing RNS-E SAT NAV for Audi A4
d) Using the same socket remove bolts -5- (2x) from the side, from the outside.
e) Then use the socket to remove bolts -4- (2x) from underneath, from footwell.
f) Pull out glove compartment downwards.
g) Disconnect the glovebox connection located at the back of the glovebox.
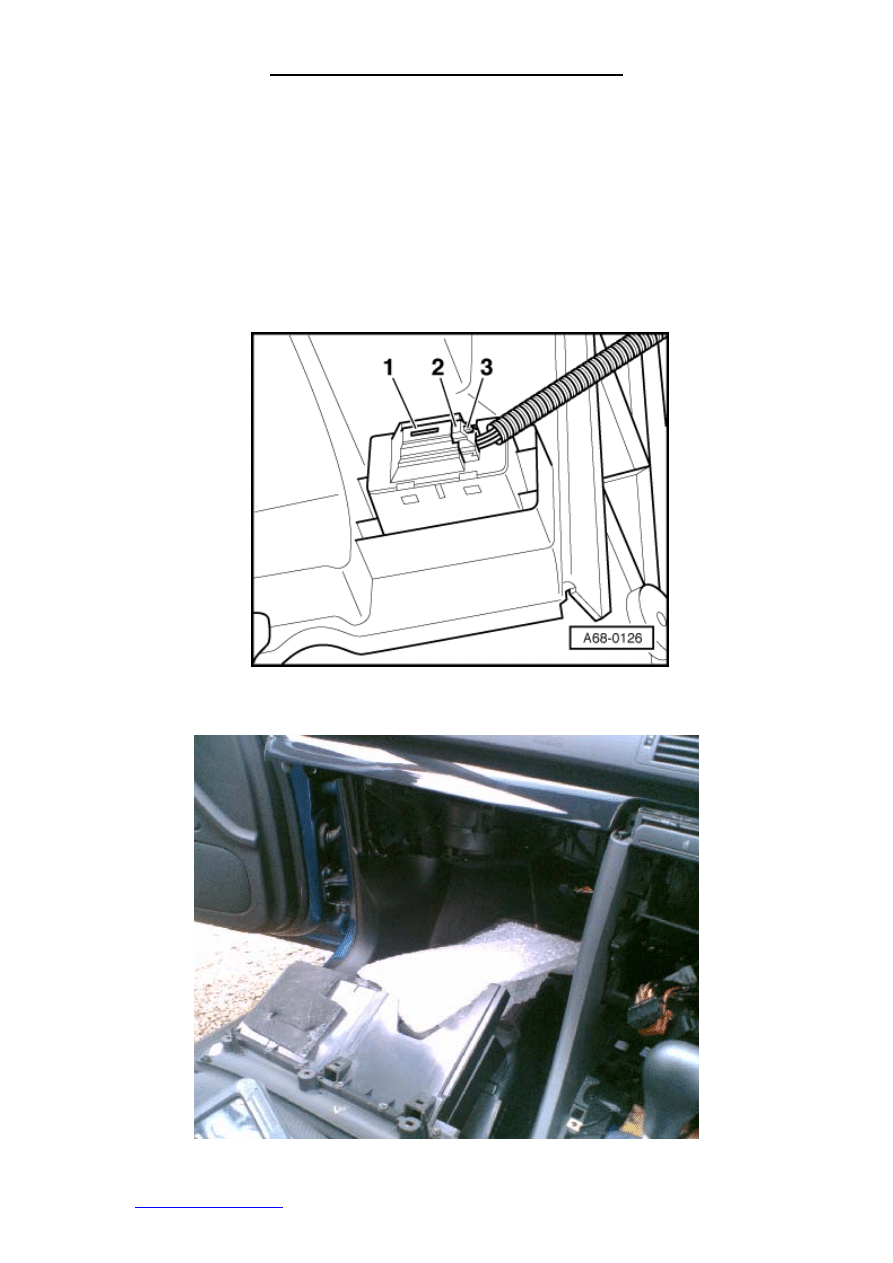
h) Unplugging connector for passenger airbag key switch (If present on your car) Press
release mechanism -3- and remove connector -2- from switch -1-.
Picture of Glovebox after it has been removed.
www.audiretrofit.co.uk
Page 9 of 27
04/02/2006
Installing RNS-E SAT NAV for Audi A4
Stage 5: Remove the Driver’s Storage Compartment
Note: The above picture is from a left hand drive vehicle but the principle is the same for the
right had drive version.
a) So not to scratch the storage compartment make sure the floor mat is clean or
covered with a towel
b) Remove bolts in positions -2- and -8- with an 8mm socket.
c) Carefully pull storage compartment at top of dash panel each side of the steering
wheel boss until it unclips.
d) Unclip diagnostic connector at the bottom on the right.
e) Unplug connector on footwell light and on additional loudspeaker, if applicable.
Picture of storage compartment after it has been removed.
www.audiretrofit.co.uk
Page 10 of 27
04/02/2006

Installing RNS-E SAT NAV for Audi A4
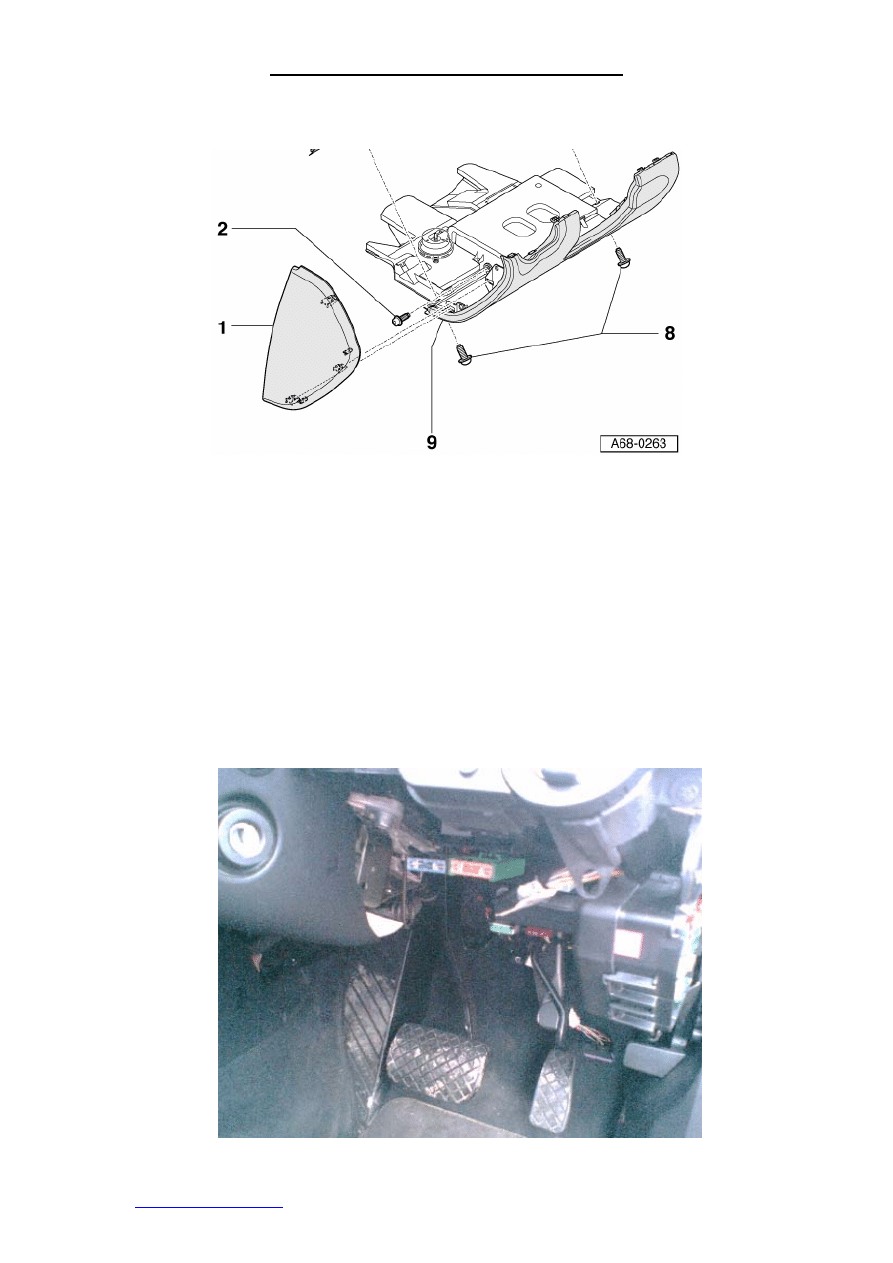
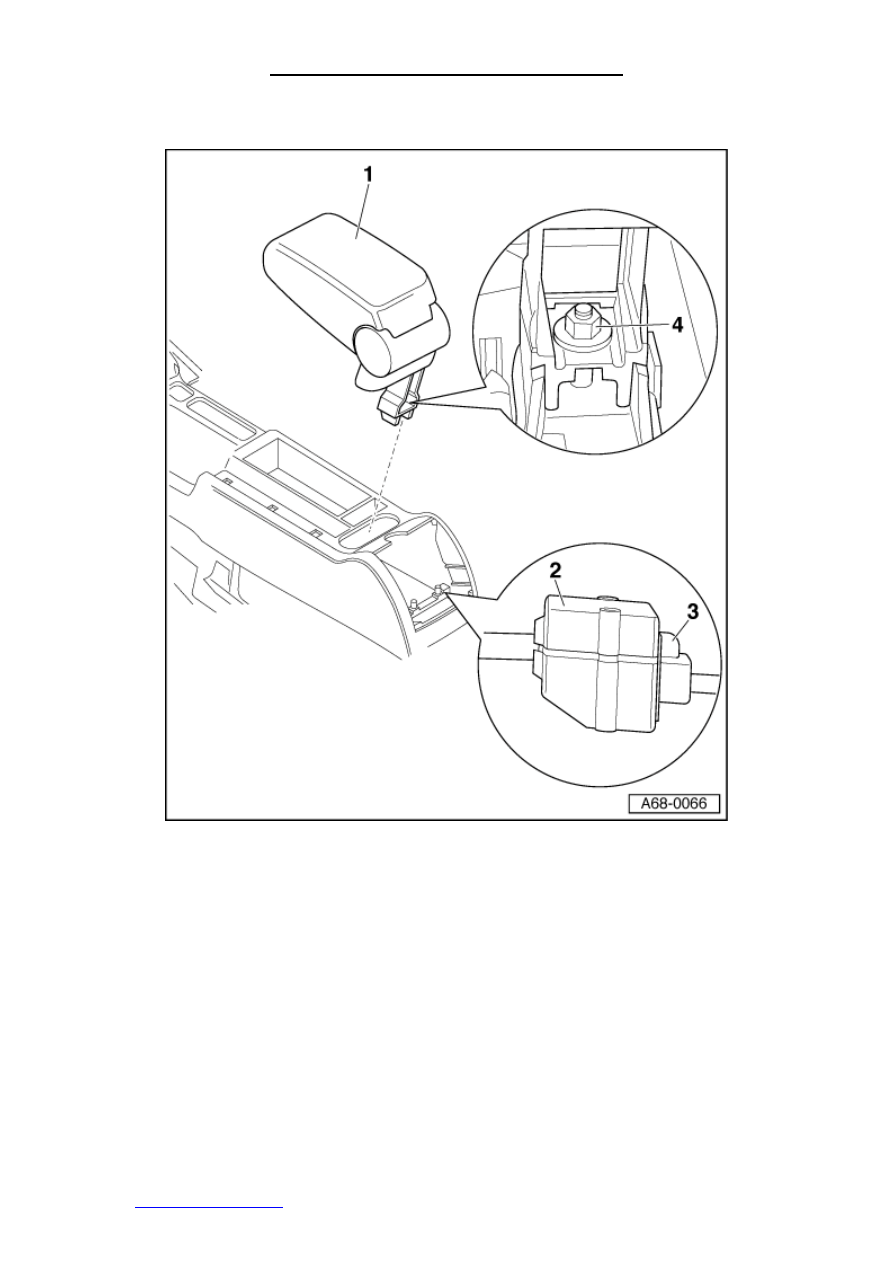
Stage 6: Remove the Centre Armrest (if present)
a) Remove
rear
ashtray
b) Remove nut -4- in ashtray well with a 13mm Socket
c) On centre armrest with telephone, unplug connector -2- by squeezing retainer tabs -
3-
d) Remove centre armrest - 1-
www.audiretrofit.co.uk
Page 11 of 27
04/02/2006
Installing RNS-E SAT NAV for Audi A4
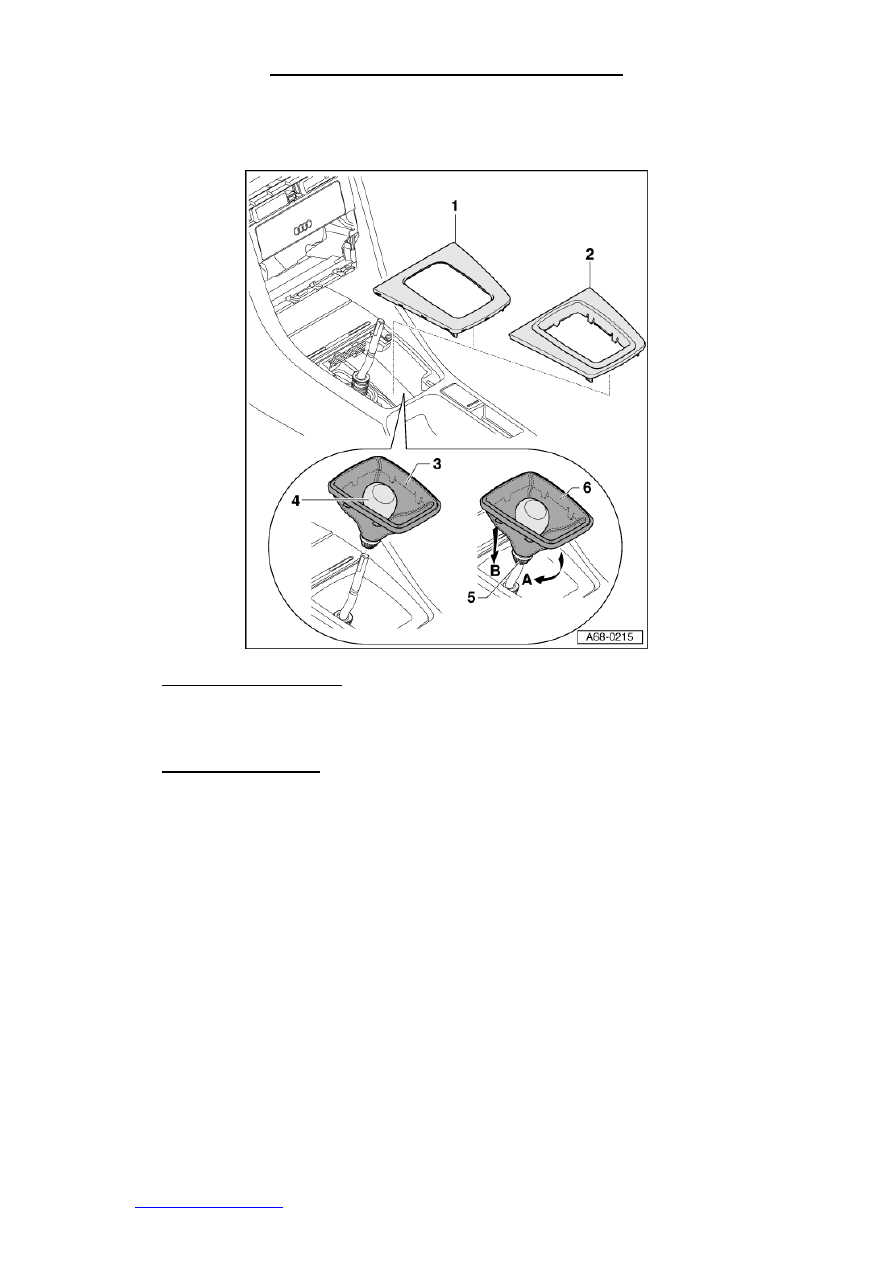
Stage 7: Remove Gear Gaiter/Cover
Automatic gearbox cover
a) Lever off selector mechanism cover -1-.
Manual gearbox cover
a) Unclip mounting frame -6-.
b) Lift up the gaiter so it is clear of the plastic surround.
c) Lever off selector mechanism cover -2-.
www.audiretrofit.co.uk
Page 12 of 27
04/02/2006
Installing RNS-E SAT NAV for Audi A4
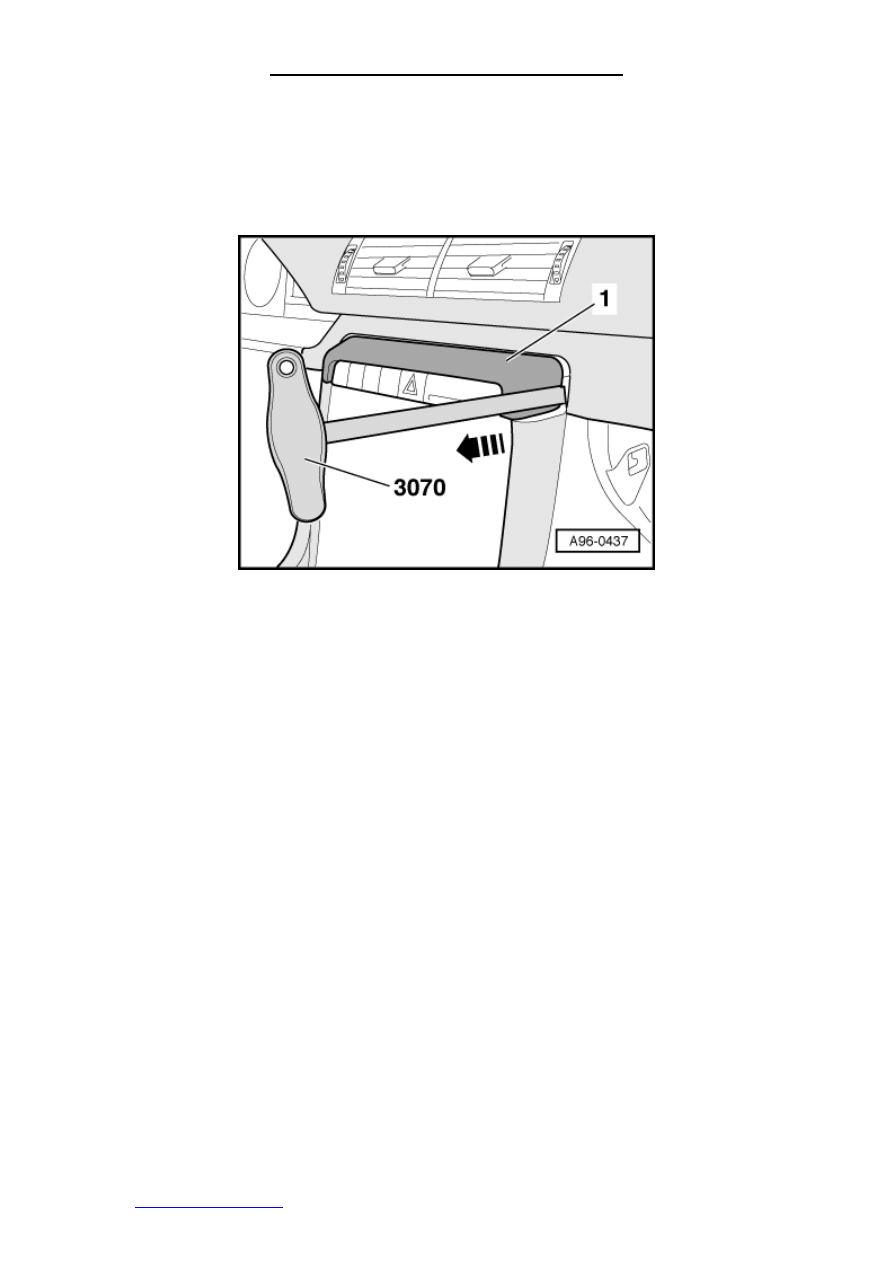
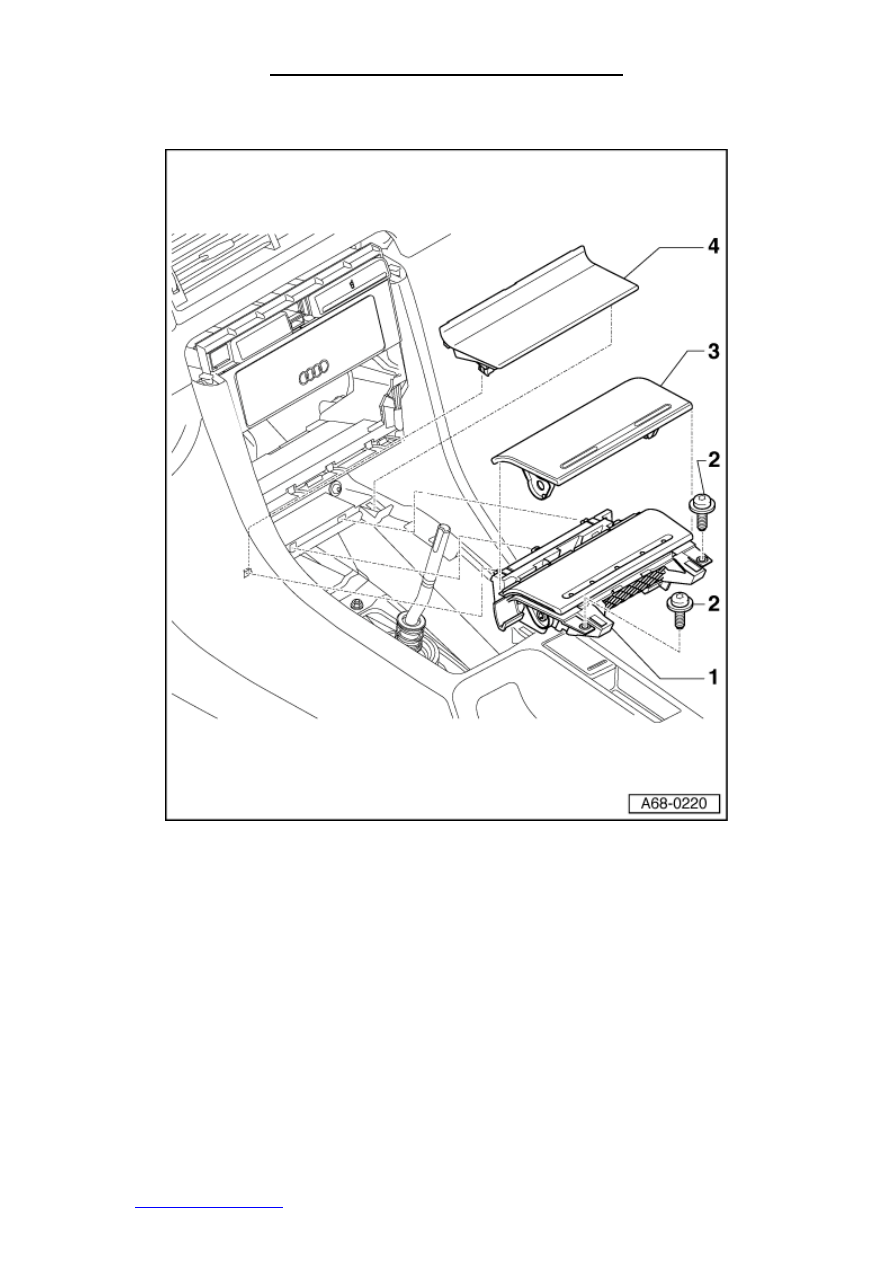
Stage 8: Remove the Ashtray
a) Release the two screws -2- on ashtray.
b) Remove ashtray -1-.
c) Unclip storage compartment trim -4-.
www.audiretrofit.co.uk
Page 13 of 27
04/02/2006
Installing RNS-E SAT NAV for Audi A4
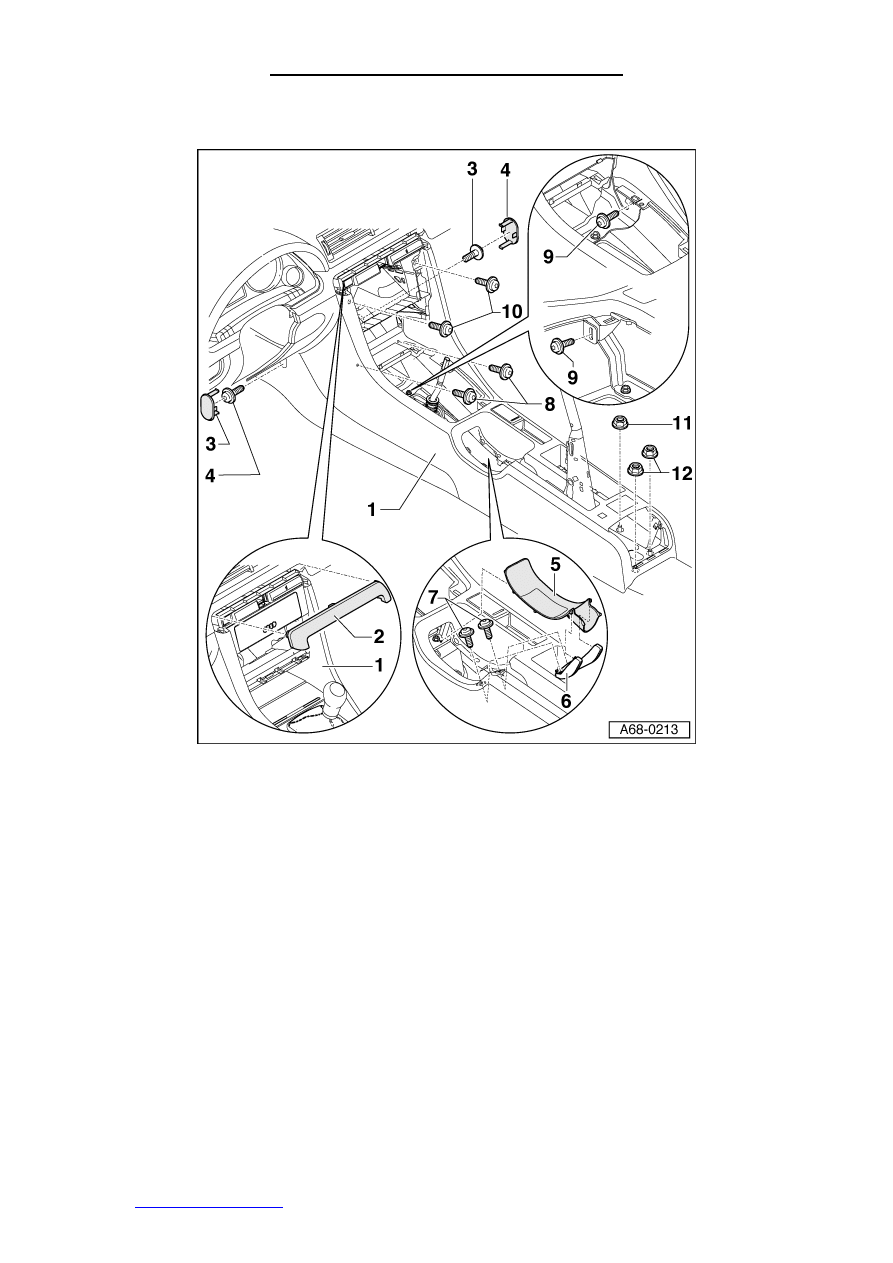
Stage 9: Remove the Centre Console
a) Apply handbrake firmly.
b) Remove caps -3- of bolts -4- on right and left of front footwell at side of centre
console.
c) Relmove bolts -4- on right and left of front footwell at side of centre console.
d) Lever out cover -5- from front.
e) Remove the two cross-head screws -7- on connecting piece -6- and remove
connecting piece. Otherwise the trim cannot be pulled over the handbrake lever.
f) Remove the two screws -8- in ashtray opening.
g) Remove the four bolts -9- round the manual gearbox (if applicable), which hold centre
console.
h) Remove the two screws -10-.
i)
Remove the two hexagon combi nuts -12- with a 13mm Socket.
www.audiretrofit.co.uk
Page 14 of 27
04/02/2006

Installing RNS-E SAT NAV for Audi A4
j)
Push centre console firmly backwards, disconnect the cigarette lighter cable and
remove from vehicle.
Picture of the console after all the components have been removed apart from connecting
piece -6-. Shown by the red arrow.
Picture of the Centre Console after it has been removed.
www.audiretrofit.co.uk
Page 15 of 27
04/02/2006
Installing RNS-E SAT NAV for Audi A4
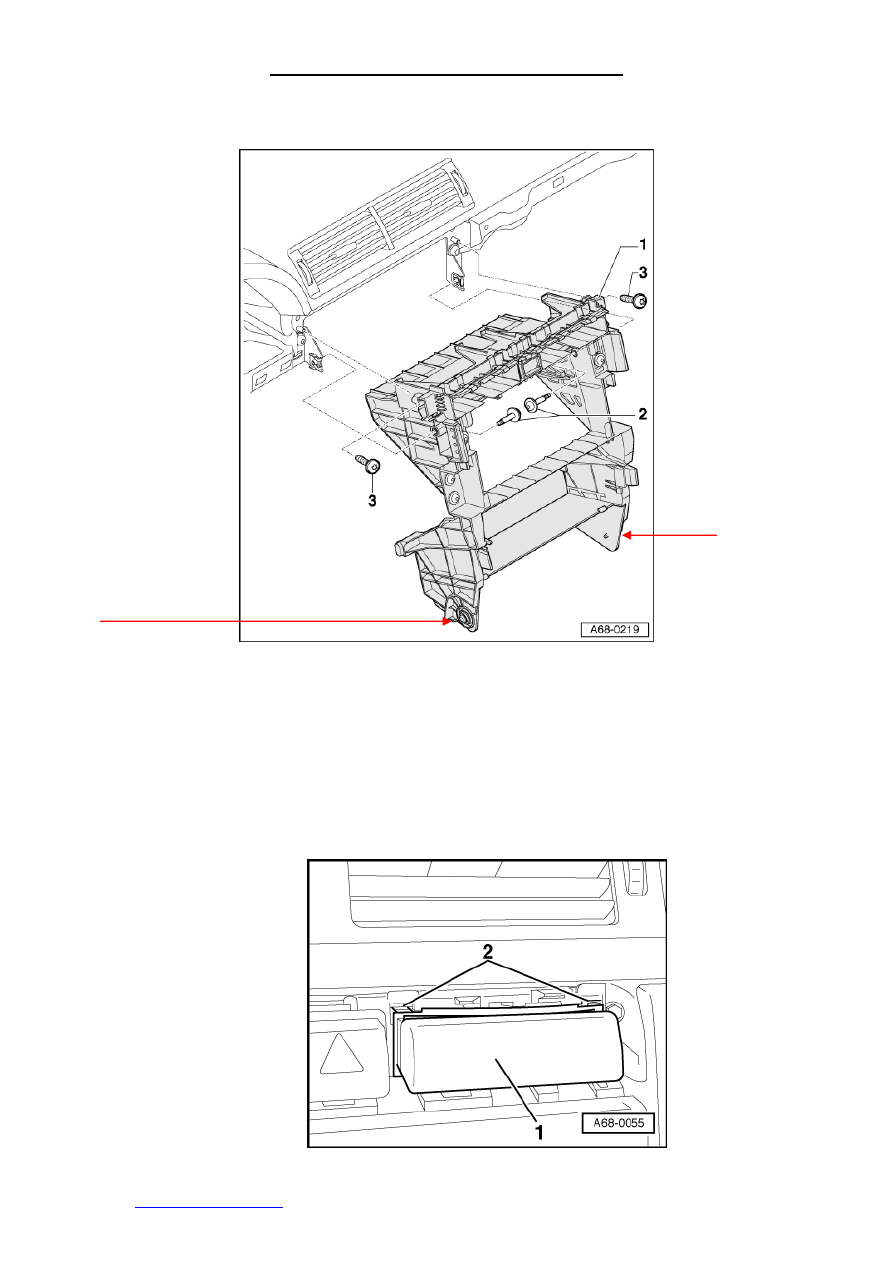
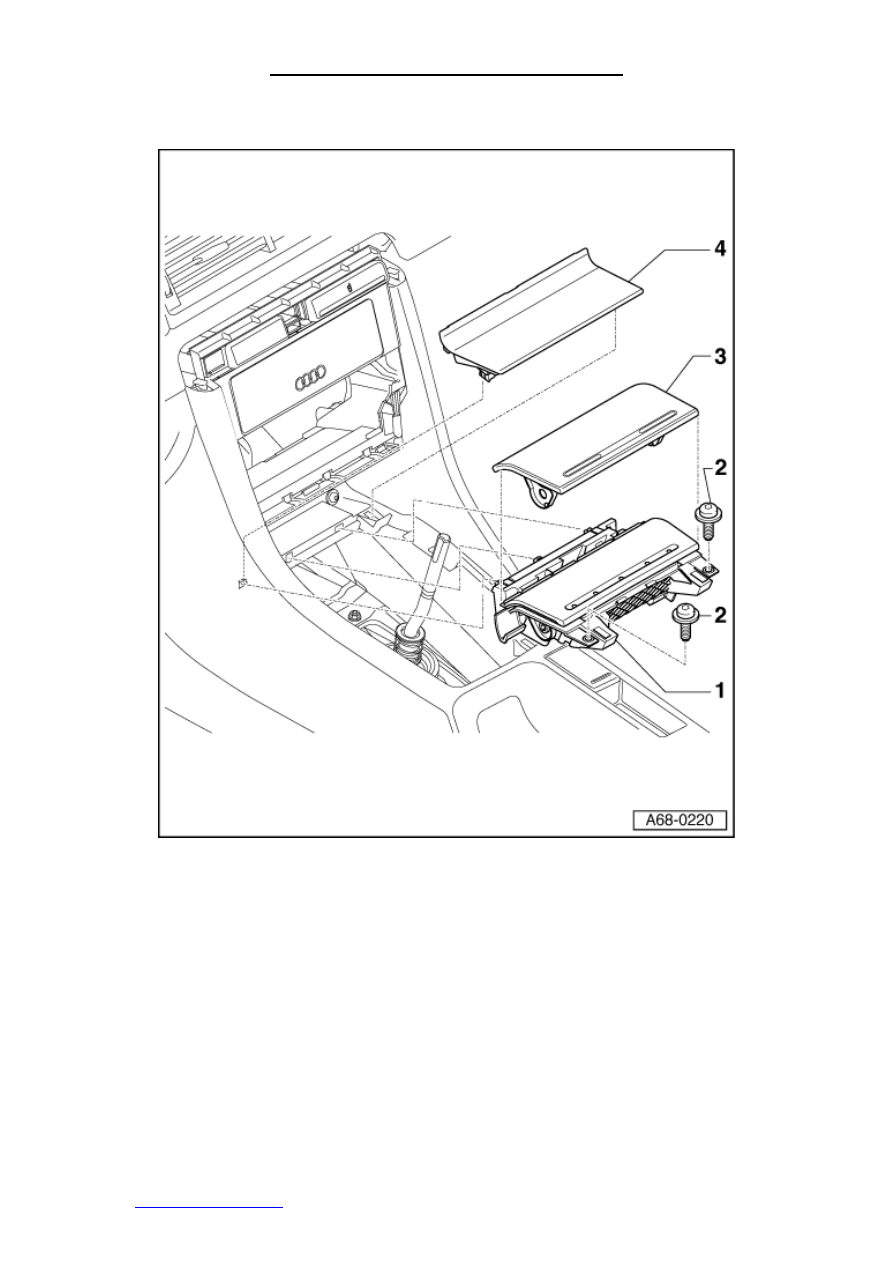
Stage 10: Removing the Center Section of the dash (Single Din
Housing)
a) Remove bolts -2- on dash panel centre section
b) Remove bolts -3- on dash panel centre section.
c) Remove screw from the areas marked by the red arrows on the diagram.
d) Detach centre section of the dash-panel.
e) Disconnect the ESP switch, the connectors going into the Climate control.
f) Remove the cup holder and storage compartments by pushing in the holding
clips - 2 - on the top of each item and then slide the compartment out.
www.audiretrofit.co.uk
Page 16 of 27
04/02/2006
Installing RNS-E SAT NAV for Audi A4
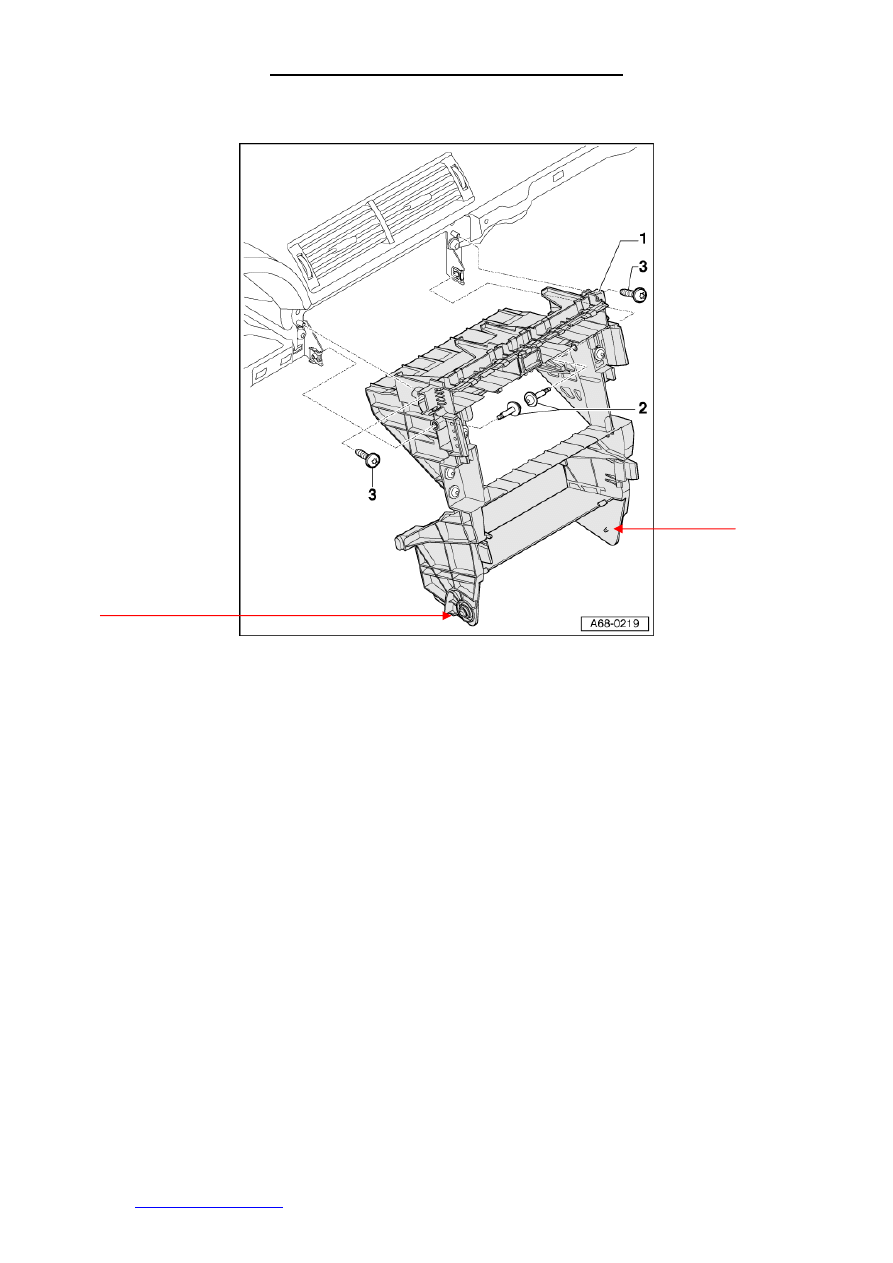
Stage 11: Fitting the new double din console.
a) Insert the cup holder, storage compartment, and switches into the Double Din
console. Make sure that they go in the same order that they were removed from the
Single Din Console.
b) Insert the Double Din console into the dash and align it with the location pins - 1 -
c) Screw in the 2 screws from the area marked with the red arrows on the diagram
above.
d) Reconnect the cables to the back of the storage compartments and switches.
e) Insert bolts – 2 – and – 3- and tighten.
www.audiretrofit.co.uk
Page 17 of 27
04/02/2006
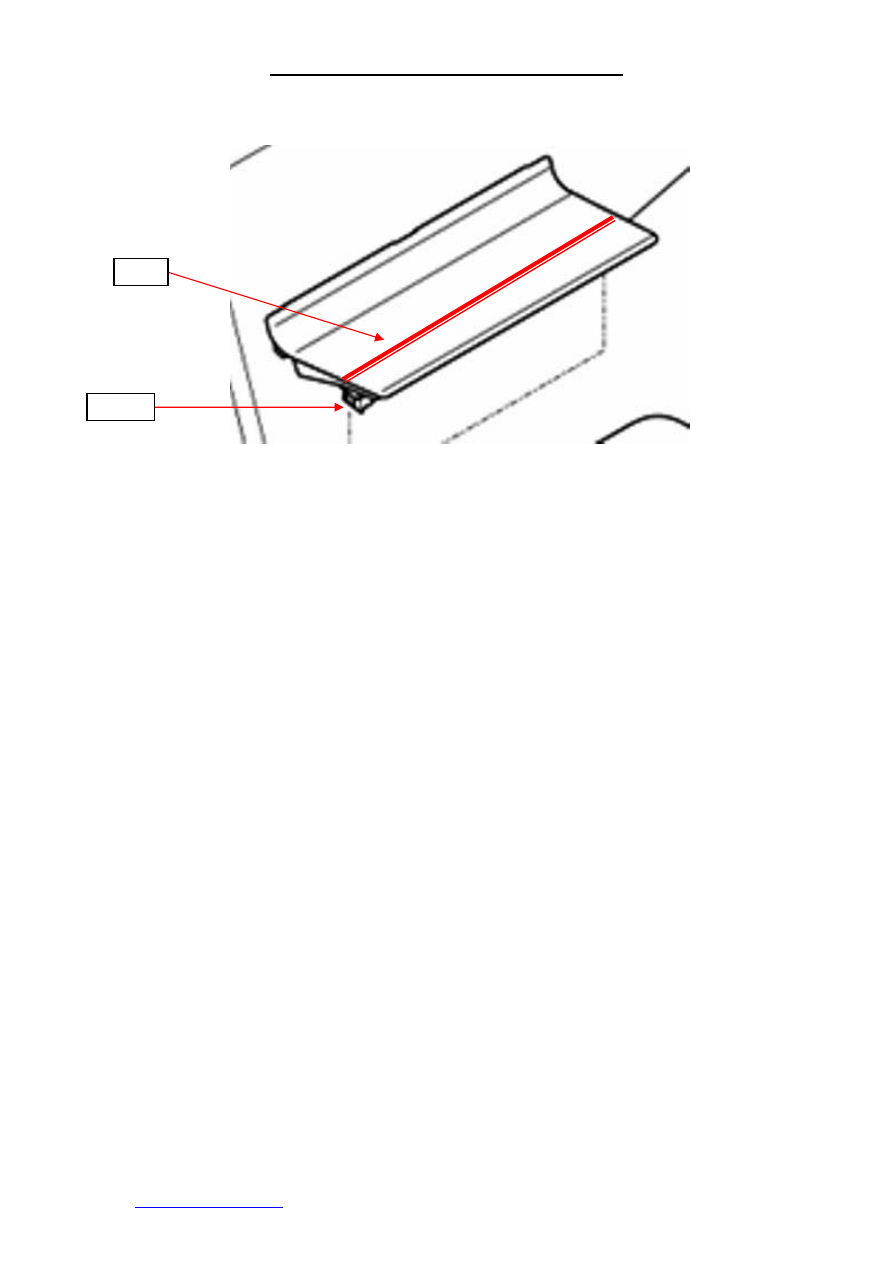
Installing RNS-E SAT NAV for Audi A4
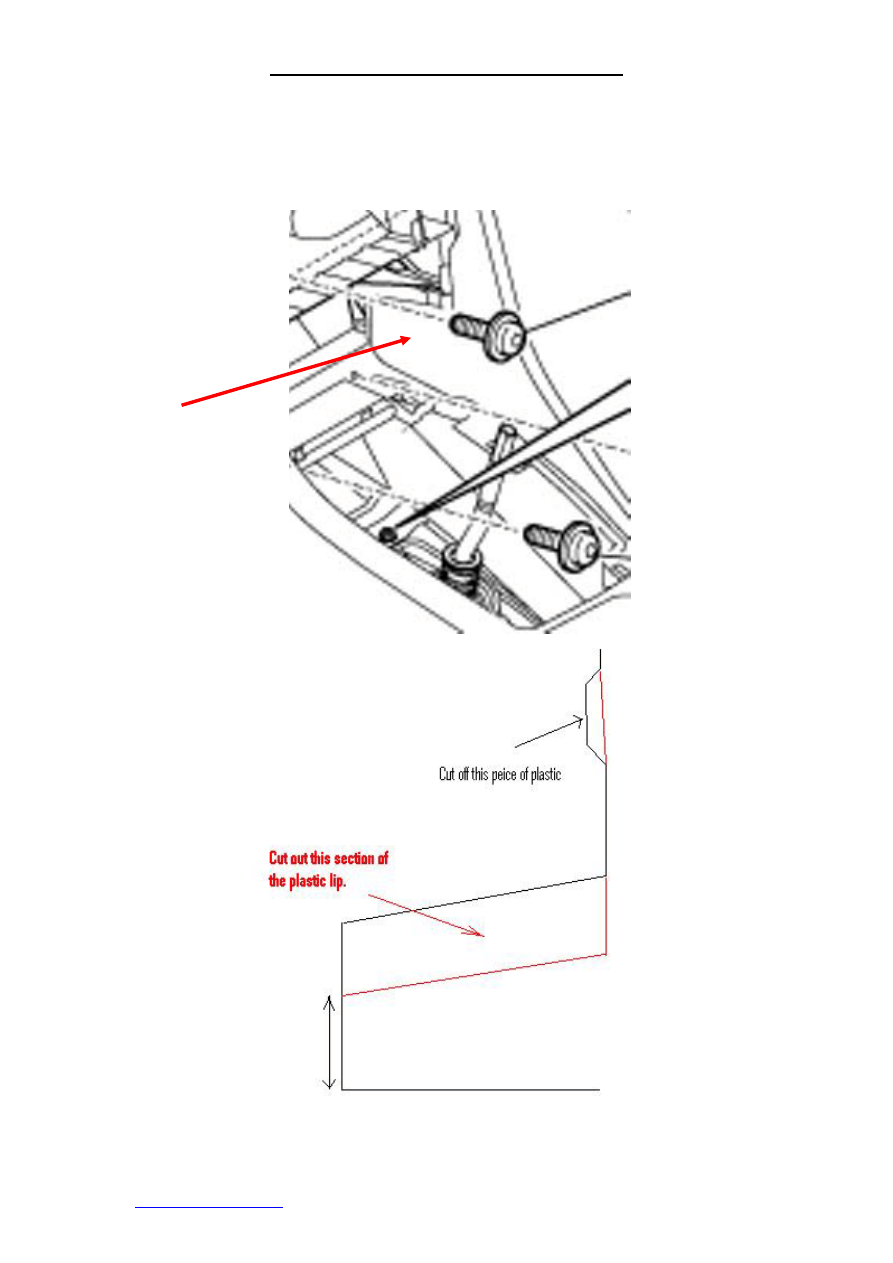
Stage 12: Cutting the Centre Tunnel.
In order for the original centre tunnel to be re fitted there are two small sections that need to
be cut out along with two corners. These parts are completely hidden when all the items have
been refitted. The main area that needs to be cut is shown below by the red arrow!
www.audiretrofit.co.uk
Page 18 of 27
04/02/2006
Installing RNS-E SAT NAV for Audi A4
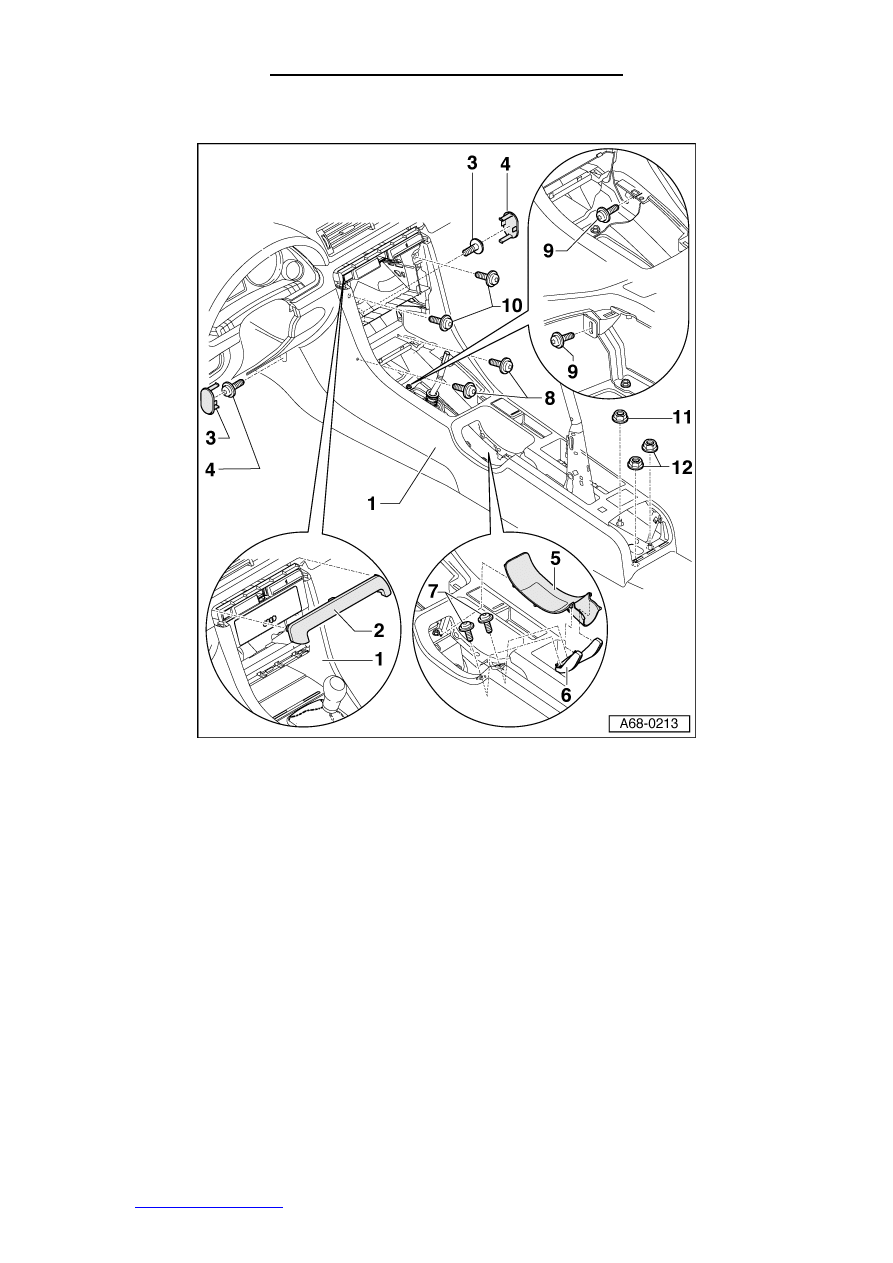
Stage 13: Re-installing the Centre Tunnel.
a) Align the centre console with the new double Din housing and push down over the
handbrake. The bolting points – 12 - at the end of the console should align with there
original position.
b) Reconnect the cigarette lighter cable.
c) Reinstall the two hexagon combi nuts -12-
d) Reinstall the four bolts -9- round the manual gearbox (if applicable), which hold centre
console
e) Reinstall bolts – 10 – and bolts – 8 -
f) Reinstall Piece -6 – into the handbrake lever area and fix in using the 2 scews – 7 -.
g) Clip in cover -5- from back.
h) Re insert the plastic trim that you remove from the dash in stage 2 of this install
document.
www.audiretrofit.co.uk
Page 19 of 27
04/02/2006
Installing RNS-E SAT NAV for Audi A4
Stage 14: Reinstalling and modifying the Ashtray.
a) Part 4 in the picture needs to be cut in order to fit it back in. There are 2 clips that
hold this piece into the console. You need to cut a straight line directly after these
clips and cut along it. Please see the diagram below.
www.audiretrofit.co.uk
Page 20 of 27
04/02/2006
Installing RNS-E SAT NAV for Audi A4
Stage 14: Reinstalling and modifying the Ashtray Cont….
CUT
CLIPS
b) Clip in storage compartment trim -4- now that it has been modified
c) Insert ashtray -1-.
d) Insert the two screws -2- on ashtray.
e) Remove ashtray -1-.
www.audiretrofit.co.uk
Page 21 of 27
04/02/2006

Installing RNS-E SAT NAV for Audi A4
Stage 15: Installing the Climate Control Unit.
a) Pull the cables for the climate control unit through the bottom aperture of the double
din console.
b) Clip the cables into the climate control unit (they have specific locations so they can
not be connected incorrectly.
c) Slot the climate control unit into the housing and it will lock into place.
Stage 16: Fit the Gear Gaiter/Cover
Automatic gearbox cover
a) Clip on selector mechanism cover -1-.
Manual gearbox cover
b) Clip on selector mechanism cover -2 -.
c) Push the gaiter mounting frame -6- into the plastic surround.
www.audiretrofit.co.uk
Page 22 of 27
04/02/2006
Installing RNS-E SAT NAV for Audi A4
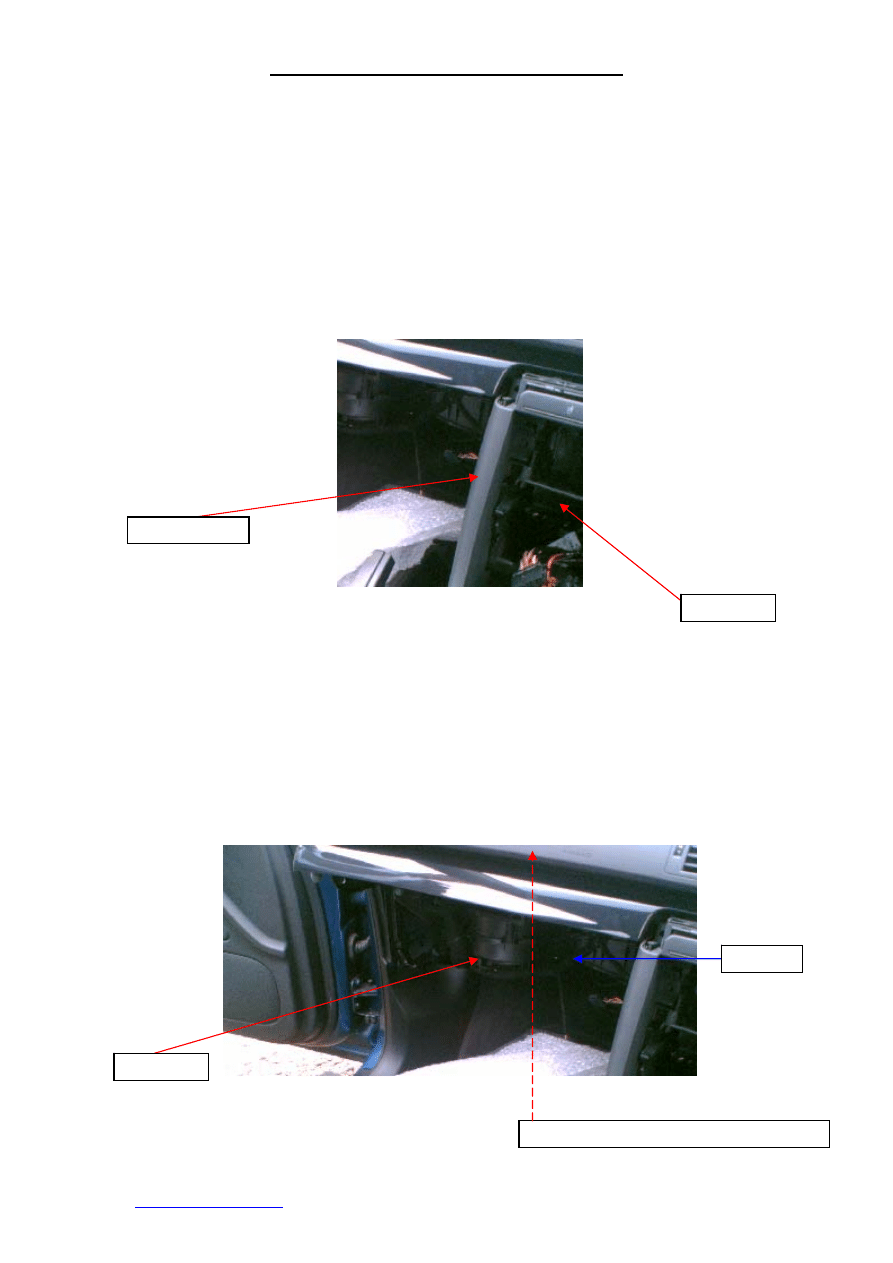
Stage 17: Fitting the RNS-E Unit.
a) Connect the RNS-E adapter cable to the existing Audi Wiring connectors that went
into the stereo.
b) On the antenna adapter you need to connect both the diversity cable and the antenna
cable. On some adapters you need to remove the plastic from the diversity cable on
the wiring loom and slot it into the new adapter.
c) Take the GPS antenna and feed the small cable through the left hand side of the
double din console from the area where you removed the glovebox (SEE IMAGE
BELOW).
FROM HERE!
TO HERE!
d) Plug the GPS antenna into the top right connector at the back of the RNS-E Unit
e) Plug the antenna adapter into the bottom left connector at the back of the RNS-E Unit
f) Connect the wiring harness to the RNS-E unit’s main connector and push the RNS-E
back into the dash. (if the unit won’t lock into place push the cables at the back of the
until down so they allow it to go all the way into the dash).
g) There is a small gap at the under the dash on the left hand side above the fan unit
which is ideal for the GPS antenna. Push the antenna into this location and if the
antenna has a magnetic base it will lock into place. (See image)
GAP BEHIND DASH FOR GPS ANTENNA
CABLE
FAN UNIT
www.audiretrofit.co.uk
Page 23 of 27
04/02/2006

Installing RNS-E SAT NAV for Audi A4
h) Once this is in place attach the GPS cable to the cable shown the image (Blue Arrow)
using cable ties and push through some slack to the back of the RNS-E Unit in case
you have to remove it in the future.
i)
Switch on the RNS-E Unit, insert the Navigation DVD and test the unit by planning a
trial route.
j)
Also to see how may satellites you are click on the Nav info button when in navigation
screen.
k) Then test the sound through the speakers to make sure that is ok.
www.audiretrofit.co.uk
Page 24 of 27
04/02/2006
Installing RNS-E SAT NAV for Audi A4
Stage 18: Install the Centre Armrest (if present)
a) Slot Armrest -1- through the slot in the centre console.
b) On centre armrest with telephone, connect connector -2- or any other connectors.
c) Bolt in nut -4- in ashtray well with a 13mm Socket
e) Reinsert the rear ashtray
www.audiretrofit.co.uk
Page 25 of 27
04/02/2006
Installing RNS-E SAT NAV for Audi A4
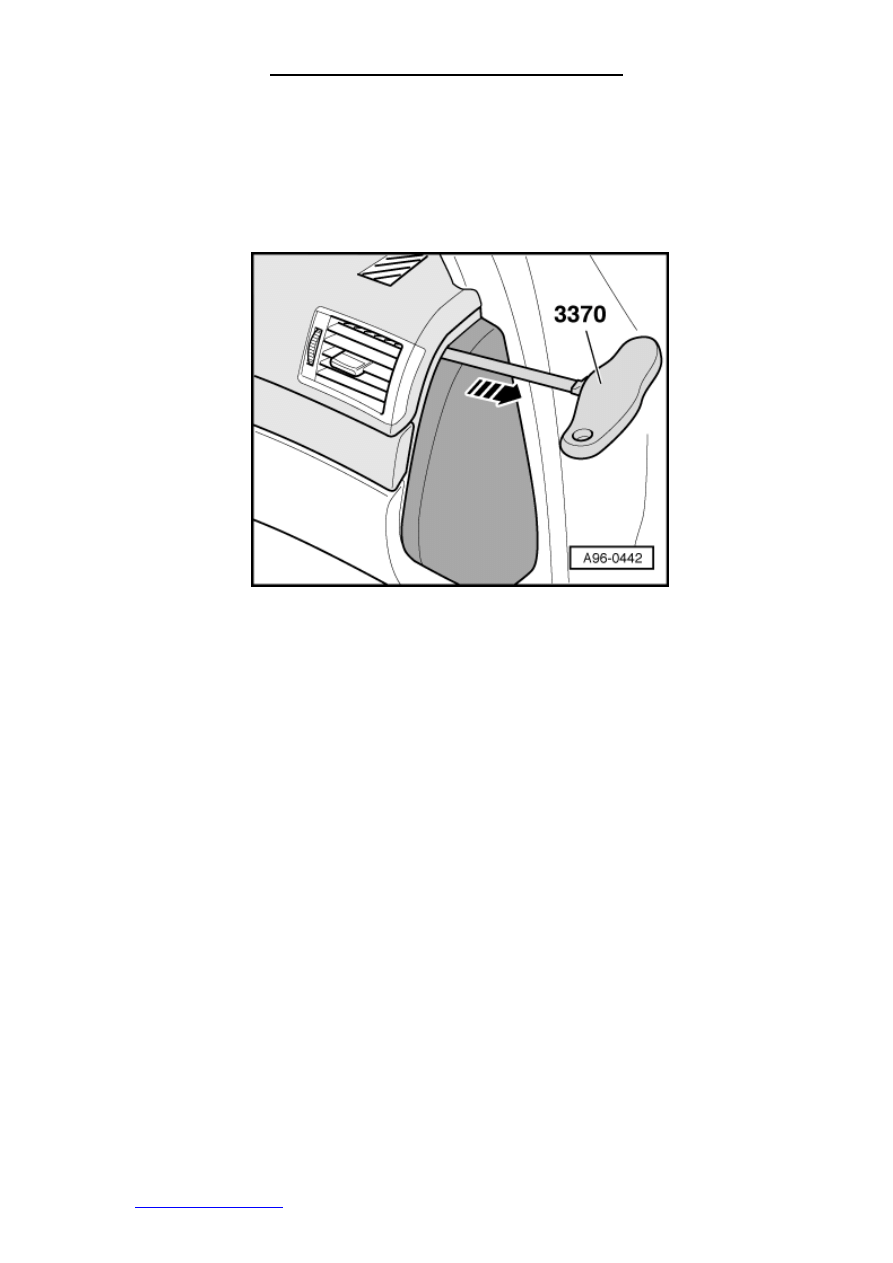
Stage 19: Reinstall the Glovebox
a) Connect the glovebox connection located at the back of the glovebox.
b) Connect connector for passenger airbag key switch (If present on your car)
c) Feed the CD changer cable through the aperture in the dash (if applicable)
d) Lift glovebox into place.
e) Insert the 3 bolts -3- in recesses at top of glove compartment -1- with an 8mm socket.
f) Using the same socket insert bolts -5- (2x) from the side, from the outside.
g) Then use the socket to insert bolts -4- (2x) from underneath, from footwell.
h) If you car has the CD changer screw in the bolt above this, connect the changer cable
and push the change back into the glovebox.
i)
Clip panel -2- back into place.
www.audiretrofit.co.uk
Page 26 of 27
04/02/2006
Installing RNS-E SAT NAV for Audi A4
Stage 20: Reinstall the Driver’s Storage Compartment
Note: The above picture is from a left hand drive vehicle but the principle is the same for the
right had drive version.
a) Reconnect diagnostic connector at the bottom on the right of the compartment.
b) Connect connector on footwell light and on additional loudspeaker, if applicable
c) Lift compartment into position
d) Push storage compartment at top of the panel each side of the steering wheel boss
until it clips in.
e) Insert bolts in positions -2- and -8- with an 8mm socket.
f) Clip panel -1- back into place.
CONGRATULATIONS YOU HAVE NOW INSTALLED AN RNS-E UNIT
INTO YOUR CAR!!
www.audiretrofit.co.uk
Page 27 of 27
04/02/2006
Wyszukiwarka
Podobne podstrony:
instr montaz zestaw
instr montaz zestaw
instr montazu uniwersal mat ogrz foteli
Montaz Fotochrom A4 B5 95 01
Instrukcja montażu Audi A4 od 2001z DWA
Instrukcja montażu Audi A4 od 2001 bez DWA
instr machina2 przygot do sklad z a4
[Audi A4 B6 B7] montaż klimatyzowanego schowka 100pln i 15min pracy plug@play
Instrukcja montażu przycisku podłokietnika a4 b6 b7
[Audi A4 B6 B7] montaż klimatyzowanego schowka 100pln i 15min pracy plug@play
23 Metody montażu w mikroelektronice
7 Sposób montażu charakterystycznych elementów
INSTR KLASYF DLUZNE
instr 2011 pdf, Roztw Spektrofoto
DEMONTAŻ MONTAŻ LINKI HAMULCA POSTOJOWEGO
więcej podobnych podstron