Lab 2.3.3 Configure Routing Authentication and Filtering
Estimated Time: 15 minutes
Number of Team Members: Two teams with four students per team.
Objective
In this lab, students will demonstrate the use of authentication and filters to control route updates
from peer routers.
Scenario
Routing protocols are vulnerable to eavesdropping and spoofing of routing updates. Cisco IOS
Software supports authentication of routing protocol updates to prevent the introduction of
unauthorized or false routing messages from unknown sources. Routing protocol authentication is
also known as neighbor authentication.
Filtering networks in routing updates sent from the private network to external routers helps secure
networks by hiding the details of networks that should not be accessed by external users. If a
network is not advertised, no apparent route exists to that network, and intruders will have more
trouble getting there.
Incoming routing updates can be filtered to provide protection against receiving false information in
routing updates due to improper configuration or intentional activity that could cause routing
problems. Suppressing networks listed in updates keeps a router from using routes that might be
spurious, helping prevent route spoofing.
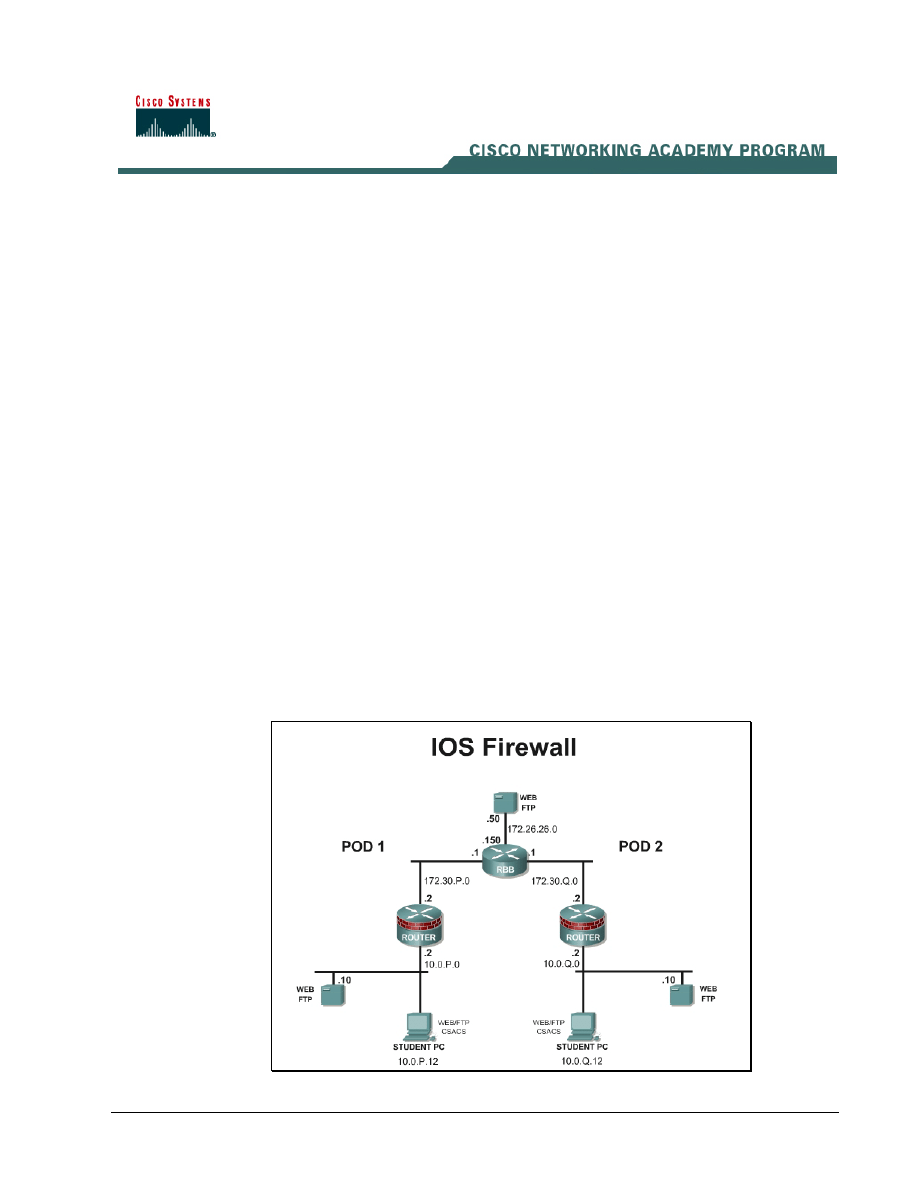
Topology
This figure illustrates the lab network environment.
1 -
6 Fundamentals of Network Security v 1.1 - Lab 2.3.3 Copyright 2003, Cisco Systems, Inc.

Preparation
Begin with the standard lab topology and verify the starting configuration on the pod routers. Access
the perimeter router console port using the terminal emulator on the Windows 2000 server. If
desired, save the router configuration to a text file for later analysis. Refer back to the Student Lab
Orientation if more help is needed.
Tools and resources
In order to complete the lab, the standard lab topology is required:
• Two pod routers
• Two student PCs
• One SuperServer
• Backbone switch and one backbone router
• Two console cables
• HyperTerminal
Additional materials
Further information about the objectives covered in this lab can be found at,
Command list
In this lab exercise, the following commands will be used. Refer to this list if assistance or help is
needed during the lab exercise.
Command
Description
accept-lifetime
Sets the time period during which the authentication
key on a key chain is received as valid.
distribute-list (in)
To filter networks received in updates.
distribute-list (out)
To suppress networks from being advertised in
updates.
ip rip authentication key-chain
key-chain
Enable authentication of IP Enhanced IGRP packets.
ip rip authentication mode
md5
Enable MD5 authentication in IP Enhanced IGRP
packets.
key
Use the key command to identify an authentication
key on a key chain.
key chain
Use the key chain command to enable authentication
for routing protocols, identifies a group of
authentication keys.
2 -
6 Fundamentals of Network Security v 1.1 - Lab 2.3.3 Copyright 2003, Cisco Systems, Inc.

Command
Description
key-string
Use the key-string command to specify the
authentication string for a key.
passive-interface
Use the passive-interface command to prevent other
routers on the network from learning about routes
dynamically.
send-lifetime
Sets the time period during which an authentication
key on a key chain is valid to be sent.
Step 1 Remove EIGRP
RIP version 2 is configured on RBB with the corresponding key chain. No changes are required on
RBB.
a. Remove EIGRP from the running configuration or load the starting configuration. Remember
that connectivity may not be available while the routing protocol is not configured
no router eigrp 1
b. Now configure RIP version 2.
router rip
version 2
network 10.0.0.0
network 172.30.0.0
no auto-summary
1. What routing protocols support route authentication using MD5?
_____________________________________________________________________________
Step 1 Enable MD5 Authentication
a. On the outside interface, enable Message Digest 5 (MD5) authentication for RIP.
ip rip authentication mode md5
.
2. What authentication modes are available?
_____________________________________________________________________________
b. Now configure the key chain mykeychain to be used in this authentication scheme. Remember
that the syntax for this command is
ip rip authentication key-chain RTRAUTH
Step 2 Configure Key Chain
a. Next, configure the parameters of this key chain identified in the previous task. The key number,
key string, and accept and send characteristics of the key chain must be configured.
b. From global configuration mode, configure the RTRAUTH key chain by using the
key chain
nameofchain
command. For key 1, configure key string text of 123456789. Remember that
the command syntax is
key-string
text.
3 -
6 Fundamentals of Network Security v 1.1 - Lab 2.3.3 Copyright 2003, Cisco Systems, Inc.

key chain RTRAUTH
key 1
key-string 123456789
3. Did the prompt change? If so, how does the prompt appear?
_____________________________________________________________________________
c. The accept-lifetime and send-lifetime parameters are shown below. Set these to the current time
and timezone.
RouterP(config-keychain-key)#accept-lifetime ?
hh:mm:ss Time to start
local Specify time in local timezone
RouterP(config-keychain-key)#send-lifetime ?
hh:mm:ss Time to start
local Specify time in local timezone
d. Clear the existing route entries
clear ip route *
e. To see authentication occurring, use the
debug ip rip events
command. Notice that if
the peer router is not authenticating, updates are ignored and the (invalid authentication)
message will appear. When the peer router begins to authenticate, updates are processed.
f. Ping the peer router and peer Student PC.
g. Turn the debugging off.
Step 3 Controlling Outbound Route Advertisements
To control which networks the router will advertise, a network security administrator can use a
combination of an access list that defines the network and a distribution list. This combination ties
that access list to the advertising interface. In this topology direct the router to hide the details of the
inside network, 10.0.P.0 since this network is internal.
a. Create a standard access list #10, which contains a permit for network 172.30.0.0 and a deny for
all other networks.
b. Now bind this access list to the correct autonomous system and advertising interface. First, go
into router configuration mode using the
router rip
command. Then use the
distribute-list
command for the FastEthernet 0/1 interface outbound. Remember that
the command syntax is
distribute-list
<acl_num> <direction>
<interface>
.
distribute-list 10 out fa0/1
h. The route table on RBB and the pod router may need to be cleared using the clear ip route
* command.
i. Now check the route table on the pod router. The peer network 10.0.Q.0 should no longer
appear in the table.
Step 4 Controlling Inbound Route Advertisements
To control which networks the router will accept routing updates from, use a combination of an
access list and a distribute list applied in the inbound direction.
a. Create a standard access list #11 to permit only network 10.0.P.0 to send routing updates to the
inside interface inbound. Then use the
distribute-list
command to tie the access list to
the interface in the correct direction.
distribute-list 11 in fa0/0
4 -
6 Fundamentals of Network Security v 1.1 - Lab 2.3.3 Copyright 2003, Cisco Systems, Inc.

4. How would this configuration step help secure the network?
_____________________________________________________________________________
Step 5 Passive Interface
One other method of controlling router advertisements is the passive-interface
command,
which is used to prevent other routers on the network from learning about routes dynamically. It can
also be used to keep any unnecessary parties from learning about the existence of certain routes or
routing protocols used.
a. Now configure the inside interface to prevent broadcasting routing information.
RouterP(config)#router rip
RouterP(config-router)#passive-interface Fa0/0
Sample configuration
A sample configuration is shown below:
hostname Router1
!
key chain RTRAUTH
key 1
key-string 1234546789
!
interface FastEthernet0/0
description inside
ip address 10.0.1.1 255.255.255.0
no ip directed-broadcast
!
interface FastEthernet0/1
description outside
ip address 172.30.1.1 255.255.0.0
no ip directed-broadcast
ip rip authentication mode md5
ip rip authentication key-chain RTRAUTH
no ip mroute-cache
!
!
router rip
version 2
passive-interface FastEthernet0/0
network 10.0.0.0
network 172.30.0.0
5 -
6 Fundamentals of Network Security v 1.1 - Lab 2.3.3 Copyright 2003, Cisco Systems, Inc.

distribute-list 11 in FastEthernet0/0
distribute-list 10 out FastEthernet0/1
no auto-summary
!
access-list 10 deny 10.0.1.0 0.0.0.255
access-list 11 permit 10.0.1.0 0.0.0.255
6 - 6
Fundamentals of Network Security v 1.1 - Lab 2.3.3
Copyright
2003, Cisco Systems, Inc.
Wyszukiwarka
Podobne podstrony:
I9M1S1 Nawrot Gudanowicz lab2
IWP JP2 Lab2 Struktury
Lab2 OZE id 259328 Nieznany
lrm sprawozdanie kck lab2
LAB 4 Lab2 WprowadzenieMATLAB 2 Nieznany
lab2(v2), Semestr III, Technologie wytwarzania
termo lab2 szczotka
Grudziński Krawiec lab2# 10 2012
Badanie wyplywu cieczy ze zbior sprawozdanie z lab2 id 631079 (2)
MES lab2
program lab2 1JP3
lab2 7 id 259265 Nieznany
Instrukcja IEF Algorytmy i struktury danych lab2
lab2 (2)
lab2 pd
lab2
PO lab2, Poptymalizacja
bd lab2 id 81995 Nieznany (2)
więcej podobnych podstron