CL 600 Standard Kamin / CL 600 Standard Roof Outlet /
Fig. 1
Fig. 3
A
Fig. 2
ENGLISH
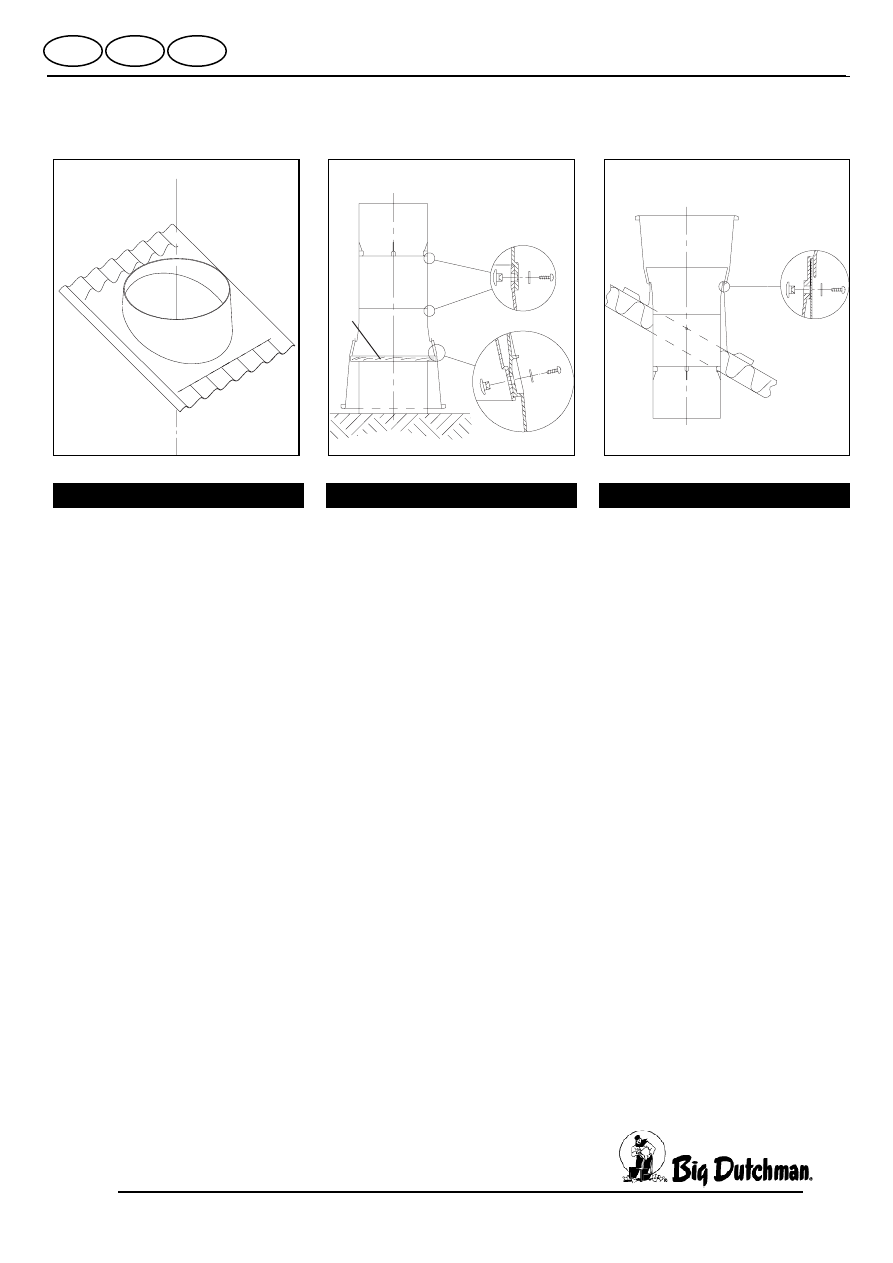
Fig. 1 - Roof sheet
Mount the roof sheet firmly on the roof. If
corrugated sheets are used, mount a screw at
the top of each surge.
Check after mounting that the top level is
horizontal. Use a tube level.
If the deviation is more than 0.5 cm, straighten
up and drill new holes. Min. cutoff is 50 mm in
order to remove the old holes. Max. deviation
to be straightened up is 3.1 cm.
Fig. 2 - Mounting of duct parts:
Each unit includes a bag containing the ne-
cessary screws, discs and joint fittings.
If more ducts should be assembled, it is an
advantage to make an auxiliary model consist-
ing of a wooden plate with a diameter of 818
mm (A).
Mounting with water discharge in cone:
1. Place ½ m of duct on level floor.
2. Place the auxiliary plate 818 mm on top of
it.
3. Place the roof duct on the auxiliary plate
(A).
4. Lead the outlet cone over the roof duct
and centre on the holes.
5. Mount 8 joint fittings with screw and disc.
(Enclosed to cone).
6. If the roof pitch exceeds 25
°, mount addi-
tional ½ m of smooth duct in order to get
under the roof construction.
Use enclosed screws and discs.
7. Add ½ m of duct with fan fittings. Use
enclosed screws and discs.
½ m of duct with fan fittings should
only be mounted in this position if the
fan is required there.
DEUTSCH
Fig. 1 - Dachplatte:
Die Dachplatte auf dem Dach fest montieren.
Bei Wellenplatten eine Schraube oben in jeder
Welle montieren.
Kontrollieren, ob der Scheitelplan waagerecht
ist. Eine Wasserwaage benutzen.
Wenn die Abweichung mehr als 0,5 cm be-
trägt, gerade richten und neue Löcher bohren.
Mindestabschneiden ist 50 mm, damit die
alten Löcher entfernt werden. Max. 3,1 cm
kann gerichtet werden.
Fig. 2 - Montage der Rohrteile:
Jeder Teil wird mit einer Tüte beeinhaltend die
notwendigen Schrauben, Scheiben und Ver-
bindungsplättchen geliefert.
Wenn mehrere Kaminrohre montiert werden
sollten, ist es ein Vorteil, eine Hilfsschabelone
in Form von einer Holzplatte mit einem Durch-
messer von 818 mm (A) herzustellen.
Montage mit Wasserauslauf im Konus:
1. ½ m Rohr auf ebenem Boden plazieren.
2. Die Hilfsplatte 818 mm obendrauf legen.
3. Das Dachrohr auf die Hilfsplatte anbringen
(A).
4. Den Abluftkonus über das Dachrohr führen
und gegenüber den Löchern einmitten.
5. 8 Verbindungsplättchen mit Schraube und
Scheibe montieren. (Beigefügt Konus).
6. Bei Dachneigungen mehr als 25
° zusätz-
lich ½ m glattes Rohr montieren, um unter
die Dachkonstruktion zu erreichen.
Beigefügte Schrauben un Scheiben an-
wenden.
7. ½ m Rohr mit Ventilatorbeschlag montie-
ren. Beigefügte Schrauben und Scheiben
anwenden.
½ m Rohr mit Ventilatorbeschlag nur in
dieser Position montieren, wenn der
Ventilator hier plaziert werden sollte.
INSTRUKTION / INSTRUCTION /
ИНСТРУКЦИЯ
РУССКИЙ
Стандартный камин CL 600
Рис. 1 – Кровельная плита:
На
крыше
необходимо
смонтировать
кровельную плиту.
При волновой поверхности необходимо
закрепить ее винтом вверху каждой волны.
Используя
уровень,
необходимо
проконтролировать, чтобы вершина камина
была горизонтальной.
Если отклонение составляет более 0,5 см,
необходимо выровнять камин и просверлить
новые отверстия. Минимальная величина
укорачивания для того, чтобы удалить все
отверстия, составляет 50 мм. Максимальная
величина выравнивания составляет 3,1 см.
Рис. 2- Монтаж труб
В комплекте к каждой детали прилагается
необходимый крепежный материал: винты,
шайбы и фитинги.
При монтаже нескольких труб для камина
целесобразно выполнить вспомогательный
шаблон в форме деревянной плиты с
диаметром, составляющим 818 мм (А).
Монтаж с водостоком в конусе:
1. разместить трубу длиной ½ м на ровной
поверхности;
2. сверху положить вспомогательную плиту
диаметром 818 мм;
3. кровельную
трубу
разместить
на
вспомогательной платине (А);
4. конус вытяжки продеть в кровельную
трубу и направить;
5. 8 соединительных фитингов укрепить
при
помощи
винтов
и
шайб
(прилагаемые к конусу);
6. при уклоне крыши более, чем 25°,
необходимо
дополнительно
смонтировать гладкую трубу длиной ½ м,
которая опускалась бы ниже конструкции
крыши,
используя
при
этом
приложенные винты и шайбы;
7. смонтировать трубу длиной ½ м с
фитингами вентилятора, используя при
этом приложенные винты и шайбы.
Трубу длиной ½ м с фитингами для
вентилятора необходимо соединять в
данной позиции только при размещении
вентилятора в данном месте.
CL
600 Standard Kamin
/ Standard Roof Outlet / Стандартный камин
D GB RUS
603-564
ENGLISH
Mounting without water discharge in cone:
1. Place the cone on level floor.
2. Place the roof duct on top of it and centre
on the holes.
3. From now on as cone with water dischar-
ge.
Fig. 3 - Mounting of the assembled outlet:
Carry the assembled duct parts up on the roof
and lower the unit through the hole in the roof
sheet.
Turn the complete duct unit until the holes fit.
IMPORTANT: When mounting the duct unit,
take care that the lower joint fittings are
lengthwise in the house and NOT 45° to
the side, as the bell mouth and swivel
shutter cannot be mounted correctly other-
wise.
Mount screws and discs. (Enclosed to roof
duct).
For all joints:
Be carefull in spreading the tolerances equally
all the way around.
Mount the first screw in each joint in the mid-
dle of the oblong hole.
Tighten the screws firmly.
If ceiling ducts or long ducts are used it may
be necessary to use back-up ring, item No.
434031, in order to keep the shape of the
duct.
DEUTSCH
Montage ohne Wasserauslauf im Konus:
1. ½ m Rohr auf ebenem Boden plazieren.
2. Die Hilfsplatte 818 mm obendrauf legen
und gegenüber den Löchern einmitten.
3. Hiernach wie Konus mit Wasserauslauf.
Fig. 3 - Montage von Kamin:
Die verbundenen Rohrteile auf das Dach tra-
gen und durch das Loch in der Dachplatte
senken. Die komplette Rohreinheit drehen, bis
die Löcher passen.
WICHTIG: Der Rohrteil so montieren, daß
die unteren Verbindungsplättchen in der
Längsrichtung im Stall sind und NICHT 45°
zur Seite, da der Ansaugtrichter und Dreh-
klappe sonst nicht korrekt montiert werden
können.
Schrauben und Scheiben montieren. (Beige-
fügt Dachrohr).
Für alle Verbindungen gilt:
Man sollte sorgfältig sein, die Toleranzen den
ganzen Weg herum gleichmäßig zu verteilen.
Die erste Schraube in jeder Verbindungsstelle
mitten im länglichen Loch montieren.
Die Schrauben fest anziehen.
Bei Deckendurchführung oder langen Rohren
kann es notwendig sein, den Stützring, Wa-
rennr. 434031, zu benutzen, um die Form des
Rohres zu bewahren.
РУССКИЙ
Монтаж без водостока в конусе:
1. разместить трубу длиной ½ м на ровной
поверхности;
2. сверху положить вспомогательную плиту
диаметром 818 мм в центре крышных
отверстий;
3. затем выполнять шаги, аналогичные
монтажу конуса с водостоком.
Рис. 3 – Монтаж камина
Связанные
части
трубы
опустить
в
отверстие кровельной плиты. Провернуть
всю трубу таким образом, чтобы отверстия
совпали.
ВАЖНО:
труба
должна
быть
смонтирована таким образом, чтобы
нижняя соединительная плита была
направлена параллельно длине птичника
и не отклонялась на 45° в сторону,
потому
что
иначе
могут
быть
неправильно
смонтированы
всасывающая воронка и вращающийся
клапан.
Затем
необходимо
закрепить
трубу
приложенными к ней винтами и шайбами.
Для
всех
соединений
необходимо
соблюдать следующее:
На протяжении всей длины необходимо
равномерно распределить допуски. Каждый
первый винт необходимо укрепить в
соединении
посередине
продолговатого
отверстия.
Винты необходимо тщательно закрепить.
При проходе через чердачное помещение
для сохранения формы трубы возможно
использование опорного кольца, кодовый
номер 434031
.
CL
600 Standard Kamin
/ Standard Roof Outlet / Стандартный камин
D GB RUS
603-564
Wyszukiwarka
Podobne podstrony:
1176792020 351
1176792020 6
1176792020 352
1176792020 34
1176792020 16
1176792020 113
1176792020 15
1176792020 311
1176792020 28
1176792020 29
1176792020 33
1176792020 25
1176792020 26
1176792020 114
1176792020 2
1176792020 351
1176792020 6
więcej podobnych podstron