
Lab 10.1.2 Configure ACLs in the PIX Security Appliance
Estimated Time: 40 minutes
Number of Team Members: Two teams with four students per team.
Objective
In this lab exercise, students will complete the following tasks:
• Disable pinging to an interface.
• Configure inbound and outbound access control lists (ACLs).
• Configure malicious active code filtering.
Scenario
By default, the PIX Security Appliance denies access to an internal or perimeter network, which is a
more secure network, from an external or less secure network. Network administrators specifically
allow inbound connections by using access lists. Access lists work on a first-match basis. So for
inbound access, administrators need to deny first and then permit after.
Note: Beginning with PIX Security Appliance version 5.3, access lists are the preferred
method for managing network access. The conduit command was used in earlier
versions. Access lists provide improved flexibility and greater ease of use for those familiar
with Cisco IOS access control. However, the conduit command is still supported to
maintain backward compatibility of configurations written for previous PIX Security Appliance
versions.
The access-list and access-group commands permit access based on source or destination
IP address, or by the protocol port number. Use the access-list command to create a single
access list entry. Use the access-group command to bind one or more access list entries to a
specific interface. Only specify one access-group command for each interface.
1 -
14 Fundamentals of Network Security v 1.1 - Lab 10.1.2 Copyright 2003, Cisco Systems, Inc.
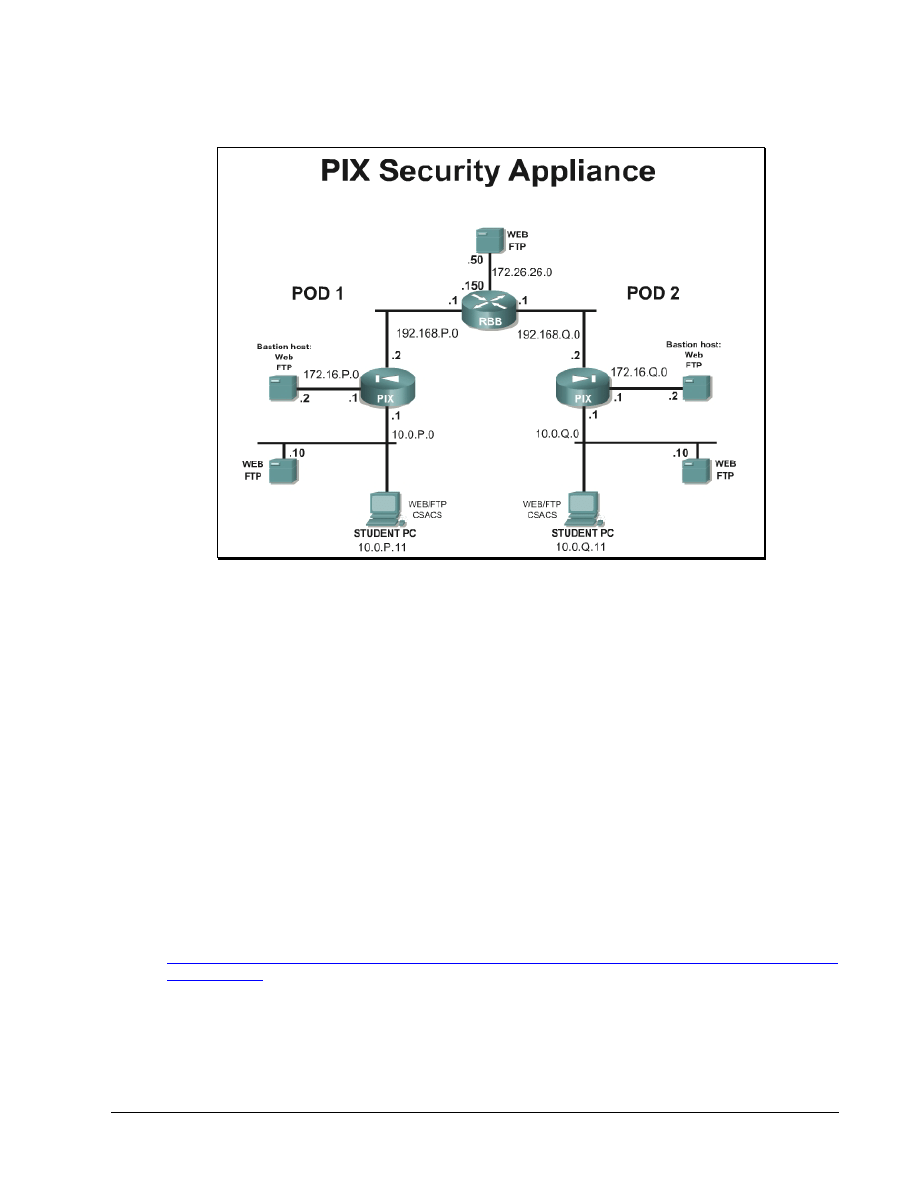
Topology
This figure illustrates the lab network environment.
Preparation
Begin with the standard lab topology and verify the standard configuration on the pod PIX Security
Appliances. Access the PIX Security Appliance console port using the terminal emulator on the
student PC. If desired, save the PIX Security Appliance configuration to a text file for later analysis.
Tools and resources
In order to complete the lab, the standard lab topology is required:
• Two pod PIX Security Appliances
• Two student PCs
• One SuperServer
• Backbone switch and one backbone router
• Two console cables
• HyperTerminal
Additional materials
Further information about the objectives covered in this lab can be found at
Additional information on configuring firewalls can be found in Cisco Secure PIX Firewalls by David
Chapman and Andy Fox (ISBN 1587050358).
Command list
2 -
14 Fundamentals of Network Security v 1.1 - Lab 10.1.2 Copyright 2003, Cisco Systems, Inc.

In this lab exercise, the following commands will be used. Refer to this list if assistance or help is
needed during the lab exercise.
Command
Description
access-list acl_ID {deny
| permit} icmp
{source_addr |
local_addr} {source_mask
| local_mask}
{destination_addr |
remote_addr}
{destination_mask |
remote_mask} icmp_type
Command used to configure an access list.
clear conduit
Removes conduit command statements from the
configuration.
clear icmp
Removes icmp command statements from the
configuration.
filter activex port
local_ip mask foreign_ip
mask
Block outbound ActiveX, Java applets, and other
HTML <object> tags from outbound packets.
filter java port[-port]
local_ip mask foreign_ip
mask
Specifies to filter out Java applets returning from an
outbound connection.
icmp permit | deny
[host] _addr [src_mask]
[type] int_name
Enables or disables the ability to ping a PIX Security
Appliance interface.
show access-list
Displays the configured access list.
show conduit
Displays the configured conduit statements.
show filter
Displays URL, Java, and ActiveX filtering
configurations.
url-server [(if_name)]
vendor websense host
local_ip [timeout
seconds] [protocol {TCP
| UDP} version]
Command used to define Websense filtering.
Step 1 Configure an Internet Control Message Protocol (ICMP)
Perform the following lab steps to configure an Internet Control Message Protocol (ICMP) ACL to
prevent pinging to the PIX Security Appliance interfaces:
a. Ping the inside interface of the PIX Security Appliance from the inside host:
C:\>ping 10.0.P.1
Pinging 10.0.P.1 with 32 bytes of data:
3 -
14 Fundamentals of Network Security v 1.1 - Lab 10.1.2 Copyright 2003, Cisco Systems, Inc.

Reply from 10.0.P.1: bytes=32 time<10ms TTL=128
Reply from 10.0.P.1: bytes=32 time<10ms TTL=128
Reply from 10.0.P.1: bytes=32 time<10ms TTL=128
Reply from 10.0.P.1: bytes=32 time<10ms TTL=128
(where P = pod number)
b. Ping the outside interface from the inside host. By default, pinging through the PIX Security
Appliance to a PIX Security Appliance interface is not allowed:
C:\>ping 192.168.P.2
Pinging 192.168.P.2 with 32 bytes of data:
Request timed out.
Request timed out.
Request timed out.
Request timed out.
(where P = pod number)
c. Use
the
icmp command to prevent pinging the inside interface:
PixP(config)# icmp deny any echo inside
1. Why would this command be used in a production network?
_____________________________________________________________________________
d. View the ICMP ACL:
PixP(config)# show icmp
icmp deny any echo inside
e. Ping the inside PIX Security Appliance interface from the inside host. The ICMP ACL causes the
ping to fail:
C:\>
ping 10.0.P.1
Pinging 10.0.P.1 with 32 bytes of data:
Request timed out.
Request timed out.
Request timed out.
Request timed out.
(where P = pod number)
f. Enable pinging to the PIX Security Appliance inside interface:
PixP(config)# clear icmp
g. Verify the inside interface by pinging the inside interface of the PIX Security Appliance:
C:\>ping 10.0.P.1
Pinging 10.0.P.1 with 32 bytes of data:
Reply from 10.0.P.1: bytes=32 time<10ms TTL=128
Reply from 10.0.P.1: bytes=32 time<10ms TTL=128
Reply from 10.0.P.1: bytes=32 time<10ms TTL=128
Reply from 10.0.P.1: bytes=32 time<10ms TTL=128
4 -
14 Fundamentals of Network Security v 1.1 - Lab 10.1.2 Copyright 2003, Cisco Systems, Inc.

(where P = pod number)
h. From the inside host, ping the inside host of a peer pod. Notice that the conduit created earlier
allows the ping through the PIX Security Appliance:
C:\>ping 192.168.Q.11
Pinging 10.0.Q.12 with 32 bytes of data:
Reply from 10.0.Q.12: bytes=32 time<10ms TTL=128
Reply from 10.0.Q.12: bytes=32 time<10ms TTL=128
Reply from 10.0.Q.12: bytes=32 time<10ms TTL=128
Reply from 10.0.Q.12: bytes=32 time<10ms TTL=128
(where Q = peer pod number)
i. From the inside host, ping a peer pod outside the PIX Security Appliance interface:
C:\>ping 192.168.Q.2
Pinging 192.168.Q.2 with 32 bytes of data:
Reply from 192.168.Q.2: bytes=32 time<10ms TTL=128
Reply from 192.168.Q.2: bytes=32 time<10ms TTL=128
Reply from 192.168.Q.2: bytes=32 time<10ms TTL=128
Reply from 192.168.Q.2: bytes=32 time<10ms TTL=128
(where Q = peer pod number)
j. Configure the PIX Security Appliance to deny all ping requests and permit all unreachable
messages at the outside interface:
PixP(config)# icmp deny any echo outside
PixP(config)# icmp permit any unreachable outside
2. What is achieved by using these commands?
_____________________________________________________________________________
_____________________________________________________________________________
_____________________________________________________________________________
k. Try again to ping the outside interface of a peer pod PIX Security Appliance from the inside host.
Notice that the ping fails due to the ICMP ACL the peer created. Verify the neighboring pod
group has the ICMP ACL configured before attempting to ping:
C:\>ping 192.168.Q.2
Pinging 192.168.Q.2 with 32 bytes of data:
Request timed out.
Request timed out.
Request timed out.
Request timed out.
(where Q = peer pod number)
l. Remove the ICMP ACL from the PIX Security Appliance outside interface:
PixP(config)# clear icmp
m. Save the configuration:
5 -
14 Fundamentals of Network Security v 1.1 - Lab 10.1.2 Copyright 2003, Cisco Systems, Inc.

PixP(config)# write memory
Step 2 Configure ACLs
Perform the following lab steps to configure ACLs:
• Allow inbound web traffic from a peer pod network to the bastion host.
• Allow inbound FTP traffic from a internal host of a peer pod to the bastion host.
• Allow inbound web traffic to the inside host.
• Allow inbound pings to the inside host and bastion host.
• Allow icmp echo-replies from hosts on the outside and dmz interfaces.
• Deny all other inbound traffic.
a. View the conduits using the show conduit command:
PixP(config)# show conduit
conduit permit tcp host 192.168.P.10 eq www any
conduit permit tcp host 192.168.P.11 eq www any
conduit permit tcp host 192.168.P.11 eq ftp any
conduit permit icmp any any
(where P = pod number)
b. If there are any conduits configured, remove them using the clear conduit command:
PixP(config)# clear conduit
c. Verify that the conduits have been removed:
PixP(config) show conduit
d. Verify that statics are in place for the bastion host and for the inside host:
PixP(config)# show static
static (inside,outside) 192.168.P.10 10.0.P.11 netmask
255.255.255.255 0 0
static (dmz,outside) 192.168.P.11 172.16.P.2 netmask 255.255.255.255
0 0
(where P = pod number)
e. Test web access to the bastion hosts of the peer pod groups by completing the following
substeps. The web request should fail to the peer bastion host via its static mapping:
i. Open a web browser on the student PC.
ii. Use the web browser to access the bastion host of the peer pod group by entering:
http://192.168.Q.11.
(where Q = peer pod number)
iii. Have a peer pod group attempt to access the bastion host in the same way.
f. Test web access to the inside host of the peer pod by completing the following substeps. The
web request should fail to access the inside host of the peer via its static mapping:
i. Open a web browser on the student PC.
6 -
14 Fundamentals of Network Security v 1.1 - Lab 10.1.2 Copyright 2003, Cisco Systems, Inc.

ii. Use the web browser to access the inside host of the peer pod group by entering
http://192.168.Q.10.
(where Q = peer pod number)
iii. Have a peer pod group attempt to access the inside host in the same way.
g. Test FTP access to the bastion hosts of the peer pod groups by completing the following
substeps. The FTP request should fail when accessing the peer bastion host via FTP:
i. On the FTP client, attempt to access the bastion host of another pod group:
Start>Run>ftp 192.168.Q.11
(where Q = peer pod number)
ii. Have a peer pod group use the FTP to attempt to access their peer bastion host.
iii. Create an ACL to permit inbound Web and FTP access to the bastion host:
PixP(config)# access-list ACLIN permit tcp 192.168.Q.0 255.255.255.0
host 192.168.P.11 eq www
PixP(config)# access-list ACLIN permit tcp 192.168.Q.0 255.255.255.0
host 192.168.P.11 eq ftp
(where P = pod number, Q = peer pod number)
3. What command would be used to allow access to the mail server?
_____________________________________________________________________________
h. Add commands to permit inbound web traffic to the inside host, permit inbound pings, permit
icmp echo replies to the inside host, and deny all other traffic from the Internet:
PixP(config)# access-list ACLIN permit tcp any host 192.168.P.10 eq
www
PixP(config)# access-list ACLIN permit icmp any any echo
PixP(config)# access-list ACLIN permit icmp any host 192.168.P.10
echo-reply
PixP(config)# access-list ACLIN deny ip any any
(where P = pod number)
i. Bind the ACL to the outside interface:
PixP(config)# access-group ACLIN in interface outside
j. Create an access list to allow icmp echo-replies from the bastion host:
PixP(config)# access-list ICMPDMZ permit icmp host 172.16.P.2 any
echo-reply
k. Bind the new ACL to the dmz interface:
PixP(config)# access-group ICMPDMZ in interface dmz
l. Display the access list and observe the hit counts:
PixP(config)# show access-list
access-list ACLIN; 6 elements
access-list ACLIN permit tcp 192.168.Q.0 255.255.255.0 host
192.168.P.11 eq www (hitcnt=0)
access-list ACLIN permit tcp host 192.168.Q.10 host 192.168.P.11 eq
ftp (hitcnt=0)
7 -
14 Fundamentals of Network Security v 1.1 - Lab 10.1.2 Copyright 2003, Cisco Systems, Inc.

access-list ACLIN permit tcp any host 192.168.P.10 eq www (hitcnt=0)
access-list ACLIN permit icmp any any echo (hitcnt=0)
access-list ACLIN permit icmp any host 192.168.P.10 echo-reply
(hitcnt=0)
access-list ACLIN deny ip any any (hitcnt=0)
access-list ICMPDMZ; 1 elements
access-list ICMPDMZ permit icmp host bastionhost any echo-reply
(hitcnt=0)
(where P = pod number, Q = peer pod number)
m. View the access groups.
PixP(config)# show access-group
access-group ACLIN in interface outside
access-group ICMPDMZ in interface dmz
PixP(config)#
Step 3 Test Inbound ACL
Perform the following steps to test the inbound ACL:
a. Have a peer inside host ping the inside host:
C:\>ping 192.168.Q.10
Pinging 192.168.Q.10 with 32 bytes of data:
Reply from 192.168.Q.10: bytes=32 time<10ms TTL=128
Reply from 192.168.Q.10: bytes=32 time<10ms TTL=128
Reply from 192.168.Q.10: bytes=32 time<10ms TTL=128
Reply from 192.168.Q.10: bytes=32 time<10ms TTL=128
(where Q = peer pod number)
b. Have a peer inside host ping the bastion host:
C:\>ping 192.168.Q.11
Pinging 192.168.Q.11 with 32 bytes of data:
Reply from 192.168.Q.11: bytes=32 time<10ms TTL=128
Reply from 192.168.Q.11: bytes=32 time<10ms TTL=128
Reply from 192.168.Q.11: bytes=32 time<10ms TTL=128
Reply from 192.168.Q.11: bytes=32 time<10ms TTL=128
(where Q = peer pod number)
c. Ping the bastion host from the student PC:
C:\>ping 172.16.P.2
Pinging 172.16.P.2 with 32 bytes of data:
Reply from 172.16.P.2: bytes=32 time<10ms TTL=128
Reply from 172.16.P.2: bytes=32 time<10ms TTL=128
Reply from 172.16.P.2: bytes=32 time<10ms TTL=128
Reply from 172.16.P.2: bytes=32 time<10ms TTL=128
8 -
14 Fundamentals of Network Security v 1.1 - Lab 10.1.2 Copyright 2003, Cisco Systems, Inc.

(where P = pod number)
d. Ping the super server from the student PC:
C:\>ping 172.26.26.50
Pinging 172.26.26.50 with 32 bytes of data:
Reply from 172.26.26.50: bytes=32 time<10ms TTL=128
Reply from 172.26.26.50: bytes=32 time<10ms TTL=128
Reply from 172.26.26.50: bytes=32 time<10ms TTL=128
Reply from 172.26.26.50: bytes=32 time<10ms TTL=128
e. Test web access to the bastion hosts of peer pod groups by completing the following substeps.
The web request should be successful when accessing the peer bastion host via its static
mapping:
i. Open a web browser on the student PC.
ii. Use the web browser to access the bastion host of the peer pod group by entering:
http://192.168.Q.11.
(where Q = peer pod number)
iii. Have a peer pod group attempt to access the bastion host in the same way.
f. Test web access to the inside hosts of peer pod groups by completing the following substeps.
Access to the IP address of the static mapped to the inside host of the opposite pod group
should be successful:
i. Open a web browser on the client PC.
ii. Use the web browser to access the inside host of the peer pod group by entering:
http://192.168.Q.10.
(where Q = peer pod number)
iii. Have a peer pod group attempt to access the inside host in the same way.
g. Test FTP access to the bastion hosts of peer pod groups by completing the following substeps.
Access to the peer bastion host via FTP should be successful:
i. On the FTP client, attempt to access the bastion host of a peer pod group:
Start > Run > ftp 192.168.Q.11.
(where Q = peer pod number)
ii. Have a peer pod group use FTP to attempt to access their peer bastion host.
4. Were any of the above steps unsuccessful? Why?
_____________________________________________________________________________
_____________________________________________________________________________
h. Display the access lists again and observe the hit counts:
PixP(config)# show access-list
access-list ACLIN; 6 elements
access-list ACLIN permit tcp 192.168.Q.0 255.255.255.0 host
192.168.P.11 eq www(hitcnt=2)
access-list ACLIN permit tcp host 192.168.Q.10 host 192.168.P.11 eq
ftp (hitcnt=0)
access-list ACLIN permit tcp any host 192.168.P.10 eq www (hitcnt=2)
9 -
14 Fundamentals of Network Security v 1.1 - Lab 10.1.2 Copyright 2003, Cisco Systems, Inc.

access-list ACLIN permit icmp any any echo (hitcnt=20)
access-list ACLIN permit icmp any host 192.168.P.10 echo-reply
(hitcnt=12)
access-list ACLIN deny ip any any (hitcnt=0)
access-list ICMPDMZ; 1 elements
access-list ICMPDMZ permit icmp host bastionhost any echo-reply
(hitcnt=12)
(where P = pod number, Q = peer pod number)
Step 4 Configure ACLs
Perform the following lab steps to configure ACLs:
• Deny outbound web traffic.
• Allow outbound FTP traffic from the internal network to 172.26.26.50.
a. Test web access to the Internet by completing the following substeps. The test to access
172.26.26.50 should be successful:
i. Open a web browser on the student PC.
ii. Use the web browser to access Internet host 172.26.26.50 by entering:
http://172.26.26.50.
b. Test FTP access to Internet host 172.26.26.50. Access to the host 172.26.26.50 via FTP should
be successful:
On the FTP client, attempt to access host 172.26.26.50:
Start>Run>ftp 172.26.26.50
c. Create an ACL that prevents users on the internal network from making outbound HTTP
connections:
PixP(config)# access-list ACLOUT deny tcp any any eq www
This access list prevents all outbound connections.
d. Enter
the
access-group command to create an access group that will bind the ACL to an
interface:
PixP(config)# access-group ACLOUT in interface inside
e. Display the configured access list, and observe the hit count:
PixP(config)# show access-list
access-list ACLIN; 6 elements
access-list ACLIN permit tcp 192.168.Q.0 255.255.255.0 host
192.168.P.11 eq www(hitcnt=4)
access-list ACLIN permit tcp host 192.168.Q.10 host 192.168.P.11 eq
ftp (hitcnt=1)
access-list ACLIN permit tcp any host 192.168.P.10 eq www (hitcnt=4)
access-list ACLIN permit icmp any any echo (hitcnt=20)
access-list ACLIN permit icmp any host 192.168.P.10 echo-reply
(hitcnt=12)
access-list ACLIN deny ip any any (hitcnt=0)
access-list ICMPDMZ; 1 elements
10 - 1
4 Fundamentals of Network Security v 1.1 - Lab 10.1.2 Copyright 2003, Cisco Systems, Inc.

access-list ICMPDMZ permit icmp host bastionhost any echo-reply
(hitcnt=12)
access-list ACLOUT; 1 elements
access-list ACLOUT deny tcp any any eq www (hitcnt=0)
(where P = pod number, Q = peer pod number)
f. Test web access to the Internet by completing the following substeps. The test via HTTP should
fail.
i. Open a web browser on the student PC.
ii. Use the web browser to access the Internet by entering: http://172.26.26.50.
g. Test FTP access to an Internet host. The FTP connection should fail as well due to the implicit
deny any:
On the FTP client, attempt to access host 172.26.26.50:
Start>Run>ftp 172.26.26.50
h. Display the access list again and note that the hit count has incremented:
PixP(config)# show access-list
access-list ACLIN; 6 elements
access-list ACLIN permit tcp 192.168.Q.0 255.255.255.0 host
192.168.P.11 eq www (hitcnt=4)
access-list ACLIN permit tcp host 192.168.Q.10 host 192.168.P.11 eq
ftp (hitcnt=1)
access-list ACLIN permit tcp any host 192.168.P.10 eq www (hitcnt=4)
access-list ACLIN permit icmp any any echo (hitcnt=20)
access-list ACLIN permit icmp any host 192.168.P.10 echo-reply
(hitcnt=12)
access-list ACLIN deny ip any any (hitcnt=0)
access-list ICMPDMZ; 1 elements
access-list ICMPDMZ permit icmp host bastionhost any echo-reply
(hitcnt=12)
access-list ACLOUT; 1 elements
access-list ACLOUT deny tcp any any eq www (hitcnt=6)
(where P = pod number, Q = peer pod number)
i. Add an additional command to the ACL to permit outbound FTP access to host 172.26.26.50:
PixP(config)# access-list ACLOUT permit tcp 10.0.P.0 255.255.255.0
host 172.26.26.50 eq ftp
(where P = pod number)
j. Add another access list command statement to deny other outbound IP traffic:
PixP(config)# access-list ACLOUT deny ip any any
This access list statement is only needed to enable viewing of the hit counts.
k. View the access list again:
PixP(config)# show access-list ACLOUT
access-list ACLOUT deny tcp any any eq www (hitcnt=2)
11 - 1
4 Fundamentals of Network Security v 1.1 - Lab 10.1.2 Copyright 2003, Cisco Systems, Inc.

access-list ACLOUT permit tcp 10.0.P.0 255.255.255.0 host
172.26.26.50 eq ftp(hitcnt=0)
access-list ACLOUT deny ip any any (hitcnt=0)
(where P = pod number)
Step 5 Test Outbound ACL
Perform the following steps to test the outbound ACL:
a. Test web access to the Internet by completing the following substeps. Access to the Internet
host will fail due to the deny ACL:
i. Open a web browser on the student PC.
ii. Use the web browser to access the Internet by entering: http://172.26.26.50.
b. Test FTP access to an Internet host by performing the following on the FTP client. At this point, a
connection using FTP will work:
Start>Run>ftp 172.26.26.50
c. Test the FTP access to a peer pod bastion host by attempting to access the peer pod bastion
host on the FTP client. The connection using FTP should fail:
Start>Run>ftp 192.168.Q.11
(where Q = peer pod number)
d. View the outbound access list again and observe the hit counts:
PixP(config)# show access-list ACLOUT
access-list ACLOUT deny tcp any any eq www (hitcnt=2)
access-list ACLOUT permit tcp 10.0.P.0 255.255.255.0 host
172.26.26.50 eq ftp (hitcnt=1)
access-list ACLOUT deny ip any any (hitcnt=3)
(where P = pod number)
Be sure to enter the following command exactly as shown. If the ACL name is omitted all access
list statements are removed.
e. Remove the outbound ACL:
PixP(config)# clear access-list ACLOUT
f. Verify that the outbound ACL has been removed:
PixP(config)# show access-list
access-list ACLIN; 6 elements
access-list ACLIN permit tcp 192.168.Q.0 255.255.255.0 host
192.168.P.11 eq www(hitcnt=4)
access-list ACLIN permit tcp host 192.168.Q.10 host 192.168.P.11 eq
ftp (hitcnt= 1)
access-list ACLIN permit tcp any host 192.168.P.10 eq www (hitcnt=4)
access-list ACLIN permit icmp any any echo (hitcnt=20)
access-list ACLIN permit icmp any host 192.168.P.10 echo-reply
(hitcnt=12)
access-list ACLIN deny ip any any (hitcnt=0)
12 - 1
4 Fundamentals of Network Security v 1.1 - Lab 10.1.2 Copyright 2003, Cisco Systems, Inc.

access-list ICMPDMZ; 1 elements
access-list ICMPDMZ permit icmp host bastionhost any echo-reply
(hitcnt=12)
(where P = pod number, Q = peer pod number)
g. View the access groups:
PixP(config)# show access-group
access-group ACLIN in interface outside
access-group ICMPDMZ in interface dmz
pixP(config)#
Save the configuration:
PixP(config)# write memory
Step 6 Filter Malicious Active Code
Perform the following lab steps to configure ActiveX and filter Java.
a. Enter
http://192.168.Q.10 in the web browser. After the peer pods homepage appears, click on
the ActiveX Control link. The ActiveX Control should open successfully.
5. Did the ActiveX Control open successfully?
_____________________________________________________________________________
b. On the PIX Security Appliance, enter the filter activex command to block ActiveX from
any local host and for connections to any foreign host on port 80:
PixP(config)# filter activex 80 0 0 0 0
6. What is the significance of 0 0 0 0?
____________________________________________________________________________
c. Open a new web browser and enter http:192.168.Q.10. After the webpage opens, click on the
ActiveX Control link. The ActiveX Control should not open successfully.
Note: It might be necessary to clear the web browser cache.
7. Did the ActiveX Control open successfully?
__________________________________________________________________________
d. Enter
http://192.168.Q.10 in the web browser. After the peer pods homepage appears, click on
the Java Applet link. The Java Applet should open successfully.
8. Did the Java Applet open successfully?
_____________________________________________________________________________
b. Enter
the
filter java command to block Java applets:
PixP(config)# filter java 80 0 0 0 0
e. Open a new web browser and enter http:192.168.Q.10. After the webpage opens, click on the
Java Applet link. The Java Applet should not open successfully.
Note: It might be necessary to clear the web browser cache.
9. Did the Java Applet open successfully?
__________________________________________________________________________
f. Use the following command to show the filters:
PixP(config)# show filter
filter activex 80 0.0.0.0 0.0.0.0 0.0.0.0 0.0.0.0
13 - 1
4 Fundamentals of Network Security v 1.1 - Lab 10.1.2 Copyright 2003, Cisco Systems, Inc.

filter java 80 0.0.0.0 0.0.0.0 0.0.0.0 0.0.0.0
Step 7 Configure the PIX Security Appliance to work with a URL filtering server
Perform the following steps to configure the PIX Security Appliance to work with a URL-filtering
server:
a. Enter
the
url-server command to designate the URL-filtering server:
PixP(config)# url-server (inside) host 10.0.P.11 timeout 5 protocol TCP
version 4
b. Show the designated url-server by entering the following command:
PixP(config)# show url-server
url-server (inside) vendor websense host insidehost timeout 5 protocol
TCP version 4
c. Enter
the
filter url http command to prevent outbound users from accessing WWW URLs
that are designated with the filtering application:
PixP(config)# filter url http 0 0 0 0 allow
d. Display
the
filter url http command by using the following command:
PixP(config)# show filter url
filter activex 80 0.0.0.0 0.0.0.0 0.0.0.0 0.0.0.0
filter java 80 0.0.0.0 0.0.0.0 0.0.0.0 0.0.0.0
filter url http 0.0.0.0 0.0.0.0 0.0.0.0 0.0.0.0 allow
e. Remove
the
url-server command:
PixP(config)# no url-server (inside) host insidehost
(where P = the pod number)
f. Remove
the
filter url command:
PixP(config)# no filter url http 0 0 0 0 allow
g. Save the configuration:
PixP(config)# write memory
14 - 14
Fundamentals of Network Security v 1.1 - Lab 10.1.2
Copyright
2003, Cisco Systems, Inc.
Wyszukiwarka
Podobne podstrony:
Lab10 integracja z ms access
infa, Inf Lab10 11
Lab10 Sprawozdanie id 259061 Nieznany
lab10 3 3
lab10 macierze wektory
lab10 3 id 259045 Nieznany
panek LAB10
lab10 rafal, Notatki, FIZYKA, labfizyka, Laborki, Laborki MC
fiza lab10
EAP Sprawozdanie Lab10, Akademia Górniczo - Hutnicza
Inf Lab10
3. Wyznaczanie współczynnika elektrochemicznego miedzi i stałej Faraday’a, LAB10 02, Wyznaczanie r˙w
LAB10 , WOJSKOWA AKADEMIA TECHNICZNA
LAB10 , WOJSKOWA AKADEMIA TECHNICZNA
lab10 macierze wektory
lab10'08
lab10 4 4
AiP Lab10
lab10 NHIP pyt
więcej podobnych podstron