
Microsoft Dynamics
®
GP
Cash Flow Management

Copyright
Copyright © 2010 Microsoft. All rights reserved.
Limitation of liability
This document is provided “as-is”. Information and views expressed in this document, including
URL and other Internet Web site references, may change without notice. You bear the risk of using
it.
Some examples depicted herein are provided for illustration only and are fictitious. No real
association or connection is intended or should be inferred.
Intellectual property
This document does not provide you with any legal rights to any intellectual property in any
Microsoft product.
You may copy and use this document for your internal, reference purposes.
Trademarks
Microsoft, Dexterity, and Microsoft Dynamics are trademarks of the Microsoft group of
companies. FairCom and c-tree Plus are trademarks of FairCom Corporation and are registered in
the United States and other countries.
All other trademarks are property of their respective owners.
Warranty disclaimer
Microsoft Corporation disclaims any warranty regarding the sample code contained in this
documentation, including the warranties of merchantability and fitness for a particular purpose.
License agreement
Use of this product is covered by a license agreement provided with the software product. If you
have any questions, please call the Microsoft Dynamics GP Customer Assistance Department at
800-456-0025 (in the U.S. or Canada) or +1-701-281-6500.
Publication date
May 2010

C A S H F L O W M A N A G E M E N T
i
Contents
...............................................................................................................................................
1
What’s in this manual................................................................................................................................... 1
Symbols and conventions ............................................................................................................................ 2
Resources available from the Help menu.................................................................................................. 2
Send us your documentation comments ................................................................................................... 4
Chapter 1: Cash flow forecasts and transactions
..................................................
5
Setting up cash flow forecasts ..................................................................................................................... 5
Entering “what if?” cash flow transactions............................................................................................... 9
Troubleshooting .......................................................................................................................................... 10
Chapter 2: Inquiries and reports
...........................................................................................
11
Using the Cash Flow Calendar window ................................................................................................. 11
Transaction inquiry using Cash Flow Explorer ...................................................................................... 13
Printing weekly reports.............................................................................................................................. 15
Printing the Monthly Calendar report..................................................................................................... 17

ii
C A S H F L O W M A N A G E M E N T

C A S H F L O W M A N A G E M E N T
1
Introduction
You can use Cash Flow Management to predefine an opening balance for a forecast,
based on a single cash management transaction or a specific General Ledger
account balance. You also can base a forecast on one or more checkbook balances
with or without work/adjust transactions, such as deposits, payments, and
reconciliation adjustments that are not part of the checkbook balance.
Cash Flow Management is installed automatically when you install Microsoft
Dynamics
®
GP. You must have the appropriate registration keys to use it, however.
For additional information about entering registration keys, refer to the Installation
Instructions manual.
You also can use Cash Flow Management to complete the following tasks:
•
Create an unlimited number of cash flow forecast definitions
•
Forecast cash flows in different ways
•
Create scenarios without actually recording transactions
•
Summarize daily inflows and outflows of cash in the calendar window
•
View the summary of any given day’s cash inflow and outflow
•
Obtain weekly—detailed or summary—and monthly calendar reports
This introduction is divided into the following sections:
•
•
•
Resources available from the Help menu
•
Send us your documentation comments
What’s in this manual
This manual is designed to give you an understanding of how to use the features of
Cash Flow Management, and how it integrates with the Microsoft Dynamics GP
system.
To make best use of Cash Flow Management, you should be familiar with
systemwide features described in the System User’s Guide, the System Setup
Guide, and the System Administrator’s Guide.
Some features described in the documentation are optional and can be purchased
through your Microsoft Dynamics GP partner.
To view information about the release of Microsoft Dynamics GP that you’re using
and which modules or features you are registered to use, choose Help >> About
Microsoft Dynamics GP.
The manual is divided into the following chapters:
•
Chapter 1, “Cash flow forecasts and transactions,”
explains how to set up cash
flow forecast definitions and enter cash flow transactions, and how to
troubleshoot common problems.
•
Chapter 2, “Inquiries and reports,”
describes how to forecast day-to-day cash
flow balances.
I N T R O D U C T I O N
2
C A S H F L O W M A N A G E M E N T
Symbols and conventions
For definitions of unfamiliar terms, see the glossary in the manual or refer to the
glossary in Help.
This manual uses the following conventions to refer to sections, navigation and
other information.
Resources available from the Help menu
The Microsoft Dynamics GP Help menu gives you access to user assistance
resources on your computer, as well as on the Web.
Contents
Opens the Help file for the active Microsoft Dynamics GP component, and displays
the main “contents” topic. To browse a more detailed table of contents, click the
Contents tab above the Help navigation pane. Items in the contents topic and tab
are arranged by module. If the contents for the active component includes an
“Additional Help files” topic, click the links to view separate Help files that
describe additional components.
To find information in Help by using the index or full-text search, click the
appropriate tab above the navigation pane, and type the keyword to find.
To save the link to a topic in the Help, select a topic and then select the Favorites tab.
Click Add.
Index
Opens the Help file for the active Microsoft Dynamics GP component, with the
Index tab active. To find information about a window that’s not currently displayed,
type the name of the window, and click Display.
Symbol
Description
The light bulb symbol indicates helpful tips, shortcuts and
suggestions.
The warning symbol indicates situations you should be especially
aware of when completing tasks.
The multicurrency symbol points out features or procedures that
apply if you’re using Multicurrency Management.
Convention
Description
Creating a batch
Italicized type indicates the name of a section or procedure.
File >> Print or File >
Print
The (>>) or (>) symbol indicates a sequence of actions, such as
selecting items from a menu or toolbar, or pressing buttons in a
window. This example directs you to go to the File menu and choose
Print.
TAB
or
ENTER
All capital letters indicate a key or a key sequence.

C A S H F L O W M A N A G E M E N T
3
I N T R O D U C T I O N
About this window
Displays overview information about the current window. To view related topics
and descriptions of the fields, buttons, and menus for the window, choose the
appropriate link in the topic. You also can press F1 to display Help about the current
window.
Lookup
Opens a lookup window, if a window that you are viewing has a lookup window.
For example, if the Checkbook Maintenance window is open, you can choose this
item to open the Checkbooks lookup window.
Show Required Fields
Highlights fields that are required to have entries. Required fields must contain
information before you can save the record and close the window. To change the
way required fields are highlighted, choose Microsoft Dynamics GP menu >> Tools
>> Setup >> User Preferences >> Display, and specify a different color and type
style.
Printable Manuals
Displays a list of manuals in Adobe Acrobat .pdf format, which you can print or
view.
What’s New
Provides information about enhancements that were added to Microsoft Dynamics
GP since the last major release.
Microsoft Dynamics GP Online
Opens a Web page that provides links to a variety of Web-based user assistance
resources. Access to some items requires registration for a paid support plan.
Current implementation and upgrade information
The most recent
revisions of upgrade and implementation documentation, plus documentation
for service packs and payroll tax updates.
User documentation and resources
The most recent user guides, how-
to articles, and white papers for users.
Developer documentation and resources
The most recent
documentation and updated information for developers.
Product support information
Information about the Microsoft Dynamics
GP product support plans and options that are available, along with
information about peer support and self-support resources.
Services information
Information about Microsoft Dynamics GP support,
training, and consulting services.
Microsoft Dynamics GP Community
Access to newsgroups, where you
can ask questions or share your expertise with other Microsoft Dynamics GP
users.
CustomerSource home page
A wide range of resources available to
customers who are registered for a paid support plan. Includes access to
Knowledge Base articles, software downloads, self-support, and much more.

I N T R O D U C T I O N
4
C A S H F L O W M A N A G E M E N T
Customer Feedback Options
Provides information about how you can join the Customer Experience
Improvement Program to improve the quality, reliability, and performance of
Microsoft software and services.
Send us your documentation comments
We welcome comments regarding the usefulness of the Microsoft Dynamics GP
documentation. If you have specific suggestions or find any errors in this manual,
send your comments by e-mail to the following address:
To send comments about specific topics from within Help, click the Documentation
Feedback link, which is located at the bottom of each Help topic.
Note: By offering any suggestions to Microsoft, you give Microsoft full permission to use
them freely.
C A S H F L O W M A N A G E M E N T
5
Chapter 1:
Cash flow forecasts and transactions
You can create and keep an unlimited number of cash flow forecast definitions. The
cash flow forecasts that you define will be displayed in the Cash Flow Calendar and
the Cash Flow Explorer.
“What if” transactions (external inflow and outflow transactions that are not
actually entered in Great Plains) let you see what effect actual transactions will have
on your cash flow.
This information is divided into the following sections:
•
Setting up cash flow forecasts
•
Entering “what if?” cash flow transactions
•
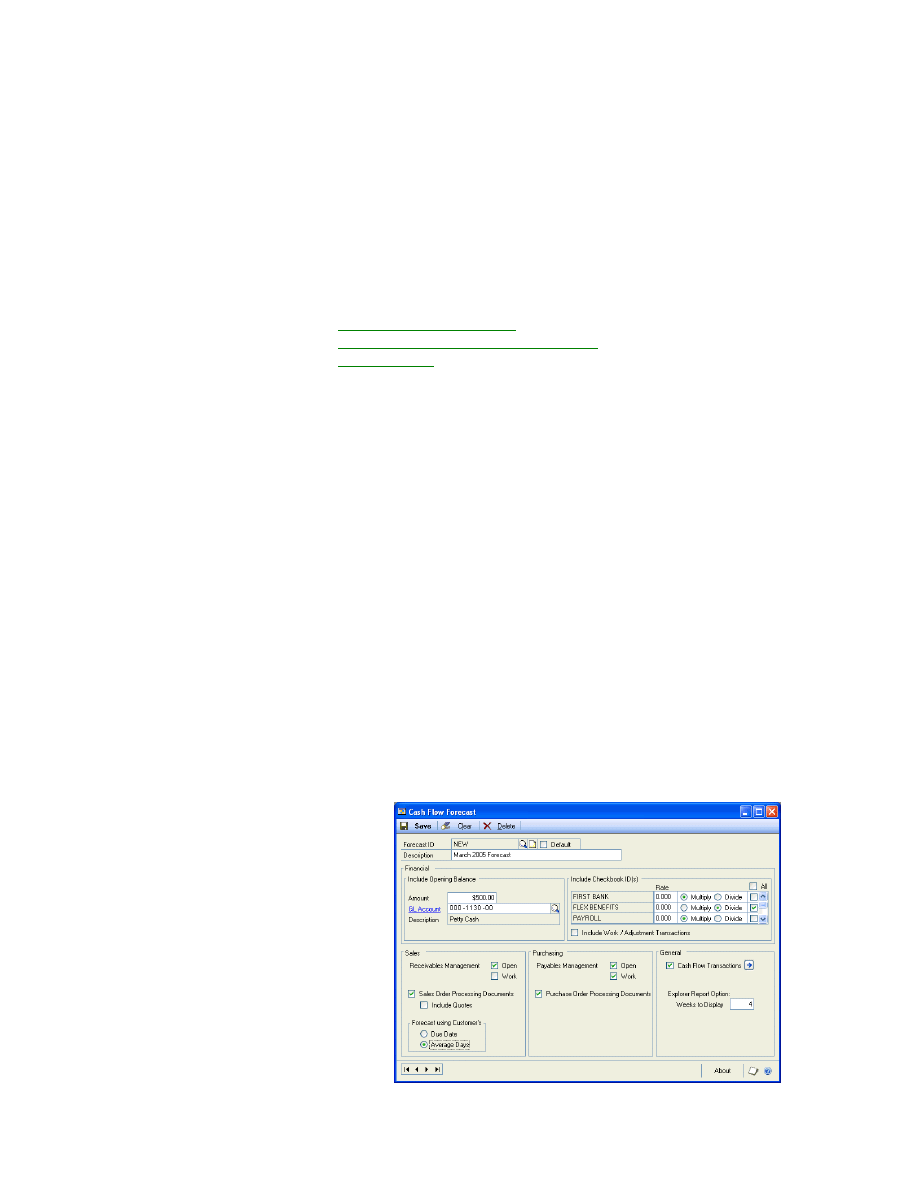
Setting up cash flow forecasts
The Cash Flow Forecast window is divided into four main sections: Financial, Sales,
Purchasing, and General. You will use these sections to customize your cash flow
forecast as follows:
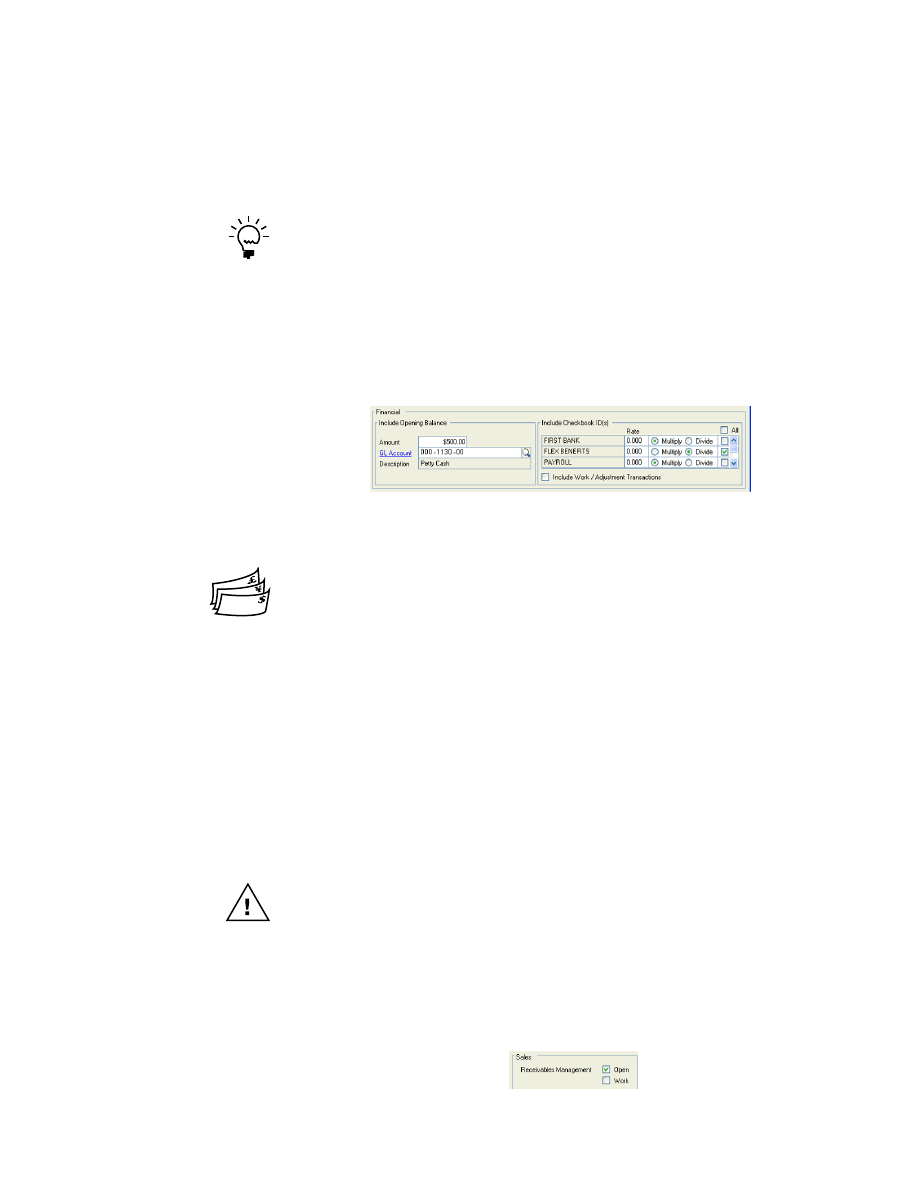
Financial
This section specifies the opening balance of your forecast. Choose
checkbook ID balance(s), a flat amount, and/or a General Ledger account balance.
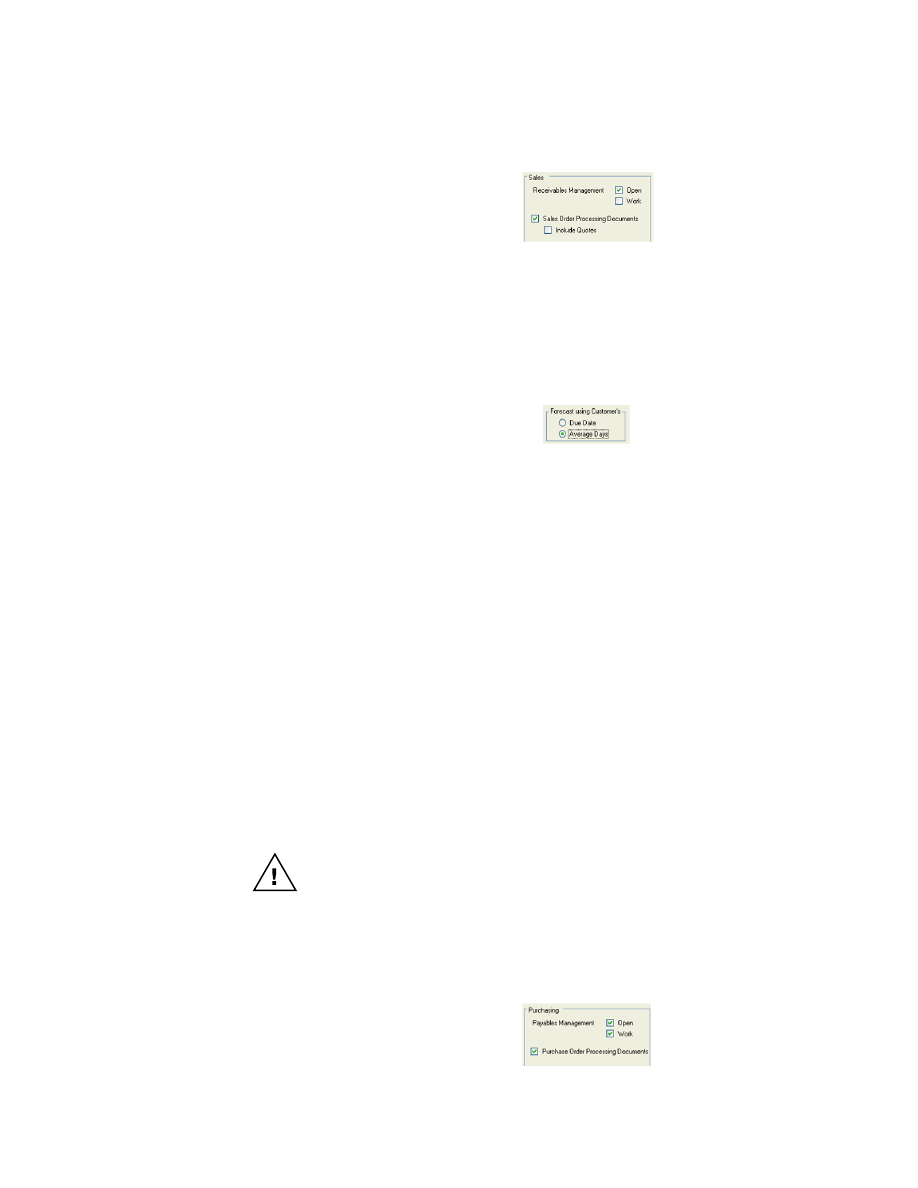
Sales
This section specifies whether your forecast will include transactions from
Receivables (Open and/or Work) and/or Sales Order Processing documents.
Purchasing
This section specifies whether your forecast will include transactions
from Payables (Open and/or Work) and/or Purchase Order Processing documents.
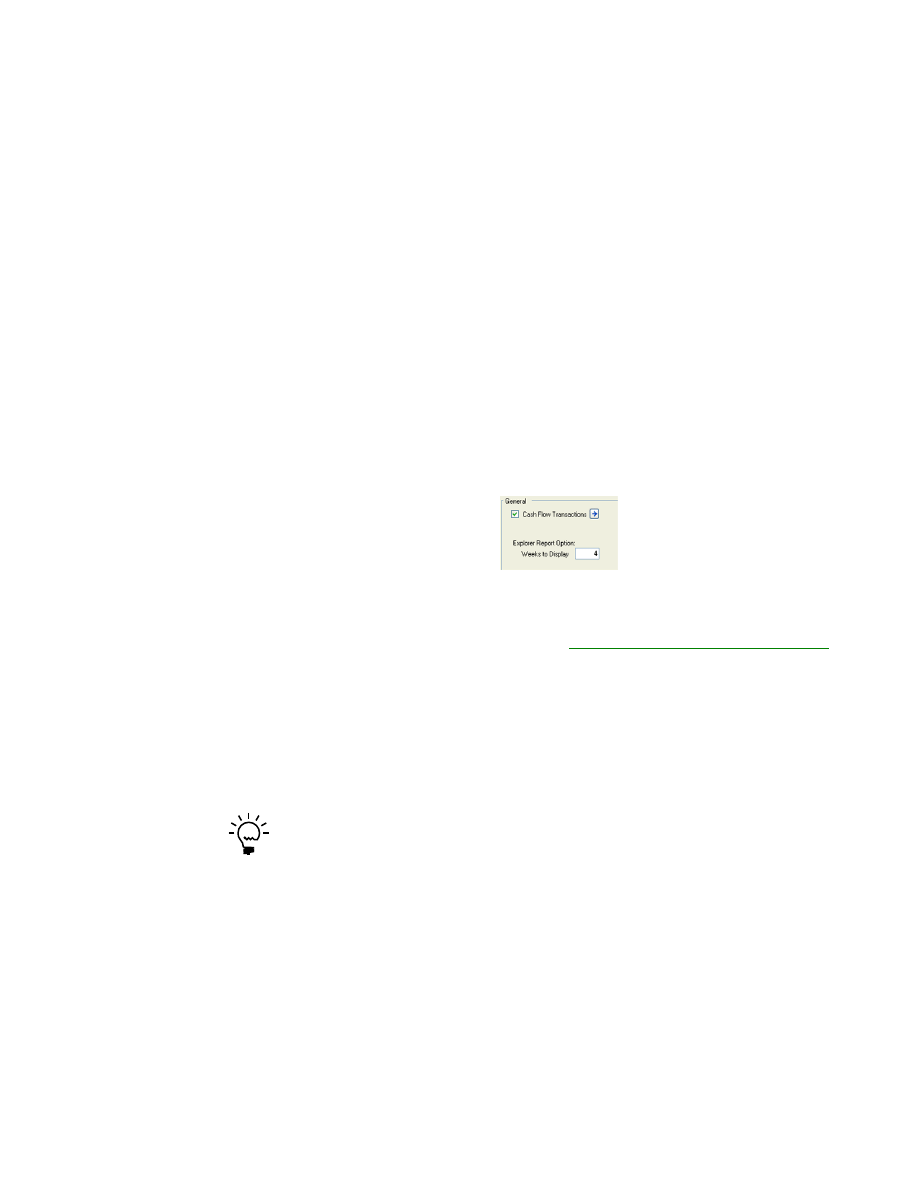
General
This section specifies whether your forecast will include Cash Flow
Transactions and the number of weeks the Explorer Reports will display.
To set up cash flow forecasts:
1.
Open the Cash Flow Forecast window.
(Great Plains menu>> Tools >> Setup >> Financial >> Cash Flow Forecast)
C H A P T E R 1 C A S H F L O W F O R E C A S T S A N D T R A N S A C T I O N S
6
C A S H F L O W M A N A G E M E N T
2.
Enter or select a Forecast ID.
3.
To save this Forecast ID as the default forecast, mark the Default option. The
default forecast appears in both the Cash Flow Calendar and the Cash Flow
Explorer. You can change the default forecast at any time, by selecting another
Forecast ID and making it the default.
If you create multiple forecasts, it is recommended that you select one as the default
forecast. If you do not select a default, Cash Flow Management automatically selects the
first forecast as the default.
4.
Enter a description for the Forecast ID selected.
5.
To include an opening balance in your forecast, mark the appropriate options.
You may include a specific amount, an account balance, and/or the balance of
one or more checkbooks.
Select the checkbook IDs that you wish to include. To mark all checkbooks,
mark the All check box. To unmark all checkbooks, unmark the All check box.
If Multicurrency Management is registered, you must enter an exchange rate
and select either the Multiply or Divide method for any non-functional
currency checkbooks selected. Cash Flow Management will use this
information to convert the non-functional currency checkbook balance into
your functional currency. Functional currency checkbook IDs do not require an
exchange rate.
To include deposits, payments, and reconciliation adjustments that are not part
of the Checkbook ID balance, mark Include Work/Adjustment Transactions
(only available for marked checkbooks).
If Bank Reconciliation is registered, payments or deposits received with Sales
documents will be displayed as negative values in the Calendar and Explorer.
Cash Flow Management works this way to prevent doubling up these amounts
which may already be included in the forecast ID if the checkbook including
these deposits is marked.
If you enter individual transactions to your general ledger, as in Quick Journal entries
for example, these transactions will not follow through to your checkbook and will not
be included in Cash Flow Management forecasts. Always post transactions directly to
your checkbook to avoid creating this situation.
6.
To include Receivables Management transactions in your forecast, mark the
appropriate options. You may include Open (posted) transactions and/or Work
(unposted) transactions. Open transactions will include scheduled payments.
C A S H F L O W M A N A G E M E N T
7
C H A P T E R 1 C A S H F L O W F O R E C A S T S A N D T R A N S A C T I O N S
7.
To include Sales Order Processing Documents—orders, back orders and
unposted Sales Order Processing invoices and returns, mark the Sales Order
Processing Documents option.
To include all non-expired quotes, mark the Include Quotes option (available
only if you include Sales Order Processing Documents).
8.
If you included Receivables Management transactions and/or Sales Order
Processing Documents, select one of the following date options for the system
to calculate the expected cash inflow:
Due Date
Based on the transaction due date (default).
Average Days
Based on the number of days a customer has taken to pay
invoices in full since you began doing business together (Avg. Days Life-to-
Date). For more information about Average Days, see the Receivables
Management documentation.
Sales transactions (Receivables Management and Sales Order Processing) will
display in Cash Flow forecasts on the requested ship date of the line item plus
the date option you select--either Due Date or Average Days. For example, if
you select Average Days and the Average Days to pay for this customer is 35
days, for a requested ship date of June 1/06 the inflow transaction will be
included in Cash Flow forecasts on July 5/06 (35 days from the requested ship
date). If the requested ship date is not available, the system will use the
document date instead.
Trade discount, freight, miscellaneous, taxes and any payments received will
display in forecasts on the document’s requested ship date plus the customer’s
terms. If the document does not have a requested ship date, the system will use
the document date instead.
For purchase orders that are entered as Blanket, or Drop-Ship Blanket, the control line
amount is excluded from the amounts shown for the Cash Flow Calendar and Cash
Flow Explorer.
9.
To include Payables Management transactions in your forecast, mark the
appropriate options under Purchasing. You may include Open (posted)
transactions and/or Work (unposted) transactions.
C H A P T E R 1 C A S H F L O W F O R E C A S T S A N D T R A N S A C T I O N S
8
C A S H F L O W M A N A G E M E N T
10. To include Purchase Order Processing Documents, mark the Purchase Order
Processing Documents option.
Purchase Order Processing transactions will display in the Cash Flow Calendar
and the Cash Flow Explorer on the required date of the line item plus the
vendor’s terms. For example, if the required date for a particular line item is Jan
15/06 and the vendor’s terms are Net 30, this outflow transaction will display
in your Cash Flow forecasts on Feb 14/06. If the required date is unavailable,
the system will use the document date instead.
If you include Purchase Order Processing documents, trade discount, freight,
miscellaneous, and tax will automatically be included in your forecasts as well.
The entire trade discount, freight, miscellaneous, and tax amount will be
included in forecasts until the document is either closed or canceled. Trade
discount, freight, miscellaneous, and tax will display in the Cash Flow Calendar
and the Cash Flow Explorer on the required date of the document plus the
vendor’s terms.
11. To include “what if?” transactions that need to be considered when forecasting
but which are not entered into the Great Plains system, mark the Cash Flow
Transactions option.
You will enter the “what if?” transactions manually in the Cash Flow
Transactions window. To drill down to the Cash Flow Transactions window,
click on the expansion button. Refer to
Entering “what if?” cash flow transactions
on page 9 for more information.
12. The Explorer Report Option box defines the number of weeks of information
that the Cash Flow Explorer reports will contain. Enter the number of weeks
you want the Cash Flow Explorer to report.
13. Choose Save to save the changes you’ve made in the Cash Flow Forecast
window.
Clicking the About button will display the Cash Flow Management, Great Plains, and
Dexterity
®
versions.
C A S H F L O W M A N A G E M E N T
9
C H A P T E R 1 C A S H F L O W F O R E C A S T S A N D T R A N S A C T I O N S
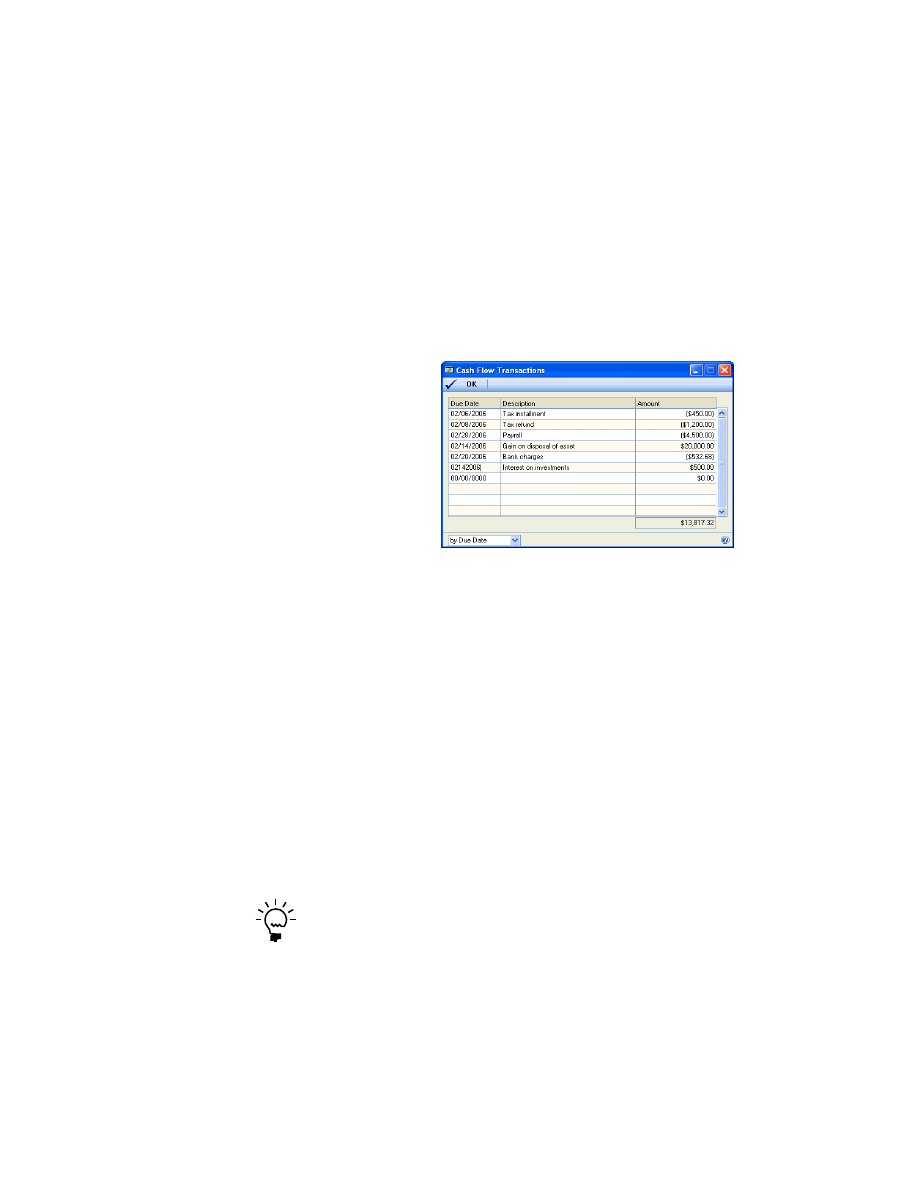
Entering “what if?” cash flow transactions
Cash Flow Management allows you to enter “what if” transactions (external inflow
and outflow transactions that are not actually entered in Great Plains) to see what
effect these transactions will have on your cash flow. These transactions will be
displayed in both the Cash Flow Explorer and the Cash Flow Calendar for any
forecast with the Cash Flow Transactions option marked in the Cash Flow Forecast
window. (If the Calendar is launched from Explorer, only the Forecast ID selected in
Explorer will launch in Calendar.)
To enter “what if?” cash flow transactions:
1.
Open the Cash Flow Transactions window.
(Great Plains menu >> Tools >> Setup >> Financial >> Cash Flow Transaction)
2.
From the bottom-left drop-down list, select one of the following sorting
methods for the transactions:
Sequence #
Transactions will be displayed as they were entered originally
(default).
Due Date
Transactions will be displayed in ascending date order.
3.
In the Due Date column, enter the transaction’s due date.
4.
In the Description column, enter a description for the transaction (optional).
5.
In the Amount column, enter the transaction amount. To enter a negative or
outflow amount, enter a minus (-) in front of the amount.
6.
Repeat steps 3 through 5 until you have entered all the transactions you wish to
enter.
To delete a row, put your cursor in the row you wish to delete. From the menu bar,
choose Edit >> Delete Row. To insert a row, put your cursor in the row below the
desired row. From the menu bar, choose Edit >> Insert Row.

C H A P T E R 1 C A S H F L O W F O R E C A S T S A N D T R A N S A C T I O N S
10
C A S H F L O W M A N A G E M E N T
Troubleshooting
This section explains common problems you might have with Cash Flow
Management. Before calling Product Support, check this section to see if there is an
easy solution to the problem you are having.
Missing checkbook transactions
Situation:
Individual transactions entered to my general ledger in Quick Journal
entries are not included in Cash Flow Management forecasts. Why?
Solution:
Individual transactions entered to your general ledger, as in Quick
Journal entries, do not follow through to your checkbook and will not be included
in Cash Flow Management forecasts. Always post transactions directly to your
checkbook to avoid creating this type of problem OR use the Cash Flow Transaction
window to record these general ledger entries.
Different currency checkbook
Situation:
One of my checkbook IDs is a different currency. How can I get a
consolidated look at my overall cash position in my home currency?
Solution:
Cash Flow Management includes all checkbook IDs marked in the
Cash Flow Forecast window. Checkbook IDs with a different currency from the
functional currency will be included in cash flow forecast but will appear in the
functional currency only.
C A S H F L O W M A N A G E M E N T
11
Chapter 2:
Inquiries and reports
Use the Cash Flow Calendar and the Cash Flow Explorer to perform inquiries. You
can use the same windows to generate the following reports:
•
Weekly Summary Report
•
Weekly Summary by Source Report
•
Weekly Detail by Source Report
•
Monthly Calendar Report
Information is divided into the following sections:
•
Using the Cash Flow Calendar window
•
Transaction inquiry using Cash Flow Explorer
•
•
Printing the Monthly Calendar report
Using the Cash Flow Calendar window
The Cash Flow Calendar displays inflows and outflows based on the default
forecast you set up in the Cash Flow Forecast window. You can use the Cash Flow
Calendar to scroll to different months, or to open to a specific day and view your
transactions.
In the Cash Flow Calendar, outflows appear in red, inflows appear in blue, and the
balance to date is shown in black.
To use the Cash Flow Calendar window:
1.
Open the Cash Flow Calendar window.
(Inquiry >> Financial >> Cash Flow Calendar)
C H A P T E R 2 I N Q U I R I E S A N D R E P O R T S
12
C A S H F L O W M A N A G E M E N T
2.
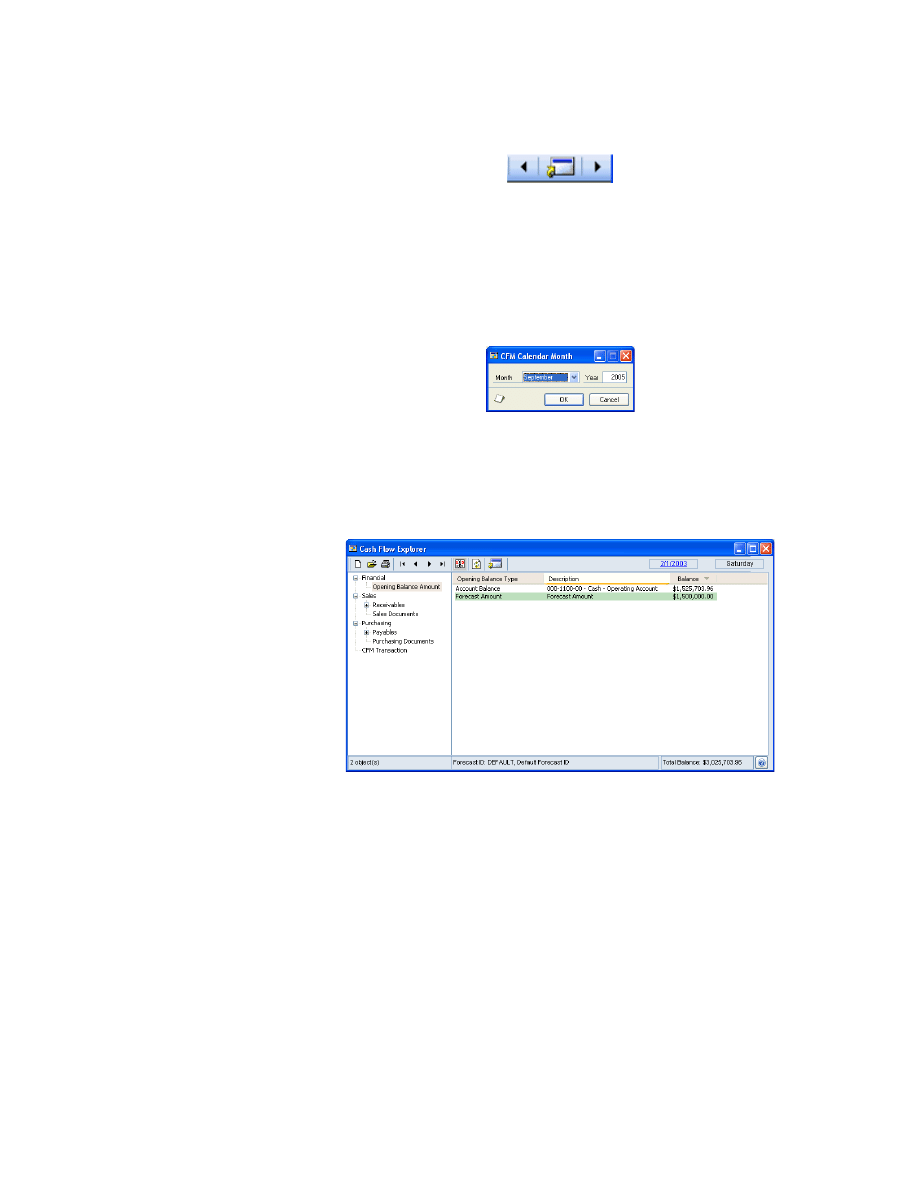
To view the cash flow forecast for a different month, use the Go To button on the
window toolbar.
•
To view the cash flow forecast from the previous or next month, click the
forward or back arrow.
•
To view a specific month’s forecast, click the Go To button between the
arrows. The CFM Calendar Month window opens. From the month drop-
down list, select a month. Change the year if necessary and then choose OK.
3.
To print the entire month as displayed, click the Print button.
4.
To view the detail for a specific day, move the cursor over the date and click; the
Cash Flow Explorer will appear listing the transactions for the day you selected.
5.
If you make changes to your forecast while the Calendar window is open, click
the Refresh button to see the resulting data changes in the open Calendar
window.
C A S H F L O W M A N A G E M E N T
13
C H A P T E R 2 I N Q U I R I E S A N D R E P O R T S
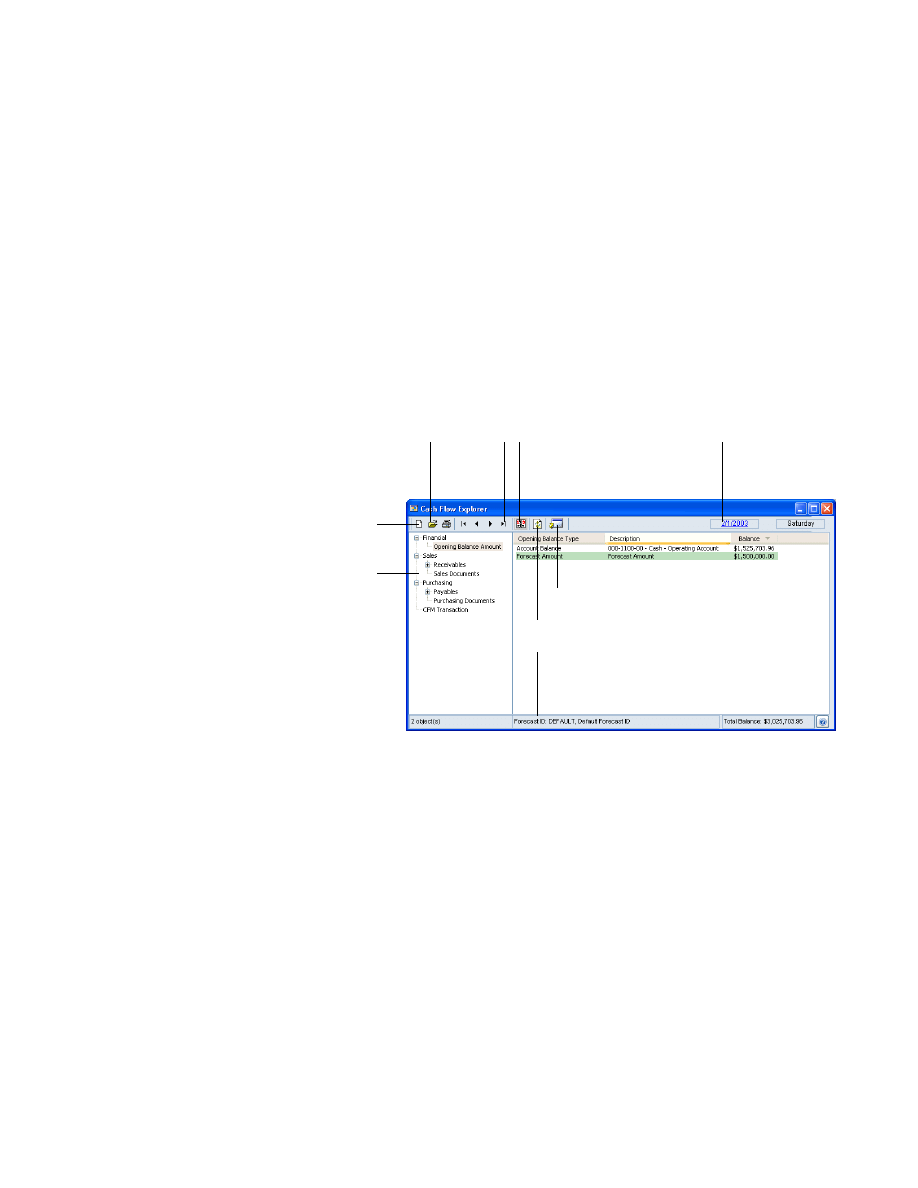
Transaction inquiry using Cash Flow Explorer
The Cash Flow Explorer displays a detailed listing of all source documents that
make up the net change in cash flow for any given day. It displays the hierarchy of
transactions and provides information in an expandable outline. When you select a
given date on the Cash Flow Calendar, the Cash Flow Explorer opens the source
documents for that date and provides detailed information at your fingertips. The
settings in Explorer are based on the default forecast definition settings as
predefined in the Cash Flow Forecast window.
With Cash Flow Explorer, you can easily change the forecast period to a different
day, month, or year. The Cash Flow Explorer provides various reports and inquiries
for supporting or original documents.
To use the Cash Flow Explorer:
1.
Open the Cash Flow Explorer.
(Inquiry >> Financial >> Cash Flow Explorer)
Current Cash Flow
Explorer date
Calendar
button
Browse
buttons
Click + to expand
or - to collapse
groups
Open
button
Refresh button
Default forecast
definition
New file button
Go To button
C H A P T E R 2 I N Q U I R I E S A N D R E P O R T S
14
C A S H F L O W M A N A G E M E N T
2.
Use the controls in the window.
The following table describes tasks you can perform:
To...
Do this...
Change the date of your forecast in the
Explorer
Use the browse buttons to go to the previous
or next month or day.
Create a new forecast definition
Click the New File button on the Explorer
toolbar. The Cash Flow Forecast window will
appear.
Open the Cash Flow Calendar
Click the Calendar button. The Cash Flow
Calendar will appear.
Open the Goto Calendar from the Cash Flow
Explorer
Display the cash flow information for the
selected date
Click on the date in the upper right-hand
corner of the Explorer.
Click on the date in the Goto Calendar. The
Goto Calendar closes and the Explorer
displays the cash flow information for the
selected date.
Open the Inquiry Zoom window
Select the line in the Explorer window that
you would like to open and double-click, OR
Select the line in the Explorer window that
you would like to open and click the
Go To button.
Print report(s)
Click the Print button. From the drop-down
menu, select the report you want to print.
The starting date for the report will be the
current Explorer date. The number of weeks
in the report will depend on the number of
weeks predefined in the Explorer Report
Options field in the Cash Flow Forecast
window.
Refresh the window
Click the Refresh button. If you make changes
to your forecast while the Explorer window is
open, you must click the Refresh button to
see the resulting data changes in the open
Explorer window.
Select and open another Forecast ID
Click the Open button. Select a forecast ID in
the window that appears.
Sort the source transactions
Click the specific column heading. For
example, if you want to sort by Vendor ID,
click the Vendor ID column heading. Click or
right-click the column heading to change the
sorting method.
C A S H F L O W M A N A G E M E N T
15
C H A P T E R 2 I N Q U I R I E S A N D R E P O R T S
Printing weekly reports
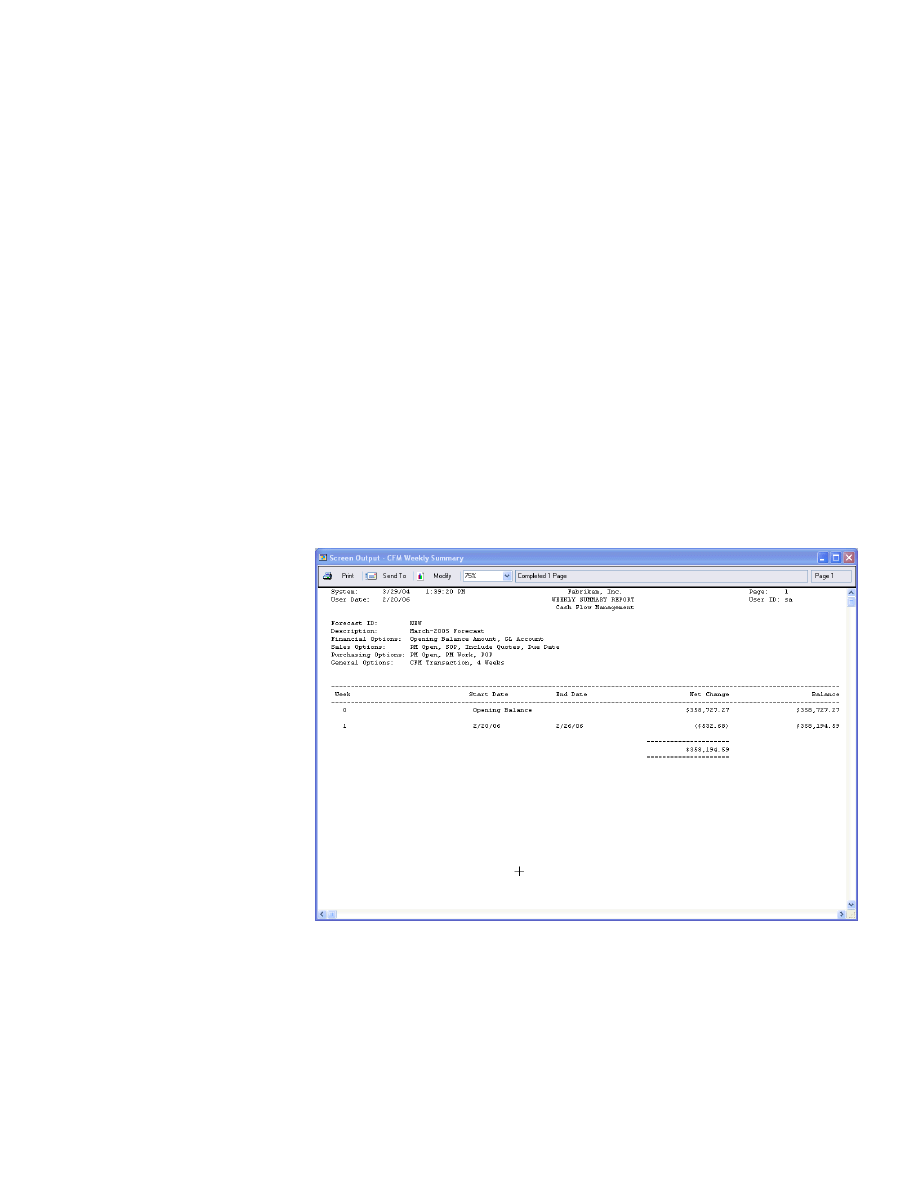
Week 0 on all of the weekly reports indicates the running balance of all the
transactions prior to the start date. The start date for all weekly reports is based on
the current Cash Flow Explorer date. The number of weeks in the report is based on
the number of weeks as predefined in the Explorer Report Options field in the Cash
Flow Forecast window.
To print any of the weekly reports:
1.
Open the Cash Flow Explorer.
(Inquiry >> Financial >> Cash Flow Explorer)
2.
Choose the Print icon, and then from the drop-down menu, select the report of
your choice: Weekly Summary, Weekly Summary by Source, or Weekly Detail
by Source. The Report Destination dialog box appears.
3.
Select the destination(s) for the report and click OK.
Weekly Summary report
The Weekly Summary report displays a summary of the weekly cash flow net
change for a predefined number of weeks beginning with the current Cash Flow
Explorer date. The number of weeks for this report was defined in the Cash Flow
Forecast window (Explorer Report Options field).
C H A P T E R 2 I N Q U I R I E S A N D R E P O R T S
16
C A S H F L O W M A N A G E M E N T
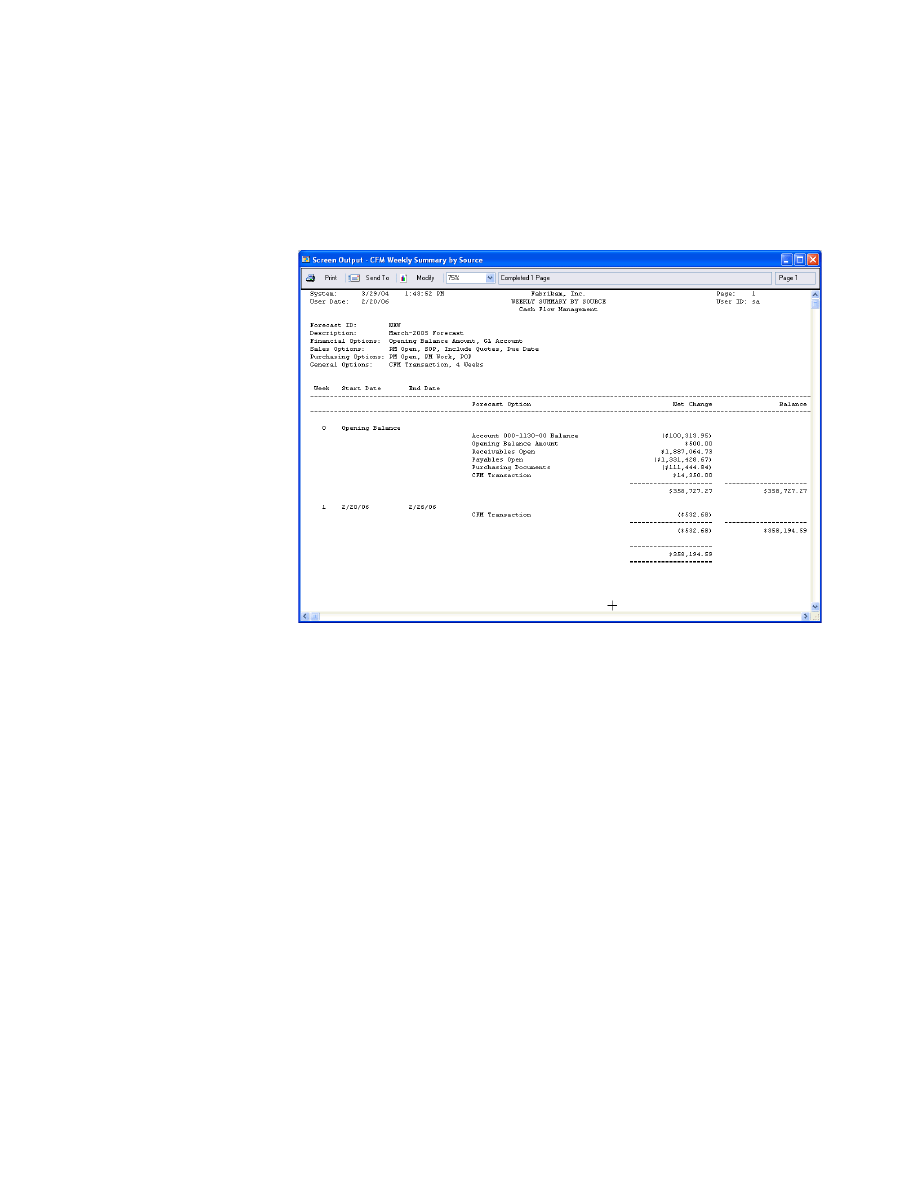
Weekly Summary by Source report
The Weekly Summary by Source report is a weekly cash flow net change report for a
predefined number of weeks—the number of weeks defined in the Cash Flow
Forecast window. This report displays the subtotals of the Forecast definition
options. For example, RM Open indicates the summary of all Receivables
Management transactions that are posted. This report includes the week number,
the source description, start and end dates, net change, and balance for each week.

C A S H F L O W M A N A G E M E N T
17
C H A P T E R 2 I N Q U I R I E S A N D R E P O R T S
Weekly Detail by Source report
The Weekly Detail by Source report is a weekly cash flow net change report for a
predefined number of weeks which displays the detail of the Forecast definition
options. For example, RM Open indicates the detail of all supporting documents for
that given week. It includes the week number, the source description, start and end
dates, Transaction ID (Customer ID or Vendor ID depending on the source),
document number, document date, due date, remaining amount, and balance for
each week.
Printing the Monthly Calendar report
The Monthly Calendar report prints a snapshot of the current Cash Flow Calendar
month. It also displays the net inflows, net outflows, and balance to date as you
would see on the Cash Flow Calendar.
To print the Monthly Calendar report:
1.
Open the Cash Flow Calendar.
(Inquiry >> Financial >> Cash Flow Calendar)
2.
Click either the Previous or the Next button to proceed to the month for which
you want to print a report.
3.
Choose File >> Print; the Report Destination dialog box appears.
4.
Select the destination(s) for the report and click OK.
Document Outline
- Copyright
- Contents
- Introduction
- Chapter 1: Cash flow forecasts and transactions
- Chapter 2: Inquiries and reports
Wyszukiwarka
Podobne podstrony:
Microsoft Dynamics GP 2010 Guides Financials MultilingualChecks
Microsoft Dynamics GP 2010 Guides Financials IntercompanyProcessing
Microsoft Dynamics GP 2010 Guides Financials PaymentDocumentManagement
Microsoft Dynamics GP 2010 Guides Financials ScheduledInstalments
Microsoft Dynamics GP 2010 Guides Financials MultidimensionalAnalysis
Microsoft Dynamics GP 2010 Guides Financials ExportFinancialData
Microsoft Dynamics CRM Online security and compliance planning guide
Microsoft Dynamics CRM 2011 Implementation Guide MicrosoftDynamicsCRM2011WindowsLogo
Microsoft Lync Server 2010 Resource Kit Chapter 04 Conferencing and Collaboration
Microsoft Dynamics CRM 2013 for Outlook Installing Guide
Microsoft Lync Server 2010 Security Guide
Microsoft Dynamics AX zarzadzanie sprzedaza
Microsoft Dynamics CRM 2011 Implementation Guide Microsoft Dynamics CRM 2011 and Claims based Authen
Microsoft Lync Server 2010 Resource Kit Tools Privacy Statement
Getting started with Microsoft SharePoint Foundation 2010
Microsoft Dynamics AX handel
Microsoft Excel 2010 PL Jezyk VBA i makra Akademia Excela e21vba
więcej podobnych podstron