
Microsoft Dynamics
®
GP
Scheduled Instalments

Copyright
Copyright © 2010 Microsoft. All rights reserved.
Limitation of liability
This document is provided “as-is”. Information and views expressed in this document, including
URL and other Internet Web site references, may change without notice. You bear the risk of using
it.
Some examples depicted herein are provided for illustration only and are fictitious. No real
association or connection is intended or should be inferred.
Intellectual property
This document does not provide you with any legal rights to any intellectual property in any
Microsoft product.
You may copy and use this document for your internal, reference purposes.
Trademarks
Microsoft and Microsoft Dynamics are trademarks of the Microsoft group of companies. FairCom
and c-tree Plus are trademarks of FairCom Corporation and are registered in the United States
and other countries.
All other trademarks are property of their respective owners.
Warranty disclaimer
Microsoft Corporation disclaims any warranty regarding the sample code contained in this
documentation, including the warranties of merchantability and fitness for a particular purpose.
License agreement
Use of this product is covered by a license agreement provided with the software product. If you
have any questions, please call the Microsoft Dynamics GP Customer Assistance Department at
800-456-0025 (in the U.S. or Canada) or +1-701-281-6500.
Publication date
May 2010

S C H E D U L E D
I N S T A L M E N T S
i
Contents
...............................................................................................................................................
1
What’s in this manual...................................................................................................................................1
Symbols and conventions ............................................................................................................................2
Resources available from the Help menu..................................................................................................2
Send us your documentation comments ...................................................................................................4
...................................................................................................................................
5
Enabling Scheduled Instalments ................................................................................................................5
Setting up instalment schedules .................................................................................................................5
Assigning scheduled instalments to debtors ............................................................................................6
Assigning scheduled instalments to creditors .........................................................................................7
..................................................................................................................
9
Entering sales transactions with scheduled instalments ........................................................................9
Posting a sales invoice with scheduled instalments ..............................................................................10
Entering purchasing transactions with scheduled instalments ........................................................... 11
Posting a purchasing invoice with scheduled instalments...................................................................12
..........................................................................................
15
Voiding posted sales invoices....................................................................................................................15
Transferring sales personnel commissions..............................................................................................15
Removing historical receivables transactions.........................................................................................15
Voiding posted purchasing invoices ........................................................................................................16
Chapter 4: Enquiry and Reports
...........................................................................................
17
Viewing sales documents generated after posting ................................................................................ 17
Viewing purchasing documents generated after posting .....................................................................17
Printing Scheduled Instalments reports ..................................................................................................1
8
..............................................................................................................................................................
19

ii
S C H E D U L E D
I N S T A L M E N T S

S C H E D U L E D
I N S T A L M E N T S
1
Introduction
Scheduled Instalments is a tool that allows you to split the total amount of an
invoice into different instalments due on different days. For each of these
instalments, the corresponding due date is established as the day on which the
debtor must pay the amount without incurring any additional cost.
You cannot use Payment Terms and Scheduled Instalments together.
Check for current instructions
This information was current as of May 2010. The documentation may be updated
as new information becomes available. Check the Microsoft Dynamics
®
online Web
site (
http://go.microsoft.com/fwlink/?LinkID=161199
) for the most current
documentation.
This introduction is divided into the following sections:
•
•
•
Resources available from the Help menu
•
Send us your documentation comments
What’s in this manual
This manual is designed to give you an understanding of how to use the features of
Scheduled Instalments, and how it integrates with the Microsoft Dynamics GP
system.
To make best use of Scheduled Instalments, you should be familiar with
systemwide features described in the System User’s Guide, the System Setup
Guide, and the System Administrator’s Guide.
Some features described in the documentation are optional and can be purchased
through your Microsoft Dynamics GP partner.
To view information about the release of Microsoft Dynamics GP that you’re using
and which modules or features you are registered to use, choose Help >> About
Microsoft Dynamics GP.
The manual is divided into the following chapters:
•
provides information on setting up and enabling Scheduled
Instalments.
•
provides information about the various transactions
you can process with scheduled instalments.
•
Chapter 3, “Record Maintenance,”
provides information about maintaining
records and searching for information.
•
Chapter 4, “Enquiry and Reports,”
provides information on viewing and
printing Scheduled Instalments reports.
I N T R O D U C T I O N
2
S C H E D U L E D
I N S T A L M E N T S
Symbols and conventions
For definitions of unfamiliar terms, see the glossary in the manual or refer to the
glossary in Help.
This manual uses the following conventions to refer to sections, navigation and
other information.
Resources available from the Help menu
The Microsoft Dynamics GP Help menu gives you access to user assistance
resources on your computer, as well as on the Web.
Contents
Opens the Help file for the active Microsoft Dynamics GP component, and displays
the main “contents” topic. To browse a more detailed table of contents, click the
Contents tab above the Help navigation pane. Items in the contents topic and tab
are arranged by module. If the contents for the active component includes an
“Additional Help files” topic, click the links to view separate Help files that
describe additional components.
To find information in Help by using the index or full-text search, click the
appropriate tab above the navigation pane, and type the keyword to find.
To save the link to a topic in the Help, select a topic and then select the Favorites tab.
Click Add.
Index
Opens the Help file for the active Microsoft Dynamics GP component, with the
Index tab active. To find information about a window that’s not currently displayed,
type the name of the window, and click Display.
About this window
Displays overview information about the current window. To view related topics
and descriptions of the fields, buttons, and menus for the window, choose the
appropriate link in the topic. You also can press F1 to display Help about the current
window.
Symbol Description
The light bulb symbol indicates helpful tips, shortcuts and
suggestions.
The warning symbol indicates situations you should be
especially aware of when completing tasks.
Convention
Description
Creating a batch
Italicized type indicates the name of a section or procedure.
File >> Print or File >
Print
The (>>) or (>) symbol indicates a sequence of actions, such as
selecting items from a menu or toolbar, or pressing buttons in
a window. This example directs you to go to the File menu and
choose Print.
TAB
or
ENTER
All capital letters indicate a key or a key sequence.

S C H E D U L E D
I N S T A L M E N T S
3
I N T R O D U C T I O N
Lookup
Opens a lookup window, if a window that you are viewing has a lookup window.
For example, if the Checkbook Maintenance window is open, you can choose this
item to open the Checkbooks lookup window.
Show Required Fields
Highlights fields that are required to have entries. Required fields must contain
information before you can save the record and close the window. You can change
the font color and style used to highlight required fields. On the Microsoft
Dynamics GP menu, choose User Preferences, and then choose Display.
Printable Manuals
Displays a list of manuals in Adobe Acrobat .pdf format, which you can print or
view.
What’s New
Provides information about enhancements that were added to Microsoft Dynamics
GP since the last major release.
Microsoft Dynamics GP Online
Opens a Web page that provides links to a variety of Web-based user assistance
resources. Access to some items requires registration for a paid support plan.
Current implementation and upgrade information
The most recent
revisions of upgrade and implementation documentation, plus documentation
for service packs and payroll tax updates.
User documentation and resources
The most recent user guides, how-
to articles, and white papers for users.
Developer documentation and resources
The most recent
documentation and updated information for developers.
Product support information
Information about the Microsoft Dynamics
GP product support plans and options that are available, along with
information about peer support and self-support resources.
Services information
Information about Microsoft Dynamics GP support,
training, and consulting services.
Microsoft Dynamics GP Community
Access to newsgroups, where you
can ask questions or share your expertise with other Microsoft Dynamics GP
users.
CustomerSource home page
A wide range of resources available to
customers who are registered for a paid support plan. Includes access to
Knowledge Base articles, software downloads, self-support, and much more.
Customer Feedback Options
Provides information about how you can join the Customer Experience
Improvement Program to improve the quality, reliability, and performance of
Microsoft
®
software and services.

I N T R O D U C T I O N
4
S C H E D U L E D
I N S T A L M E N T S
Send us your documentation comments
We welcome comments regarding the usefulness of the Microsoft Dynamics GP
documentation. If you have specific suggestions or find any errors in this manual,
send your comments by e-mail to the following address:
To send comments about specific topics from within Help, click the Documentation
Feedback link, which is located at the bottom of each Help topic.
Note: By offering any suggestions to Microsoft, you give Microsoft full permission to use
them freely.
S C H E D U L E D
I N S T A L M E N T S
5
Chapter 1:
Setup
Use this information to complete the setup procedures to begin using Scheduled
Instalments.
When you set up Scheduled Instalments, you can open each setup window and
enter information, or you can use the Setup Checklist window (Microsoft Dynamics
GP menu >> Tools >> Setup >> Setup Checklist) to guide you through the setup
process. Refer to your System Setup Guide (Help >> Contents >> select Setting up
the System) for more information about the Setup Checklist window.
This information is divided into the following sections:
•
Enabling Scheduled Instalments
•
Setting up instalment schedules
•
Assigning scheduled instalments to debtors
•
Assigning scheduled instalments to creditors
Enabling Scheduled Instalments
Use the following information to enable Scheduled Instalments.
To enable Scheduled Instalments:
1.
Open the Scheduled Instalment Setup window.
(Microsoft Dynamics GP menu >> Tools >> Setup >> Company >> Instalment
Schedule Setup)
2.
Mark the Enabled Scheduled Instalments option to set default schedules for
debtors and creditors.
3.
Select a predefined scheduled instalment to be set as a default debtor schedule
from the Debtor Scheduled Instalments ID lookup. Click the Default Debtor
Instalment Schedule ID link to set up instalment schedules for debtors.
4.
Select a predefined scheduled instalment to be set as a default creditor schedule
from the Creditor Scheduled Instalments ID lookup. Click the Default Creditor
Instalment Schedule ID link to set up instalment schedules for creditors.
5.
Choose OK to close the window.
Setting up instalment schedules
Use the following information to set up the instalment schedules for both payments
and receipts.
C H A P T E R 1 S E T U P
6
S C H E D U L E D
I N S T A L M E N T S
To set up instalment schedules:
1.
Open the Instalment Schedule Maintenance window.
(Microsoft Dynamics GP menu >> Tools >> Setup >> Company >> Instalment
Schedule Maintenance).
2.
Enter or select the instalment schedule ID.
3.
Enter a brief description for the instalment schedule ID in the Description field.
4.
Enter the number of instalments into which the invoice amount is divided in
the Number of Instalments field.
5.
Enter the number of days between the invoice date and the first instalment
payday in the Days to First Instalment field.
6.
Enter the number of days between each instalment in the Instalment Interval
field.
The following example shows how the due dates and payment deadlines based on
the data provided are calculated:
A particular creditor’s invoice for an amount of $660 is recorded on the 10th of
April, 2005. The Scheduled Instalments agreed with the Creditor is 30/60/90 days
from the date of the invoice.
The information posted in this window can be modified at any time. This is possible even
when the plan is associated with debtors or creditors and has been used in purchase and sales
transactions. Any scheduled instalments can also be deleted without causing any damage
regardless of whether it has been assigned to the entities or whether transactions have been
carried out with them.
Assigning scheduled instalments to debtors
Use the following information to allow you to associate a scheduled instalments ID
with each debtor and thus allow the invoice to be divided automatically when
issued. You can specify paydays and nonpaying months which influence the
calculation of the due dates.
Purchase Invoice
Due Date
Instalment Amount
Total Amount Payable:
$660
Invoice Date: 10-04-2005
Scheduled Instalments: 30/
60/90.
1st 10-05-2005
2nd 09-06-2005
3rd 09-07-2005
$220
$220
$220
S C H E D U L E D
I N S T A L M E N T S
7
C H A P T E R 1 S E T U P
To assign scheduled instalments to debtors:
1.
Open the Debtor Instalment Schedule Maintenance window.
(Cards >> Sales >> Instalment Schedule)
2.
Enter or select a debtor ID in the Debtor ID field.
3.
Select an instalment schedule ID in the Instalment Schedule ID field.
4.
In the Payday 1,2,3 and 4 fields, you can specify up to four dates on which the
payment will be due. All instalment due dates falling before the date entered in
the Payday 1 field will be payable on Payday 1, and so on for Payday 2,3, and 4.
For example, if you specify Payday 1 as 10, then all instalment due dates
between 1 and 10 of a month will be due on the 10th of that month.
5.
Enter up to two months in which no payments are due in the Nonpaying Month
1 and 2 fields.
For example, if one of the instalment due dates falls in August and the debtor is
closed for the summer holidays during that month, you can specify August as
Nonpaying Month 1. The instalment due date will be moved to the following
month. This takes care of the condition of a debtor being on holiday.
The chosen scheduled instalments may be changed at any time and a new schedule
may be assigned to the debtor. This is regardless of the invoices being prepared
previously as different scheduled instalments cannot be assigned to the same
debtor. Debtor instalment schedule associated with a debtor will be voided
automatically when the debtor’s record is voided.
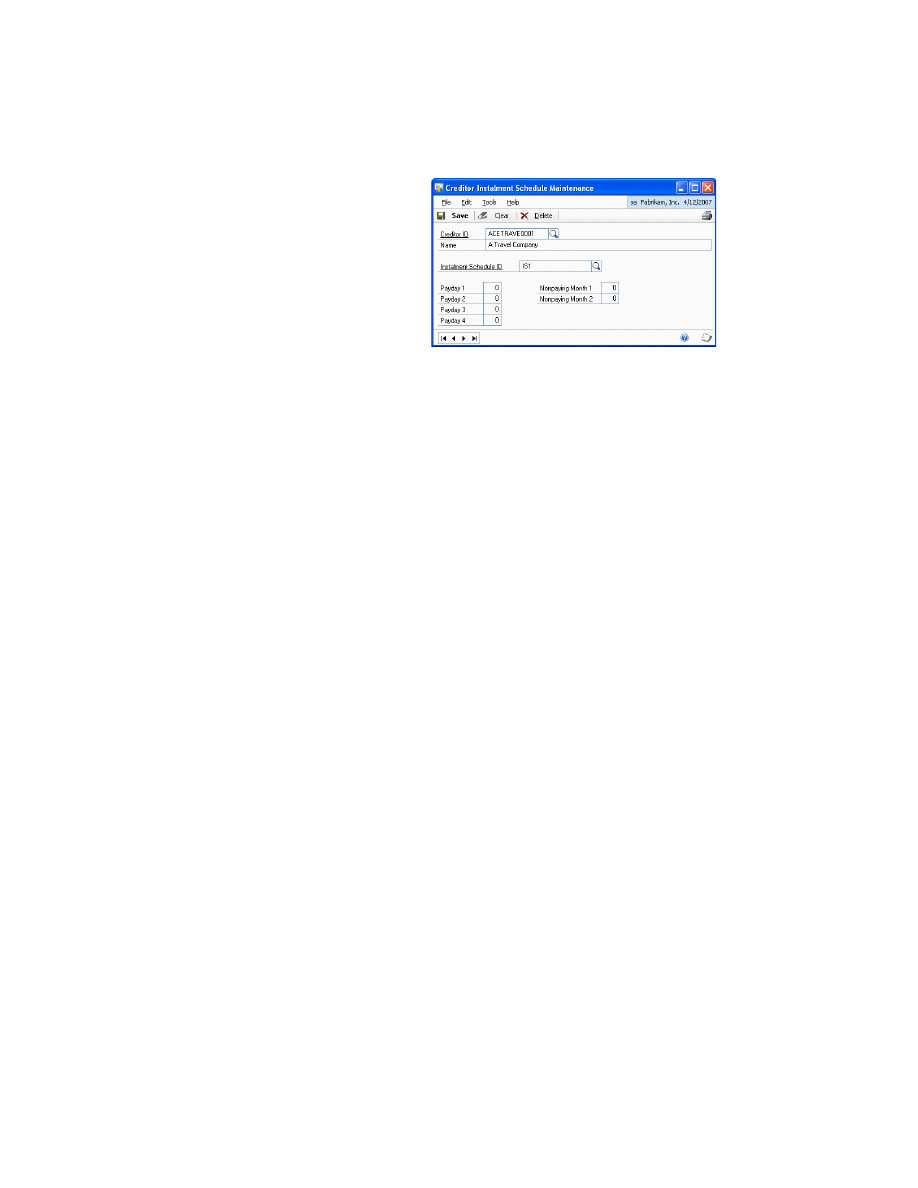
Assigning scheduled instalments to creditors
Use the following information to allow you to associate a scheduled instalments ID
with each creditor and thus allow the invoice to be divided automatically when it is
recorded. You can specify paydays and nonpaying months which influence the
calculation of the due dates.
C H A P T E R 1 S E T U P
8
S C H E D U L E D
I N S T A L M E N T S
To assign scheduled instalments to creditors:
1.
Open the Creditor Instalment Schedule Maintenance window.
(Cards >> Purchasing >> Instalment Schedule)
2.
Enter or select a creditor ID in the Creditor ID field.
3.
Select an instalment schedule ID in the Instalment Schedule ID field.
4.
In the Payday 1,2,3 and 4 fields, you can specify up to four dates on which the
payment will be due. All instalment due dates falling before the date entered in
the Payday 1 field will be payable on Payday 1, and so on for Payday 2,3, and 4.
For example, if you specify Payday 1 as 10, then all instalment due dates
between 1 and 10 of a month will be due on the 10th of that month.
5.
Enter up to two months in which no payments are due in the Nonpaying Month
1 and 2 fields. The due dates for these instalments will be shifted to the same
date of the following month.
For example, if one of the instalment due dates falls in August and the creditor
is closed for the summer holidays during that month, you can specify August as
Nonpaying Month 1. The instalment due date will be moved to the following
month. This takes care of the condition of a creditor being on holiday.
The chosen scheduled instalments may be changed at any time and a new schedule
may be assigned to the creditor. This is regardless of the invoices being prepared
previously as different scheduled instalments cannot be assigned to the same
creditor. Creditor instalment schedule associated with a creditor will be voided
automatically when the creditor’s record is voided.
S C H E D U L E D
I N S T A L M E N T S
9
Chapter 2:
Transactions
You can understand the processes that take place in the daily sales (Receivables
Management and Sales Order Processing) and purchasing (Payables Management
and Purchase Order Processing) modules when you post a transaction with
scheduled instalments. Internally, batch processing is also integrated with
scheduled instalments.
Scheduled Instalments can only be applied to invoice-type documents. This function is
unavailable in the Invoicing module.
This information is divided into the following sections:
•
Entering sales transactions with scheduled instalments
•
Posting a sales invoice with scheduled instalments
•
Entering purchasing transactions with scheduled instalments
•
Posting a purchasing invoice with scheduled instalments
Entering sales transactions with scheduled
instalments
You can select one of the available instalment schedules or assign one to a debtor
who does not have an associated instalment schedule. The instalments for the
selected schedule are calculated automatically.
You must enter the document number and date, debtor ID, amount on account in the
Receivables Transaction Entry window or the Sales Transaction Entry window to open the
Debtor Instalment Schedule Entry window. The Payment Terms field must be blank.
To enter sales transactions with scheduled instalments:
1.
Open the Debtor Instalment Schedule Entry window.
(Transactions >> Sales >> Transaction Entry >> Additional >> Schedule
Instalment)
(Transactions >> Sales >> Sales Transaction Entry >> Additional >> Schedule
Instalment)
2.
The Doc. Number and Doc. Date fields display the values entered for the
invoice in the Transaction Entry window.

C H A P T E R 2 T R A N S A C T I O N S
10
S C H E D U L E D
I N S T A L M E N T S
3.
The On Account field displays the amount calculated for the invoice in the
Transaction Entry window.
4.
The Instalment Schedule ID field displays the Instalment Schedule ID assigned
to the debtor. You can assign a schedule instalment for a transaction if it has not
been assigned one. Refer to
Assigning scheduled instalments to debtors
for more information.
5.
The instalment due dates are calculated according to the instalment schedule ID
you have entered and are displayed in the Due Date column in the scrolling
window. If you change the instalment schedule ID, the due dates are
recalculated. You can edit the values in the Due Date field.
6.
The instalment amounts are calculated according to the instalment schedule ID
you have entered and are displayed in the Doc. Amount column in the scrolling
window. If you change the instalment schedule ID, the amounts are
recalculated. You can change the values in the Doc. Amount field, provided
that the total of all Doc. Amounts is equal to the value in the On Account field
in the Transaction Entry window.
7.
The Total field displays the total of all instalment amounts. If this total is not
equal to the value in the On Account field in the Transaction Entry window, the
difference is displayed in the Difference field. You can post an invoice only if
the value in the Difference field is zero.
When the amount on the original invoice cannot be divided on an equal basis for each
instalment, it will be rounded off in the final instalment.
8.
Choose Redisplay to update the window with changes you’ve made.
9.
Choose Save to save the information you have entered and close the window.
Posting a sales invoice with scheduled instalments
The following processes take place when you post a sales invoice with scheduled
instalments:
•
A credit memo is created corresponding to the original invoice, to which the
total amount of the original invoice is applied automatically. The document
number for the credit memo corresponds to the next document number
available for this type of document. You cannot unapply this credit memo.
•
The current transaction amount of the original document is set to zero, and the
original invoice and the credit memo remains open in Receivables Management
until all the related instalments have been fully paid. You can move the original
invoice to history in the Paid Sales Transaction Removal window (Microsoft
Dynamics GP menu >> Tools >> Routines >> Sales >> Paid Transaction
Removal).
•
An invoice document is created in Receivables Management for each
instalment. Each invoice is numbered so that it reflects the original invoice
number, suffixed with a two digit number. For example, if the invoice
document number 100102 has three instalments, the resulting instalment
invoices in Receivables Management are numbered 100102.01, 100102.02 and
100102.03.
S C H E D U L E D
I N S T A L M E N T S
11
C H A P T E R 2 T R A N S A C T I O N S
•
The amounts and due dates of the instalment invoices are calculated based on
the instalments set up for the scheduled instalment ID assigned to the original
invoice. The instalment invoices maintain the same currency as the original
invoice and the characteristics of the batch of the original invoice.
•
The credit memo and the instalment invoices do not indicate the VAT amount
(to avoid results from being cancelled in VAT reports). They also do not create
account entries (to avoid information from being cancelled in General Ledger).
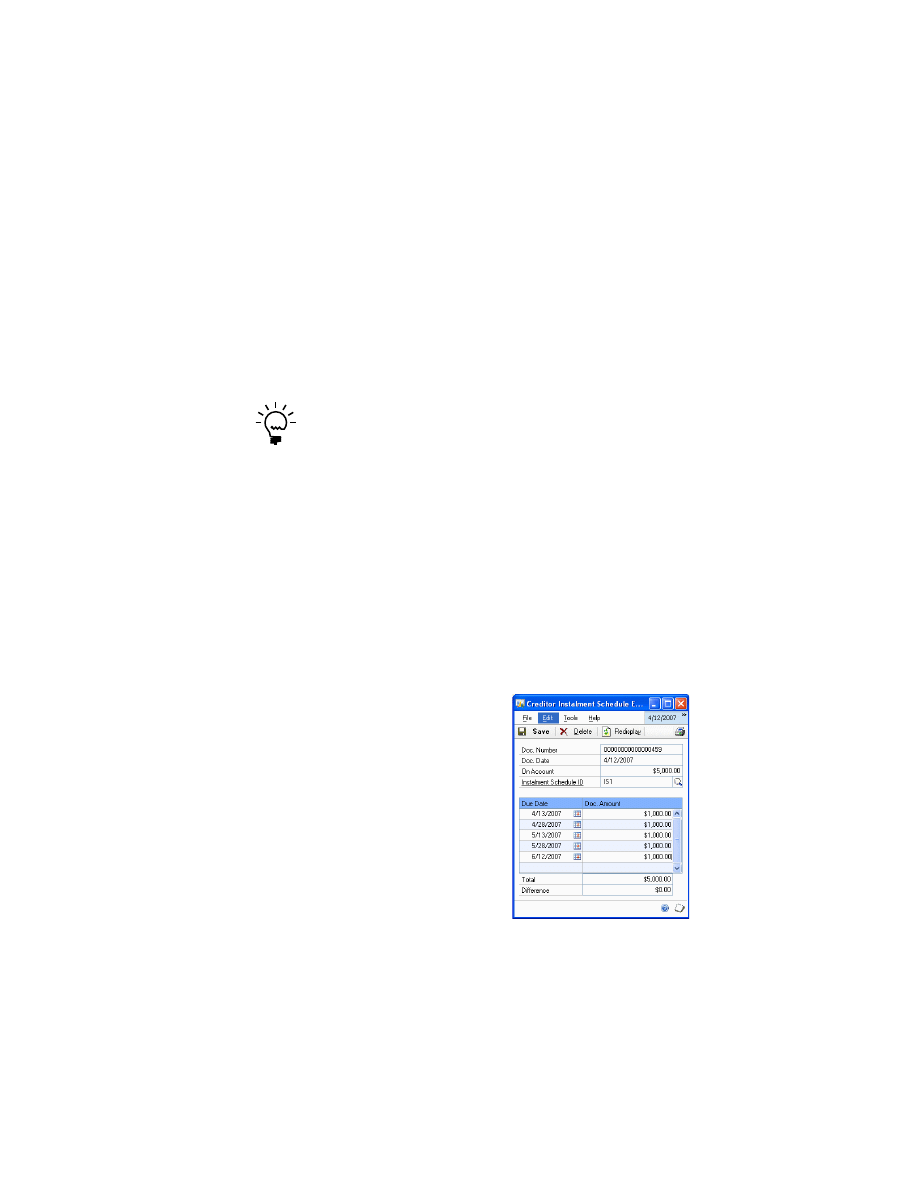
Entering purchasing transactions with scheduled
instalments
You can select one of the available instalment schedules or assign one to a creditor
who does not have an associated instalment schedule. The instalments for the
selected schedule are calculated automatically. If you do not assign an instalment
schedule to an invoice, the document will function as a standard document.
You must enter the voucher number and date, creditor ID, document number, and
amount on account in the Purchasing Transaction Entry window to be able to open the
Creditor Instalment Schedule Entry window through the Additional menu. The
Payment Terms field must be blank.
To enter purchasing transactions with scheduled
instalments:
1.
Open the Creditor Instalment Schedule Entry window.
(Transactions >> Purchasing >> Transaction Entry >> Additional >> Schedule
Instalment)
(Transactions >> Purchasing >> Receivings Transaction Entry >> Enter a
Shipment/ Invoice >> Additional >> Schedule Instalment)
(Transactions >> Purchasing >> Enter/ Match Invoices >> Enter an Invoice >>
Additional >> Schedule Instalment)
2.
The Doc. Number and Doc. Date fields display the values entered for the
invoice in the Transaction Entry window.
3.
The On Account field displays the amount calculated for the invoice in the
Transaction Entry window.

C H A P T E R 2 T R A N S A C T I O N S
12
S C H E D U L E D
I N S T A L M E N T S
4.
The Instalment Schedule ID field displays the Instalment Schedule ID assigned
to the creditor. You can assign a schedule instalment for a transaction if it has
not been assigned one. Refer to
Assigning scheduled instalments to creditors
page 7, for more information.
5.
The instalment due dates are calculated according to the instalment schedule ID
you have entered and are displayed in the Due Date column in the scrolling
window. If you change the instalment schedule ID, the due dates are
recalculated. You can edit the values in the Due Date field.
6.
The instalment amounts are calculated according to the instalment schedule ID
you have entered and are displayed in the Doc. Amount column in the scrolling
window. If you change the instalment schedule ID, the amounts are
recalculated. You can change the values in the Doc. Amount field, provided
that the total of all Doc. Amounts is equal to the value in the On Account field
in the Transaction Entry window.
7.
The Total field displays the total of all instalment amounts. If this total is not
equal to the value in the On Account field in the Transaction Entry window, the
difference is displayed in the Difference field. You can post an invoice only if
the value in the Difference field is zero.
When the amount on the original invoice cannot be divided on an equal basis for each
instalment, it will be rounded off in the final instalment.
8.
Choose Redisplay to update the window with changes you’ve made.
9.
Choose Save to save the information you have entered and close the window
Posting a purchasing invoice with scheduled
instalments
When you post a purchasing invoice with scheduled instalments, the following
processes take place:
•
A credit memo is created corresponding to the original invoice, to which the
total amount of the original invoice is applied automatically. The document
number for the credit memo corresponds to the next document number
available for this type of document. You cannot unapply this credit memo.
•
The current transaction amount of the original document is set to zero, and the
original invoice and the credit memo confirming payment of this invoice are
automatically transferred to history.
•
A voucher document is created in Payables Management for each instalment.
Each voucher is numbered so that it reflects the original creditor invoice
number entered in the original invoice, suffixed with a two digit number. For
example, if the creditor invoice number 100102 has three instalments, the
resulting instalment invoices in Payables Management are numbered
100102.01, 100102.02 and 100102.03.
•
The amounts and due dates of the instalment invoices are calculated based on
the instalments set up in the scheduled instalment ID assigned to the original
invoice. The instalment invoices maintain the same currency as the original
invoice and the characteristics of the batch of the original invoice.

S C H E D U L E D
I N S T A L M E N T S
13
C H A P T E R 2 T R A N S A C T I O N S
•
The credit memo and the instalment invoices do not indicate the VAT amount
(to avoid results from being cancelled in VAT reports). They also do not create
account entries (to avoid information from being cancelled in General Ledger).

14
S C H E D U L E D
I N S T A L M E N T S

S C H E D U L E D
I N S T A L M E N T S
15
Chapter 3:
Record Maintenance
You can understand the procedures for transaction maintenance, such as voiding,
transferring commissions and removing historical receivables transactions.
This information is divided into the following sections:
•
•
Transferring sales personnel commissions
•
Removing historical receivables transactions
•
Voiding posted purchasing invoices
Voiding posted sales invoices
Use the Receivables Posted Transaction Maintenance window (Transactions >>
Sales >> Posted Transactions) to void a posted sales invoice with scheduled
instalments.
•
You can only void an original sales invoice that has been posted, if none of the
instalment invoices associated with it have been applied either partially or
fully.
•
When you void an original invoice, the corresponding credit memo and all the
associated instalment invoices are automatically voided.
•
Neither the credit memo nor the instalment invoices will create an account
entry.
•
The Void button is not available if you select an instalment invoice in the
Receivables Posted Transaction Maintenance window.
Refer to the Receivables Management documentation for more information on
voiding posted sales invoices.
Transferring sales personnel commissions
Use the Transfer Sales Commissions window (Microsoft Dynamics GP menu >>
Tools >> Routines >> Sales >> Transfer Commission) to transfer sales personnel
commissions on invoices with scheduled instalments.
If you have marked the option Pay Commissions after Invoice Paid in the
Receivables Management Setup window (Microsoft Dynamics GP menu >>
Tools >> Setup >> Sales >> Receivables), commissions will be paid when all the
instalments of the corresponding invoice have been paid and fully applied.
Refer to the Sales Order Processing documentation for more information on
transferring sales commissions.
Removing historical receivables transactions
Use the Remove Receivables Transaction History window (Microsoft Dynamics GP
menu >> Tools >> Utilities >> Sales >> Remove Transaction History) to remove
historical invoices with Scheduled Instalments. You cannot remove a historical
invoice unless all its associated instalments have been fully applied.

C H A P T E R 3 R E C O R D M A I N T E N A N C E
16
S C H E D U L E D
I N S T A L M E N T S
Refer to the Receivables Management documentation for more information on
voiding historical receivables transactions.
Voiding posted purchasing invoices
You can void a posted purchasing invoice with scheduled instalments by voiding its
associated credit memo in the Void Historical Payables Transactions window
(Transactions >> Purchasing >> Void Historical Transactions).
•
You can only void a credit memo if the associated instalment invoices have not
been applied. If any of the instalment invoices have been partially or fully
applied, you must first unapply them.
•
When you void a credit memo, the corresponding original invoice and all the
associated instalment invoices are automatically voided.
Refer to the Payables Management documentation for more information on voiding
posted purchasing invoices.

S C H E D U L E D
I N S T A L M E N T S
17
Chapter 4:
Enquiry and Reports
You can view and print various documents and reports for transactions with
Scheduled Instalments.
This information is divided into the following sections:
•
Viewing sales documents generated after posting
•
Viewing purchasing documents generated after posting
•
Printing Scheduled Instalments reports
Viewing sales documents generated after posting
You can view documents generated after posting a sales invoice in the Receivables
Transaction Enquiry - Debtor window.
To view sales documents generated after posting:
1.
Open the Receivables Transaction Enquiry- Debtor window.
(Enquiry >> Sales >> Transaction by Debtor)
2.
You can view the following documents in the scrolling window:
•
Original invoice
•
Instalment invoices according to the instalment schedule assigned to the
original invoice
•
Credit memo applied to the original invoice
3.
Click the Document No. link to check the details of each document.
Viewing purchasing documents generated after
posting
You can view documents generated after posting a purchasing invoice in the
Payables Transaction Enquiry- Creditor window
To view purchasing documents generated after posting:
1.
Open the Payables Transaction Enquiry- Creditor window.
(Enquiry >> Purchasing >> Transaction by Creditor)
2.
You can view the following documents in the scrolling window:
•
Original invoice
•
Instalment invoices as per the instalment schedule assigned to the original
invoice
•
Credit memo applied to the original invoice
3.
Click the Document No. link to check the details of each document.

C H A P T E R 4 E N Q U I R Y A N D R E P O R T S
18
S C H E D U L E D
I N S T A L M E N T S
Printing Scheduled Instalments reports
You can view or print reports for the scheduled instalments you have set up and
used in transactions.
The following scheduled instalments reports can be printed:
Instalment Schedule Maintenance Report
You can print a report that shows all the scheduled instalments set up in the
company from the Instalment Schedule Maintenance window.
To print the Instalment Schedule Maintenance Report, choose (Microsoft Dynamics
GP menu >> Tools >> Setup >> Company >> Instalment Schedule Maintenance >>
Choose the Print icon).
Debtor Instalment Schedule Maintenance Report
You can print a report that shows the instalment schedule ID and payment terms set
up for each debtor from the Debtor Instalment Schedule Maintenance window.
To print the Debtor Instalment Schedule Maintenance Report, choose (Cards >>
Sales >> Instalment Schedule >> Choose the Print icon).
Creditor Instalment Schedule Maintenance Report
You can print a report that shows the instalment schedule ID and payment terms set
up for each creditor from the Creditor Instalment Schedule Maintenance window.
To print the Creditor Instalment Schedule Maintenance Report, choose (Cards >>
Purchasing >> Instalment Schedule >> Choose the Print icon).
Debtor Instalment Schedule report
You can print a report that shows the due dates and instalment amount for each
instalment for a selected sales invoice from the Debtor Instalment Schedule Entry
window.
To print the Debtor Instalment Schedule Report, choose (Transactions >> Sales >>
Transaction Entry >> Additional >> Schedule Instalment >> Choose the Print icon).
Creditor Instalment Schedule report
You can print a report that shows the due dates and instalment amount for each
instalment for a selected purchasing invoice from the Creditor Instalment Schedule
Entry window.
To print the Creditor Instalment Schedule Report, choose (Transactions >>
Purchasing >> Transaction Entry >> Additional >> Schedule Instalment >> Choose
the Print icon).

S C H E D U L E D
I N S T A L M E N T S
19
Index
C
changes since last release, information
Creditor Instalment Schedule Entry
Maintenance Report, printing 18
Maintenance window, displaying 8
Creditor Instalment Schedule Report,
current upgrade information, accessing on
D
Debtor Instalment Schedule Entry
Debtor Instalment Schedule Maintenance
Debtor Instalment Schedule Maintenance
Debtor Instalment Schedule Report,
documentation, symbols and conventions
H
help, displaying 2
Help menu, described 2
historical sales invoices, removing 15
I
icons, used in manual 2
Instalment Schedule Maintenance Report,
Instalment Schedule Maintenance
Instalment Schedule reports, printing 17
instalment schedules
for creditors 7
for debtors 6
setting up 5
L
lessons, accessing 3
lookup window, displaying 3
N
navigation, symbols used for 2
new features, information about 3
P
purchasing invoices
posting 12
viewing 17
voiding 16
purchasing transactions, entering 11
R
required fields, described 3
resources, documentation 2
S
sales commissions, transferring 15
sales invoices
posting 10
viewing 17
voiding 15
sales transactions, entering 9
Scheduled Instalment Setup window,
Scheduled Instalments
T
U
upgrade information, accessing on the
W

20
S C H E D U L E D
I N S T A L M E N T S
Document Outline
- Copyright
- Contents
- Introduction
- Chapter 1: Setup
- Chapter 2: Transactions
- Chapter 3: Record Maintenance
- Chapter 4: Enquiry and Reports
- Index
Wyszukiwarka
Podobne podstrony:
Microsoft Dynamics GP 2010 Guides Financials CashFlowManagement
Microsoft Dynamics GP 2010 Guides Financials MultilingualChecks
Microsoft Dynamics GP 2010 Guides Financials IntercompanyProcessing
Microsoft Dynamics GP 2010 Guides Financials PaymentDocumentManagement
Microsoft Dynamics GP 2010 Guides Financials MultidimensionalAnalysis
Microsoft Dynamics GP 2010 Guides Financials ExportFinancialData
Microsoft Dynamics CRM Online security and compliance planning guide
Microsoft Dynamics CRM 2011 Implementation Guide MicrosoftDynamicsCRM2011WindowsLogo
Microsoft Lync Server 2010 Resource Kit Chapter 04 Conferencing and Collaboration
Microsoft Dynamics CRM 2013 for Outlook Installing Guide
Microsoft Lync Server 2010 Security Guide
Microsoft Dynamics AX zarzadzanie sprzedaza
Microsoft Dynamics CRM 2011 Implementation Guide Microsoft Dynamics CRM 2011 and Claims based Authen
Microsoft Lync Server 2010 Resource Kit Tools Privacy Statement
Getting started with Microsoft SharePoint Foundation 2010
Microsoft Dynamics AX handel
Microsoft Excel 2010 PL Jezyk VBA i makra Akademia Excela e21vba
więcej podobnych podstron