Workshop 1: AVR C Programming Learning Platform
Introducing the AVR C Programming Workshop Series
6/6/08 Joe Pardue © 2008
C Programming and microcontrollers are two big topics, practically continental in size, and like
continents, are easy to get lost in. Combining the two is a little like traipsing from Alaska to
Tierra del Fuego. Chances are you’ll get totally lost and if the natives don’t eat you, your infected
blisters will make you want to sit and pout. I’ve been down this road so many times that I
probably have my own personal rut etched in the metaphorical soil, and I can point to the sharp
rocks I’ve stepped on, the branches that have whacked me in the face, and the bushes from which
the predators leapt. If you get the image of a raggedy bum stumbling through the jungle, you’ve
got me right. Consider these workshops a combination roadmap, guidebook, and emergency first
aid kit for your journey into this fascinating, but sometimes dangerous world.
I highly recommend that you get the book, ‘The C Programming Language – second edition’ by
Kernighan and Ritchie, here after referred to as K&R. Dennis Ritchie, Figure 1, wrote C, and his
book is the definitive source on all things C.
Figure 1: C being invented
In Figure 1, Dennis Ritchie, inventor of the C programming language stands next to Ken
Thompson, original inventor of Unix, designing the original Unix operating system at Bell Labs
on a PDP-11
1

Workshop 1: AVR C Programming Learning Platform
I have chosen to follow that book’s organization structure in this series of workshops. The main
difference is that their book is machine independent and gives lots of examples based on
manipulating text, while these workshops are machine dependent, specifically based on the AVR
microcontroller, and the examples are as microcontroller oriented as I can make them.
Why C?
Back in the dark ages of microprocessors, software development was done exclusively in the
specific assembly language of the specific device. These assembly languages were character
based ‘mnemonic’ substitutions for the numerical machine language codes. Instead of writing
something like: 0x12 0x07 0xA4 0x8F to get the device to load a value into a memory location,
you could write something like: MOV 22 MYBUFFER+7. The assembler would translate that
statement into the machine language for you. I’ve written code in machine language (as a learning
experiment) and believe me when I tell you that assembly language is a major step up in
productivity. But a device’s assembly language is tied to the device and the way the device works.
Assembly languages are hard to master, and become obsolete for you the moment you change
microcontroller families. They are specific purpose languages that work only on specific
microprocessors. C is a general-purpose programming language that can work on any
microprocessor that has a C compiler written for it. C abstracts the concepts of what a computer
does and provides a text based logical and readable way to get computers to do what computers
do. Once you learn C, you can move easily between microcontroller families, write software
much faster, and create code that is much easier to understand and maintain.
Why AVR?
There are many excellent microcontroller families out there, but I chose the AVR because, among
many reasons, it was designed with the C Programming language in mind, has Flash memory that
can be configured with a bootloader (more on all this later), and has the best user forum I’ve ever
used:
.
The AVR is fast, cheap, in-circuit programmable, and development software can be had for FREE
(really free, not crippled or limited in any way). I’ve paid thousands of dollars for development
boards, programming devices, and C compilers for the other micros, but never again -- I like free.
The hardware used in these workshops, the Atmel AVR Butterfly, can be modified with a few
components to turn it into a decent learning system and the needed components can be had for
less than $40.00. You can’t get a better learning system for 10 times this price and you can pay
100 times this and not get as good.
You will often stumble across arguments on the Internet as to which microcontroller or
programming language is the ‘best’. People take sides and soon a religious war breaks out. I don’t
want to enter that fray so I’ll just say that the AVR is the best microcontroller and C is the best
2

Workshop 1: AVR C Programming Learning Platform
programming language and if you don’t believe me: you are bound for perdition - hallelujah and
amen.
Workshop Goals
What I hope to accomplish with this series is to help you learn SOME C programming on A
SPECIFIC microcontroller and provide you with enough foundation knowledge that you can go
off on your own somewhat prepared to tackle the many kinds of microcontrollers and C
programming systems that infest the planet.
Both C programming and microcontrollers are best learned while doing projects. I’ve tried to
provide projects that enhance the learning process, but I’ve got to admit that some of the projects
are pretty lame and are put in mainly to help you learn C syntax and methods.
I know how easy it is to get bogged down in all the detail and lose momentum on this journey, so
we’ll begin with a quick start guide and learn just enough to get our learning platform tools
working -- kind of a jet plane ride over the territory.
Quick Start Guide for the AVR Learning Platform
Software
AVRStudio – FREE and darn well worth it.
AVR Studio is provided free by the good folks at Atmel Corporation, who seem to understand
that the more helpful free stuff they give developers, the more they will sell their
microcontrollers. Actually, this software could cost hundreds and still be darn well worth it, but
unless you just really like Norway, don’t send them any money, they’ll get theirs on the backend
when you start buying thousands of AVRs for your next great invention. The workshop is based
on version 4.14 and if you use a newer version you may find differences in it and our discussions.
You can find AVRStudio at
under the AVR Tools & Software section:
http://atmel.com/dyn/products/tools_card.asp?tool_id=2725
).
WinAVR – Oh, Whenever…
WinAVR is a GCC compiler toolset for Windows that we will use in AVRStudio. We will use
this package under the AVR Studio IDE that has a GCC plug-in that finds the WinAVR
installation and adapts it to the IDE. You can find WinAVR at:
http://sourceforge.net/projects/winavr/ .
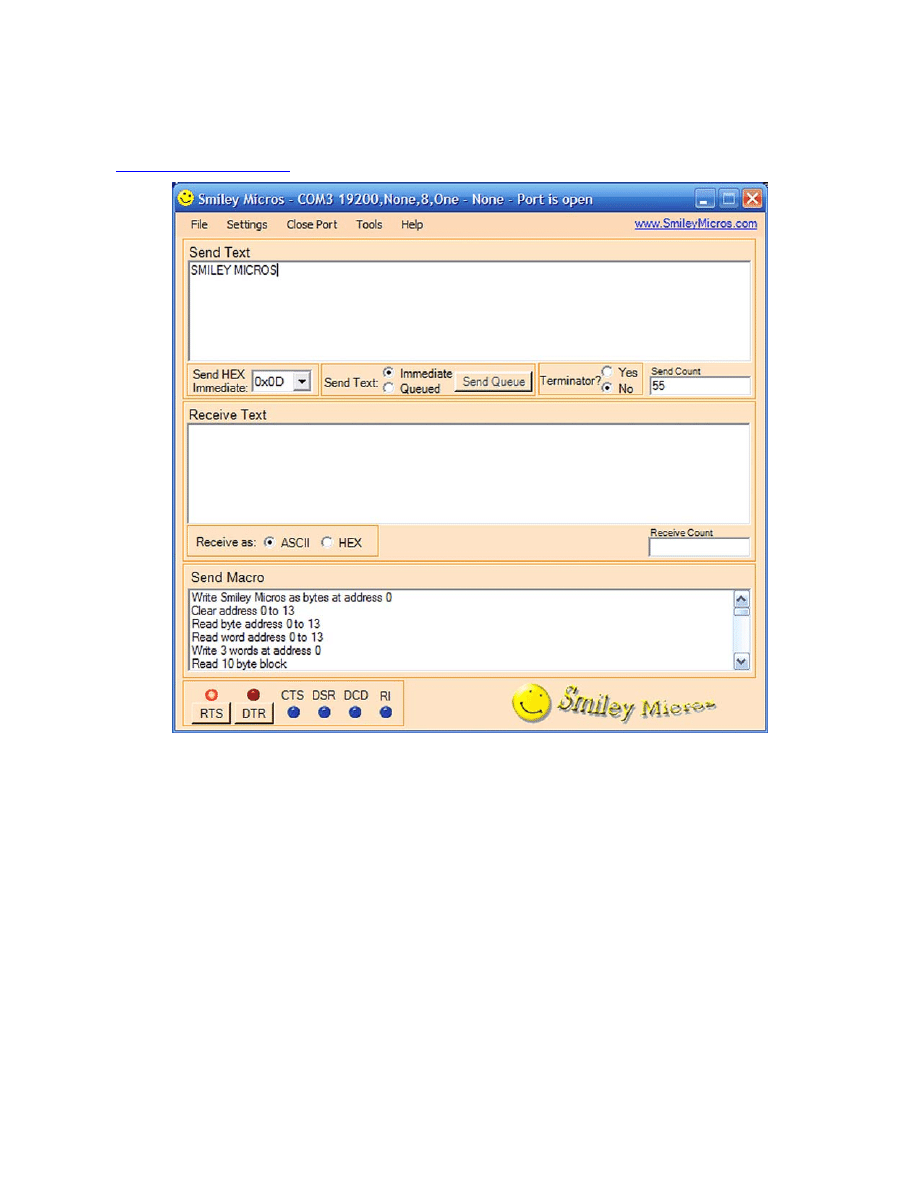
Developer Terminal
Figure 2: Developer Terminal shows the PC terminal we will use to communicate with the AVR in
our workshop. You can get the terminal installer and related documents from
. The source code in C# and Visual Basic .NET for this terminal is
3
Workshop 1: AVR C Programming Learning Platform
discussed in detail in the book: Virtual Serial Port Cookbook, by Joe Pardue and available from
and Nuts and Volts.
Figure 2: Developer Terminal
4
Workshop 1: AVR C Programming Learning Platform
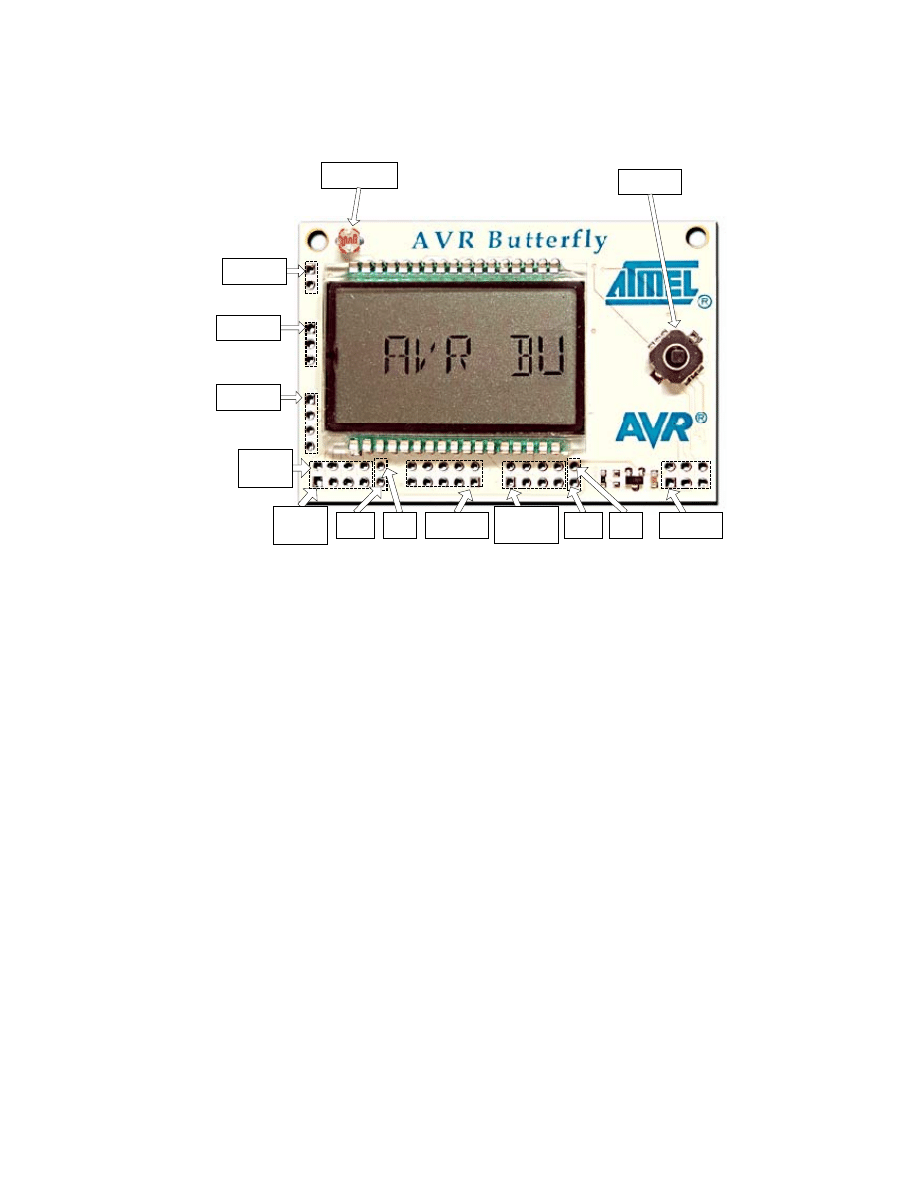
Hardware
ADC
USART
USI
PORTB
Pin 1
JTAG
PORTD
Pin1
ISP
Light Sensor
Joystick
+3V
GND
GND
+3V
PORTB
Pin 2
Figure 3: The Butterfly front
It is simply amazing what the Butterfly has built in:
• 100 segment LCD display
• 4 Mbit (that’s 512,000 bytes!) dataflash memory
• Real Time Clock 32.768 kHz oscillator
• 4-way joystick, with center push button
• Light sensor
• Temperature sensor
• ADC voltage reading, 0-5V
• Piezo speaker for sound generation
• Header connector pads for access to peripherals
• RS-232 level converter for PC communications
• Bootloader for PC based programming without special hardware
• Pre-programmed demos with source code
• Built-in safety pin for hanging from your shirt (GEEK POWER!)
• Kitchen sink.
I mean this thing has everything (except a kitchen sink… sorry). If anyone can find a learning
platform with anywhere near this much for this price, I want to hear about it. If I seem to be
raving a bit, get used to it, I do that a lot.
5
Workshop 1: AVR C Programming Learning Platform
The AVR Butterfly box has instructions to show you how to use the built-in functions. Play with it
now before you risk destroying it in the next step. I shudder to think how many of these things
will get burned up, blown up, stepped on, and drenched in coffee. And that’s just me this morning.
After you’ve seen how it works out of the box, remove the battery and prepare to add components
for our learning platform.
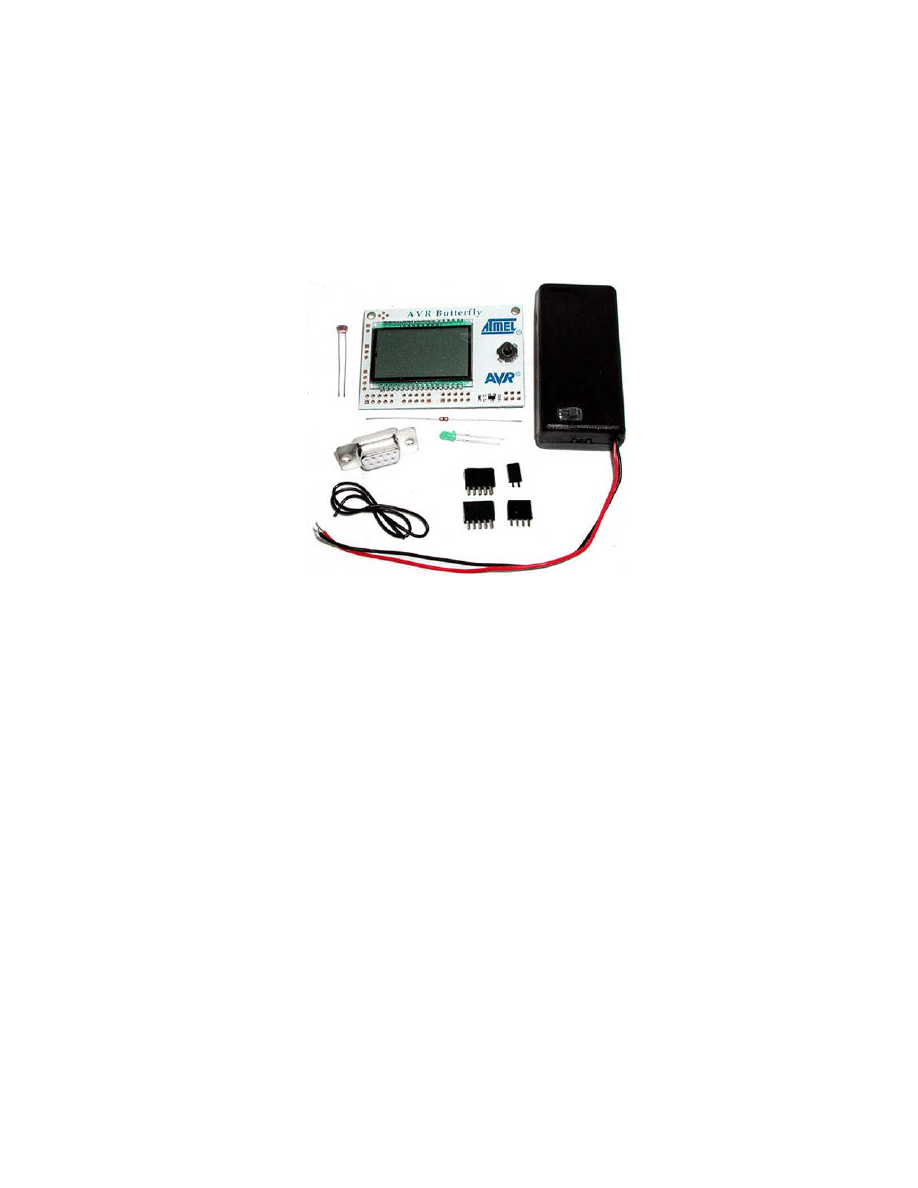
Butterfly++ Mini-Kit Construction
Figure 4: Butterfly++ MiniKit
The Butterfly provides an excellent learning platform, but it can be even better with a few extra
parts that Smiley Micros supplies in the Butterfly++ Mini-Kit. This kit includes a CdS Light
Sensor, a DB9 female connector and wires, and a 2-AA battery holder with power on LED and
resistor.
Adding a CdS LDR Light Sensor
Atmel’s AVR Butterfly no longer has a light sensor due to European RoHS compliancy
considerations (don’t get me started, grrrr…). The Butterfly++ MiniKit provides a suitable
substitute component that the user must solder to the Butterfly to use the light sensor function.
This sensor works with the existing Butterfly software.
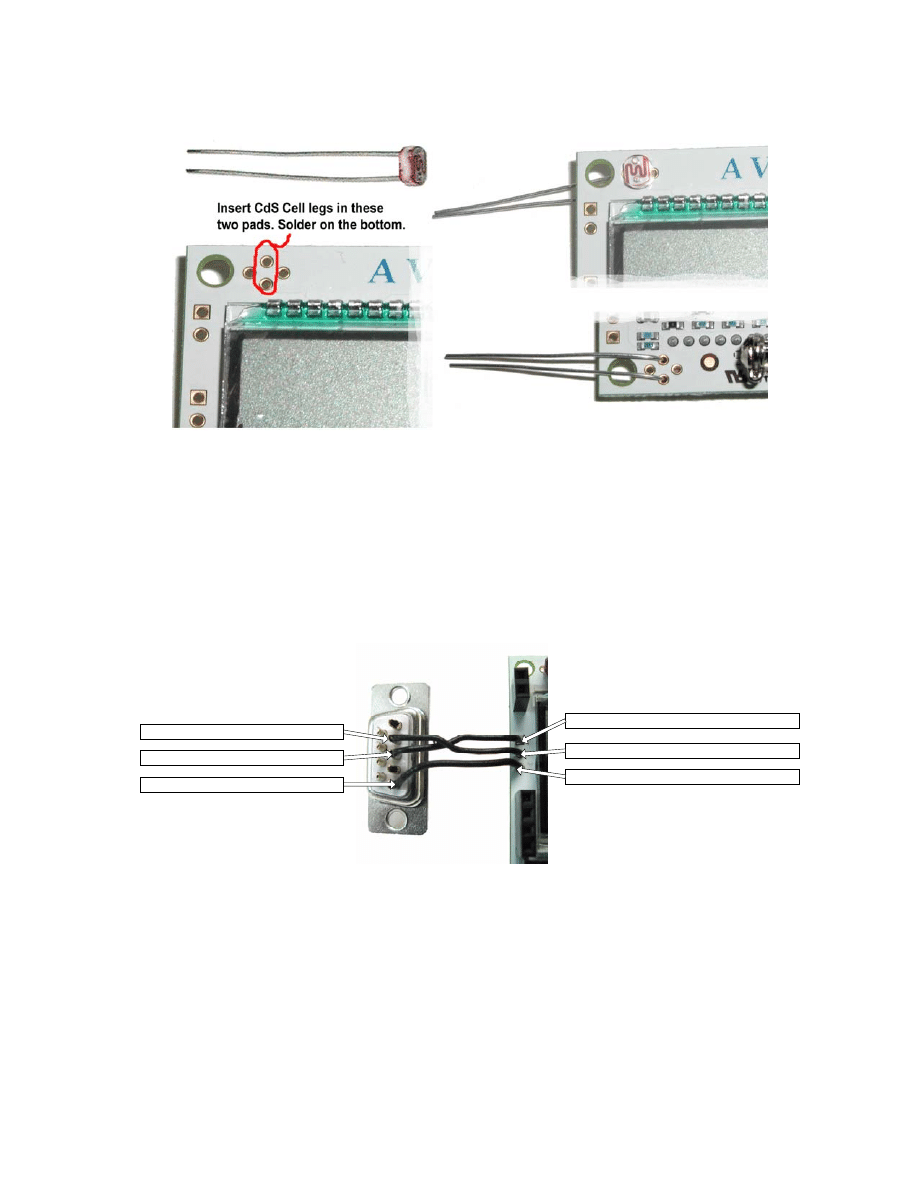
The CdS light sensor is device that has resistance proportional to the incident light. As a resistor,
the device has no polarity so either leg can be inserted in the pads shown circled in red. Seat the
sensor snug to the top of the Butterfly then solder the legs to the bottom and trim them just above
the solder meniscus.
6
Workshop 1: AVR C Programming Learning Platform
Figure 5: Butterfly CDS Light Meter
DB9 Female connector and wire
In order to communicate with a PC the Butterfly must connect to a serial cable. The mini-kit
provides the connector and wire to make the connection to a serial cable.
The Butterfly has built-in RS232 converters for serial communication with a PC. Most serial
cables will have a DB9 male connector on the device side that will mate with the provided DB9
Female connector (calm down – it’s technical).
Solder cup backside pin 5 - GND
Solder cup backside pin 2 - RXD
Solder cup backside pin 3 - TXD
USART (J406) connector: pin2 TXD
USART (J406) connector: pin3 GND
USART (J406) connector: pin1 RXD
Figure 6: RS232 DB9 Connection
Strip about 1/8 inch from the ends of each wire and then carefully solder them to the Butterfly and
the DB9 connector as shown. Notice that the upper wires in the picture cross. Be very careful to
get this exactly according to Figure 6: RS232 Wiring; about half the emails I get for problems
turn out to be related to either incorrect wiring or poor soldering this component.
7
Workshop 1: AVR C Programming Learning Platform
Female Headers
Refer to Figure 3: The Butterfly Front to see the location of the ADC, USI, PORTB, and PORTD
pads. Solder the 2-pin header to the ADC pads, the 4-pin header to the USI pads, and 2x5 headers
to the PORTB and PORTD pads. Notice that Figure 7 shows a male header on the ISP pad, this is
not included in the kit and won’t be used for our work (maybe later).
AVR Learning Base Board
The AVR Workshop Learning Platform is built on a foamcore board that lives in a protective
foamcore box. Details for the construction can be found in: Smiley’s Workshop 1 Supplement:
AVR Learning Platform Foamcore Base and Box on
.
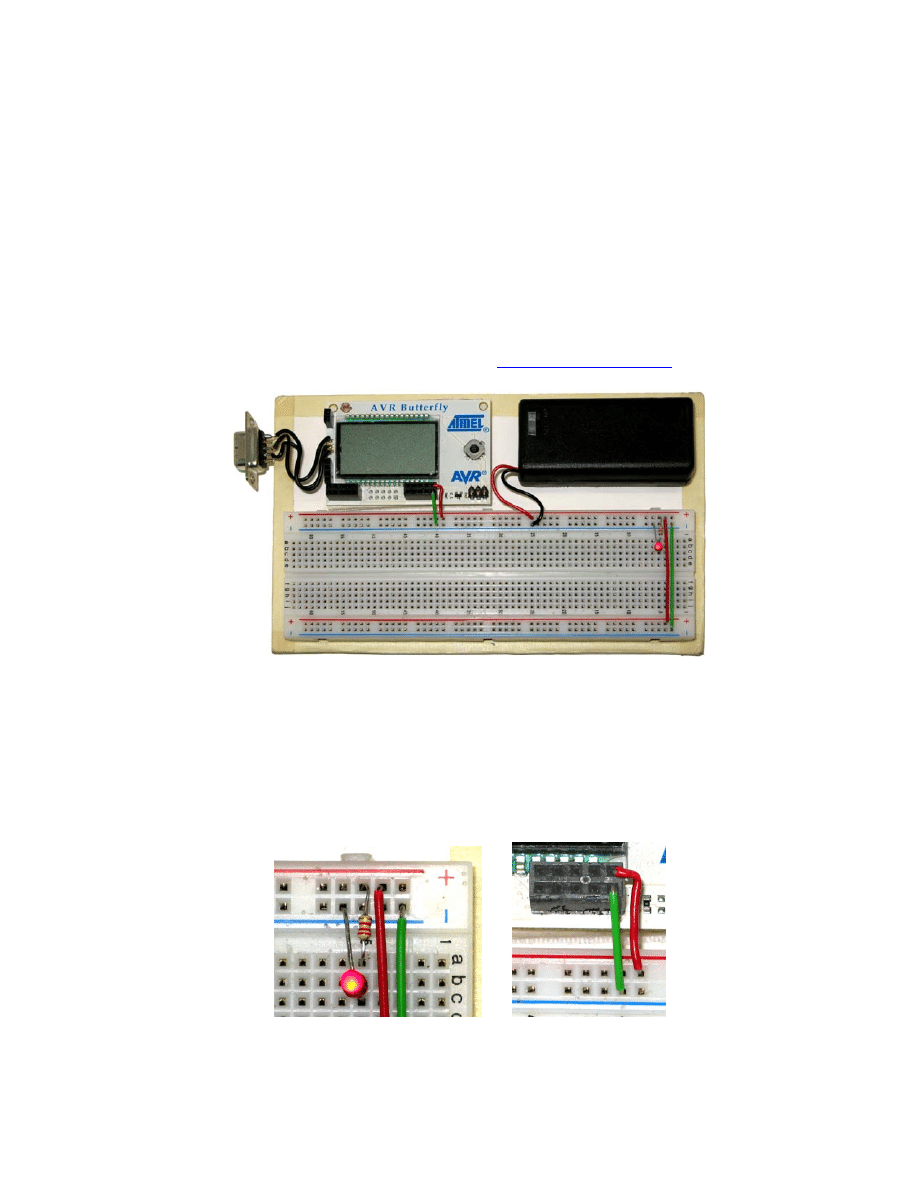
Figure 7: AVR Workshop Learning Platform
You will need to carefully twist the ends of the battery box wires until they are straight then soak
them with solder so that it runs up under the insulation to make these wires strong enough to
insert into the breadboard power bus. The red wire goes to the + red bus and the black wire goes
to the – blue bus. Connect the two power busses with red and green wire and then put an LED
with 2.2K-ohm resistor on the breadboard. The resistor goes to the + power, the LED short leg
goes to the – power. The LED and resistor are then connected on a breadboard strip as shown.
Figure 8: Close up of power connections
8

Workshop 1: AVR C Programming Learning Platform
The Butterfly receives power from the bus as shown, the + red wire goes to the right most top of
the header and the – green wire to the right most bottom of the header.
Test your Connection using Developer Terminal:
Hook your Butterfly DB9 connection to an RS232 cable from a PC. If you use a USB to Serial
Converter cable you may have problems if the voltage levels are not robust, but I’ve used several
and not had a problem.
Open Developer Terminal. You can read the user manual (I recommend: RTFM) by clicking the
‘Help/Manual’. Click the ‘Settings/Port’ menu item to open the settings window. Select the
RS232 COM port that the Butterfly is connected to. Set the baudrate to 19200, Data Bits to 8,
Parity to None, Stop Bits to 1, and Handshaking to None.
You can test that your learning platform is working okay by two methods. A simple test is to turn
the power off on the Butterfly and then WITH THE JOYSTICK BUTTON PRESSED TO THE
CENTER turn the power back on. Now each time you press the joystick button to the center, you
should see as series of question marks: ??????? in the Simple Terminal receive window. This is
the Butterfly bootloader wondering what the heck is going on.
Another test is to turn the Butterfly on and click the joystick up to get the LCD scrolling. Move
the joystick straight down three times till you see ‘Name’ then move the joystick to the right twice
till you see ‘Enter name’ then move the joystick straight down once and you will see ‘Download
name’ then push down the joystick center for a moment until you see ‘Waiting for input’.
In Developer Terminal make sure the ‘Send Text: Immediate’ radio button is checked. Type in
your name, then in the ‘Send HEX Immediate’ dropdown box, select and click on 0x0D that tells
the Butterfly you are finished sending characters. Your name should appear on the LCD.
This isn’t easy and there are many opportunities to mess up along the way. Many folks get this
going right away, but others seem to have fits getting over this hurdle, so I’ve provided a Smiley’s
Workshop 1 Supplement: Problems Communicating with the Butterfly (on
www.smileymicros.com) to help you get past this point. Trust me, if you see the ????? or get your
name scrolling on the LCD you are over a major hump and subsequent workshops will be easier
to get going than this step.
Well that was a lot and we haven’t really gotten started yet. Next month we will look at the
software side of the AVR Learning Platform and learn about the AVRStudio IDE and the
WinAVR C compiler toolset. We’ll write our first C program and create a set of Cylon Eyes in
hardware.
9

Workshop 1: AVR C Programming Learning Platform
This workshop is the first of a series that will introduce C programming for the AVR
microcontroller based on the book C Programming for Microcontrollers by Joe Pardue available
from
Bill of Materials
AVR Butterfly
DigiKey - ATAVRBFLY
CdS LDR
DigiKey - PDV-P9005-1
2 2x5-pin header
DigiKey - S7108
4-pin header
DigiKey - S71035
2-pin header
DigiKey - S71037
3” Wire AWG 22
Jameco - 36792
2.2K ohm
Jameco - 690742CG
2-AA Bat. Box
Jameco - 216119CG
DB9-Female Ctr.
Circuit Specialists - DE-09S
Green LED
Circuit Specialists - BAG-GREEN3MM
10
Document Outline
Wyszukiwarka
Podobne podstrony:
44588 Basic NumberSense Worksheets 01
eim4 01 worksheet
eim3 01 worksheet
eim1 01 worksheet
islcollective worksheets grundstufe a1 grundstufe a2 grundschule klassen 14 haupt und realschule kla
wfhss workshop20071206 lecture05 01 en
CE Elementary module 01 web worksheet
wfhss workshop20071206 lecture06 01 en
phonics worksheet v1 01
TD 01
Ubytki,niepr,poch poł(16 01 2008)
01 E CELE PODSTAWYid 3061 ppt
01 Podstawy i technika
01 Pomoc i wsparcie rodziny patologicznej polski system pomocy ofiarom przemocy w rodzinieid 2637 p
zapotrzebowanie ustroju na skladniki odzywcze 12 01 2009 kurs dla pielegniarek (2)
01 Badania neurologicz 1id 2599 ppt
01 AiPP Wstep
ANALIZA 01
więcej podobnych podstron