
© Schafer 1993-2000
All rights reserved. No part of this publication may be transmitted,
reproduced, stored in any retrieval system or translated into any
language or computer language in any form or by any means,
mechanical, electronic, magnetic, optical, chemical, manual, or other-
wise without prior written consent by ScriptPerfection Enterprises, Inc.
The software described in this book is furnished under license and may
be used only in accordance with the terms of such license.
Screenwriter 2000 and the Screenwriter Logo are trademarks of
Screenplay Systems, Inc.; Movie Magic and Movie Magic Scheduling
are registered trademarks of Screenplay Systems, Inc; all others are
trademarks of their respective holders.
Disclaimer
Screenplay Systems, Inc and ScriptPerfection Enterprises, Inc. make
no representation or warranties with respect to the contents hereof and
specifically disclaim any implied warranties of merchantability or fitness
for any particular purpose. Screenwriter™ is provided "as is" without
warranty of any kind, either expressed or implied.
Screenplay Systems, Inc and ScriptPerfection Enterprises, Inc. shall
have no liability or responsibility to you or any other person or entity
with respect to any loss or damage caused by Movie Magic
Screenwriter™ 2000 including, but not limited to, any loss of profits,
interruption of service, loss of business or consequential damages
resulting from the use of such programs.

Welcome to
Screenwriter’s
Production Bible
This “New Testament” replaces the Screenwriter in Production
chapter in the original manual, and you should refer to this rather than
the original manual for all your production questions. We’ve
streamlined, improved and added a huge number of production
features since the original manual was printed, and you hold in your
hands the results of all these changes.
Although Screenwriter makes production rewrites incredibly easy, at
the very least we HIGHLY recommend that you review the first three
chapters. And ONLINE production help can always be found within the
program by going to the Production menu and clicking Production
Solutions.
TABLE OF CONTENTS
Movie Magic Screenwriter 2000 in Production . . . . . . . . . . . . . 1
What does "production" mean? . . . . . . . . . . . . . . . . . . . . . 1
The Production Menu . . . . . . . . . . . . . . . . . . . . . . . . . . . . 3
Preparing for Production Rewrites . . . . . . . . . . . . . . . . . . . . . 13
Setting up Screenwriter Prior to Production . . . . . . . . . . . 13
Setting OMITTED text . . . . . . . . . . . . . . . . . . . . . . . . . . . 14
A-Scene Numbering Scheme . . . . . . . . . . . . . . . . . . . . . 15
Revision Marks . . . . . . . . . . . . . . . . . . . . . . . . . . . . . . . . 15
Locked Letter Skip List . . . . . . . . . . . . . . . . . . . . . . . . . . 16
Revision Colors . . . . . . . . . . . . . . . . . . . . . . . . . . . . . . . . . . . . . 17
Setting the Current Revision Draft Color . . . . . . . . . . . . . 19
Printing only those pages of a certain color . . . . . . . . . . . 20
The Production Revision Cycle . . . . . . . . . . . . . . . . . . . . . . . . 21
Putting in the first Day’s Revisions . . . . . . . . . . . . . . . . . 24
Printing Today’s Revisions . . . . . . . . . . . . . . . . . . . . . . . 24
Preparing for the Next Revision . . . . . . . . . . . . . . . . . . . 24
Production Techniques . . . . . . . . . . . . . . . . . . . . . . . . . . . . . . . 25
Screenwriter’s Production Tricks & Tips . . . . . . . . . . . . . . . . . 29
Casting and Sides . . . . . . . . . . . . . . . . . . . . . . . . . . . . . . 29
Script Analysis . . . . . . . . . . . . . . . . . . . . . . . . . . . . . . . . . 30
Script Comparison . . . . . . . . . . . . . . . . . . . . . . . . . . . . . . 30
Script Notes . . . . . . . . . . . . . . . . . . . . . . . . . . . . . . . . . . . 31
Highlight All of One Character’s Dialogue . . . . . . . . . . . . 34
Screenwriter and Television Production . . . . . . . . . . . . . . . . . 37
Scene Character Lists . . . . . . . . . . . . . . . . . . . . . . . . . . . 37
Rundown Sheets . . . . . . . . . . . . . . . . . . . . . . . . . . . . . . . 39
Set Lists . . . . . . . . . . . . . . . . . . . . . . . . . . . . . . . . . . . . . 42
Production Breakdowns . . . . . . . . . . . . . . . . . . . . . . . . . . . . . . 45
Tagging Items for Breakdown . . . . . . . . . . . . . . . . . . . . . 45
Associating Breakdown Items with
Characters or Locations . . . . . . . . . . . . . . . . . . . 47
Internal Breakdown Sheets . . . . . . . . . . . . . . . . . . . . . . . 48
The On-Screen Breakdown Sheet Editor . . . . . . . . . . . . . 49
“Standard Breakdowns” . . . . . . . . . . . . . . . . . . . . . . . . . . 53
Time-of-Day Normalization . . . . . . . . . . . . . . . . . . . . . . . 57
Movie Magic Screenwriter 2000 & Animation Production . . . . 61
Multiple Revision Marks . . . . . . . . . . . . . . . . . . . . . . . . . 61
Locking Revision Marks . . . . . . . . . . . . . . . . . . . . . . . . . . 61
Printing Numbered Dialogue . . . . . . . . . . . . . . . . . . . . . . 62

1
Movie Magic
Screenwriter 2000
in Production
What does "production" mean?
If you have to ask, chances are you won’t be needing to use most of
these functions anytime soon. If you DO know and need to know how
Screenwriter handles production then jump down to The Production
Menu which starts on page 3... otherwise feel free to read on, as it
certainly can’t hurt to know what it’s all about.
Let’s say you’ve written your script, submitted it, sold it . . . and then
learned, to your delight, that it’s been bought and will be transformed
from your personal vision into something millions of people will see on
the big screen, the small screen, the computer screen or the stage.
You’ll be rich, famous, admired and . . . wait, we’re getting way ahead
of ourselves.
Before the Academy Award can be handed to you, the film, video,
computer game or stage play must first be completed. Your script is the
blueprint. Be warned, though, odds are your darling will be modified,
tweaked, rearranged, and rewritten by any number of people involved
in the artistic or technical side of the process. And that's even before
production actually begins.
Before most of that happens, though, at some point a version of the
script is agreed upon and the script is "locked"—that is, declared
official. Special options are then applied to its format—for example,
scene headings will usually be numbered for ease of identification, and
top and bottom continues are added to appropriate pages. The script
is then printed out, and a copy distributed to everyone concerned, so
that they are literally "on the same page." This minimizes miscues and
costly delays while the prop guy is trying to find the stuffed gorilla he
didn’t realize got added into Scene 11.
2
So now that the script is locked, no further changes will occur to it . . .
right? Not likely. It might turn out that the stuffed gorilla can’t be used,
because of a PETA boycott; or the star breaks her leg and has to be
replaced with someone who can’t do an Armenian accent; or the
pyrotechnics wizard refuses to work with fissionable material; or the
director has a dream that shows him a better way to stage the love
scene. As a result, new scenes must be written and inserted, and old
scenes deleted. This obviously wreaks havoc with the numbering of
existing scenes and pages.
In the bad old days when scripts were written on typewriters, this posed
a really major problem because it was hardly practical to retype the
entire script every time someone made a change. So several shortcuts
were developed: revision marks, and the so-called "A-Scene" and
"A-Page." These are tools to ensure that whenever a locked script is
revised, everyone concerned knows what’s been changed, and where,
and that they've all got the exact same version. This way, a scene
numbered 12 when the script was locked will still be scene 12 when
production wraps, even if a half-dozen scenes get placed before it in
the meantime.
You might think that computers, with their ability to instantly renumber
and repaginate a document, would make it easy to send out a brand-
new script after every revision. True, but that’s actually not desirable
as everyone from the costumer to the director has made a lot of notes
in the script, and has all this paperwork that references specific page
and scene numbers.
So here’s how the system works. Let’s say we’ve got a locked script,
and someone wants to add a new scene after Scene 11. If you were to
simply assign the new scene the number 12, that would mean you’d
have to change the next scene number from 12 to 13, and so on
throughout the script. That’s a recipe for serious confusion. So, in order
to protect the original numbers, the new scene is given the number
12A.
Same thing with pages. If enough new material gets added to page 77
so that some of the original text is forced down a page, well, rather
than allowing the "excess" to slop over onto page 78 (and therefore
push the remainder of 78 down to 79, and so on throughout the script),
the excess simply gets placed, all by itself, on a page numbered 77A.
3
Ah, but what if only a word or two is changed; not enough to generate
an A-Scene or A-Page? How does anyone know what’s been changed?
Simple: Every line that gets changed receives a "revision mark,"
usually an asterisk, that shows up in the adjacent right hand margin.
Once all the new changes have been made to the script, only the
changed pages are printed out and they are distributed to everyone on
a different color of paper, to make it easy to verify that everyone is
working from the correct version of each page. Thus if you’re looking
at a BLUE copy of page 16 and everyone else has YELLOW, it’s pretty
obvious that someone doesn’t have the right version.
So now everything’s fine, right? Well . . . what happens if the director
has another dream? What if he wants to add a scene after 12A? What
happens is this: The script evolves to the next revision level. The new
scene will be called 12B, and new revised pages will be issued in a new
color, and so on throughout the production process.
As you can imagine, this process can get pretty complicated, but not
when Screenwriter’s on the job, automatically generating all the
A-Pages, A-Scenes and revision marks for you. However, for the
program to do this, you must first tell it to start noting changes by
locking the script. And your gateway for doing that is...
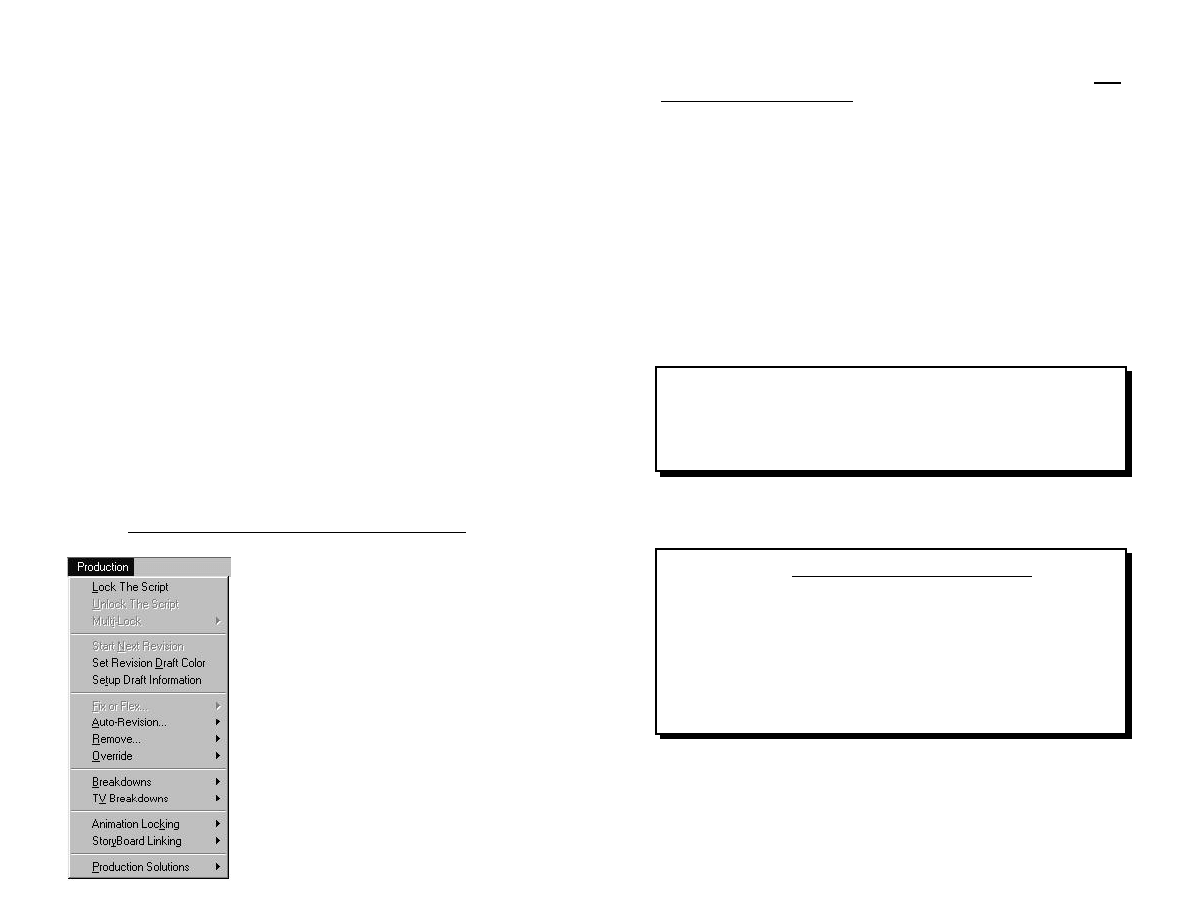
The Production Menu
The Production Menu is THE one-stop
shopping location for all your production
needs. Here you can do everything from
locking the script, to having the program
insert or remove revision marks, to
producing production breakdown sheets of
your script, to preparing production
information for export to Movie Magic
Scheduling.
There are currently fifteen menu items on
the Production menu:
LOCK THE SCRIPT—click on the Lock the
Script menu, and you'll see a warning ask-
ing you whether you REALLY want to lock
the script. Respond YES if you do, and
you'll be taken to the Lock the Script dialog.
4
For more details on this menu’s specific options, see the chapter The
Production Revision Cycle...
UNLOCK THE SCRIPT—this item will ONLY be available in a script
with locked pages and/or scenes. Occasionally a locked script gets so
many A-pages or A-scenes that the decision is made to unlock it so
that everything gets numbered consecutively, then re-lock it and start
all over again by issuing a completely new draft. In this case, selecting
this menu item is the way to do that.
However, since unlocking a script can wreak havoc on a production if
done unintentionally, if you select this menu, you'll get a warning
message requiring another YES response; then you'll see an Unlock
the Script options dialog again. This time you will have to UNcheck
anything that you don't want to be locked, and then press OK.
NOTE:
From this Unlock Menu, you can also unlock a script
from a certain page on forwards rather than unlocking the
entire script. To do so, simply put the cursor on the first page
to be unlocked before calling up the Unlock Menu, and then
click the FORWARDS button rather than ENTIRE SCRIPT.
MULTI-LOCK—this will take you to a sub-menu where you can specify
Multi-Locked Pages or Multi-Locked Scenes.
What is Multi-Locking?
Let's say that several scenes have been inserted in your
script following a locked scene, so you've got, say, Scenes 21A,
21B, and 21C. Now, someone comes along with a new scene
to insert between 21A and 21B. Oops . . . what happens to
your numbering now? Multi-lock gives you the opportunity to
create yet another level of locking, generating unique scene
and/or page numbers like 21AA that won't change any
existing A-numbers.
START NEXT REVISION—After the most recent version of the locked
script has been printed and distributed, but before you start putting in
the next set of changes, you need to tell Screenwriter to go from the
current revision color (blue, for example) to the next one—yellow, or
whatever you decide. To tell Screenwriter to make the move, all you
need to do is click Start Next Revision. Once again you'll have to
5
respond YES to another warning box—and then the program will do
everything necessary to prepare the script for the next set of revisions
including:
C
Removing all Current Revision Marks
C
Fixing all A-Pages (which will ensure that if you delete
some text on page 12, for example, it won’t affect 12A)
C
Fixing all Header Text (which ensures that each page’s
header correctly reflects the date/color in use when that
specific page was last revised)
C
Incrementing the Revision Color
C
Taking you to the Title Page Publisher so that you
can add the current revision color to a running list.
SET REVISION DRAFT COLOR—Because different production com-
panies use different progressions through the rainbow for their produc-
tion revisions, (some going from BLUE to YELLOW to GREEN, others
going from BLUE to GOLDENROD to BEIGE) we offer you the option
of setting the color order to whatever your Production Manager or 1st
AD desires. This menu item will take you to a menu where you can set
these colors, how their names will print in the header, and whether or
not they will display on-screen in their respective colors. See the
section on Revision Colors for LOTS more details.
SETUP DRAFT INFORMATION—This option is only used if you are
printing with WATERMARKS, and it allows you to change the draft’s
information without printing out any copies.
FIX OR FLEX—This option will be grayed out if your script does not
have locked pages. Otherwise, it takes you to sub-menus where you
can fix or flex A-Pages and/or Headers.
"Fixing" A-pages
means to convert all the flexible A-Pages to
Fixed A-Pages so that if you delete text on
page 34, it won’t affect page 34A
"Flexing" A-pages means to convert all the fixed A-Pages back
to Flexible A-Pages so that if you have short
pages 34A, 34B, and 34C, they’ll be joined
into just one or two pages.
6
"Fixing" Headers
means to “lock” them, so that each existing
page's current header text will remain fixed
until that page is revised and a new header
applied.
"Flexing" Headers means to convert all the headers in the script
to the current header settings
AUTO-REVISION—This will take you to a sub menu where you can
turn on or off the...
C
MARKS—Selecting this menu will turn on or off the Auto-Revision
marks. When they are on, any changes you make to your script
will automatically be “flagged” with the chosen revision mark in the
margin of the appropriate line. The menu item will have a check
mark next to it when auto-revision marks are on, and selecting it
again will then turn it off.
CC
COLORS—When selected, this will take you to a sub-menu where
you can select which Auto-Revision Color to use: Red, Blue, or
Green in addition to giving you the option to Turn off the Auto-
Revision Color. An Auto-revision color is like an Auto-Revision
Mark in that all text you change after turning it on will appear on
your screen in the selected revision color rather than black.
REMOVE—will take you to a sub-menu where you can remove such
things as:
CC
CURRENT REVISION MARKS—This menu item will remove all
the current Revision Marks from the script.
CC
STRIKEOUT CODES AND/OR TEXT—This will remove all
Strikeout codes from the script, with the option of removing all
Striked-out text along with them.
C
RED, BLUE, OR GREEN OR USER DEFINED
HIGHLIGHTS—Will remove the selected highlight color from the
script, though the text that had been highlighted will not itself be
deleted.
CC
ALL OMITTED SCENE HEADINGS—Pretty self-explanatory, as
it will completely remove all Scene Headings in the script that are
7
currently marked as omitted, though by doing so, all remaining
scenes will be renumbered as if the omitted scenes never existed.
CC
SCENE HEADING W/OUT OMITTED—This option will be grayed
out unless you are in a script with locked Scene Headings.
Selecting it will remove the Scene Heading that the cursor is
currently in WITHOUT creating a corresponding OMITTED. Use
this with caution as it WILL cause all following Scene Headings to
be renumbered!!!
CC
LOCKED PAGE BREAK—This option will be grayed out unless
you are in a script with locked page breaks. Selecting it will remove
the page break that the cursor is immediately before or
immediately following, resulting in an A-Page as appropriate.
OVERRIDE—This will take you to a sub-menu with powerful features
which allow you to manually override the program’s automatic num-
bering of pages or scenes so that you can always make the script print
out exactly how you and your production people want it to, regardless
of how arcane.
CC
PAGE’S HEADER/DRAFT COLOR—This option will be grayed out
unless you are in a script with locked page breaks. Selecting it will
allow you to override that page’s header text and/or that page’s
revision color.
NOTE:
You CANNOT override a Page’s Header or Draft Color
if that page has Revision Marks on it AND the option AUTO-
UPDATE HEADERS ON REVISION is set on the REVISIONS Page
of the Program Options Menu. This is true because, in that
case, the existence of the Revision Mark would override your
cheating, assigning that page the current header.
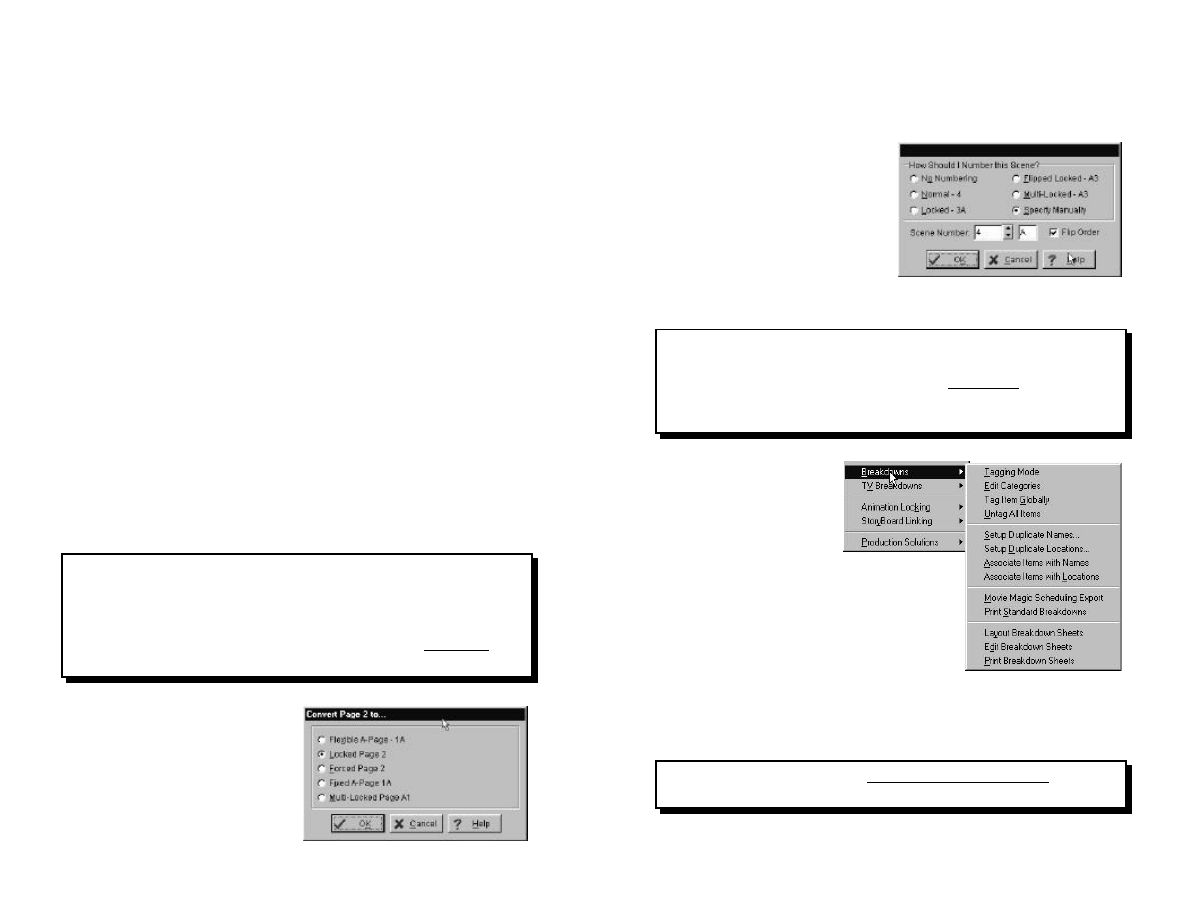
CC
PAGE BREAK TYPE—This
option will be grayed out unless
you are in a script with locked
page breaks. To use it, the
cursor must be either imme-
diately before or immediately
following a locked page break.
Select it, and you will see the
menu displayed to the right (though the numbers listed will very
8
likely be different, depending on the page which you started on).
On it, you can change the page break type with the result of having
it (and any following pages) being renumbered appropriately.
CC
ELEMENT’S NUMBERING—
This option will be grayed out
unless you are in a script with
locked Scene Headings. Put
the cursor anywhere in a Scene
Heading and then select this
menu item to see the menu
shown on the right, where you
can override this Scene Heading’s numbering as desired.
NOTE:
When you override a Scene Heading’s numbering, you
MAY end up renumbering some or all of the following scenes,
so you may also need to override the following Scene Head-
ing’s number in order to maintain the correct scene
numbering in the script.
B R E A K D O W N S — T h i s
menu item will take you to
a sub-menu with 13 power-
ful breakdown options:
C
TAGGING MODE is at
the very heart of Screenwriter’s break-
down functions, allowing you to go
through your script and literally TAG any-
thing in the script as one of over 20
categories which range from Props to
Sound Effects to Stunts to anything else
you need. Once anything is tagged, Screenwriter will include it in
one of its many breakdowns in addition to exporting that
information directly to Movie Magic Scheduling.
NOTE:
See the chapter on Production Breakdowns for more
information on Breakdown Tagging.
9
C
EDIT CATEGORIES—This menu item will allow you to edit the
breakdown categories to add new ones or remove ones you never
use.
NOTE:
At the time of this writing, Movie Magic Scheduling
does NOT support renamed categories so if you intend to
export to it, then we do not recommend renaming them.
CC
TAG ITEM GLOBALLY—This will tag a word or phrase globally
with the category you desire, so, for example, if you want to tag
MACHINE GUN as a PROP everywhere it appears, select this
menu item.
CC
UNTAG ALL ITEMS—If, for some reason, you want to remove all
tags from the script, use this option.
CC
SETUP DUPLICATE NAMES—It is not uncommon that a
character may be introduced in the script as, say MR. MELVILLE,
but from then on, he is refered to simply as MELVILLE.
Screenwriter can report BOTH of these names as either MR.
MELVILLE or MELVILLE in all breakdowns if you merely tell it that
they are, in fact, the same character. This function will allow you
to do so.
CC
SETUP DUPLICATE LOCATIONS—Like Character Names, it is
not uncommon that a location may be first introduced in the script
as, say MIKE’S CORNER OFFICE, but from then on it’s referred
to simply as CORNER OFFICE or just OFFICE. Screenwriter can
report ALL of these locations as MIKE’S CORNER OFFICE in all
breakdowns if you merely tell it that they are, in fact, the same
location. This function will allow you to do so.
C
ASSOCIATE ITEMS WITH NAMES—In many cases, a character
or actor may always have certain breakdown items associated with
them, and rather than tagging those items every time that
character or actor appears in the script, you can simply associate
that breakdown item with the character in question, and
Screenwriter will automatically always fill in that breakdown item
whenever that character is in the scene. Common examples of
when you might use this would be a BLIND CHARACTER who will
always need DARK GLASSES and a CANE, or a CHILD ACTOR
10
who will always need a SOCIAL WORKER present when he or she
is on the set.
CC
ASSOCIATE ITEMS WITH LOCATIONS—Just like the option
above, except the association is with a location rather than a char-
acter. A common example of its use would be EXTRAS for
GRAND CENTRAL STATION, or BOOKS and BOOKSHELVES for
LIBRARY.
CC
MOVIE MAGIC SCHEDULING EXPORT—will export all the
breakdown information, including any tagged items, in a form
which can be read by Screenplay Systems’ Movie Magic
Scheduling program. When you select this menu, you are given
the choice to export the breakdown information for the entire script
or for selected scenes only.
NOTE:
We are proud to now be a reseller of Movie Magic
Scheduling with a special discount for Screenwriter users! Call
800-450-9450 for pricing and availability.
CC
PRINT STANDARD BREAKDOWNS—will print breakdowns in one
of many different formats. Selecting it is identical to choosing
Production Breakdown on the Print Menu and then pressing
OK or FAX. In either case, you will be taken to the Production
Breakdown menu as described in the chapter, Production
Breakdowns.
TV BREAKDOWNS—will take you to a sub-menu with three options
specific to Television Production, and you should see the chapter
Screenwriter and Television Production for more specific details.
C
GENERATE RUNDOWN SHEETS—will take you to a menu
where you can specify how you want the Rundown Sheet laid
out, then it can automatically print this run-down sheet for you.
CC
PRINT SET LIST—will take you to a menu where you can
specify how you want the set list laid out, then automatically print
it for you.
CC
SCENE CHARACTER LISTS—many sitcoms put lists of all the
characters in each scene directly under the scene heading.
11
Screenwriter can generate these lists automatically for you, by
selecting this menu and then choosing Generate.
ANIMATION LOCKING—Animation Production is fairly similar to
normal feature production, except for having the concept of locked
asterisks and numbered dialogue. See the chapter Screenwriter
and Animation Production for more details.
STORYBOARD LINKING—allows you to “Link” specific frames of
storyboards created in Storyboard Quick, produced by
PowerProductions, Inc., to specific text within Screenwriter. To do
so, have both Storyboard Quick and Screenwriter running at the
same time, then select one of the following options:
C
CREATE NEW FRAME—Selecting this option will create a new
Storyboard frame, automatically passing whatever text is
currently selected, or just the text of the current element if no
text is selected, to be associated with this frame in Storyboard
Quick. You will automatically be taken to Storyboard Quick to
draw the frame as desired.
C
ASSIGN TEXT TO EXISTING FRAME—Selecting this option
will automatically take you to Storyboard Quick where you
should select the frame you want "linked" to be displayed on-
screen and then click back into Screenwriter. It will
automatically assign all selected elements (or just the current
element if none are selected) to be linked to that frame.
CC
CLEAR LINKS TO FRAME(S)—Use this option when there is
an existing link or links that you wish to be removed. Highlight
the text whose links you wish to clear and select this option.
C
HIDE ALL LINK BRACKETS—When there are links in a script
to frames in Storyboard Quick, they are displayed as large Red
Brackets on the left hand side of the page. If you don't want
them displayed, simply select this option.
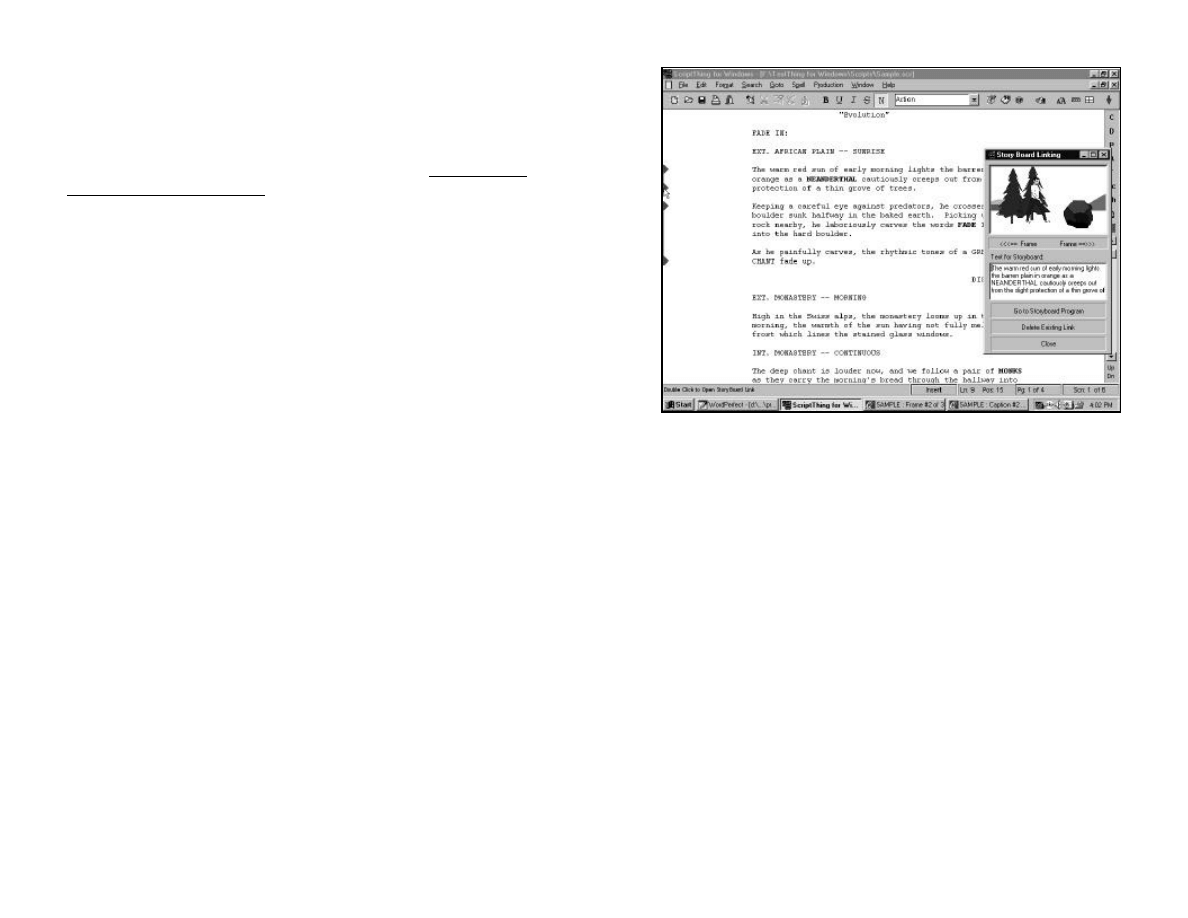
Once you have links in the script—assuming you haven’t checked
Hide all Link Brackets—you will see red link brackets on the very
left edge of the screen, which look like the following:
12
When you double-click on any red Link Bracket, it will automatically
display the frame associated with that link in a floating window as
displayed on the previous page. You can then "walk" forwards or
backwards through the linked frames by clicking on the “<<<==
FRAME” or “FRAME==>>>” buttons respectively, or go directly to
that frame in Storyboard Quick by double clicking on the displayed
image of the frame itself.
13
Preparing for
Production Rewrites
Production rewrites can be completely painless, and as long as you
follow some basic rules, Screenwriter can automatically generate all
the A-Pages, A-Scenes and revision marks for you.
Setting Screenwriter up PRIOR to Production
Screenwriter is designed to handle the entire gamut of production
revision styles in Hollywood (and beyond!) so it’s a good idea to verify
that it is set-up to perform revisions the way you want before you start
your production revisions and are in the depth of production.
Here’s what we recommend you check prior to production.
C
The REVISIONS page of the Preferences dialog—On this page
you can specify how to tag revised text, when an entire page
should be considered revised and so on. To get there click on the
FILE menu, select Program Options and then click on the tab
labeled Revisions. (For detailed description of each option on this
page, in the full manual, see the section Revisions Page in the
chapter entitled Configuring Movie Magic Screenwriter 2000.)
C
The LOCKED SCRIPTS page of the Edit Scripts Format
dialog— You get to this menu by clicking on the Formats Menu,
then Edit Script Formats, then on the Locked Pages Button. On
this page you can specify exactly HOW the A-Pages and A-Scenes
should be numbered, which letters (such as “I” and “O”) should be
skipped and so on.
NOTE:
Since these options are SCRIPT SPECIFIC, you have to
FIRST load the script in question, and THEN click the FORMATS
menu, select EDIT SCRIPT FORMATS and then click on the
button labeled LOCKED SCRIPTS.
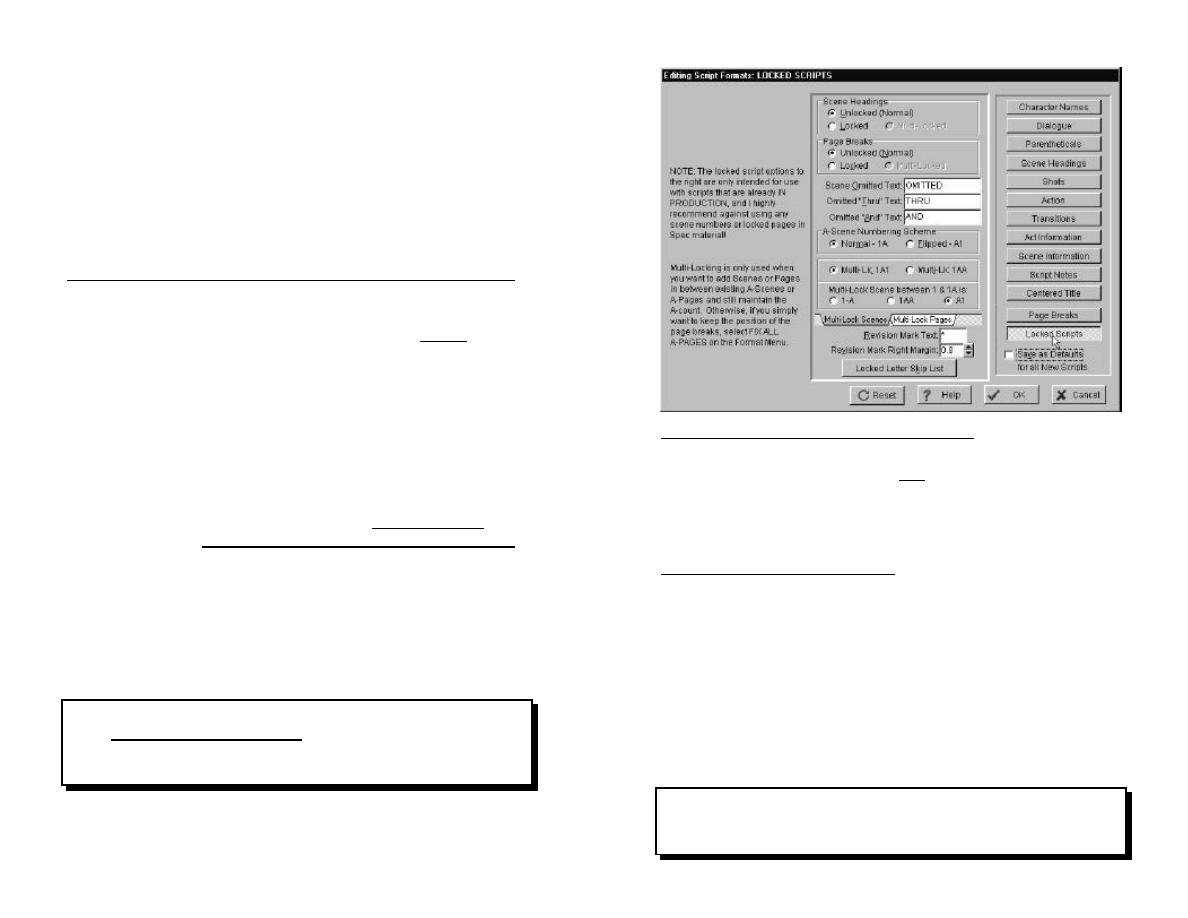
The Locked Scripts Page looks like the menu on the following page,
though of course what selections are checked and what their values are
will vary depending on the settings within the script itself.
14
Scene Headings/Page Breaks
These options show the current locking level of both Scene Headings
and page breaks, and though you can set them here, we HIGHLY
reccomend that you use the Lock The Script and Start Next Revision
functions on the Production Menu instead, as they do a lot more and
ensure that everything is done correctly.
Setting OMITTED text
When you’ve locked your scene headings and then delete one,
Screenwriter automatically replaces it with whatever OMITTED text is
specified here, rather than actually deleting it, so as to maintain the
numbering correctly. If more than one scene is being omitted in a row,
then it will list it with whatever AND or THRU text you’ve specified, and
will look something like the following:
3 OMITTED:5 3
THRU THRU
5 5
NOTE:
(1) Any text from the colon onwards in the OMITTED
LINE (such as the ":5" text displayed above) will NOT Print as
it is there solely for manual override control, that is to allow

15
you to change the ending number of the run if you ever need
to. (2) Screenwriter will automatically use the specified AND
text when only two scenes in a row have been OMITTED, and
the specified THRU text when MORE than two scenes in a row
were omittted.
A-Scene Numbering Scheme
There are many alternative ways of numbering inserted A-Scenes, and
Screenwriter can pretty much handle all of them. This is where you’d
set how you want inserted Scenes to be numbered, with either the letter
after the number (as in 12A) or before the number (as in A12).
Underneath that, you can specify whether Multi-Locked Scenes should
be number, letter, number (as in 12A1) or number, letter, letter (as in
12AA). Finally, you can specify how it should number a Multi-locked
Scene inserted between a normal scene and an A-scene, such as a
multi-locked scene inserted between 12 and 12A.
NOTE:
These numbering Schemes are Dynamic, meaning that
if your 1st AD later changes his/her mind as to what number-
ing sheme to use for Multi-locked Scene Numbers then you
can simply change it here, and the entire script will be
instantly updated with the new numbering scheme.
Multi-Locked Pages
You can specify how Screenwriter numbers Multi-Locked Pages
differently from how it numbers multi-locked scenes, though the options
themselves are identical. To do so, simply click the Multi-Lock Pages
tab and set the values as desired.
Revision Mark Text
This field lets you specify how you want Screenwriter to print and
display all Revision Marks for this script. Common ways are with an
Asterisk or text such as “(X)”.
Revision Mark Right Margin
Lets you specify the position for revision marks based on the distance
from the right hand side of the page in tenths of an inch. Thus if you
put in a value of 1.0, then revision marks will print 1" from the right
hand side of the page, a value of 0.5 would have them print ½" and so
on...
16
Locked Letter Skip List
Due to potential confusion between the letter “I” and the number “1",
the letter “O” and the number “0", many production companies skip
those letters, going straight from “H” to “J” and from “N” to “P”. Other
companies also like to skip “E” and “F” because they look too much
alike, and some even skip “C” and “G” for the same reason.
To exclude specific letters from being used in the Scene Numbering,
simply click the Locked Letter Skip List button and you will see a
dialog with all the letters of the alphabet on it. Check the check box
next to those letters which you don’t want Screenwriter to use, and it
will skip them in all numbering.
NOTE:
Screenwriter also uses this skip list in the way it
numbers Act and Scene Info if they are set to use LETTERS.
C
The SET REVISION DRAFT COLOR dialog lets you specify
exactly which revision colors the program should use, and in what
order it should use them, in addition to turning on/off the actual
display of revision colors on-screen. See the chapter Revision
Colors for more details.
17
Revision Colors
Screenwriter is currently the ONLY software program on the market to
completely internalize Production Revision Colors. This has quite a
number of advantages, including:
C
Not having to edit the header every time you change
the revision color, as Screenwriter automatically updates
the headers of all changed pages to have the correct revi-
sion color.
C
Having each individual page always show the correct
header for that page with the date and revision color that
it was last modfied on... thus page 2 may show BLUE
REVISION - 9/9/98 and page 3 would have WHITE
REVISION - 9/8/98 and so on, all within the same script!
C
The ability to print just the pages that are in a certain
color, which means that if you are in your GREEN
revision and you need to go back and print all the BLUE
pages that are currently in the script to rebuild a draft for
someone, it’s a snap!
However, since not all production companies use the same revision
color order, Screenwriter allows you to edit the color order, the names
of each of the colors (in case you want them in upper-lower case like
“Blue” rather than “BLUE”) and how they’ll display on screen.
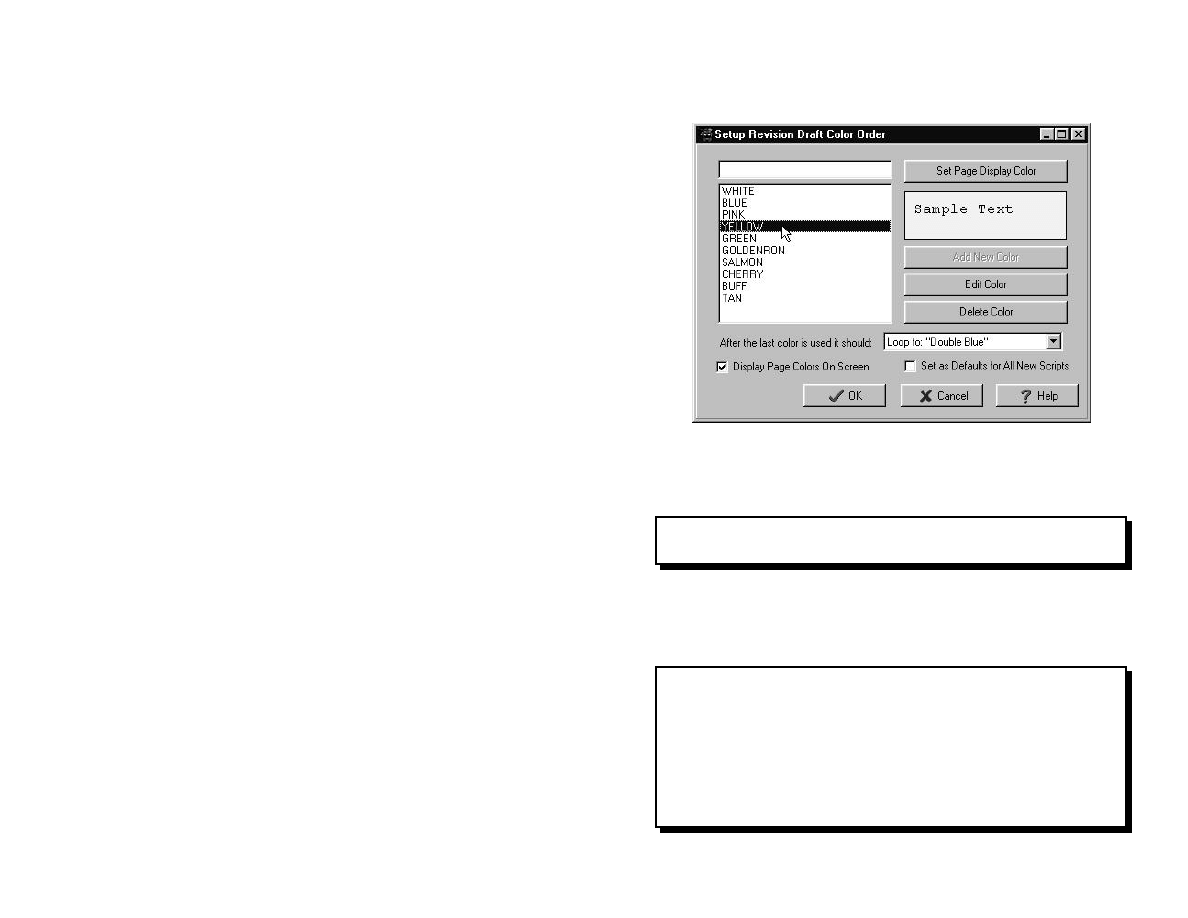
All of this is done by going to the Set Draft Color Menu which is found
under the Production menu. You will then see the menu displayed on
the following page.
C
TO CHANGE THE REVISION COLOR ORDER, simply drag and
drop the colors in the list, to re-order them as desired.
C
TO DELETE ANY COLOR FROM THE COLOR ORDER, simply
click on the color you want to remove so that it is highlighted and
click the Delete Color button or press the DELETE key.
18
C
TO EDIT THE NAME OF ANY COLOR, for example, to change
“WHITE” to “White” or “BLUE” to “CYAN”, simply click on the color
whose name you want to edit, then click the Edit Color button.
CC
TO ADD A NEW COLOR, click on the color that you want this new
color to FOLLOW, type the new color’s name in the text entry field
located above the color list, and then click ADD NEW COLOR.
NOTE:
After you add a new color, don’t forget to set how it
will display on-screen, as otherwise it will display as white.
C
TO SET HOW ANY COLOR DISPLAYS ON-SCREEN,click on
the color whose display you want to change, then click the button
SET PAGE DISPLAY COLOR.
NOTE:
Screenwriter can dynamically display all revision colors
ON-SCREEN so your BLUE pages display as BLUE, your
YELLOW as YELLOW and so on. However, for it to do so in a
pleasing manner, you MUST have your Windows Display set to
show MORE than 256 colors. If this is beyond the capabilities
of your computer, or if you simply find the on-screen display
of colors distracting, then uncheck the check box DISPLAY
PAGE COLORS ON SCREEN.
19
To set Windows 95/98/NT to display more
than 256 colors do the following:
STEP 1:
Click the START button, choose
SETTINGS then CONTROL
PANEL.
STEP 2:
Double-Click on the icon labelled
DISPLAY.
STEP 3:
Click on the SETTINGS tab at the
top of the screen and you will see
a menu similar to the one on the right, though both it and
the number of tabs on the top can vary greatly due both to
your specific graphics card and the version of Windows that
you are running.
STEP 4:
Click on the drop-down menu listed under COLOR
PALETTE and select any option on the list as long as it’s
displayed BELOW 256 colors. Typically it will be called
High Color or True Color.
STEP 5:
Click OK and then Windows may or may not need to
reboot, but you’ll then have the higher color settings.
NOTE:
Some older screens (and many laptops) do not support
over 256 colors and if this is the case, you’ll either be given a
message to that effect, or there simply won’t be any options
below 256 colors.
Setting the Current Revision Draft Color
Although Screenwriter automatically sets and increments the revision
draft colors for you when you use the Lock the Script and Start Next
Revision menu items found on the Production Menu, there may be
certain odd cases when you need to manually set the revision color
yourself. To do so simply:
STEP 1:
Click on the Production menu and select Set Revision
Draft Color.
STEP 2:
Click on the Revision Color that you want to be the current
color, and then click OK.
20
Cheating the Revision Color
In extremely rare cases, you may want to simply tell Screenwriter that
a specific page should be a certain color. To do so:
STEP 1: Go to the Production Menu, click Override, then Page’s
Header/Draft Color. You will see the following menu,
though as always, the text will vary from what you see here:
STEP 2: Click on Page’s Draft Color and set it to whatever available
color you desire.
NOTE:
You will ONLY be able to Cheat a page’s Header/Draft
Color if there are NO REVISION MARKS on that page or if the
AUTO-UPDATE LOCKED HEADERS ON REVISION option is NOT
checked on the REVISIONS Page of the PROGRAM OPTIONS
Menu. This is because otherwise any cheats you made would
be ignored as the revision marks would cause Screenwriter
to automatically update that page to use the current header.
Printing only those pages of a certain color
One of the big advantages of having internalized revision colors is that
Screenwriter can print just those pages of a certain color, even if
you’ve long since incremented past that color!
STEP 1: Click the FILE Menu and select
PRINT. You will see this menu:
STEP 2: To the right of Script Notes will be
an option with the current revision
color displayed in it. Click it to
select it, and/or change the selected color as desired.
STEP 3: Click OK and Screenwriter will automatically print only those
pages which are in the selected revision draft color.
21
The Production
Revision Cycle
Congratulations. The script’s been given a green light, and you’re
ready to issue your final full WHITE script. Before doing so, however,
you need to go to the Production Menu and select Lock the Script to
ensure that all future pages will “track” when inserted within this WHITE
draft. When you select Lock the Script, you’ll have to respond YES
to a warning prompt asking if you really want to lock the script, and
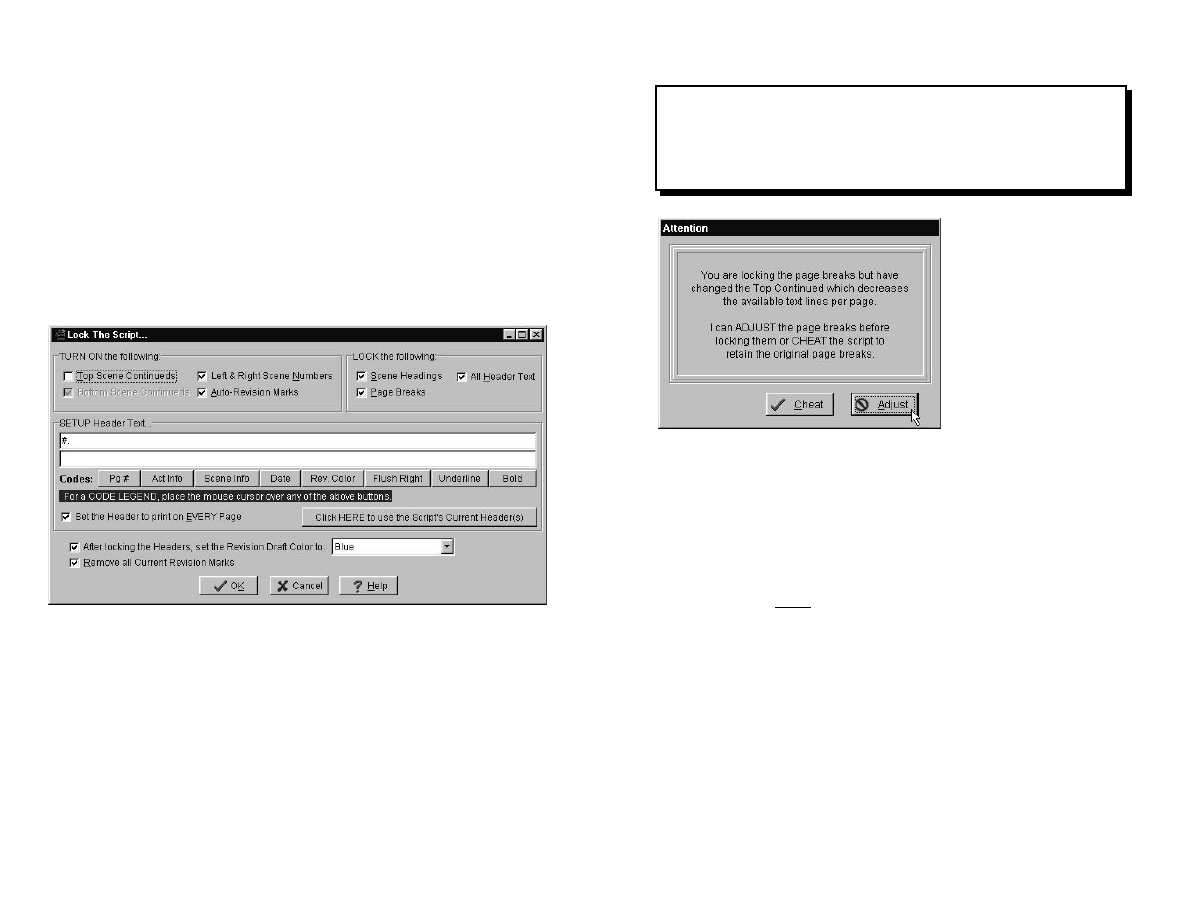
then you will see the following dialog:
In most cases you’ll want to leave all the selections in their default
states, but (of course!) feel free to check or uncheck any items as your
specific production needs dictate.
TURN ON THE FOLLOWING: has four options—if any of them are
grayed out, that is because that option is already turned on in the script
and there’s no need for it to be accessible on this menu.
C
Top Scene Continueds—These are the continued text lines which
will go on the top of each page where the scene continues from the
previous page. They typically use the text CONTINUED: and will
automatically pick up whatever numbering is being used on the
scene headings.
22
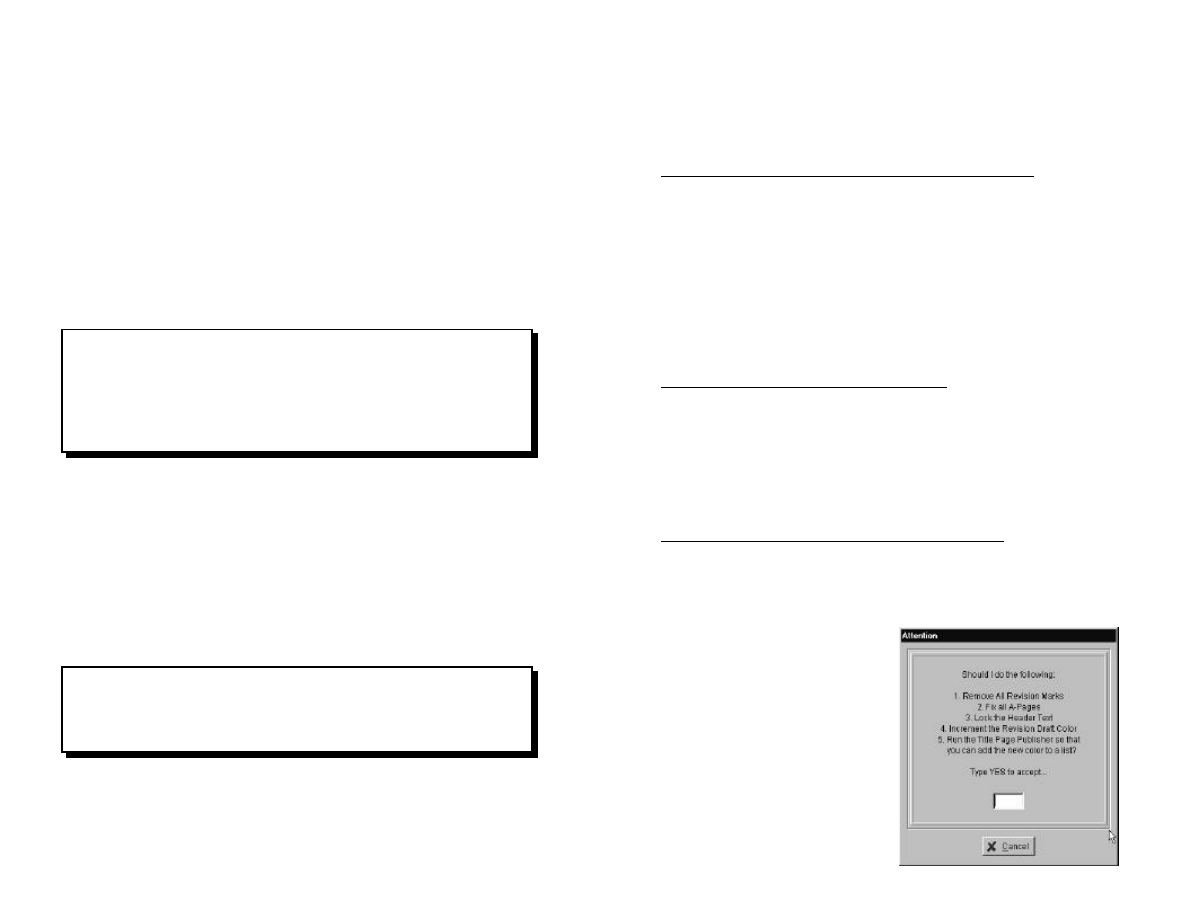
NOTE:
Adding Top Scene Continueds to your script will mean
that each page has 2 FEWER lines on it, as the top continued
takes up one line and then there is a blank line following it.
Thus if you add TOP CONTINUEDs as part of locking the
script, it will prompt you as follows:
C H E A T w i l l c a u s e
Screenwriter to cheat the
Text Line and Blank Line
spacing in order to
squeeze the extra two
lines onto each page
without any change in the
position of the page
breaks.
ADJUST will cause
Screenwriter to adjust all
the page breaks before locking them so that each page will have the
correct amount of text on it, but two fewer lines of it compared to the
script before being loacked. This may result in adding one or even
several pages to the total page count.
C
Bottom Scene Continueds—these are the continued text lines
which will go on bottom of each page where the scene continues
onto the next page. They typically use the text (CONTINUED) and
adding them won’t change the page breaks in your script.
C
Left and Right Scene Numbers—turns on left and right scene
numbers and also automatically applies them to the Top
Continueds if they are turned on.
C
Auto-Revision Marks—will turn on the auto-revision marks to
ensure that everything that’s added, changed or deleted after the
script has been locked will be marked as revised.
LOCK THE FOLLOWING has three options:
C
Scene Headings—will lock the Scene Headings so that any new
Scene Headings will be put in as A-Scenes and any deleted ones
will be tracked as OMITTEDS.
23
C
Page Breaks—will lock the Page Breaks so that if you add enough
new text to require a new page break, it will flow onto an A-Page,
and all existing page breaks will be maintained.
C
All Header Text—will lock the text of all headers so that each
page’s header will be “frozen” at the header in use when that page
was last modified. If a page is subsequently modfied, then the
current date and revision color will be applied to that page’s
header.
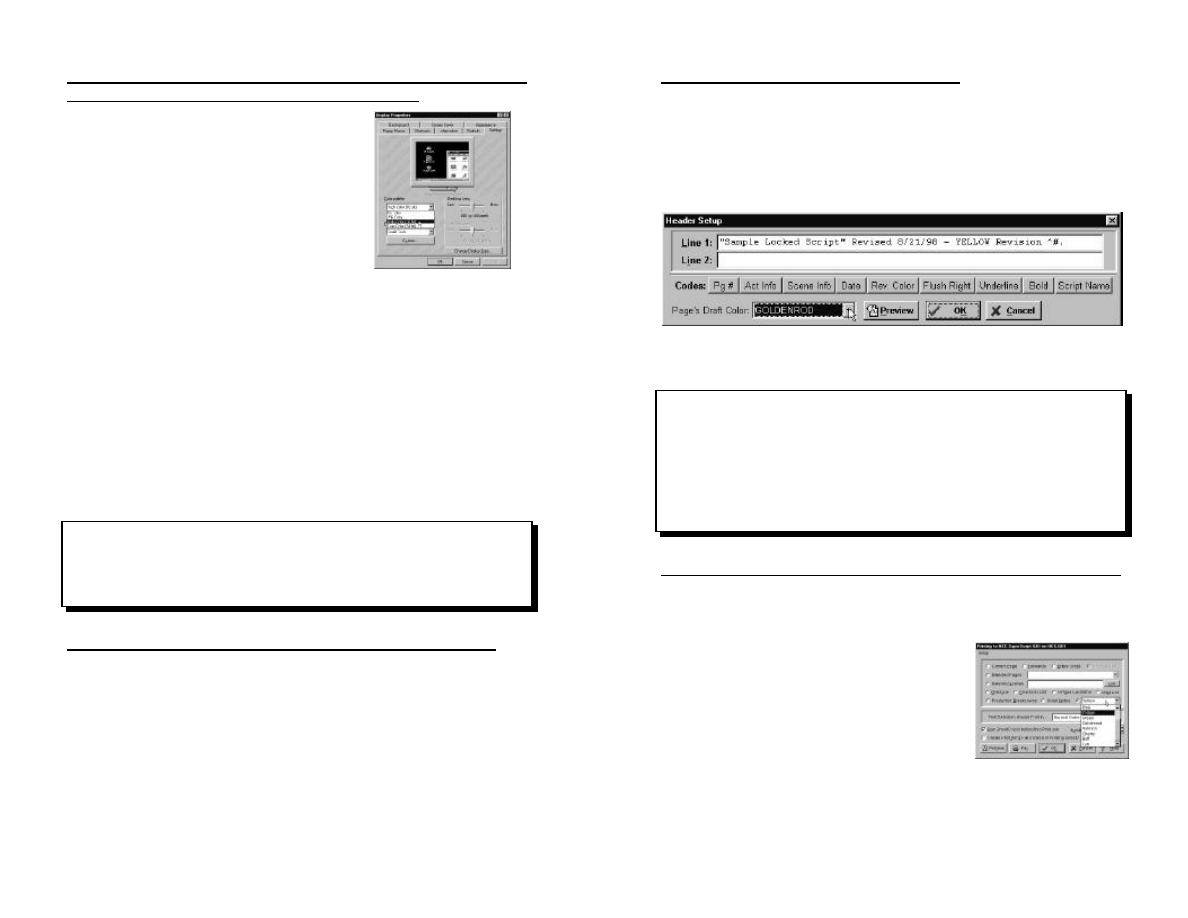
SETUP HEADER TEXT—will allow you to set the header text to
contain codes for Revision Color, Revision Date and/or any other text
you desire.
NOTE:
Screenwriter will normally default to a “generic”
locked script header which consists of whatever you last used,
under the assumption that your unlocked script’s header
probably contains only a page number. However if you want
it to use the script’s current header then click the button CLICK
HERE TO USE THE SCRIPT’S CURRENT HEADER.
CLICK HERE TO USE THE SCRIPT’S CURRENT HEADER—will
change the Header Text to whatever is being currently used by the
script.
SET THE HEADER TO PRINT ON EVERY PAGE—will do just that.
AFTER LOCKING THE HEADERS, SET THE REVISION COLOR TO
[BLUE] —lets you specify what revision color should be applied to any
pages that are revised AFTER the script has been locked.
NOTE:
The Revision color that you set here will ONLY be
applied to any pages that are SUBSEQUENTLY changed, not
to the headers of the pages that exist when you lock the
script!
REMOVE ALL CURRENT REVISION MARKS—will do just that, so
you’re ready to start with a brand new, clean white copy without
revision marks.
24
Change the settings of any of the items as needed, then click OK to
accept these settings. When you’re back to the script, print out your
final full white copy and distribute it. You are now ready to make any
changes for your BLUE draft (or whatever revision color you selected).
Putting in the first Day’s Revisions
Once you’ve received the revisions for today’s draft, assuming you’ve
already Locked the Script and have issued the final WHITE, simply
go ahead and start putting in the changes. You’ll notice that all deleted
pages and scenes will automatically be correctly omitted, any added or
edited text will have an automatically generated revision mark next to
it, and the headers on all revised pages and any new A-Pages will
reflect both the correct date and revision color while the headers on all
unchanged pages will remain as they were when that page was last
revised.
Printing Today’s Revisions
STEP 1: Go to the FILE menu and select Print.
STEP 2: Click on the Revision Color which you want to be printed.
STEP 3:
Click OK and only those pages which are in the
selected revision color will print. It’s THAT easy!
Preparing for the Next Revision
Once you’ve issued today’s revisions,
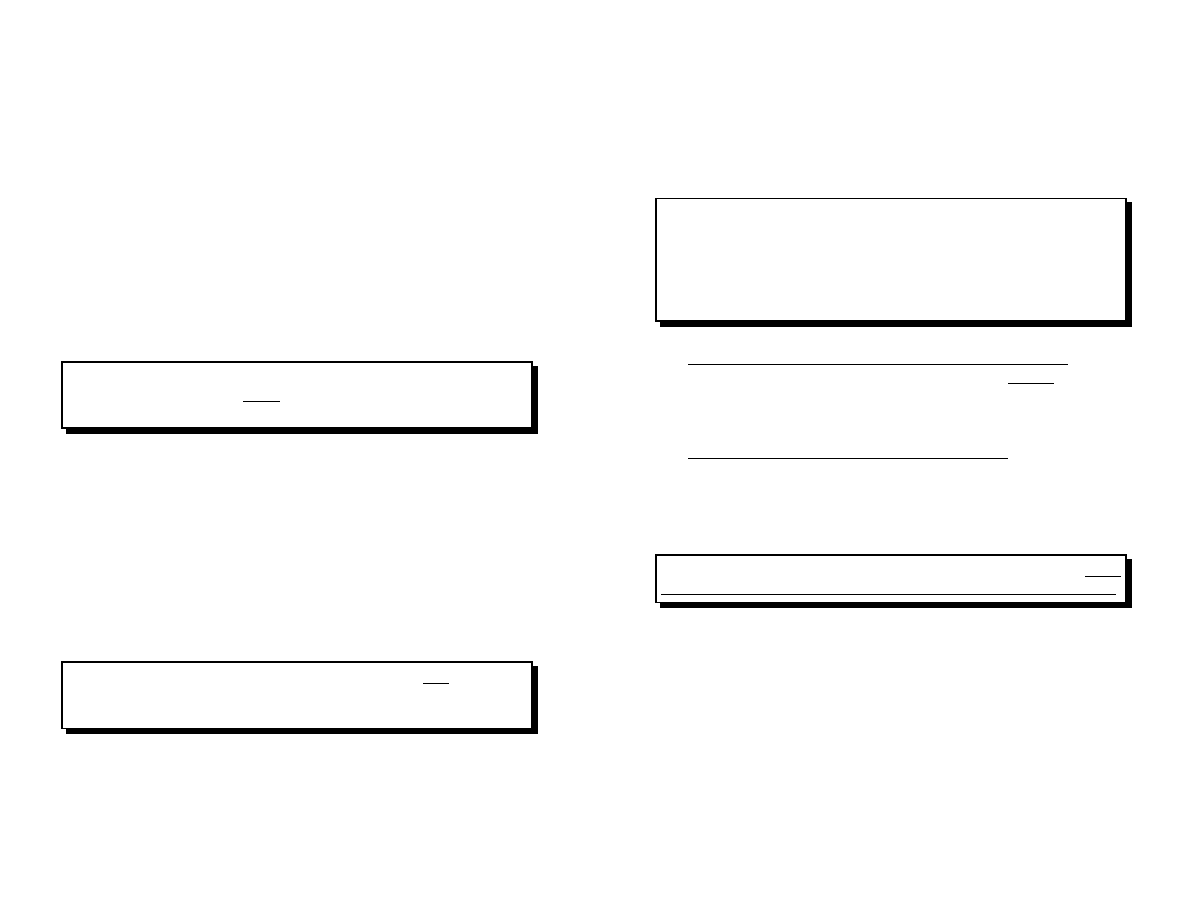
STEP 1: Go to the Production Menu and select Start Next Revision.
You will see the following menu:
STEP 2: Type YES, then after
you’ve made any needed changes
to the Title Page, you’re ready to
start the next revision!
25
Production
Techniques
Here are a number of useful production techniques that can help your
production go a lot smoother, and we HIGHLY recommend that you
review these items before you get into production.
MANUALLY PUT IN & REMOVE REVISION MARKS—you can
manually put in or remove a revision mark simply by pressing the
asterisk (*). If there isn’t a current revision mark on that line it will put
one in, if there is one, then it will remove it.
NOTE:
The asterisk key is used to manually put in and/or
remove revision marks even if the revision mark has been re-
defined to something other than an asterisk.
CHANGING A SPECIFIC SCENE HEADING’S NUMBER—If, for some
arcane reason, you need to manually override any given Scene
Heading’s number, then simply do the following:
STEP 1: With the cursor anywhere in that Scene Heading, click the
Production Menu, select Override, and then Element’s
Numbering.
STEP 2: Select whatever numbering you desire from the menu that
appears, and then press OK.
NOTE:
Overriding a Scene Header’s Number will affect the
numbering of all subsequent Scene Headings accordingly, so
use this with caution!
CHANGING A PAGE BREAK’S NUMBERING—There are rare cases
where you may want to change a page break from one type to another
in order to change its numbering (and thus the numbering of all
following pages). To do so:
26
STEP 1: With the cursor on the first line of that page whose number-
ing you want to change, click the Production Menu, select
Override, then Page Break Type.
STEP 2: From the menu which appears, select the Page Break Type
which gives you the number you want for this page.
HINT:
If a page number is too low—i.e. you need to make
Page 15 be page 17—then the way to do it is by inserting
blank pages before it until it is numbered the way you want.
To add these blank pages, simply go to the EDIT MENU, click
ADD FORCED PAGE BREAK to add a LOCKED PAGE BREAK, and
repeat as many times as needed.
C
To Remove an existing Locked or Fixed A-Page Break, put the
cursor at the beginning of the first element that follows that page
break, and then either press the BACKSPACE key or select
Remove Forced Page from the EDITMenu.
C
To Put in a Locked or Fixed A-Page Break, in a script with
locked page breaks, put the cursor at the end of the element that
you want the page break to follow, press SHIFT+ENTER (or select
Add Forced Page Break from the EDIT Menu) and then select the
page break type you want to put in.
NOTE:
Adding or removing LOCKED PAGE BREAKS WILL
CHANGE THE NUMBERING OF ALL FOLLOWING PAGE BREAKS!
UNLOCKING LOCKED ELEMENTS—There are times when the script
gets SO revised that the decision is made to reissue the ENTIRE script
with all the numbers reverted to normal numbering. In that case...
STEP 1: Click the Production menu and choose Unlock the Script.
STEP 2: On the menu that appears, uncheck all items which you
wish to unlock and press either ENTIRE SCRIPT or
FORWARDS, the latter button ONLY performing the
changes from the cursor position on forwards.
27
NOTE:
If you UNLOCK a script’s page breaks or scene head-
ings, all of the A-Numbering will be completely and
permanently lost and you will not easily be able to recreate it.
Merging (or Joining) Different Pieces of a
Locked Script back into the Original
Sometimes two or more writers will be simultaneously editing different
copies of the same locked script (e.g., one will be working on Scene
13, the other on Scene 57) and then these modified sections have to
be rejoined into the same locked script as if all the writers had been
actually editing the same file. To do so:
STEP 1: Open the two copies of the script, one of which will be your
“Master Copy”, the other one containing the modified text to
be merged.
STEP 2: Go to the Production Menu, select Production Solutions
and then Merge Text into Script.
Follow the on-screen prompts and it will merge the changed text into
the script while maintiaining all revision marks, and scene
numbers/page breaks.
28
29
Screenwriter’s
Production Tricks
& Tips
Screenwriter has some great tools for both production and pre-
production including script analysis, script comparison, and dialogue
printing tools.
Casting and Sides
When you are ready to go into casting and you want to find good
scenes to read, try the following:
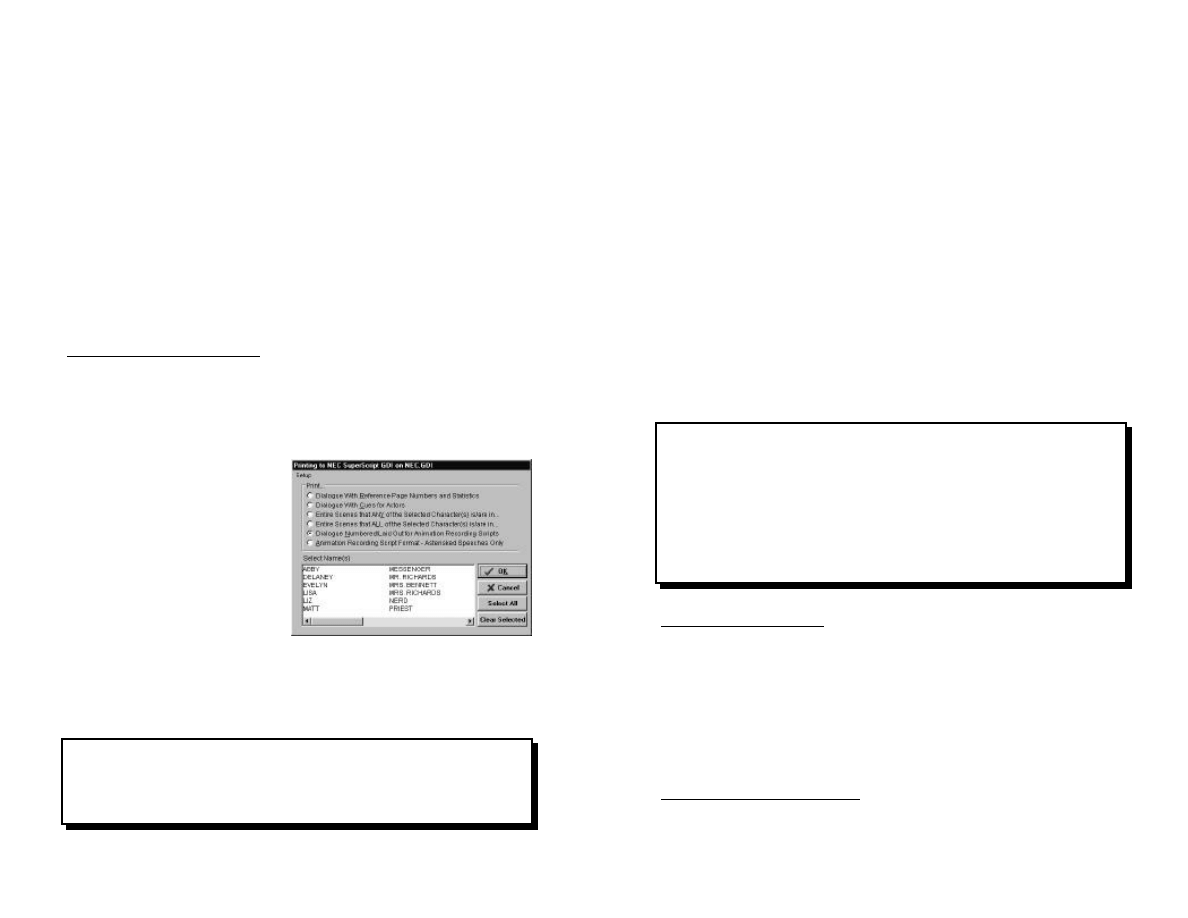
STEP 1: Click on the File Menu and select Print.
STEP 2: Click on the Dialogue
radio button and you’ll
see the following menu
with five great options
for printing out scenes
and information about
each character.
C
Dialogue with Reference
Page Numbers and Statis-
tics will print out all the dialogue of the selected name(s) with
reference page numbers and statistics about how many speeches
he or she had, the total number of words and sentences, and the
longest sentence.
HINT:
This can be particularly useful in TV production when
how much bit actors are paid is defined by how many
sentences they spoke, and whether they are “under-5's” and
so on.
30
C
Dialogue with Cues for Actors will print out all the dialogue of the
selected name(s) with reference page numbers, and preceded by
either the previous character’s speech (if there is one) or the
preceding action element.
C
Entire Scene that ANY of the Selected Character(s) is/are in...
will print out all scenes that any of the selected characters are in,
thus providing a great source of possible scenes for casting.
C
Entire Scene that ALL of the Selected Character(s) is/are in...
will print out all scenes that ALL of the selected characters are in,
thus giving you a selection of all scenes with specific characters
(like the two leads) so you can have them read a scene together in
casting.
Once you’ve selected the dialogue printing option you want, click on as
many character names as desired to select them, then click the OK
button to return to the standard Print Menu. Click OK to start printing.
NOTE:
When Screenwriter prints entire scenes, it can print
JUST the text of the scene (with blank lines before and after
the Scene Heading) or it can print the full pages which may
contain bits of the preceding and/or following scenes. To
choose which of these it should do, go to the PROGRAM
OPTIONS MENU (found under FILE) and click on the PRINTER
TAB and then check or uncheck WHEN PRINTING BY SCENES,
PRINT ENTIRE PAGES, as desired.
Script Analysis
Gives you statistical information about the script—how many scenes
you have, how many unique locations, how many major characters and
so on. This can be invaluable if you’re trying to reach a certain budget
or shooting schedule.
Script Analysis is gotten to by going to the Help Menu and selecting
Script Analysis.
Script Comparison
Allows you to take two drafts of the same script and have Screenwriter
automatically generate a redlined/striked-out comparison of the two.
To do so, open both scripts and then click the Help Menu and select
31
Compare Two Scripts. It will give you the option to compare Word
by Word or Element by Element. The former is much more detailed
but takes a lot longer, the latter will note changes by redlining and
striking-out entire elements rather than within elements, but is a lot
faster.
In either case, it will use the older of the two scripts as a “baseline” and
the newer one as the “modified version.” Anything it finds in the base-
line that’s not in the modified version will be marked in strike-out to
identify that it’s been removed, while anything that’s in the modified
version but not in the baseline will be added in redline to identify that
it’s been added.
Once it is done, you can “walk” your way through the changes in the
comparison script by starting at the top and selecting the Goto Menu,
then Next Strikeout or Colored Text or by pressing SHIFT+F3.
NOTE:
The Script Comparison function will only find TEXTUAL
CHANGES and it ignores any margin or formatting changes
other then element type changes.
Script Notes
Script Notes can be an amazingly useful production and pre-production
feature, allowing different people (such as the director, writer, producer,
or 1st AD) to put in non-printing notes into the script.
Screenwriter supports up to 25 different colors of Script Notes, so
different people can be assigned different colors. This not only allows
for easy visual identification in the script, but when you print the notes,
you can select which colors to print, allowing you to only print out the
notes that you’re interested in.
To Put in a Script Note
METHOD 1:
Press <CTRL+F1> from anywhere in the script and
you’ll be put into a script note.
METHOD 2:
Click the Script Note Element Button (the button on
the right speed bar with a Musical Note on it) and
you’ll be put into a script note.
32
Cheating the color of a Single Script Note
STEP 1:
Put the cursor anywhere in the Script Note.
STEP 2:
Click the Format Menu, select Cheat, then Element.
STEP 3:
Click the Cheat Note Color button and select the
desired color from the menu that appears.
Changing the Default Script NoteColor
STEP 1: Click the Format Menu, select Edit Script Formats.
STEP 2: Click the Script Notes button then the button labelled Click
Here to Set Note Color.
STEP 3: A Color Selection Menu will appear and you should select
the desired new color, then click OK.
STEP 4: Click OK and it will then ask you if you want to change all
the Script Notes in the current color to the new color, select
NO unless you want to change the color of existing Script
Notes. Any new Script Notes will now be put in using the
new color.
Hiding/Showing Individual Notes
Each Script Note has a Hide/Show Box to the left of it which has an
H for Hide in it when the note is visible, and an S for Show when the
note is hidden. In either case double-clicking on this box will toggle the
display state (i.e. hiding it if it’s visible, showing it if it’s hidden).
Hiding All Script Notes
...or all except those of a certain color...
STEP 1: Go to the File Menu.
STEP 2: Click Hide Elements On-Screen then Script Notes.
STEP 3: Select either All Colors or All Colors Except... and it will
hide all of the Script Notes in the selected color(s).
Showing All Script Notes
...or all except those of a certain color...
STEP 1: Go to the File Menu.
33
STEP 2: Click Hide Elements On-Screen then Unhide.
STEP 3: Select Script Notes (All Colors) or Script Notes (All
Colors Except...) To show the Script Notes in the selected
color(s).
Printing Script Notes
You have many options in printing Script Notes, including having them
print within the script, having them print separately with reference page
numbers, and even having them print on the backs of the facing pages,
lined up with whatever element they preceded.
Turning On/Off Script Note Printing WITHIN
the text of the Script
STEP 1: Click the Format Menu, select Edit Script Formats.
STEP 2: Click the Script Notes button then check or uncheck the
option Print Notes in Script as desired.
STEP 3: Click OK to return to your script.
HINT:
When Script Notes are set to PRINT WITHIN THE SCRIPT,
they will do so UNLESS they are hidden, at which point they
will NOT take up any space and will not print, so even if you
generally want them to print within the script, you can hide
individual notes so they won’t print as desired.
Printing Notes Separately
STEP 1: Click the File Menu and click Print.
STEP 2: On the Print Menu that appears, click the Script Notes
radio button, then click OK.
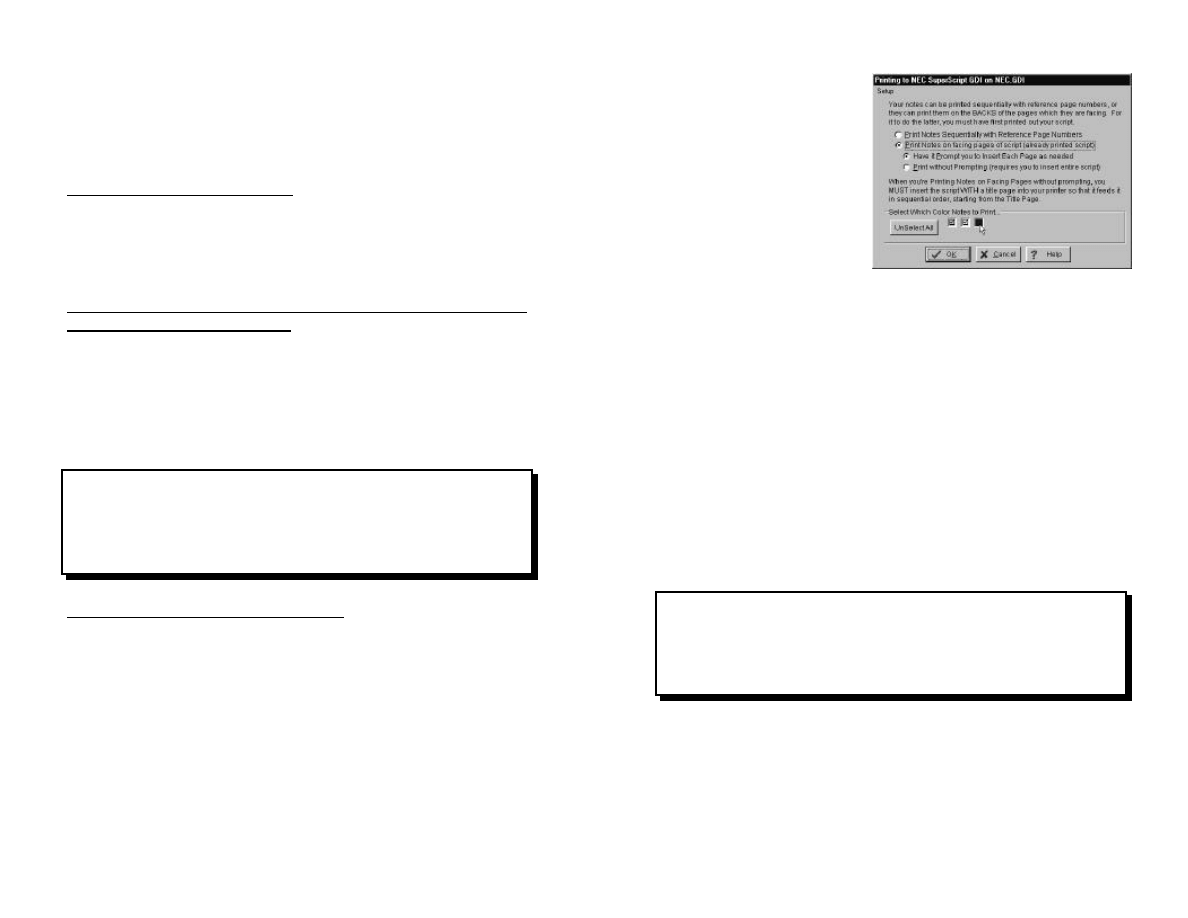
You will see the following Print Script Notes Menu though the colors
and number of colors displayed under Select Which Color Notes to
Print will vary depending on what actually exists within your script.
34
There are two main options on
this menu:
Print Notes Sequentially with
Reference Page Numbers
which, if checked, will do that:
printing only the script notes
with a reference page number
for each note.
Print Notes on facing pages
of script (already printed script) which has under it two additional
options:
C
Have it Prompt you to Insert Each page as needed. If
selected, this will cause the program to prompt you to insert each
required page one at a time, face-down in your printer. It will tell
you which page is needed by its page number, and this is
particularly useful if you don’t have a huge number of notes in your
script.
C
Print without Prompting (requires you to insert the entire
script). If this is selected, then you will have to put the entire
script, including Title Page, face-down in your printer and it will
then print all the script notes, simply ejecting any pages which
have no notes on them.
NOTE:
Depending on the paper path and feeder of your
printer, you may need to experiment to determine the correct
order to have the script printed out to use this later function
without requiring you to shuffle pages. Some printers will
need it printed in normal order, some in reverse order.
Select Which Color Notes to Print will have under it a colored box for
each color of Script Note currently in the script. To select or unselect
a color, simply click on the colored box. When a color is selected to be
printed it will have a check mark in it, otherwise it will not.
STEP 3: Click OK to have it print the selected Script Notes.
35
Highlight All of One Character’s Dialogue
It is not uncommon for an actor to want a copy of the script with all of
their dialogue highlighted. Screenwriter can do this automatically for
you.
STEP 1: Go to the Format menu, select Mark One Character’s Dia-
logue, and click the Character Name to highlight.
STEP 2: Double-click the menu’s header to continue, and all of that
Character’s dialogue will now be highlighted in RED (which
on a B&W printer will print out as a gray background).
HINT:
To remove this highlighting once you’ve printed out a
copy for this actor, go to the Production menu, select Remove
then Red Highlights and type YES at the menu that appears.
36
37
Screenwriter and
Television
Production
Although most Television Production follows the same sorts of revision
cycles as feature production, there are some things they do differently
and Screenwriter is set up to handle them.
Scene Character Lists
Most ½ Hour TV shows and some 1 hr TV shows use Scene Character
Lists, which are a list of all the characters in each scene directly under
the Scene Heading. It typically looks something like the following:
INT. RESTAURANT DINING ROOM - DAY
(MANDY, JANINE, WAITER)
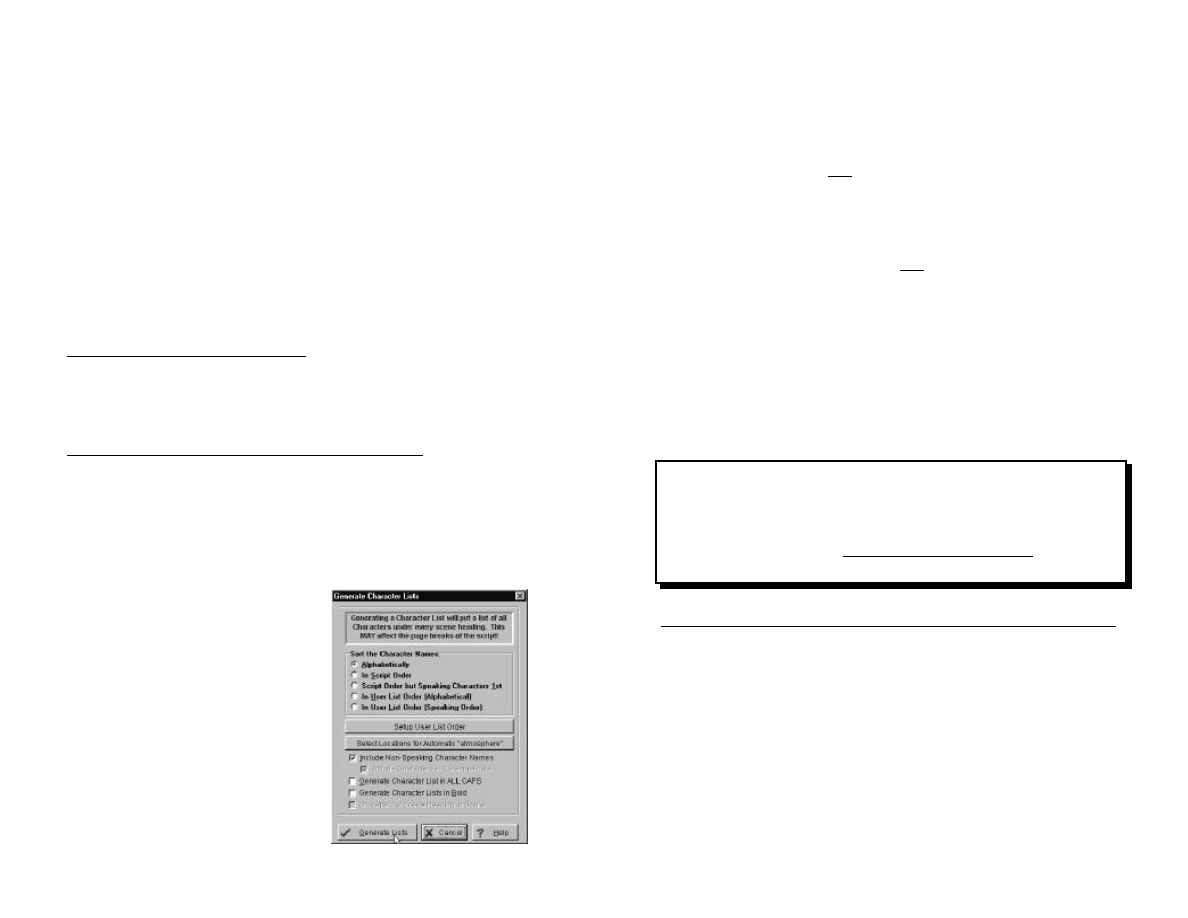
To have Screenwriter automatically generate these lists, simply go to
the Production menu, select TV Breakdowns then Scene
Characters Lists, and then click Generate. You will see the following
menu:
Sort the Character Names: has five
options as to the order in which it will
put the names into the Scene Character
list.
C
Alphabetically will put the names
in alphabetical order.
C
In Script Order will put the names
in the order in which they appear in
that scene.
C
Script Order but Speaking Char-
acters 1st will put the names in the
38
order in which they speak in the scene, followed by any non-speaking
characters in the order in which they appear in action.
C
In User List Order (Alphabetical) will put the names in the order
in which they appear in the Character Name User List, followed by
any names which do not appear in the Character Name User List,
in alphabetical order.
C
In User List Order (Speaking Order) will put the names in the
order in which they appear in the Character Name User List,
followed by any names which do not appear in the Character Name
User List, in the order in which they speak within the scene.
The SETUP USER LIST ORDER button will take you directly to the
Character Name User List (just as if you’d clicked Format, Edit User
Lists) so that you can set up the User List Order.
The SETUP LOCATIONS FOR AUTOMATIC ATMOSPHERE button
will allow you to designate specific locations as always having “ATMO-
SPHERE” or “EXTRAS” or whatever text you desire.
HINT:
A much more powerful version of the same feature is
ASSOCIATE ITEMS WITH LOCATIONS which allows you to
associate specific extras with specific locations, like BUSBOYS
& WAITERS at RESTAURANT and OFFICE EXTRAS at OFFICE.
See the chapter on Production Breakdowns for more
information.
General Options for Scene Character Lists
In addition of the options as to sort order, there are options for how the
program should identify which characters are in each scene.
C
Include Non-Speaking Characters—Checking this option will tell
Screenwriter to scan each Action and Script Note element for all
Character Names to automatically include non-speaking characters
such as one who may be standing behind a doorway listening but
who has no dialogue.
C
Include Characters In Parentheticals—Checking this option
will tell Screenwriter to also scan parentheticals for non-
speaking character names.
39
NOTE:
This option will ONLY be available if Parentheticals
are part of Dialogue rather than a separate element.
C
Generate Character List in ALL CAPS—If checked, the list will
be all capitals, otherwise the list will be generated in upper/lower
case.
C
Generate List in Bold—Checking this will have the lists be
bolded, otherwise they won’t be.
C
Only After 1st Scene Heading in Scene—This option will ONLY
be available if the script uses Scene Information (e.g. SCENE
ONE) and in that case, if checked, it will treat the entire scene as
one big scene regardless of the number of Scene Headings in it,
and it will ONLY put the Scene Character List under the very first
Scene Heading in the Scene, otherwise it will put a Scene
Character List under each Scene Heading.
When all the options are set to what you desire, click the GENERATE
button, and the program will automatically generate all the Scene
Character Lists for you.
NOTE:
Once you have generated the lists, every time you go
to print it will ask you if you want to regenerate the lists, as
the script may have been modified since they were last
generated and thus they might be no longer accurate.
Manually Modifying a Scene Character List
There are times when you may want to manually modify an auto-
generated Scene Character List, to add extras, re-order specific
names, or so on. As the Scene Character Lists are simply text, you
can do so as desired.
HINT:
(1) Use a semi-colon in place of the first comma when
you add names to any autogenerated Scene Character List, as
that will tell Screenwriter to leave all additions following the
semi-colon untouched when it next regenerates that list. And
when it prints, it will print the semi-colon as a comma too!
(2) If you want to ”freeze“ a list completely, put the semi-colon
at the very beginning of the list, just following the left
parenthesis. In this case, Screenwriter will not touch this list
40
when it regenerates all lists, and it will not print the semi-
colon at all, either.
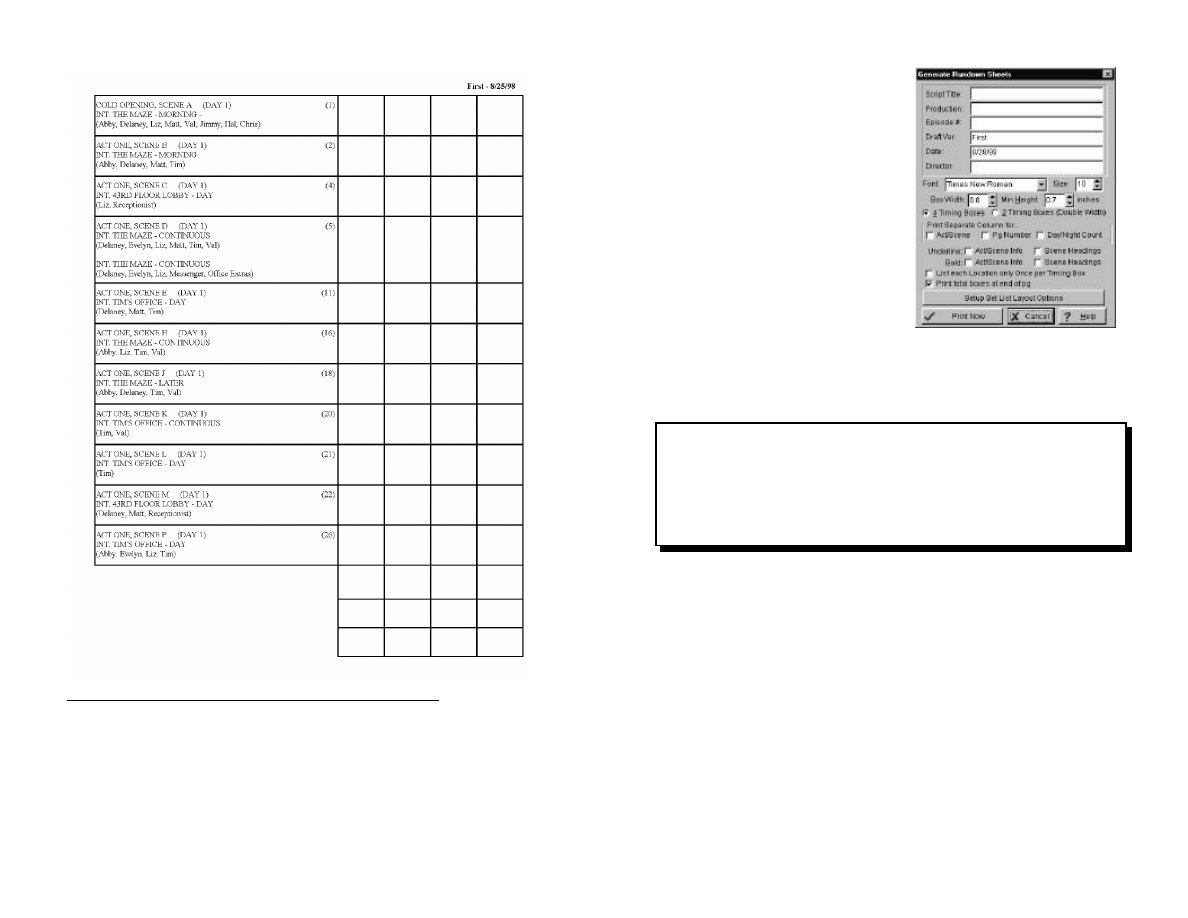
Rundown Sheets
Many TV Shows use a semi-standard Rundown (or Timing) sheet to aid
with production. It is distributed with the script and different depart-
ments use it for different things, but its quite helpful for most of the
people involved. Screenwriter can layout these rundown sheets in
many different ways, but they fundamentally look something like the
following:
41
To Layout & Print Rundown Sheets
STEP 1: Click on the Production Menu, select TV Breakdowns then
Generate Rundown Sheets.
It will ask you if you want to regenerate the character Lists, choose
YES or NO as desired and you will be taken to the menu shown on the
following page.
42
The first SIX fields are script informa
tion used in the Rundown’s header;
underneath that are the settings used
to determine the actual layout.
Font Name Drop-Down Box lets
you select which font should be used
for the Rundown Sheets (and Set
Lists).
Font Size Box lets you select the
font size.
Box Width lets you specify the width
(in tenths of inches) of the Timing
Boxes which follow to the right of the Scene Information Box.
Min. Height lets you specify the minimum height of the Timing boxes.
NOTE:
The height of each row of boxes is normally auto-
adjusted based on the number of lines actually in the left-
most Scene Information box. Thus this minimum height is only
used when the height of a row of boxes would be less than
this specified value, at which point this one row is forced to be
the minimum height.
4 Timing Boxes or 2 Timing Boxes (Double Width) lets you specify
how many timing boxes follow the Scene Information Box. When you
select 2 Timing Boxes (Double Width), each of the two timing boxes is
automatically double the value of the Box Width that you’d specified.
Some shows use Rundowns with separate columns for Act/Scene,
Day/Night and/or Page Number, so Screenwriter lets you turn on/off
these extra columns simply by checking or unchecking the appropriate
check box.
You can also have the Act/Scene Information and/or the Scene
Headings bolded or underlined if desired, and you should check or
uncheck the appropriate boxes to set it to your preference.
Normally, each location is only listed ONCE per Timing box, as the
purpose of the box is to identify which sets need to be used. However,
43
certain productions want each and every scene heading within a TV
Scene listed in each timing box. To have it do so, uncheck List each
Location only Once per Timing Box.
Finally, at the end of each page is an optional set of “Total Boxes”
which lets you total timing numbers from each row of boxes. As some
shows don’t use these total boxes, you can check or uncheck the option
Print Total Boxes at End of Pg as desired.
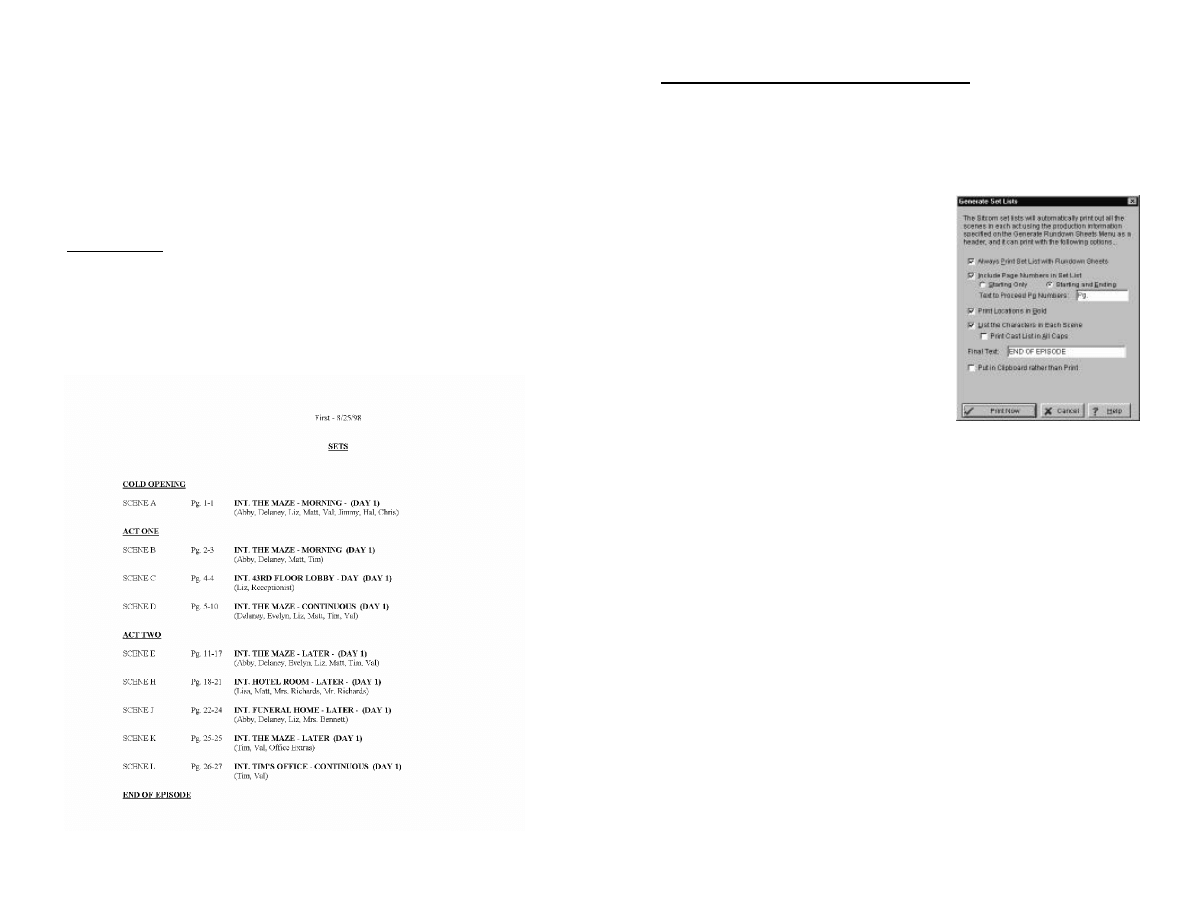
Set Lists
Many TV shows also distribute Set Lists containing varying amounts of
information along with the script. Screenwriter can automatically gen-
erate a wide variety of set lists, in addition to putting the same
information into the clipboard so that it can be pasted into another word
processor (such as WordPerfect
®
or MS Word
®
) and modified further
as desired. A Set List typically looks something like the following:
44
To Setup/Generate a Set List
STEP 1: Click on the Production Menu, select TV Breakdowns,
then Print Set List.
It will ask you whether you want to regenerate the Character List, select
YES or NO as desired.
You will then see the following Menu, and as
it explains on the top, It will automatically
use the same script/production information
that you’ve set on the Generate Rundown
Sheet Menu as the Set List’s header, too.
Always Print Set List with Rundown
Sheets lets you specify whether or not it
should automatically print the Set List when-
ever you print the Rundown Sheets.
Include Page Numbers in Set List lets you
specify whether or not each Scene Heading should have its starting
(and optionally ending) page number printed next to it.
CC
Starting Only, Starting and Ending and Text to Proceed Pg
Numbers will only be available if Include Page Numbers... is
checked, and they specify how the page numbers will be printed.
Print Locations In Bold sets whether or not the Scene Headings
should be printed in bold or not.
List the Characters in Each Scene will copy the Scene Character
Lists into the set list if checked, printing them in all capital letters if
Print Cast List in All Caps is checked, otherwise it will print them in
upper/lower case.
Final Text lets you specify how Screenwriter should end the Set List,
and this text is typically END OF SHOW or END OF EPISODE.
Put in Clipboard Rather than Print will put the set list into the clip-
board rather than printing it, so that you can then go into another Word
Processor (such as MS Word
®
or WordPerfect
®
) and edit the set list.
45
Production
Breakdowns
Screenwriter can generate an amazing variety of breakdowns ranging
from a “standard” production breakdown listing the scene information
sorted in basically any way you can imagine, to directly generating its
own internal rundown sheets, or exporting that same information to
Movie Magic Scheduling.
Without you having to do anything special at all, Screenwriter can auto-
matically gather the following information for each scene:
C
Scene Heading, broken down to INT. vs. EXT., LOCA-
TION, and TIME-OF-DAY
C
Starting and Ending Page Numbers for that scene
C
Page Count in Eighths of a Page - with an eighth
defined either as 6 lines (1") or as a “truer” 7 lines
C
All the Characters in the Scene, whether or not they
have dialogue, as long as they are listed in action and
speak somewhere in the script.
However, if you want to go through the script and Tag Items for
Breakdown, you can identify any items such as props, stunts, extras
and so on, and Screenwriter can add this information to virtually any of
its breakdowns.
Tagging Items for Breakdown
Alhough Screenwriter can gather a lot of information automatically from
the script, there’s a whole lot more in there like props, costume, extras,
fx and so on, that it needs a little help to know about. And thus the idea
of breakdown tagging.
What Breakdown Tagging lets you do is go through the script and high-
light any information that the production people need to know about
(like a costume or special effect)
, and assign it to one of more than
twenty breakdown categories.
46
From that point on, Screenwriter knows about this tagged item and can
include it in all of its breakdowns and scheduling exports.
To Tag Items for Breakdowns
You first need to turn on the Tagging Mode so Screenwriter knows
that you’re tagging items rather than editing.
METHOD:
Click the PRODUCTION Menu, select BREAKDOWNS,
then TAGGING MODE.
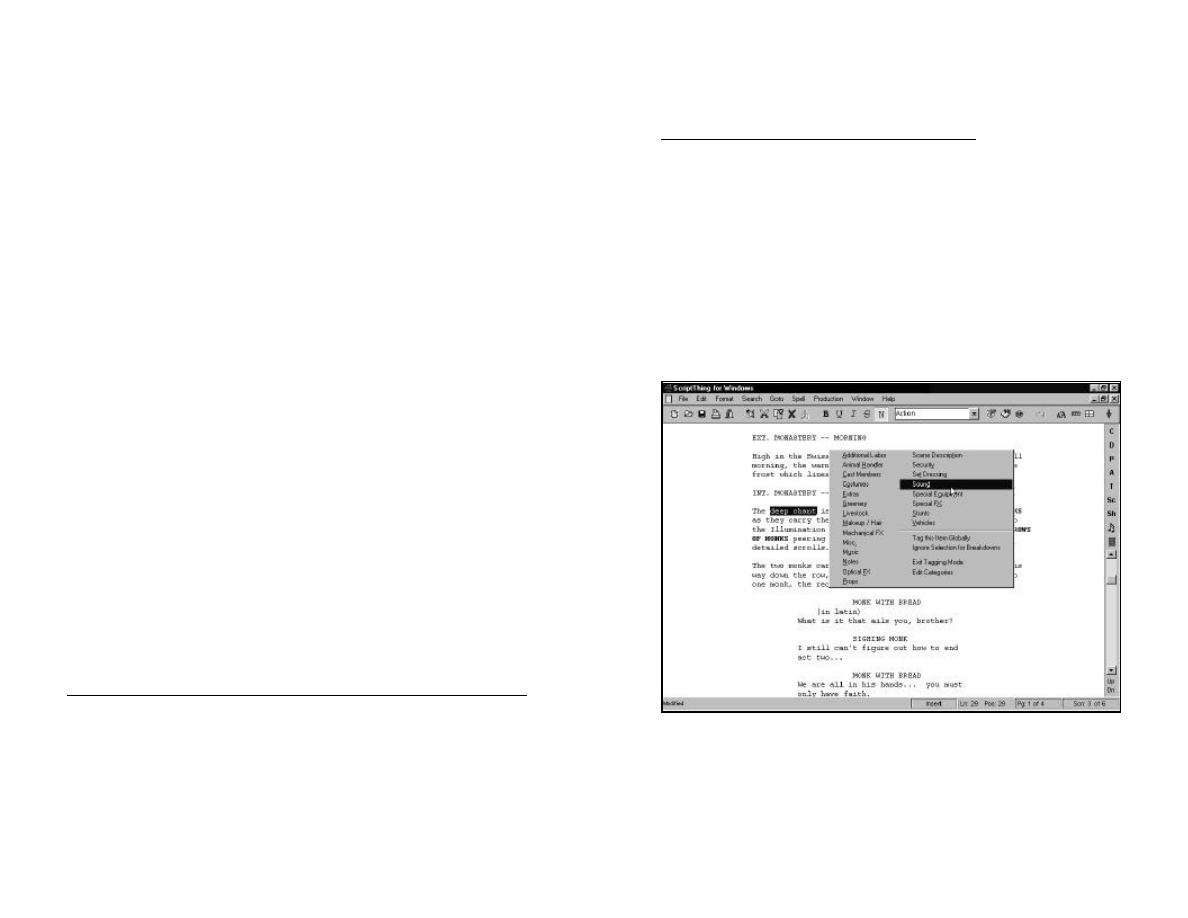
Once you’re in tagging mode:
STEP 1:
Simply highlight a word or phrase with the mouse or
keyboard like you would normally, and as soon as you
release the mouse button or selection keys, you will see
the menu below or something very much like it.
STEP 2:
Choose the category that’s appropriate for the selected
text and that’s it, Screenwriter will automatically list that
item in that category for all future breakdowns and Sche-
duling Exports!
47
NOTE:
While you’re in tagging mode you will see tagging
codes in the script which identify what category the text is
tagged for, like “[PR GUN]” (which identifies this GUN as a
PROP). These codes will NOT take up any space, will NOT
print, and as soon as you exit Tagging Mode, they will NOT be
displayed either.
One of the options on the pop-up menu is TAG THIS ITEM
GLOBALLY which, if selected, will mark every instance of the selected
text in the script with whatever category you choose.
HINT:
If there is something that you want the breakdowns to
list as being in a scene, but that item is not actually written
within the text of the scene—such as a WIND GENERATOR for
a kite flying scene—then simply put in a SCRIPT NOTE, type
the text in the note and then tag it within the note. This way
it will be in the script but not change the text or layout at all.
Associating Breakdown Items with Charac-
ters or Locations
There are many cases where a specific character or location may
always have certain breakdown items associated with them, like a
CHILD ACTOR who will always need a SOCIAL WORKER present
when he or she is on the set, or a CAFÉ which always has PLATES
and FOOD as props.
Instead of having to manually add these items to every scene where
this character exists, or to every scene that’s set in that given location,
you can tell Screenwriter to Associate any breakdown item or category
with any Character or Location. To do so, simply do the following:
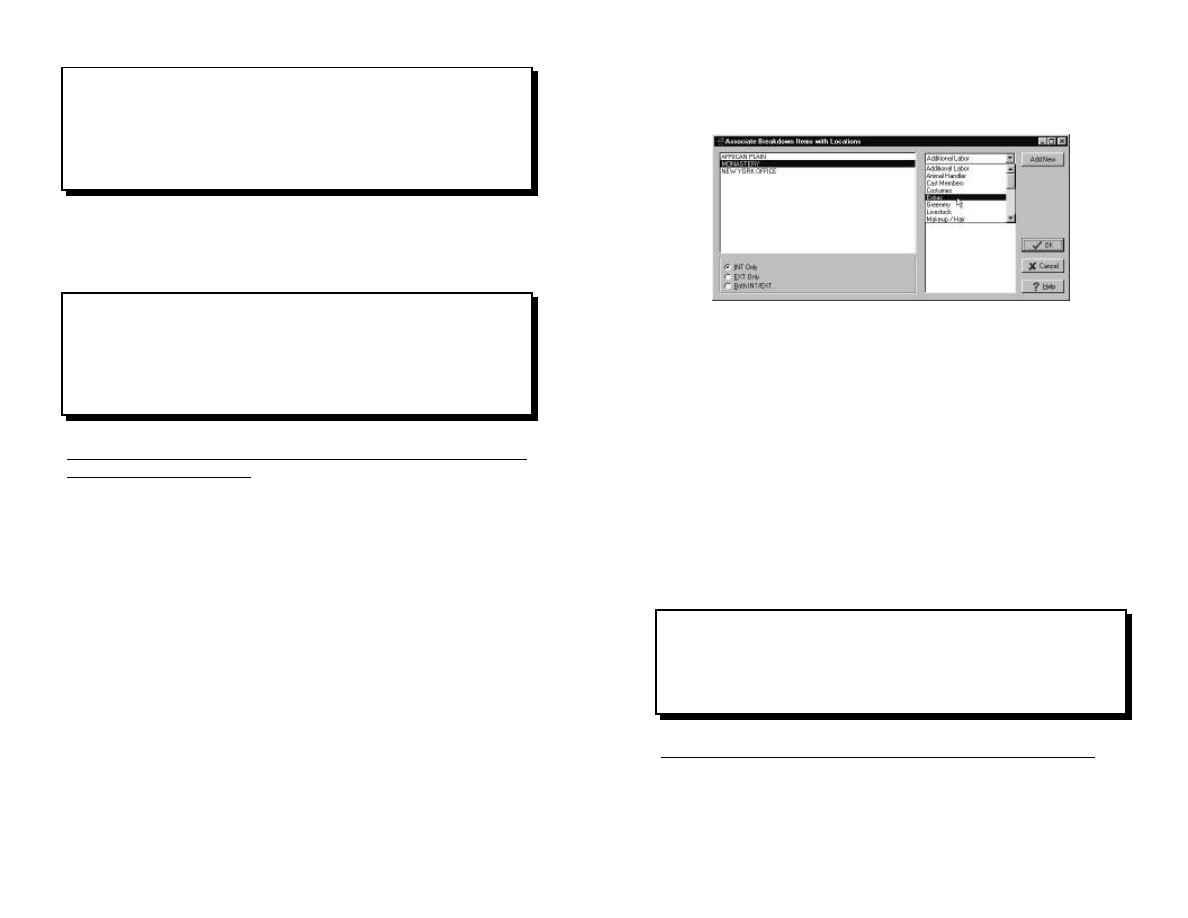
STEP 1:
Click on the Production Menu, select
Breakdowns and then Associate Items with
Characters or Locations as appropriate.
You will see the menu displayed on the following page (and though this
menu will be slightly different if you’re Associating items with
Characters instead of Locations, it functions in basically the same
manner):
48
STEP 2:
Click on the desired Character or Location so
that it’s highlighted.
STEP 3:
Click on the drop-down list on the right side of
the menu and select the category whose items
you want to associate with the selected
Character or Location. (In the screen shot
above, we’re selecting extras.)
STEP 4:
If the breakdown item you want is already
displayed on the list below this category list,
then simply click on it so that it’s highlighted,
otherwise click ADD NEW and type in the new
item’s text.
Repeat Steps 3-4 as many times as desired.
STEP 5:
Click OK to save all your added associations.
NOTE:
On the Associate Items with LOCATIONS Menu, there
is an additional option: INT. ONLY, EXT. ONLY or BOTH INT./
EXT. This allows you to associate BOOKS, for example, with
INT. LIBRARY but not with EXT. LIBRARY. Make sure you set
this as appropriate!
Internal Breakdown Sheets
Screenwriter can print its own internal breakdown sheets, much like
you’d get from a full-fledged scheduling program.
However, in addition to printing them out (as displayed below), the On-
Screen Breakdown Sheet Editor actually lets you add, edit, change
or even re-categorize ANY tagged breakdown item, making it incredibly
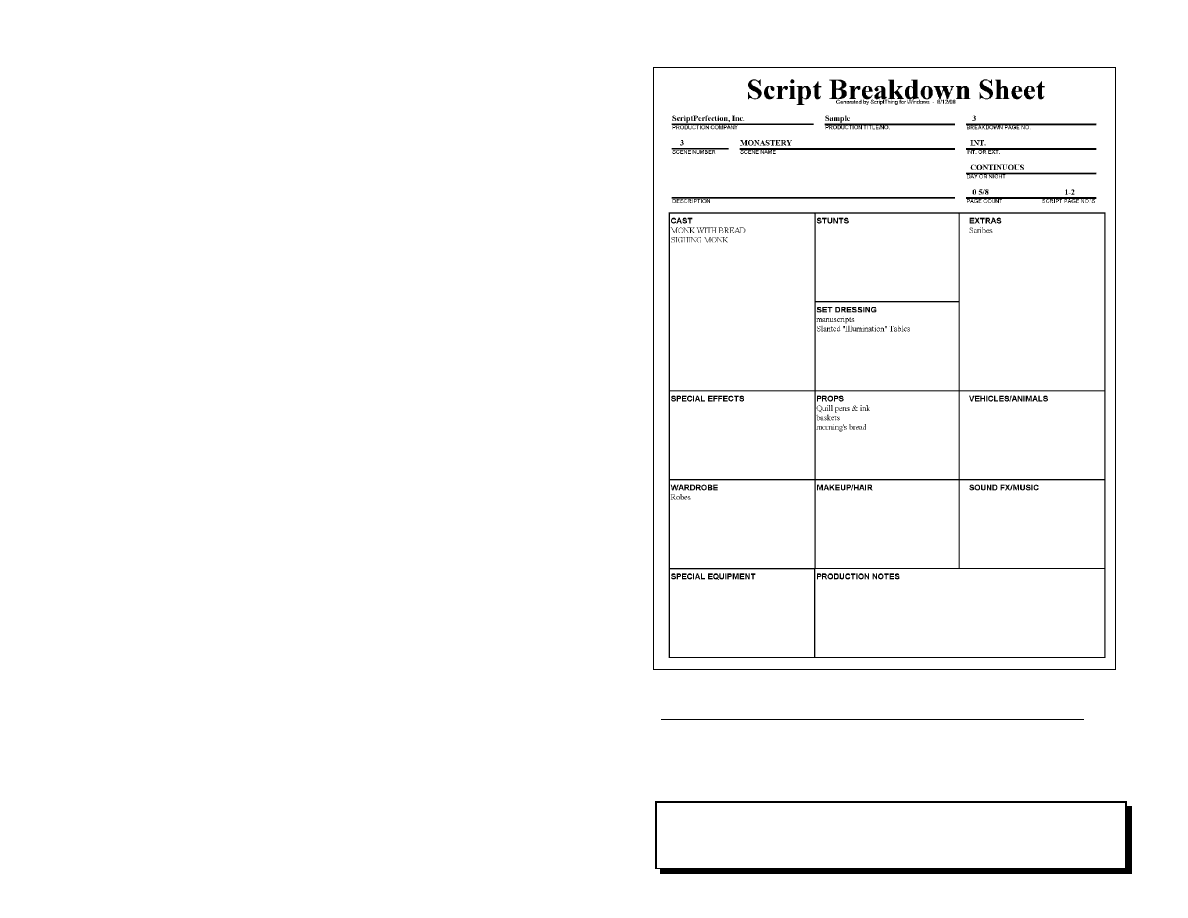
49
useful in the production process, even if you’re ultimately going to send
the information to a real scheduling program.
50
The On-Screen Breakdown Sheet Editor
As mentioned above, the On-Screen Breakdown Sheet Editor is a
powerful tool for breakdown tagging, allowing you to dynamically see,
edit, add or even re-categorize any breakdown items for every scene!
HINT:
The most useful time to use the on-screen Breakdown
Sheet Editor is AFTER you’ve gone through the script in
tagging mode and tagged all the items that are actually in

51
the script. Then you can do a second pass with the Breakdown
Sheet Editor and add all the items that might not be within
the text of the script itself.
To open the Breakdown Sheet Editor
METHOD: Click the Production Menu, select Breakdowns, then
Breakdown Sheet Editor.
You will see the following menu, though of course the text in it will be
different depending on what’s actually tagged within your scene, and
it won’t initially have the EDIT TAGGED ITEM box popped up.
The top Row of the Breakdown Editor consists of the following:
C
A Drop-Down list of all the Scene Headings in the script with the
selected one currently displayed.
HINT:
You can ”walk“ your way through the script simply by
changing the selected Scene Heading on this menu.
C
Scene Description Button which allows you to add a non-printing
Scene Description as a Tagged Item so that when you print the
Breakdown Sheets there is a brief description of the scene.
52
C
Print Button will print the current Breakdown page.
C
Close Button will return you to wherever you were in the script
when you first opened the Breakdown Sheet Editor.
C
Goto Scn Button will take you to the beginning of whatever scene
is currently selected in the drop-down menu.
Adding a New Item
STEP 1:
Double-click in the category box into which you want to add
the new item. The Edit Tagged Item box will pop up and
you can either type in the new item, or if it exists
somewhere else in the script, you can drop down the list in
the Edit Tagged Item box, and select it from a list of all
previously tagged items.
NOTE:
When you add a new item to the breakdown sheet, it
will automatically add it to a hidden Script Note placed right
under the scene heading, with all the appropriate tags. This
won’t affect the layout of the script and will ensure that
Screenwriter will always know about this tagged item.
Editing an Existing Item
STEP 1:
Double-click on the item whose text you want to edit. The
Edit Tagged Item box will pop up and you can change the
text as desired.
NOTE:
If you change the text of an item which was tagged
within the text of the script itself, it WILL be changed in that
script text with possibly undesirable results, so use this
function with caution!
Deleting an Existing Item
STEP 1:
Click on the item to highlight it.
STEP 2:
Press the DELETE key, and all tagging codes which
reference this item will be deleted from the scene, though
the text itself will not be removed if it’s actually within the
script’s text.
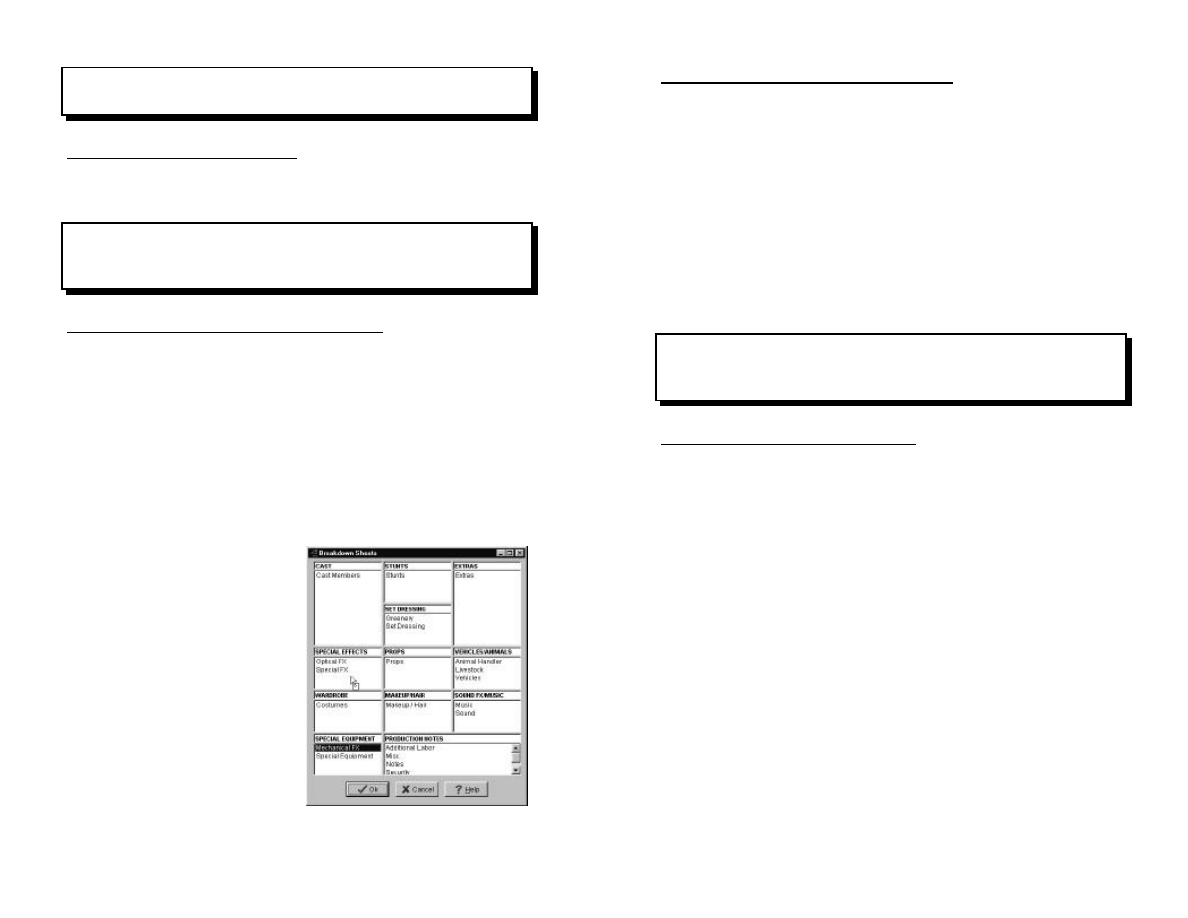
53
NOTE:
You will NOT be able to delete Character Names who
actually have dialogue within the scene.
Recategorizing Items
You can recategorize most any tagged item simply by dragging it from
one category box to another.
NOTE:
Items categorized as CAST can ONLY be recategorized
to EXTRAS, and you CANNOT recategorize any ASSOCIATED
ITEMS, though you CAN delete them.
Editing the Category Headers
Since there are over twenty different breakdown categories but only 12
boxes on the Breakdown sheets, you can edit both the category names
(i.e. the headings such as CAST, STUNTS etc.) and which categories
get assigned to each box. Thus, for example, the box labelled
SPECIAL EFFECTS could list both OPTICAL EFFECTS and SPECIAL
EFFECTS while still maintaining them as separately categorized lists.
To do so:
STEP 1:
Click on the Production Menu, select Breakdowns then
Layout Breakdown Sheets.
You will then see the following
menu, though the headers and cat-
egories may be different.
STEP 2:
To move any category
from one box to an-
other, simply drag it into
a new box.
STEP 3:
To change any category
header, simply click in-
side the header text to
be changed, and edit it
as desired.
STEP 4:
Click OK when done.
54
Printing Breakdown Sheets
There are three basic methods of printing breakdown sheets:
METHOD 1:
Click on the Production Menu, select Breakdowns
then Print Breakdown Sheets.
METHOD 2:
On the Print Menu, select Production Breakdowns
and click OK. Then select Script Breakdown Sheets
and click OK.
METHOD 3:
From within the On-Screen Breakdown Editor, click
the PRINT button and it will print the currently dis-
played Breakdown Sheet.
NOTE:
Methods #1 and 2 will allow you to print a RANGE of
Breakdown Sheets and will perform Time-of-Day Normali-
zation while Method #3 will NOT.
“Standard Breakdowns”
In addition to the Internal Breakdown Sheets, Screenwriter can print a
wide variety of “standard” breakdowns sorted in virtually any way you
might desire. To print a “Standard Breakdown” do one of the following:
METHOD 1:
Select the File Menu, then Print. On the standard
Print Menu which appears, click the Production
Breakdown radio box, then click OK.
METHOD 2:
Select the Production Menu, then Breakdowns, then
Print Standard Breakdowns.
No matter which method you use, you will see the menu displayed on
the following page.
Breakdowns can be sorted in two levels: a Primary Sort and an
optional Secondary Sort. In both cases, the first four options are the
same:
SCRIPT ORDER—will print the breakdown in the order the scenes
appear in the script without any sorting.
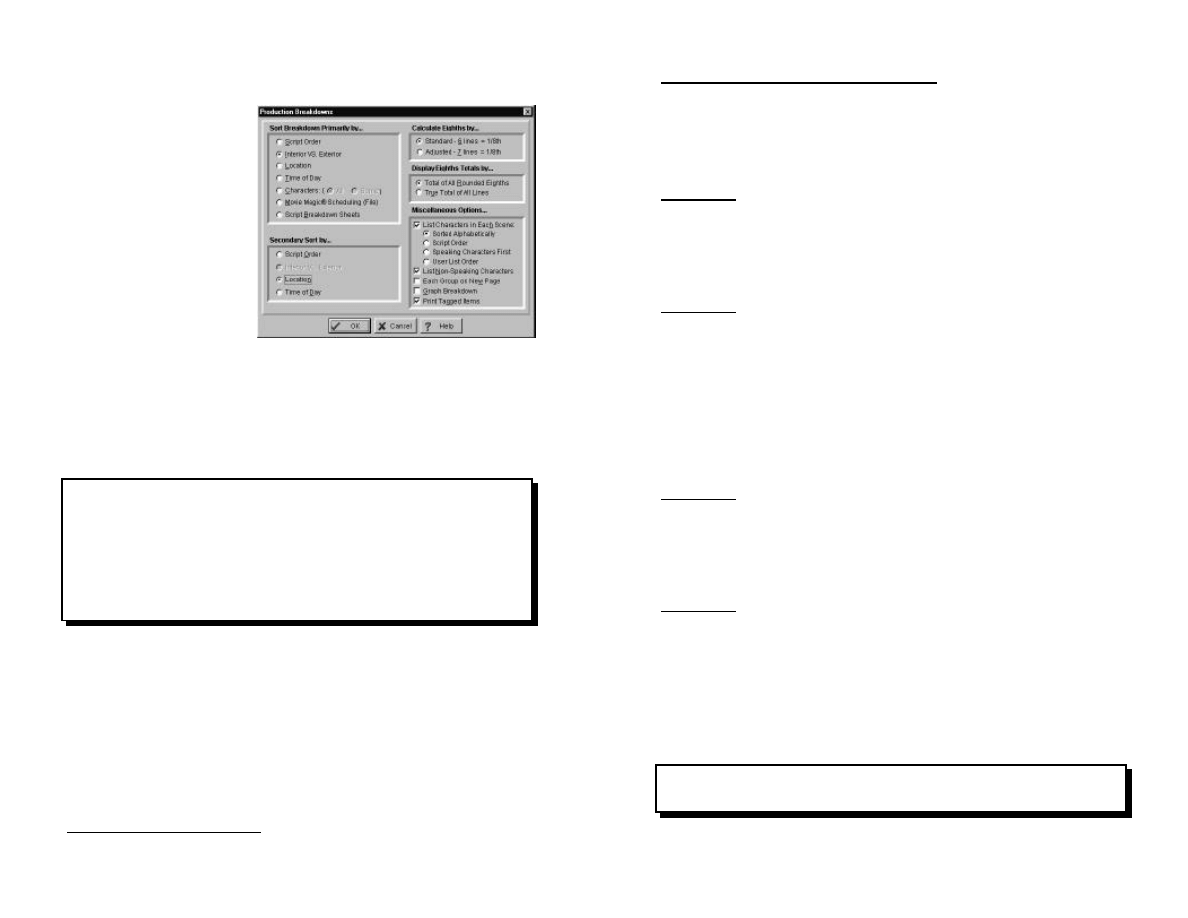
55
INTERIOR VS. EXTERIOR—Will group all the INTERIORS and
EXTERIORS together.
LOCATION—Will group all
scenes that take place in the
same Location, sorting
those grouped scenes into
alphabetical order.
TIME OF DAY—Will group
all scenes in the same Time
of Day, sorting these groups
into alphabetical order.
CHARACTERS (ALL)—Will
list all the Characters (in
alphabetical order) followed by all scenes that each Character appears
in, whether or NOT they actually have dialogue in that scene.
CHARACTERS (SOME)—Will list only the Character Names you
select followed by all the scenes that each selected Character appears
in, whether or NOT they actually have dialogue in that scene.
NOTE:
(1) If you select Script Order as your PRIMARY SORT,
the SECONDARY SORT BY... options will be unselectable. (2) If
you choose a sort other than Script Order, then the breakdown
will perform “Time of Day Normalization.” This means that
any scene with a Time-of-Day of CONTINUOUS, LATER or
SAME will be given the previous Scene Headings’s Time-of-
Day...
MOVIE MAGIC (PRINT TO IMPORT FILE)—This will
?print” out a
breakdown and save it as a file which can be imported into Screenplay
Systems’ Movie Magic
®
Scheduling program. The file contains Scene
Heading Info, Page count in Eighths/page and Character Names in
addition to all tagged items. With this checked, the Secondary Sort,
and Miscellaneous options will be grayed out and unselectable.
SCRIPT BREAKDOWN SHEETS—will print your script onto
Screenwriter’s Internal Breakdown Sheets. See the previous section
Internal Breakdown Sheets for lots more information.
56
The Secondary Sort Order
Allows you to specify how you want the scenes sorted within the
primary groupings. For example, if you chose Interior VS. Exterior
as your primary sort and Script Order as a secondary sort you'd get
something like the following:
EXTERIOR
1 HOSPITAL -- DAY 1-2 1 1/8
4 PARK -- DAY 4-4 2/8
5 HOSPITAL -- EVENING 4-5 6/8
--------
2 1/8
INTERIOR
2 HOSPITAL -- DAY 2-2 3/8
3 EMERGENCY ROOM -- DAY 2-3 5/8
6 EMERGENCY ROOM -- EVENING 5-5 2/8
--------
1 2/8
Let's say you chose Location as a secondary sort instead, then
the same script would breakdown as:
EXTERIOR
1 HOSPITAL -- DAY 1-2 1 1/8
5 HOSPITAL -- EVENING 4-5 6/8
4 PARK -- DAY 4-4 2/8
--------
2 1/8
INTERIOR
3 EMERGENCY ROOM -- DAY 2-3 5/8
6 EMERGENCY ROOM -- EVENING 5-5 2/8
2 HOSPITAL -- DAY 2-2 3/8
--------
1 2/8
...with the locations grouped together in alphabetical order.
NOTE:
The numbers with dashes in between them are the
starting and ending page numbers for that scene.

57
Calculate Eighths
Allows you to specify how you want Screenwriter to define an eighth
of a page. Historically—way back when the Mesopotamians were
breaking down scripts and inventing beer—an eighth was always an
inch (6 lines), but as most writers are now using more than 48 lines
on a page, Screenwriter gives you a choice between this standard
eighth or a "truer" Adjusted Eighth.
Ž
Standard: 6 lines = 1/8th of a Page—Will tell Screenwriter to
define an eighth of a page as that good old historical standard
of 1" (6 lines). If you have more than 8" of text on a page,
however, it then becomes possible for it to report a page as
longer than 8/8ths and this may produce some inappropriate
results.
Ž
Adjusted: 7 lines = 1/8th of a Page—Will tell Screenwriter to
define an eighth of a page as the total allowable lines on a
page divided by eight which, when rounded, becomes 7 lines.
Display Eighth Totals...
Lets you specify how you want Screenwriter to calculate the totals
for each grouping, because if it simply adds up the displayed totals
for each scene, it accumulates rounding.
For example, say a group has Scene 5, and Scene 7 in it. Scene 5
is 39 lines long, Scene 7 is 50 lines long, and you've told
Screenwriter to use 6 lines per eighth. Thus for Scene 5, it will
report 7/8ths because 39 divided by 6 is 6.5 eighths, which rounded
upwards becomes 7/8ths. And Scene 7 is reported as 1 1/8
because 50 divided by 6 is 8.33 eighths—or 1 and
0.33/eighths—which rounded upwards becomes 1 1/8. Okay, so if
you choose...
Totals of All Rounded Eighths—Screenwriter will simply add up
the displayed length of each scene in that group. In our previous
example, it will show 2 0/8 as the total of Scenes 5 & 7.
True Total of All Lines—Screenwriter will add up the actual
number of lines in each scene, then convert that total into eighths,
thus producing a more accurate total. In our previous example, the
total of the lines from Scenes 5 & 7 is 89. And 89 divided by 6 is
58
14.83 eighths—or 1 and 6.83 eighths—which rounded upwards
comes out to 1 7/8ths rather than 2 0/8ths.
Miscellaneous
Has several additional options for your selection enjoyment:
LIST CHARACTERS IN EACH SCENE—which will list all the
characters that are in any given scene (whether they have dialogue
or not!) directly underneath the Scene Heading in the breakdown.
You have four options as to how it lists them:
C
SORTED ALPHABETICALLY—Will print all the names in any
given scene sorted into alphabetical order.
C
SCRIPT ORDER—Will print all the names in any given scene
in the order in which they appear in that scene.
C
SPEAKING CHARACTERS FIRST—Will print all the names in
any given scene in the order in which they speak in the scene,
followed by any non-speaking characters, if any.
C
USER LIST ORDER—Will print all the names in any given scene,
first in the order in which they appear in the Character Name User
List, then followed by any names not in the user list, in alphabetical
order.
LIST NON-SPEAKING CHARACTERS—Will add characters who are
found in action, even if they have no dialogue in the scene.
EACH GROUP ON NEW PAGE—This option will be grayed out if
you've selected Script Order as your primary sort, otherwise, if
checked, will start each group at the head of a new page.
GRAPH BREAKDOWN—This option will cause the breakdown to print
in a chart form rather than a text form, though all the same information
(except tagged items) will be included. This is particularly useful if
you’re doing a call sheet or as a “poor man’s strip board.” A sample of
this graphic breakdown follows on the next page.
PRINT TAGGED ITEMS—Sets whether it should list the tagged items
in each Scene in the normal breakdowns or not.
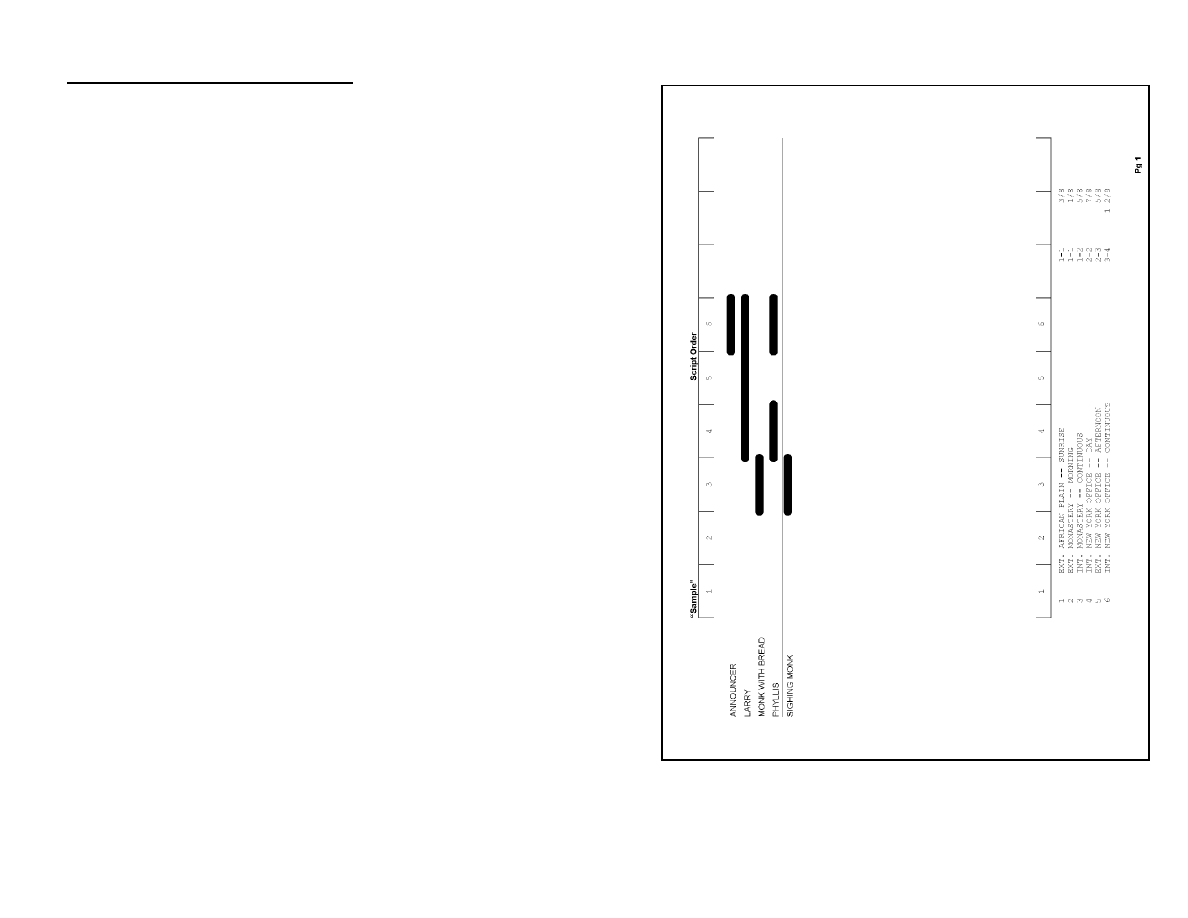
59
Time-of-Day Normalization
Many writers use times-of-day such as LATER or CONTINUOUS in
their scene headings to help the reader with the flow of the script;
however, once you get into production and start looking at the scenes
out of order, this sort of Time-of-Day is not very useful. Because of
that, Screenwriter will AUTOMATICALLY perform Time-of-Day
Normalization (which will replace LATER, SAME or CONTINUOUS
with the previous scene’s time of day) for all breakdowns whenever you
are printing a range of scenes in anything other than Script Order.
A Production Breakdown printed as a graph looks like the following:
60
The numbers across the top and bottom refer to the Scene Numbers
listed in the legend on the bottom, and each character has a bar listing
which scenes it is in.
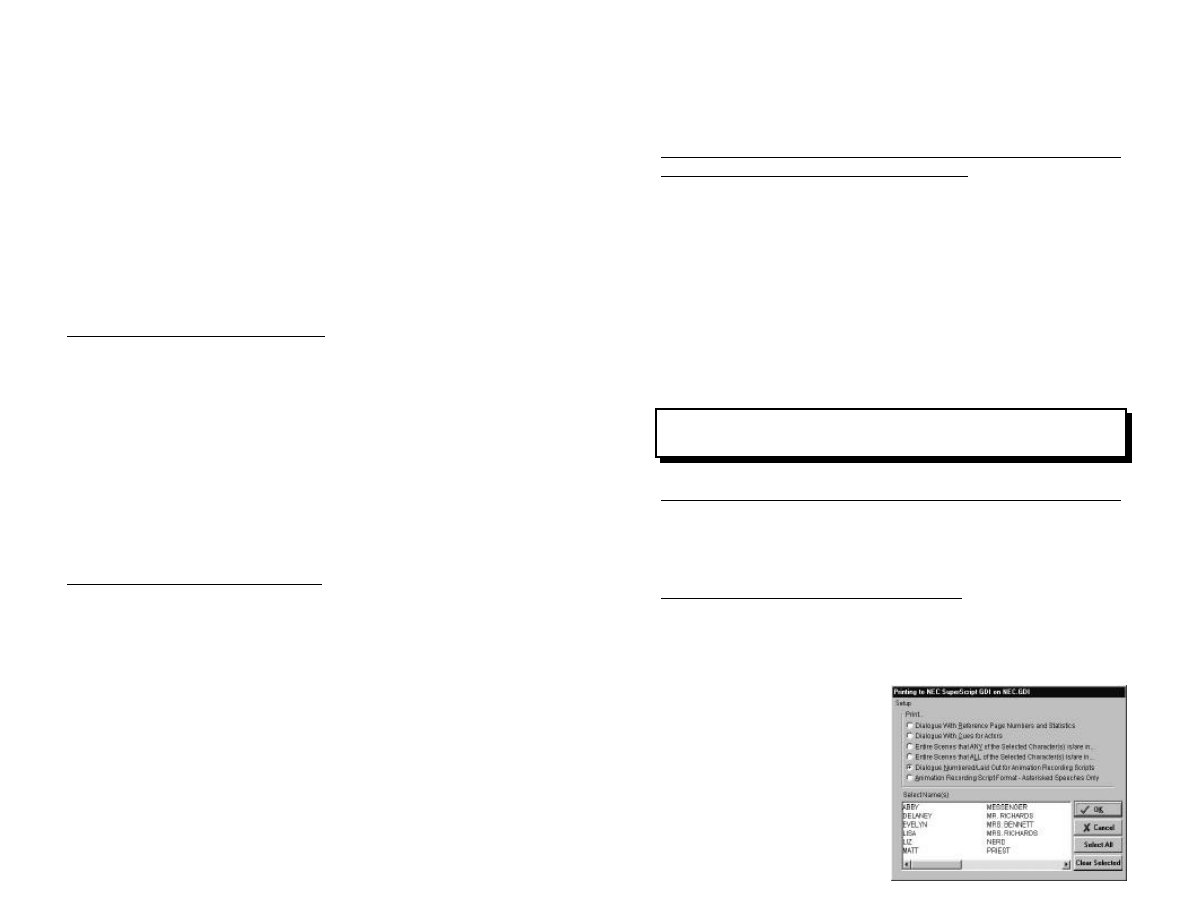
61
Movie Magic
Screenwriter 2000
& Animation
Production
Multiple Revision Marks
As most animation is being produced overseas, production companies
are discovering that the usual multi-colored page identification of
revisions doesn't work all that well when pages need to be faxed to
Korea or elsewhere.
To solve this problem, a multi-revision mark standard has been
introduced whereby the first day's revisions are a single asterisk (*), the
next day's are two (**) and so on. Needless to say, Movie Magic
Screenwriter 2000 handles this quite nicely.
It does this with a Revision Locking Count which you increment by...
Locking Revision Marks
There are two types of Revision Marks available in Screenwriter,
Current Revision Marks and Locked Revision Marks.
Current Revision Marks are the ones that are put in automatically by
the Auto-Revision function—or manually by pressing *—and which will
not be visible if you turn on “reveal codes”.
These Current Revision Marks are the only ones which will be removed
by selecting Remove, then Current Revision Marks from the Produc-
tion Menu; they are the only ones that will be found when you select
Next Current Revision Mark from the Goto menu; and finally, they
are the only ones used to select pages to print when you select
Asterisked Pages on the Print Menu.
62
Locked Revision Marks are ex-Current Revision Marks which have
been Locked so that the program goes to the next Revision Mark
Locking Level.
To Lock Revision Marks and/or Increase the
Revision Mark Locking Level
METHOD:
Go to the Production Menu, select Animation
Locking, then select Lock Current Rev. Marks.
What it does at that point is (1) convert all Current Revision Marks into
a code appropriate for the Revision Locking Level; (2) embed this code
in the text where there had been a Current Revision Mark; and then (3)
increment the Revision Locking Level.
If you turn on Reveal Codes (ALT+F3) then any Locked Revision
Marks will be displayed as [1],[2],[3], and [4] depending on their
locking level.
NOTE:
Repeating the method above will increase the Revision
Mark Locking Level.
Decreasing the Revision Mark Locking level
METHOD:
Go to the Production Menu, select Unlock One Rev.
Mark Level and it decrement the Revision Locking
Level.
Printing Numbered Dialogue
Many animation production companies want recording scripts—that is,
print-outs of just dialogue with an incrementing number assigned to
each speech. With Movie Magic Screenwriter 2000, all you need to do
is the following:
STEP 1:
Click the File Menu,
and select Print.
STEP 2:
On the Print Menu
that appears, select
Dialogue and you will
see the following
menu:
63
STEP 3:
Click Dialogue Numbered / Laid Out for Animation
Recording scripts.
STEP 4:
If you want the recording scripts to contain the dialogue of
certain characters only, then select those names, otherwise
click Select All, then click OK.
To change the Animation Numbering Layout
both for Recording Scripts and within the
script itself
STEP 1:
Click on the File Menu and select Print.
STEP 2:
On the Print Menu, click on the word SETUP in the upper
left hand corner, then select Animation Dialogue and
change the layout options as desired.
NOTE:
Two option on this menu will affect how numbering is
layed out in the script itself and they are:
CC
SPEECH NUMBERING - On Right Margin of Page/On Left
Margin of Page
CC
PRINT <> AROUND NUMBERING
To Lock the Numbering of Dialogue
You can lock the Dialogue's numbering—which you might want to do
if you're using these numbers to relate to story boards or cels—so that
any new speeches will be numbered as A-Speeches and any
reordered speeches will retain their original numbers.
METHOD:
Go to the Production Menu, select Animation
Locking and then Lock Dialogue Numbering.
This will cause Screenwriter to display on screen each speech's
number on the right or left margin of the page next to the Character
Name depending on the settings in the Animation Dialogue Layout
Menu described immediately above.
These numbers are typically put in angle brackets (e.g. <6>) to disting-
uish them from Page and Scene Numbers, though as mentioned
above, you can also turn this off in the Animation Dialogue Layout
Menu.
64
To Set the Dialogue Numbering to Print
Within The Script
Although the dialogue number is displayed on screen as a reference,
it will not print within the script unless you:
STEP 1:
Click the Production Menu, select Animation Locking,
and then click Print Numbering In Script.
Multi-Locking Dialogue Numbering
You can Multi-Lock the dialogue numbering so that any new speeches
added between existing speeches are added as AA Numbers (e.g.
<6AA>) by simply repeating the method listed above To Lock the
Numbering of Dialogue.
Unlocking Dialogue Locking
You can also unlock the Dialogue Numbering at any point, going from
AA-Numbering to A-Numbering or from A-Numbering to non-locked
numbering.
METHOD:
Go to the Production Menu, select Animation
Locking then Unlock Dialogue Numbering.
Overriding Animation Dialogue Numbering
Once dialogue numbering has been Locked or Multi-Locked, you can
override any speech's automatically generated numbering.
STEP 1:
Put the cursor in the Character Name whose number you
wish to change.
STEP 2:
Click on the Production Menu, select Animation Locking
then Adjust Dialogue Numbering.
You will see a menu with the following options:
C
Set this Dialogue's numbering to Normal—which, if selected,
will change the current A or AA numbered Dialogue to a normally
numbered Dialogue.
C
Set this Dialogue's numbering to A-Numbering—which, if
selected, will change the current AA- or normally numbered
Dialogue to A-Numbering.
65
C
Set this Dialogue's numbering to AA-Numbering—This option
will only be available in scripts where the dialogue numbering has
been Multi-Locked. If it is selected, then it will change the current
A- or normally numbered Dialogue to change to AA-Numbering.
C
Override this Speech's Numbering—This option will only be
available when you are in a normally numbered speech in a script
that has Locked or Multi-Locked Dialogue Numbering. If selected,
then you can specify which normal number this speech should be
given.
NOTE:
If you change the normal numbering order in any
way—either by switching a normally numbered speech to an
A- or AA- speech or vice-versa—then you will be given an
option to have it adjust all following speeches accordingly so
that you don't end up with two speeches with the same
number.
Wyszukiwarka
Podobne podstrony:
[Filmmaking] Screenwriting BBC screenplay format for films
Machine Production of Screen Subtitles for Large Scale Production
Product presentation XC100FC
~$Production Of Speech Part 2
Product presentation easyControl
Wykład nr 5 podstawy decyzji producenta
Historia gry Heroes of Might and Magic
W5 screening szczepu
Overview of Exploration and Production
fizyka screeny, screeny quiz kociemb
Ek w 5, Producent, 25mar11 [t Nieznany
CM 52 ProductDefinition oct2011
produkcja-pytania, PWR, ZiIP Zarządzanie i Inżynieria Produckji, ZPiU Chlebus
Status producenta na podstawie przepisów prawa w oparciu o praktykę, BHP I PRAWO PRACY, PORADY PRAWN
Bezpieczeństwo klienta i producenta
Zadanie nr 3 screeny gotowe
Producenci maszyn gorniczych
więcej podobnych podstron