48

V • BEADED AMULET PURSES
V • BEADED AMULET PURSES

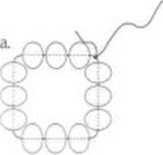
figurę A-14a & b
Exit

Single needle,
Rightangle Weave
Used in Project Six
In this technique, a series of squares or cells are formed to create a netting. The beads lie at right angles to each other. Regular graph paper is excellent for plotting the squares of this stitch.This stilch may be initially difficult to learn so Davld Chatt, the artist of Project Six, recom-mends learning the stitch using a 12 bead unit first then learning the 4 bead unit.
To make a sample. String 12 beads and tie into a circle. Do not make the circle too snug because you will need to backtrack through three of the beads. Try to think of this circle of beads as a square with three beads on each of the four sides (figurę A-14a). Working from left to right, pick up nine beads. Pass the needle back through the three right vertical beads of the first square, exiting before the knot (figurę A-14b). Take the needle again through the first s«x beads of the second square, exiting at the opposite corner from the knot. The new square has nine new beads which uses three beads of the previ-ous square to make the fourth side.

String nine morę beads and return the needle down through the right three vertical beads of the last square. Pass the needle back through the lower three horizontal beads and the right three vertical beads of the new square (figurę A-15). You should have just exited the opposite corner from the exit point of the last square. This stitch alternates between a counter-clockwise and a clock-wise threading pattem.
Figurę A IS
Notę: With the exception of the last square, the needle will always exit a completed square, altemating between exit-ing the bottom and exiting the top. To begin a new row, the finał exit point in the last square will depend upon whether there are an even number or an odd number of squares in the row.
The sample has an even number of squares in each row. Continue to make squares by adding nine new beads to each square. Complete nine squares. The threading path of the finał and tenth square of the row will differ from the previous squares.
To bead the last square of a row with an even number of squares, pick up another nine beads and pass the needle through the vertical beads of the last square and then through the upper horizontal beads. Stop here. Usually, you would also pass down through the right vertical beads of the new square. You are now in position to begin a new row (figurę A-16).

Figurę A-16. Starting a new row with an even number of sguares per row.
Notę: To complete the finał square of a row with an odd number of squares, exit the last square as usual at the top of the right verticol beads. Take the needle back through the upper horizontal beads of the last square. You are now in position to begin a new row (figurę A-17).
Wyszukiwarka
Podobne podstrony:
V • BEADED AMULET PURSES V • BEADED AMULET PURSES figurę A-14a & b ExitSingle needle,Rightangle
10 PROJECT ONE • BEADED AMULET PURSES Figurę 4 To outline the hearts at the top rim. Begin a new thr
BEADED AMULET PURSES • PROIECT SEVEN i ) Figurę 4 To make the triangular points at the top of the pu
BEADED AMULET PURSES • APPENDIX A 43Appendix ABeading Technigues Figurę A-la&b. The thread gaps
BEADED AMULET PURSES • APPENDIX A 45 BEADED AMULET PURSES • APPENDIX A 45 Figurę A-8 Figurę A-6a &am
BEADED AMULET PURSES • PROJECT ONE 11 To make the strap. Think oł the strap as a necklace. Choose th
16 PROfECT THREE • BEADED AMULET PURSES 16 PROfECT THREE • BEADED AMULET PURSESProject ThreeRain For
BEADED AMULET PURSES • PROIECT THREE 17 Sections to be read before beginning: • Tu
IS rRO)£CT THREE • BEADED AMULET PURSES To apply edge bcading to the ribbon. After the ribbon is sti
BEADED AMULET PURSES • PROJECT SIX 31 Sections to read before beginning: •
BEADED AMULET PURSES • PROJECT SIX 33 To add the fringes to the edges. Add two-bead fringes between
więcej podobnych podstron