84 5c90f6ee81

INSPECTIOIM AND REPAIR


5. Measure:
•Piston-to-cylinder clearance
|
Pisto steps First •Mea Borę NOT! Measi at righ avera |
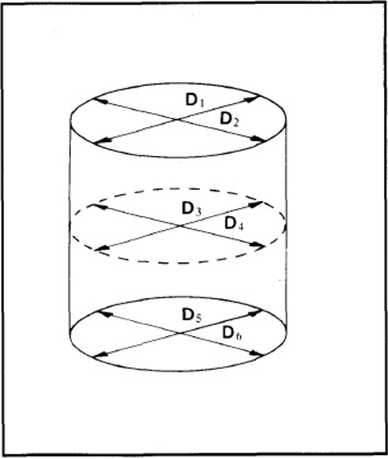
n-to-cylinder clearance measurement Step: surę the cylinder borę "C" with a Cylinder Gauge. | ||
|
jre the cylinder borę "C" in parallel to and lt angles to the crankshaft. Then, find the ge of the measurements. | |||
|
Standard |
Wear Limit | ||
|
Cylinder Borę "C" |
40.00'40.02 mm (1.575-1.576 in) |
40.1 mm (1.579 in) | |
|
Taper"T" |
- |
0.05 mm (0.0019 in) | |
|
Out of Round "R" |
- |
0.01 mm (0.0004 in) | |
|
C = Maximum D T = (Maximum Dj, or D2)-(Maximum Ds or D&) R = (Maximum Di, Dj or D5)-(Minimum D2 D4 or Do) | |||
•If out of specification, rebore or replace cylinder, and replace piston and piston rings as a set.
Second Step:
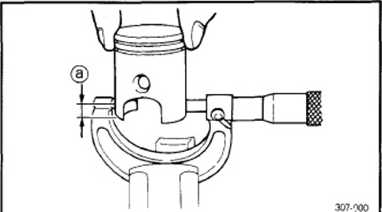
• Measure the piston skirt diameter "P" with a micrometer.
(a) 5 mm (0.20 in) from the piston bottom edge.
4-14
Wyszukiwarka
Podobne podstrony:
83 6f6936accc INSPECTION AND REPAIRENG m 4-13 Warpage measurement and resurface-ment steps: •Attach
86 4c6f346dff INSPECTION AND REPAIRENG m 0.15-0.35 mm (0.006 - 0.014 in) 2. Instal
88 1a78f80731 INSPECTION AND REPAIRENG m Clutch Spring Minimum Length: 26.2 mm (1.03 in) 6. Measure:
84-1738 Yibration and Subility of Orthotropie CircuUr Cylindricai Shells Subjected to Axial Load G.
85 ec002ba75d INSPECTION AND REPAIRENG § Piston size P Standard 39.96 - 39.98 mm (1.573-1.574
87 1160047f2c INSPECTIOIM AND REPAIR 5. Check: • Free play (when the piston pin is
92 eaef762dcf INSPECTION AND REPAIRENG
Suzuki RM125? 6-8 CYLINDER, PISTON AND EXHAU$T VALVE 6-8 CYLINDER, PISTON AND EXHAU$T VALVE PISTON-T
CO TO JEST CYKL KONIUNKTURALNY? Burns and Mitchell (Measuring Business Cycles, 1946) •
time Lec3 Direct and indirect measurement methods 2 Lec4 Measurement accuracy and approaches to
84 Z. Michalczyk, M. Łoś The depth of underground waters is very differentiated and is generally rel
ENGINE OVERHAUL_Inspection (Cont d)— PISTON TO CYLINDER WALL CLEARANCE 1. Measure piston
84 (32) knots and couching to fluffy Lana tl NEEDLE BOOK Tracę lettering on to the right side of a13
Measurements and Patterns also applies to very large chest measurements. Pattern 2: Slanted shoulder
więcej podobnych podstron